Page 807 of 1771
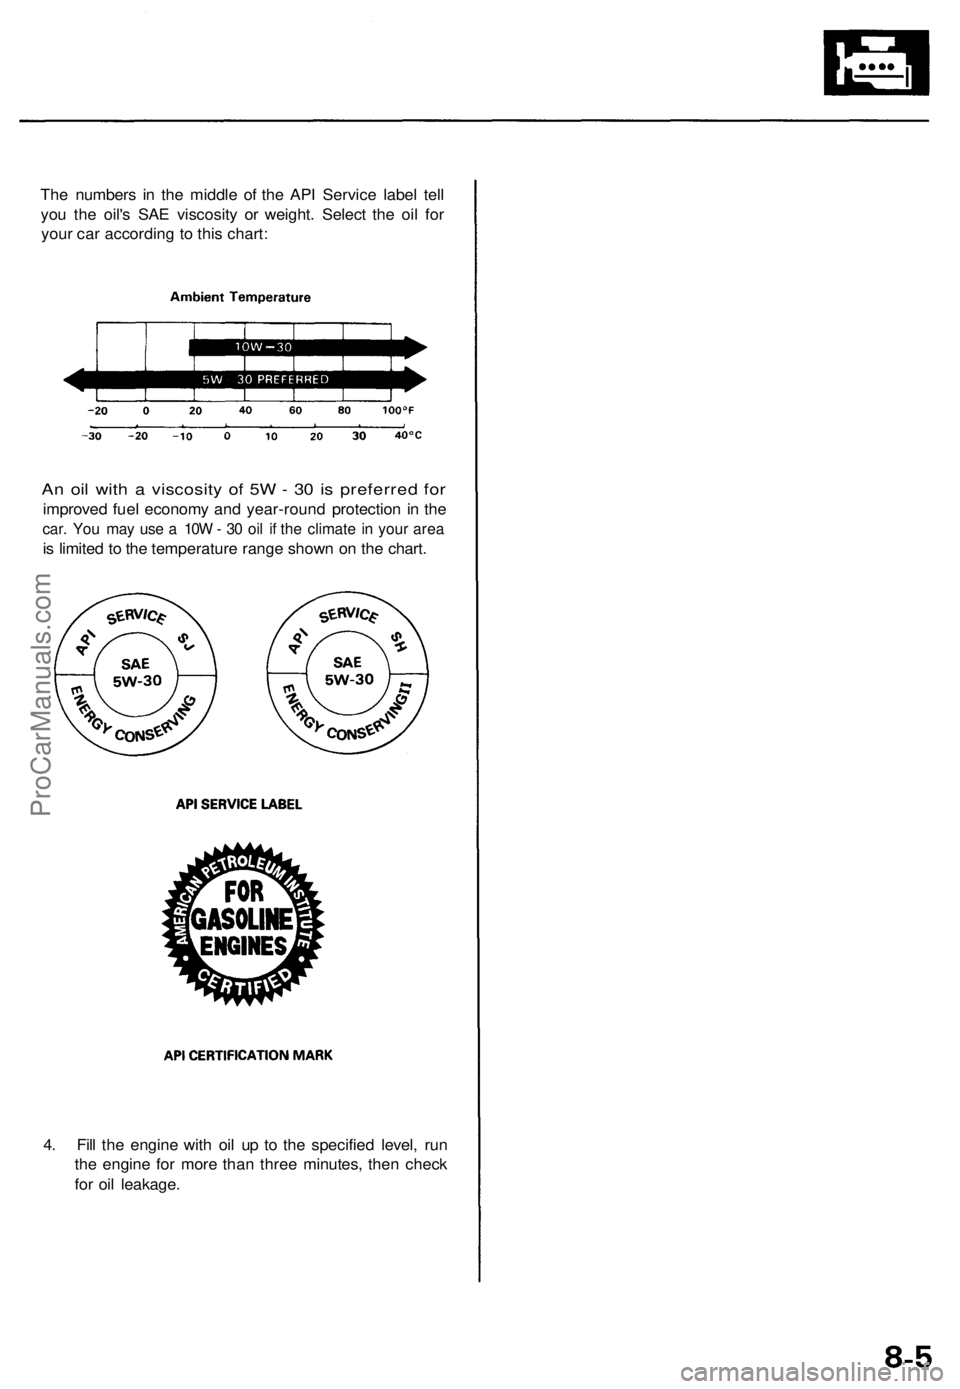
The numbers in the middle of the API Service label tell
you the oil's SAE viscosity or weight. Select the oil for
your car according to this chart:
An oil with a viscosity of 5W - 30 is preferred for
improved fuel economy and year-round protection in the
car. You may use a 10W - 30 oil if the climate in your area
is limited to the temperature range shown on the chart.
4. Fill the engine with oil up to the specified level, run
the engine for more than three minutes, then check
for oil leakage.ProCarManuals.com
Page 1010 of 1771
25. Remove the transmission mid mount nuts.
26. Place a jack under the transmission and raise the
transmission just enough to take weight off of the
mounts, then remove the mid mounts and mid mount
spacer as shown.
TRANSMISSION
TRANSMISSION
MID MOUNT
NUT
MID MOUNT
SPACER
MID MOUNT
MID MOUNTS
OFFSET WRENCH
(Commercially available)
27. Remove the transmission housing mounting bolts.
28. Remove the torque converter cover mounting bolt on
the torque converter housing side.
NOTE: Do not remove the torque converter cover
mounting bolt on the differential carrier side and the
torque converter cover.
TRANSMISSION
HOUSING
MOUNTING
BOLT
DOWEL PIN
TORQUE CONVERTER
COVER
Do not remove.
Do not remove
this bolt.
TRANSMISSION HOUSING
MOUNTING BOLT
TORQUE CONVERTER COVER
MOUNTING BOLT
Remove this bolt.
29. Pull the transmission away from the engine until it
clears the dowel pins, then lower it on the transmis-
sion jack.ProCarManuals.com
Page 1027 of 1771
Valve Body
Repair
NOTE: This repair is only necessary if one or more of
the valves in a valve body do not slide smoothly in their
bores. You may use this procedure to free the valves in
the valve bodies.
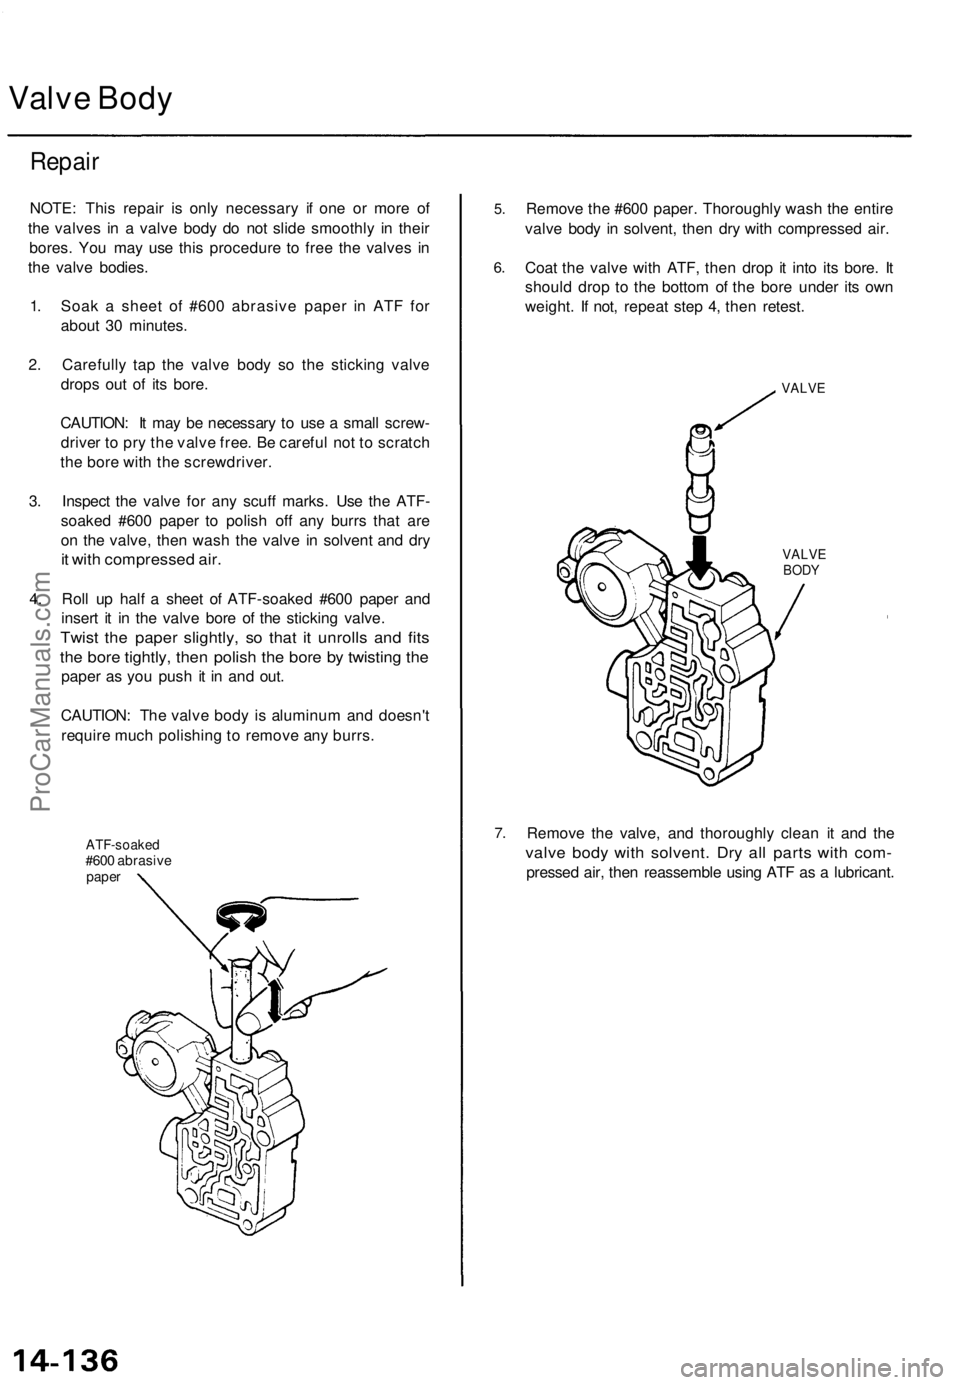
1. Soak a sheet of #600 abrasive paper in ATF for
about 30 minutes.
2. Carefully tap the valve body so the sticking valve
drops out of its bore.
CAUTION: It may be necessary to use a small screw-
driver to pry the valve free. Be careful not to scratch
the bore with the screwdriver.
3. Inspect the valve for any scuff marks. Use the ATF-
soaked #600 paper to polish off any burrs that are
on the valve, then wash the valve in solvent and dry
it with compressed air.
4. Roll up half a sheet of ATF-soaked #600 paper and
insert it in the valve bore of the sticking valve.
Twist the paper slightly, so that it unrolls and fits
the bore tightly, then polish the bore by twisting the
paper as you push it in and out.
CAUTION: The valve body is aluminum and doesn't
require much polishing to remove any burrs.
ATF-soaked
#600 abrasive
paper
5.
6.
Remove the #600 paper. Thoroughly wash the entire
valve body in solvent, then dry with compressed air.
Coat the valve with ATF, then drop it into its bore. It
should drop to the bottom of the bore under its own
weight. If not, repeat step 4, then retest.
VALVE
VALVE
BODY
7.
Remove the valve, and thoroughly clean it and the
valve body with solvent. Dry all parts with com-
pressed air, then reassemble using ATF as a lubricant.ProCarManuals.com
Page 1223 of 1771
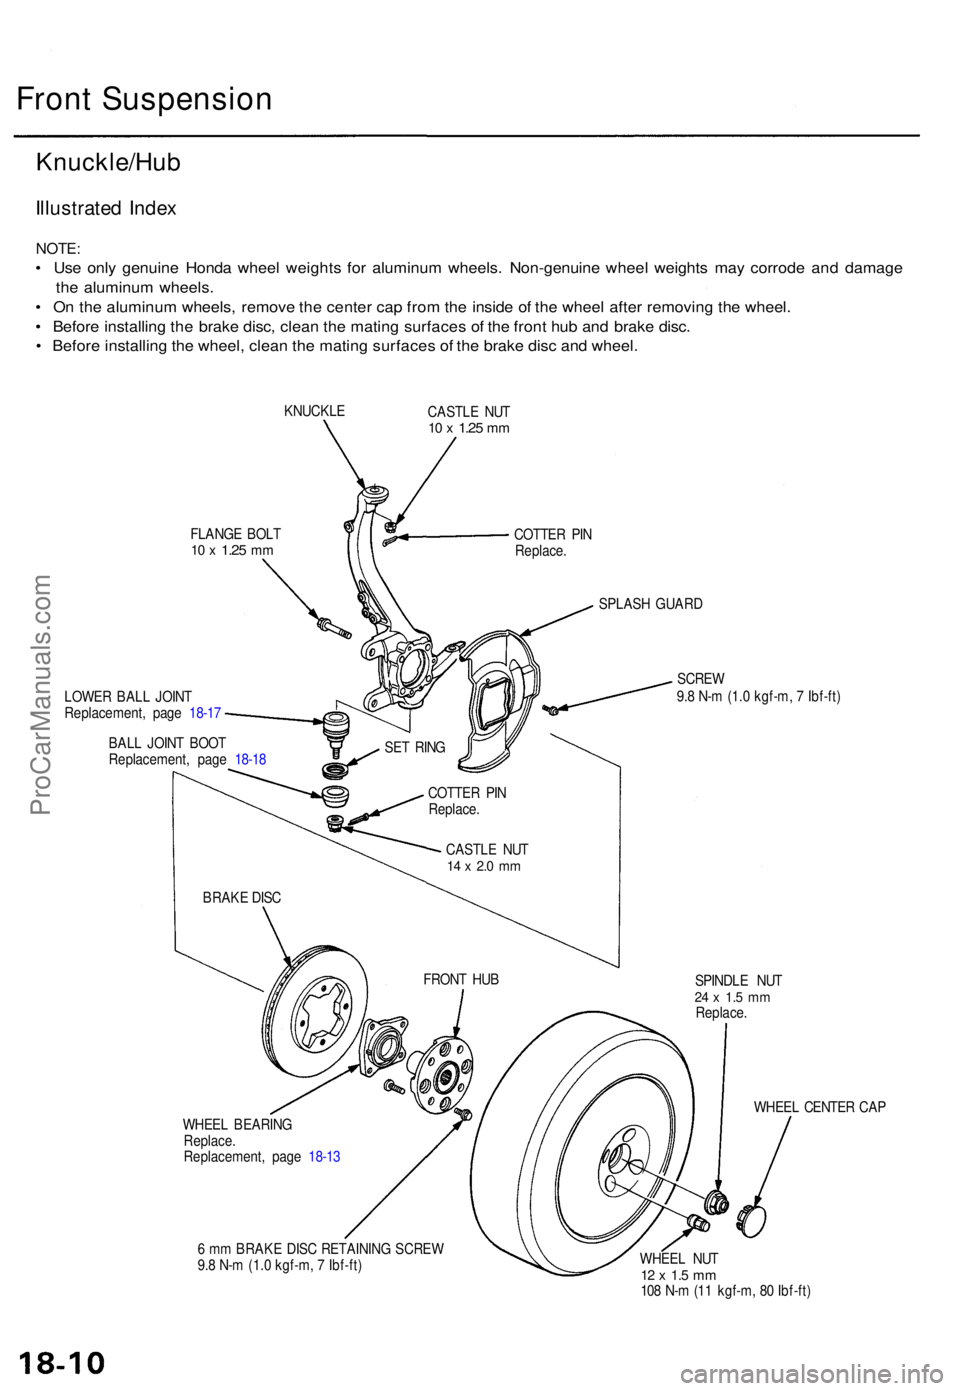
Front Suspensio n
Knuckle/Hu b
Illustrated Inde x
NOTE :
• Us e onl y genuin e Hond a whee l weight s fo r aluminu m wheels . Non-genuin e whee l weight s ma y corrod e an d damag e
th e aluminu m wheels .
• O n th e aluminu m wheels , remov e th e cente r ca p fro m th e insid e o f th e whee l afte r removin g th e wheel .
• Befor e installin g th e brak e disc , clea n th e matin g surface s o f th e fron t hu b an d brak e disc .
• Befor e installin g th e wheel , clea n th e matin g surface s o f th e brak e dis c an d wheel .
KNUCKL E
CASTLE NU T10 x 1.2 5 mm
FLANG E BOL T10 x 1.2 5 mmCOTTE R PI N
Replace .
SPLAS H GUAR D
LOWE R BAL L JOIN T
Replacement , pag e 18-1 7
BAL L JOIN T BOO T
Replacement , pag e 18-1 8
SCRE W9.8 N- m (1. 0 kgf-m , 7 Ibf-ft )
SPINDL E NU T
24 x 1. 5 m mReplace .
WHEEL CENTE R CA P
WHEE L BEARIN G
Replace .
Replacement , pag e 18-1 3
6 m m BRAK E DIS C RETAININ G SCRE W
9. 8 N- m (1. 0 kgf-m , 7 Ibf-ft ) WHEE
L NU T
12 x 1. 5 m m108 N- m (1 1 kgf-m , 8 0 Ibf-ft )
SE
T RIN G
COTTE R PI N
Replace .
CASTL E NU T
14 x 2. 0 m m
BRAK E DIS C
FRONT HU B
ProCarManuals.com
Page 1238 of 1771
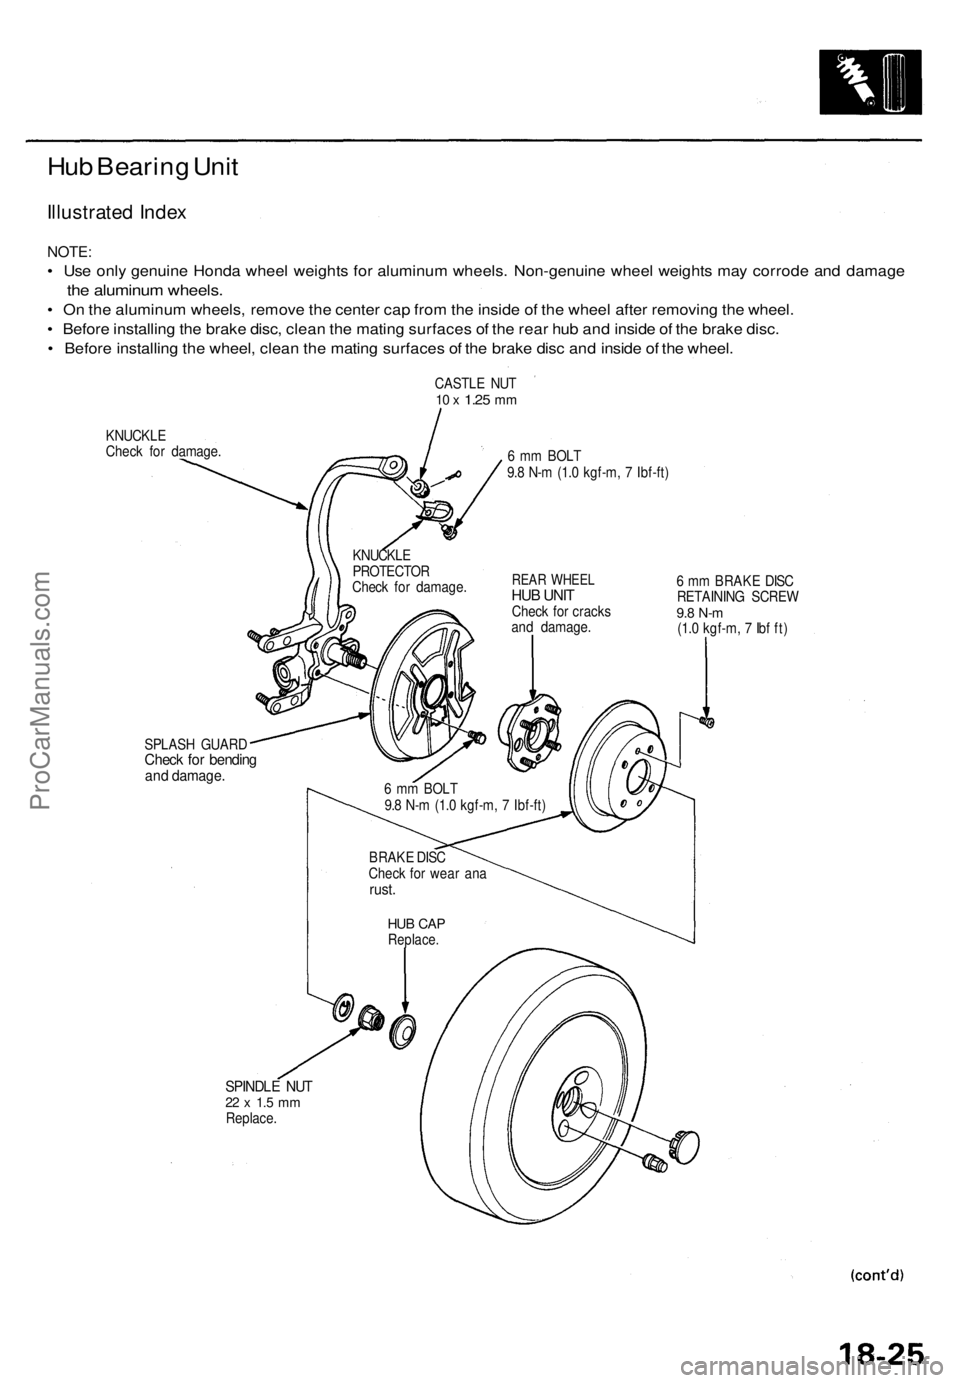
Hub Bearing Unit
Illustrated Index
NOTE:
• Use only genuine Honda wheel weights for aluminum wheels. Non-genuine wheel weights may corrode and damage
the aluminum wheels.
• On the aluminum wheels, remove the center cap from the inside of the wheel after removing the wheel.
• Before installing the brake disc, clean the mating surfaces of the rear hub and inside of the brake disc.
• Before installing the wheel, clean the mating surfaces of the brake disc and inside of the wheel.
KNUCKLE
Check for damage.
6 mm BOLT
9.8 N-m (1.0 kgf-m, 7 Ibf-ft)
SPLASH GUARD
Check for bending
and damage.
6 mm BRAKE DISC
RETAINING SCREW
9.8 N-m
(1.0 kgf-m, 7 Ibf ft)
SPINDLE NUT
22 x 1.5 mm
Replace.
CASTLE NUT
10 x
1.25
mm
KNUCKLE
PROTECTOR
Check for damage.
HUB CAP
Replace.
BRAKE DISC
Check for wear ana
rust.
6 mm BOLT
9.8 N-m (1.0 kgf-m, 7 Ibf-ft)
REAR WHEEL
HUB UNIT
Check for cracks
and damage.ProCarManuals.com