1995 ACURA TL brake fluid
[x] Cancel search: brake fluidPage 28 of 1771

Lubrication Points
For the details of lubrication points and types of lubricants to be applied, refer to the illustrated index and various work
procedures (such as Assembly/Reassembly, Replacement, Overhaul, Installation, etc.) contained in each section.
No.
1
2
3
4
5
6
7
8
9
10
11
12
13
14
15
16
17
18
19
20
21
LUBRICATION POINTS
Engine
Transmission
Brake Line (Includes Anti-lock brake line)
Power steering gearbox
Steering boots
Throttle cable end
Steering ball joints
Shift lever (Automatic transmission)
Pedal linkage
Intermediate shaft
Brake master cylinder pushrod
Fuel
fill
lid
Trunk hinges
Door hinges upper and lower
Door opening detents
Hood hinges and hood latch
Brake pipe joint (Front and rear wheel house)
Caliper Piston seal, Dust seal,
Caliper pin, Piston
Power steering system
Differential
A/C compressor
LUBRICANT
API Service Grade: Use SH "Energy Conserving II" or SJ
"Energy Conserving" grade oil.
The oil container may also display the API Certification
mark shown below. Make sure it says "For Gasoline
Engines."
SAE Viscosity: See chart below.
Genuine Honda Premium Formula Automatic
Transmission Fluid (ATF)*1
Genuine Honda DOT3 Brake Fluid*2
Steering grease P/N 08733 - B070E
Multi-purpose grease
Honda White Lithium Grease
Rust preventives
Silicone grease
Genuine Honda Power Steering Fluid-V or S*3
Hypoid gear Oil API service GL4 or GL5
Viscosity:
at above -18°C (0°F): SAE 90
at less than -18°C (0°F): SAE 80 W-90
Compressor oil:
DENSO: ND-OIL8 (P/N 38897 - PR7 - A01 AH or 38899 -
PR7-A01)
(For Refrigerant: HFC-134a (R-134a))
API SERVICE LABEL
API CERTIFICATION MARK
Recommended Engine Oil
Engine oil viscosity for ambient temperature ranges
NOTE: The following information as marked *1, *2 and *3 on above chart details for 1997 model:
*1: Always use Genuine Honda Premium Formula Automatic Transmission Fluid (ATF). Using a non-Honda ATF can affect
shift quality.
*2: Always use Genuine Honda DOT3 Brake Fluid. Using a non-Honda brake fluid can cause corrosion and decrease the
life of the system.
*3: Always use Genuine Honda Power Steering Fluid-V or S. Using any other type of power steering fluid or automatic
transmission fluid can cause increase wear and poor steering in cold weather.ProCarManuals.com
Page 1250 of 1771
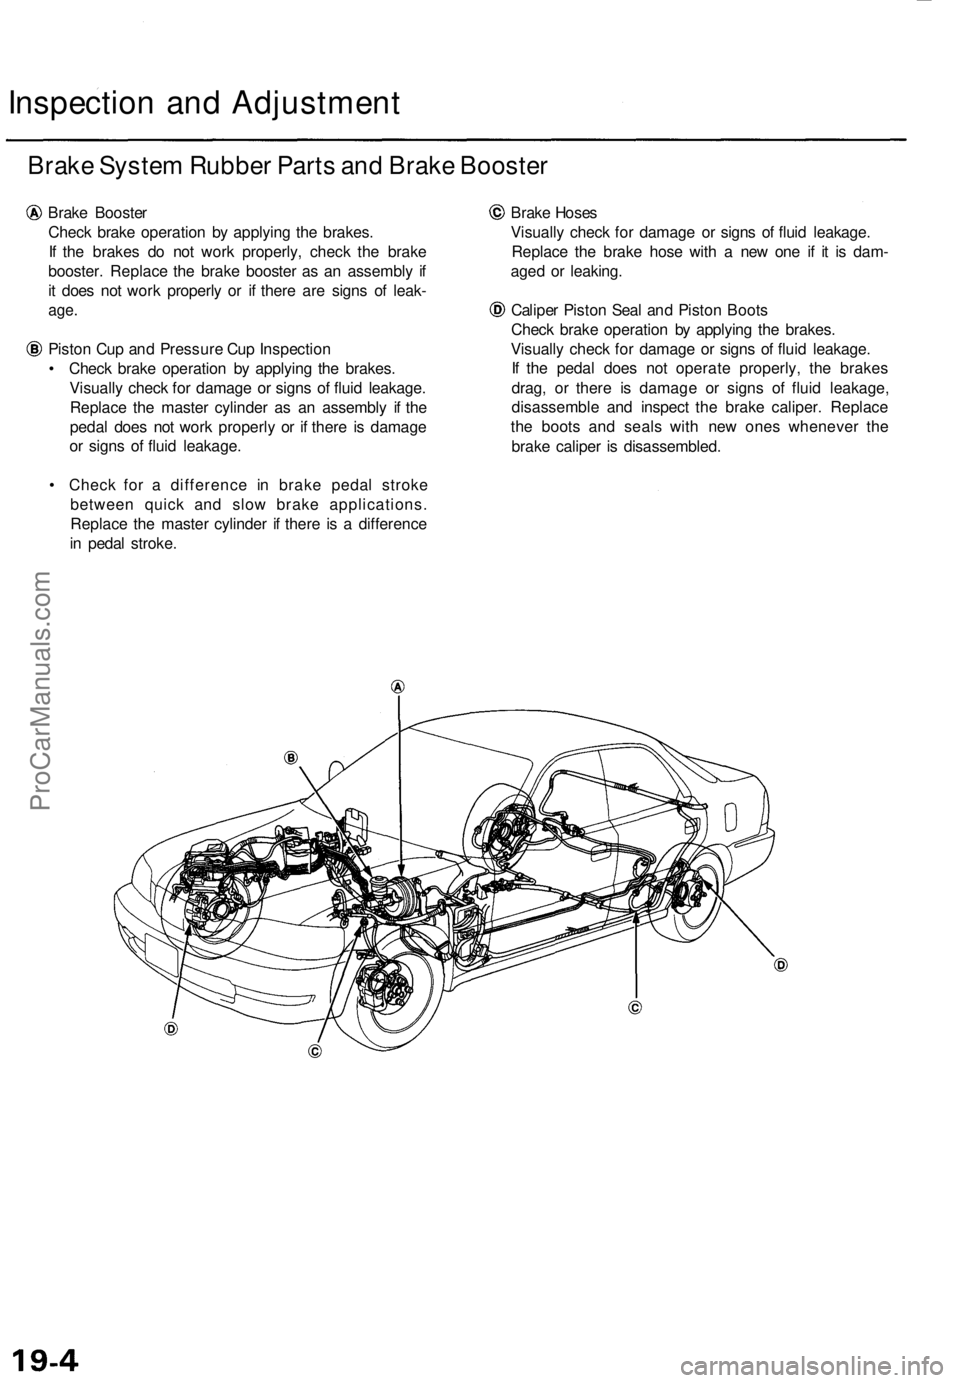
Inspection and Adjustment
Brake System Rubber Parts and Brake Booster
Brake Booster
Check brake operation by applying the brakes.
If the brakes do not work properly, check the brake
booster. Replace the brake booster as an assembly if
it does not work properly or if there are signs of leak-
age.
Piston Cup and Pressure Cup Inspection
• Check brake operation by applying the brakes.
Visually check for damage or signs of fluid leakage.
Replace the master cylinder as an assembly if the
pedal does not work properly or if there is damage
or signs of fluid leakage.
• Check for a difference in brake pedal stroke
between quick and slow brake applications.
Replace the master cylinder if there is a difference
in pedal stroke.
Brake Hoses
Visually check for damage or signs of fluid leakage.
Replace the brake hose with a new one if it is dam-
aged or leaking.
Caliper Piston Seal and Piston Boots
Check brake operation by applying the brakes.
Visually check for damage or signs of fluid leakage.
If the pedal does not operate properly, the brakes
drag, or there is damage or signs of fluid leakage,
disassemble and inspect the brake caliper. Replace
the boots and seals with new ones whenever the
brake caliper is disassembled.ProCarManuals.com
Page 1253 of 1771
Bleeding
CAUTION:
• Always use Genuine Honda DOT 3 Brake Fluid. Using
a non-Honda brake fluid can cause corrosion and
decrease the life of the system.
• Make sure no dirt or other foreign matter is allowed
to contaminate the brake fluid.
• Do not spill brake fluid on the vehicle, it may damage
the paint; if brake fluid does contact the paint, wash
it off immediately with water.
NOTE: The reservoir on the master cylinder must be at
the MAX (upper) level mark at the start of bleeding pro-
cedure, and checked after bleeding each brake caliper.
Add fluid as required.
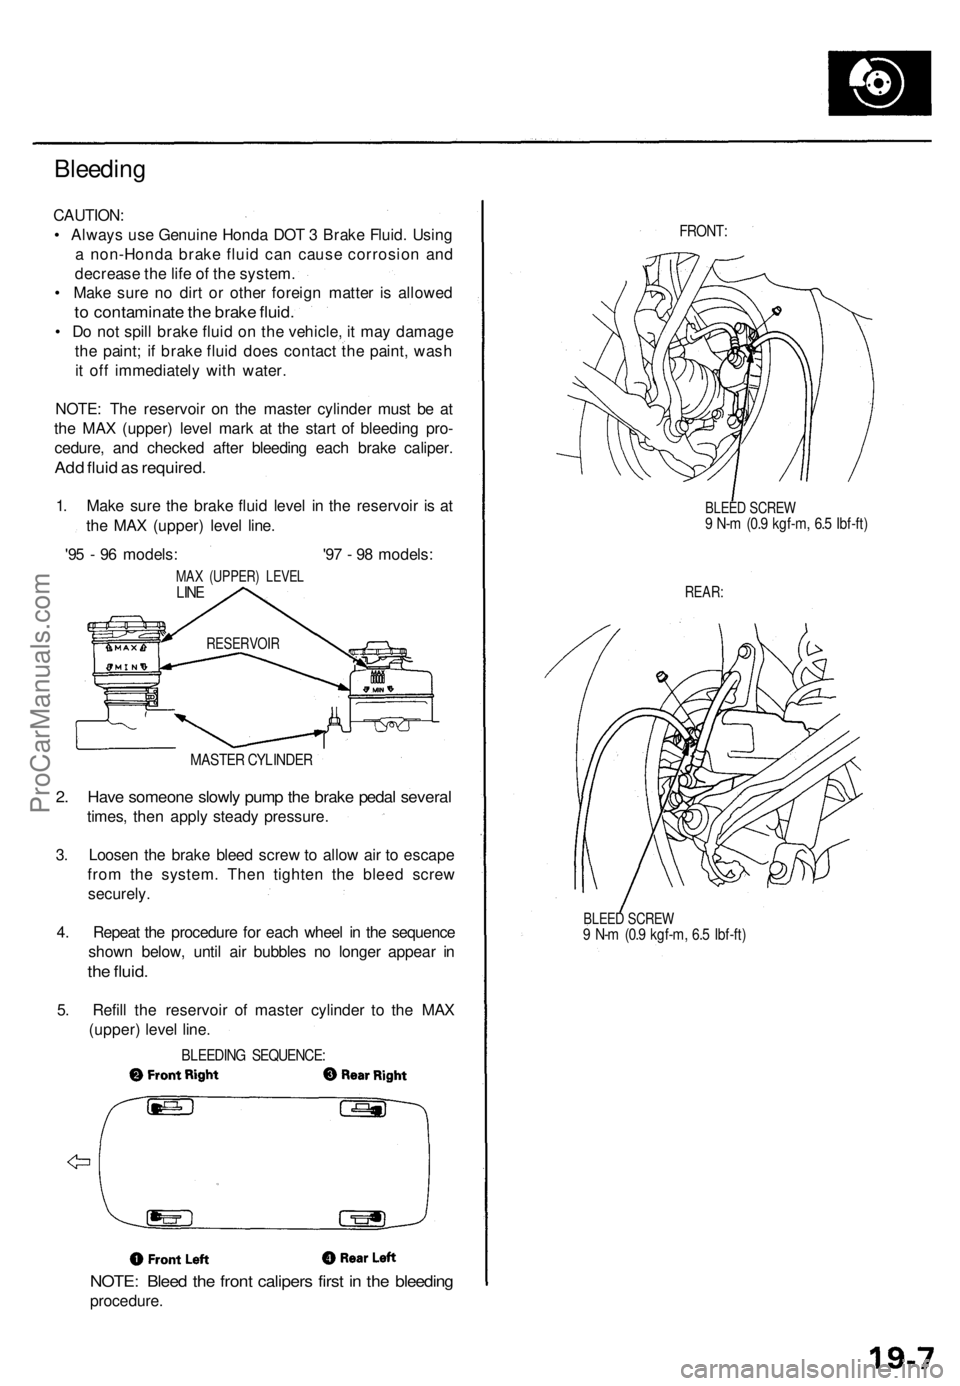
1. Make sure the brake fluid level in the reservoir is at
the MAX (upper) level line.
'95 - 96 models: '97 - 98 models:
MAX (UPPER) LEVEL
LINE
MASTER CYLINDER
2. Have someone slowly pump the brake pedal several
times, then apply steady pressure.
3. Loosen the brake bleed screw to allow air to escape
from the system. Then tighten the bleed screw
securely.
4. Repeat the procedure for each wheel in the sequence
shown below, until air bubbles no longer appear in
the fluid.
5. Refill the reservoir of master cylinder to the MAX
(upper) level line.
BLEEDING SEQUENCE:
NOTE: Bleed the front calipers first in the bleeding
procedure.
FRONT:
BLEED SCREW
9 N-m (0.9 kgf-m, 6.5 Ibf-ft)
REAR:
BLEED SCREW
9 N-m (0.9 kgf-m, 6.5 Ibf-ft)
RESERVOIRProCarManuals.com
Page 1257 of 1771
Front Brake Caliper
Disassembly
• Never use an air hose or dry brush to clean brake
assemblies.
• Use an OSHA-approved vacuum cleaner to avoid
breathing brake dust.
CAUTION:
• Do not spill brake fluid on the vehicle; it may damage
the paint; if brake fluid does contact the paint, wash
it off immediately with water.
• To prevent spills, cover the hose joints with rags or
shop towels.
• Clean all parts in brake fluid and air dry; blow out all
passages with compressed air.
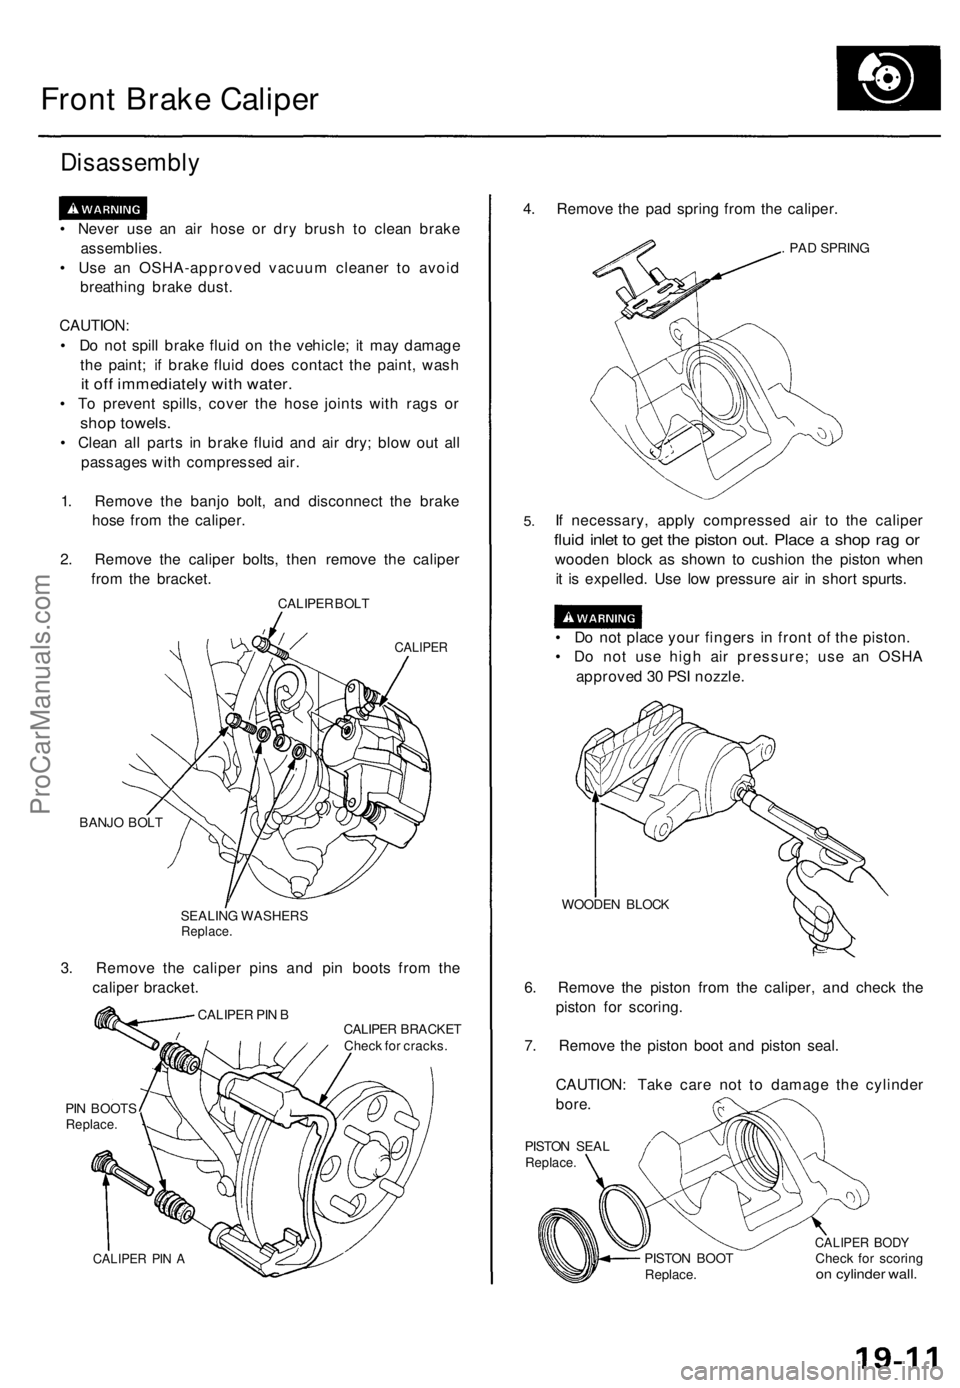
1. Remove the banjo bolt, and disconnect the brake
hose from the caliper.
2. Remove the caliper bolts, then remove the caliper
from the bracket.
CALIPER BOLT
CALIPER
BANJO BOLT
SEALING WASHERS
Replace.
3. Remove the caliper pins and pin boots from the
caliper bracket.
CALIPER BRACKET
Check for cracks.
PIN BOOTS
Replace.
CALIPER PIN A
4. Remove the pad spring from the caliper.
. PAD SPRING
5.
If necessary, apply compressed air to the caliper
fluid inlet to get the piston out. Place a shop rag or
wooden block as shown to cushion the piston when
it is expelled. Use low pressure air in short spurts.
• Do not place your fingers in front of the piston.
• Do not use high air pressure; use an OSHA
approved 30 PSI nozzle.
WOODEN BLOCK
6. Remove the piston from the caliper, and check the
piston for scoring.
7. Remove the piston boot and piston seal.
CAUTION: Take care not to damage the cylinder
bore.
PISTON SEAL
Replace.
PISTON BOOT
Replace.
CALIPER BODY
Check for scoring
on cylinder wall.
CALIPER PIN BProCarManuals.com
Page 1258 of 1771
Front Brake Caliper
Reassembly
Never use an air hose or dry brush to clean brake assemblies.
Use an OSHA-approved vacuum cleaner to avoid breathing brake dust.
Contaminated brake discs or pads reduce stopping ability.
When reusing the pads, always reinstall the brake pads in their original positions to prevent loss of braking efficiency.
CAUTION:
Do not spill brake fluid on the vehicle; it may damage the paint; if brake fluid does contact the paint, wash it off imme-
diately with water.
Clean all parts in brake fluid and air dry; blow out all passages with compressed air.
Before reassembling, check that all parts are free of dust and other foreign particles.
Replace parts with new ones whenever specified to do so.
Make sure no dirt or other foreign matter is allowed to contaminate the brake fluid.
Always use Genuine Honda DOT 3 Brake Fluid. Using a non-Honda brake fluid can cause corrosion and decrease the
life of the system.
NOTE:
Coat piston, piston seal, and caliper bore with clean brake fluid.
Replace all rubber parts with new ones whenever disassembled.
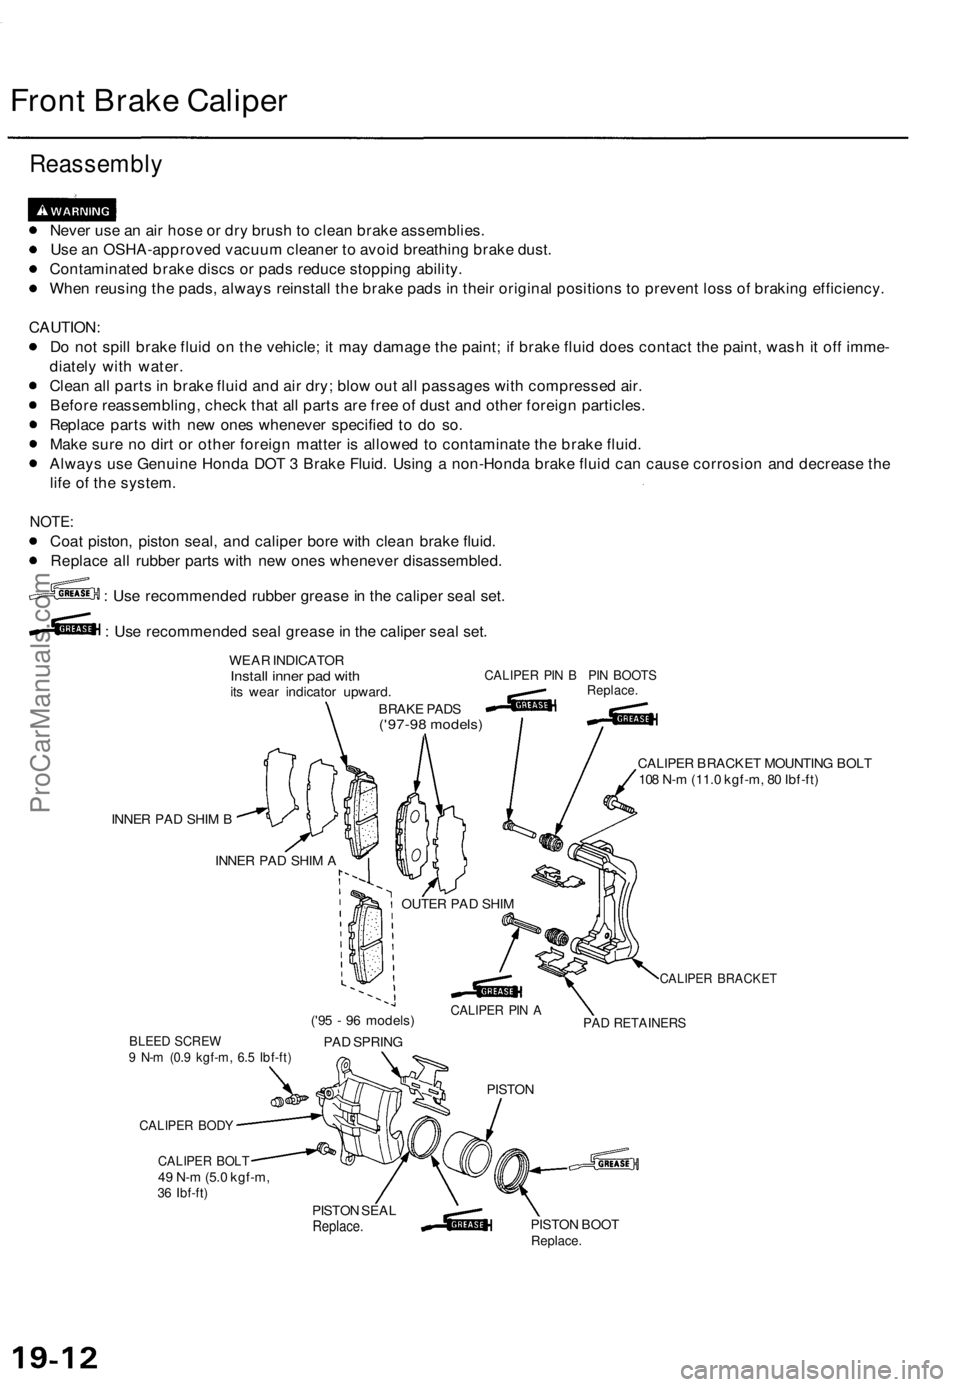
: Use recommended rubber grease in the caliper seal set.
: Use recommended seal grease in the caliper seal set.
WEAR INDICATOR
Install inner pad with
its wear indicator upward.
BRAKE PADS
('97-98 models)
CALIPER PIN B PIN BOOTS
Replace.
INNER PAD SHIM B
CALIPER BRACKET MOUNTING BOLT
108 N-m (11.0 kgf-m, 80 Ibf-ft)
INNER PAD SHIM A
BLEED SCREW
9 N-m (0.9 kgf-m, 6.5 Ibf-ft)
CALIPER BODY
CALIPER BOLT
49 N-m (5.0 kgf-m,
36 Ibf-ft)
('95 - 96 models)
PAD SPRING
CALIPER BRACKET
PAD RETAINERS
PISTON
PISTON SEAL
Replace.
PISTON BOOT
Replace.
OUTER PAD SHIM
CALIPER PIN AProCarManuals.com
Page 1260 of 1771
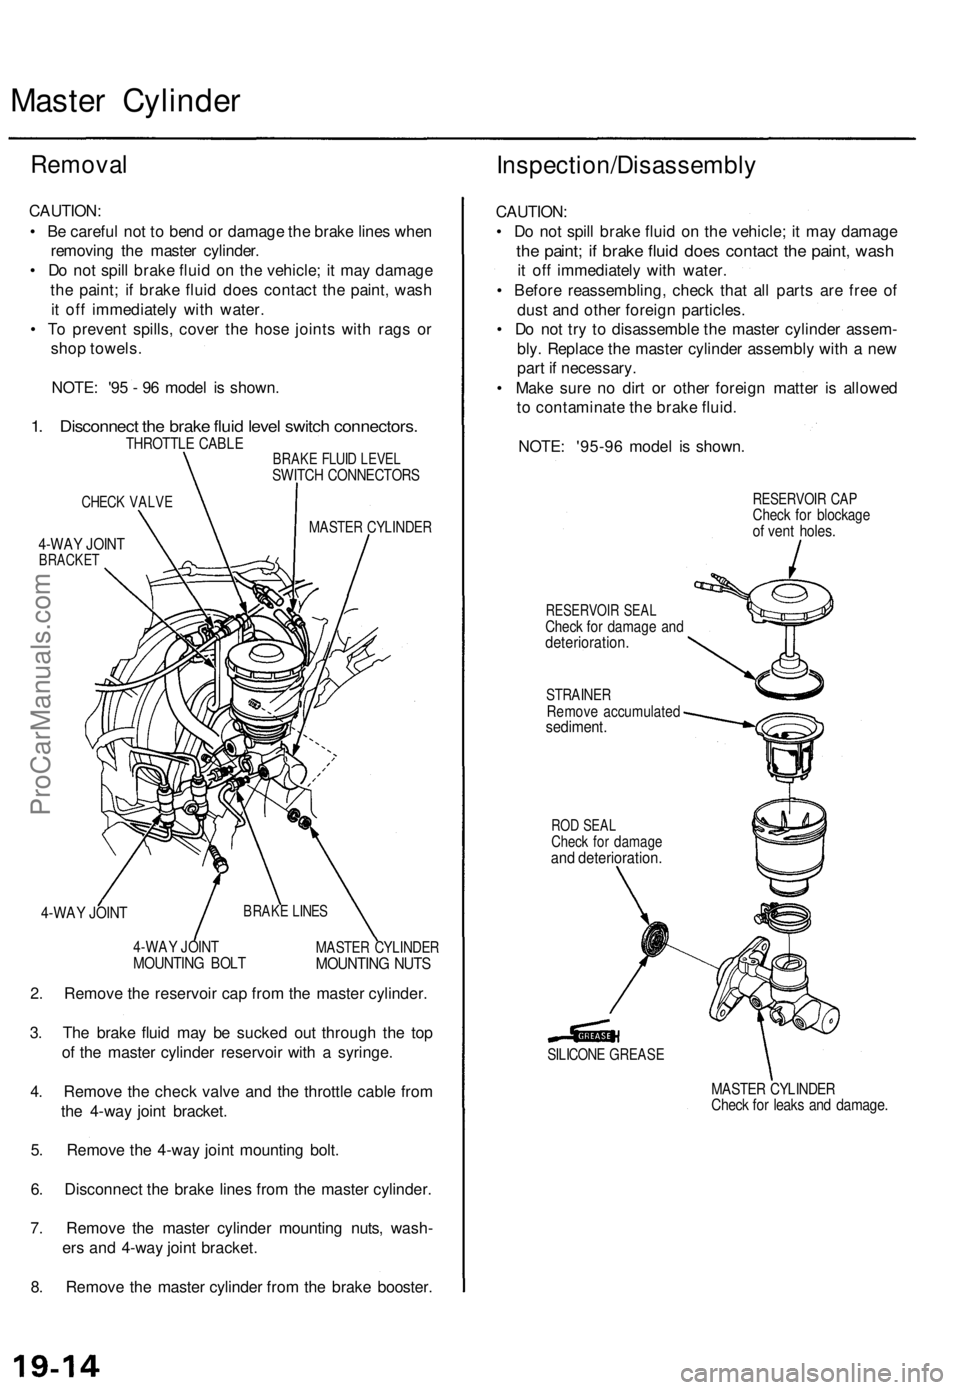
Master Cylinde r
Removal
CAUTION :
• B e carefu l no t t o ben d o r damag e th e brak e line s whe n
removin g th e maste r cylinder .
• D o no t spil l brak e flui d o n th e vehicle ; i t ma y damag e
th e paint ; i f brak e flui d doe s contac t th e paint , was h
i t of f immediatel y wit h water .
• T o preven t spills , cove r th e hos e joint s wit h rag s o r
sho p towels .
NOTE : '9 5 - 9 6 mode l i s shown .
1. Disconnec t th e brak e flui d leve l switc h connectors .THROTTLE CABL EBRAKE FLUI D LEVE LSWITC H CONNECTOR S
CHECK VALV E
MASTE R CYLINDE R4-WAY JOIN TBRACKE T
4-WAY JOIN T
4-WA Y JOIN TMOUNTIN G BOL TMASTE R CYLINDE RMOUNTING NUT S
2. Remov e th e reservoi r ca p fro m th e maste r cylinder .
3 . Th e brak e flui d ma y b e sucke d ou t throug h th e to p
o f th e maste r cylinde r reservoi r wit h a syringe .
4 . Remov e th e chec k valv e an d th e throttl e cabl e fro m
th e 4-wa y join t bracket .
5 . Remov e th e 4-wa y join t mountin g bolt .
6 . Disconnec t th e brak e line s fro m th e maste r cylinder .
7 . Remov e th e maste r cylinde r mountin g nuts , wash -
er s an d 4-wa y join t bracket .
8 . Remov e th e maste r cylinde r fro m th e brak e booster .
Inspection/Disassembl y
CAUTION:
• D o no t spil l brak e flui d o n th e vehicle ; i t ma y damag e
the paint ; i f brak e flui d doe s contac t th e paint , was h
it of f immediatel y wit h water .
• Befor e reassembling , chec k tha t al l part s ar e fre e o f
dus t an d othe r foreig n particles .
• D o no t tr y t o disassembl e th e maste r cylinde r assem -
bly . Replac e th e maste r cylinde r assembl y wit h a ne w
par t i f necessary .
• Mak e sur e n o dir t o r othe r foreig n matte r i s allowe d
t o contaminat e th e brak e fluid .
NOTE : '95-9 6 mode l i s shown .
RESERVOI R SEA LCheck fo r damag e an ddeterioration .
STRAINERRemove accumulate dsediment.
RESERVOI R CA PChec k fo r blockag eof ven t holes .
ROD SEA LCheck fo r damag eand deterioration .
SILICONE GREAS E
MASTER CYLINDE RCheck fo r leak s an d damage .
BRAKE LINE S
ProCarManuals.com
Page 1272 of 1771
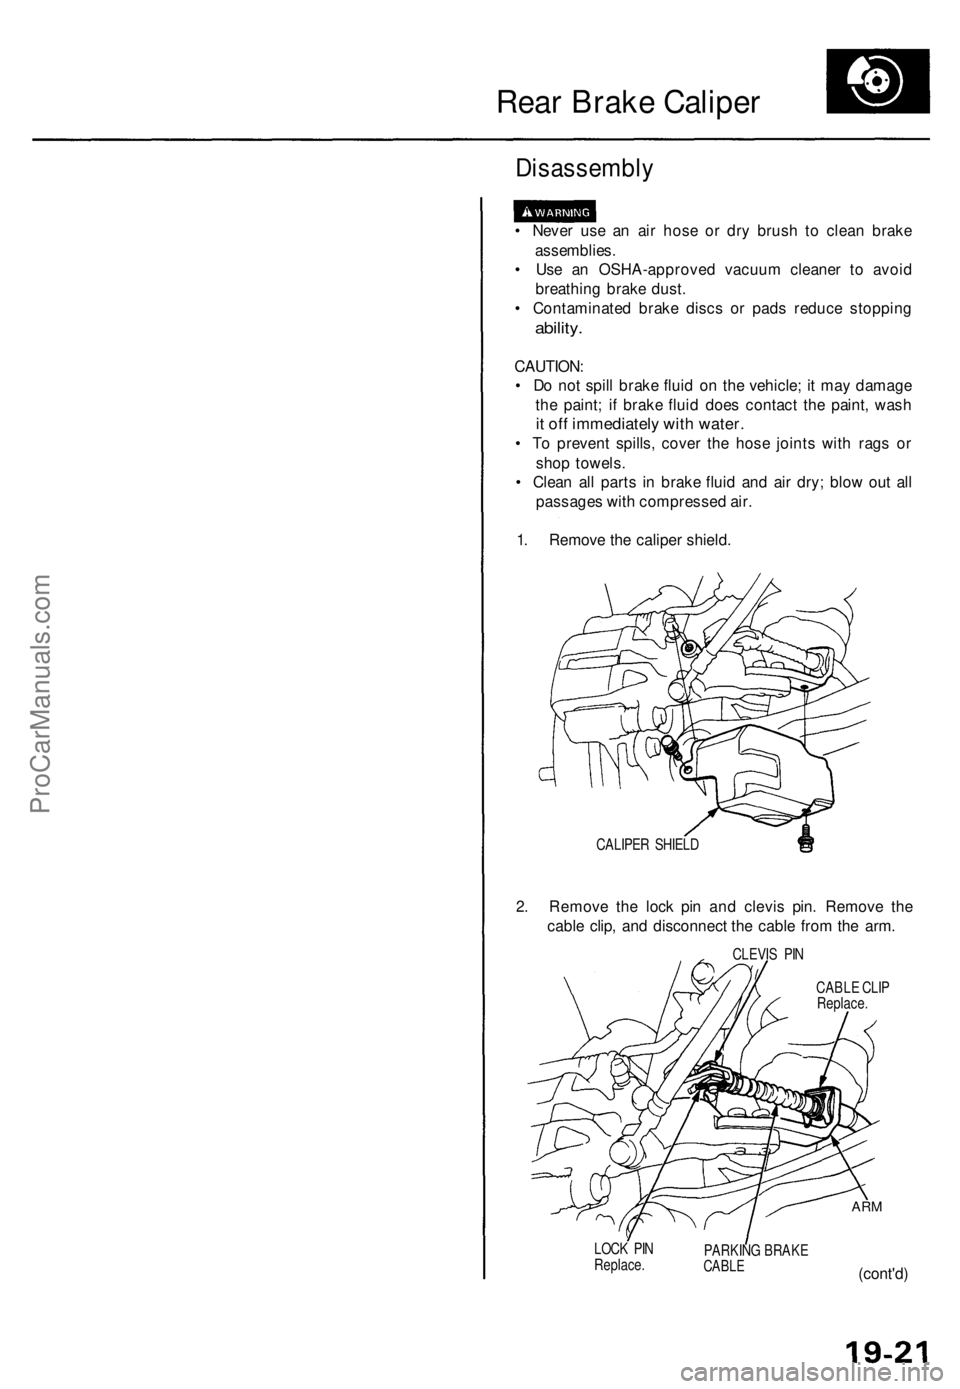
Rear Brake Caliper
Disassembly
• Never use an air hose or dry brush to clean brake
assemblies.
• Use an OSHA-approved vacuum cleaner to avoid
breathing brake dust.
• Contaminated brake discs or pads reduce stopping
ability.
CAUTION:
• Do not spill brake fluid on the vehicle; it may damage
the paint; if brake fluid does contact the paint, wash
it off immediately with water.
• To prevent spills, cover the hose joints with rags or
shop towels.
• Clean all parts in brake fluid and air dry; blow out all
passages with compressed air.
1. Remove the caliper shield.
CALIPER SHIELD
2. Remove the lock pin and clevis pin. Remove the
cable clip, and disconnect the cable from the arm.
CLEVIS PIN
CABLE CLIP
Replace.
LOCK PIN
Replace.
PARKING BRAKE
CABLE
ARM
(cont'd)ProCarManuals.com
Page 1276 of 1771
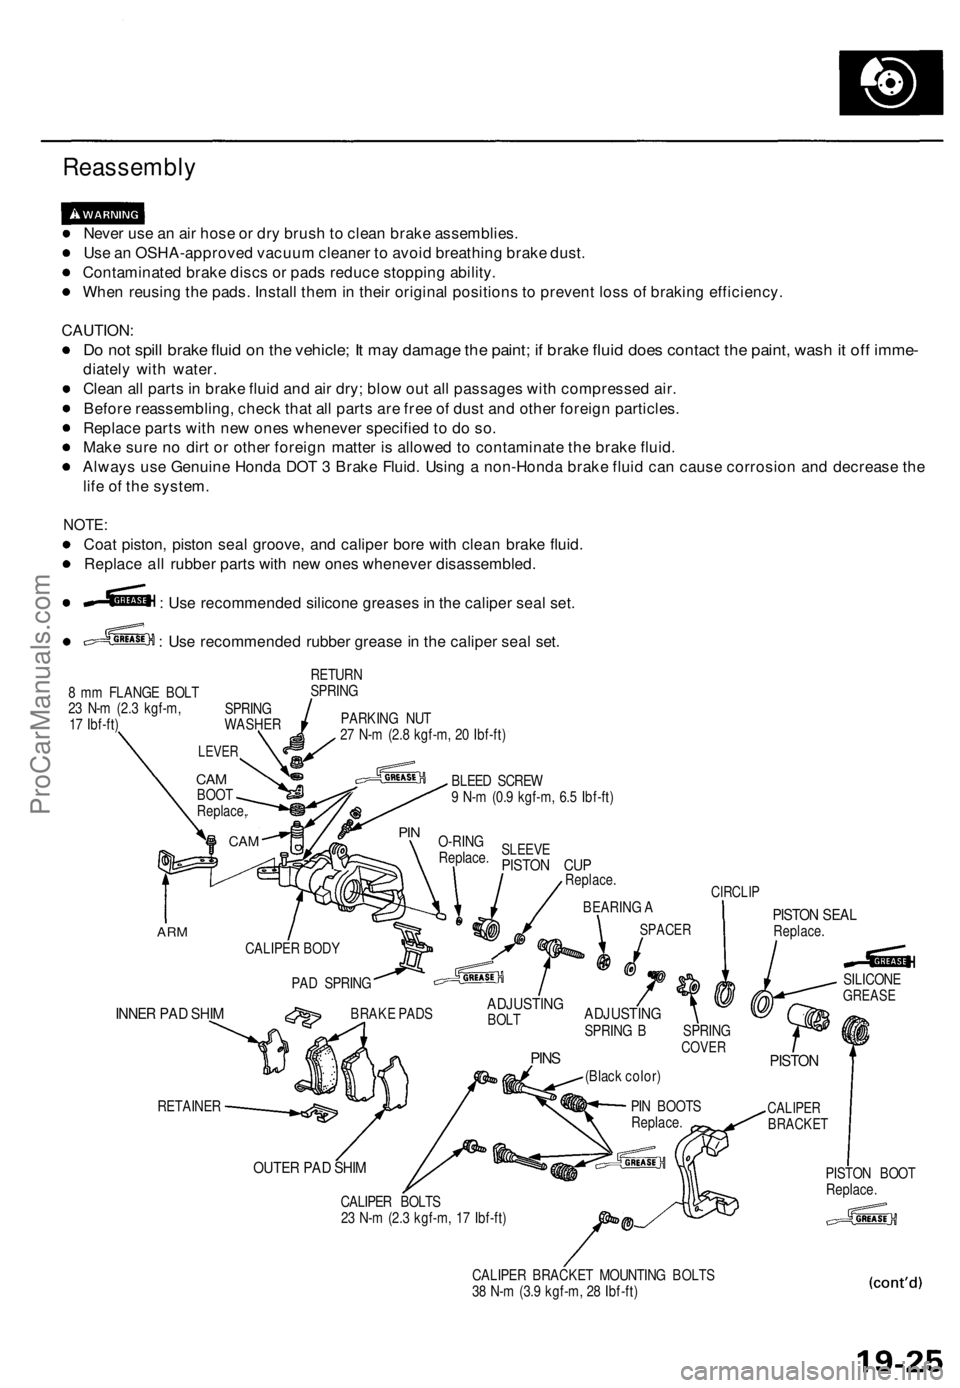
Reassembly
Never use an air hose or dry brush to clean brake assemblies.
Use an OSHA-approved vacuum cleaner to avoid breathing brake dust.
Contaminated brake discs or pads reduce stopping ability.
When reusing the pads. Install them in their original positions to prevent loss of braking efficiency.
CAUTION:
Do not spill brake fluid on the vehicle; It may damage the paint; if brake fluid does contact the paint, wash it off imme-
diately with water.
Clean all parts in brake fluid and air dry; blow out all passages with compressed air.
Before reassembling, check that all parts are free of dust and other foreign particles.
Replace parts with new ones whenever specified to do so.
Make sure no dirt or other foreign matter is allowed to contaminate the brake fluid.
Always use Genuine Honda DOT 3 Brake Fluid. Using a non-Honda brake fluid can cause corrosion and decrease the
life of the system.
NOTE:
Coat piston, piston seal groove, and caliper bore with clean brake fluid.
Replace all rubber parts with new ones whenever disassembled.
: Use recommended silicone greases in the caliper seal set.
: Use recommended rubber grease in the caliper seal set.
8 mm FLANGE BOLT
23 N-m (2.3 kgf-m,
17 Ibf-ft)
RETURN
SPRING
PARKING NUT
27 N-m (2.8 kgf-m, 20 Ibf-ft)
BLEED SCREW
9 N-m (0.9 kgf-m, 6.5 Ibf-ft)
SLEEVE
PISTON CUP
Replace.
ARM
INNER PAD SHIM
RETAINER
CALIPER BODY
PAD SPRING
CIRCLIP
BEARING A
SPACER
PISTON SEAL
Replace.
BRAKE PADS
ADJUSTING
BOLT
PINS
ADJUSTING
SPRING B SPRING
COVER
(Black color)
PISTON
CALIPER
BRACKET
OUTER PAD SHIM
CALIPER BOLTS
23 N-m (2.3 kgf-m, 17 Ibf-ft)
CALIPER BRACKET MOUNTING BOLTS
38 N-m (3.9 kgf-m, 28 Ibf-ft)
PISTON BOOT
Replace.
SILICONE
GREASE
O-RING
Replace.
PIN
CAM
LEVER
CAM
BOOT
Replace,
SPRING
WASHER
PIN BOOTS
Replace.ProCarManuals.com