1994 JEEP CHEROKEE oil
[x] Cancel search: oilPage 59 of 1784
(9) Disconnect the tie rod from the steering
knuckle. Disconnect the steering dampener from the
axle bracket.
(10) Support the axle with a hydraulic jack under
the differential. Raise the axle just enough to relieve
the axle weight from the springs.
(11) Remove the spring U-bolts from the plate
brackets.
(12) Loosen BUT DO NOT REMOVE the bolts that
attach the spring rear pivot at the frame rail brack-
ets. This will allow the springs to pivot without bind-
ing on the bushings.
(13) Disconnect shackle from the springs and lower
the springs to the surface.
(14) Lower the jack enough to remove the axle.
INSTALLATION
CAUTION: All suspension components that use rub-
ber bushings should be tightened with the vehicle
at the normal height. It is important to have the
springs supporting the weight of the vehicle when
the fasteners are torqued. If the springs are not at
their normal ride position, vehicle ride comfort
could be affected along with premature rubber
bushing wear. Rubber bushings must never be lu-
bricated.
(1) Support the axle on a hydraulic jack under the
differential. Position the axle under the vehicle.
(2) Raise the springs and install the spring shackle
bolts.Do not tighten at this time.
(3) Lower the axle and align the spring center
bolts with the locating holes in the axle pads and
plate brackets.
(4) Install the spring U-bolts through the plate
brackets and tighten to 122 Nzm (90 ft. lbs.) torque.
(5) Connect the track bar to the axle bracket and
install the bolt.Do not tighten at this time.
It is important that the springs support the
weight of the vehicle when the track bar is con-
nected. If the springs are not at their usual po-
sition, the vehicle ride comfort could be affected.
(6) Install the shock absorber and tighten the nut
to 61 Nzm (45 ft. lbs.) torque.
(7) Install the stabilizer bar link to the axle
bracket. Tighten the nut to 61 Nzm (45 ft. lbs.)
torque.
(8) Install the tie rod to the steering knuckles and
tighten the nuts to 47 Nzm (35 ft. lbs.) torque. Install
the steering dampener to the axle bracket and
tighten the bolt to 75 Nzm (55 ft. lbs.) torque.
(9) Install the brake components and ABS brake
sensor (if equipped). Refer to Group 5ÐBrakes.
(10) Connect the vent hose to the tube fitting and
axle shift motor vacuum harness.(11) Align the reference marks and connect the
drive shaft to the axle yoke. Tighten the U-joint
clamp bolts to 19 Nzm (14 ft. lbs.) torque.
(12) Check differential lubricant and add if neces-
sary.
(13) Install the wheel and tire assemblies.
(14) Remove the supports and lower the vehicle.
(15) Tighten the spring rear pivot bolt/nut to 142
Nzm (105 ft. lbs.) torque. Tighten the spring shackle
bolt/nut to 135 Nzm (100 ft. lbs.) torque.
(16) Tighten the track bar nut at the axle bracket
to 100 Nzm (74 ft. lbs.) torque.
(17) Check the front wheel alignment.
LUBRICANT CHANGE
The gear lubricant will drain quicker if the vehicle
has been recently driven.
(1) Raise and support the vehicle.
(2) Remove the lubricant fill hole plug from the
differential housing cover.
(3) Remove the differential housing cover and
drain the lubricant from the housing.
(4) Clean the housing cavity with a flushing oil,
light engine oil or lint free cloth.Do not use water,
steam, kerosene or gasoline for cleaning.
(5) Remove the sealant from the housing and cover
surfaces. Use solvent to clean the mating surfaces.
(6) Apply a bead of MOPARtSilicone Rubber Seal-
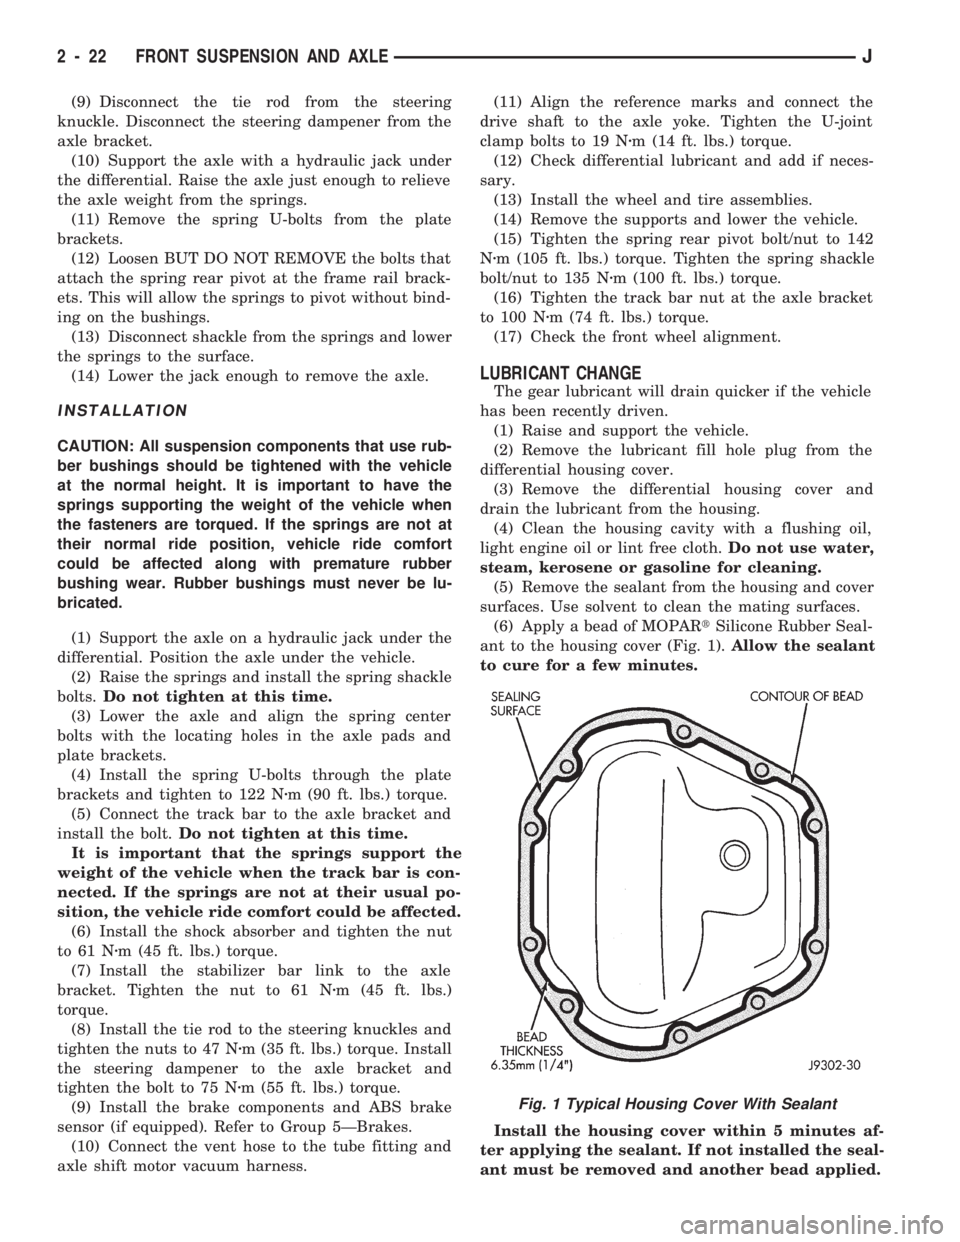
ant to the housing cover (Fig. 1).Allow the sealant
to cure for a few minutes.
Install the housing cover within 5 minutes af-
ter applying the sealant. If not installed the seal-
ant must be removed and another bead applied.
Fig. 1 Typical Housing Cover With Sealant
2 - 22 FRONT SUSPENSION AND AXLEJ
Page 61 of 1784
CAUTION: Never loosen the pinion gear nut to de-
crease the pinion gear bearing preload torque. If the
specified preload torque is exceeded, a new col-
lapsible spacer must be installed. The torque se-
quence will have to be repeated.
(4) Install a socket and inch-pound torque wrench
on the pinion nut.
(5) Rotate the shaft with the torque wrench and
note the torque.
Required preload torque is the amount re-
corded during removal plus an additional 0.56
Nzm (5 in. lbs.).
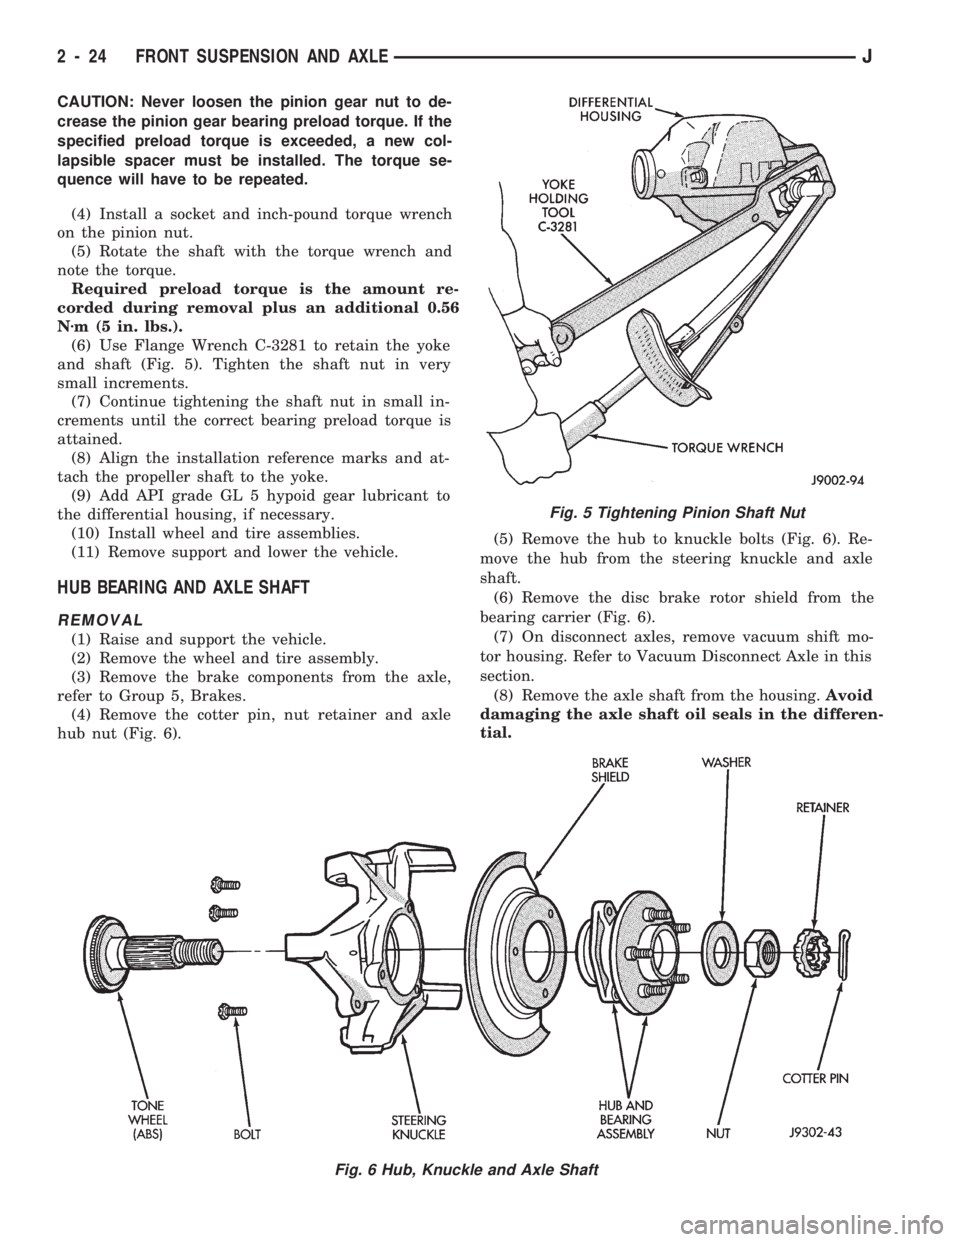
(6) Use Flange Wrench C-3281 to retain the yoke
and shaft (Fig. 5). Tighten the shaft nut in very
small increments.
(7) Continue tightening the shaft nut in small in-
crements until the correct bearing preload torque is
attained.
(8) Align the installation reference marks and at-
tach the propeller shaft to the yoke.
(9) Add API grade GL 5 hypoid gear lubricant to
the differential housing, if necessary.
(10) Install wheel and tire assemblies.
(11) Remove support and lower the vehicle.
HUB BEARING AND AXLE SHAFT
REMOVAL
(1) Raise and support the vehicle.
(2) Remove the wheel and tire assembly.
(3) Remove the brake components from the axle,
refer to Group 5, Brakes.
(4) Remove the cotter pin, nut retainer and axle
hub nut (Fig. 6).(5) Remove the hub to knuckle bolts (Fig. 6). Re-
move the hub from the steering knuckle and axle
shaft.
(6) Remove the disc brake rotor shield from the
bearing carrier (Fig. 6).
(7) On disconnect axles, remove vacuum shift mo-
tor housing. Refer to Vacuum Disconnect Axle in this
section.
(8) Remove the axle shaft from the housing.Avoid
damaging the axle shaft oil seals in the differen-
tial.
Fig. 5 Tightening Pinion Shaft Nut
Fig. 6 Hub, Knuckle and Axle Shaft
2 - 24 FRONT SUSPENSION AND AXLEJ
Page 62 of 1784
INSTALLATION
(1) Thoroughly clean the axle shaft (Fig. 6) and ap-
ply a thin film of Mopar Wheel Bearing Grease to
the shaft splines, seal contact surface, hub bore.
(2) Install the axle shaft into the housing and dif-
ferential side gears. Avoid damaging the axle shaft
oil seals in the differential.
(3) Install the hub bearing and brake dust shield
to the knuckle.
(4) Install the hub to knuckle bolts and tighten to
102 Nzm (75 ft. lbs.) torque.
(5) Install the hub washer and nut. Tighten the
hub nut to 237 Nzm (175 ft. lbs.) torque. Install the
nut retainer and a new cotter pin (Fig. 6).
(6) Install the brake components, refer to Group 5,
Brakes.
(7) Install the wheel and tire assembly.
(8) Remove support and lower the vehicle.
AXLE SHAFTÐ CARDAN U-JOINT
DISASSEMBLY
Single cardan U-joints are not serviceable. If defec-
tive, they must be replaced as a unit. If the bearings,
seals, spider or bearing caps are damaged or worn,
replace the complete U-joint.
CAUTION: Clamp only the forged portion of the
yoke in the vise. Also, to avoid distorting the yoke,
do not over tighten the vise jaws.
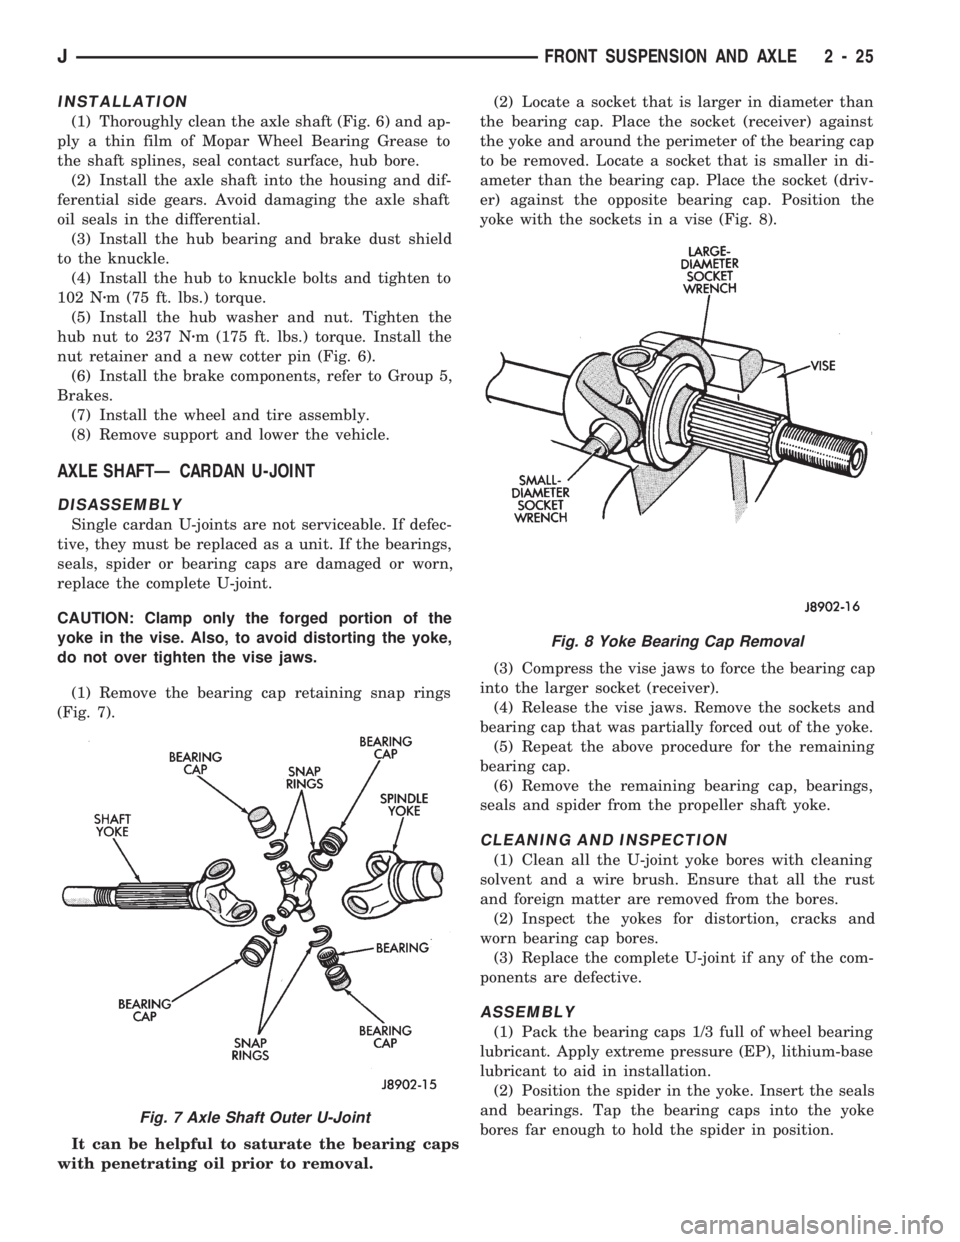
(1) Remove the bearing cap retaining snap rings
(Fig. 7).
It can be helpful to saturate the bearing caps
with penetrating oil prior to removal.(2) Locate a socket that is larger in diameter than
the bearing cap. Place the socket (receiver) against
the yoke and around the perimeter of the bearing cap
to be removed. Locate a socket that is smaller in di-
ameter than the bearing cap. Place the socket (driv-
er) against the opposite bearing cap. Position the
yoke with the sockets in a vise (Fig. 8).
(3) Compress the vise jaws to force the bearing cap
into the larger socket (receiver).
(4) Release the vise jaws. Remove the sockets and
bearing cap that was partially forced out of the yoke.
(5) Repeat the above procedure for the remaining
bearing cap.
(6) Remove the remaining bearing cap, bearings,
seals and spider from the propeller shaft yoke.
CLEANING AND INSPECTION
(1) Clean all the U-joint yoke bores with cleaning
solvent and a wire brush. Ensure that all the rust
and foreign matter are removed from the bores.
(2) Inspect the yokes for distortion, cracks and
worn bearing cap bores.
(3) Replace the complete U-joint if any of the com-
ponents are defective.
ASSEMBLY
(1) Pack the bearing caps 1/3 full of wheel bearing
lubricant. Apply extreme pressure (EP), lithium-base
lubricant to aid in installation.
(2) Position the spider in the yoke. Insert the seals
and bearings. Tap the bearing caps into the yoke
bores far enough to hold the spider in position.
Fig. 7 Axle Shaft Outer U-Joint
Fig. 8 Yoke Bearing Cap Removal
JFRONT SUSPENSION AND AXLE 2 - 25
Page 66 of 1784
SHIFT MOTOR Ð REMOVAL/DISASSEMBLY
(1) Disconnect the vacuum and wiring connector
from the shift housing.
(2) Remove indicator switch.
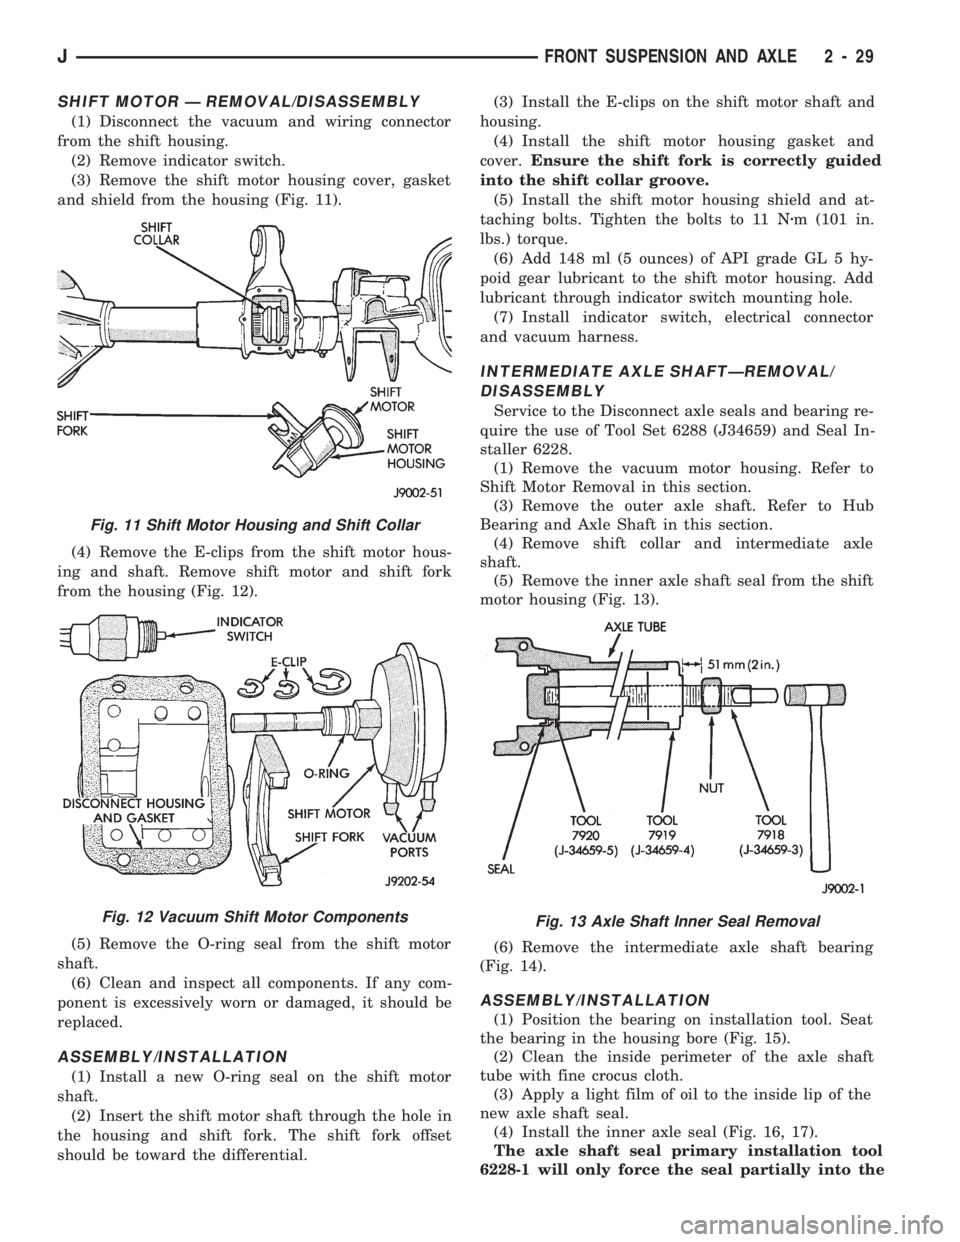
(3) Remove the shift motor housing cover, gasket
and shield from the housing (Fig. 11).
(4) Remove the E-clips from the shift motor hous-
ing and shaft. Remove shift motor and shift fork
from the housing (Fig. 12).
(5) Remove the O-ring seal from the shift motor
shaft.
(6) Clean and inspect all components. If any com-
ponent is excessively worn or damaged, it should be
replaced.
ASSEMBLY/INSTALLATION
(1) Install a new O-ring seal on the shift motor
shaft.
(2) Insert the shift motor shaft through the hole in
the housing and shift fork. The shift fork offset
should be toward the differential.(3) Install the E-clips on the shift motor shaft and
housing.
(4) Install the shift motor housing gasket and
cover.Ensure the shift fork is correctly guided
into the shift collar groove.
(5) Install the shift motor housing shield and at-
taching bolts. Tighten the bolts to 11 Nzm (101 in.
lbs.) torque.
(6) Add 148 ml (5 ounces) of API grade GL 5 hy-
poid gear lubricant to the shift motor housing. Add
lubricant through indicator switch mounting hole.
(7) Install indicator switch, electrical connector
and vacuum harness.
INTERMEDIATE AXLE SHAFTÐREMOVAL/
DISASSEMBLY
Service to the Disconnect axle seals and bearing re-
quire the use of Tool Set 6288 (J34659) and Seal In-
staller 6228.
(1) Remove the vacuum motor housing. Refer to
Shift Motor Removal in this section.
(3) Remove the outer axle shaft. Refer to Hub
Bearing and Axle Shaft in this section.
(4) Remove shift collar and intermediate axle
shaft.
(5) Remove the inner axle shaft seal from the shift
motor housing (Fig. 13).
(6) Remove the intermediate axle shaft bearing
(Fig. 14).
ASSEMBLY/INSTALLATION
(1) Position the bearing on installation tool. Seat
the bearing in the housing bore (Fig. 15).
(2) Clean the inside perimeter of the axle shaft
tube with fine crocus cloth.
(3) Apply a light film of oil to the inside lip of the
new axle shaft seal.
(4) Install the inner axle seal (Fig. 16, 17).
The axle shaft seal primary installation tool
6228-1 will only force the seal partially into the
Fig. 11 Shift Motor Housing and Shift Collar
Fig. 12 Vacuum Shift Motor ComponentsFig. 13 Axle Shaft Inner Seal Removal
JFRONT SUSPENSION AND AXLE 2 - 29
Page 70 of 1784
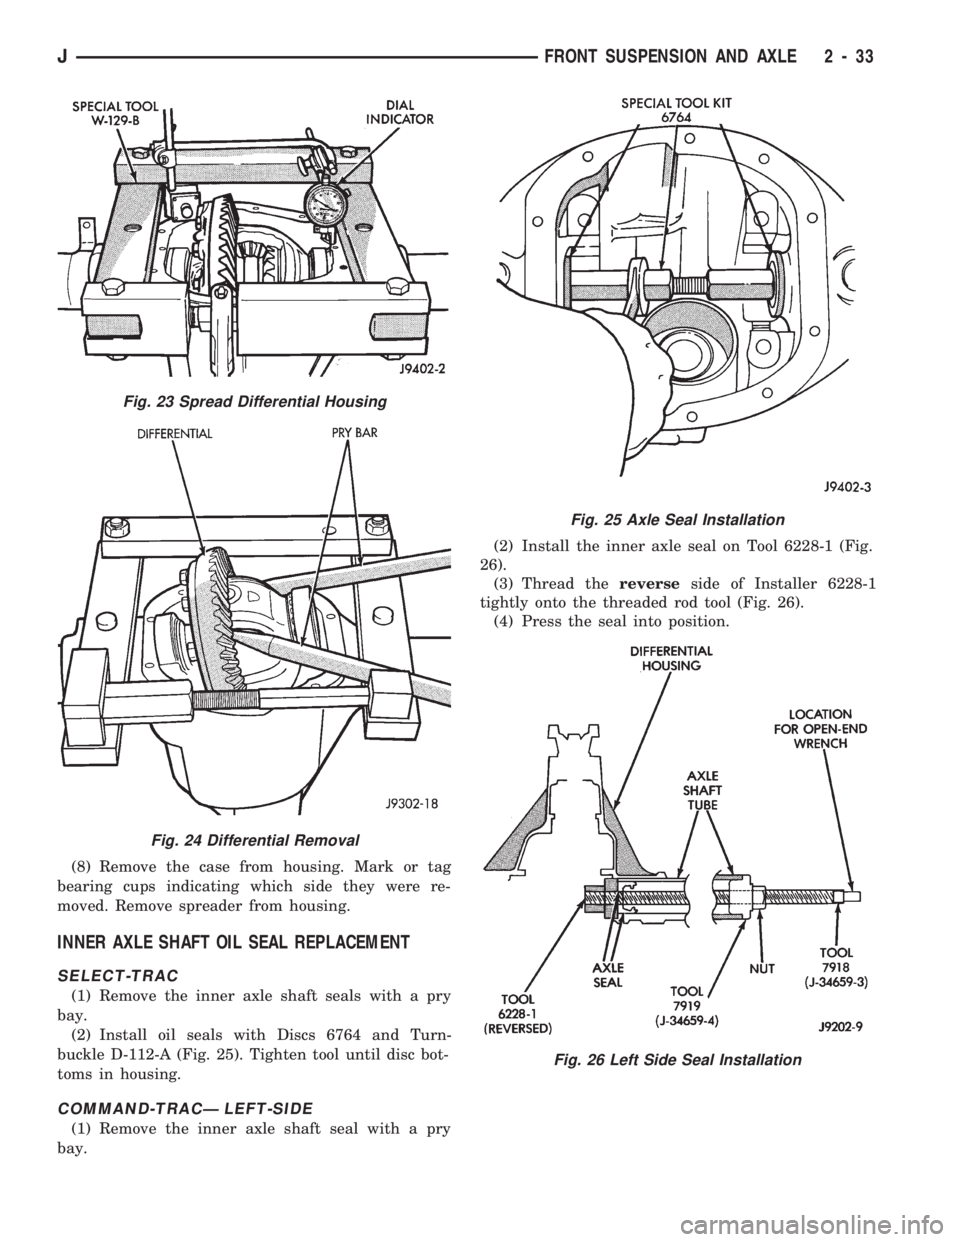
(8) Remove the case from housing. Mark or tag
bearing cups indicating which side they were re-
moved. Remove spreader from housing.
INNER AXLE SHAFT OIL SEAL REPLACEMENT
SELECT-TRAC
(1) Remove the inner axle shaft seals with a pry
bay.
(2) Install oil seals with Discs 6764 and Turn-
buckle D-112-A (Fig. 25). Tighten tool until disc bot-
toms in housing.
COMMAND-TRACÐ LEFT-SIDE
(1) Remove the inner axle shaft seal with a pry
bay.(2) Install the inner axle seal on Tool 6228-1 (Fig.
26).
(3) Thread thereverseside of Installer 6228-1
tightly onto the threaded rod tool (Fig. 26).
(4) Press the seal into position.
Fig. 23 Spread Differential Housing
Fig. 24 Differential Removal
Fig. 25 Axle Seal Installation
Fig. 26 Left Side Seal Installation
JFRONT SUSPENSION AND AXLE 2 - 33
Page 72 of 1784
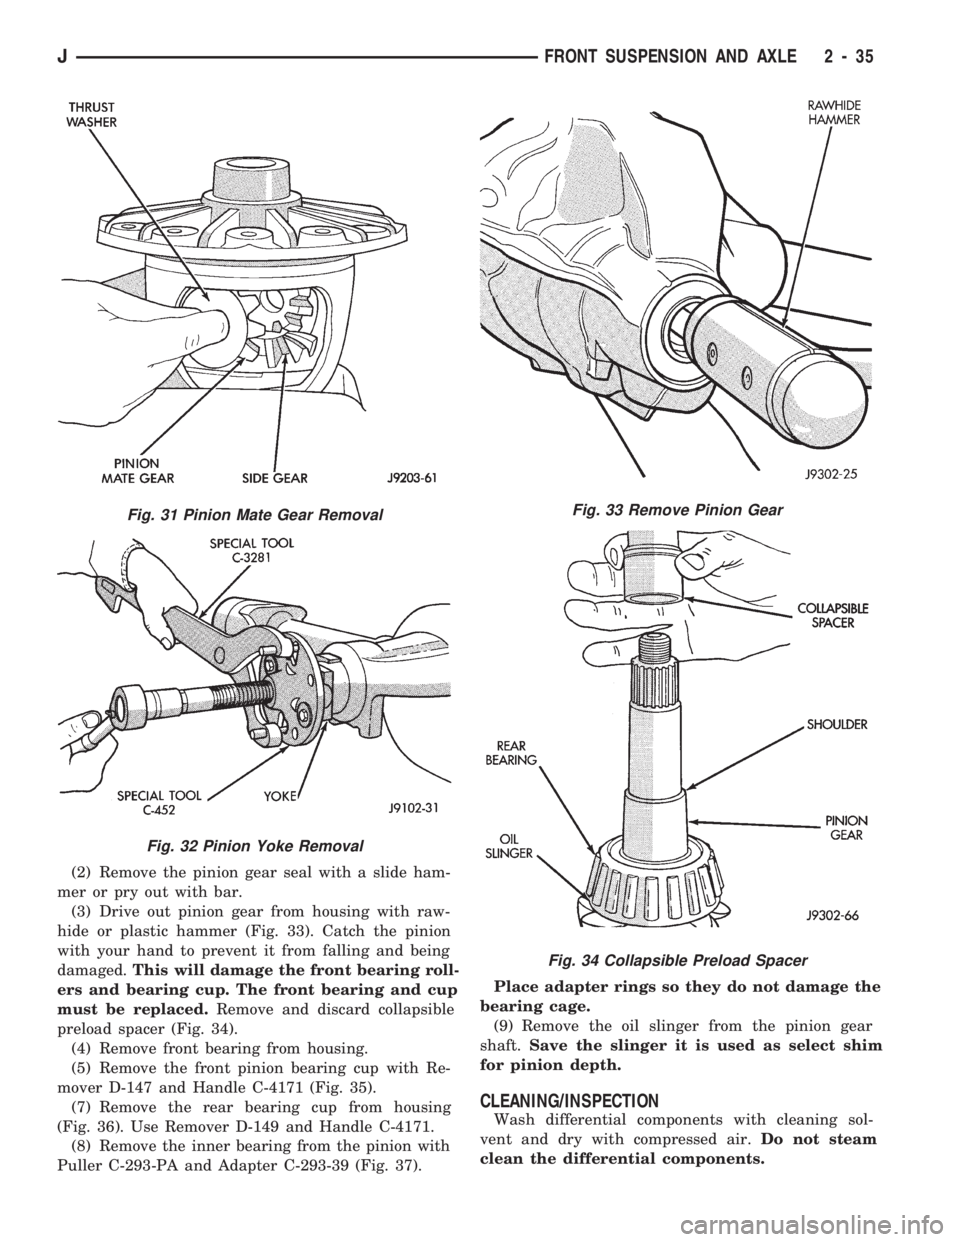
(2) Remove the pinion gear seal with a slide ham-
mer or pry out with bar.
(3) Drive out pinion gear from housing with raw-
hide or plastic hammer (Fig. 33). Catch the pinion
with your hand to prevent it from falling and being
damaged.This will damage the front bearing roll-
ers and bearing cup. The front bearing and cup
must be replaced.Remove and discard collapsible
preload spacer (Fig. 34).
(4) Remove front bearing from housing.
(5) Remove the front pinion bearing cup with Re-
mover D-147 and Handle C-4171 (Fig. 35).
(7) Remove the rear bearing cup from housing
(Fig. 36). Use Remover D-149 and Handle C-4171.
(8) Remove the inner bearing from the pinion with
Puller C-293-PA and Adapter C-293-39 (Fig. 37).Place adapter rings so they do not damage the
bearing cage.
(9) Remove the oil slinger from the pinion gear
shaft.Save the slinger it is used as select shim
for pinion depth.
CLEANING/INSPECTION
Wash differential components with cleaning sol-
vent and dry with compressed air.Do not steam
clean the differential components.
Fig. 31 Pinion Mate Gear Removal
Fig. 32 Pinion Yoke Removal
Fig. 33 Remove Pinion Gear
Fig. 34 Collapsible Preload Spacer
JFRONT SUSPENSION AND AXLE 2 - 35
Page 74 of 1784
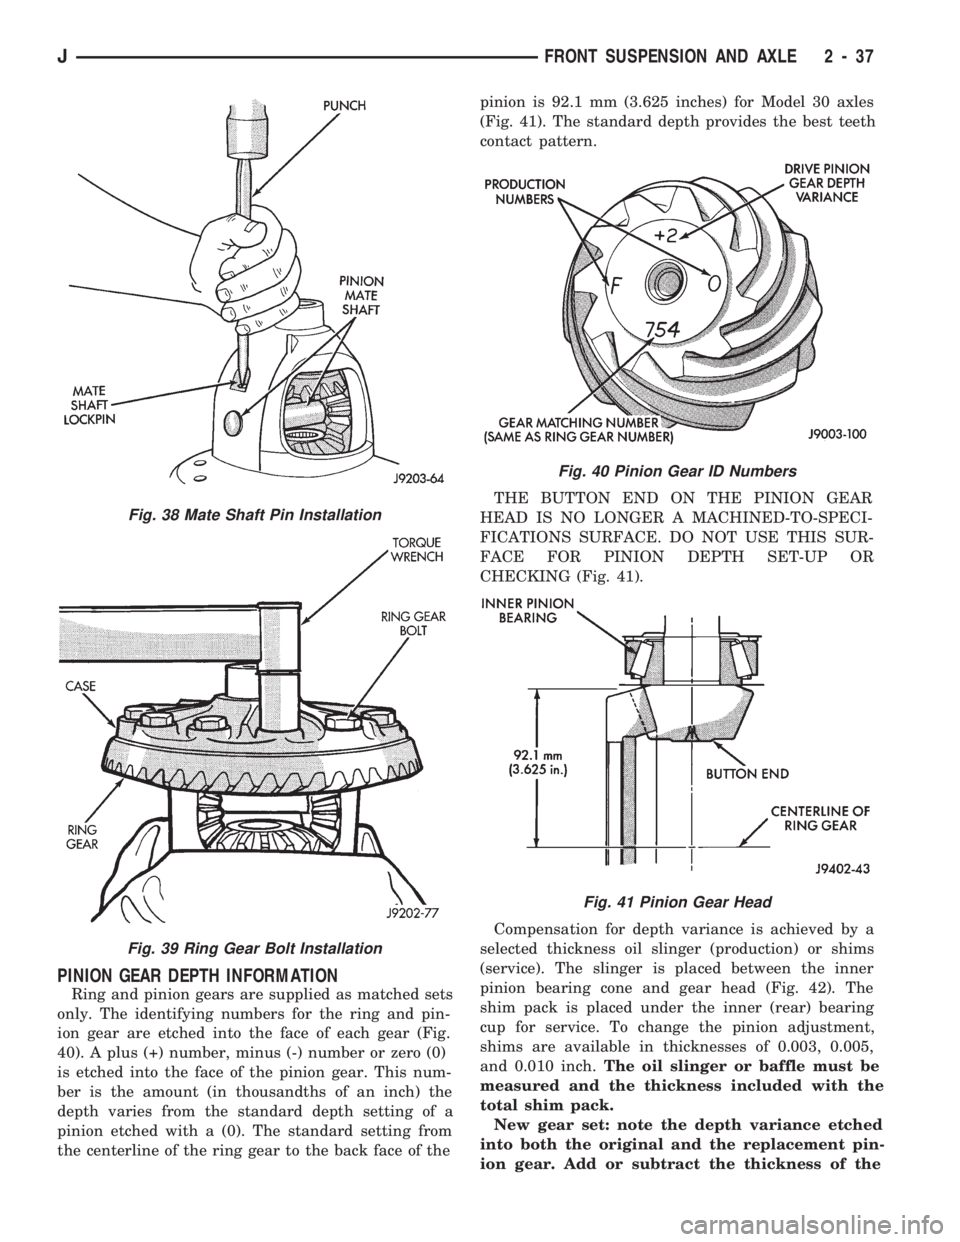
PINION GEAR DEPTH INFORMATION
Ring and pinion gears are supplied as matched sets
only. The identifying numbers for the ring and pin-
ion gear are etched into the face of each gear (Fig.
40). A plus (+) number, minus (-) number or zero (0)
is etched into the face of the pinion gear. This num-
ber is the amount (in thousandths of an inch) the
depth varies from the standard depth setting of a
pinion etched with a (0). The standard setting from
the centerline of the ring gear to the back face of thepinion is 92.1 mm (3.625 inches) for Model 30 axles
(Fig. 41). The standard depth provides the best teeth
contact pattern.
THE BUTTON END ON THE PINION GEAR
HEAD IS NO LONGER A MACHINED-TO-SPECI-
FICATIONS SURFACE. DO NOT USE THIS SUR-
FACE FOR PINION DEPTH SET-UP OR
CHECKING (Fig. 41).
Compensation for depth variance is achieved by a
selected thickness oil slinger (production) or shims
(service). The slinger is placed between the inner
pinion bearing cone and gear head (Fig. 42). The
shim pack is placed under the inner (rear) bearing
cup for service. To change the pinion adjustment,
shims are available in thicknesses of 0.003, 0.005,
and 0.010 inch.The oil slinger or baffle must be
measured and the thickness included with the
total shim pack.
New gear set: note the depth variance etched
into both the original and the replacement pin-
ion gear. Add or subtract the thickness of the
Fig. 38 Mate Shaft Pin Installation
Fig. 39 Ring Gear Bolt Installation
Fig. 40 Pinion Gear ID Numbers
Fig. 41 Pinion Gear Head
JFRONT SUSPENSION AND AXLE 2 - 37
Page 77 of 1784
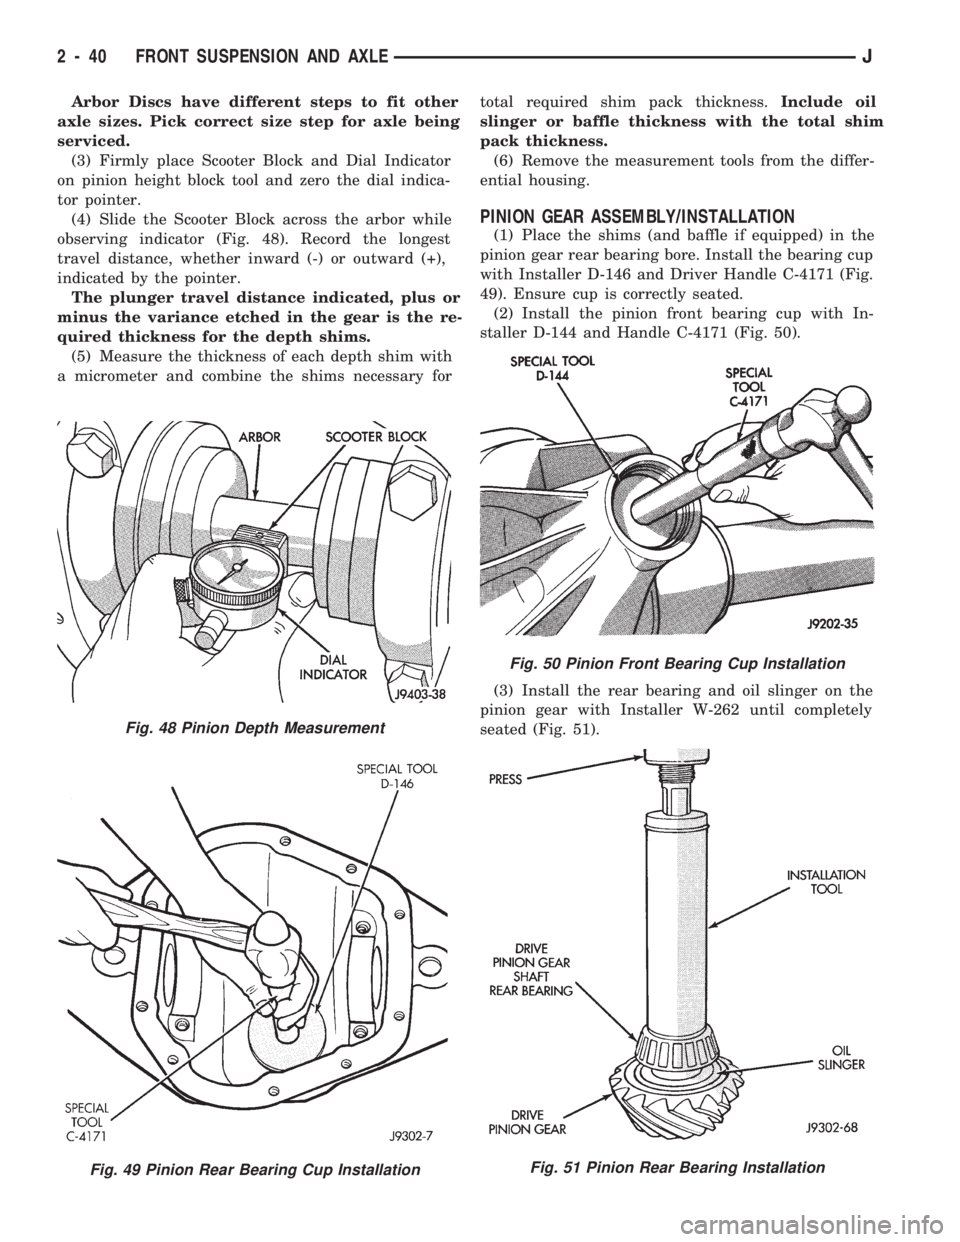
Arbor Discs have different steps to fit other
axle sizes. Pick correct size step for axle being
serviced.
(3) Firmly place Scooter Block and Dial Indicator
on pinion height block tool and zero the dial indica-
tor pointer.
(4) Slide the Scooter Block across the arbor while
observing indicator (Fig. 48). Record the longest
travel distance, whether inward (-) or outward (+),
indicated by the pointer.
The plunger travel distance indicated, plus or
minus the variance etched in the gear is the re-
quired thickness for the depth shims.
(5) Measure the thickness of each depth shim with
a micrometer and combine the shims necessary fortotal required shim pack thickness.Include oil
slinger or baffle thickness with the total shim
pack thickness.
(6) Remove the measurement tools from the differ-
ential housing.
PINION GEAR ASSEMBLY/INSTALLATION
(1) Place the shims (and baffle if equipped) in the
pinion gear rear bearing bore. Install the bearing cup
with Installer D-146 and Driver Handle C-4171 (Fig.
49). Ensure cup is correctly seated.
(2) Install the pinion front bearing cup with In-
staller D-144 and Handle C-4171 (Fig. 50).
(3) Install the rear bearing and oil slinger on the
pinion gear with Installer W-262 until completely
seated (Fig. 51).
Fig. 48 Pinion Depth Measurement
Fig. 49 Pinion Rear Bearing Cup Installation
Fig. 50 Pinion Front Bearing Cup Installation
Fig. 51 Pinion Rear Bearing Installation
2 - 40 FRONT SUSPENSION AND AXLEJ