Page 1302 of 1413
Stereo Sound
Power Antenna
System
Motor Replacement
1.Remove tho quart€r trim panel (Hatchback) or trunk
side trim panel (Sedan).
Disconnect the 3-P connector and antenna lead trom
the motor, then remove the antenna nut and motor
bracket nut.
AI{TENNA 1{UT2.3 l{.mAT{TEI{]{A I{UTWBEI{CHoTJAA-OOlo(xrc
3+CO ECTOR
DRAI HOSE
MOTORBRACKETTUT
3.Remove the motor and antenna as an assemblv.
NOTE: Tighten the antenna nut, then tighten tha
motor bracket nut.
23-196
Page 1317 of 1413
Moonroof
Gomponent Location lndex
a All SRS oloctrical wiring harnesses aro covared withyellow insulation,
a Eoforo disconnocting any part of tho SRS wire har-neaa, connoct th6 shon connector(sl.a Roplace th6 entire 8ff6cted SRS harness assombly ifit has an open circuit or damaged widng.
MOO BOOF SWTTCHRemov8l, page 23-214Test, page 23-215
SRS MAIN HARI{ESS{Covered with yellow insulation)
MOO ROOF MOTORTest, pag€ 23-215Replacoment, section 20
23-211
Page 1319 of 1413
Electrical Troubleshooting
NOTE: The numbers in the table show the troubleshooting sequence.
It€m to be insoected
Symptom
es(!OE E:
FE3b9 o
.o6
;g:
oiSE
bE*
5:3
?t;:-=iE d
o66
-9-.9:t<
'r3
<-co9
F6
zac93t9cdl=
o
3E;o-
<€
3tr\fi
z)
t5
€t
3l.', l
>l
ct
go
o
oo
oo
oo
oo
oo
oo
.9
E-
3E
.::
a-g
o6
Moonroof does not move,
but motor tums.
Moonroof
does notmove andmotor doesnot tum
lmoonrootcan bemoved withmoonroof
wrenchl.
In all switchpositions1a45G201
G401WHT, GRN/BLK,GRN,BLK
With OPENswitchI2GRN/REO
with closEswitchI2GRN/YEL
23-213
Page 1320 of 1413

Moonroof
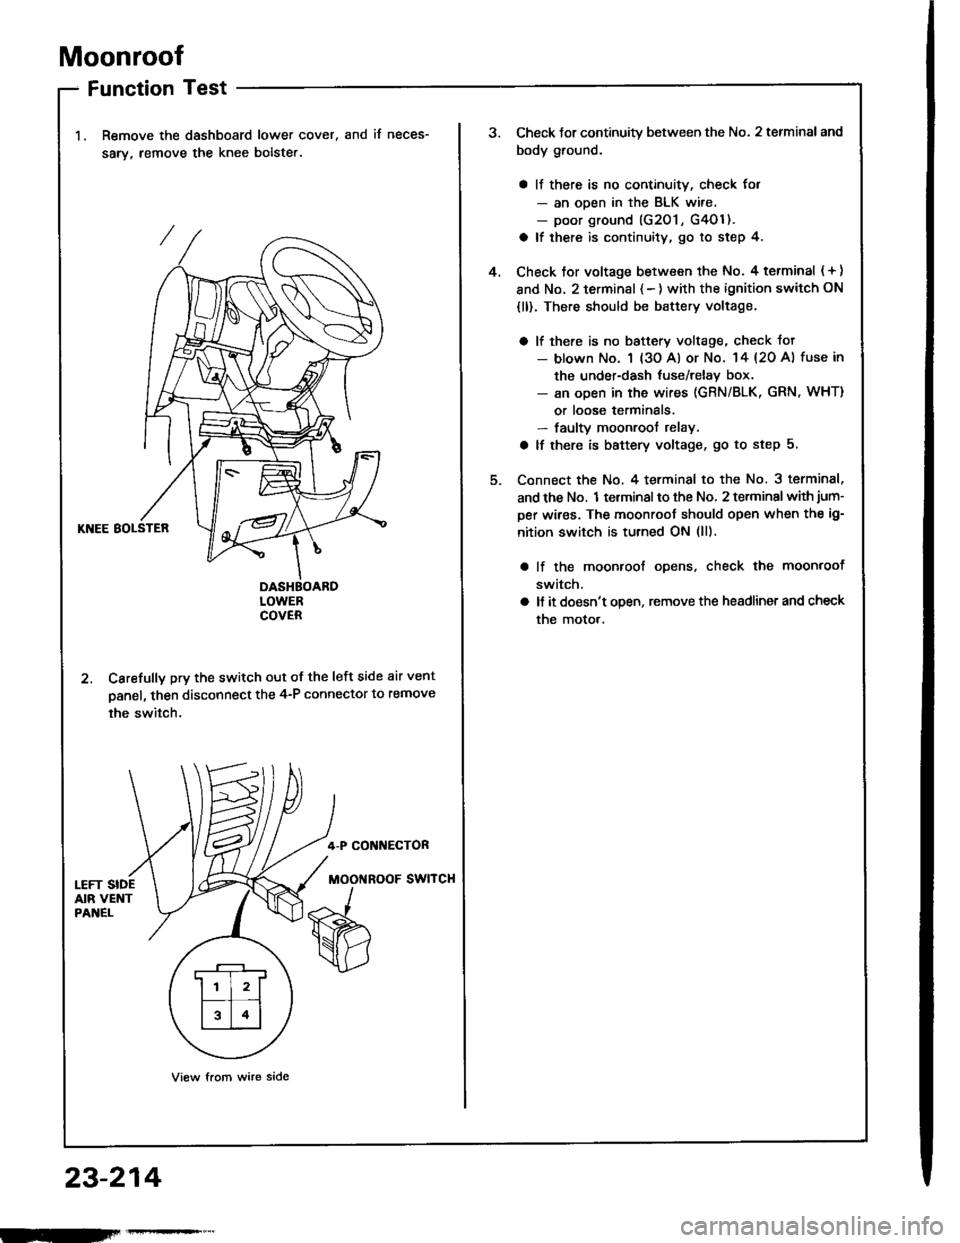
Function Test
Remove the dashboard lower cover,
sarv, remove the knee bolste..
and if neces-
KNEE BOLSTER
DASHBOARDLOWERCOVER
2. Carefully pry the switch out of the left side air vent
panel, then disconnect the 4-P connector to remove
the switch.
4-P CONI{ECTOR
MOOi{ROOF SWITCH
View from wire side
.r--r
ll l2lf--T� --t
l314l
23-214
Check Jor continuity between the No. 2 terminal and
body ground.
a ll there is no continuity, check for- an ooen in the BLK wire.- poor ground (G201 , G4Ol ).
a lf there is continuity, go to step 4.
Check tor voltage between the No. 4 terminal ( + )
and No. 2 terminsl { - ) with the ignition switch ON
{ll). There should be battery voltage.
a lf there is no baftery voltage, check tot- blown No. 1 (3o Al or No. 14 {20 A) fuse in
the under-dash tuse/relay box.- an open in the wires (GRN/BLK, GRN, WHT)
or loose terminals.- faulty moonroof relay.
a lf there is battery voltage, go to step 5.
Connect the No. 4 terminal to the No. 3 terminal,
and the No. 1 terminal to the No, 2 terminal with jum-
per wires. The moonroot should open when the ig-
nition switch is turned ON (ll).
lf the moonroof ooens, check the moonroof
switch,
ll it doesn't open, remove the headlinet and check
the motor.
4.
Page 1321 of 1413
Switch Test
1, Remove the dashboard lower cover.
2. Carefully pry the switch out of the left side air vent
Danel, then disconnect the 4-P connector and re-
move the switch.
3. Check lor continuity between the terminals in each
switch position sccording to the table,
MOONROOF SWITCH
Motor Test
Remove the headliner (see section 20).
Disconnect the 2-P connector from the moonroot
moror.
Check the motor by connecting power and ground
according to the table.
NOTE: Motor clutch test is in section 20.
lHatchblckl (Scd!n)
View from terminal side
It the motor fails to run or doesn't run smoothly.
replace it.
4.
Torminal
P"ri i-
---__\AID
OFFG---o
OP€No---oG-
CLOSE
o---o
Te.minal
Condition -- ---------lAB
OPENo
CLOSE@
,l
rd\./ cLos€
Y
IOPEiIIOFF
23-215
Page 1328 of 1413
Power Windows
Component LocationIndex
POWER WINDOW RELAYTest, page 23-68UI{DER-DASHFUSE/RELAY BOX
FOWER WINDOWMASTER SWITCH{Has built-in control unitlfnput Test, page 23-226, 228Tost, page 23-229, 23ORopfacement, page 23-231
FRONT PASSEI{GER'S WII{DOW SWITCHTest, page 23-230Repf acement. page 23- 231
FRONT PASSENGER'S WII{DOW MOTORfosr, page 23-232
RIGHT REAR Wll{DOW SWITCH (Sodrn}
Tost, page 23-230Replacement, page 23-231
RIGHT REAR WII{DOW
MOTOR (Sod.nl
Test, page 23-232
DBIVER'S WINDOW MOTORTest, page 23-232
LEFT REAR WINDOW MOTOB {S6dan)Test. page 23-232
LEFT REAR Wlt{DOW SWITCH lsodanlTest, page 23-230Repfacement, page 23-231
23-222
Page 1329 of 1413
UNOER-HOOO FUSE/RELAY 8OX
Circuit Diagram (Sedanl
G20rG401
UNDER_ DASH FUSE/RELAY BOX
LEFT REARWINDOWMOTORRIGHT REAN WINOOWMOTORFROI{T PASSENGER'SwrNoow i,roToRG501G502
DRiVER'S WINOOW MOTOR
23-223
Page 1333 of 1413

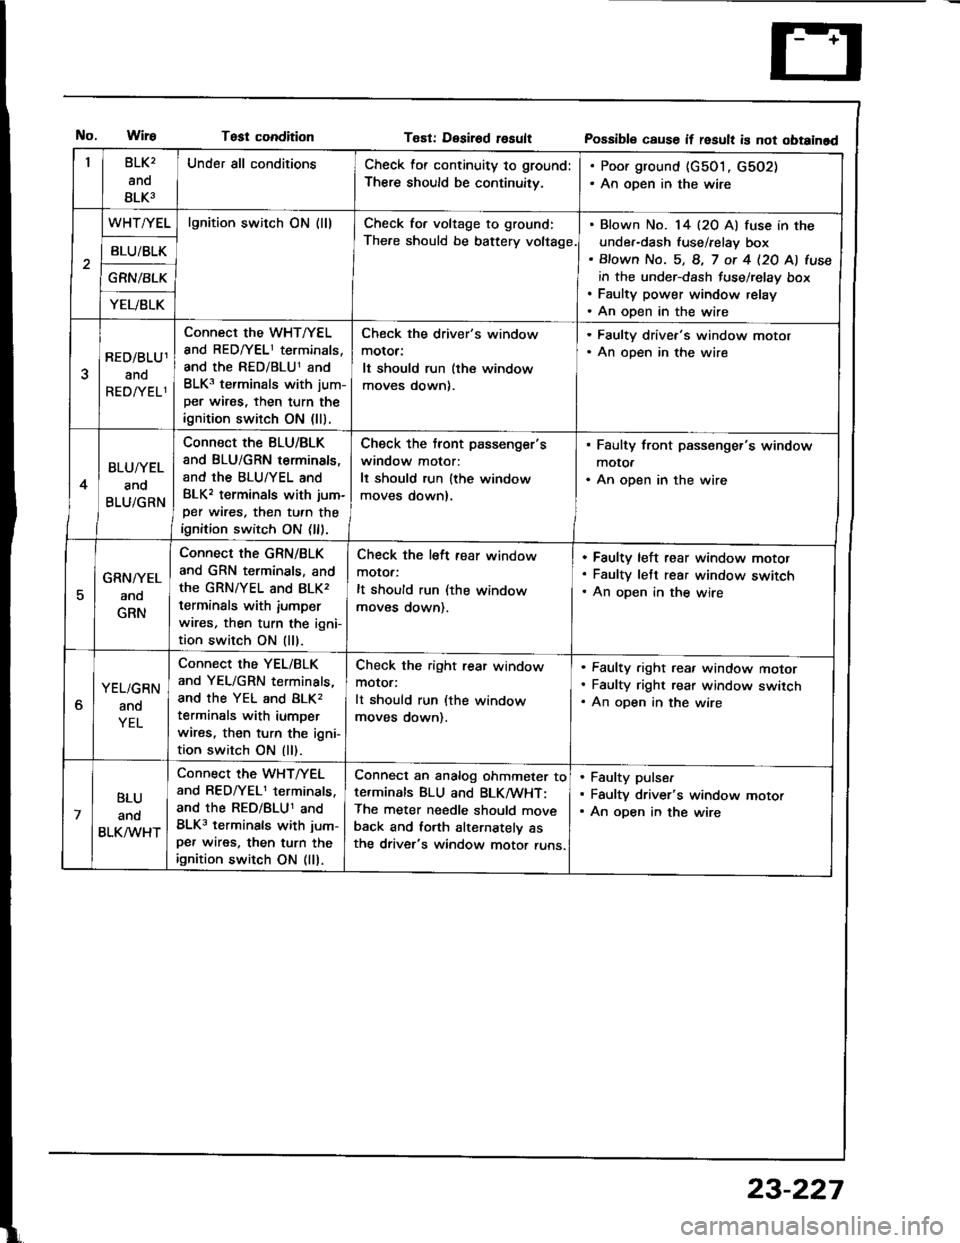
Test conditionT€st: Desirod rosultPossibl€ cause if result is not obtainad
BLK2
ano
BLK3
Under all conditionsCheck for continuity to ground:
There should be continuitv,
. Poor ground {c501, G502). An open in the wire
WHT/YELlgnition switch ON (lllCheck for voltage to ground:
The.e should be battery voltage.
Blown No. 14 (20 Al fuse in the
under-dash fuse/relay box
Bfown No. 5, 8, 7 ot 4 l2O Al fuse
in the under-dash fuse/relay box
Faulty power window relay
An open in the wire
BLU/BLK
GRN/BLK
YEL/BLK
RED/BLU1
ano
REDATELl
Connect the WHT/YEL
and RED/YEL1 terminals,
and the RED/BLU1 and
BLK3 terminals with jum-
per wires, then turn the
ignition switch ON (lll.
Check the driver's window
motor:
It should run (the window
moves down).
. Faulty drivea's window motor. An open in the wire
4
BLU/YEL
and
BLU/GRN
Connect the BLU/BLK
and BLU/GRN terminals,
and the BLU/YEL and
BLK, terminals with jum-
per wires, then turn the
ignition switch ON (ll).
Check the tront passenger's
window motor:
It should run {the window
moves down).
. Faulty front passenger's window
motOa. An open in the wire
5
GRN/YEL
ano
GRN
Connect the GRN/BLK
and GRN terminals, and
the GRN/YEL and 8LK,
terminals with iumperwires, then turn the igni-
tion switch ON (ll).
Check the left fear window
motor:
It should run (the window
moves down).
Faulty left rear window motof
Faulty lett rear window switch
An oDen in the wire
6
YEL/GRN
and
YEL
Connect the YEL/BLK
and YEL/GRN terminals,
and the YEL and BLK,
terminals with iumper
wires, then turn the igni-
tion switch ON (ll).
Check the right rear window
motor:
It should run (the window
moves down).
Faulty .ight rea. window motor
Faulty right rear window switch
An open in the wire
7
BLU
ano
BLK/VVHT
Connect the WHT/YEL
and RED/YEL1 terminals.
and the REo/BLU1 and
BLK3 terminals with jum-
per wires. then turn theignition switch ON (ll).
Conned an analog ohmmeter tote.minals BLU and BLK/wHT:
The meter needle should move
back and lorth alternatelv asthe driver's window motor runs.
Faulty pulser
Faulty driver's window motor
An open in the wire
23-227