Page 623 of 1413

Troubleshooting
Fluid Leaks
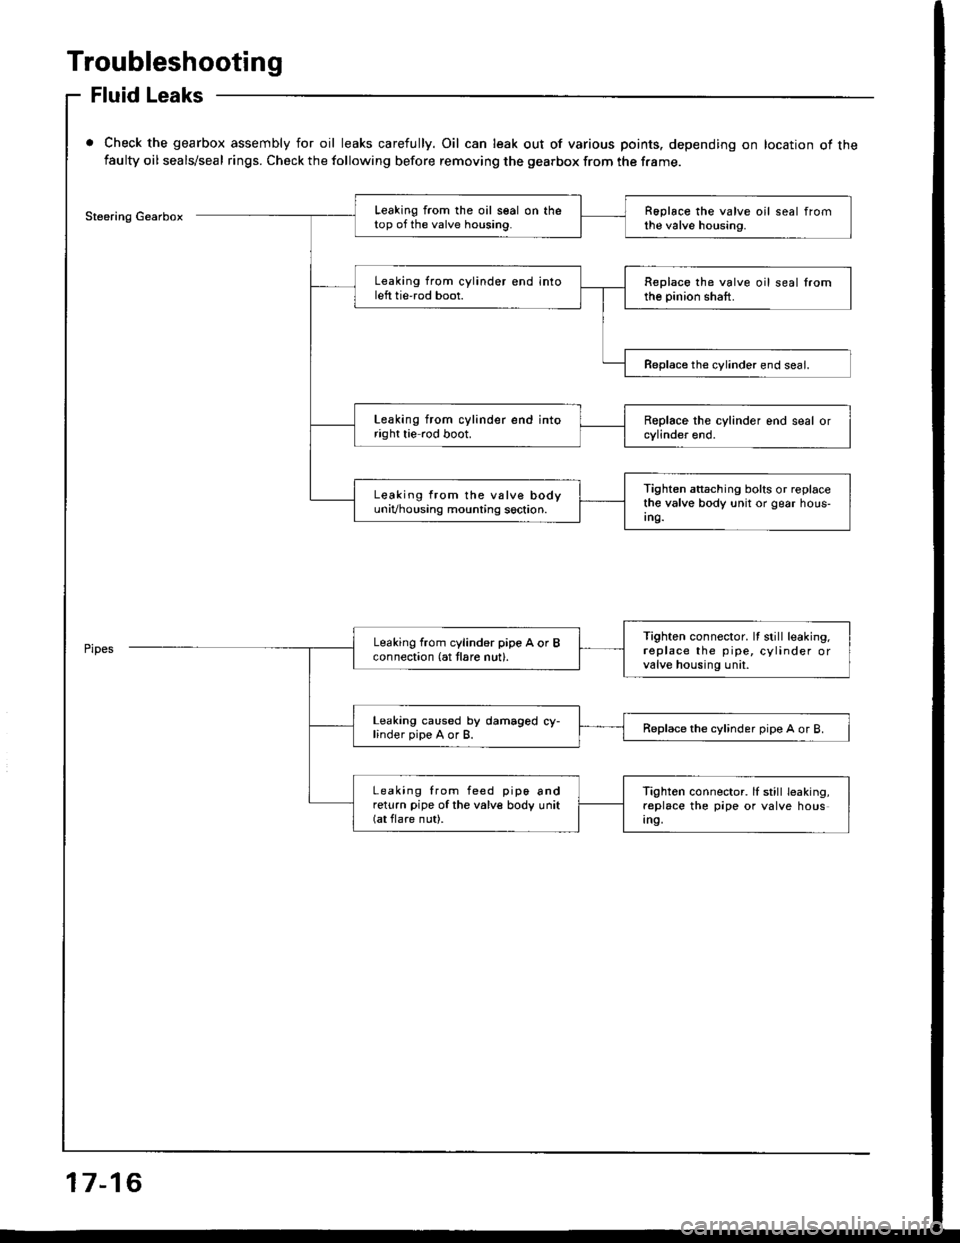
Check the gearbox assembly for oil leaks carefully. Oil can leak out of various points. depending on location of thefaulty oil seals/seal rings. Check the following before removing the gearbox from the frame.
Steering GearboxLeaking from the oil seal on thetop of the valve housing.Roplace the valve oil seal fromthe valve housing.
Leaking from cylinder end intoleft tie'rod boot.Replace the valve oil seal lromthe pinion shaft.
Reolace the cvlinder end seal.
Leaking from cylinder end intoright tie rod boot.
Tighten attaching bolts or replacethe valve body unit or gear hous-Ing.
Leaking from the vslve bodyuniVhousing mounting soction.
Tighten connector. It still leaking.replace the pipe, cylinder orvalve housing unil.
Leaking from cylind6r pipe A or Bconnection (at tlare nut).
Leaking caused by damaged cy-linder pipe A or B.Replace the cylinder pipe A or B.
Leaking from feed pip6 andreturn pipe of the valve body unit(at flare nut).
Tighten connector. lI still leaking,replace the pipe or valve housIn9,
17-16
Page 629 of 1413

lnspection and Adjustment
Pump Pressure Check
Check the fluid pressure as follows to determine
whether the trouble is in the pump or gearbox.
NOTE: First check the power steering fluid level and
pump belt tension,
CAUnON: Dilconn€st the high pros3uro ho3s with cale
!o e3 not to spill tho powor stooring fluid on th6 lramo
lnd olhor parG.
1. Disconnect the outlet hose from the oumo outlet fit-
ting, 8nd install the pump joint adapter on the
pump outlet.
2, Connect the hose joint sdapter to the power steer-
ing pressure gauge, then connect the outlet hose to
the adaotor.
3. Instsll the power steering pressure gauge to the
pump joint adaptor as shown.
OUTLET HOSE FlTnNG
HOSE ATTACHING BOLT1l Nm11.1 kg{ m 8lbf.ftl
6 x 1.0 m.n BOLT{P!rt of tooll11 N.m11.1 kgtm,8lbf.ftl
P/S JOINT ADAPTOR IPUMPIo?NAK - SmolrA
PUMP OUTI.TTFITIING
Open the shut-off valve fully.
Open the pressure control valve fully.
17 -22
1.
Start the engine and let it idle.
Turn the stee.ing wheel from lock-to-lock several
times to warm the fluid to operating temperature.
Measure steady-state fluid pressure while idling
with the shut-off valve fully open. lf the pump is in
good condition, the gauge should read less than
1500 kpa (15 kgf/cm,,213 psi).
lf it reads high, check the feed line or valve body
unit (see General Troubleshooting l7-10).
Close the shut-off valve. then close the pressure
control valve gradually until the pressure gauge
needle is stabl6, Read the pressure.
lmmediately open the shut-off valve fully.
CAUTION: Do not keep the shut-ott valvs closod
moro thgn 5 soconds or th9 pump could b6 dam"
agod by over-h6ating,
lf the pump is in good condition, the gauge should
read at least 6.400 - 7,400 kpa (65 - 75 kgIlcm,,924- 1,067 psi). A low reading means pump output is
too low for full assist. Repair or replace the pump.
10.
P/S PRESSURE GAUGE
Page 630 of 1413
Fluid Leakage Inspection
BOOTCheck lor leaks.
GEARBOX rnd VALVE BODY UNITCheck for leaks at the mating surfaceand rlare nut connections.
PUMP ASSEMBLYCh€ck for leaks at the pumpseal, inlet and outlet fiftings.
Inspect hoses for d6mage, leaks,interference or tlvisting,Inspect fluid lines for damage,rusting or leakage.Inspect for leaks at hose andline ioints or connections,
17-23
Page 643 of 1413

Power Steering Pump
Disassembly (cont'dl
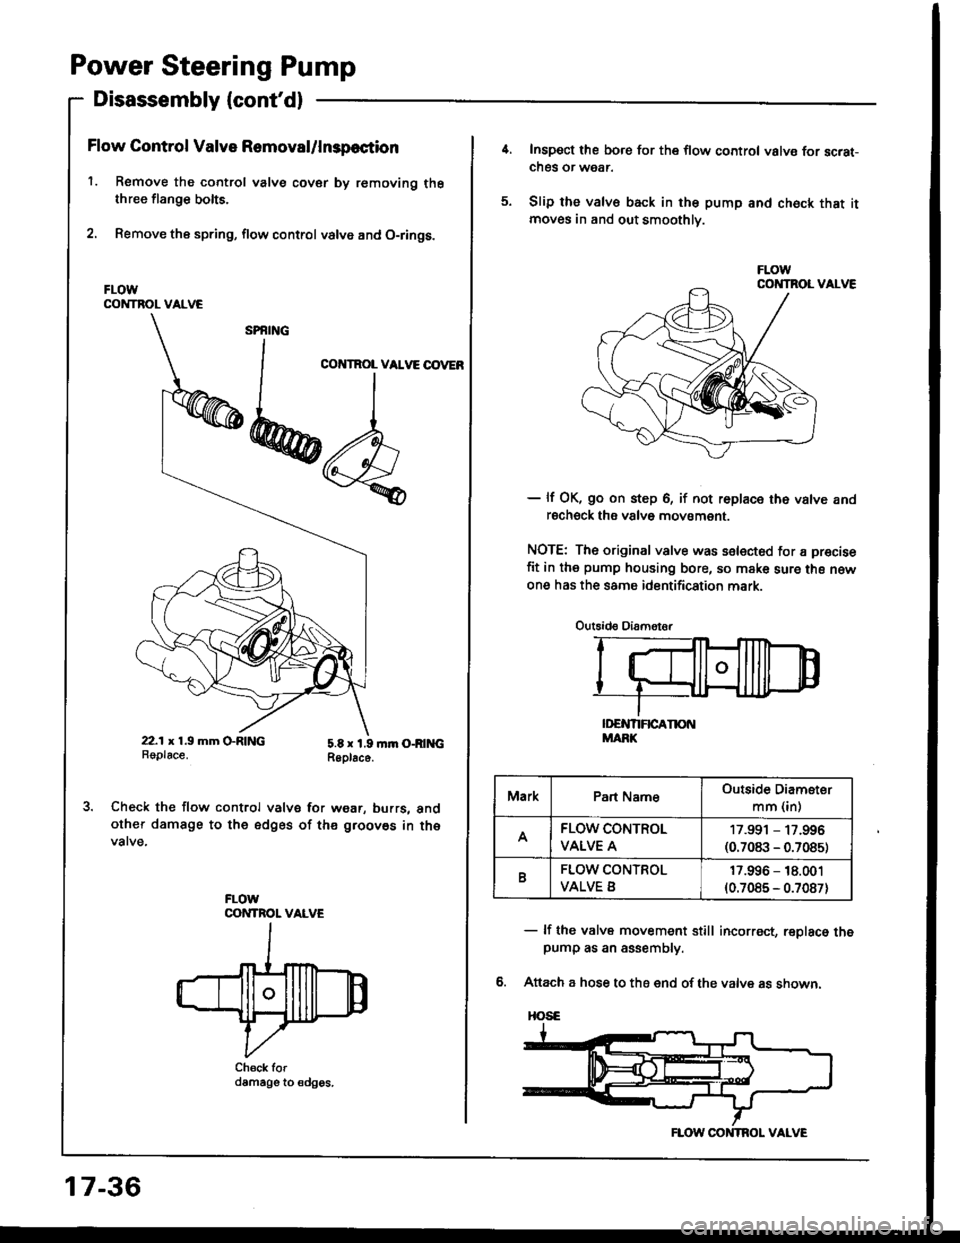
Flow Gontrol Valve Removal/lnspoction
l. Rsmove the control valve cov€r by romoving thethree flange bolts.
2. Remove the spring, flow control valve and O-rings.
FLOWCONTROL VALVE
Check the flow control valvg for wgar, burrs, andother damage to the edges of th€ groovos in tho
FLOWOONTROL VALVE
Ch6ck fordamags to €dgos.
17-36
il. Inspect the bore for the flow control valvs for scrat-ches or wear.
5. Slip the valve back in the pump and chock that itmoves in and out smoothly.
- lf OK, go on step 6, if not replace th6 valve androchsck the valve movsment.
NOTE: The original valve was selected for a precise
fit in the pump housing bore, so make sure ths n€w
on6 has the same identification mark.
Outsid€ Oiam€ter
- lf the valve movement still incorr€ct, replaco thepump as an assembly.
6. Attach a hose to the end of the valve as shown.
HOSE
MarkPart NameOutside Diameter
mm (in)
AFLOW CONTROL
VALVE A
17.991 - 17.996(0.7083 - 0.7085)
FLOW CONTROL
VALVE B
17.996 - 18.001
{0.7085 - 0.7087}
FLOW CONTROL VALVE
Page 644 of 1413

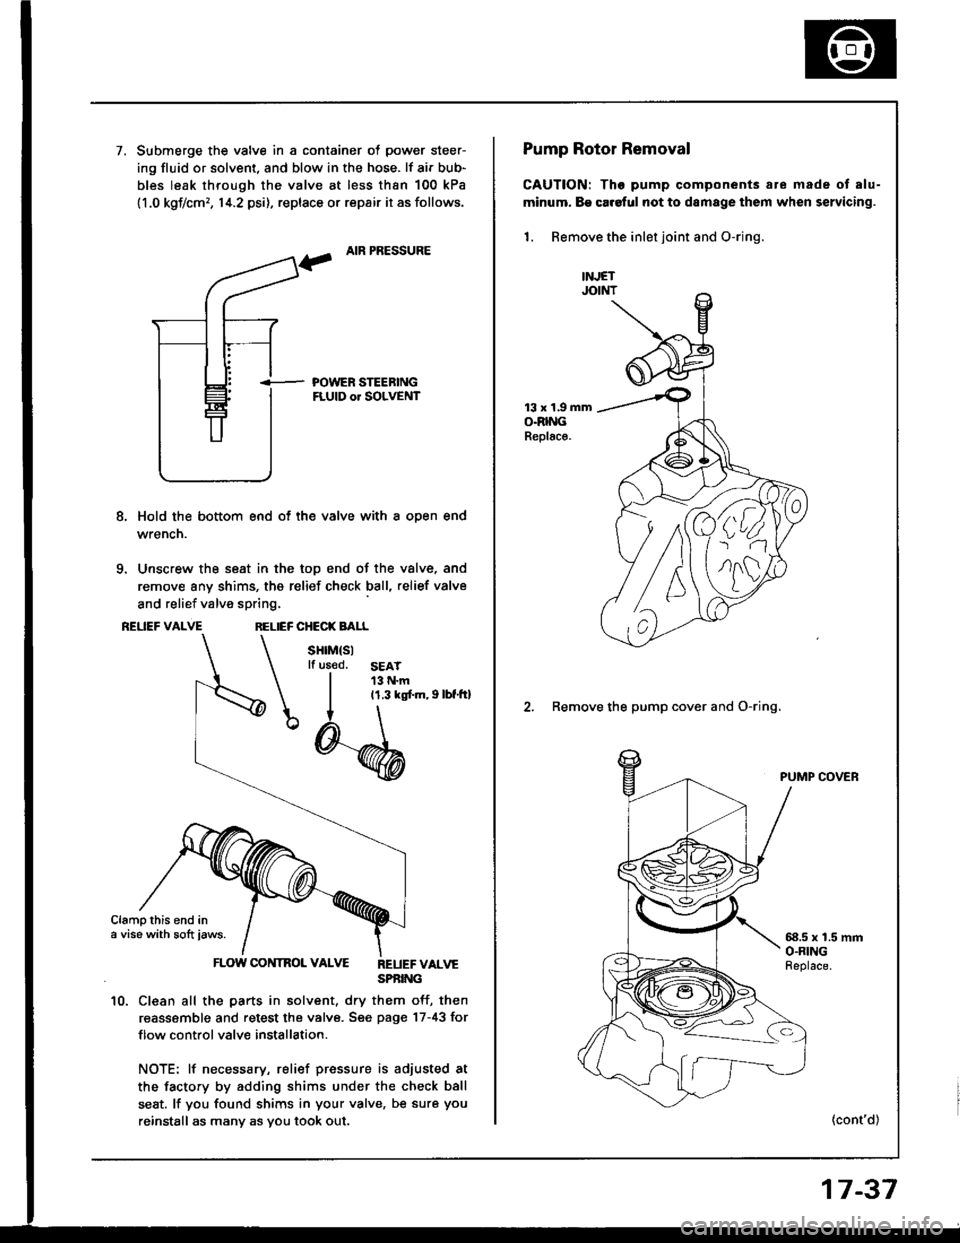
7.Submerge the valve in a container of power steer-
ing fluid or solvent, and blow in the hose. lf air bub-
bles leak through the valve at less than 100 kPa
11.0 kgf/cm,, 14.2 psi), replace or repair it as follows.
AIR PRESSURE
i- POWER STEEBINGFLUID or SOLVENT
8, Hold the bottom end of th€ valve with a oDen end
wrencn.
9. Unscrew the seat in the top end of the valve, and
remove any shims, the relief check ball, relief valve
and relief valve spring,
REUEF VALVERELIEF CHECK BALL
sHrM(sllf us€d.SEAT13 N.m11.3 ks[.m, I lbf.tt]
Clampthis end ina vise with sott iaws.
FLOW CONTROL VALVE REUEFvALvESPBING
10. Clean all the parts in solvent, dry them off, then
reassemble and retest the valve. Sge page 17-43 for
f low control valve installation.
NOTE: lf necessary, relief pressure is adiusted at
the facto.y by adding shims under the check ball
seat. lf you found shims in your valve, be sure you
reinstall as many as you took out,
')4.
nlll
Pump Rotor Removal
CAUTION: Tho pump components are made ot alu-
minum. B€ car6ful not to damage them when servicing.
1. Remove the inlet joint and O-rjng.
13 x 1.9 mmO.RINGReplac€.
2. Remove the pump cover and O-ring.
PUMP COVER
58.5 x 1.5 mmO.RINGFeplace.
(cont'd)
17-37
Page 647 of 1413

Power Steering Pump
Reassembly
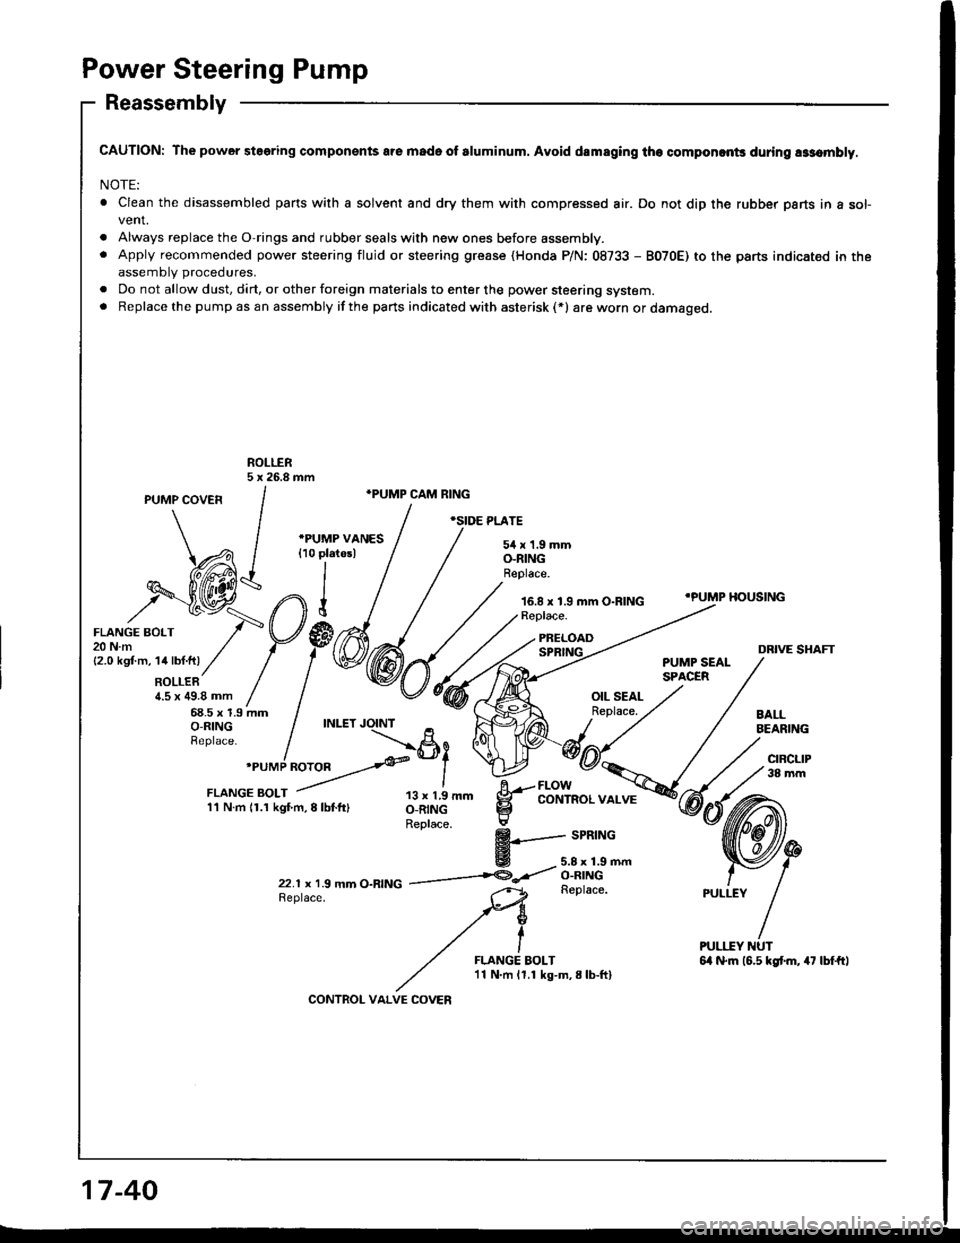
CAUTION: The power steering componsnts are mado of sluminum. Avoid dsmaging th€ componcnts during assombly,
NOTE:
. Clean the disassembled pans with a solvent and dry them with compressed air. Do not dip the rubber parts in a sofvent.
. Always replace the O-rings and rubber seals with new ones before assembly.. Apply recommended power steering fluid or steering grease (Honda P/N: 08733 - B070E) to the parts indicated in theassemblv procedures.
. Do not allow dust, dirt, or other foreign materials to enter the power steering system.. Replacethe pump asan assembly ifthe parts indicated with asterisk (*) are worn or damaged.
ROLLER5 x 26.8 mm
PUMP covEn /
."'MP cAM RING
, / .",or r*r,
^ / -e^urrae vrues / / sirx1.smm
\Al {ro pratesl I / o_nrNc
dA-h1//EZil*l///'^ee'ace
o-ntNGReplace.
16.8 x 1.9 mm O-RING
\A I {ro Platesl
,h$;@:",n1
i'"otr
/-V#mtt.m,1a|t�t.fti// / / \E
RoLLER / |a.5 x ag.a mm / |68.5 x 1.9 mm Io-RING / INLET
Reptace.
I
.PUMP HOUSING
xf:.i'/pp@6{fr;ryDRIVE SHAFTPUMP SEALSPACERROLLER /1.5 x 49.8 mm /68.5 x 1.9 mmO-R|NG / INLET JO-INT
Replace.
I'PUMP ROTOR>ei
iiij:f:,ll-T;-,",,,, ll;il'- g--lblY""."*";
Replace. :
$+--- srntnc
E -5.8x1.9mm
22.r x r.9 mm o-RfNG ------t@-<'t o^::t:\-GReplace.Replace.
FLANGE BOLT'11 N.m 11.1 kg-m,8lb-ftI
17-40
CONTROL VALVE COVEN
Page 650 of 1413
Flow Gontrol Valve Installation
1. Apply steering grease (Honda P/N 08733 - B070E) to
new O-rings.
2. Coat the flow control valve with clean power steer-
ing fluid.
3. Install the flow control valve, spring and control
valve cover on the pump housing.
4. Tighten the three control cover bolts.
FLOW CONTROLVALVE
SPRING
E;W
11 N.m {1.1 kgl.m,8lbtftl
2
Pulley Installation
1. Hold the steering pump in a vise with soft jaws.
CAUTION: Be careful not to damago the pump
hou3ing with the laws ol th€ vise.
2. Install the pump pulley as shown. Then install the
pulley nut.
Hold the pulley with the special tool and tighten the
pulley nut.
PULLEY NUT6ir N.m (6.5 kgt.m,47 lbt tt)
Check that the pump turns smoothly by turning the
pulrey.
PULLEY NUT
PULLEY
17-43
Page 652 of 1413

Steering Gearbox
Removal
NOTE: Using solvent and a brush, wash any oil and dirt
off the valve body unit, its lines, and the end if the gear-
box. Blow dry with compressed air.
1. Drain the power steering fluid as described on page
17 -21.
2. Rsise the front of car, and support on safety stands
in the propsr locations (see section 1).
3. Remove the front wheels.
il. Removs the st€ering joint cove.,
SIEERING JOIi{T COVEB
Remove the steering joint lower bolt, and move thejoint toward the column.
NOTE: Lock the steering shaft with the ignition key
to retain the steering shaft position.
Remove the cotter pin trom the castle nut and
removo the nut.
Installthe 10 mm hex nut on the balljoint.
Be sure that ths 10 mm hex nut is flush with the ball
ioint pin end, or the threaded section of the ball
ioint pin might be damaged by the ball iointremover.
NOTE: Remove the ball joint using the Ball Joint
Remover, 28 mm {07MAC - 5100200}. Refer to page
l8-11 fot how to use the ball joint rcmover,
Separat€ the tie-rod ball joint and knuckle using the
soscialtool.
CAUTION: Avold d.maging th. blllloint boot.
BALL JOlt{T REMOVER. 28 mm07MAC - SLqt2|X)
Disconnect the shift linkage {MfI model: see section
13, A/[ model see section 14).
Disconnect the heated oxygen sensor (H02S) con-
ngctor, and separate the three way catalytic conver-
ter by removing the s€lf-locking nuts.
NOTE: Always replace the gaskets with new ones.
OXycEt{S€NSOnOONNECTOR SELF.LOCKINGNUT
{cont'd)IHREE WAYCA?ALYTIC CONVERTEN
8.
10.
HEATED
Replacs.
17-45