1993 VOLKSWAGEN CORRADO catalytic converter
[x] Cancel search: catalytic converterPage 139 of 920

* EXHAUST SYSTEM UNIFORM INSPECTION GUIDELINES *
Article Text (p. 4)
1993 Volkswagen Corrado
For Volkswagen Technical Site: http://vw.belcom.ru
Copyright © 1998 Mitchell Repair Information Company, LLC
Wednesday, March 22, 2000 08:41PMÚÄÄÄÄÄÄÄÄÄÄÄÄÄÄÄÄÄÄÄÄÄÄÄÄÄÄÄÄÄÄÄÄÄÂÄÄÄÄÄÄÄÄÄÄÄÄÄÄÄÄÄÄÄÄÄÄÄÄÄÄÄÄÄÄÄÄÄÄ¿
³ Reasons to Require Repair
³ Reasons to Suggest Repair ³
³ or Replacement
³ or Replacement ³
ÃÄÄÄÄÄÄÄÄÄÄÄÄÄÄÄÄÄÄÄÄÄÄÄÄÄÄÄÄÄÄÄÄÄÅÄÄÄÄÄÄÄÄÄÄÄÄÄÄÄÄÄÄÄÄÄÄÄÄÄÄÄÄÄÄÄÄÄÄ´
³ A - Part no longer performs
³ 1 - Part is close to the end of ³
³ intended purpose
³ its useful life (just above ³
³
³ discard specifications, or ³
³
³ weak; failure likely to ³
³
³ occur soon, etc.) ³
ÀÄÄÄÄÄÄÄÄÄÄÄÄÄÄÄÄÄÄÄÄÄÄÄÄÄÄÄÄÄÄÄÄÄÁÄÄÄÄÄÄÄÄÄÄÄÄÄÄÄÄÄÄÄÄÄÄÄÄÄÄÄÄÄÄÄÄÄÄÙB - PART DOES NOT MEET DESIGN SPEC., REGARDLESS OF PERFORMANCE
ÚÄÄÄÄÄÄÄÄÄÄÄÄÄÄÄÄÄÄÄÄÄÄÄÄÄÄÄÄÄÄÄÄÄÂÄÄÄÄÄÄÄÄÄÄÄÄÄÄÄÄÄÄÄÄÄÄÄÄÄÄÄÄÄÄÄÄÄÄ¿
³ Reasons to Require Repair
³ Reasons to Suggest Repair ³
³ or Replacement
³ or Replacement ³
ÃÄÄÄÄÄÄÄÄÄÄÄÄÄÄÄÄÄÄÄÄÄÄÄÄÄÄÄÄÄÄÄÄÄÅÄÄÄÄÄÄÄÄÄÄÄÄÄÄÄÄÄÄÄÄÄÄÄÄÄÄÄÄÄÄÄÄÄÄ´
³ B - Part does not meet a design
³ 2 - To address a customer need, ³
³ specification (regardless
³ convenience, or request (to ³
³ of performance)
³ stiffen ride, enhance ³
³
³ performance, eliminate noise ³
³
³ etc.) ³
ÀÄÄÄÄÄÄÄÄÄÄÄÄÄÄÄÄÄÄÄÄÄÄÄÄÄÄÄÄÄÄÄÄÄÁÄÄÄÄÄÄÄÄÄÄÄÄÄÄÄÄÄÄÄÄÄÄÄÄÄÄÄÄÄÄÄÄÄÄÙC - PART IS MISSING
ÚÄÄÄÄÄÄÄÄÄÄÄÄÄÄÄÄÄÄÄÄÄÄÄÄÄÄÄÄÄÄÄÄÄÂÄÄÄÄÄÄÄÄÄÄÄÄÄÄÄÄÄÄÄÄÄÄÄÄÄÄÄÄÄÄÄÄÄÄ¿
³ Reasons to Require Repair
³ Reasons to Suggest Repair ³
³ or Replacement
³ or Replacement ³
ÃÄÄÄÄÄÄÄÄÄÄÄÄÄÄÄÄÄÄÄÄÄÄÄÄÄÄÄÄÄÄÄÄÄÅÄÄÄÄÄÄÄÄÄÄÄÄÄÄÄÄÄÄÄÄÄÄÄÄÄÄÄÄÄÄÄÄÄÄ´
³ C - Part is missing
³ 3 - To comply with maintenance ³
³
³ recommended by the vehicle's ³
³
³ Original Equipment ³
³
³ Manufacturer (OEM) ³
³
³ 4 - Technician's recommendation ³
³
³ based on substantial and ³
³
³ informed experience ³
ÀÄÄÄÄÄÄÄÄÄÄÄÄÄÄÄÄÄÄÄÄÄÄÄÄÄÄÄÄÄÄÄÄÄÁÄÄÄÄÄÄÄÄÄÄÄÄÄÄÄÄÄÄÄÄÄÄÄÄÄÄÄÄÄÄÄÄÄÄÙ EXHAUST
SERVICE PROCEDURES REQUIRED & SUGGESTED FOR PROPER
VEHICLE OPERATION
WARNING: Federal EPA rules prohibit altering an exhaust system in
any way that defeats the emission reduction components of
a vehicle. Be sure to review and adhere to EPA policy on
removing and replacing catalytic converters. Where state or
local laws are stricter, they take precedence over these
guidelines.
Some exhaust systems are of a welded design. It is not
required that the entire system be replaced. Determine the need to
replace individual components based on conditions of component.
Page 140 of 920

* EXHAUST SYSTEM UNIFORM INSPECTION GUIDELINES *
Article Text (p. 5)
1993 Volkswagen Corrado
For Volkswagen Technical Site: http://vw.belcom.ru
Copyright © 1998 Mitchell Repair Information Company, LLC
Wednesday, March 22, 2000 08:41PM
CATALYTIC CONVERTERS
CAUTION: Before working on an exhaust system, review EPA regulations
on removing and replacing catalytic converters.
NOTE: Any time a converter has failed, further diagnosis is
required to determine the reason(s) for converter failure.
Advise customer of cause(s).
CATALYTIC CONVERTERSÄÄÄÄÄÄÄÄÄÄÄÄÄÄÄÄÄÄÄÄÄÄÄÄÄÄÄÄÂÄÄÄÄÄÄÂÄÄÄÄÄÄÄÄÄÄÄÄÄÄÄÄÄÄÄÄÄÄÄÄÄÄÄÄÄÄÄÄÄÄCondition
³ Code ³ Procedure
ÄÄÄÄÄÄÄÄÄÄÄÄÄÄÄÄÄÄÄÄÄÄÄÄÄÄÄÄÅÄÄÄÄÄÄÅÄÄÄÄÄÄÄÄÄÄÄÄÄÄÄÄÄÄÄÄÄÄÄÄÄÄÄÄÄÄÄÄÄÄAir injection tube broken
³ A ³
ÄÄÄÄÄÄÄÄÄÄÄÄÄÄÄÄÄÄÄÄÄÄÄÄÄÄÄÄÅÄÄÄÄÄÄ´Air injection tube burnt
³ A ³
ÄÄÄÄÄÄÄÄÄÄÄÄÄÄÄÄÄÄÄÄÄÄÄÄÄÄÄÄÅÄÄÄÄÄÄ´Air injection tube damaged
³ B ³
ÄÄÄÄÄÄÄÄÄÄÄÄÄÄÄÄÄÄÄÄÄÄÄÄÄÄÄÄÅÄÄÄÄÄÄ´Air injection tube leaking
³ A ³
ÄÄÄÄÄÄÄÄÄÄÄÄÄÄÄÄÄÄÄÄÄÄÄÄÄÄÄÄÅÄÄÄÄÄÄ´Air injection tube loose
³ A ³ Require repair or replacement of
ÄÄÄÄÄÄÄÄÄÄÄÄÄÄÄÄÄÄÄÄÄÄÄÄÄÄÄÄÅÄÄÄÄÄÄ´ injection tube or replacement of
Air injection tube
³ A ³ catalytic converter.
restricted
³ ³
ÄÄÄÄÄÄÄÄÄÄÄÄÄÄÄÄÄÄÄÄÄÄÄÄÄÄÄÄÅÄÄÄÄÄÄ´Air injection tube threads
³ B ³ damaged
³ ³
ÄÄÄÄÄÄÄÄÄÄÄÄÄÄÄÄÄÄÄÄÄÄÄÄÄÄÄÄÅÄÄÄÄÄÄ´Air injection tube threads
³ A ³ stripped (threads missing)
³ ³
ÄÄÄÄÄÄÄÄÄÄÄÄÄÄÄÄÄÄÄÄÄÄÄÄÄÄÄÄÅÄÄÄÄÄÄÅÄÄÄÄÄÄÄÄÄÄÄÄÄÄÄÄÄÄÄÄÄÄÄÄÄÄÄÄÄÄÄÄÄÄBody cracked
³ B ³
ÄÄÄÄÄÄÄÄÄÄÄÄÄÄÄÄÄÄÄÄÄÄÄÄÄÄÄÄÅÄÄÄÄÄÄ´Converter empty
³ A ³ Require repair or replacement.
ÄÄÄÄÄÄÄÄÄÄÄÄÄÄÄÄÄÄÄÄÄÄÄÄÄÄÄÄÅÄÄÄÄÄÄ´Converter fill plug missing
³ C ³
ÄÄÄÄÄÄÄÄÄÄÄÄÄÄÄÄÄÄÄÄÄÄÄÄÄÄÄÄÅÄÄÄÄÄÄÅÄÄÄÄÄÄÄÄÄÄÄÄÄÄÄÄÄÄÄÄÄÄÄÄÄÄÄÄÄÄÄÄÄÄConverter missing
³ C ³ Require replacement.
ÄÄÄÄÄÄÄÄÄÄÄÄÄÄÄÄÄÄÄÄÄÄÄÄÄÄÄÄÅÄÄÄÄÄÄÅÄÄÄÄÄÄÄÄÄÄÄÄÄÄÄÄÄÄÄÄÄÄÄÄÄÄÄÄÄÄÄÄÄÄExhaust gases leaking
³ A ³ Require repair or replacement.
ÄÄÄÄÄÄÄÄÄÄÄÄÄÄÄÄÄÄÄÄÄÄÄÄÄÄÄÄÅÄÄÄÄÄÄÅÄÄÄÄÄÄÄÄÄÄÄÄÄÄÄÄÄÄÄÄÄÄÄÄÄÄÄÄÄÄÄÄÄÄFlanges leaking
³ A ³ Require repair or replacement of
³ ³ flanges.
ÄÄÄÄÄÄÄÄÄÄÄÄÄÄÄÄÄÄÄÄÄÄÄÄÄÄÄÄÅÄÄÄÄÄÄÅÄÄÄÄÄÄÄÄÄÄÄÄÄÄÄÄÄÄÄÄÄÄÄÄÄÄÄÄÄÄÄÄÄÄInlet pipes cracked
³ B ³ Require repair or replacement.
ÄÄÄÄÄÄÄÄÄÄÄÄÄÄÄÄÄÄÄÄÄÄÄÄÄÄÄÄÅÄÄÄÄÄÄÅÄÄÄÄÄÄÄÄÄÄÄÄÄÄÄÄÄÄÄÄÄÄÄÄÄÄÄÄÄÄÄÄÄÄInternal rattle (except
³ B,2 ³ Further inspection required.
pellet-type)
³ ³ See note (1) below.
ÄÄÄÄÄÄÄÄÄÄÄÄÄÄÄÄÄÄÄÄÄÄÄÄÄÄÄÄÅÄÄÄÄÄÄÅÄÄÄÄÄÄÄÄÄÄÄÄÄÄÄÄÄÄÄÄÄÄÄÄÄÄÄÄÄÄÄÄÄÄMounting brackets that are
³ A ³ Require repair or replacement.
Page 301 of 920

2.8L IN-LINE V6 (VR6)
Article Text (p. 10)
1993 Volkswagen Corrado
For Volkswagen Technical Site: http://vw.belcom.ru
Copyright © 1998 Mitchell Repair Information Company, LLC
Wednesday, March 22, 2000 08:47PM
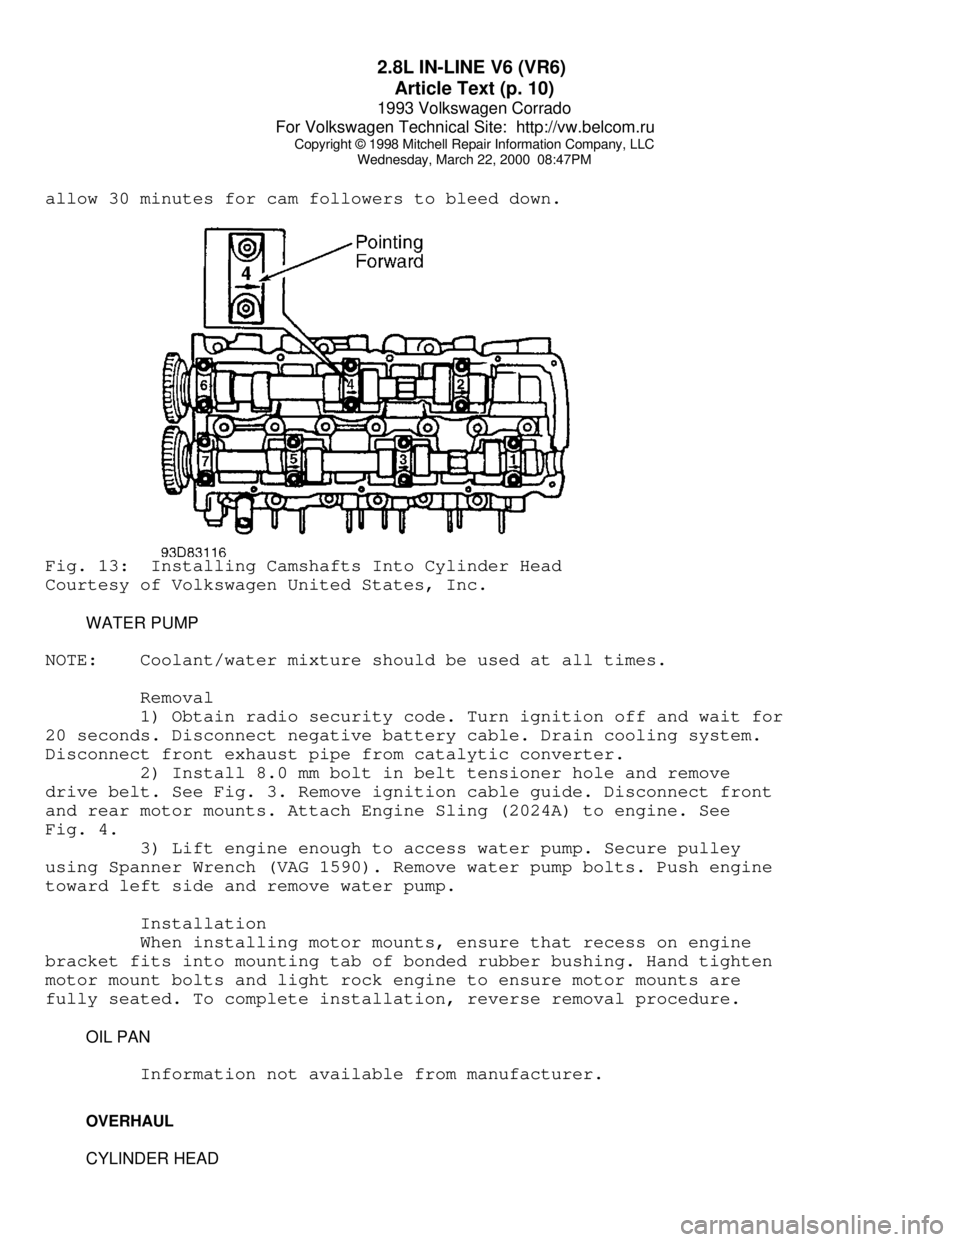
allow 30 minutes for cam followers to bleed down.Fig. 13: Installing Camshafts Into Cylinder Head
Courtesy of Volkswagen United States, Inc.
WATER PUMP
NOTE: Coolant/water mixture should be used at all times.
Removal
1) Obtain radio security code. Turn ignition off and wait for
20 seconds. Disconnect negative battery cable. Drain cooling system.
Disconnect front exhaust pipe from catalytic converter.
2) Install 8.0 mm bolt in belt tensioner hole and remove
drive belt. See Fig. 3. Remove ignition cable guide. Disconnect front
and rear motor mounts. Attach Engine Sling (2024A) to engine. See
Fig. 4.
3) Lift engine enough to access water pump. Secure pulley
using Spanner Wrench (VAG 1590). Remove water pump bolts. Push engine
toward left side and remove water pump.
Installation
When installing motor mounts, ensure that recess on engine
bracket fits into mounting tab of bonded rubber bushing. Hand tighten
motor mount bolts and light rock engine to ensure motor mounts are
fully seated. To complete installation, reverse removal procedure.
OIL PAN
Information not available from manufacturer.
OVERHAUL
CYLINDER HEAD
Page 307 of 920

2.8L IN-LINE V6 (VR6)
Article Text (p. 16)
1993 Volkswagen Corrado
For Volkswagen Technical Site: http://vw.belcom.ru
Copyright © 1998 Mitchell Repair Information Company, LLC
Wednesday, March 22, 2000 08:47PM
TORQUE SPECIFICATIONS
TORQUE SPECIFICATIONS TABLEÄÄÄÄÄÄÄÄÄÄÄÄÄÄÄÄÄÄÄÄÄÄÄÄÄÄÄÄÄÄÄÄÄÄÄÄÄÄÄÄÄÄÄÄÄÄÄÄÄÄÄÄÄÄÄÄÄÄÄÄApplication Ft. Lbs. (N.m)
A/C Bracket-To-Engine Bolt ....................... 22 (30)
Axle Shaft-To-Transaxle Drive Flange Bolt ........ 33 (45)
Camshaft Bearing Cap Bolt ........................ 15 (20)
Camshaft Sprocket Bolt .......................... 74 (100)
Clutch Cover Bolt ................................ 15 (20)
Connecting Rod Bolt ................... 22 (30) + 1/4 Turn
Crankshaft Main Bearing Cap Bolt ...... 22 (30) + 1/2 Turn
Cylinder Head Bolt (1)
Step 1 ......................................... 30 (40)
Step 2 ......................................... 44 (60)
Step 3 ....................... Additional 1/4 (90
ø) Turn
Step 4 ....................... Additional 1/4 (90
ø) Turn
Engine Bracket (Front) ........................... 44 (60)
Engine Bracket (To Body) ......................... 33 (45)
Engine-To-Transaxle 10-mm Bolt ................... 44 (60)
Engine-To-Transaxle 12-mm Bolt ................... 55 (80)
Exhaust Manifold-To-Cylinder Head Bolt & Nut ..... 18 (25)
Exhaust Pipe-To-Catalytic Converter Bolt ......... 18 (25)
Exhaust Pipe-To-Manifold Nut ..................... 30 (40)
Flywheel-To-Crankshaft Bolt ........... 44 (60) + 1/4 Turn
Intake Manifold .................................. 18 (25)
Intermediate Shaft Sprocket Bolt ................ 74 (100)
Oil Pan Bolt ..................................... 15 (20)
Oil Pan Drain Plug ............................... 37 (50)
Oil Pressure Switch .............................. 18 (25)
Oil Pump Cover Long Bolt ............................. (2)
Oil Pump Cover Short Bolt ........................ 18 (25)
Power Steering Pump Bracket Bolt ................. 18 (25)
Pressure Plate Bolt .............................. 15 (20)
Starter Mount Bolt ............................... 18 (25)
Timing Belt Tensioner Nut ........................ 15 (20)
Torque Converter-To-Carrier Plate Bolt ........... 22 (30)
Vibration Damper Bolt .......................... 332 (450)
Water Pump Pulley Bolt ........................... 15 (20)
Water Pump Housing-To-Engine Bolt ................ 15 (20)
INCH Lbs. (N.m)
Fuel Rail Bolt (Lower) ............................ 89 (10)
Timing Belt Idler Bolt ........................... 89 (10)
Valve Cover Retaining Nut ........................ 89 (10)
Water Pump-To-Housing ........................... 115 (13)
(1) - Never reuse cylinder head bolt(s) when servicing.
(2) - Tighten bolt to 89 INCH lbs. (10 N.m).
ÄÄÄÄÄÄÄÄÄÄÄÄÄÄÄÄÄÄÄÄÄÄÄÄÄÄÄÄÄÄÄÄÄÄÄÄÄÄÄÄÄÄÄÄÄÄÄÄÄÄÄÄÄÄÄÄÄÄÄÄ
Page 392 of 920

AA - USING THIS SECTION (GENERAL HELP INFORMATION)
Article Text (p. 6)
1993 Volkswagen Corrado
For Volkswagen Technical Site: http://vw.belcom.ru
Copyright © 1998 Mitchell Repair Information Company, LLC
Wednesday, March 22, 2000 08:49PM
1) If no self-diagnostics available, or no trouble codes
present, identify symptom.
2) See trouble shooting procedure to repair complaint. See H
- TESTS W/O CODES
TEST SYSTEM
1) Perform necessary systems and component tests. See I -
SYS/COMP TESTS.
2) Verify that complaint is repaired.
SAFETY PRECAUTIONS
* Always refer to Engine Tune-Up Decal in engine compartment before
performing tune-up. If manual and decal differ, always use decal
specifications.
* DO NOT allow or create a condition of misfire in more than one
cylinder for an extended period of time. Damage to converter may
occur due to loading converter with unburned air/fuel mixture.
* Always turn ignition off and disconnect negative battery cable
BEFORE disconnecting or connecting computer or other electrical
components.
* DO NOT drop or shock electrical components such as computer,
airflow meter, etc.
* DO NOT use fuel system cleaning compounds that are not
recommended by the manufacturer. Damage to gaskets, diaphragm
materials and catalytic converter may result.
* Before performing a compression test or cranking engine using a
remote starter switch, disconnect coil wire from distributor and
secure it to a good engine ground, or disable ignition.
* Before disconnecting any fuel system component, ensure fuel
system pressure is released.
* Use a shop towel to absorb any spilled fuel to prevent fire.
* DO NOT create sparks or have an open flame near battery.
* If any EFI components such as hoses or clamps are replaces,
ensure they are replaced with components designed for EFI use.
* Always reassemble throttle body components with new gaskets, "O"
rings and seals.
* If equipped with an inertia switch, DO NOT reset switch until
fuel system has been inspected for leaks.
* Wear safety goggles when drilling or grinding.
* Wear proper clothing which protects against chemicals and other
hazards.
END OF ARTICLE
Page 394 of 920

ABBREVIATIONS
Article Text (p. 2)
1993 Volkswagen Corrado
For Volkswagen Technical Site: http://vw.belcom.ru
Copyright © 1998 Mitchell Repair Information Company, LLC
Wednesday, March 22, 2000 08:49PM³Assy. ³Assembly ³
³Auto.
³Automatic ³
³Aux.
³Auxiliary ³
³Avg.
³Average ³
ÀÄÄÄÄÄÄÄÄÄÄÄÄÄÄÄÄÄÁÄÄÄÄÄÄÄÄÄÄÄÄÄÄÄÄÄÄÄÄÄÄÄÄÄÄÄÄÄÄÄÄÄÄÄÄÄÄÄÄÄÄÄÄÄÄÄÄÄÄÙ "B" ABBREVIATION TABLE
"B" ABBREVIATION TABLE
ÚÄÄÄÄÄÄÄÄÄÄÄÄÄÄÄÄÄÂÄÄÄÄÄÄÄÄÄÄÄÄÄÄÄÄÄÄÄÄÄÄÄÄÄÄÄÄÄÄÄÄÄÄÄÄÄÄÄÄÄÄÄÄÄÄÄÄÄÄ¿
³ABBREVIATION
³DEFINITION ³
ÃÄÄÄÄÄÄÄÄÄÄÄÄÄÄÄÄÄÅÄÄÄÄÄÄÄÄÄÄÄÄÄÄÄÄÄÄÄÄÄÄÄÄÄÄÄÄÄÄÄÄÄÄÄÄÄÄÄÄÄÄÄÄÄÄÄÄÄÄ´
³B/P
³Backpressure ³
³BAC
³By-Pass Air Control ³
³BAP
³Barometric Absolute Pressure Sensor ³
³BARO
³Barometric ³
³BBDC
³Before Bottom Dead Center ³
³BCM
³Body Control Module ³
³BDC
³Bottom Dead Center ³
³BHP
³Brake Horsepower ³
³BLK
³Black ³
³BLU
³Blue ³
³BMAP
³Barometric & Manifold Absolute Pressure Sensor ³
³BOO
³Brake On-Off Switch ³
³BP
³Barometric Pressure sensor ³
³BPS
³Barometric Pressure Sensor ³
³BPT
³Backpressure Transducer ³
³BRN
³Brown ³
³BTDC
³Before Top Dead Center ³
³BTU
³British Thermal Unit ³
³BVSV
³Bimetallic Vacuum Switching Valve ³
³Baro.
³Barometric ³
³Batt.
³Battery ³
³Bbl.
³Barrel (Example: 4-Bbl.) ³
³Blst.
³Ballast ³
³Blwr.
³Blower ³
³Brkr.
³Breaker ³
ÀÄÄÄÄÄÄÄÄÄÄÄÄÄÄÄÄÄÁÄÄÄÄÄÄÄÄÄÄÄÄÄÄÄÄÄÄÄÄÄÄÄÄÄÄÄÄÄÄÄÄÄÄÄÄÄÄÄÄÄÄÄÄÄÄÄÄÄÄÙ "C" ABBREVIATION TABLE
"C" ABBREVIATION TABLE
ÚÄÄÄÄÄÄÄÄÄÄÄÄÄÄÄÄÄÂÄÄÄÄÄÄÄÄÄÄÄÄÄÄÄÄÄÄÄÄÄÄÄÄÄÄÄÄÄÄÄÄÄÄÄÄÄÄÄÄÄÄÄÄÄÄÄÄÄÄ¿
³ABBREVIATION
³DEFINITION ³
ÃÄÄÄÄÄÄÄÄÄÄÄÄÄÄÄÄÄÅÄÄÄÄÄÄÄÄÄÄÄÄÄÄÄÄÄÄÄÄÄÄÄÄÄÄÄÄÄÄÄÄÄÄÄÄÄÄÄÄÄÄÄÄÄÄÄÄÄÄ´
³ø C
³Celsius (Degrees) ³
³C(3) I
³Computer Controlled Coil Ignition ³
³C(4)
³Computer Controlled Catalytic Converter ³
³CANP
³Canister Purge solenoid ³
³CARB
³California Air Resources Board ³
³CAT
³Catalytic Converter ³
³CB
³Circuit Breaker ³
Page 518 of 920

EMISSION CONTROL VISUAL INSPECTION PROCEDURES
Article Text (p. 4)
1993 Volkswagen Corrado
For Volkswagen Technical Site: http://vw.belcom.ru
Copyright © 1998 Mitchell Repair Information Company, LLC
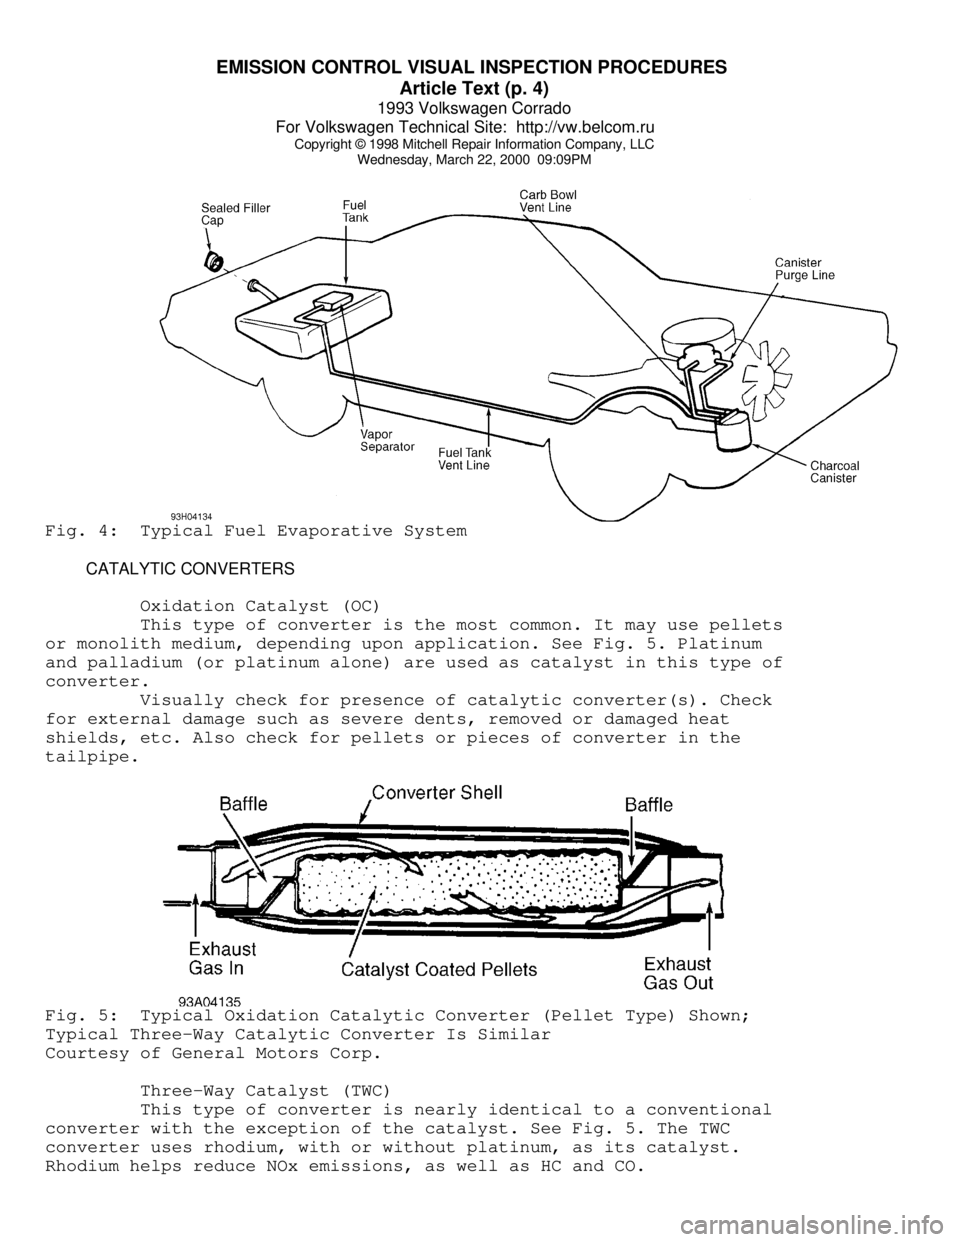
Wednesday, March 22, 2000 09:09PMFig. 4: Typical Fuel Evaporative System
CATALYTIC CONVERTERS
Oxidation Catalyst (OC)
This type of converter is the most common. It may use pellets
or monolith medium, depending upon application. See Fig. 5. Platinum
and palladium (or platinum alone) are used as catalyst in this type of
converter.
Visually check for presence of catalytic converter(s). Check
for external damage such as severe dents, removed or damaged heat
shields, etc. Also check for pellets or pieces of converter in the
tailpipe.Fig. 5: Typical Oxidation Catalytic Converter (Pellet Type) Shown;
Typical Three-Way Catalytic Converter Is Similar
Courtesy of General Motors Corp.
Three-Way Catalyst (TWC)
This type of converter is nearly identical to a conventional
converter with the exception of the catalyst. See Fig. 5. The TWC
converter uses rhodium, with or without platinum, as its catalyst.
Rhodium helps reduce NOx emissions, as well as HC and CO.
Page 519 of 920

EMISSION CONTROL VISUAL INSPECTION PROCEDURES
Article Text (p. 5)
1993 Volkswagen Corrado
For Volkswagen Technical Site: http://vw.belcom.ru
Copyright © 1998 Mitchell Repair Information Company, LLC
Wednesday, March 22, 2000 09:09PM
Visually check for presence of catalytic converter(s). Also
check for presence of any required air supply system for the oxidizing
section of the converter. Check for external damage such as severe
dents, removed or damaged heat shields, etc. Check for pellets or
pieces of converter in the tailpipe.
Three-Way Catalyst + Oxidation Catalyst (TWC + OC)
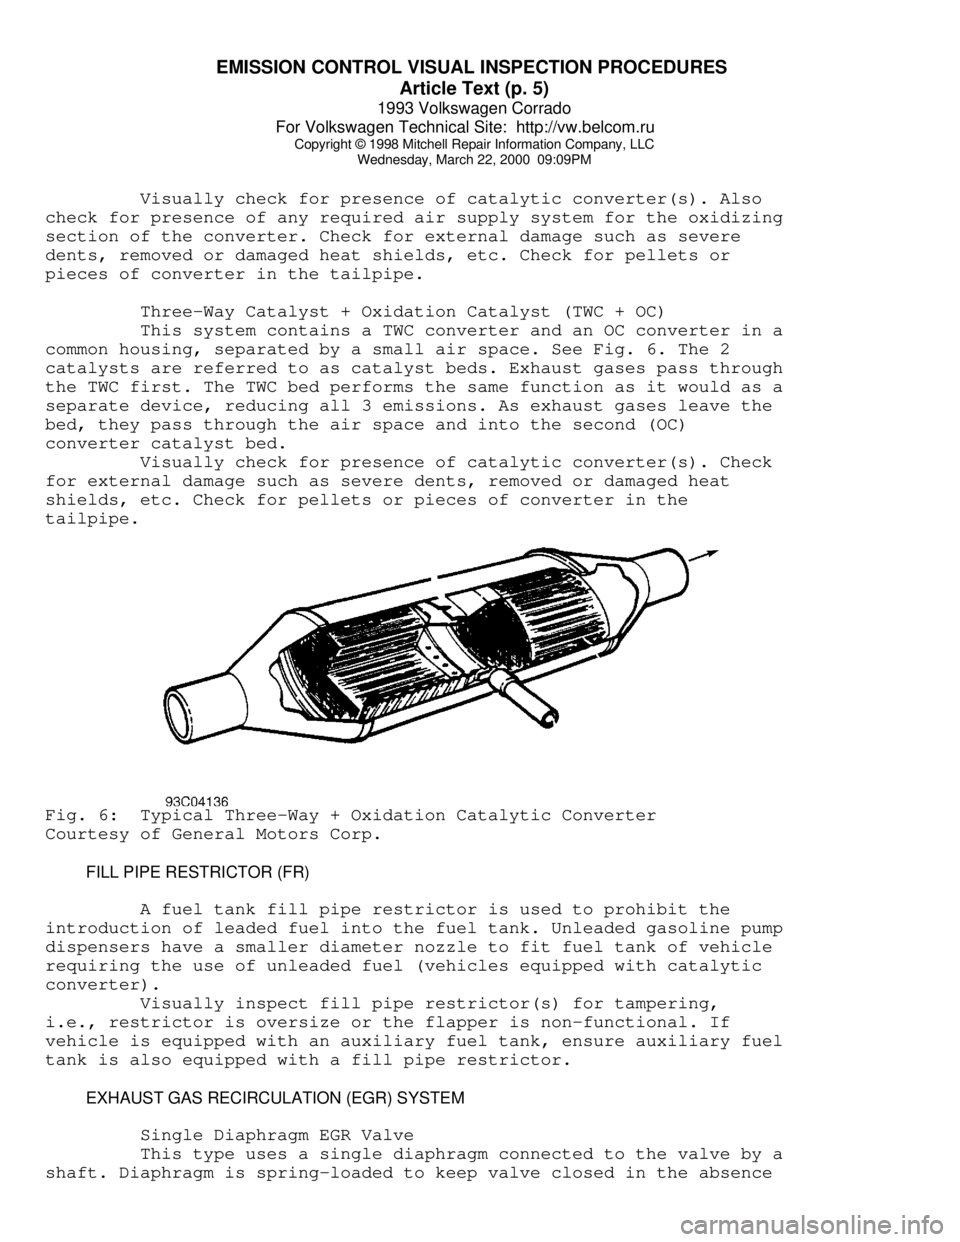
This system contains a TWC converter and an OC converter in a
common housing, separated by a small air space. See Fig. 6. The 2
catalysts are referred to as catalyst beds. Exhaust gases pass through
the TWC first. The TWC bed performs the same function as it would as a
separate device, reducing all 3 emissions. As exhaust gases leave the
bed, they pass through the air space and into the second (OC)
converter catalyst bed.
Visually check for presence of catalytic converter(s). Check
for external damage such as severe dents, removed or damaged heat
shields, etc. Check for pellets or pieces of converter in the
tailpipe.Fig. 6: Typical Three-Way + Oxidation Catalytic Converter
Courtesy of General Motors Corp.
FILL PIPE RESTRICTOR (FR)
A fuel tank fill pipe restrictor is used to prohibit the
introduction of leaded fuel into the fuel tank. Unleaded gasoline pump
dispensers have a smaller diameter nozzle to fit fuel tank of vehicle
requiring the use of unleaded fuel (vehicles equipped with catalytic
converter).
Visually inspect fill pipe restrictor(s) for tampering,
i.e., restrictor is oversize or the flapper is non-functional. If
vehicle is equipped with an auxiliary fuel tank, ensure auxiliary fuel
tank is also equipped with a fill pipe restrictor.
EXHAUST GAS RECIRCULATION (EGR) SYSTEM
Single Diaphragm EGR Valve
This type uses a single diaphragm connected to the valve by a
shaft. Diaphragm is spring-loaded to keep valve closed in the absence