1993 VOLKSWAGEN CORRADO alternator
[x] Cancel search: alternatorPage 724 of 920

SPECIFICATIONS & ELECTRIC COOLING FANS
Article Text
1993 Volkswagen Corrado
For Volkswagen Technical Site: http://vw.belcom.ru
Copyright © 1998 Mitchell Repair Information Company, LLC
Wednesday, March 22, 2000 09:23PM
ARTICLE BEGINNING
1993 ENGINE COOLING
Volkswagen Specifications & Electric Cooling Fans
Volkswagen; Corrado SLC, Passat
SPECIFICATIONS
BELT ADJUSTMENT
BELT ADJUSTMENT TABLEÄÄÄÄÄÄÄÄÄÄÄÄÄÄÄÄÄÄÄÄÄÄÄÄÄÄÄÄÄÄÄÄÄÄÄÄÄÄÄÄÄÄÄÄÄÄÄÄÄÄÄÄÄÄÄÄÄÄÄÄApplication Specification
A/C Compressor
Passat GL
New ............................ (1) 72 INCH Lbs. (8 N.m)
Used ........................... (1) 36 INCH Lbs. (4 N.m)
Alternator
Passat GL .................. (1) (2) 72 INCH Lbs. (8 N.m)
Power Steering
Passat GL ................................. 13/64" (5 mm)
Serpentine Belt
Corrado SLC, Passat GLX ............................. (3)
(1) - Turn tensioning nut on toothed rack with Torque Wrench
(VAG1410) and Ring Insert (SW VAG 1410-2).
(2) - Start engine and let it idle for 5 minutes. Loosen
bolts and retighten belt to specification.
(3) - Serpentine belt tension automatically adjusted by
tensioner.
ÄÄÄÄÄÄÄÄÄÄÄÄÄÄÄÄÄÄÄÄÄÄÄÄÄÄÄÄÄÄÄÄÄÄÄÄÄÄÄÄÄÄÄÄÄÄÄÄÄÄÄÄÄÄÄÄÄÄÄÄ COOLING SYSTEM SPECIFICATIONS
COOLING SYSTEM SPECIFICATIONS (1)
ÄÄÄÄÄÄÄÄÄÄÄÄÄÄÄÄÄÄÄÄÄÄÄÄÄÄÄÄÄÄÄÄÄÄÄÄÄÄÄÄÄÄÄÄÄÄÄÄÄÄÄÄÄÄÄÄÄÄÄÄModel Specification
Coolant Replacement Interval ................ 30,000 Miles
Corrado SLC ............................. 9.1 Qts. (8.6L)
Passat GL ............................... 5.9 Qts. (5.6L)
Passat GLX .............................. 9.1 Qts. (8.6L)
(1) - Cooling system includes heater.
ÄÄÄÄÄÄÄÄÄÄÄÄÄÄÄÄÄÄÄÄÄÄÄÄÄÄÄÄÄÄÄÄÄÄÄÄÄÄÄÄÄÄÄÄÄÄÄÄÄÄÄÄÄÄÄÄÄÄÄÄ ELECTRIC COOLING FAN
NOTE: If detonation is a problem, it is possible that the cooling
Page 729 of 920

STARTER
Article Text (p. 3)
1993 Volkswagen Corrado
For Volkswagen Technical Site: http://vw.belcom.ru
Copyright © 1998 Mitchell Repair Information Company, LLC
Wednesday, March 22, 2000 09:23PM
STARTER NO-LOAD TEST
With starter on test bench, operate starter and check
ammeter, voltage, and RPM. Readings should be within specification.
See STARTER NO-LOAD TEST SPECIFICATIONS table.
STARTER NO-LOAD TEST SPECIFICATIONS TABLEÄÄÄÄÄÄÄÄÄÄÄÄÄÄÄÄÄÄÄÄÄÄÄÄÄÄÄÄÄÄÄÄÄÄÄÄÄÄÄÄÄÄVolts Amps RPM
11.5 ........... 65-95 .......... 6500
ÄÄÄÄÄÄÄÄÄÄÄÄÄÄÄÄÄÄÄÄÄÄÄÄÄÄÄÄÄÄÄÄÄÄÄÄÄÄÄÄÄÄ REMOVAL & INSTALLATION
CORRADO SLC & PASSAT
CAUTION: Failure to use Support Beam (VW 10-222A) and Leg Set (VW
10-222A/1) may result in misalignment of
engine/transmission assembly.
Removal & Installation
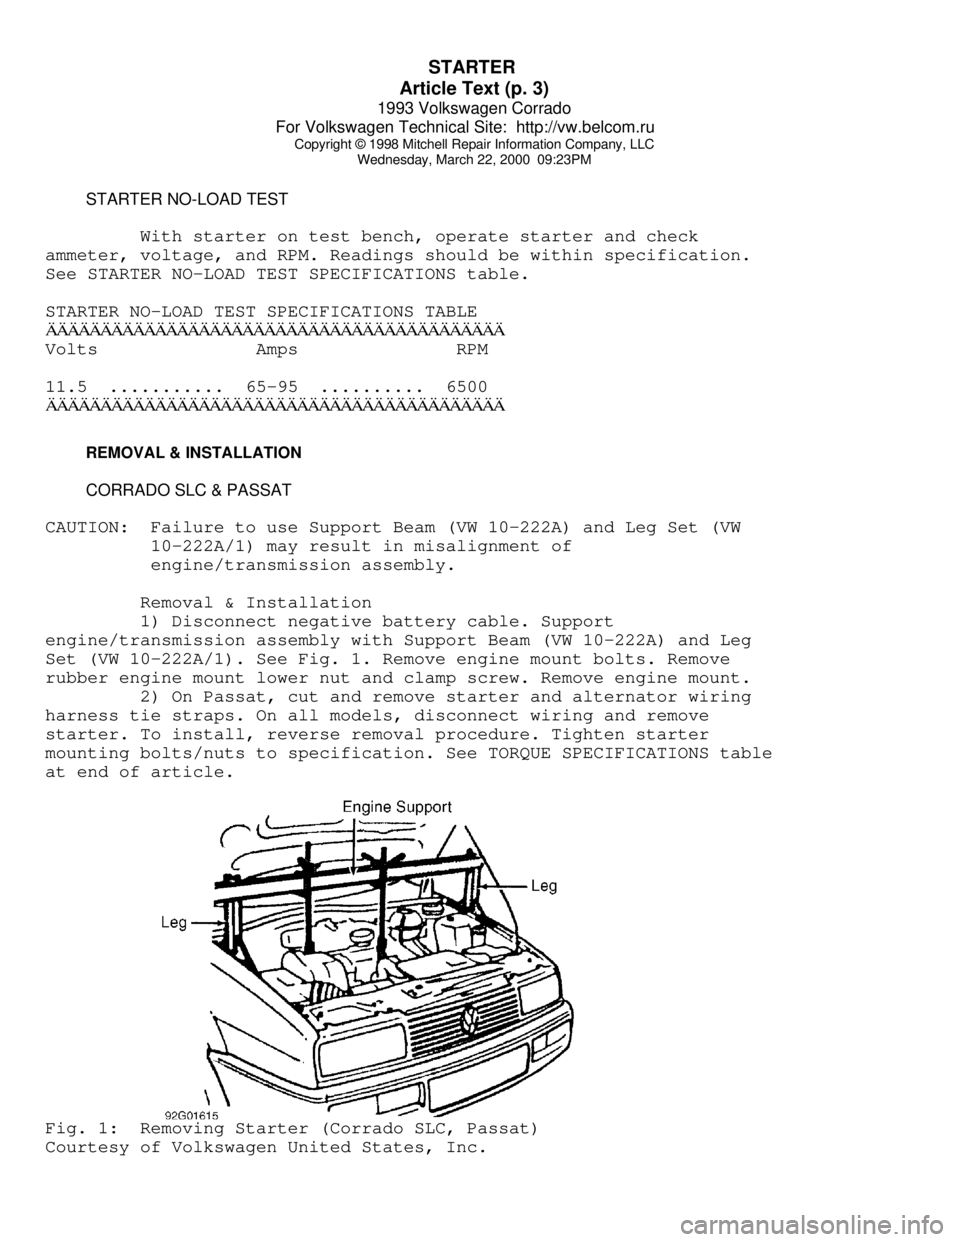
1) Disconnect negative battery cable. Support
engine/transmission assembly with Support Beam (VW 10-222A) and Leg
Set (VW 10-222A/1). See Fig. 1. Remove engine mount bolts. Remove
rubber engine mount lower nut and clamp screw. Remove engine mount.
2) On Passat, cut and remove starter and alternator wiring
harness tie straps. On all models, disconnect wiring and remove
starter. To install, reverse removal procedure. Tighten starter
mounting bolts/nuts to specification. See TORQUE SPECIFICATIONS table
at end of article.Fig. 1: Removing Starter (Corrado SLC, Passat)
Courtesy of Volkswagen United States, Inc.
Page 746 of 920

STEERING GEAR - POWER RACK & PINION
Article Text (p. 3)
1993 Volkswagen Corrado
For Volkswagen Technical Site: http://vw.belcom.ru
Copyright © 1998 Mitchell Repair Information Company, LLC
Wednesday, March 22, 2000 09:23PM
Remove rack and pinion assembly. See POWER RACK & PINION
under REMOVAL & INSTALLATION. Loosen lock nut. Turn adjuster bolt
until pinion shaft can be turned by hand without binding. Hold
adjuster bolt in position while tightening lock nut.
REMOVAL & INSTALLATION
POWER STEERING PUMP
Removal
Remove alternator and pump belts. Disconnect hydraulic lines
from pump. Cap lines to prevent contamination. Remove bracket bolts.
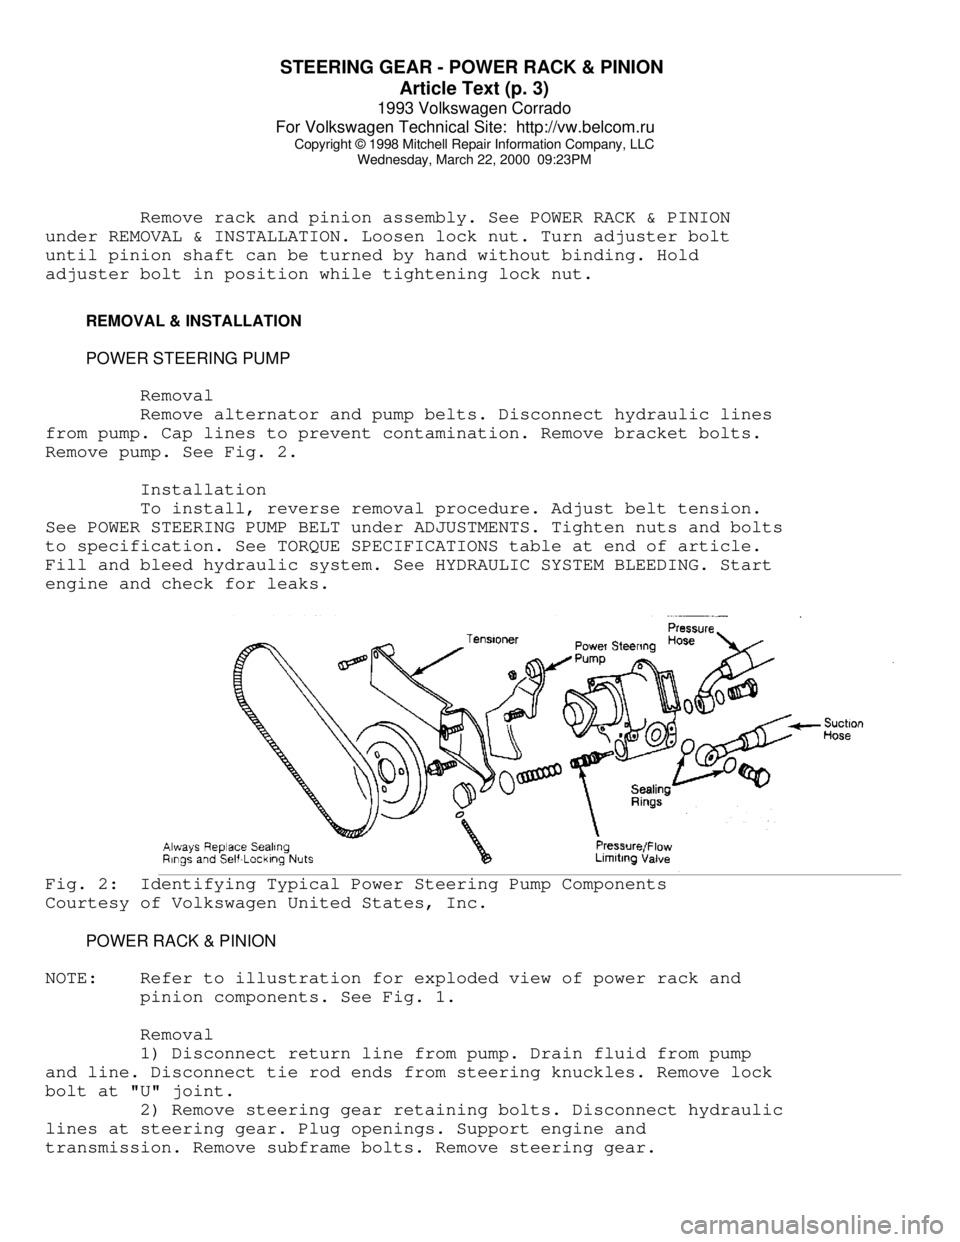
Remove pump. See Fig. 2.
Installation
To install, reverse removal procedure. Adjust belt tension.
See POWER STEERING PUMP BELT under ADJUSTMENTS. Tighten nuts and bolts
to specification. See TORQUE SPECIFICATIONS table at end of article.
Fill and bleed hydraulic system. See HYDRAULIC SYSTEM BLEEDING. Start
engine and check for leaks.Fig. 2: Identifying Typical Power Steering Pump Components
Courtesy of Volkswagen United States, Inc.
POWER RACK & PINION
NOTE: Refer to illustration for exploded view of power rack and
pinion components. See Fig. 1.
Removal
1) Disconnect return line from pump. Drain fluid from pump
and line. Disconnect tie rod ends from steering knuckles. Remove lock
bolt at "U" joint.
2) Remove steering gear retaining bolts. Disconnect hydraulic
lines at steering gear. Plug openings. Support engine and
transmission. Remove subframe bolts. Remove steering gear.
Page 799 of 920

TROUBLE SHOOTING - BASIC PROCEDURES
Article Text (p. 8)
1993 Volkswagen Corrado
For Volkswagen Technical Site: http://vw.belcom.ru
Copyright © 1998 Mitchell Repair Information Company, LLC
Wednesday, March 22, 2000 09:25PM
FUEL SYSTEMS
Carburetor idle or transfer Inspect system and
system plugged remove restriction
Frozen or binding heated air Inspect heated air
inlet door for bindingÄÄÄÄÄÄÄÄÄÄÄÄÄÄÄÄÄÄÄÄÄÄÄÄÄÄÄÄÄÄÄÄÄÄÄÄÄÄÄÄÄÄÄÄÄÄÄÄÄÄÄÄÄÄÄÄÄÄÄÄÄÄÄÄÄÄÄÄÄÄHesitation With Defective accelerator pump Replace pump, see
Heavy Gas Pedal FUEL SYSTEMS
Movement
Metering rod carrier Remove restriction
sticking or binding
Large vacuum leak Inspect vacuum
system and repair
leak
Float level setting too Reset float level,
low see FUEL SYSTEMS
Defective fuel pump, lines Inspect pump, lines
or filter and filter
Air door setting incorrect Adjust air door
setting, see FUEL
ÄÄÄÄÄÄÄÄÄÄÄÄÄÄÄÄÄÄÄÄÄÄÄÄÄÄÄÄÄÄÄÄÄÄÄÄÄÄÄÄÄÄÄÄÄÄÄÄÄÄÄÄÄÄÄÄÄÄÄÄÄÄÄÄÄÄÄÄÄÄ CHARGING SYSTEM TROUBLE SHOOTING
WARNING: This is GENERAL information. This article is not intended
to be specific to any unique situation or individual vehicle
configuration. The purpose of this Trouble Shooting
information is to provide a list of common causes to
problem symptoms. For model-specific Trouble Shooting,
refer to SUBJECT, DIAGNOSTIC, or TESTING articles available
in the section(s) you are accessing.
BASIC CHARGING SYSTEM TROUBLE SHOOTING CHART
ÄÄÄÄÄÄÄÄÄÄÄÄÄÄÄÄÄÄÄÄÄÄÄÄÄÄÄÄÄÄÄÄÄÄÄÄÄÄÄÄÄÄÄÄÄÄÄÄÄÄÄÄÄÄÄÄÄÄÄÄÄÄÄÄÄÄÄÄÄÄCONDITION POSSIBLE CAUSE CORRECTION
ÄÄÄÄÄÄÄÄÄÄÄÄÄÄÄÄÄÄÄÄÄÄÄÄÄÄÄÄÄÄÄÄÄÄÄÄÄÄÄÄÄÄÄÄÄÄÄÄÄÄÄÄÄÄÄÄÄÄÄÄÄÄÄÄÄÄÄÄÄÄVehicle Will Not Dead battery Check battery cells,
Start alternator belt
tension and alternator
output
Loose or corroded battery Check all charging
connections system connections
Ignition circuit or switch Check and replace as
Page 800 of 920

TROUBLE SHOOTING - BASIC PROCEDURES
Article Text (p. 9)
1993 Volkswagen Corrado
For Volkswagen Technical Site: http://vw.belcom.ru
Copyright © 1998 Mitchell Repair Information Company, LLC
Wednesday, March 22, 2000 09:25PM
malfunction necessaryÄÄÄÄÄÄÄÄÄÄÄÄÄÄÄÄÄÄÄÄÄÄÄÄÄÄÄÄÄÄÄÄÄÄÄÄÄÄÄÄÄÄÄÄÄÄÄÄÄÄÄÄÄÄÄÄÄÄÄÄÄÄÄÄÄÄÄÄÄÄAlternator Light Loose or worn alternator Check alternator drive
Stays On With drive belt tension and
Engine Running condition, See Belt
Adjustment in TUNE-UP
article in the
TUNE-UP section
Loose alternator wiring Check all charging
connections system connections
Short in alternator light See Indicator Warning
wiring Lights in STANDARD
INSTRUMENTS in the
ACCESSORIES &
EQUIPMENT section
Defective alternator stator See Bench Tests in
or diodes ALTERNATOR article
Defective regulator See Regulator Check in
ALTERNATOR article
ÄÄÄÄÄÄÄÄÄÄÄÄÄÄÄÄÄÄÄÄÄÄÄÄÄÄÄÄÄÄÄÄÄÄÄÄÄÄÄÄÄÄÄÄÄÄÄÄÄÄÄÄÄÄÄÄÄÄÄÄÄÄÄÄÄÄÄÄÄÄAlternator Blown fuse See WIRING DIAGRAMS
Light Stays Off
With Ignition
Switch ON
Defective alternator See Testing in
ALTERNATOR article
Defective indicator light See Indicator Warning
bulb or socket Lights in STANDARD
INSTRUMENTS in the
ACCESSORIES &
EQUIPMENT section
ÄÄÄÄÄÄÄÄÄÄÄÄÄÄÄÄÄÄÄÄÄÄÄÄÄÄÄÄÄÄÄÄÄÄÄÄÄÄÄÄÄÄÄÄÄÄÄÄÄÄÄÄÄÄÄÄÄÄÄÄÄÄÄÄÄÄÄÄÄÄAlternator Short in alternator wiring See On-Vehicle Tests
Light Stays OFF in ALTERNATOR article
With Ignition
Switch ON
Defective rectifier bridge See Bench Tests in
ALTERNATOR article
ÄÄÄÄÄÄÄÄÄÄÄÄÄÄÄÄÄÄÄÄÄÄÄÄÄÄÄÄÄÄÄÄÄÄÄÄÄÄÄÄÄÄÄÄÄÄÄÄÄÄÄÄÄÄÄÄÄÄÄÄÄÄÄÄÄÄÄÄÄÄLights or Fuses Defective alternator wiring See On-Vehicle Tests
Burn Out in ALTERNATOR article
Frequently
Defective regulator See Regulator Check in
ALTERNATOR article
Page 801 of 920

TROUBLE SHOOTING - BASIC PROCEDURES
Article Text (p. 10)
1993 Volkswagen Corrado
For Volkswagen Technical Site: http://vw.belcom.ru
Copyright © 1998 Mitchell Repair Information Company, LLC
Wednesday, March 22, 2000 09:25PM
Defective battery Check and replace as
necessaryÄÄÄÄÄÄÄÄÄÄÄÄÄÄÄÄÄÄÄÄÄÄÄÄÄÄÄÄÄÄÄÄÄÄÄÄÄÄÄÄÄÄÄÄÄÄÄÄÄÄÄÄÄÄÄÄÄÄÄÄÄÄÄÄÄÄÄÄÄÄAmmeter Gauge Loose or worn drive belt Check alternator drive
Shows Discharge belt tension and
condition. See Belt
Adjustment in TUNE-UP
article in the
TUNE-UP section
Defective wiring Check all wires and
wire connections
Defective alternator or See Bench Tests and
regulator On-Vehicle Tests in
ALTERNATOR article
Defective ammeter, or See Testing in
improper ammeter wiring STANDARD INSTRUMENTS
connection in the ACCESSORIES &
EQUIPMENT section
ÄÄÄÄÄÄÄÄÄÄÄÄÄÄÄÄÄÄÄÄÄÄÄÄÄÄÄÄÄÄÄÄÄÄÄÄÄÄÄÄÄÄÄÄÄÄÄÄÄÄÄÄÄÄÄÄÄÄÄÄÄÄÄÄÄÄÄÄÄÄNoisy Loose drive pulley Tighten drive pulley
Alternator attaching nut
Loose mounting bolts Tighten all alternator
mounting bolts
Worn or dirty bearings See Bearing
Replacement
ALTERNATOR article
Defective diodes or stator See Bench Test in
ALTERNATOR article
ÄÄÄÄÄÄÄÄÄÄÄÄÄÄÄÄÄÄÄÄÄÄÄÄÄÄÄÄÄÄÄÄÄÄÄÄÄÄÄÄÄÄÄÄÄÄÄÄÄÄÄÄÄÄÄÄÄÄÄÄÄÄÄÄÄÄÄÄÄÄBattery Does Loose or worn drive belt Check alternator drive
Stay Charged belt tension and
condition. See
Belt Adjustment in
appropriate TUNE-UP
article in the
TUNE-UP section
Loose or corroded battery Check all charging
connections system connections
Loose alternator connections Check all charging
system connections
Defective alternator or See On-Vehicle Tests
battery and Bench Tests in
Page 802 of 920

TROUBLE SHOOTING - BASIC PROCEDURES
Article Text (p. 11)
1993 Volkswagen Corrado
For Volkswagen Technical Site: http://vw.belcom.ru
Copyright © 1998 Mitchell Repair Information Company, LLC
Wednesday, March 22, 2000 09:25PM
ALTERNATOR article
Add-on electrical accessories Install larger
exceeding alternator capacity alternatorÄÄÄÄÄÄÄÄÄÄÄÄÄÄÄÄÄÄÄÄÄÄÄÄÄÄÄÄÄÄÄÄÄÄÄÄÄÄÄÄÄÄÄÄÄÄÄÄÄÄÄÄÄÄÄÄÄÄÄÄÄÄÄÄÄÄÄÄÄÄBattery Defective battery Check alternator
Overcharged- output and repair as
Uses Too Much necessary
Water
Defective alternator See On-Vehicle Test and
Bench Tests in
ALTERNATOR article
Excessive alternator voltage Check alternator output
and repair as necessary
ÄÄÄÄÄÄÄÄÄÄÄÄÄÄÄÄÄÄÄÄÄÄÄÄÄÄÄÄÄÄÄÄÄÄÄÄÄÄÄÄÄÄÄÄÄÄÄÄÄÄÄÄÄÄÄÄÄÄÄÄÄÄÄÄÄÄÄÄÄÄ CLUTCH TROUBLE SHOOTING
WARNING: This is GENERAL information. This article is not intended
to be specific to any unique situation or individual vehicle
configuration. The purpose of this Trouble Shooting
information is to provide a list of common causes to
problem symptoms. For model-specific Trouble Shooting,
refer to SUBJECT, DIAGNOSTIC, or TESTING articles available
in the section(s) you are accessing.
BASIC CLUTCH TROUBLE SHOOTING CHART
ÄÄÄÄÄÄÄÄÄÄÄÄÄÄÄÄÄÄÄÄÄÄÄÄÄÄÄÄÄÄÄÄÄÄÄÄÄÄÄÄÄÄÄÄÄÄÄÄÄÄÄÄÄÄÄÄÄÄÄÄÄÄÄÄÄÄÄÄÄÄCONDITION POSSIBLE CAUSE CORRECTION
ÄÄÄÄÄÄÄÄÄÄÄÄÄÄÄÄÄÄÄÄÄÄÄÄÄÄÄÄÄÄÄÄÄÄÄÄÄÄÄÄÄÄÄÄÄÄÄÄÄÄÄÄÄÄÄÄÄÄÄÄÄÄÄÄÄÄÄÄÄÄChattering or Incorrect clutch adjustment Adjust clutch
Grabbing
Oil, grease or glaze on Disassemble and clean
facings or replace
Loose "U" joint flange See DRIVE AXLES
article
Worn input shaft spline Replace input shaft
Binding pressure plate Replace pressure plate
Binding release lever See CLUTCH article
Binding clutch disc hub Replace clutch disc
Unequal pressure plate Replace worn/misaligned
contact components
Loose/bent clutch disc Replace clutch disc
Page 907 of 920

WIRING DIAGRAMS
Article Text
1993 Volkswagen Corrado
For Volkswagen Technical Site: http://vw.belcom.ru
Copyright © 1998 Mitchell Repair Information Company, LLC
Wednesday, March 22, 2000 09:28PM
ARTICLE BEGINNING
1993 WIRING DIAGRAMS
Volkswagen Wiring Diagrams
Volkswagen; Corrado
COMPONENT LOCATION MENU
COMPONENT LOCATIONS TABLEÄÄÄÄÄÄÄÄÄÄÄÄÄÄÄÄÄÄÄÄÄÄÄÄÄÄÄÄÄÄÄÄÄÄÄÄÄÄÄÄÄÄÄÄÄÄÄÄÄÄÄÄÄÄÄÄÄÄÄÄÄÄÄÄÄComponent Figure No. (Location)
A/C COMPRESSOR CLUTCH ................................. 7 (C 3)
A/C PRESSER SWITCH .................................... 1 (C 1)
A/C SWITCH ........................................ 6 (E 20
Ä21)
ABS CONTROL UNIT .................................. 4 (B 12-14)
ABS DIAGNOSTIC CONNECTOR ............................. 4 (D 15)
ABS HYDRAULIC PUMP FUSE .............................. 4 (E 15)
ABS VALVE FUSE ....................................... 4 (A 12)
ABS WARNING SWITCHES ................................. 4 (B 15)
ALTERNATOR ............................................ 1 (B 3)
ANTI-THEFT ALARM CONTROL UNIT ......................... 3 (E 8)
BACK-UP LIGHT SWITCH ........................... 9,10 (E 32
Ä39)
BATTERY ............................................... 1 (A 2)
BEAM SELECT SWITCH ................................... 6 (A 20)
BRAKE FLUID LEVEL SWITCH ............................. 8 (A 31)
CENTRAL LOCK CONTROL UNIT ........................... 10 (A 39)
CIGARETTE LIGHTER AND LIGHT .......................... 7 (A 24)
COOLANT FAN CONTROL/COOLANT TEMPERATURE SENDER UNIT ... 1 (D 1)
COOLANT TEMPERATURE SENDER (EXCEPT SLC) .............. 8 (A 29)
CRUISE CONTROL UNIT ............................... 4 (A 12
Ä15)
DEFOGGER SWITCH ...................................... 8 (E 29)
DIRECTIONAL HAZARD SWITCH ............................ 6 (A 21)
DOOR SWITCHES ....................................... 10 (B 38)
ENGINE CONTROL MODULE (ECM)(SLC) .................... 2 (A
ÄE 7)
FOG LIGHT SWITCH ..................................... 6 (A 23)
FRESH AIR SWITCH ............................. 6,9 (E 22, E 32)
FRESH AIR SWITCH ILLUMINATION LIGHT .................. 6 (D 20)
FUEL INJECTORS ........................................ 2 (D 4)
FUEL TANK SENDER ..................................... 5 (E 18)
FUSE #23 ............................................. 6 (D 20)
FUSE #51 ............................................. 9 (D 34)
FUSE/RELAY PANEL ............................... 5,8 (C 16, 31)
FUSE/RELAY PANEL LAYOUT ...................... 10 (D, E 37, 39)
GLOVE COMPARTMENT LIGHT .......................... 9 (D 30, 31)
HYDRAULIC PUMP RELAY ............................... 5 (D-E 15)
HYDRAULIC UNIT .................................... 5 (E 17
Ä15)
IGNITION COIL ......................................... 2 (E 6)
IGNITION SWITCH ...................................... 5 (A 16)
INSTRUMENT CLUSTER .............................. 9 (A
ÄD 32Ä34)
INTERIOR LIGHT SWITCH ............................... 11 (E 41)