1993 VOLKSWAGEN CORRADO light
[x] Cancel search: lightPage 665 of 920

MAINTENANCE INFORMATION
Article Text (p. 18)
1993 Volkswagen Corrado
For Volkswagen Technical Site: http://vw.belcom.ru
Copyright © 1998 Mitchell Repair Information Company, LLC
Wednesday, March 22, 2000 09:14PM
WARNING: Always disconnect battery ground cable before servicing
"high-current fuses. It is recommended that "high-current"
fuses be replaced by a qualified technician.
Fuse & Circuit Breaker Identification
1 - 10 Amp (Red)
Left Low Beam
2 - 10 Amp (Red)
Right Low Beam
3 - 10 Amp (Red)
Instrument Lights, License Plate Lights
4 - 15 Amp (Blue)
Rear Window Wiper, Sliding Roof
5 - 15 Amp (Blue)
Windshield & Rear Window Washer, Windshield Wiper
6 - 20 Amp (Yellow)
Air Conditioner, Fresh Air Fan
7 - 10 Amp (Red)
Right Tail & Side Lights
8 - 10 Amp (Red)
Left Tail & Side Lights
9 - 20 Amp (Yellow)
Rear Window Defroster, Mirror Heating
10 - 15 Amp (Blue)
Foglights
11 - 10 Amp (Red)
Left High Beam, High Beam Indicator
12 - 10 Amp (Red)
Right High Beam
13 - 10 Amp (Red)
Horn, Radiator Fan
14 - 15 Amp (Blue)
Back-Up Lights, Electric Mirrors, Heated Washer Jets
15 - 10 Amp (Red)
Crankcase Ventilation Heating Element
16 - 15 Amp (Blue)
Warning/Indicator Lights, Multi-Function Indicator, Glove Box
Light, Cassette Storage Light, Rear Spoiler Control Unit
17 - 10 Amp (Red)
Emergency Flashers, Turn Signals
18 - 20 Amp (Yellow)
Fuel Pump, Heated Oxygen Sensor Control
19 - 30 Amp (Green)
Radiator Fan, Air Conditioner
20 - 10 Amp (Red)
Brake Lights, Cruise Control
21 - 15 Amp (Blue)
Dome & Luggage Compartment Lights, Cigarette Lighter, Clock
Central Locking System, Multi-Function Indicator,
Rear Spoiler Adjustment
22 - 10 Amp (Red)
Page 666 of 920

MAINTENANCE INFORMATION
Article Text (p. 19)
1993 Volkswagen Corrado
For Volkswagen Technical Site: http://vw.belcom.ru
Copyright © 1998 Mitchell Repair Information Company, LLC
Wednesday, March 22, 2000 09:14PM
Radio
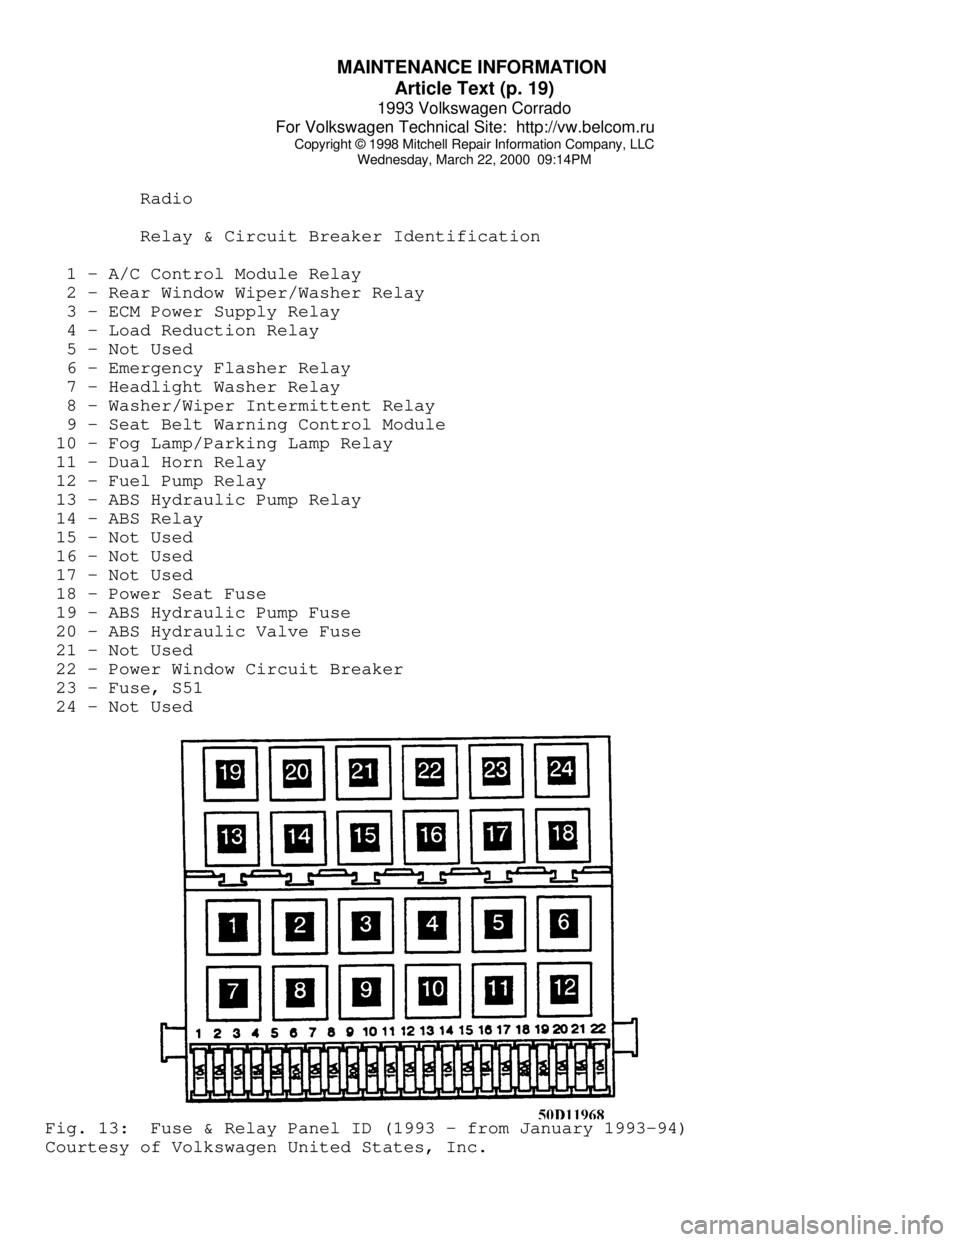
Relay & Circuit Breaker Identification
1 - A/C Control Module Relay
2 - Rear Window Wiper/Washer Relay
3 - ECM Power Supply Relay
4 - Load Reduction Relay
5 - Not Used
6 - Emergency Flasher Relay
7 - Headlight Washer Relay
8 - Washer/Wiper Intermittent Relay
9 - Seat Belt Warning Control Module
10 - Fog Lamp/Parking Lamp Relay
11 - Dual Horn Relay
12 - Fuel Pump Relay
13 - ABS Hydraulic Pump Relay
14 - ABS Relay
15 - Not Used
16 - Not Used
17 - Not Used
18 - Power Seat Fuse
19 - ABS Hydraulic Pump Fuse
20 - ABS Hydraulic Valve Fuse
21 - Not Used
22 - Power Window Circuit Breaker
23 - Fuse, S51
24 - Not UsedFig. 13: Fuse & Relay Panel ID (1993 - from January 1993-94)
Courtesy of Volkswagen United States, Inc.
Page 667 of 920

MAINTENANCE INFORMATION
Article Text (p. 20)
1993 Volkswagen Corrado
For Volkswagen Technical Site: http://vw.belcom.ru
Copyright © 1998 Mitchell Repair Information Company, LLC
Wednesday, March 22, 2000 09:14PM
WARNING: Always disconnect battery ground cable before servicing
"high-current fuses. It is recommended that "high-current"
fuses be replaced by a qualified technician.
Fuse & Circuit Breaker Identification
1 - 10 Amp (Red)
Left Low Beam
2 - 10 Amp (Red)
Right Low Beam
3 - 10 Amp (Red)
Instrument Lights, License Plate Lights
4 - 15 Amp (Blue)
Rear Window Wiper, Sliding Roof
5 - 15 Amp (Blue)
Windshield & Rear Window Washer, Windshield Wiper
6 - 20 Amp (Yellow)
Air Conditioner, Fresh Air Fan
7 - 10 Amp (Red)
Right Tail & Side Lights
8 - 10 Amp (Red)
Left Tail & Side Lights
9 - 20 Amp (Yellow)
Rear Window Defroster, Mirror Heating
10 - 15 Amp (Blue)
Foglights
11 - 10 Amp (Red)
Left High Beam, High Beam Indicator
12 - 10 Amp (Red)
Right High Beam
13 - 10 Amp (Red)
Horn, Radiator Fan
14 - 15 Amp (Blue)
Back-Up Lights, Electric Mirrors, Heated Washer Jets
15 - 10 Amp (Red)
Crankcase Ventilation Heating Element
16 - 15 Amp (Blue)
Warning/Indicator Lights, Multi-Function Indicator, Glove Box
Light, Cassette Storage Light, Rear Spoiler Control Unit
17 - 10 Amp (Red)
Emergency Flashers, Turn Signals
18 - 20 Amp (Yellow)
Fuel Pump, Heated Oxygen Sensor
19 - 30 Amp (Green)
Radiator Fan, Air Conditioner
20 - 10 Amp (Red)
Brake Lights, Cruise Control
21 - 15 Amp (Blue)
Dome & Luggage Compartment Lights, Cigarette Lighter, Clock
Central Locking System, Multi-Function Indicator,
Rear Spoiler Adjustment
22 - 10 Amp (Red)
Page 668 of 920

MAINTENANCE INFORMATION
Article Text (p. 21)
1993 Volkswagen Corrado
For Volkswagen Technical Site: http://vw.belcom.ru
Copyright © 1998 Mitchell Repair Information Company, LLC
Wednesday, March 22, 2000 09:14PM
Radio
Relay & Circuit Breaker Identification
1 - A/C Control Module Relay
2 - Rear Window Wiper/Washer Relay
3 - ECM Power Supply Relay
4 - Load Reduction Relay
5 - Engine Coolant Level (ECL) Control Module
6 - Emergency Flasher Relay
7 - Headlight Washer Relay
8 - Washer/Wiper Intermittent Relay
9 - Seat Belt Warning Control Module
10 - Fog Lamp/Parking Lamp Relay
11 - Dual Horn Relay
12 - Fuel Pump Relay
13 - Back-Up Light Fuse (A/T)
14 - Coolant After-Run Control Module
15 - ABS Hydraulic Pump Relay
16 - ABS Relay
17 - Not Used
18 - Power Seat Fuse
19 - A/C Relay
20 - Park/Neutral Position (PNP) Relay
21 - ABS Hydraulic Pump Fuse/Power Window Circuit Breaker
22 - ABS Hydraulic Valve Fuse
23 - Cruise Control Fuse/Automatic Shoulder Belt System Fuse
24 - Not Used
END OF ARTICLE
Page 669 of 920

MAINTENANCE REMINDER LIGHT RESET PROCEDURES
Article Text
1993 Volkswagen Corrado
For Volkswagen Technical Site: http://vw.belcom.ru
Copyright © 1998 Mitchell Repair Information Company, LLC
Wednesday, March 22, 2000 09:20PM
ARTICLE BEGINNING
1983-96 MAINTENANCE
Volkswagen Maintenance Reminder Light Reset Procedures
EGR MAINTENANCE LIGHT (IF EQUIPPED)
EGR light comes on at 15,000 mile intervals to indicate EGR
servicing is required. After checking EGR system, reset mileage
counter. See RESETTING MILEAGE COUNTER.
OXYGEN SENSOR WARNING LIGHT (IF EQUIPPED)
Oxygen sensor (OXS) light comes on at 30,000 mile intervals
to indicate oxygen sensor replacement. After installing new sensor,
reset mileage counter. See RESETTING MILEAGE COUNTER.
RESETTING MILEAGE COUNTER (IF EQUIPPED)
1) On some Rabbit and Pickup models, remove instrument panel
cover plate. Reach into opening at top left corner of speedometer and
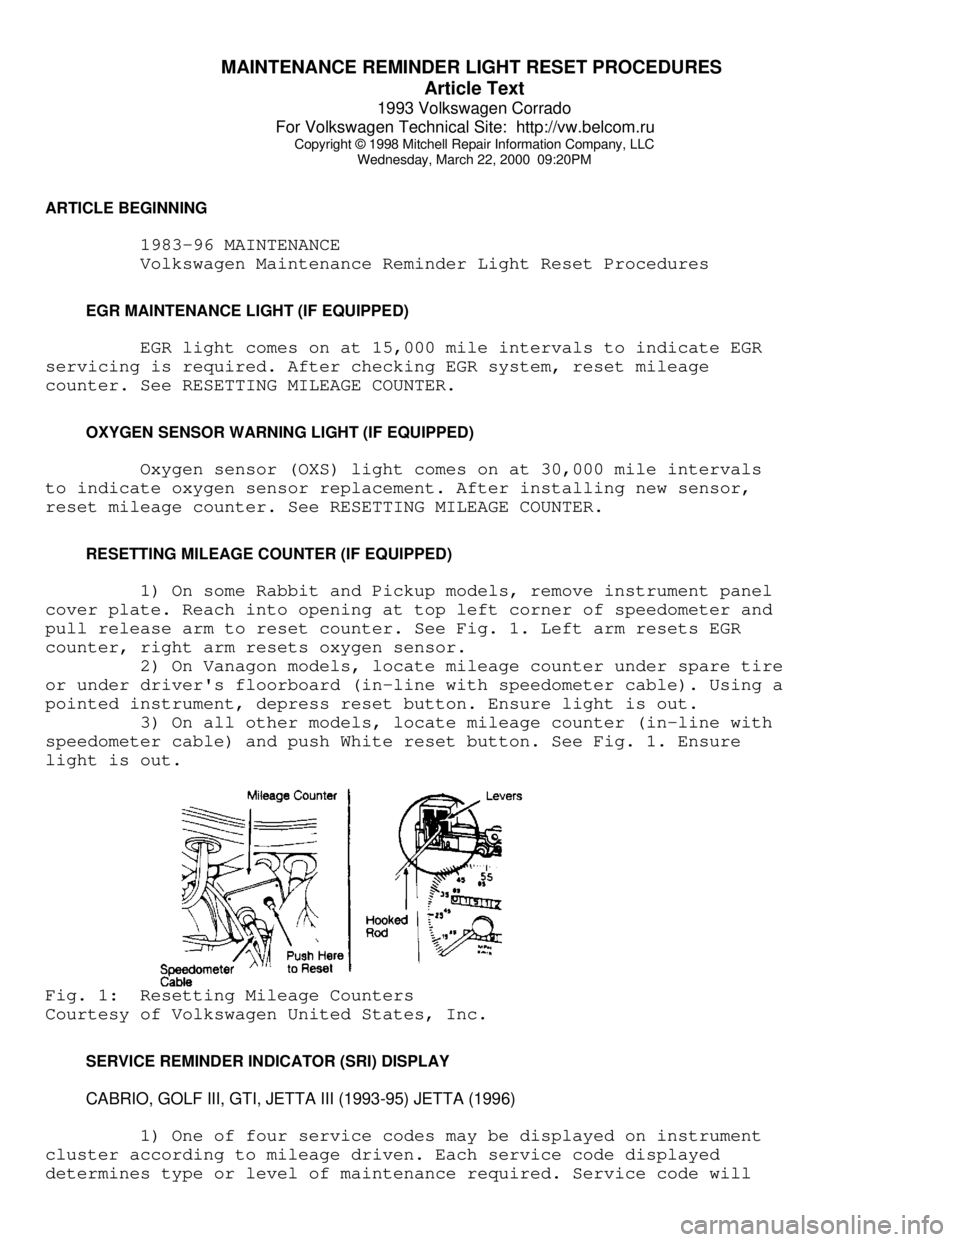
pull release arm to reset counter. See Fig. 1. Left arm resets EGR
counter, right arm resets oxygen sensor.
2) On Vanagon models, locate mileage counter under spare tire
or under driver's floorboard (in-line with speedometer cable). Using a
pointed instrument, depress reset button. Ensure light is out.
3) On all other models, locate mileage counter (in-line with
speedometer cable) and push White reset button. See Fig. 1. Ensure
light is out.Fig. 1: Resetting Mileage Counters
Courtesy of Volkswagen United States, Inc.
SERVICE REMINDER INDICATOR (SRI) DISPLAY
CABRIO, GOLF III, GTI, JETTA III (1993-95) JETTA (1996)
1) One of four service codes may be displayed on instrument
cluster according to mileage driven. Each service code displayed
determines type or level of maintenance required. Service code will
Page 670 of 920

MAINTENANCE REMINDER LIGHT RESET PROCEDURES
Article Text (p. 2)
1993 Volkswagen Corrado
For Volkswagen Technical Site: http://vw.belcom.ru
Copyright © 1998 Mitchell Repair Information Company, LLC
Wednesday, March 22, 2000 09:20PM
flash for approximately 3 seconds in odometer display window as
ignition is turned on. When servicing becomes due (every 7500 miles),
appropriate service code will flash for approximately 60 seconds. The
four service codes available for display are as follows:
* IN 00 (No Service Necessary)
* OEL (Oil Change Service) Every 7500 Miles
* IN 01 (Inspection Service) Every 15,000 Miles
* IN 02 (Additional Servicing Work) Every 30,000 Miles
2) After performing required maintenance, each effected
service code displayed must be reset individually. For example, at 15,
000 miles service codes OEL and IN 01 will both need to be reset.
3) To reset service codes, turn ignition on. Press and hold
odometer reset button located below speedometer. While holding button,
press clock reset button (lower button for digital clock) located to
left of fuel gauge. Release buttons. Programming mode is now
activated. Service code OEL1.S (distance counter) should be displayed.
4) Press clock reset button once more. 7500 miles should now
be indicated on display. Desired mileage for reset may be attained by
pressing clock reset button. Mileage displayed will decrease in
increments of 500 miles each time button is pressed. This feature
should only be used to calibrate mileage when instrument cluster is
replaced. When desired mileage is displayed, press odometer reset
button.
5) Service code OEL2.S (time counter) should be displayed.
Press clock reset button. 6 (months) will be indicated on display.
Time counter for next oil change may be set by pressing clock reset
button if instrument cluster was replaced. When desired time is
displayed, press odometer reset button.
6) Service code IN 01.S (time counter) should be displayed.
Press clock reset button. 12 (months) will be indicated on display.
Time counter for next maintenance interval may be set by pressing
clock reset button if instrument cluster was replaced. When desired
time is displayed, press odometer reset button.
7) Service code IN 02.S (distance counter) should be
displayed. Press clock reset button. 30,000 (miles) will be indicated
on display. Desired mileage for reset may be attained by pressing
clock reset button. Mileage displayed will decrease in increments of
500 miles each time button is pressed. This feature should only be
used to calibrate mileage when instrument cluster is replaced. When
desired mileage is displayed, turn ignition off. Programming is now
stored in memory.
END OF ARTICLE
Page 671 of 920

METRIC CONVERSIONS
Article Text
1993 Volkswagen Corrado
For Volkswagen Technical Site: http://vw.belcom.ru
Copyright © 1998 Mitchell Repair Information Company, LLC
Wednesday, March 22, 2000 09:20PM
ARTICLE BEGINNING
GENERAL INFORMATION
METRIC CONVERSIONS
METRIC CONVERSIONS
Metric conversions are making life more difficult for the
mechanic. In addition to doubling the number of tools required,
metric-dimensioned nuts and bolts are used alongside English
components in many new vehicles. The mechanic has to decide which tool
to use, slowing down the job. The tool problem can be solved by trial
and error, but some metric conversions aren't so simple. Converting
temperature, lengths or volumes requires a calculator and conversion
charts, or else a very nimble mind. Conversion charts are only part of
the answer though, because they don't help you "think" metric, or
"visualize" what you are converting. The following examples are
intended to help you "see" metric sizes:
LENGTH
Meters are the standard unit of length in the metric system.
The smaller units are 10ths (decimeter), 100ths (centimeter), and
1000ths (millimeter) of a meter. These common examples might help you
to visualize the metric units:
* A meter is slightly longer than a yard (about 40 inches).
* An aspirin tablet is about one centimeter across (.4 inches).
* A millimeter is about the thickness of a dime.
VOLUME
Cubic meters and centimeters are used to measure volume, just
as we normally think of cubic feet and inches. Liquid volume
measurements include the liter and milliliter, like the English quarts
or ounces.
* One teaspoon is about 4 cubic centimeters.
* A liter is about one quart.
* A liter is about 61 cubic inches.
WEIGHT
The metric weight system is based on the gram, with the most
common unit being the kilogram (1000 grams). Our comparable units are
ounces and pounds:
* A kilogram is about 2.2 pounds.
* An ounce is about 28 grams.
TORQUE
Page 675 of 920

MIRRORS - POWER
Article Text
1993 Volkswagen Corrado
For Volkswagen Technical Site: http://vw.belcom.ru
Copyright © 1998 Mitchell Repair Information Company, LLC
Wednesday, March 22, 2000 09:21PM
ARTICLE BEGINNING
1993 ACCESSORIES & EQUIPMENT
Volkswagen Power Mirrors
Volkswagen; Corrado SLC, Passat
DESCRIPTION & OPERATION
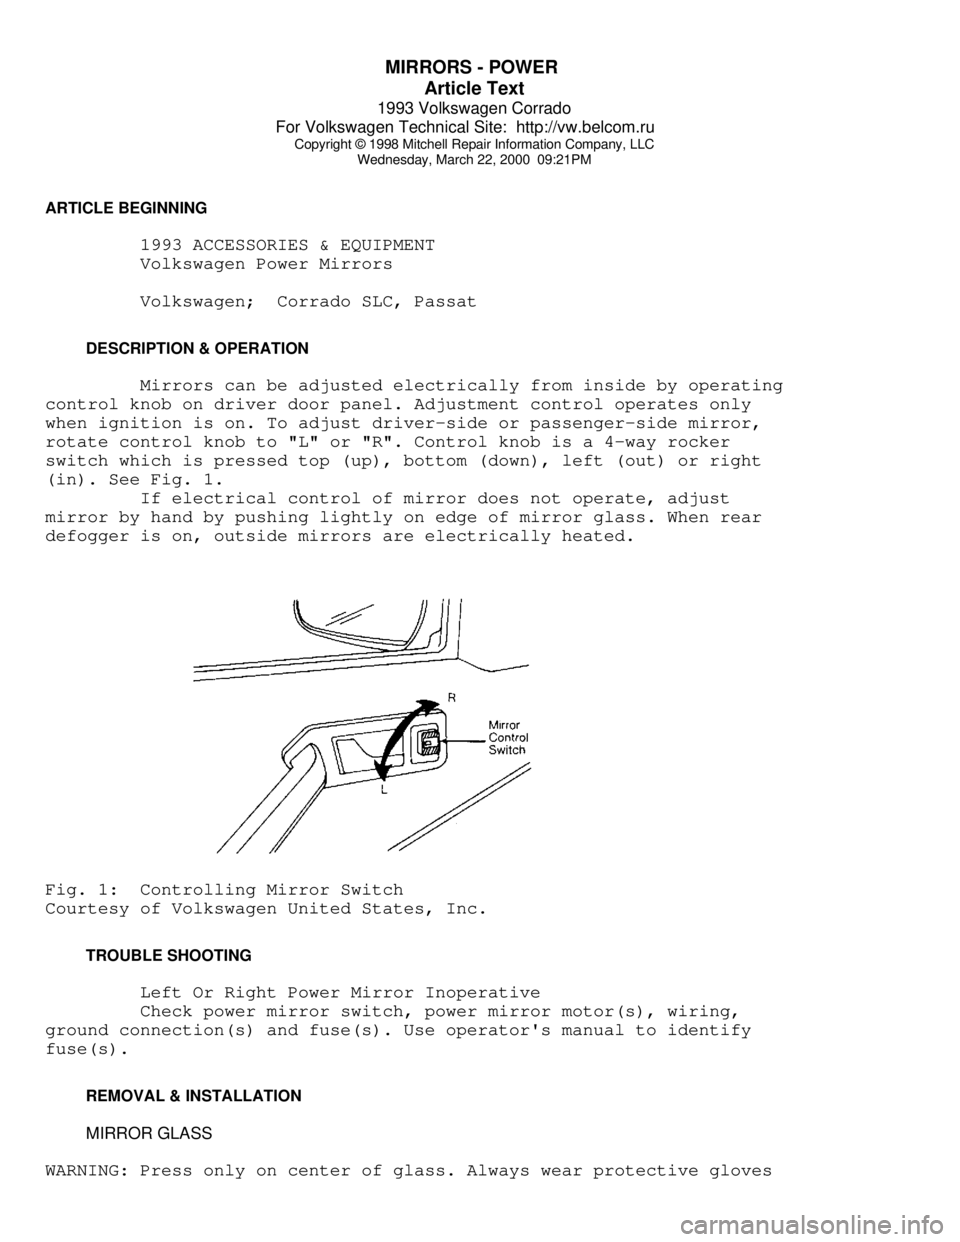
Mirrors can be adjusted electrically from inside by operating
control knob on driver door panel. Adjustment control operates only
when ignition is on. To adjust driver-side or passenger-side mirror,
rotate control knob to "L" or "R". Control knob is a 4-way rocker
switch which is pressed top (up), bottom (down), left (out) or right
(in). See Fig. 1.
If electrical control of mirror does not operate, adjust
mirror by hand by pushing lightly on edge of mirror glass. When rear
defogger is on, outside mirrors are electrically heated.Fig. 1: Controlling Mirror Switch
Courtesy of Volkswagen United States, Inc.
TROUBLE SHOOTING
Left Or Right Power Mirror Inoperative
Check power mirror switch, power mirror motor(s), wiring,
ground connection(s) and fuse(s). Use operator's manual to identify
fuse(s).
REMOVAL & INSTALLATION
MIRROR GLASS
WARNING: Press only on center of glass. Always wear protective gloves