1993 CHEVROLET PLYMOUTH ACCLAIM stop start
[x] Cancel search: stop startPage 1934 of 2438
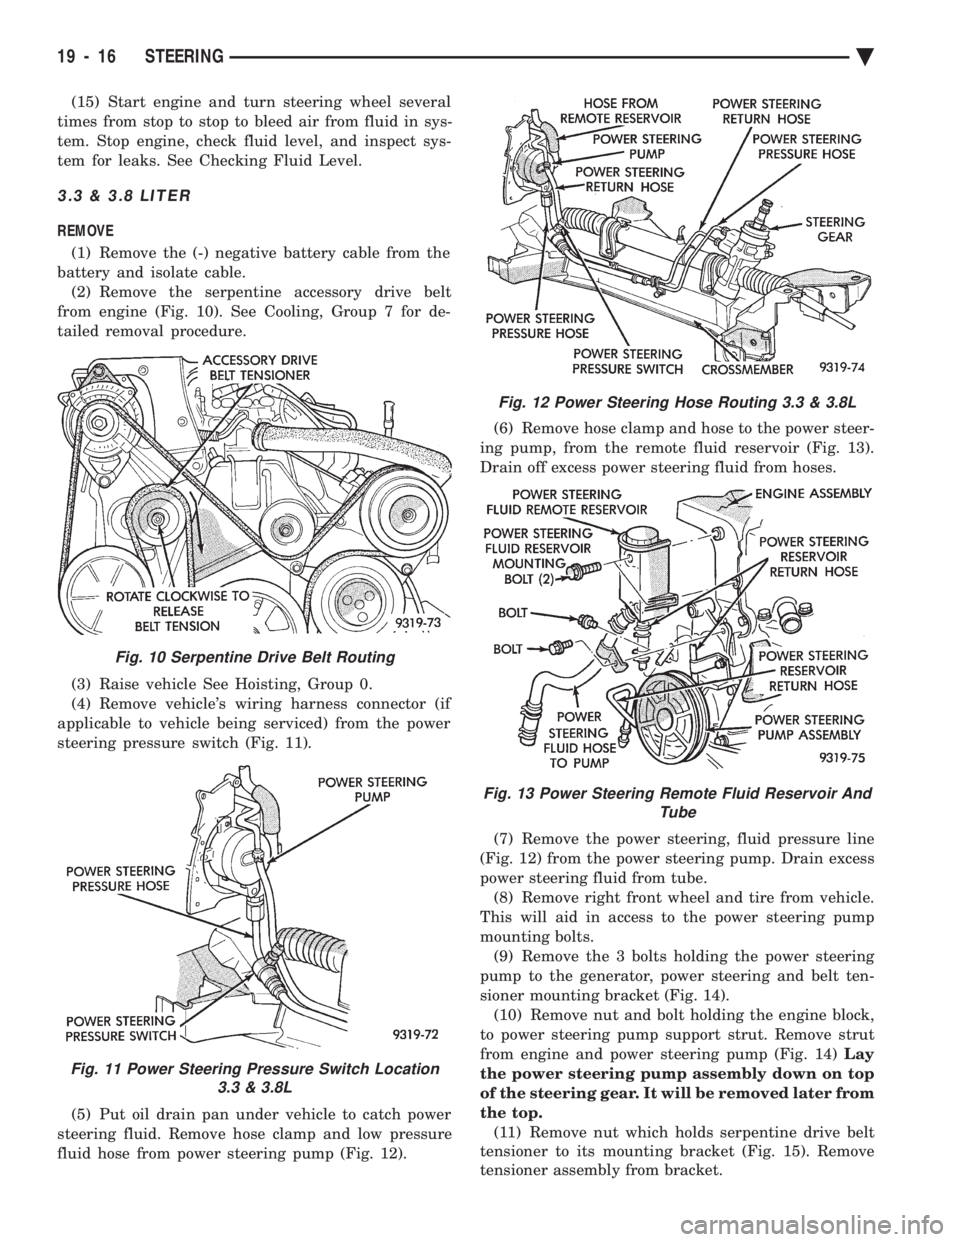
(15) Start engine and turn steering wheel several
times from stop to stop to bleed air from fluid in sys-
tem. Stop engine, check fluid level, and inspect sys-
tem for leaks. See Checking Fluid Level.
3.3 & 3.8 LITER
REMOVE
(1) Remove the (-) negative battery cable from the
battery and isolate cable. (2) Remove the serpentine accessory drive belt
from engine (Fig. 10). See Cooling, Group 7 for de-
tailed removal procedure.
(3) Raise vehicle See Hoisting, Group 0.
(4) Remove vehicle's wiring harness connector (if
applicable to vehicle being serviced) from the power
steering pressure switch (Fig. 11).
(5) Put oil drain pan under vehicle to catch power
steering fluid. Remove hose clamp and low pressure
fluid hose from power steering pump (Fig. 12). (6) Remove hose clamp and hose to the power steer-
ing pump, from the remote fluid reservoir (Fig. 13).
Drain off excess power steering fluid from hoses.
(7) Remove the power steering, fluid pressure line
(Fig. 12) from the power steering pump. Drain excess
power steering fluid from tube. (8) Remove right front wheel and tire from vehicle.
This will aid in access to the power steering pump
mounting bolts. (9) Remove the 3 bolts holding the power steering
pump to the generator, power steering and belt ten-
sioner mounting bracket (Fig. 14). (10) Remove nut and bolt holding the engine block,
to power steering pump support strut. Remove strut
from engine and power steering pump (Fig. 14) Lay
the power steering pump assembly down on top
of the steering gear. It will be removed later from
the top. (11) Remove nut which holds serpentine drive belt
tensioner to its mounting bracket (Fig. 15). Remove
tensioner assembly from bracket.
Fig. 10 Serpentine Drive Belt Routing
Fig. 11 Power Steering Pressure Switch Location 3.3 & 3.8L
Fig. 12 Power Steering Hose Routing 3.3 & 3.8L
Fig. 13 Power Steering Remote Fluid Reservoir And Tube
19 - 16 STEERING Ä
Page 1937 of 2438
(18) Lower vehicle.
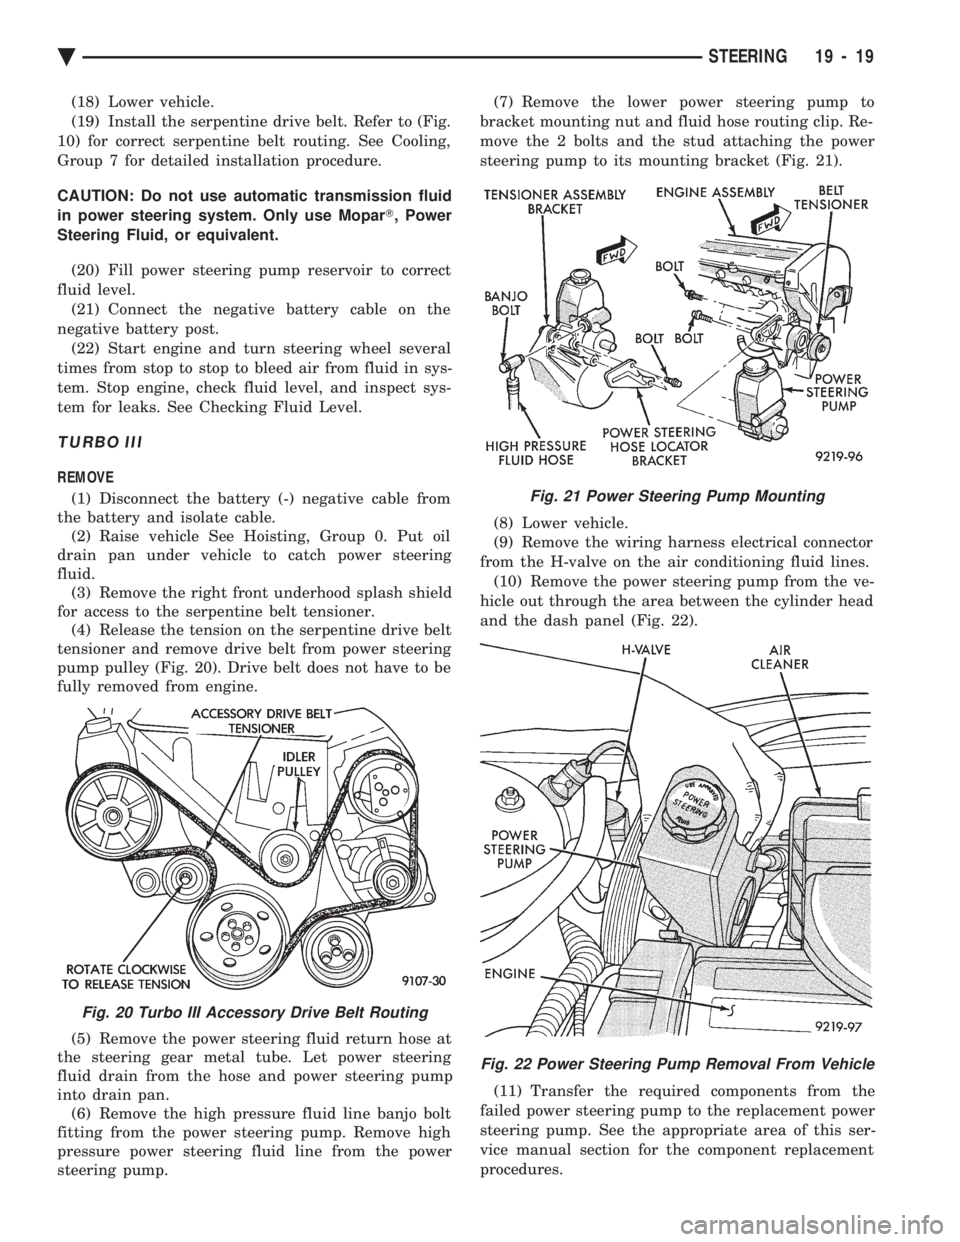
(19) Install the serpentine drive belt. Refer to (Fig.
10) for correct serpentine belt routing. See Cooling,
Group 7 for detailed installation procedure.
CAUTION: Do not use automatic transmission fluid
in power steering system. Only use Mopar T, Power
Steering Fluid, or equivalent.
(20) Fill power steering pump reservoir to correct
fluid level. (21) Connect the negative battery cable on the
negative battery post. (22) Start engine and turn steering wheel several
times from stop to stop to bleed air from fluid in sys-
tem. Stop engine, check fluid level, and inspect sys-
tem for leaks. See Checking Fluid Level.
TURBO III
REMOVE
(1) Disconnect the battery (-) negative cable from
the battery and isolate cable. (2) Raise vehicle See Hoisting, Group 0. Put oil
drain pan under vehicle to catch power steering
fluid. (3) Remove the right front underhood splash shield
for access to the serpentine belt tensioner. (4) Release the tension on the serpentine drive belt
tensioner and remove drive belt from power steering
pump pulley (Fig. 20). Drive belt does not have to be
fully removed from engine.
(5) Remove the power steering fluid return hose at
the steering gear metal tube. Let power steering
fluid drain from the hose and power steering pump
into drain pan. (6) Remove the high pressure fluid line banjo bolt
fitting from the power steering pump. Remove high
pressure power steering fluid line from the power
steering pump. (7) Remove the lower power steering pump to
bracket mounting nut and fluid hose routing clip. Re-
move the 2 bolts and the stud attaching the power
steering pump to its mounting bracket (Fig. 21).
(8) Lower vehicle.
(9) Remove the wiring harness electrical connector
from the H-valve on the air conditioning fluid lines. (10) Remove the power steering pump from the ve-
hicle out through the area between the cylinder head
and the dash panel (Fig. 22).
(11) Transfer the required components from the
failed power steering pump to the replacement power
steering pump. See the appropriate area of this ser-
vice manual section for the component replacement
procedures.
Fig. 20 Turbo III Accessory Drive Belt Routing
Fig. 21 Power Steering Pump Mounting
Fig. 22 Power Steering Pump Removal From Vehicle
Ä STEERING 19 - 19
Page 1938 of 2438
INSTALL (1) Install the power steering pump back into the
vehicle in the reverse order of removal, between cyl-
inder head and dash panel (Fig. 20). (2) Install the wiring harness connector back on
the H-valve located on the air conditioning fluid
lines (Fig. 20). (3) Raise vehicle See Hoisting, Group 0.
(4) Install the power steering pump on its mount-
ing bracket, and the hose locator bracket. Install the
bolt/stud and 2 bolts attaching the power steering
pump to its mounting bracket, and the bolts attach-
ing the hose locator bracket (Fig. 19). Torque all fas-
teners to 31 N Im (280 in. lbs.).
(5) Install the power steering fluid pressure hose,
banjo bolt and seal washer onto power steering pump
(Fig. 4). Pressure hose is to be installed so it is
routed to the left of the hose locator bracket (Fig.
19). Torque the banjo bolt to 31 N Im (275 in. lbs.).
Inspect the O-rings on the banjo bolt to ensure
they are not damaged and located correctly. (6) Install the low pressure fluid return hose from
the power steering pump back on the steel tube on
the steering gear (Fig. 4). Install hose clamp, be sure
the hose clamp is installed past the retaining bead
the steel tube. Install the hose routing clip on the
power steering pump bolt/stud, install clip retaining
nut and tighten. (7) Install the serpentine accessory drive belt (Fig.
18). Be sure the belt is correctly installed and
aligned on all pulleys before starting engine. (8) Install the right front underhood splash shield.
CAUTION: Do not use automatic transmission fluid
in power steering system. Only use Mopar T, Power
Steering Fluid, or equivalent.
(9) Fill power steering pump reservoir to correct
fluid level. (10) Connect the negative battery cable on the
negative battery post. (11) Start engine and turn steering wheel several
times from stop to stop to bleed air from fluid in sys-
tem. Stop engine, check fluid level, and inspect sys-
tem for leaks. See Checking Fluid Level.
POWER STEERING PUMP PULLEY SERVICE
SAGINAW VANE SUBMERGED PUMP
REMOVE
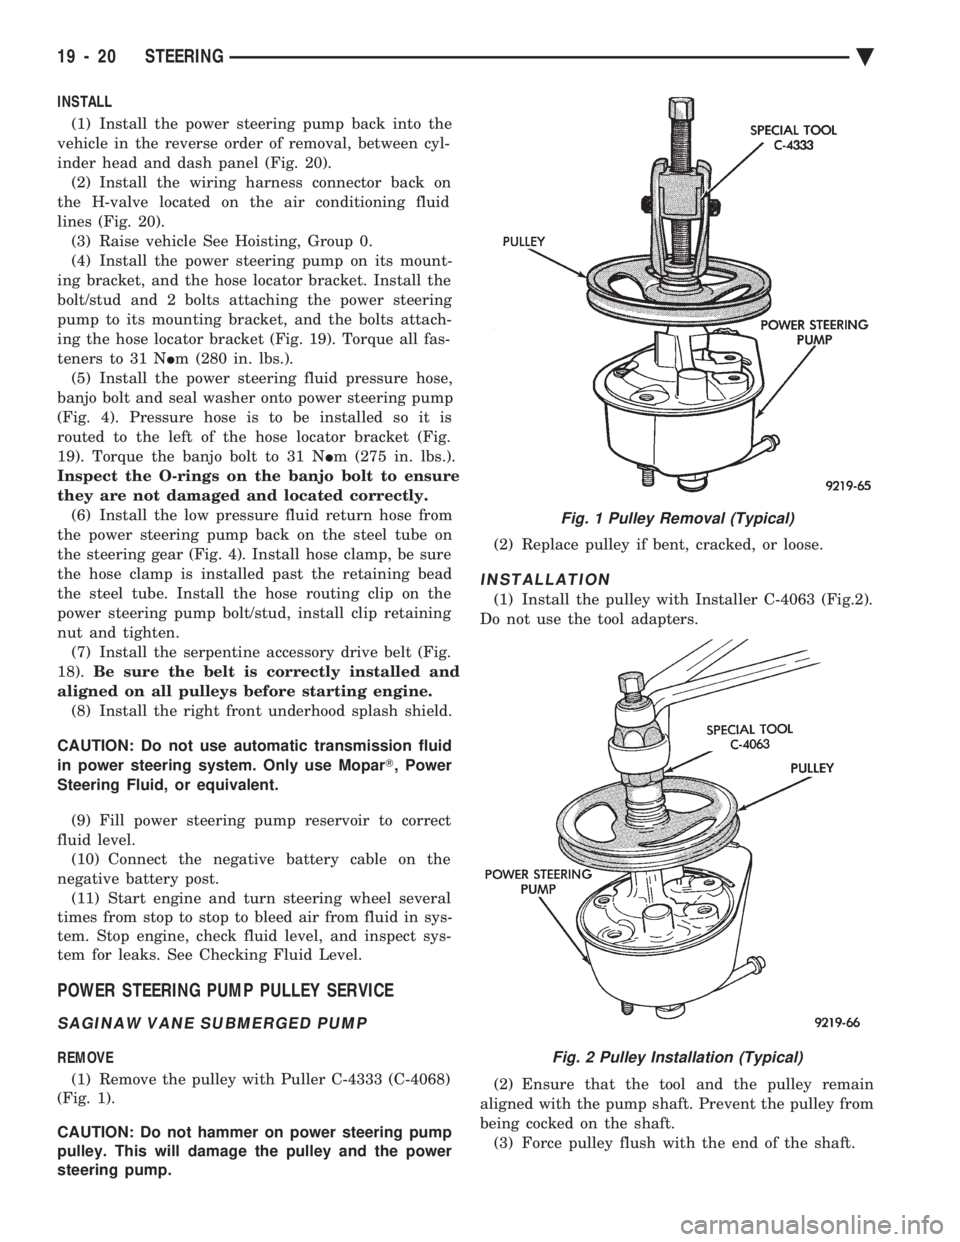
(1) Remove the pulley with Puller C-4333 (C-4068)
(Fig. 1).
CAUTION: Do not hammer on power steering pump
pulley. This will damage the pulley and the power
steering pump. (2) Replace pulley if bent, cracked, or loose.
INSTALLATION
(1) Install the pulley with Installer C-4063 (Fig.2).
Do not use the tool adapters.
(2) Ensure that the tool and the pulley remain
aligned with the pump shaft. Prevent the pulley from
being cocked on the shaft. (3) Force pulley flush with the end of the shaft.
Fig. 1 Pulley Removal (Typical)
Fig. 2 Pulley Installation (Typical)
19 - 20 STEERING Ä
Page 1942 of 2438
POWER STEERING PUMPÐINITIAL OPERATION
CAUTION: The fluid level should be checked with
engine off to prevent injury from moving compo-
nents. Use only Mopar TPower Steering Fluid. Do
not use automatic transmission fluid. Do not over-
fill.
Wipe filler cap clean, then check the fluid level.
The dipstick should indicate FULL COLDwhen the
fluid is at normal temperature of approximately 21ÉC
to 27ÉC (70ÉF to 80ÉF). (1) Fill power steering pump fluid reservoir to the
proper level. (2) Start the engine and let run for a few seconds.
Then turn the engine off.
(3) Add fluid if necessary. Repeat the above proce-
dure until the fluid level remains constant after run-
ning the engine. (4) Raise front wheels of vehicle off the ground.
(5) Start the engine. Slowly turn the steering
wheel right and left, lightly contacting the wheel
stops. Then turn the engine off. (6) Add power steering fluid if necessary.
(7) Lower the vehicle and turn the steering wheel
slowly from lock to lock. (8) Stop the engine. Check the fluid level and refill
as required. (9) If the fluid is extremely foamy, allow the vehi-
cle to stand a few minutes and repeat the above pro-
cedure.
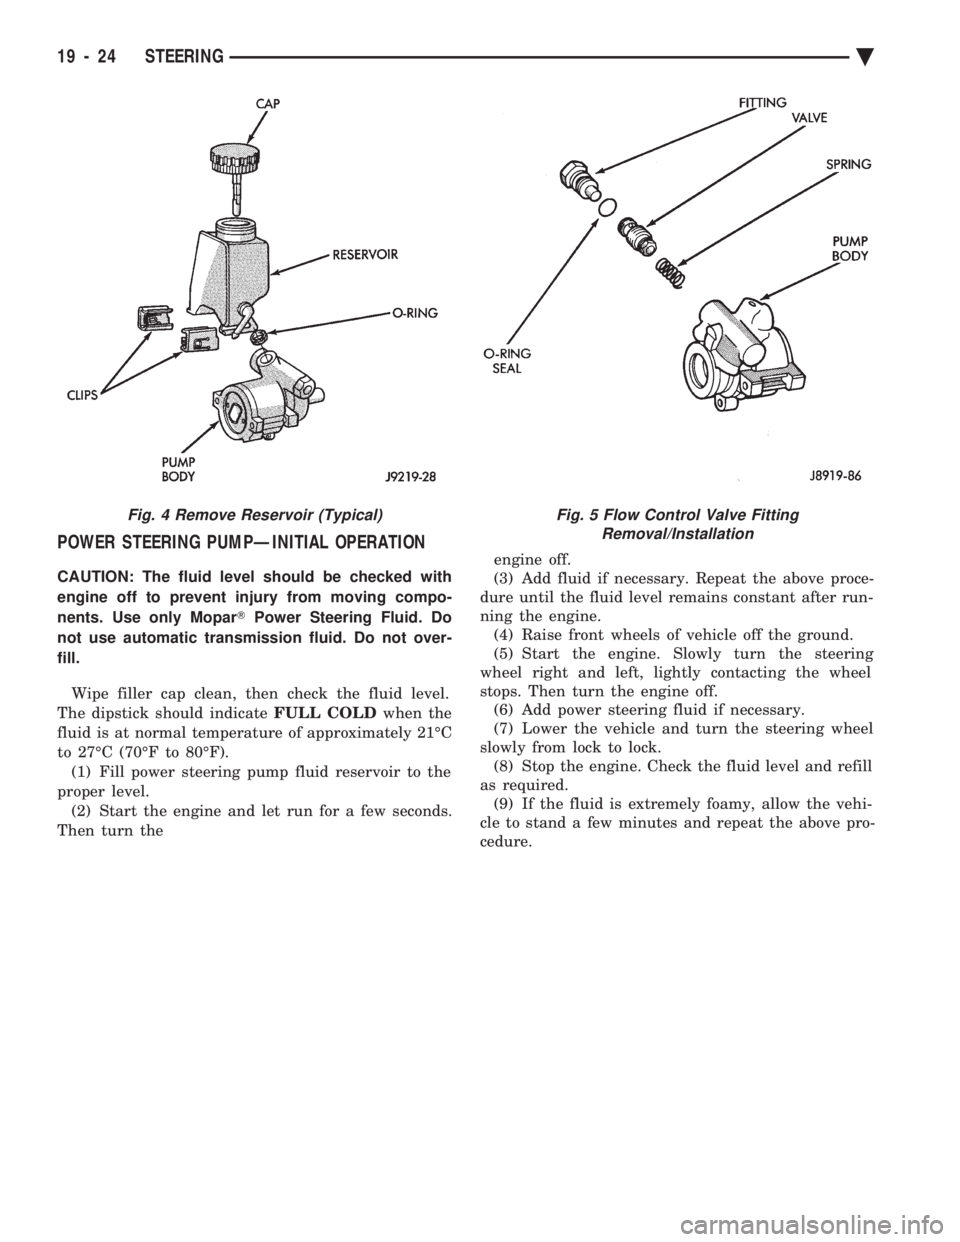
Fig. 4 Remove Reservoir (Typical)Fig. 5 Flow Control Valve Fitting Removal/Installation
19 - 24 STEERING Ä
Page 1945 of 2438
bolts and nut on locating stud (Fig. 2). The right rear
crossmember stud is a pilot that correctly locates
the crossmember. Tighten down this bolt first,
then torque all 4 crossmember fasteners to 122
N Im (90 ft. lbs.).
CAUTION: Proper torque on the crossmember to
frame rail mounting bolts is very important.
(3) Torque the 4 bolts (Fig. 3) attaching the steering
gear assembly to front crossmember, to 68 N Im (50 ft.
lbs.). To ensure proper alignment of the steering
gear tighten left front bolt first. (4) Attach the engine damper strut from the engine
to the crossmember (if so equipped). (5) Attach the fluid tubes (Fig. 3) from the power
steering pump to the fittings on the steering gear.
Torque the fluid pressure line to steering gear tube nut
to 31 N Im (275 in. lbs.).
(6) Mount the outer tie rod ends to the steering
knuckles. Install the tie rod end to steering knuckle
attaching nuts. Torque the tie rod end to steering
knuckle nuts to 52 N Im (38 ft. lbs.). Install cotter pin
in tie rod end. (7) Install the front tire and wheel assemblies on
vehicle. Install the wheel lug nuts and torque to 129
N Im (95 ft. lbs.).
(8) Lower vehicle.
CAUTION: Do not use automatic transmission fluid. (9) Fill power steering pump fluid reservoir to the
(Full-Cold) proper level. (10) Start the engine and let run for a few seconds.
Then turn the engine off.
(11) Add fluid if necessary.
(12) Raise front wheels of vehicle off the ground.
(13) Start engine and turn steering wheel several
times from stop to stop to bleed air from fluid in
system. Stop engine, check fluid level, and inspect
system for leaks. Fill pump reservoir to correct
level with Mopar t, Power Steering Fluid, or
equivalent. See Checking Fluid Level.
(14) Lower front wheels of vehicle back on the
ground. (15) Adjust toe (Refer to Group 2 Suspension).
OUTER TIE ROD
REMOVAL
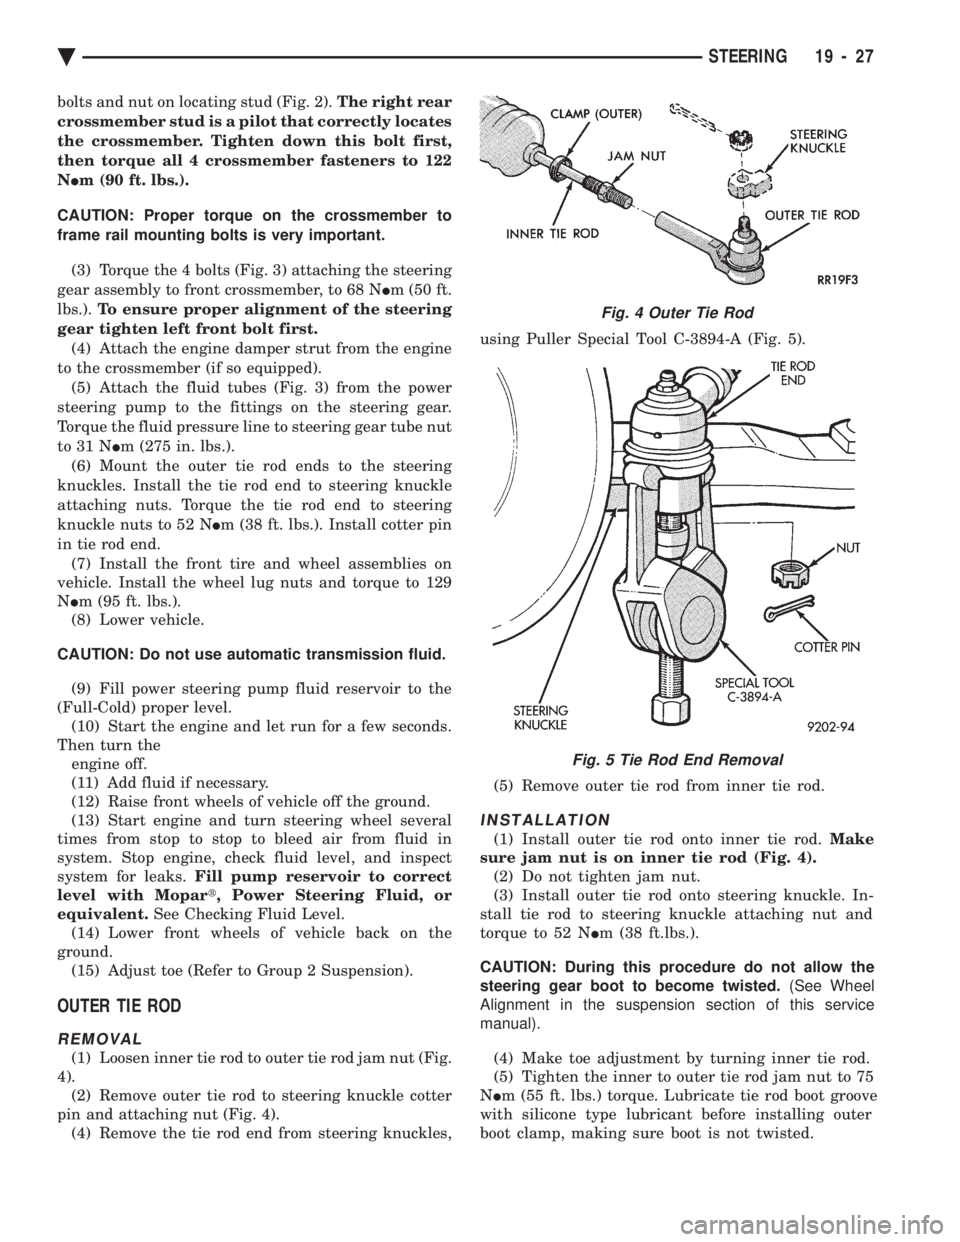
(1) Loosen inner tie rod to outer tie rod jam nut (Fig.
4). (2) Remove outer tie rod to steering knuckle cotter
pin and attaching nut (Fig. 4). (4) Remove the tie rod end from steering knuckles, using Puller Special Tool C-3894-A (Fig. 5).
(5) Remove outer tie rod from inner tie rod.
INSTALLATION
(1) Install outer tie rod onto inner tie rod. Make
sure jam nut is on inner tie rod (Fig. 4). (2) Do not tighten jam nut.
(3) Install outer tie rod onto steering knuckle. In-
stall tie rod to steering knuckle attaching nut and
torque to 52 N Im (38 ft.lbs.).
CAUTION: During this procedure do not allow the
steering gear boot to become twisted. (See Wheel
Alignment in the suspension section of this service
manual).
(4) Make toe adjustment by turning inner tie rod.
(5) Tighten the inner to outer tie rod jam nut to 75
N Im (55 ft. lbs.) torque. Lubricate tie rod boot groove
with silicone type lubricant before installing outer
boot clamp, making sure boot is not twisted.
Fig. 4 Outer Tie Rod
Fig. 5 Tie Rod End Removal
Ä STEERING 19 - 27
Page 2005 of 2438
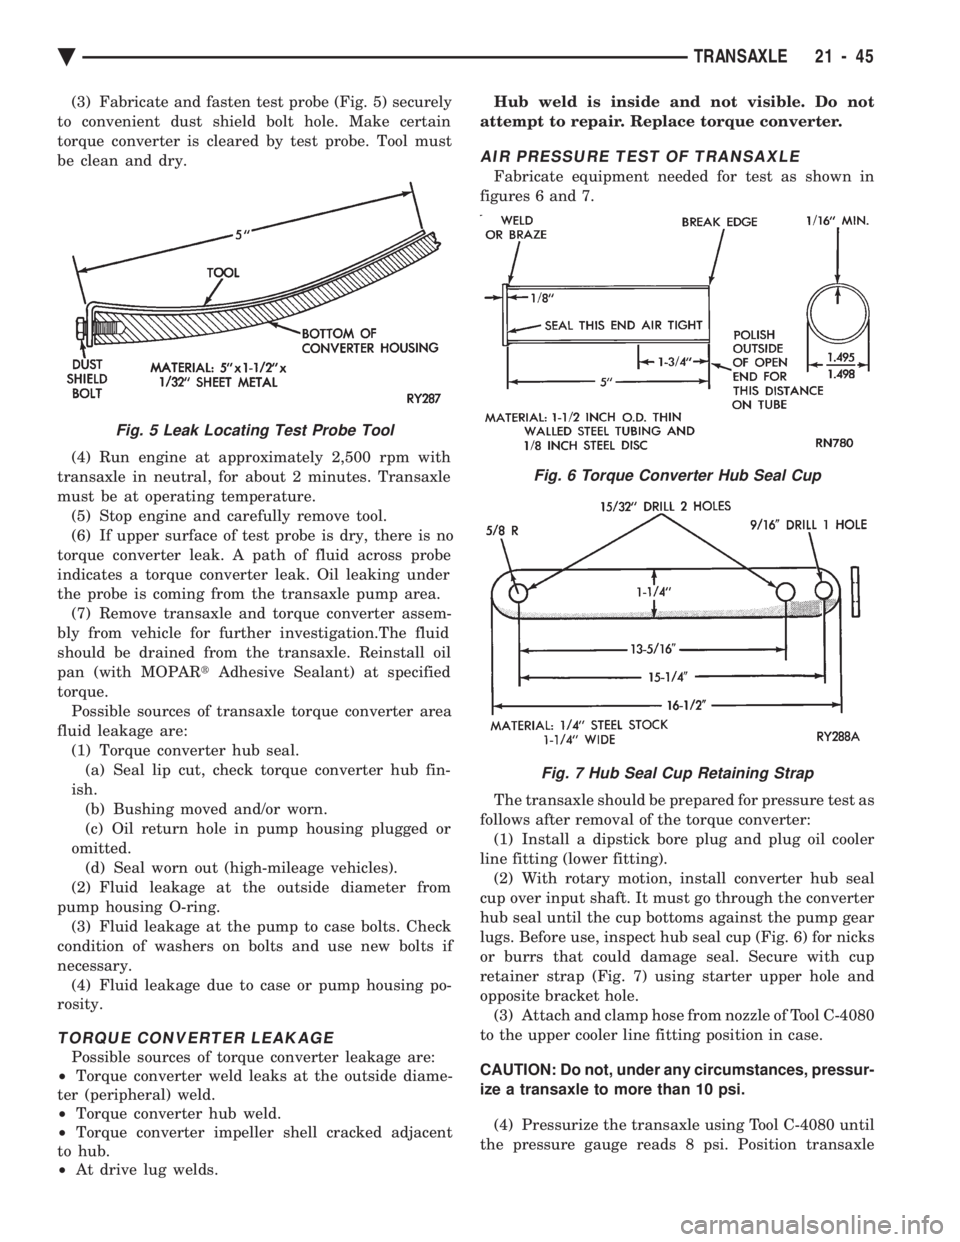
(3) Fabricate and fasten test probe (Fig. 5) securely
to convenient dust shield bolt hole. Make certain
torque converter is cleared by test probe. Tool must
be clean and dry.
(4) Run engine at approximately 2,500 rpm with
transaxle in neutral, for about 2 minutes. Transaxle
must be at operating temperature. (5) Stop engine and carefully remove tool.
(6) If upper surface of test probe is dry, there is no
torque converter leak. A path of fluid across probe
indicates a torque converter leak. Oil leaking under
the probe is coming from the transaxle pump area. (7) Remove transaxle and torque converter assem-
bly from vehicle for further investigation.The fluid
should be drained from the transaxle. Reinstall oil
pan (with MOPAR tAdhesive Sealant) at specified
torque. Possible sources of transaxle torque converter area
fluid leakage are: (1) Torque converter hub seal.(a) Seal lip cut, check torque converter hub fin-
ish. (b) Bushing moved and/or worn.
(c) Oil return hole in pump housing plugged or
omitted. (d) Seal worn out (high-mileage vehicles).
(2) Fluid leakage at the outside diameter from
pump housing O-ring. (3) Fluid leakage at the pump to case bolts. Check
condition of washers on bolts and use new bolts if
necessary. (4) Fluid leakage due to case or pump housing po-
rosity.
TORQUE CONVERTER LEAKAGE
Possible sources of torque converter leakage are:
² Torque converter weld leaks at the outside diame-
ter (peripheral) weld.
² Torque converter hub weld.
² Torque converter impeller shell cracked adjacent
to hub.
² At drive lug welds. Hub weld is inside and not visible. Do not
attempt to repair. Replace torque converter.
AIR PRESSURE TEST OF TRANSAXLE
Fabricate equipment needed for test as shown in
figures 6 and 7.
The transaxle should be prepared for pressure test as
follows after removal of the torque converter: (1) Install a dipstick bore plug and plug oil cooler
line fitting (lower fitting). (2) With rotary motion, install converter hub seal
cup over input shaft. It must go through the converter
hub seal until the cup bottoms against the pump gear
lugs. Before use, inspect hub seal cup (Fig. 6) for nicks
or burrs that could damage seal. Secure with cup
retainer strap (Fig. 7) using starter upper hole and
opposite bracket hole. (3) Attach and clamp hose from nozzle of Tool C-4080
to the upper cooler line fitting position in case.
CAUTION: Do not, under any circumstances, pressur-
ize a transaxle to more than 10 psi. (4) Pressurize the transaxle using Tool C-4080 until
the pressure gauge reads 8 psi. Position transaxle
Fig. 5 Leak Locating Test Probe Tool
Fig. 6 Torque Converter Hub Seal Cup
Fig. 7 Hub Seal Cup Retaining Strap
Ä TRANSAXLE 21 - 45
Page 2006 of 2438
so that pump housing and case front may be covered
with soapy solution or water. Leaks are sometimes
caused by porosity in the case or pump housing.If a leak source is located, that part and all associ-
ated seals, O-rings, and gaskets should be replaced
with new parts.
GEARSHIFT LINKAGE ADJUSTMENT
Normal operation of the Park/Neutral Position
Switch provides a quick check to confirm proper
manual linkage adjustment. Move the selector level slowly upward until it
clicks into the ``P'' Park notch in the selector gate. If
the starter will operate the ``P'' position is correct. After checking ``P'' position, move selector slowly
toward ``N'' Neutral position until lever drops in the
``N'' stop. If the starter will also operate at this point
the gearshift linkage is properly adjusted. If the
starter fails to operate in either position, linkage ad-
justment is required.
CAUTION: When it is necessary to disassemble
linkage cable from levers, which use plastic grom-
mets as retainers, the grommets should be replaced
with new grommets. Use a prying tool to force rod
from grommet in lever, then cut away old grommet.
Use pliers to snap new grommet into lever and rod
into grommet.
(1) Set parking brake.
(2) Place gearshift lever in P(PARK) position.
(3) Loosen clamp bolt on gearshift cable bracket.
(4) Column shift: Insure that preload adjustment
spring engages fork on transaxle bracket. (5) Pull the shift lever by hand to the front detent
position (PARK) and tighten lock. Tighten screw to
11 N Im (100 in. lbs.). Gearshift linkage should now
be properly adjusted. (6) Check adjustment as follows:(a) Detent position for neutral and drive should
be within limits of hand lever gate stops. (b) Key start must occur only when shift lever is
in park or neutral positions.
THROTTLE PRESSURE LINKAGE ADJUSTMENT
The throttle pressure cable adjustment is very im-
portant to proper transaxle operation. This adjust-
ment positions a valve which controls shift speed,
shift quality, and part throttle downshift sensitivity.
If the setting is too long, early shifts and slippage be-
tween shifts may occur. If the setting is too short,
shifts may be delayed and part throttle downshifts
may be very sensitive.
CABLE ADJUSTMENT PROCEDURE (4-CYL.)
(1) Perform transaxle throttle pressure cable ad-
justment while engine is at normal operating tem-
perature. (2) Loosen cable mounting bracket lock screw.
(3) Bracket should be positioned with both bracket
alignment tabs touching the transaxle cast surface.
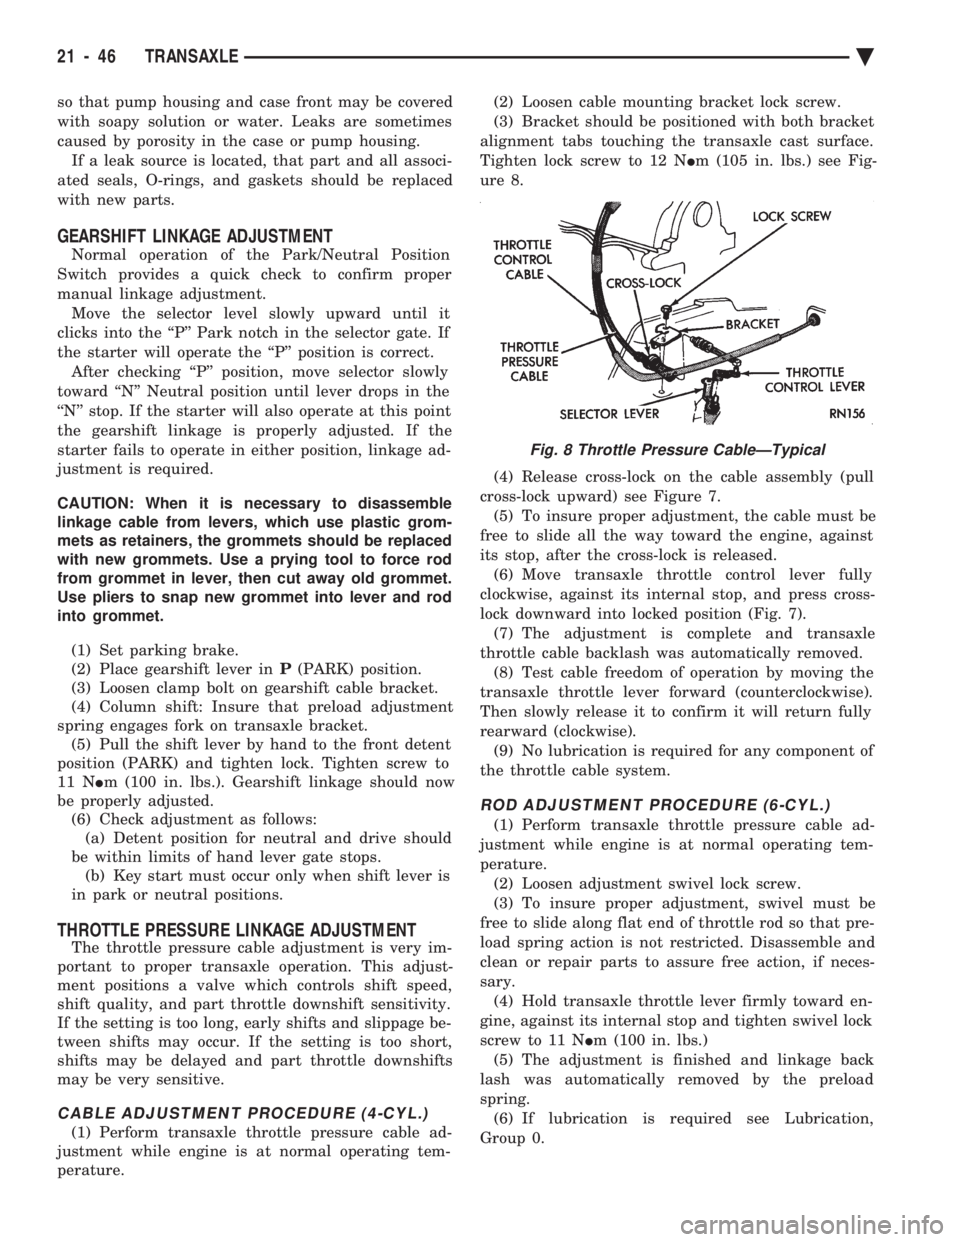
Tighten lock screw to 12 N Im (105 in. lbs.) see Fig-
ure 8.
(4) Release cross-lock on the cable assembly (pull
cross-lock upward) see Figure 7. (5) To insure proper adjustment, the cable must be
free to slide all the way toward the engine, against
its stop, after the cross-lock is released. (6) Move transaxle throttle control lever fully
clockwise, against its internal stop, and press cross-
lock downward into locked position (Fig. 7). (7) The adjustment is complete and transaxle
throttle cable backlash was automatically removed. (8) Test cable freedom of operation by moving the
transaxle throttle lever forward (counterclockwise).
Then slowly release it to confirm it will return fully
rearward (clockwise). (9) No lubrication is required for any component of
the throttle cable system.
ROD ADJUSTMENT PROCEDURE (6-CYL.)
(1) Perform transaxle throttle pressure cable ad-
justment while engine is at normal operating tem-
perature. (2) Loosen adjustment swivel lock screw.
(3) To insure proper adjustment, swivel must be
free to slide along flat end of throttle rod so that pre-
load spring action is not restricted. Disassemble and
clean or repair parts to assure free action, if neces-
sary. (4) Hold transaxle throttle lever firmly toward en-
gine, against its internal stop and tighten swivel lock
screw to 11 N Im (100 in. lbs.)
(5) The adjustment is finished and linkage back
lash was automatically removed by the preload
spring. (6) If lubrication is required see Lubrication,
Group 0.
Fig. 8 Throttle Pressure CableÐTypical
21 - 46 TRANSAXLE Ä
Page 2007 of 2438
BAND ADJUSTMENT
KICKDOWN BAND (FRONT)
The kickdown band adjusting screw is located on
left side (top front) of the transaxle case. (1) Loosen locknut and back off nut approximately
five turns. Test adjusting screw for free turning in
the transaxle case. (2) Using wrench, Tool C-3880-A with adapter Tool
C-3705, tighten band adjusting screw to 5 N Im (47 to
50 in. lbs.). If adapter C-3705 is not used, tighten ad-
justing screw to 8 N Im (72 in. lbs.) which is the true
torque. (3) Back off adjusting screw the number of turns
listed in Specifications . Hold adjusting screw in this
position and tighten locknut to 47 N Im (35 ft. lbs.)
LOW/REVERSE BAND-REAR
To adjust low-reverse band, proceed as follows:
(1) Loosen and back off locknut approximately 5
turns. (2) Using an inch-pound torque wrench, tighten
adjusting screw to 5 N Im (41 in. lbs.) true torque.
(3) Back off adjusting screw the number of turns
listed under Specifications in the rear of the Tran-
saxle Section in this service manual. (4) Tighten locknut to 14 N Im (10 ft. lbs.).
HYDRAULIC CONTROL PRESSURE ADJUSTMENTS
LINE PRESSURE
An incorrect throttle pressure setting will cause in-
correct line pressure readings even though line pres-
sure adjustment is correct. Always inspect and
correct throttle pressure adjustment before adjusting
the line pressure. The approximate adjustment for line pressure is
1-5/16 inches, measured from valve body to inner
edge of adjusting nut. However, due to manufactur-
ing tolerances, the adjustment can be varied to ob-
tain specified line pressure. The adjusting screw may be turned with an Allen
wrench. One complete turn of adjusting screw
changes closed throttle line pressure approximately
1-2/3 psi. Turning adjusting screw counterclockwise
increases pressure, and clockwise decreases pressure.
THROTTLE PRESSURE
Throttle pressures cannot be tested accurately;
therefore, the adjustment should be measured if a
malfunction is evident. (1) Insert gauge pin of Tool C-3763 between the
throttle lever cam and kickdown valve. (2) By pushing in on tool, compress kickdown
valve against its spring so throttle valve is com-
pletely bottomed inside the valve body. (3) While compressing spring, turn throttle lever
stop screw with adapter C-4553. Turn until head of screw touches throttle lever tang, with throttle lever
cam touching tool and throttle valve bottomed. Be sure
adjustment is made with spring fully compressed and
valve bottomed in the valve body.
VEHICLE SPEED SENSOR PINION GEAR
When the speed sensor is removed for any reason, a
NEW O-ring must be installed on its outside diameter.
REMOVAL AND INSTALLATION
(1) Remove speedometer cable (if so equipped).
(2) Remove harness connector from sensor. Make
sure weatherseal stays on harness connector. (3) Remove bolt securing the distance sensor in the
extension housing. (4) Carefully pull sensor and pinion gear assembly
out of extension housing. (5) Remove pinion gear from sensor.
(6) To install, reverse the above procedure. Make
sure extension housing and sensor flange are clean
prior to installation. Always use a NEW sensor O-ring. (7) Tighten securing bolt to 7 N Im (60 in. lbs.).
Tighten speedometer cable to 4 N Im (35 in. lbs.).
PARK/NEUTRAL POSITION AND BACK-UP LAMP
SWITCH
REPLACEMENT AND TEST
The Park/Neutral switch is the center terminal of the
3 terminal switch. It provides ground for the starter
solenoid circuit through the selector lever in only Park
and Neutral positions. (1) To test switch, remove wiring connector from
switch and test for continuity between center pin of
switch and transaxle case. Continuity should exist only
when transaxle is in Park or Neutral. (2) Check gearshift cable adjustment before replac-
ing a switch which tests bad. (3) Unscrew switch from transaxle case allowing
fluid to drain into a container. Move selector lever to
Park and then to Neutral positions. Inspect to see that
the switch operating lever fingers are centered in
switch opening in the case. (4) Screw the switch with a new seal into transaxle
case and tighten to 33 N Im (24 ft. lbs.). Retest switch
with the test lamp. (5) Add fluid to transaxle to bring up to proper level.
(6) The back-up lamp switch circuit is through the
two outside terminals of the 3 terminal switch. (7) To test switch, remove wiring connector from
switch and test for continuity between the two outside
pins. (8) Continuity should exist only with transaxle in
Reverse position. (9) No continuity should exist from either pin to the
case.
Ä TRANSAXLE 21 - 47