1993 CHEVROLET PLYMOUTH ACCLAIM belt
[x] Cancel search: beltPage 2219 of 2438
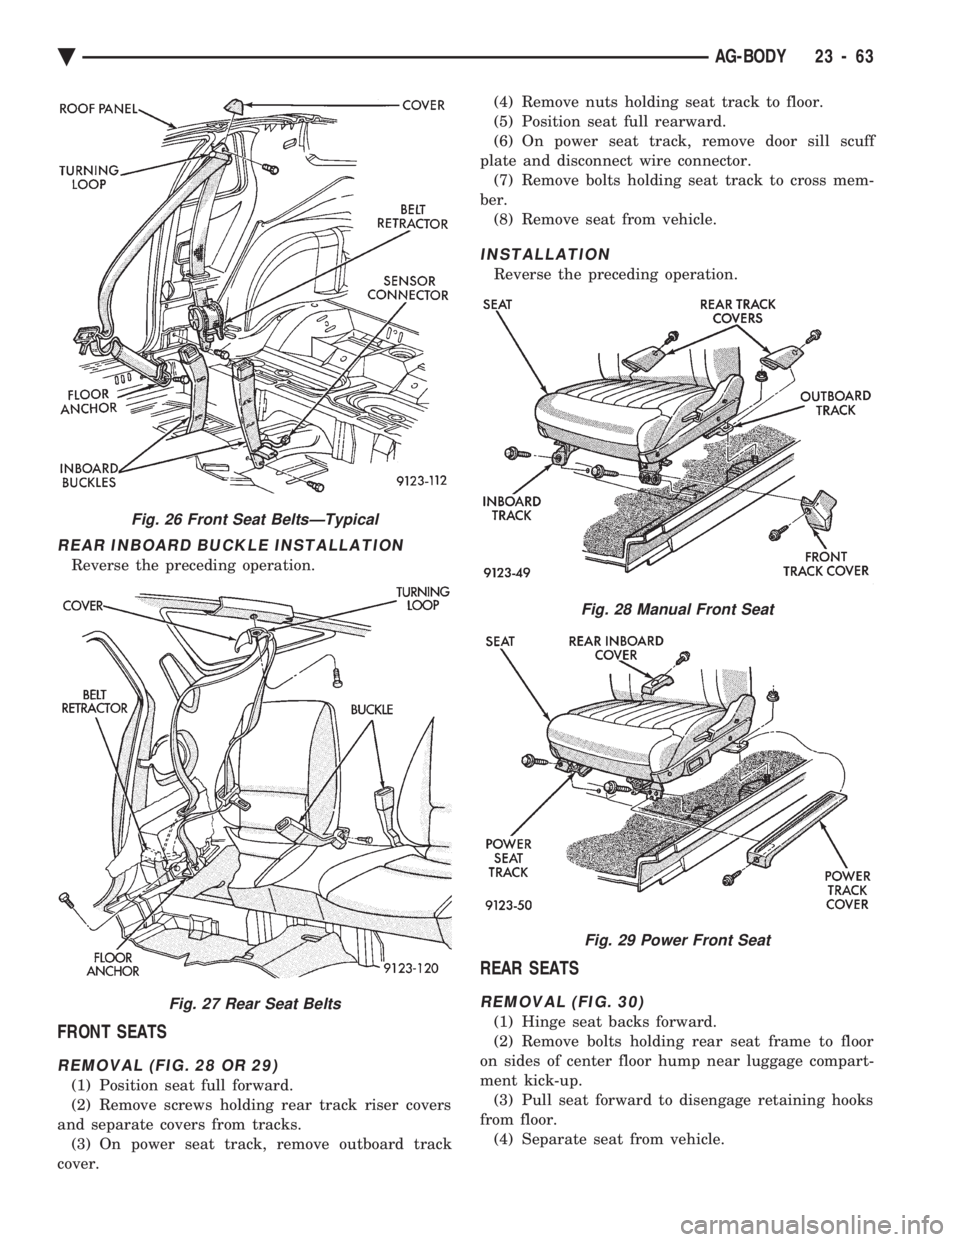
REAR INBOARD BUCKLE INSTALLATION
Reverse the preceding operation.
FRONT SEATS
REMOVAL (FIG. 28 OR 29)
(1) Position seat full forward.
(2) Remove screws holding rear track riser covers
and separate covers from tracks. (3) On power seat track, remove outboard track
cover. (4) Remove nuts holding seat track to floor.
(5) Position seat full rearward.
(6) On power seat track, remove door sill scuff
plate and disconnect wire connector. (7) Remove bolts holding seat track to cross mem-
ber. (8) Remove seat from vehicle.
INSTALLATION
Reverse the preceding operation.
REAR SEATS
REMOVAL (FIG. 30)
(1) Hinge seat backs forward.
(2) Remove bolts holding rear seat frame to floor
on sides of center floor hump near luggage compart-
ment kick-up. (3) Pull seat forward to disengage retaining hooks
from floor. (4) Separate seat from vehicle.
Fig. 26 Front Seat BeltsÐTypical
Fig. 27 Rear Seat Belts
Fig. 28 Manual Front Seat
Fig. 29 Power Front Seat
Ä AG-BODY 23 - 63
Page 2220 of 2438
INSTALLATION
Reverse the preceding operation.
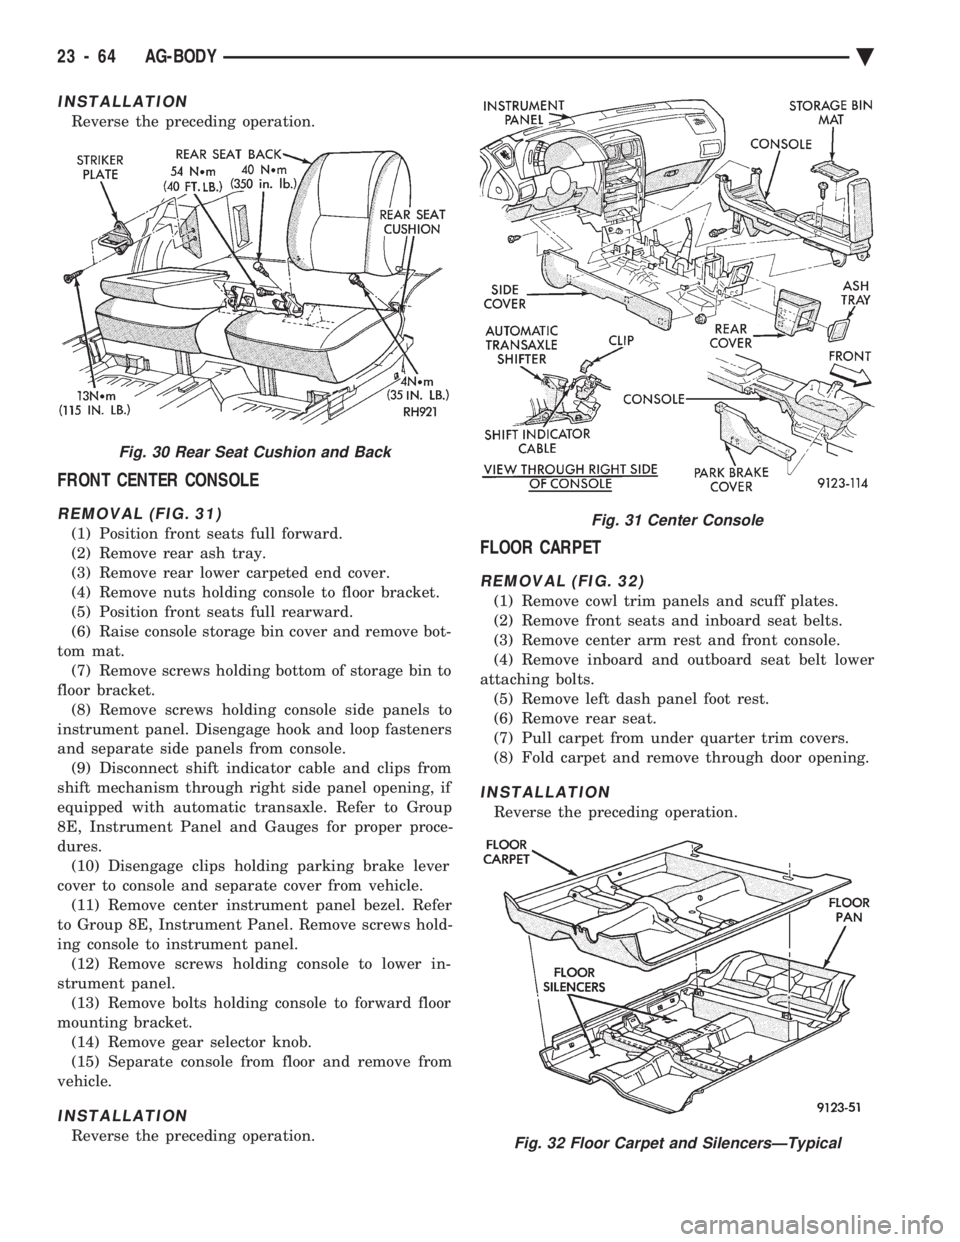
FRONT CENTER CONSOLE
REMOVAL (FIG. 31)
(1) Position front seats full forward.
(2) Remove rear ash tray.
(3) Remove rear lower carpeted end cover.
(4) Remove nuts holding console to floor bracket.
(5) Position front seats full rearward.
(6) Raise console storage bin cover and remove bot-
tom mat. (7) Remove screws holding bottom of storage bin to
floor bracket. (8) Remove screws holding console side panels to
instrument panel. Disengage hook and loop fasteners
and separate side panels from console. (9) Disconnect shift indicator cable and clips from
shift mechanism through right side panel opening, if
equipped with automatic transaxle. Refer to Group
8E, Instrument Panel and Gauges for proper proce-
dures. (10) Disengage clips holding parking brake lever
cover to console and separate cover from vehicle. (11) Remove center instrument panel bezel. Refer
to Group 8E, Instrument Panel. Remove screws hold-
ing console to instrument panel. (12) Remove screws holding console to lower in-
strument panel. (13) Remove bolts holding console to forward floor
mounting bracket. (14) Remove gear selector knob.
(15) Separate console from floor and remove from
vehicle.
INSTALLATION
Reverse the preceding operation.
FLOOR CARPET
REMOVAL (FIG. 32)
(1) Remove cowl trim panels and scuff plates.
(2) Remove front seats and inboard seat belts.
(3) Remove center arm rest and front console.
(4) Remove inboard and outboard seat belt lower
attaching bolts. (5) Remove left dash panel foot rest.
(6) Remove rear seat.
(7) Pull carpet from under quarter trim covers.
(8) Fold carpet and remove through door opening.
INSTALLATION
Reverse the preceding operation.
Fig. 30 Rear Seat Cushion and Back
Fig. 31 Center Console
Fig. 32 Floor Carpet and SilencersÐTypical
23 - 64 AG-BODY Ä
Page 2227 of 2438
AJ-VEHICLE BODY COMPONENT SERVICE INDEX
page page
A-Pillar and Roof Rail Mouldings ............. 77
Cowl Cover ............................. 73
Cowl Panel Trim and Scuff Plates ............ 77
Door Glass ............................. 76
Door Glass Lift Plate and Guide Post ......... 76
Door Latch ............................. 75
Door Trim Panel ......................... 74
Floor Carpet ............................ 80
Front Center Console ..................... 79
Front Door and Hinge ..................... 75
Front Door Silencer and Water Shield ......... 74
Front End Splash Shields .................. 73
Front Seat Belts ......................... 78
Front Seats ............................. 78
Fuel Fill Door ........................... 84
Glass Run WeatherstripÐAJ-21 Body ......... 76
Grille .................................. 71
Grille Header Molding ..................... 71
Grille Opening Panel ...................... 71
Head Lining ............................. 81
Hood and Hinges ........................ 72
Hood Latch and Release Cable .............. 72
Inside Latch Release Handle ................ 76 Lower Grille
............................. 71
Outside Door Latch Release Handle .......... 76
Overhead Console ........................ 80
Power Door Lock Actuator .................. 76
Quarter Extension Trim Panel ............... 77
Quarter Glass Module ..................... 85
Quarter Trim Panel ....................... 77
Rear Seat Belts .......................... 78
Rear Seats ............................. 79
Rear Shelf Trim Panel ..................... 78
Rear Window Glass ...................... 81
Sun Roof Air Deflector .................... 81
Sun Roof Drain Tubes .................... 81
Sun Roof Weatherstrip .................... 81
Trunk Lid .............................. 82
Trunk Lid and Fuel Fill Door Release Cables . . . 83
Trunk Lid Hinge ......................... 82
Trunk Lid Latch .......................... 83
Trunk Lid Lock .......................... 83
Trunk Lid Luggage Rack ................... 83
Trunk Lid Torsion Bar ..................... 83
Trunk Opening Weatherstrip ................ 83
Window Regulator ........................ 75
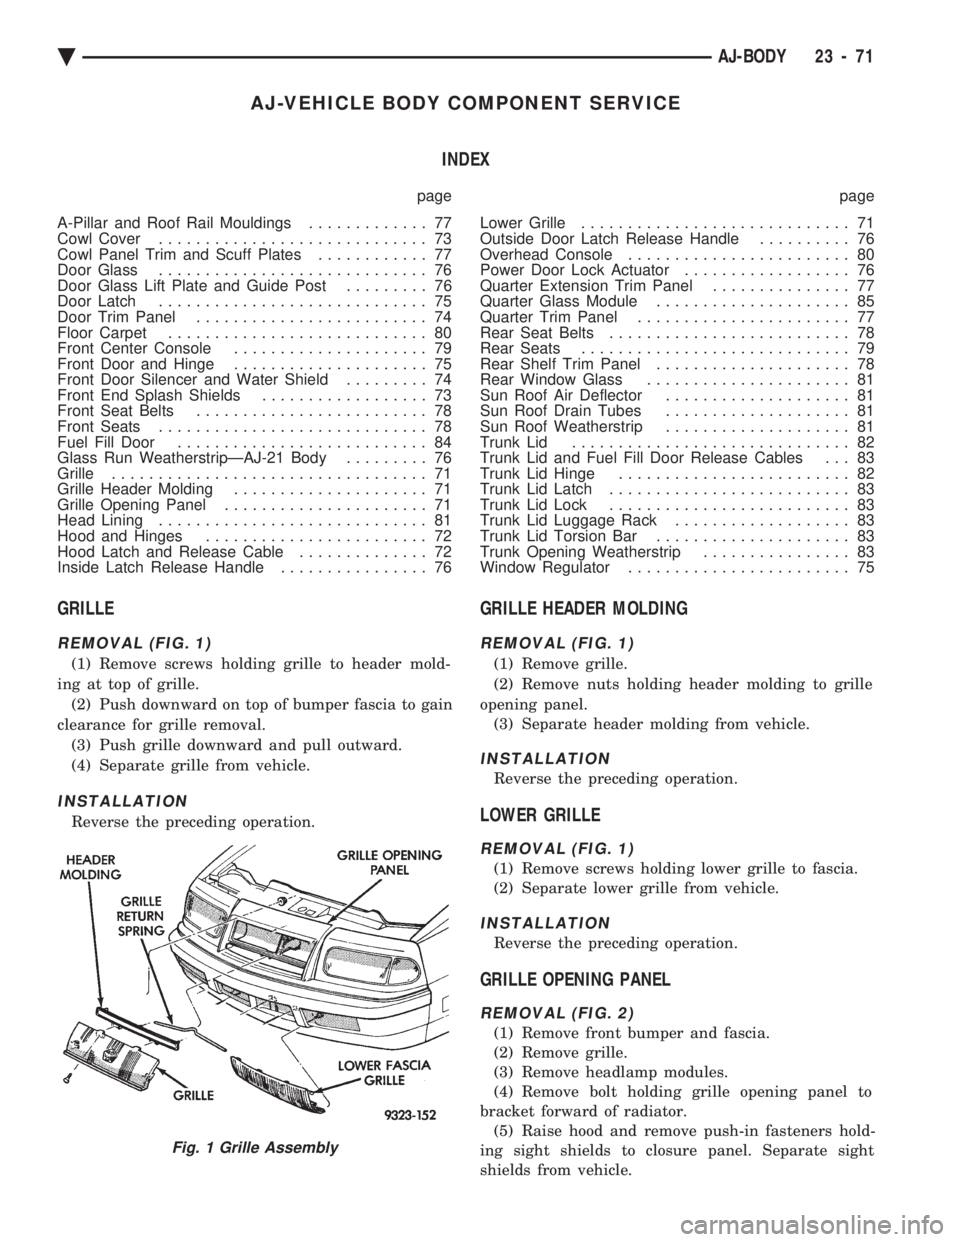
GRILLE
REMOVAL (FIG. 1)
(1) Remove screws holding grille to header mold-
ing at top of grille. (2) Push downward on top of bumper fascia to gain
clearance for grille removal. (3) Push grille downward and pull outward.
(4) Separate grille from vehicle.
INSTALLATION
Reverse the preceding operation.
GRILLE HEADER MOLDING
REMOVAL (FIG. 1)
(1) Remove grille.
(2) Remove nuts holding header molding to grille
opening panel. (3) Separate header molding from vehicle.
INSTALLATION
Reverse the preceding operation.
LOWER GRILLE
REMOVAL (FIG. 1)
(1) Remove screws holding lower grille to fascia.
(2) Separate lower grille from vehicle.
INSTALLATION
Reverse the preceding operation.
GRILLE OPENING PANEL
REMOVAL (FIG. 2)
(1) Remove front bumper and fascia.
(2) Remove grille.
(3) Remove headlamp modules.
(4) Remove bolt holding grille opening panel to
bracket forward of radiator. (5) Raise hood and remove push-in fasteners hold-
ing sight shields to closure panel. Separate sight
shields from vehicle.
Fig. 1 Grille Assembly
Ä AJ-BODY 23 - 71
Page 2230 of 2438
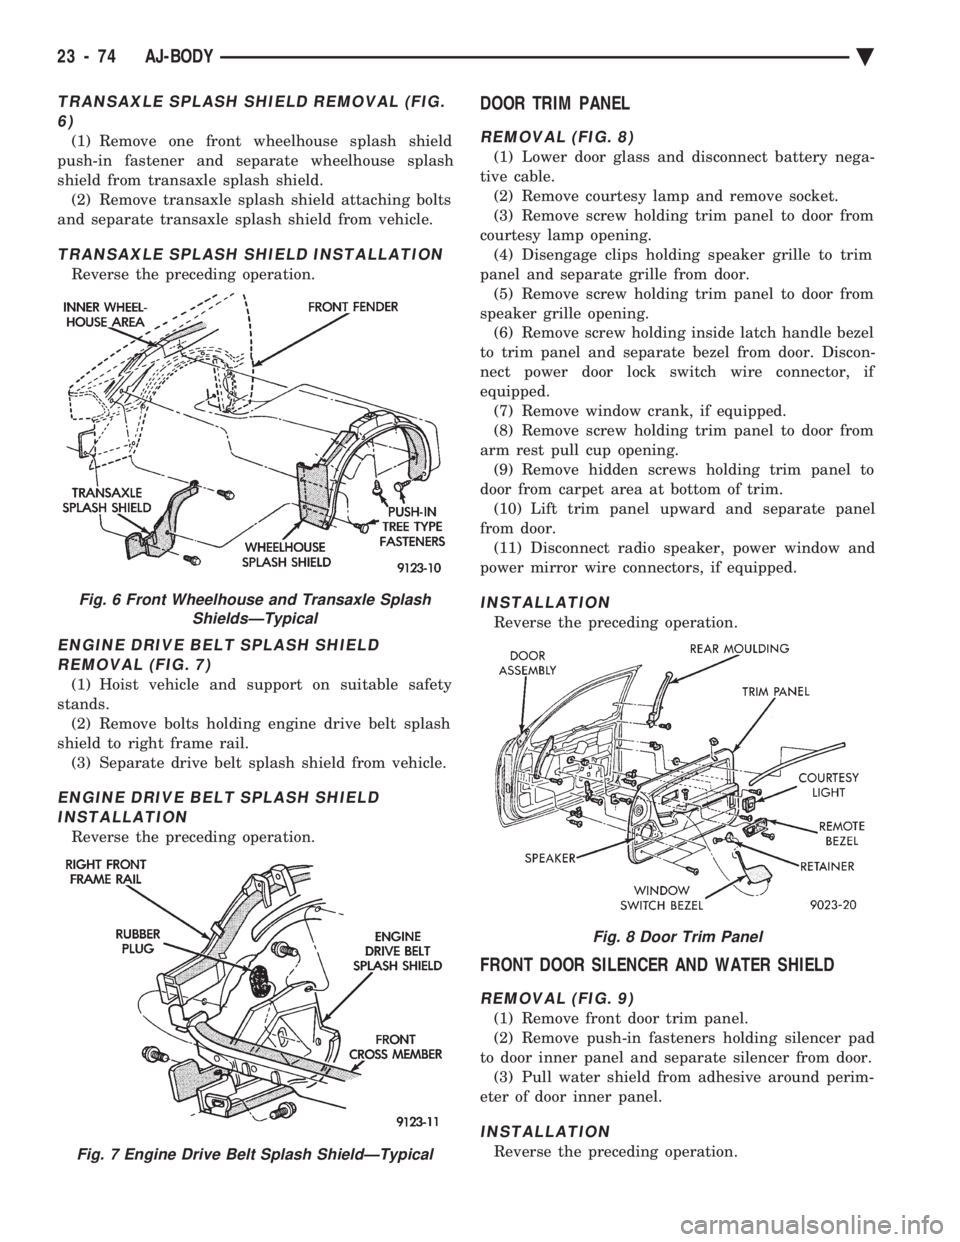
TRANSAXLE SPLASH SHIELD REMOVAL (FIG. 6)
(1) Remove one front wheelhouse splash shield
push-in fastener and separate wheelhouse splash
shield from transaxle splash shield. (2) Remove transaxle splash shield attaching bolts
and separate transaxle splash shield from vehicle.
TRANSAXLE SPLASH SHIELD INSTALLATION
Reverse the preceding operation.
ENGINE DRIVE BELT SPLASH SHIELD REMOVAL (FIG. 7)
(1) Hoist vehicle and support on suitable safety
stands. (2) Remove bolts holding engine drive belt splash
shield to right frame rail. (3) Separate drive belt splash shield from vehicle.
ENGINE DRIVE BELT SPLASH SHIELDINSTALLATION
Reverse the preceding operation.
DOOR TRIM PANEL
REMOVAL (FIG. 8)
(1) Lower door glass and disconnect battery nega-
tive cable. (2) Remove courtesy lamp and remove socket.
(3) Remove screw holding trim panel to door from
courtesy lamp opening. (4) Disengage clips holding speaker grille to trim
panel and separate grille from door. (5) Remove screw holding trim panel to door from
speaker grille opening. (6) Remove screw holding inside latch handle bezel
to trim panel and separate bezel from door. Discon-
nect power door lock switch wire connector, if
equipped. (7) Remove window crank, if equipped.
(8) Remove screw holding trim panel to door from
arm rest pull cup opening. (9) Remove hidden screws holding trim panel to
door from carpet area at bottom of trim. (10) Lift trim panel upward and separate panel
from door. (11) Disconnect radio speaker, power window and
power mirror wire connectors, if equipped.
INSTALLATION
Reverse the preceding operation.
FRONT DOOR SILENCER AND WATER SHIELD
REMOVAL (FIG. 9)
(1) Remove front door trim panel.
(2) Remove push-in fasteners holding silencer pad
to door inner panel and separate silencer from door. (3) Pull water shield from adhesive around perim-
eter of door inner panel.
INSTALLATION
Reverse the preceding operation.
Fig. 6 Front Wheelhouse and Transaxle Splash ShieldsÐTypical
Fig. 7 Engine Drive Belt Splash ShieldÐTypical
Fig. 8 Door Trim Panel
23 - 74 AJ-BODY Ä
Page 2234 of 2438
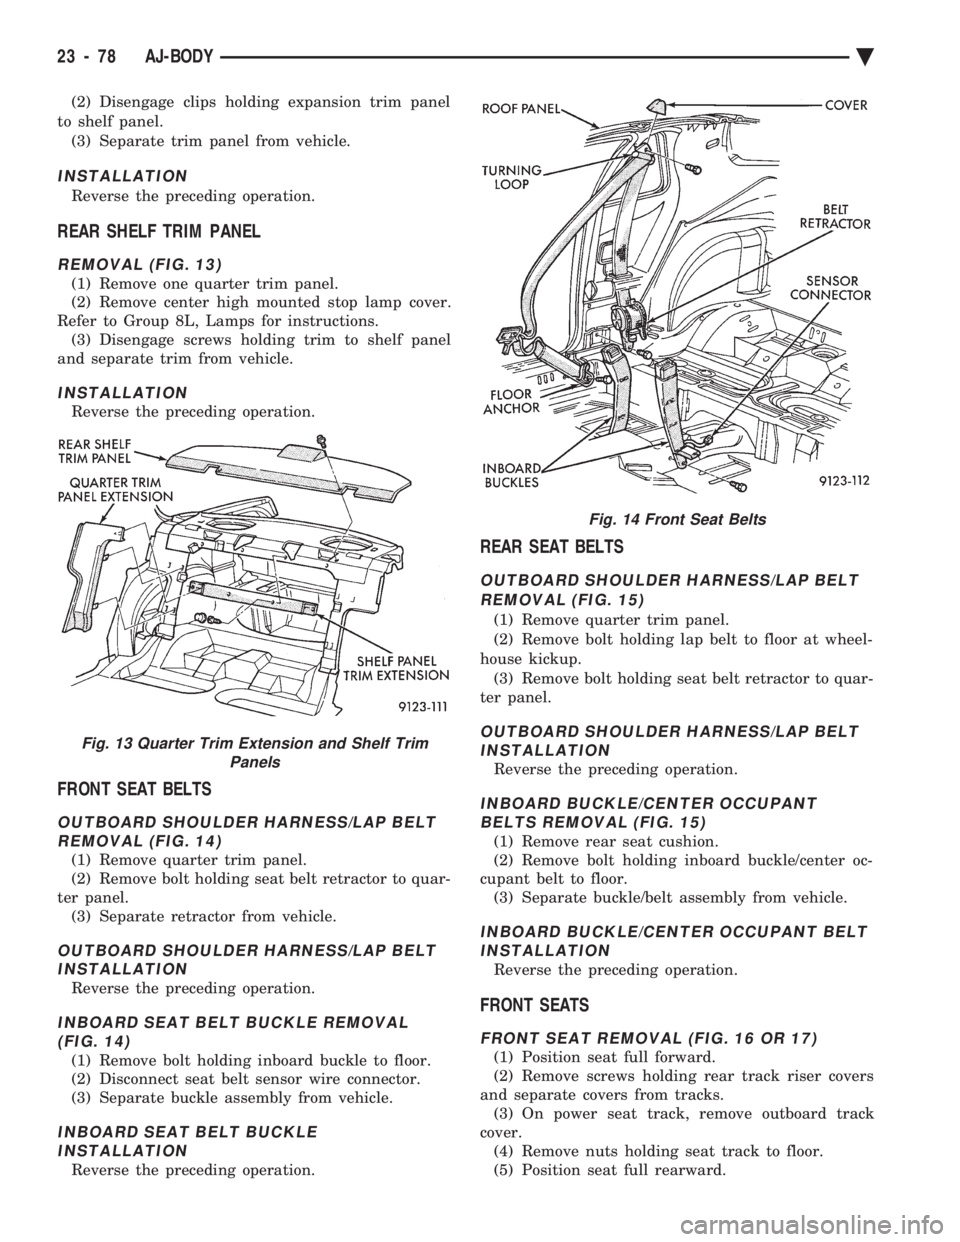
(2) Disengage clips holding expansion trim panel
to shelf panel. (3) Separate trim panel from vehicle.
INSTALLATION
Reverse the preceding operation.
REAR SHELF TRIM PANEL
REMOVAL (FIG. 13)
(1) Remove one quarter trim panel.
(2) Remove center high mounted stop lamp cover.
Refer to Group 8L, Lamps for instructions. (3) Disengage screws holding trim to shelf panel
and separate trim from vehicle.
INSTALLATION
Reverse the preceding operation.
FRONT SEAT BELTS
OUTBOARD SHOULDER HARNESS/LAP BELT REMOVAL (FIG. 14)
(1) Remove quarter trim panel.
(2) Remove bolt holding seat belt retractor to quar-
ter panel. (3) Separate retractor from vehicle.
OUTBOARD SHOULDER HARNESS/LAP BELTINSTALLATION
Reverse the preceding operation.
INBOARD SEAT BELT BUCKLE REMOVAL(FIG. 14)
(1) Remove bolt holding inboard buckle to floor.
(2) Disconnect seat belt sensor wire connector.
(3) Separate buckle assembly from vehicle.
INBOARD SEAT BELT BUCKLE INSTALLATION
Reverse the preceding operation.
REAR SEAT BELTS
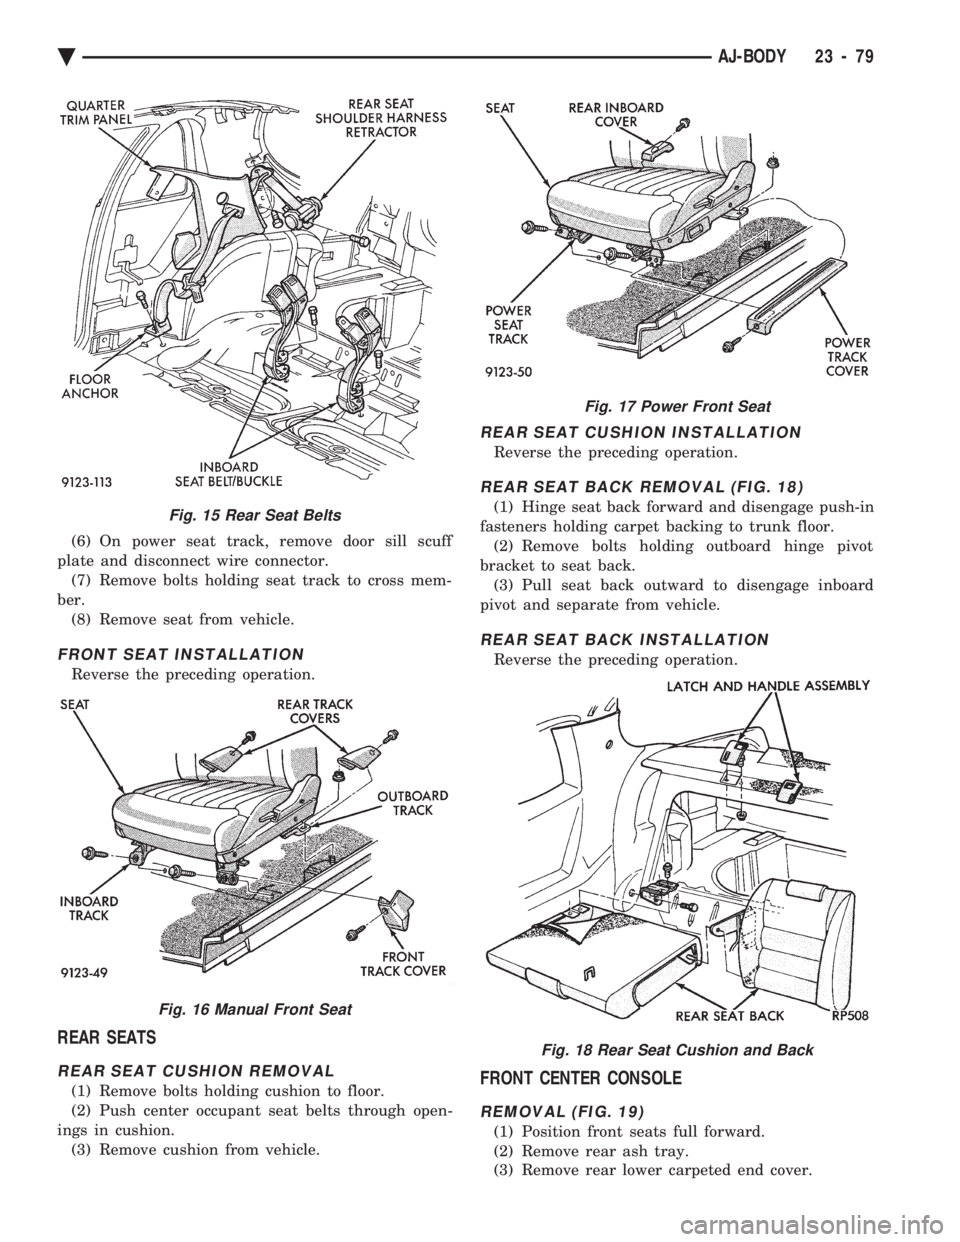
OUTBOARD SHOULDER HARNESS/LAP BELT
REMOVAL (FIG. 15)
(1) Remove quarter trim panel.
(2) Remove bolt holding lap belt to floor at wheel-
house kickup. (3) Remove bolt holding seat belt retractor to quar-
ter panel.
OUTBOARD SHOULDER HARNESS/LAP BELT INSTALLATION
Reverse the preceding operation.
INBOARD BUCKLE/CENTER OCCUPANTBELTS REMOVAL (FIG. 15)
(1) Remove rear seat cushion.
(2) Remove bolt holding inboard buckle/center oc-
cupant belt to floor. (3) Separate buckle/belt assembly from vehicle.
INBOARD BUCKLE/CENTER OCCUPANT BELTINSTALLATION
Reverse the preceding operation.
FRONT SEATS
FRONT SEAT REMOVAL (FIG. 16 OR 17)
(1) Position seat full forward.
(2) Remove screws holding rear track riser covers
and separate covers from tracks. (3) On power seat track, remove outboard track
cover. (4) Remove nuts holding seat track to floor.
(5) Position seat full rearward.
Fig. 13 Quarter Trim Extension and Shelf Trim Panels
Fig. 14 Front Seat Belts
23 - 78 AJ-BODY Ä
Page 2235 of 2438
(6) On power seat track, remove door sill scuff
plate and disconnect wire connector. (7) Remove bolts holding seat track to cross mem-
ber. (8) Remove seat from vehicle.
FRONT SEAT INSTALLATION
Reverse the preceding operation.
REAR SEATS
REAR SEAT CUSHION REMOVAL
(1) Remove bolts holding cushion to floor.
(2) Push center occupant seat belts through open-
ings in cushion. (3) Remove cushion from vehicle.
REAR SEAT CUSHION INSTALLATION
Reverse the preceding operation.
REAR SEAT BACK REMOVAL (FIG. 18)
(1) Hinge seat back forward and disengage push-in
fasteners holding carpet backing to trunk floor. (2) Remove bolts holding outboard hinge pivot
bracket to seat back. (3) Pull seat back outward to disengage inboard
pivot and separate from vehicle.
REAR SEAT BACK INSTALLATION
Reverse the preceding operation.
FRONT CENTER CONSOLE
REMOVAL (FIG. 19)
(1) Position front seats full forward.
(2) Remove rear ash tray.
(3) Remove rear lower carpeted end cover.
Fig. 15 Rear Seat Belts
Fig. 16 Manual Front Seat
Fig. 17 Power Front Seat
Fig. 18 Rear Seat Cushion and Back
Ä AJ-BODY 23 - 79
Page 2236 of 2438
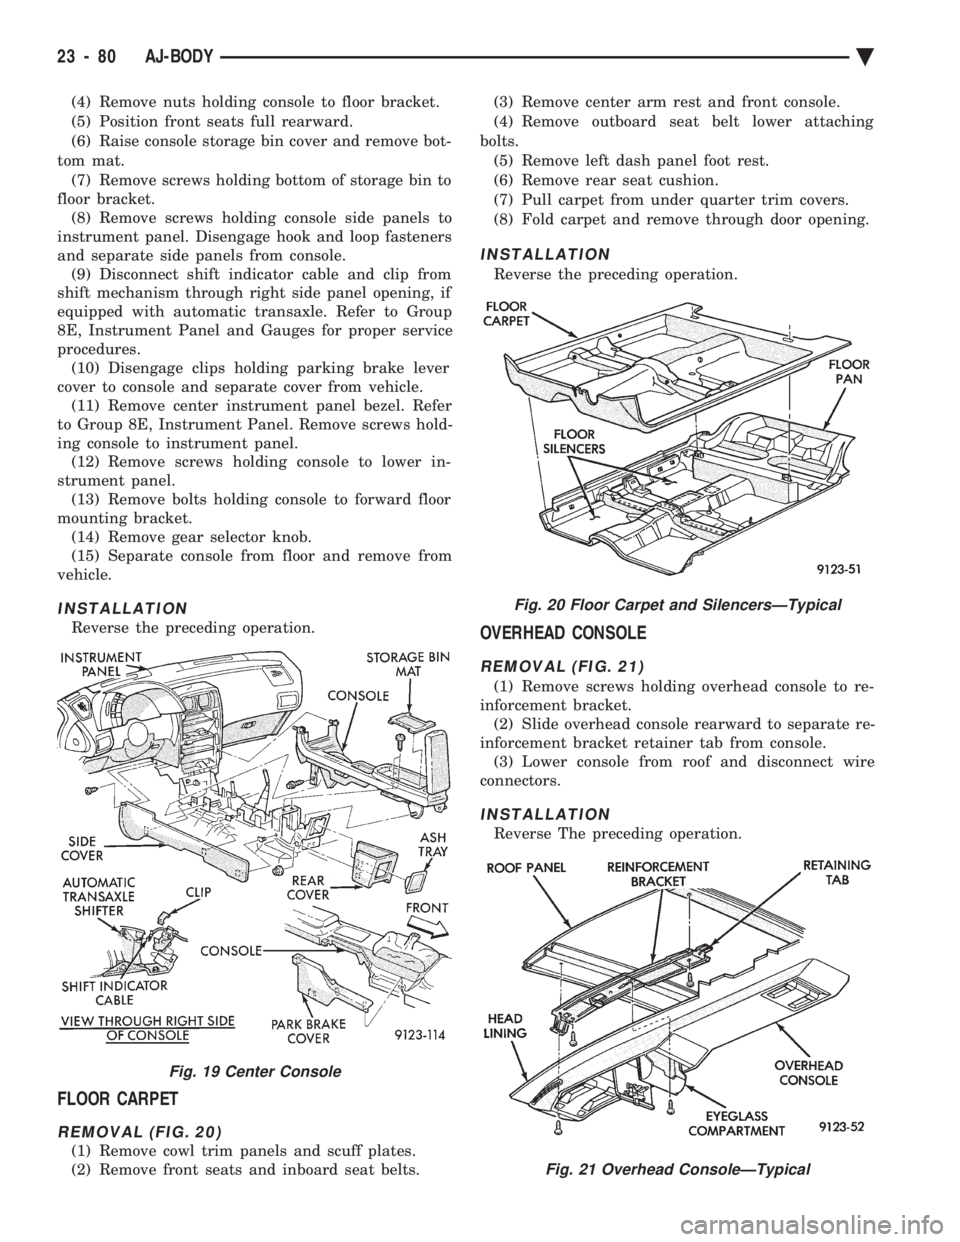
(4) Remove nuts holding console to floor bracket.
(5) Position front seats full rearward.
(6) Raise console storage bin cover and remove bot-
tom mat. (7) Remove screws holding bottom of storage bin to
floor bracket. (8) Remove screws holding console side panels to
instrument panel. Disengage hook and loop fasteners
and separate side panels from console. (9) Disconnect shift indicator cable and clip from
shift mechanism through right side panel opening, if
equipped with automatic transaxle. Refer to Group
8E, Instrument Panel and Gauges for proper service
procedures. (10) Disengage clips holding parking brake lever
cover to console and separate cover from vehicle. (11) Remove center instrument panel bezel. Refer
to Group 8E, Instrument Panel. Remove screws hold-
ing console to instrument panel. (12) Remove screws holding console to lower in-
strument panel. (13) Remove bolts holding console to forward floor
mounting bracket. (14) Remove gear selector knob.
(15) Separate console from floor and remove from
vehicle.
INSTALLATION
Reverse the preceding operation.
FLOOR CARPET
REMOVAL (FIG. 20)
(1) Remove cowl trim panels and scuff plates.
(2) Remove front seats and inboard seat belts. (3) Remove center arm rest and front console.
(4) Remove outboard seat belt lower attaching
bolts. (5) Remove left dash panel foot rest.
(6) Remove rear seat cushion.
(7) Pull carpet from under quarter trim covers.
(8) Fold carpet and remove through door opening.
INSTALLATION
Reverse the preceding operation.
OVERHEAD CONSOLE
REMOVAL (FIG. 21)
(1) Remove screws holding overhead console to re-
inforcement bracket. (2) Slide overhead console rearward to separate re-
inforcement bracket retainer tab from console. (3) Lower console from roof and disconnect wire
connectors.
INSTALLATION
Reverse The preceding operation.
Fig. 19 Center Console
Fig. 20 Floor Carpet and SilencersÐTypical
Fig. 21 Overhead ConsoleÐTypical
23 - 80 AJ-BODY Ä
Page 2242 of 2438
AJ/27-VEHICLE CONVERTIBLE BODY COMPONENT SERVICE INDEX
page page
Adjustment Procedures .................... 92
Folding Top Cover ....................... 90
Folding Top Headlining .................... 87
Folding Top Storage Sling Well .............. 87
Hydraulic Cylinder ........................ 95
Hydraulic Cylinder Line Seals ............... 95
Hydraulic Pump Assembly .................. 95
Hydraulic Pump Line Seals ................. 95 Hydraulic System Tests
.................... 95
Hydraulic Systems ........................ 95
Quarter Window ......................... 87
Rear Seat Back .......................... 86
Rear Seat Belt Retractors .................. 86
Rear Seat Cushion ....................... 86
Rear Window and Zipper ................... 88
Rear WindowÐWithout Zipper ............... 88
REAR SEAT CUSHION
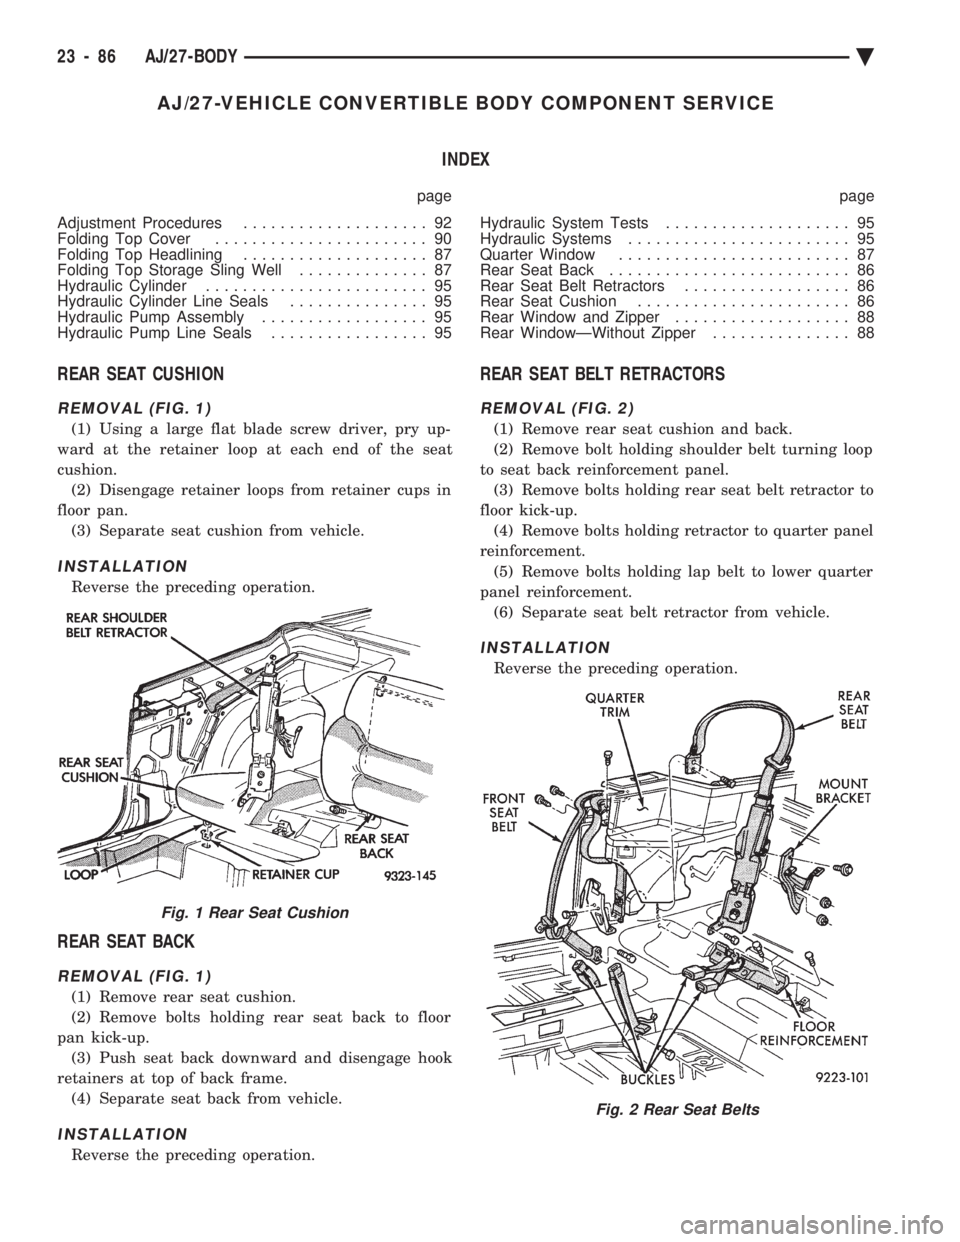
REMOVAL (FIG. 1)
(1) Using a large flat blade screw driver, pry up-
ward at the retainer loop at each end of the seat
cushion. (2) Disengage retainer loops from retainer cups in
floor pan. (3) Separate seat cushion from vehicle.
INSTALLATION
Reverse the preceding operation.
REAR SEAT BACK
REMOVAL (FIG. 1)
(1) Remove rear seat cushion.
(2) Remove bolts holding rear seat back to floor
pan kick-up. (3) Push seat back downward and disengage hook
retainers at top of back frame. (4) Separate seat back from vehicle.
INSTALLATION
Reverse the preceding operation.
REAR SEAT BELT RETRACTORS
REMOVAL (FIG. 2)
(1) Remove rear seat cushion and back.
(2) Remove bolt holding shoulder belt turning loop
to seat back reinforcement panel. (3) Remove bolts holding rear seat belt retractor to
floor kick-up. (4) Remove bolts holding retractor to quarter panel
reinforcement. (5) Remove bolts holding lap belt to lower quarter
panel reinforcement. (6) Separate seat belt retractor from vehicle.
INSTALLATION
Reverse the preceding operation.
Fig. 1 Rear Seat Cushion
Fig. 2 Rear Seat Belts
23 - 86 AJ/27-BODY Ä