1993 CHEVROLET PLYMOUTH ACCLAIM belt
[x] Cancel search: beltPage 2265 of 2438
APPLIQUE MOULDING AND RETAINER REMOVAL
(1) Remove screws holding applique to rocker
panel from under vehicle. (2) Lift applique upward to separate from retain-
ing channel. (3) Remove pop-rivets holding retainer to rocker
panel using a suitable drill.
APPLIQUE MOULDING AND RETAINER INSTALLATION
(1) Install applique retainer on rocker panel with
pop-rivets. Paint or undercoat bare metal surfaces to
avoid rust. (2) Hook top of applique over retainer channel and
install screws under rocker panel.
COWL PANEL TRIM AND SCUFF PLATES
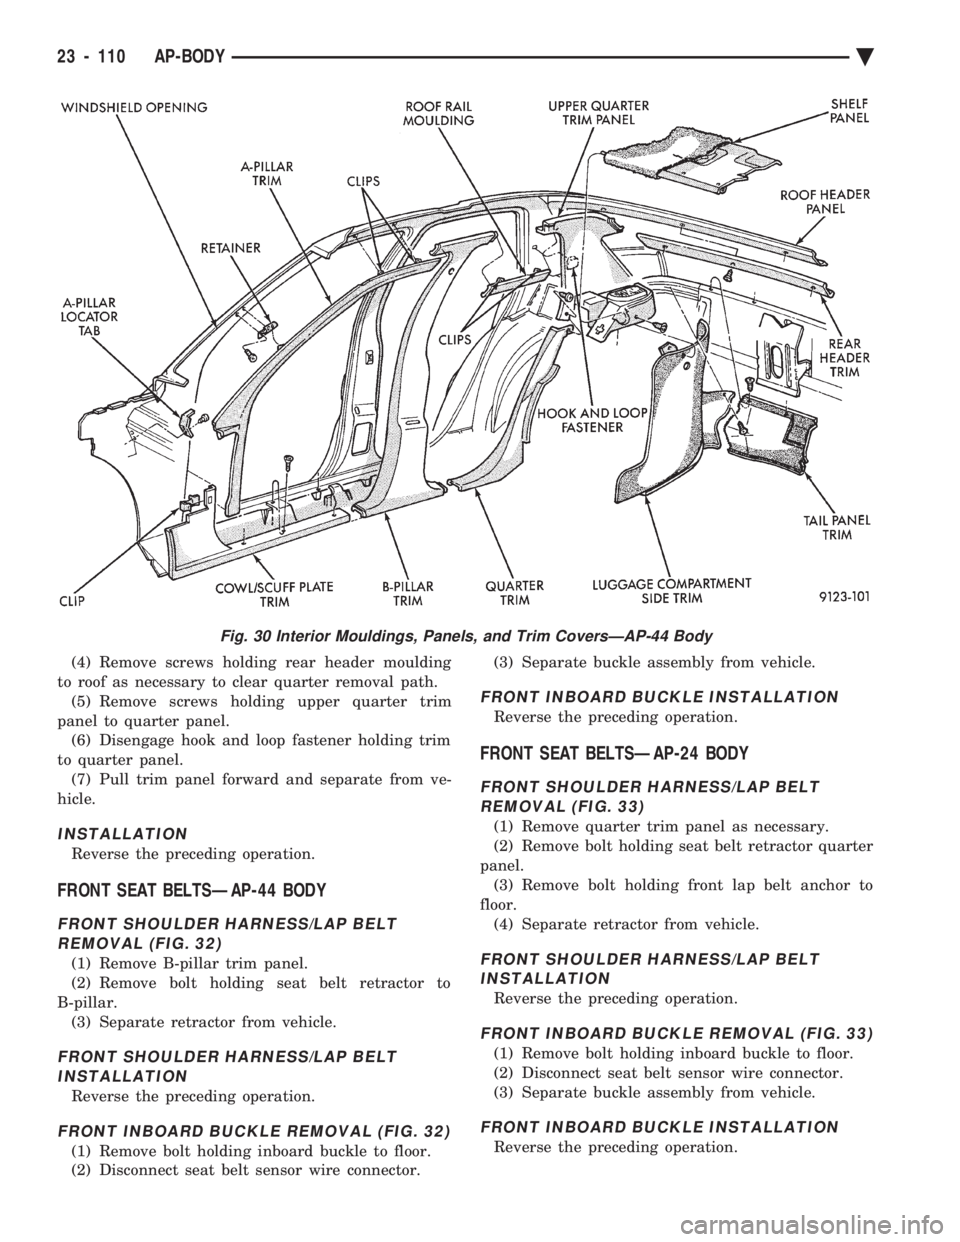
COWL PANEL AND DOOR OPENING SCUFF PLATE REMOVAL (FIG. 30 OR 31)
(1) Open front door.
(2) Remove screw holding trim panel to cowl for-
ward of the front door opening. (3) Remove screws holding scuff plate to door sill.
(4) Separate cowl panel trim and scuff plate from
vehicle.
COWL PANEL AND DOOR OPENING SCUFF PLATE INSTALLATION
Reverse the preceding operation.
A-PILLAR AND ROOF RAIL MOULDINGS
A-PILLAR MOULDING REMOVAL (FIG. 30 OR31)
(1) Open front door.
(2) Disengage clips holding A-pillar moulding to
roof rail above door opening. (3) Slide A-pillar moulding upward and pull rear-
ward to separate moulding from A-pillar.
A-PILLAR MOULDING INSTALLATION
Reverse the preceding operation.
REAR DOOR ROOF RAIL MOULDING REMOVALÐAP-44 BODY (FIG. 30)
(1) Open rear door.
(2) Disengage clips holding roof rail moulding to
roof rail above rear door opening. (3) Separate moulding from vehicle.
REAR DOOR ROOF RAIL MOULDINGINSTALLATIONÐAP-44 BODY
Reverse the preceding operation.
B-PILLAR TRIM PANELÐAP-44 Body
REMOVAL (FIG. 30)
(1) Remove roof rail mouldings and scuff plates as
necessary. (2) Remove shoulder harness turning loop cover.
Remove bolt holding turning loop to B-pillar. (3) Remove bolt holding seat belt to floor below
B-pillar. (4) Lift B-pillar trim off door opening sill weather-
strips and push inward. (5) Slide B-pillar trim downward as far as possible
and separate trim from B-pillar.
INSTALLATION
Reverse the preceding operation.
UPPER QUARTER TRIM PANELÐAP-44 BODY
REMOVAL (FIG. 30)
(1) Remove roof rail mouldings as necessary.
(2) Remove shoulder harness turning loop cover.
Remove bolt holding turning loop to quarter panel. (3) Remove rear seat as necessary to gain access to
quarter trim fasteners. (4) Remove screws holding rear header moulding
to roof as necessary to clear quarter removal path. (5) Remove screws holding upper quarter trim
panel to quarter panel. (6) Disengage hook and loop fastener holding trim
to quarter panel. (7) Pull trim panel forward and separate from ve-
hicle.
INSTALLATION
Reverse the preceding operation.
LOWER QUARTER TRIM PANELÐAP-44 BODY
REMOVAL (FIG. 30)
(1) Open rear door.
(2) Remove rear seat as necessary to gain access to
quarter trim fasteners. (3) Remove screw holding lower quarter trim panel
to quarter panel. (4) Separate lower quarter trim panel from vehicle.
INSTALLATION
Reverse the preceding operation.
QUARTER TRIM PANELÐAP-44 BODY
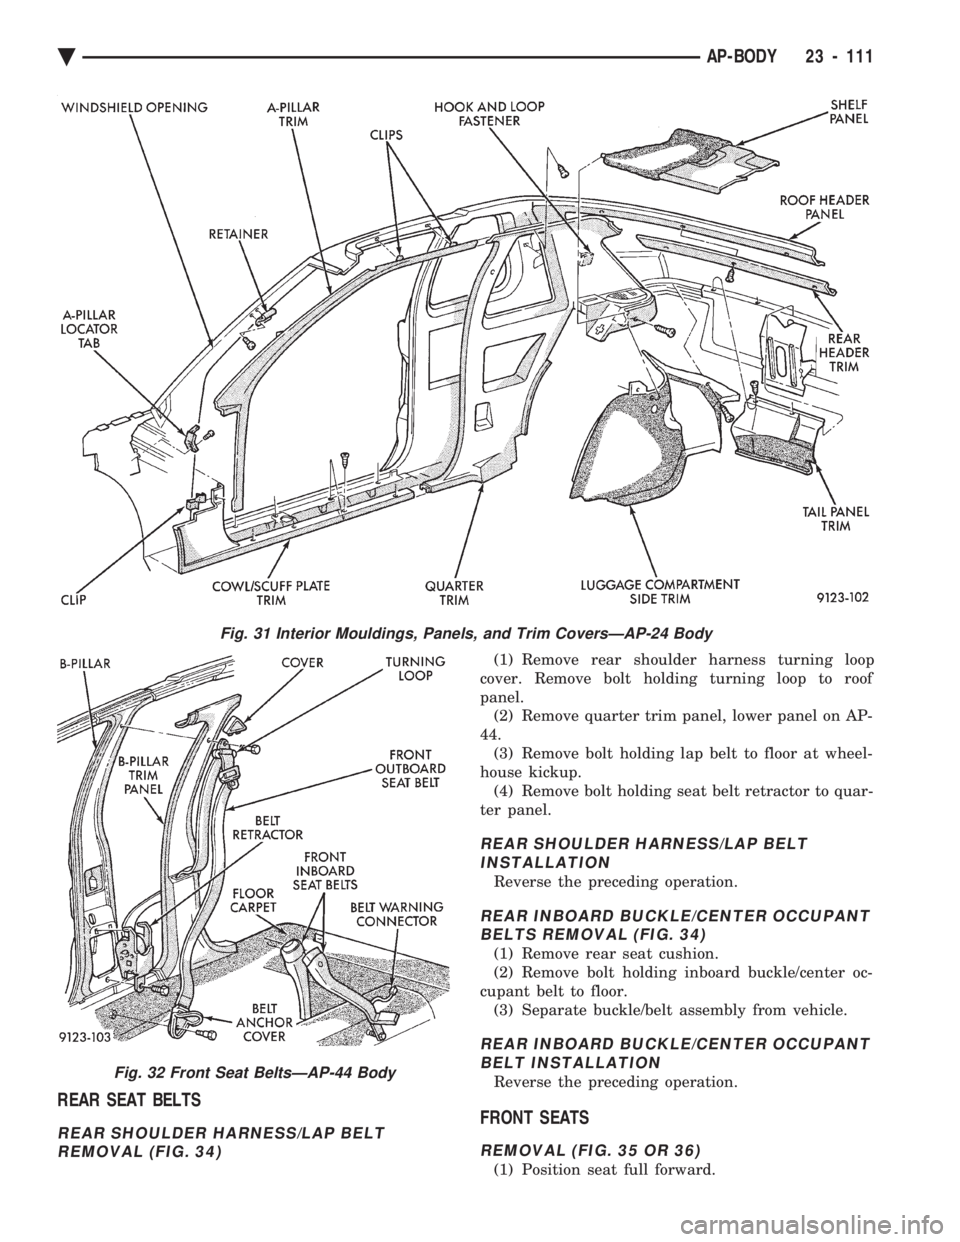
REMOVAL (FIG. 31)
(1) Remove roof rail mouldings and scuff plates as
necessary. (2) Remove shoulder harness turning loop cover.
Remove bolt holding turning loop to quarter panel. (3) Remove rear seat cushion, back, and rear bol-
ster.
Ä AP-BODY 23 - 109
Page 2266 of 2438
(4) Remove screws holding rear header moulding
to roof as necessary to clear quarter removal path. (5) Remove screws holding upper quarter trim
panel to quarter panel. (6) Disengage hook and loop fastener holding trim
to quarter panel. (7) Pull trim panel forward and separate from ve-
hicle.
INSTALLATION
Reverse the preceding operation.
FRONT SEAT BELTSÐAP-44 BODY
FRONT SHOULDER HARNESS/LAP BELT REMOVAL (FIG. 32)
(1) Remove B-pillar trim panel.
(2) Remove bolt holding seat belt retractor to
B-pillar. (3) Separate retractor from vehicle.
FRONT SHOULDER HARNESS/LAP BELTINSTALLATION
Reverse the preceding operation.
FRONT INBOARD BUCKLE REMOVAL (FIG. 32)
(1) Remove bolt holding inboard buckle to floor.
(2) Disconnect seat belt sensor wire connector. (3) Separate buckle assembly from vehicle.
FRONT INBOARD BUCKLE INSTALLATION
Reverse the preceding operation.
FRONT SEAT BELTSÐAP-24 BODY
FRONT SHOULDER HARNESS/LAP BELT
REMOVAL (FIG. 33)
(1) Remove quarter trim panel as necessary.
(2) Remove bolt holding seat belt retractor quarter
panel. (3) Remove bolt holding front lap belt anchor to
floor. (4) Separate retractor from vehicle.
FRONT SHOULDER HARNESS/LAP BELTINSTALLATION
Reverse the preceding operation.
FRONT INBOARD BUCKLE REMOVAL (FIG. 33)
(1) Remove bolt holding inboard buckle to floor.
(2) Disconnect seat belt sensor wire connector.
(3) Separate buckle assembly from vehicle.
FRONT INBOARD BUCKLE INSTALLATION
Reverse the preceding operation.
Fig. 30 Interior Mouldings, Panels, and Trim CoversÐAP-44 Body
23 - 110 AP-BODY Ä
Page 2267 of 2438
REAR SEAT BELTS
REAR SHOULDER HARNESS/LAP BELT REMOVAL (FIG. 34)
(1) Remove rear shoulder harness turning loop
cover. Remove bolt holding turning loop to roof
panel. (2) Remove quarter trim panel, lower panel on AP-
44. (3) Remove bolt holding lap belt to floor at wheel-
house kickup. (4) Remove bolt holding seat belt retractor to quar-
ter panel.
REAR SHOULDER HARNESS/LAP BELT INSTALLATION
Reverse the preceding operation.
REAR INBOARD BUCKLE/CENTER OCCUPANTBELTS REMOVAL (FIG. 34)
(1) Remove rear seat cushion.
(2) Remove bolt holding inboard buckle/center oc-
cupant belt to floor. (3) Separate buckle/belt assembly from vehicle.
REAR INBOARD BUCKLE/CENTER OCCUPANTBELT INSTALLATION
Reverse the preceding operation.
FRONT SEATS
REMOVAL (FIG. 35 OR 36)
(1) Position seat full forward.
Fig. 31 Interior Mouldings, Panels, and Trim CoversÐAP-24 Body
Fig. 32 Front Seat BeltsÐAP-44 Body
Ä AP-BODY 23 - 111
Page 2268 of 2438
(2) Remove screws holding rear track riser covers
and separate covers from tracks. (3) On power seat track, remove outboard track
cover. (4) Remove nuts holding seat track to floor.
(5) Position seat full rearward.
(6) On power seat track, remove door sill scuff
plate and disconnect wire connector. (7) Remove bolts holding seat track to cross mem-
ber. (8) Remove seat from vehicle.
INSTALLATION
Reverse the preceding operation.
REAR SEATS
REAR SEAT CUSHION REMOVAL
(1) Remove bolts holding cushion to floor.
(2) Push center occupant seat belts through open-
ings in cushion. (3) Remove cushion from vehicle.
REAR SEAT CUSHION INSTALLATION
Reverse the preceding operation.
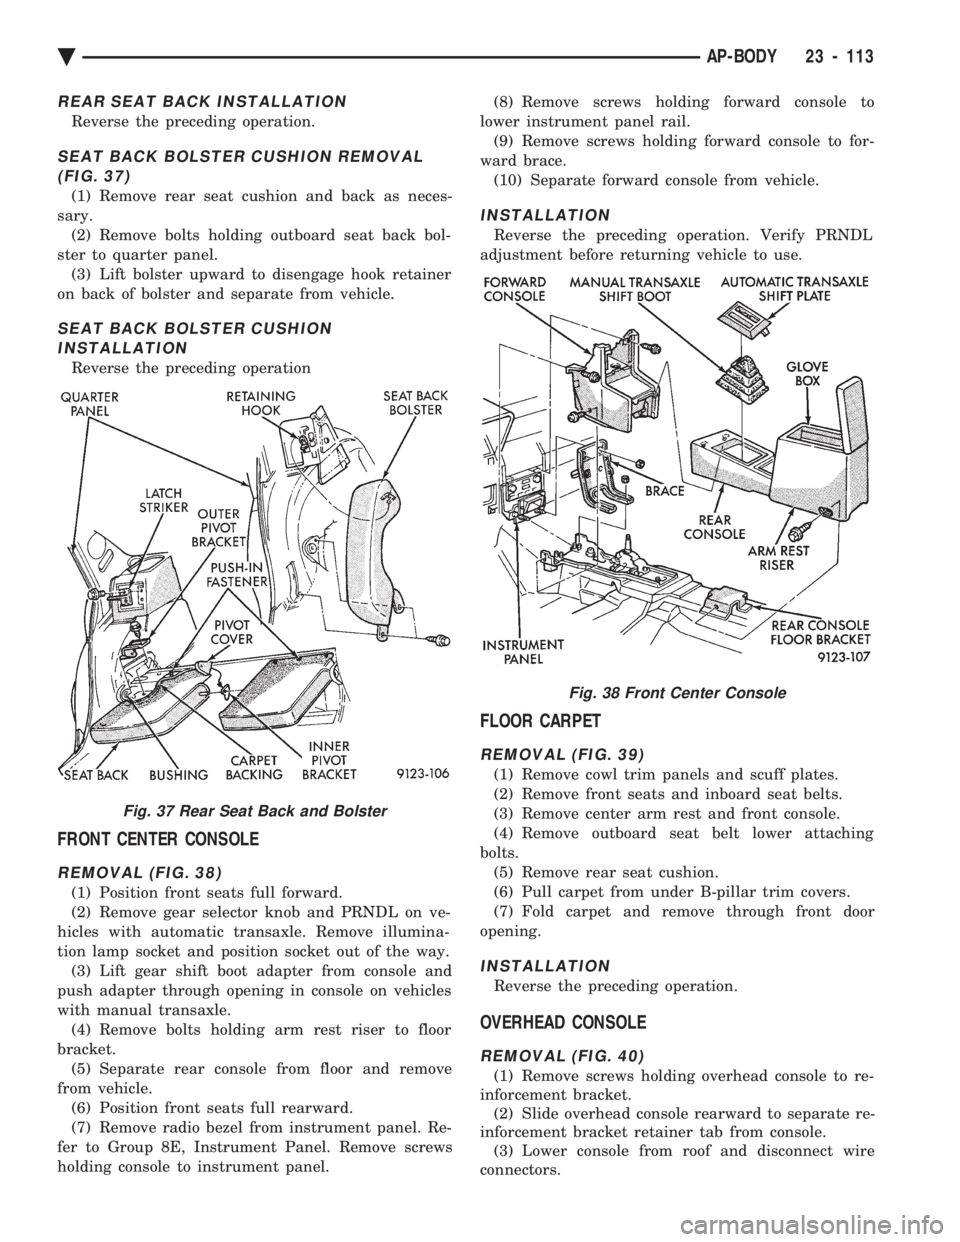
REAR SEAT BACK REMOVAL (FIG. 37)
(1) Hinge seat back forward and disengage push-in
fasteners holding carpet backing to trunk floor. (2) Remove bolts holding outboard hinge pivot
bracket to seat back. (3) Pull seat back outward to disengage inboard
pivot and separate from vehicle.
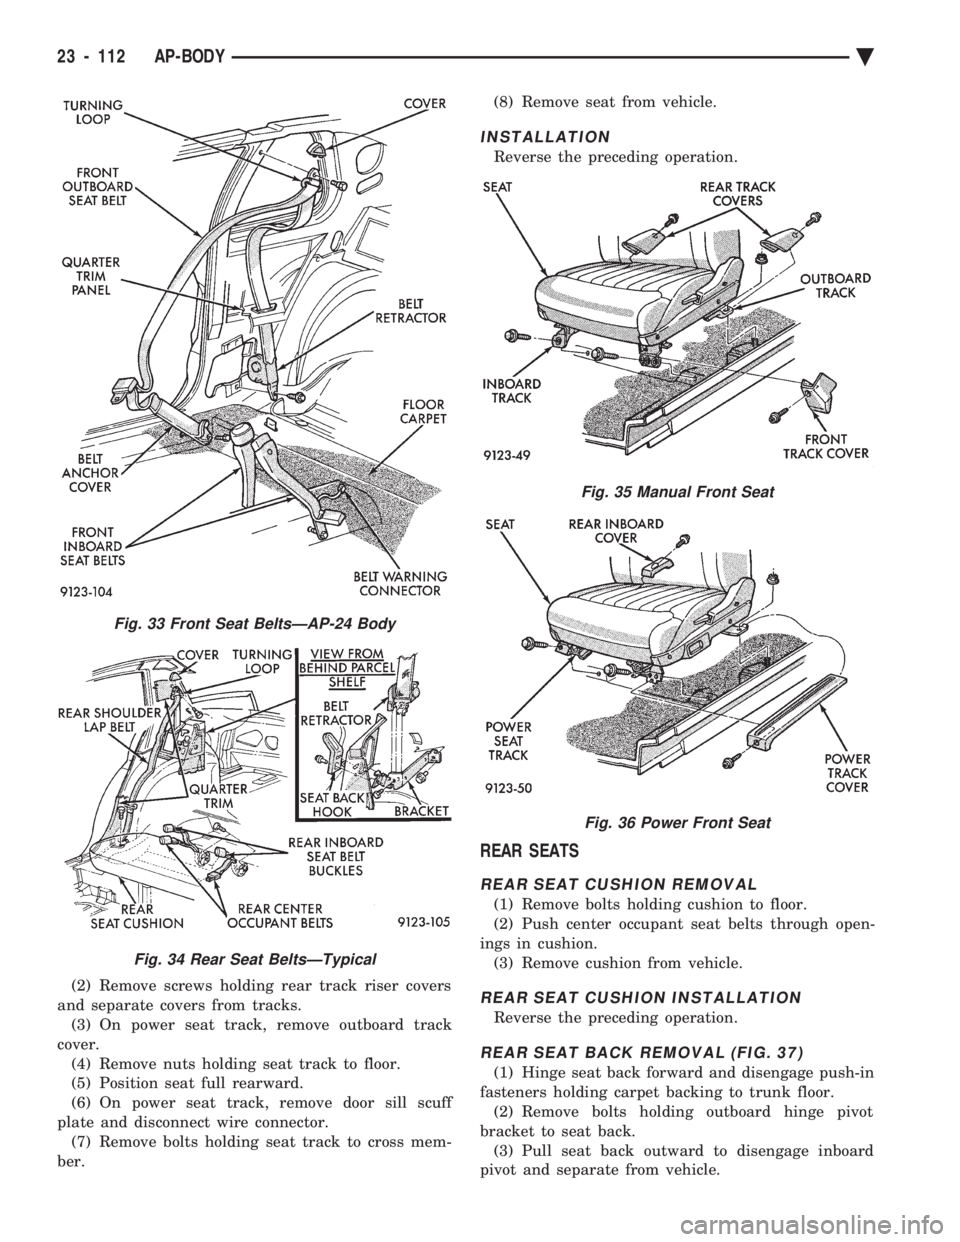
Fig. 33 Front Seat BeltsÐAP-24 Body
Fig. 34 Rear Seat BeltsÐTypical
Fig. 35 Manual Front Seat
Fig. 36 Power Front Seat
23 - 112 AP-BODY Ä
Page 2269 of 2438
REAR SEAT BACK INSTALLATION
Reverse the preceding operation.
SEAT BACK BOLSTER CUSHION REMOVAL (FIG. 37)
(1) Remove rear seat cushion and back as neces-
sary. (2) Remove bolts holding outboard seat back bol-
ster to quarter panel. (3) Lift bolster upward to disengage hook retainer
on back of bolster and separate from vehicle.
SEAT BACK BOLSTER CUSHION INSTALLATION
Reverse the preceding operation
FRONT CENTER CONSOLE
REMOVAL (FIG. 38)
(1) Position front seats full forward.
(2) Remove gear selector knob and PRNDL on ve-
hicles with automatic transaxle. Remove illumina-
tion lamp socket and position socket out of the way. (3) Lift gear shift boot adapter from console and
push adapter through opening in console on vehicles
with manual transaxle. (4) Remove bolts holding arm rest riser to floor
bracket. (5) Separate rear console from floor and remove
from vehicle. (6) Position front seats full rearward.
(7) Remove radio bezel from instrument panel. Re-
fer to Group 8E, Instrument Panel. Remove screws
holding console to instrument panel. (8) Remove screws holding forward console to
lower instrument panel rail. (9) Remove screws holding forward console to for-
ward brace. (10) Separate forward console from vehicle.
INSTALLATION
Reverse the preceding operation. Verify PRNDL
adjustment before returning vehicle to use.
FLOOR CARPET
REMOVAL (FIG. 39)
(1) Remove cowl trim panels and scuff plates.
(2) Remove front seats and inboard seat belts.
(3) Remove center arm rest and front console.
(4) Remove outboard seat belt lower attaching
bolts. (5) Remove rear seat cushion.
(6) Pull carpet from under B-pillar trim covers.
(7) Fold carpet and remove through front door
opening.
INSTALLATION
Reverse the preceding operation.
OVERHEAD CONSOLE
REMOVAL (FIG. 40)
(1) Remove screws holding overhead console to re-
inforcement bracket. (2) Slide overhead console rearward to separate re-
inforcement bracket retainer tab from console. (3) Lower console from roof and disconnect wire
connectors.
Fig. 37 Rear Seat Back and Bolster
Fig. 38 Front Center Console
Ä AP-BODY 23 - 113
Page 2273 of 2438
AP/27-VEHICLE CONVERTIBLE BODY COMPONENT SERVICE INDEX
page page
A-Pillar and Windshield Header Weatherstrip . . . 117
Convertible Top Adjustments ............... 131
Convertible Top Header ................... 118
Convertible Top Latch Hooks ............... 131
Door Glass Alignment .................... 131
Door Glass Rear Channel ................. 127
Door Striker Guide ...................... 128
Forward Roof Rail ....................... 121
Fourth Roof Bow and Slat ................. 120
Fourth Roof Bow Slat .................... 132
Front Door Belt Moulding and Weatherstrip .... 127
Front Door Glass ........................ 125
Front Door Stationary Glass and Division Channel ............................. 126
Front Door Stationary Glass Channel Weatherstrip .......................... 126
Front Door Striker Guide Socket ............ 127
Front Seat Belt Retractor .................. 128
General Information ...................... 117
Quarter Glass and Roller Bracket ........... 132
Quarter Panel Belt Moulding ............... 129
Quarter Trim Panel ...................... 128
Rear Roof Rail ......................... 121
Rear Seat Back ......................... 128 Rear Seat Belt Retractor
.................. 129
Rear Tensioner Plate ..................... 132
Rear Window .......................... 122
Roof Linkage ........................... 121
Roof Rail Weatherstrip ................... 118
Roof Rail Weatherstrip Retainer ............. 131
Second Roof Bow and Linkage ............. 119
Sling-Well ............................. 124
Stationary Quarter Glass and Weatherstrip .... 121
Third Roof Bow ......................... 120
Top Cover ............................. 124
Top Frame ............................ 125
Top Header Trim Cover ................... 118
Top Latch ............................. 118
Top Lift Assist Cylinder ................... 122
Top Stack Down-Stop .................... 132
Top Stack Up-Stop ...................... 132
Trunk Hinge Lid ........................ 130
Trunk Lid .............................. 130
Trunk Lid Applique ...................... 130
Trunk Lid Lining ........................ 129
Trunk Opening Weatherstrip ............... 130
Windshield Header Lining ................. 117
Windshield Header Moulding ............... 117
GENERAL INFORMATION
This section will cover components that are unique
to the AP-vehicle convertible. All components that
are common to the AP-vehicle two door hardtop are
covered in the AP-Vehicle Body Components section.
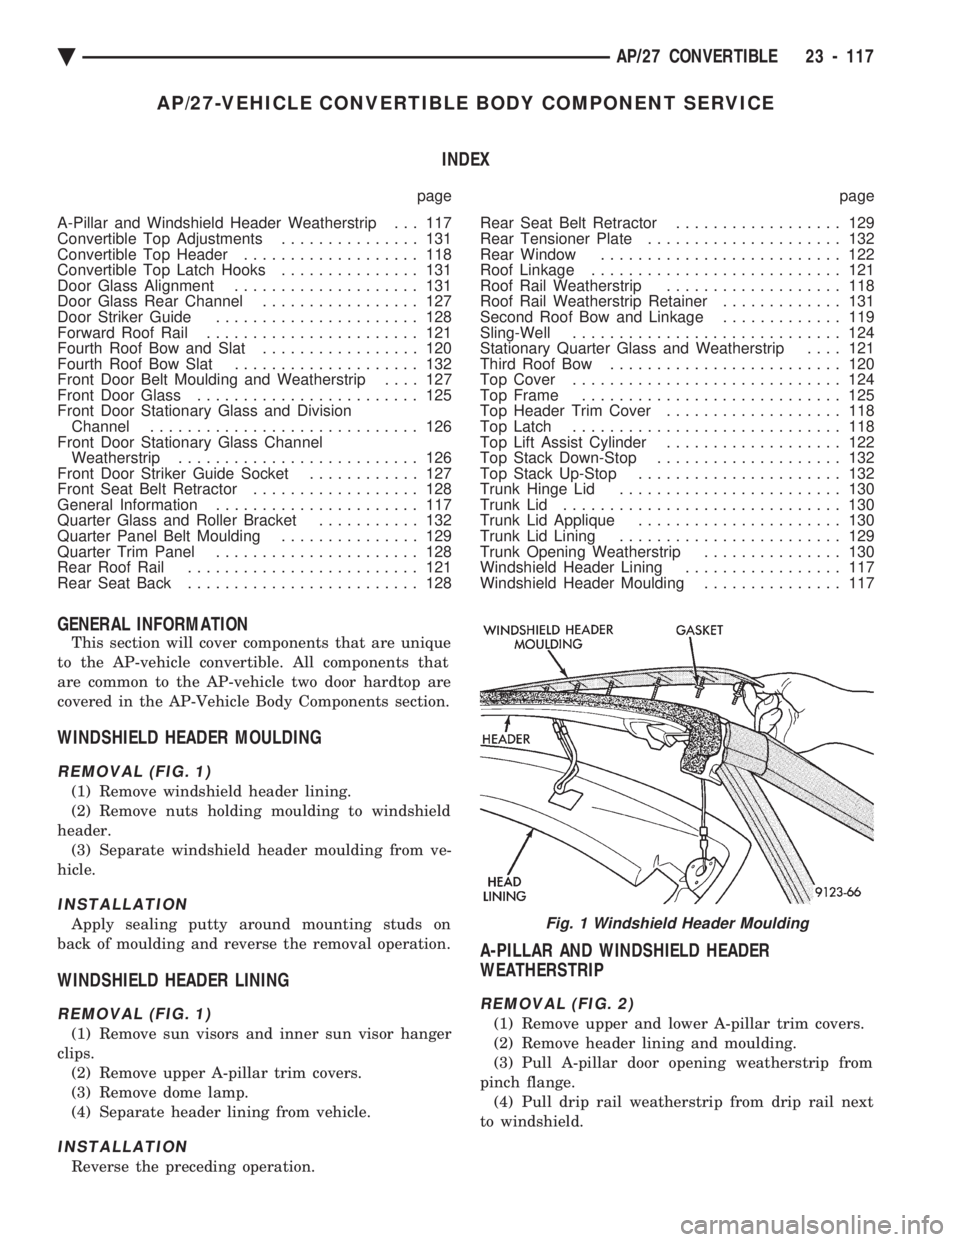
WINDSHIELD HEADER MOULDING
REMOVAL (FIG. 1)
(1) Remove windshield header lining.
(2) Remove nuts holding moulding to windshield
header. (3) Separate windshield header moulding from ve-
hicle.
INSTALLATION
Apply sealing putty around mounting studs on
back of moulding and reverse the removal operation.
WINDSHIELD HEADER LINING
REMOVAL (FIG. 1)
(1) Remove sun visors and inner sun visor hanger
clips. (2) Remove upper A-pillar trim covers.
(3) Remove dome lamp.
(4) Separate header lining from vehicle.
INSTALLATION
Reverse the preceding operation.
A-PILLAR AND WINDSHIELD HEADER
WEATHERSTRIP
REMOVAL (FIG. 2)
(1) Remove upper and lower A-pillar trim covers.
(2) Remove header lining and moulding.
(3) Pull A-pillar door opening weatherstrip from
pinch flange. (4) Pull drip rail weatherstrip from drip rail next
to windshield.
Fig. 1 Windshield Header Moulding
Ä AP/27 CONVERTIBLE 23 - 117
Page 2280 of 2438
(7) Install lower portion of rear window in position
on rear tack strip, align to the bottom center mark. (8) Staple the corners of the rear window valance
and carrier to the rear tack strip. Verify the edges
are even. (9) Position rear stay pads and suspender straps
over fourth roof bow and over the outboard ends of
the rear window fabric. (10) Stretch lower end of suspender straps to edge
of rear tack strip. (11) Staple lower end of suspender straps to rear
tack strip. (12) Staple lower end of rear stay pad to rear tack
strip. (13) Position top cover retainer channel on fourth
roof bow. (14) Rivet top cover retainer channel to fourth roof
bow with aluminum pop-rivets. (15) Position top cover over the fourth roof bow re-
tainer locating the centerline reference marks. (16) Slide feature strip insert into the fourth roof
bow retainer channel. (17) Position top cover on rear tack strip.
(18) Staple top cover to rear tack strip starting
from the outboard corner and stapling inward. (19) Position rear tack strip over the mounting
studs on inside of quarter panels. (20) Install nuts and bolts to hold rear tack strip to
the quarter panels an deck panel. (21) Install rear seat back.
(22) Remove protective materials that was applied
to the body during to removal operation.
TOP COVER
REMOVAL (FIG. 18)
(1) Open rear window and position glass, as flat as
possible, in the drop well. (2) Lower convertible top.
(3) Remove rear seat cushion and back.
(4) Remove quarter trim panels.
(5) Remove quarter glass assemblies.
(6) Raise top to mid-point.
(7) Remove screws holding cover retainer to top
header. Separate retainer from header. (8) Separate top cover from adhesive on top
header. (9) Open trunk lid. Remove screws holding rear
deck filler panel to rear deck below rear window.
Mark screw locations before removal to aid installa-
tion. The rear deck filler panel applies pressure to
top cover to eliminate wrinkles. (10) From in luggage compartment, remove nuts
and bolts holding lower top tack strip to deck and
quarter panels. Lift sling well upward to gain access
to fasteners. CAUTION: Do not damage painted surfaces when
separating tack strip from mounting locations.
(11) Separate tack strip from deck and quarter
panels and remove staples holding top cover. Leave
rear window skirt, pads and drop well attached to
tack strip. (12) Pull top cover from adhesive in quarter glass
weatherstrip channel. (13) Remove rivets holding top cover roof rail ten-
sion cables to top header. Pull tension cables from
rear of listing pockets on top cover. (14) Remove screws holding top cover fastener
strip to center roof bows. Separate top cover from
roof bows and pull retainers from listing pockets on
top cover. (15) Fold top cover so that all material is above
rear roof bow. Slide rear top cover retainer to one
side from rear roof bow channel. (16) Separate top cover from vehicle.
INSTALLATION
Reverse the preceding operation. Use contact adhe-
sive to secure top cover to header and quarter glass
weatherstrip channels. Fold replacement convertible
top along center line and mark with tailors chalk.
Measure and mark the center line of header, center
bow and tack strip. Install top cover from the center
line out. Do not over stretch top cover when remov-
ing wrinkles. Allow for some shrinkage. Water leak
and wind noise tests should be performed before re-
turning vehicle to use.
SLING-WELL
REMOVAL
(1) Remove rear seat cushion and back.
(2) Remove quarter trim panels.
(3) Remove rear shoulder harness turning loop cov-
ers. (4) Remove bolts holding shoulder harness turning
loops to seat back support. (5) Remove seat back support trim cover.
(6) Disengage wire hanger from hole in quarter
panel near front seat belt retractor. (7) Disengage convertible top header latches.
(8) From in luggage compartment, remove nuts
and bolts holding lower top tack strip to deck and
quarter panels. Lift sling well upward to gain access
to fasteners.
CAUTION: Do not damage painted surfaces when
separating tack strip from mounting locations.
(9) Separate tack strip from deck and quarter pan-
els and remove staples holding sling well and top
cover to tack strip. (10) Separate sling well from vehicle.
23 - 124 AP/27 CONVERTIBLE Ä
Page 2283 of 2438
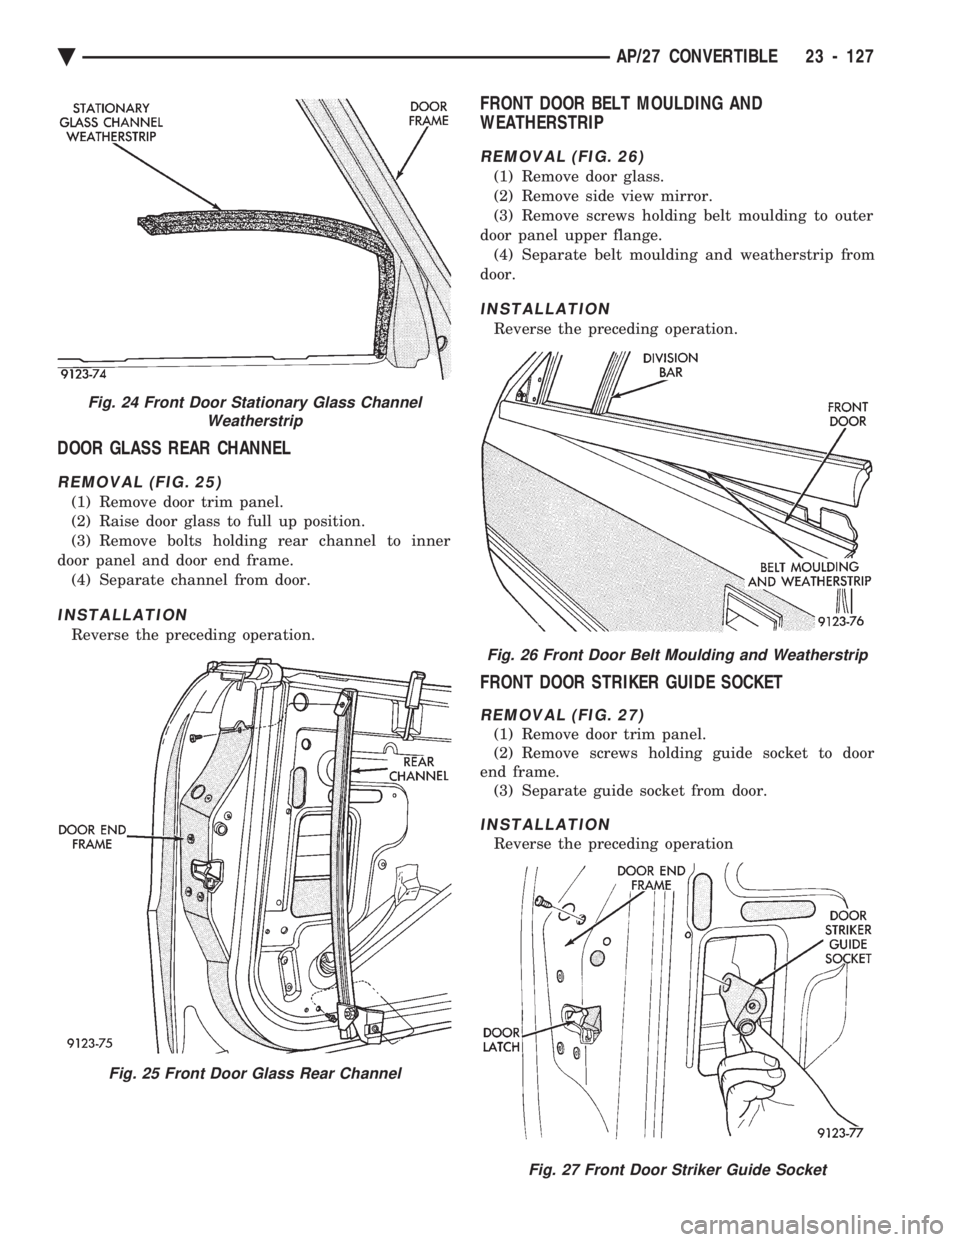
DOOR GLASS REAR CHANNEL
REMOVAL (FIG. 25)
(1) Remove door trim panel.
(2) Raise door glass to full up position.
(3) Remove bolts holding rear channel to inner
door panel and door end frame. (4) Separate channel from door.
INSTALLATION
Reverse the preceding operation.
FRONT DOOR BELT MOULDING AND
WEATHERSTRIP
REMOVAL (FIG. 26)
(1) Remove door glass.
(2) Remove side view mirror.
(3) Remove screws holding belt moulding to outer
door panel upper flange. (4) Separate belt moulding and weatherstrip from
door.
INSTALLATION
Reverse the preceding operation.
FRONT DOOR STRIKER GUIDE SOCKET
REMOVAL (FIG. 27)
(1) Remove door trim panel.
(2) Remove screws holding guide socket to door
end frame. (3) Separate guide socket from door.
INSTALLATION
Reverse the preceding operation
Fig. 24 Front Door Stationary Glass Channel Weatherstrip
Fig. 25 Front Door Glass Rear Channel
Fig. 26 Front Door Belt Moulding and Weatherstrip
Fig. 27 Front Door Striker Guide Socket
Ä AP/27 CONVERTIBLE 23 - 127