1993 CHEVROLET PLYMOUTH ACCLAIM ECU
[x] Cancel search: ECUPage 2228 of 2438
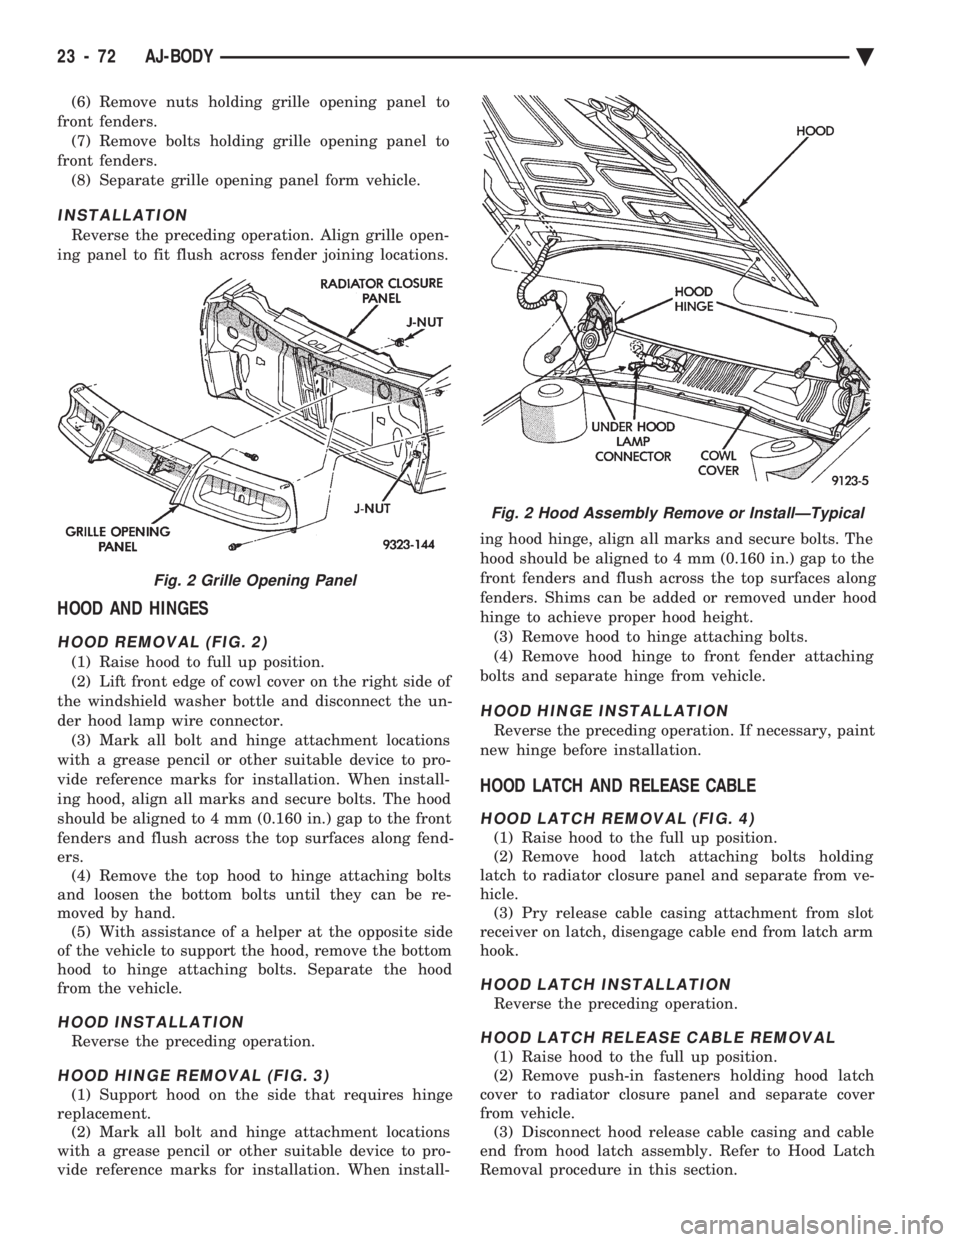
(6) Remove nuts holding grille opening panel to
front fenders. (7) Remove bolts holding grille opening panel to
front fenders. (8) Separate grille opening panel form vehicle.
INSTALLATION
Reverse the preceding operation. Align grille open-
ing panel to fit flush across fender joining locations.
HOOD AND HINGES
HOOD REMOVAL (FIG. 2)
(1) Raise hood to full up position.
(2) Lift front edge of cowl cover on the right side of
the windshield washer bottle and disconnect the un-
der hood lamp wire connector. (3) Mark all bolt and hinge attachment locations
with a grease pencil or other suitable device to pro-
vide reference marks for installation. When install-
ing hood, align all marks and secure bolts. The hood
should be aligned to 4 mm (0.160 in.) gap to the front
fenders and flush across the top surfaces along fend-
ers. (4) Remove the top hood to hinge attaching bolts
and loosen the bottom bolts until they can be re-
moved by hand. (5) With assistance of a helper at the opposite side
of the vehicle to support the hood, remove the bottom
hood to hinge attaching bolts. Separate the hood
from the vehicle.
HOOD INSTALLATION
Reverse the preceding operation.
HOOD HINGE REMOVAL (FIG. 3)
(1) Support hood on the side that requires hinge
replacement. (2) Mark all bolt and hinge attachment locations
with a grease pencil or other suitable device to pro-
vide reference marks for installation. When install- ing hood hinge, align all marks and secure bolts. The
hood should be aligned to 4 mm (0.160 in.) gap to the
front fenders and flush across the top surfaces along
fenders. Shims can be added or removed under hood
hinge to achieve proper hood height. (3) Remove hood to hinge attaching bolts.
(4) Remove hood hinge to front fender attaching
bolts and separate hinge from vehicle.
HOOD HINGE INSTALLATION
Reverse the preceding operation. If necessary, paint
new hinge before installation.
HOOD LATCH AND RELEASE CABLE
HOOD LATCH REMOVAL (FIG. 4)
(1) Raise hood to the full up position.
(2) Remove hood latch attaching bolts holding
latch to radiator closure panel and separate from ve-
hicle. (3) Pry release cable casing attachment from slot
receiver on latch, disengage cable end from latch arm
hook.
HOOD LATCH INSTALLATION
Reverse the preceding operation.
HOOD LATCH RELEASE CABLE REMOVAL
(1) Raise hood to the full up position.
(2) Remove push-in fasteners holding hood latch
cover to radiator closure panel and separate cover
from vehicle. (3) Disconnect hood release cable casing and cable
end from hood latch assembly. Refer to Hood Latch
Removal procedure in this section.
Fig. 2 Grille Opening Panel
Fig. 2 Hood Assembly Remove or InstallÐTypical
23 - 72 AJ-BODY Ä
Page 2232 of 2438
DOOR GLASS
REMOVAL
(1) Remove door trim panel.
(2) Remove silencer and water shield.
(3) Raise door glass 100 mm (4 in.) from down po-
sition. (4) Disconnect battery negative cable if equipped
with power windows. (5) Loosen bolts holding glass stabilizers and guide
hook receiver to top of inner door frame. (6) Remove nuts holding door glass to lift plate.
(7) Separate glass from lift plate and lift glass up-
ward from opening at top of door.
INSTALLATION
Reverse the preceding operation.
DOOR GLASS LIFT PLATE AND GUIDE POST
REMOVAL
(1) Remove door trim panel.
(2) Remove silencer and water shield.
(3) Raise door glass 100 mm (4 in.) from down po-
sition. (4) Disconnect battery negative cable if equipped
with power windows. (5) Remove nuts holding door glass to lift plate
and separate glass from lift plate. Allow glass to
slide downward to the bottom of door. (6) Remove bolts (nuts on AJ-27 body) holding
guide post to inner door panel. (7) Separate lift plate channel from regulator lift
roller. (8) Remove lift plate and guide assemble from door
through access hole in inner door panel.
INSTALLATION
Reverse the preceding operation.
GLASS RUN WEATHERSTRIPÐAJ-21 BODY
REMOVAL
(1) Remove door trim panel.
(2) Remove silencer and water shield as necessary.
(3) Remove side view mirror cover.
(4) Pull glass run weatherstrip from door frame
channel.
INSTALLATION
Reverse the preceding operation.
OUTSIDE DOOR LATCH RELEASE HANDLE
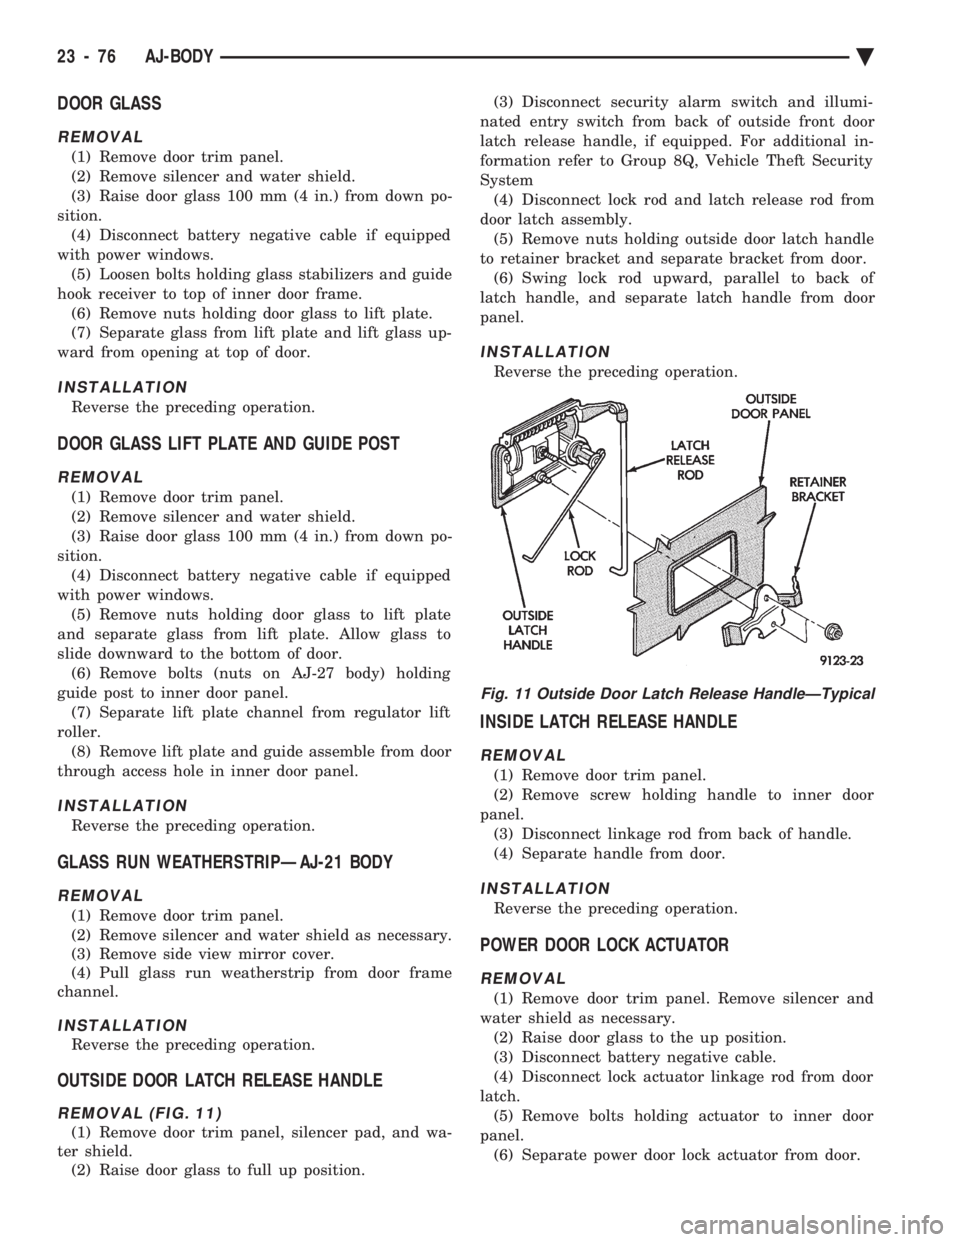
REMOVAL (FIG. 11)
(1) Remove door trim panel, silencer pad, and wa-
ter shield. (2) Raise door glass to full up position. (3) Disconnect security alarm switch and illumi-
nated entry switch from back of outside front door
latch release handle, if equipped. For additional in-
formation refer to Group 8Q, Vehicle Theft Security
System (4) Disconnect lock rod and latch release rod from
door latch assembly. (5) Remove nuts holding outside door latch handle
to retainer bracket and separate bracket from door. (6) Swing lock rod upward, parallel to back of
latch handle, and separate latch handle from door
panel.
INSTALLATION
Reverse the preceding operation.
INSIDE LATCH RELEASE HANDLE
REMOVAL
(1) Remove door trim panel.
(2) Remove screw holding handle to inner door
panel. (3) Disconnect linkage rod from back of handle.
(4) Separate handle from door.
INSTALLATION
Reverse the preceding operation.
POWER DOOR LOCK ACTUATOR
REMOVAL
(1) Remove door trim panel. Remove silencer and
water shield as necessary. (2) Raise door glass to the up position.
(3) Disconnect battery negative cable.
(4) Disconnect lock actuator linkage rod from door
latch. (5) Remove bolts holding actuator to inner door
panel. (6) Separate power door lock actuator from door.
Fig. 11 Outside Door Latch Release HandleÐTypical
23 - 76 AJ-BODY Ä
Page 2238 of 2438
TRUNK LID
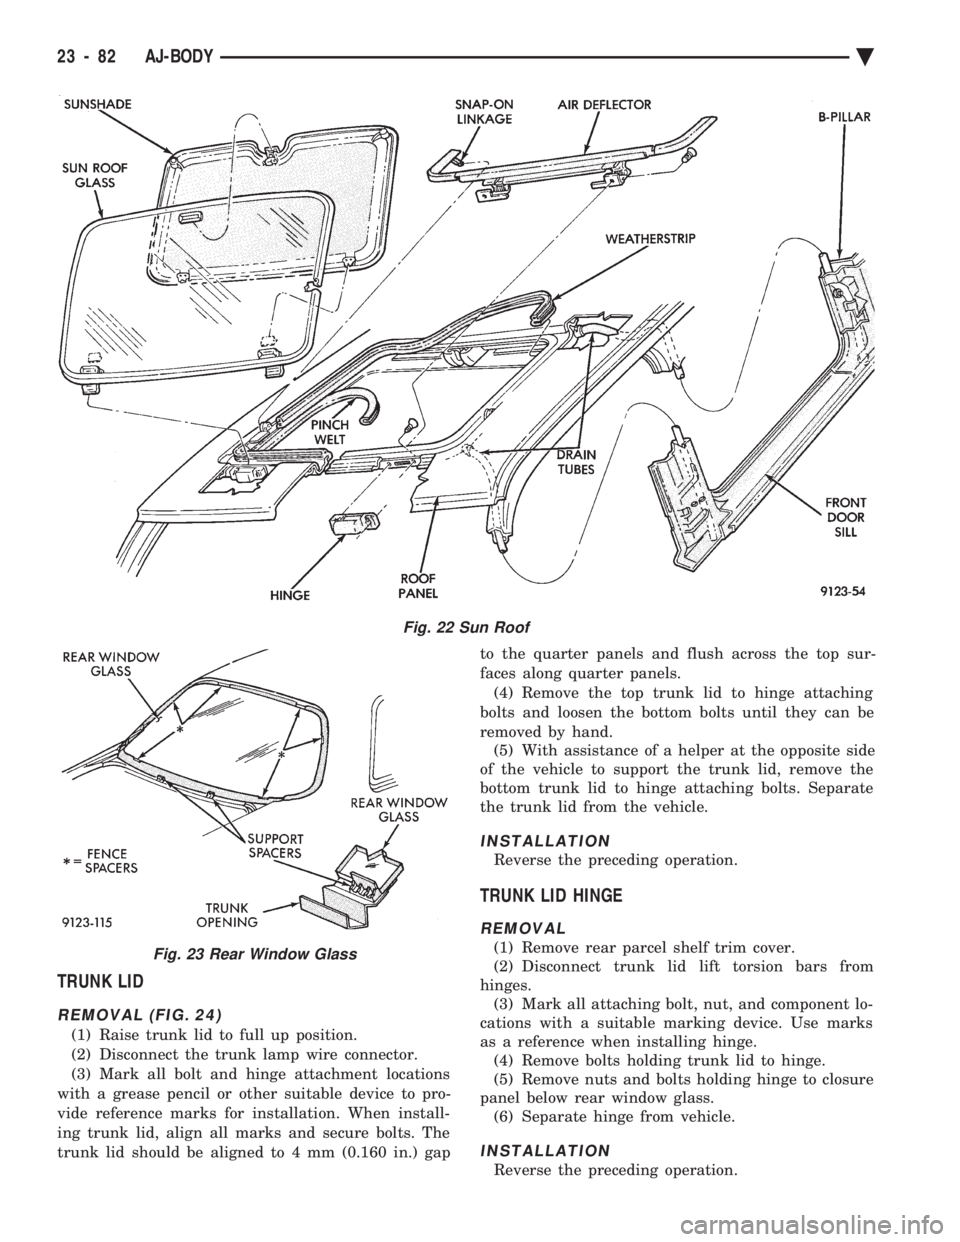
REMOVAL (FIG. 24)
(1) Raise trunk lid to full up position.
(2) Disconnect the trunk lamp wire connector.
(3) Mark all bolt and hinge attachment locations
with a grease pencil or other suitable device to pro-
vide reference marks for installation. When install-
ing trunk lid, align all marks and secure bolts. The
trunk lid should be aligned to 4 mm (0.160 in.) gap to the quarter panels and flush across the top sur-
faces along quarter panels. (4) Remove the top trunk lid to hinge attaching
bolts and loosen the bottom bolts until they can be
removed by hand. (5) With assistance of a helper at the opposite side
of the vehicle to support the trunk lid, remove the
bottom trunk lid to hinge attaching bolts. Separate
the trunk lid from the vehicle.
INSTALLATION
Reverse the preceding operation.
TRUNK LID HINGE
REMOVAL
(1) Remove rear parcel shelf trim cover.
(2) Disconnect trunk lid lift torsion bars from
hinges. (3) Mark all attaching bolt, nut, and component lo-
cations with a suitable marking device. Use marks
as a reference when installing hinge. (4) Remove bolts holding trunk lid to hinge.
(5) Remove nuts and bolts holding hinge to closure
panel below rear window glass. (6) Separate hinge from vehicle.
INSTALLATION
Reverse the preceding operation.
Fig. 22 Sun Roof
Fig. 23 Rear Window Glass
23 - 82 AJ-BODY Ä
Page 2248 of 2438
ADJUSTMENT PROCEDURES
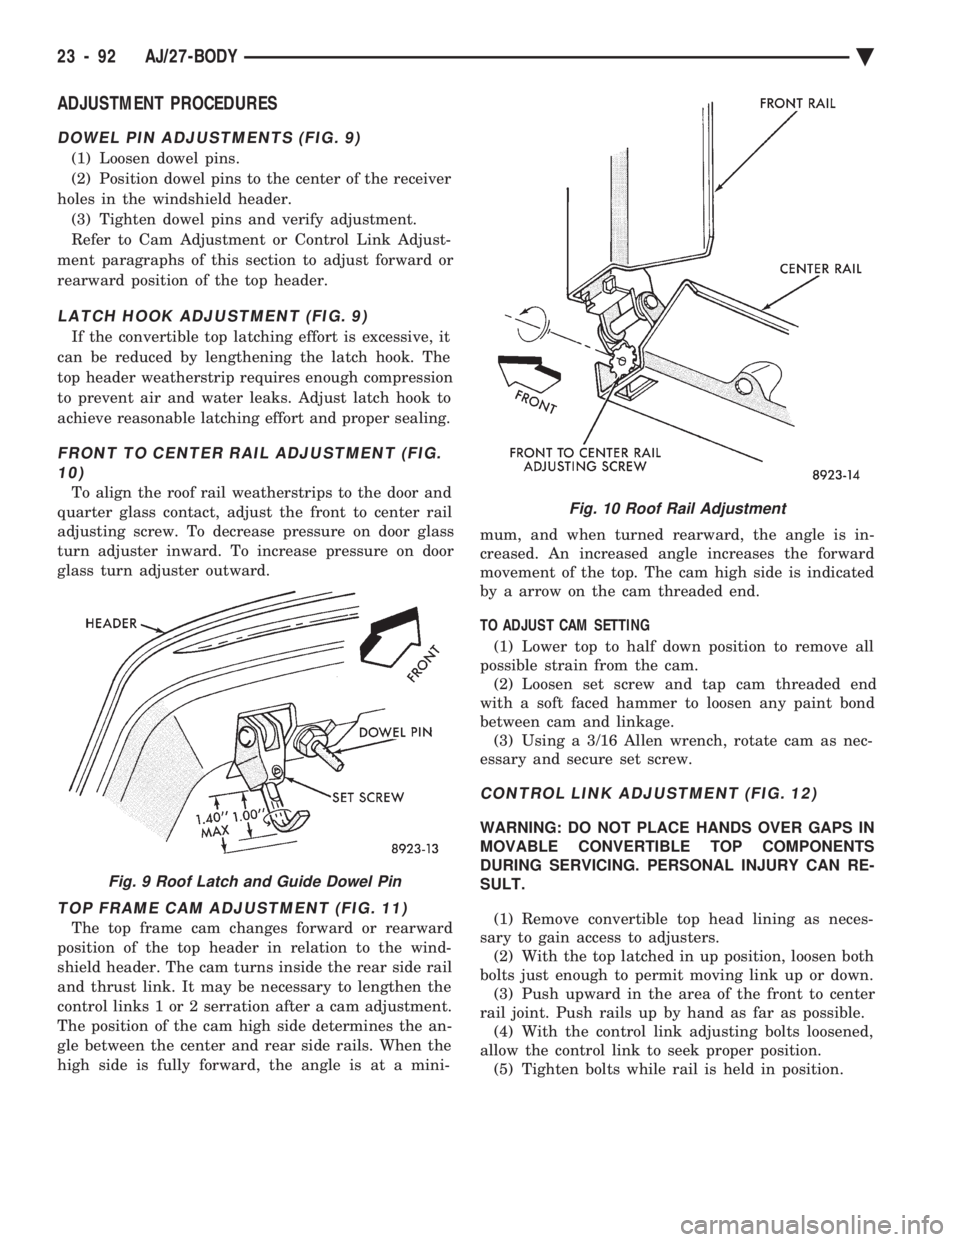
DOWEL PIN ADJUSTMENTS (FIG. 9)
(1) Loosen dowel pins.
(2) Position dowel pins to the center of the receiver
holes in the windshield header. (3) Tighten dowel pins and verify adjustment.
Refer to Cam Adjustment or Control Link Adjust-
ment paragraphs of this section to adjust forward or
rearward position of the top header.
LATCH HOOK ADJUSTMENT (FIG. 9)
If the convertible top latching effort is excessive, it
can be reduced by lengthening the latch hook. The
top header weatherstrip requires enough compression
to prevent air and water leaks. Adjust latch hook to
achieve reasonable latching effort and proper sealing.
FRONT TO CENTER RAIL ADJUSTMENT (FIG. 10)
To align the roof rail weatherstrips to the door and
quarter glass contact, adjust the front to center rail
adjusting screw. To decrease pressure on door glass
turn adjuster inward. To increase pressure on door
glass turn adjuster outward.
TOP FRAME CAM ADJUSTMENT (FIG. 11)
The top frame cam changes forward or rearward
position of the top header in relation to the wind-
shield header. The cam turns inside the rear side rail
and thrust link. It may be necessary to lengthen the
control links 1 or 2 serration after a cam adjustment.
The position of the cam high side determines the an-
gle between the center and rear side rails. When the
high side is fully forward, the angle is at a mini- mum, and when turned rearward, the angle is in-
creased. An increased angle increases the forward
movement of the top. The cam high side is indicated
by a arrow on the cam threaded end.
TO ADJUST CAM SETTING (1) Lower top to half down position to remove all
possible strain from the cam. (2) Loosen set screw and tap cam threaded end
with a soft faced hammer to loosen any paint bond
between cam and linkage. (3) Using a 3/16 Allen wrench, rotate cam as nec-
essary and secure set screw.
CONTROL LINK ADJUSTMENT (FIG. 12)
WARNING: DO NOT PLACE HANDS OVER GAPS IN
MOVABLE CONVERTIBLE TOP COMPONENTS
DURING SERVICING. PERSONAL INJURY CAN RE-
SULT.
(1) Remove convertible top head lining as neces-
sary to gain access to adjusters. (2) With the top latched in up position, loosen both
bolts just enough to permit moving link up or down. (3) Push upward in the area of the front to center
rail joint. Push rails up by hand as far as possible. (4) With the control link adjusting bolts loosened,
allow the control link to seek proper position. (5) Tighten bolts while rail is held in position.
Fig. 9 Roof Latch and Guide Dowel Pin
Fig. 10 Roof Rail Adjustment
23 - 92 AJ/27-BODY Ä
Page 2254 of 2438
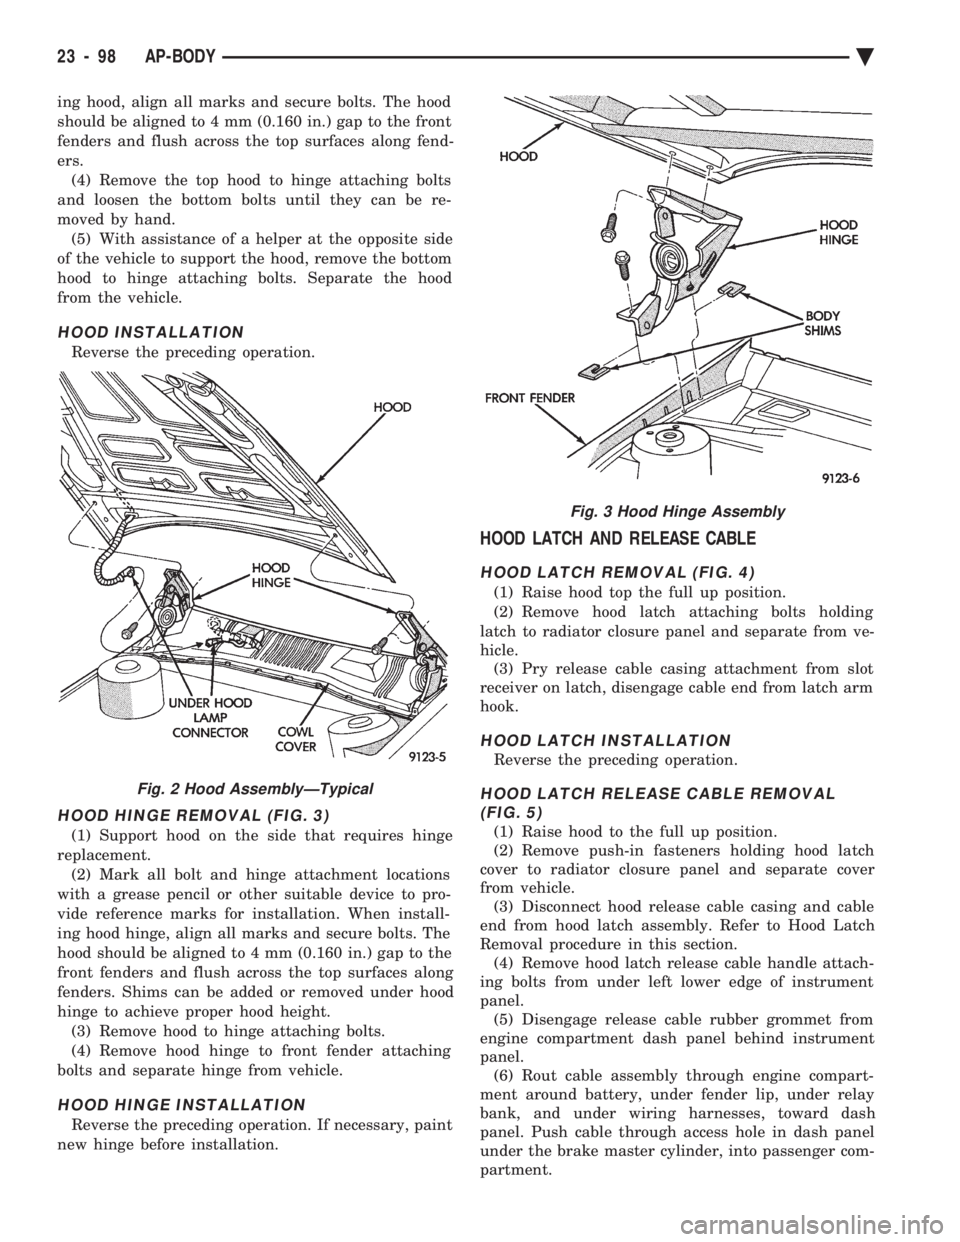
ing hood, align all marks and secure bolts. The hood
should be aligned to 4 mm (0.160 in.) gap to the front
fenders and flush across the top surfaces along fend-
ers.(4) Remove the top hood to hinge attaching bolts
and loosen the bottom bolts until they can be re-
moved by hand. (5) With assistance of a helper at the opposite side
of the vehicle to support the hood, remove the bottom
hood to hinge attaching bolts. Separate the hood
from the vehicle.
HOOD INSTALLATION
Reverse the preceding operation.
HOOD HINGE REMOVAL (FIG. 3)
(1) Support hood on the side that requires hinge
replacement. (2) Mark all bolt and hinge attachment locations
with a grease pencil or other suitable device to pro-
vide reference marks for installation. When install-
ing hood hinge, align all marks and secure bolts. The
hood should be aligned to 4 mm (0.160 in.) gap to the
front fenders and flush across the top surfaces along
fenders. Shims can be added or removed under hood
hinge to achieve proper hood height. (3) Remove hood to hinge attaching bolts.
(4) Remove hood hinge to front fender attaching
bolts and separate hinge from vehicle.
HOOD HINGE INSTALLATION
Reverse the preceding operation. If necessary, paint
new hinge before installation.
HOOD LATCH AND RELEASE CABLE
HOOD LATCH REMOVAL (FIG. 4)
(1) Raise hood top the full up position.
(2) Remove hood latch attaching bolts holding
latch to radiator closure panel and separate from ve-
hicle. (3) Pry release cable casing attachment from slot
receiver on latch, disengage cable end from latch arm
hook.
HOOD LATCH INSTALLATION
Reverse the preceding operation.
HOOD LATCH RELEASE CABLE REMOVAL (FIG. 5)
(1) Raise hood to the full up position.
(2) Remove push-in fasteners holding hood latch
cover to radiator closure panel and separate cover
from vehicle. (3) Disconnect hood release cable casing and cable
end from hood latch assembly. Refer to Hood Latch
Removal procedure in this section. (4) Remove hood latch release cable handle attach-
ing bolts from under left lower edge of instrument
panel. (5) Disengage release cable rubber grommet from
engine compartment dash panel behind instrument
panel. (6) Rout cable assembly through engine compart-
ment around battery, under fender lip, under relay
bank, and under wiring harnesses, toward dash
panel. Push cable through access hole in dash panel
under the brake master cylinder, into passenger com-
partment.
Fig. 2 Hood AssemblyÐTypical
Fig. 3 Hood Hinge Assembly
23 - 98 AP-BODY Ä
Page 2257 of 2438
FRONT DOOR HINGE INSTALLATION
Reverse the preceding operation. Align door to
achieve 6 mm (0.240 in.) gap to all surrounding pan-
els and flush across gaps.
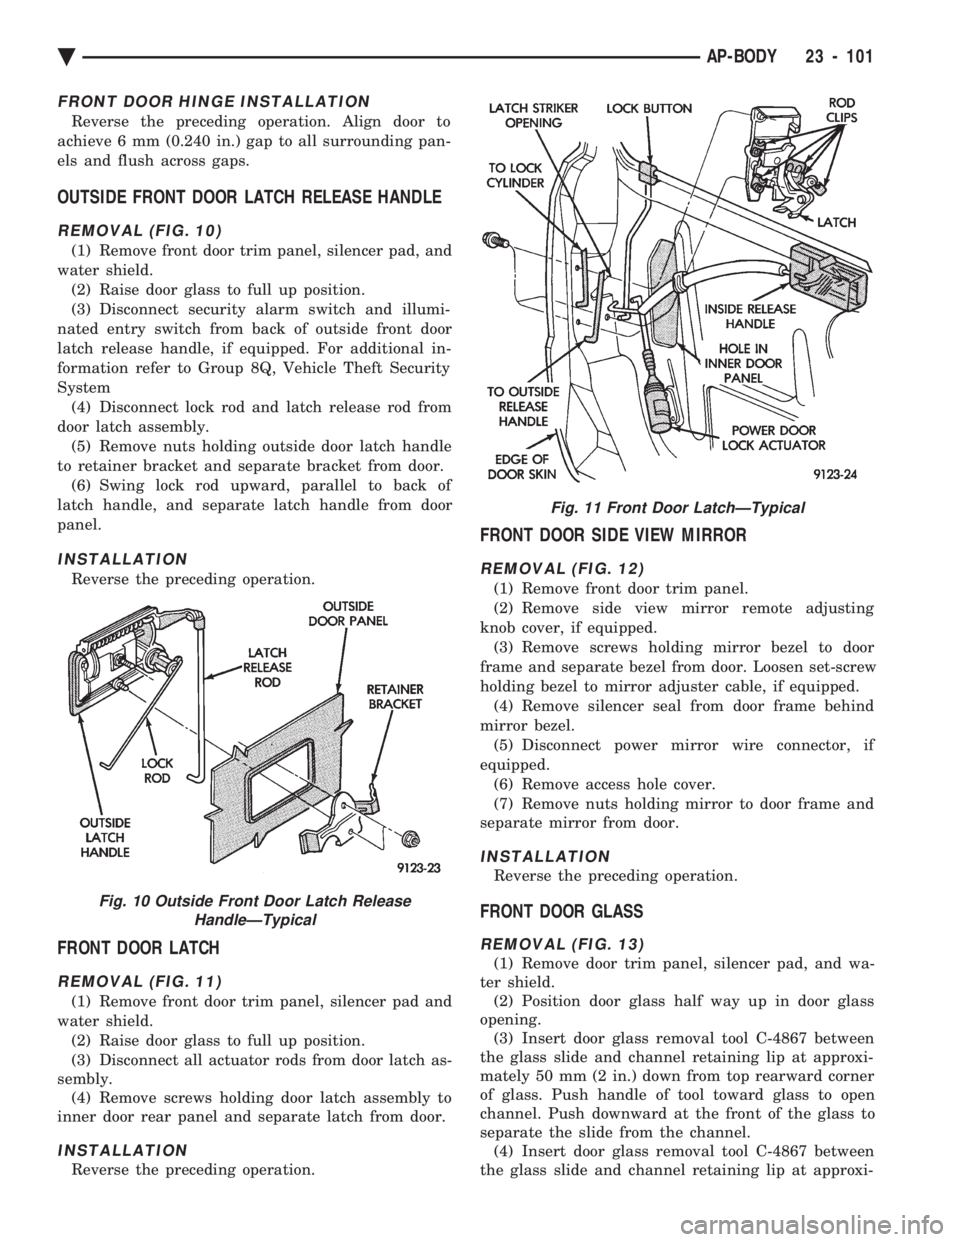
OUTSIDE FRONT DOOR LATCH RELEASE HANDLE
REMOVAL (FIG. 10)
(1) Remove front door trim panel, silencer pad, and
water shield. (2) Raise door glass to full up position.
(3) Disconnect security alarm switch and illumi-
nated entry switch from back of outside front door
latch release handle, if equipped. For additional in-
formation refer to Group 8Q, Vehicle Theft Security
System (4) Disconnect lock rod and latch release rod from
door latch assembly. (5) Remove nuts holding outside door latch handle
to retainer bracket and separate bracket from door. (6) Swing lock rod upward, parallel to back of
latch handle, and separate latch handle from door
panel.
INSTALLATION
Reverse the preceding operation.
FRONT DOOR LATCH
REMOVAL (FIG. 11)
(1) Remove front door trim panel, silencer pad and
water shield. (2) Raise door glass to full up position.
(3) Disconnect all actuator rods from door latch as-
sembly. (4) Remove screws holding door latch assembly to
inner door rear panel and separate latch from door.
INSTALLATION
Reverse the preceding operation.
FRONT DOOR SIDE VIEW MIRROR
REMOVAL (FIG. 12)
(1) Remove front door trim panel.
(2) Remove side view mirror remote adjusting
knob cover, if equipped. (3) Remove screws holding mirror bezel to door
frame and separate bezel from door. Loosen set-screw
holding bezel to mirror adjuster cable, if equipped. (4) Remove silencer seal from door frame behind
mirror bezel. (5) Disconnect power mirror wire connector, if
equipped. (6) Remove access hole cover.
(7) Remove nuts holding mirror to door frame and
separate mirror from door.
INSTALLATION
Reverse the preceding operation.
FRONT DOOR GLASS
REMOVAL (FIG. 13)
(1) Remove door trim panel, silencer pad, and wa-
ter shield. (2) Position door glass half way up in door glass
opening. (3) Insert door glass removal tool C-4867 between
the glass slide and channel retaining lip at approxi-
mately 50 mm (2 in.) down from top rearward corner
of glass. Push handle of tool toward glass to open
channel. Push downward at the front of the glass to
separate the slide from the channel. (4) Insert door glass removal tool C-4867 between
the glass slide and channel retaining lip at approxi-
Fig. 10 Outside Front Door Latch Release HandleÐTypical
Fig. 11 Front Door LatchÐTypical
Ä AP-BODY 23 - 101
Page 2259 of 2438
FRONT DOOR GLASS CHANNEL AND RUN
WEATHERSTRIP
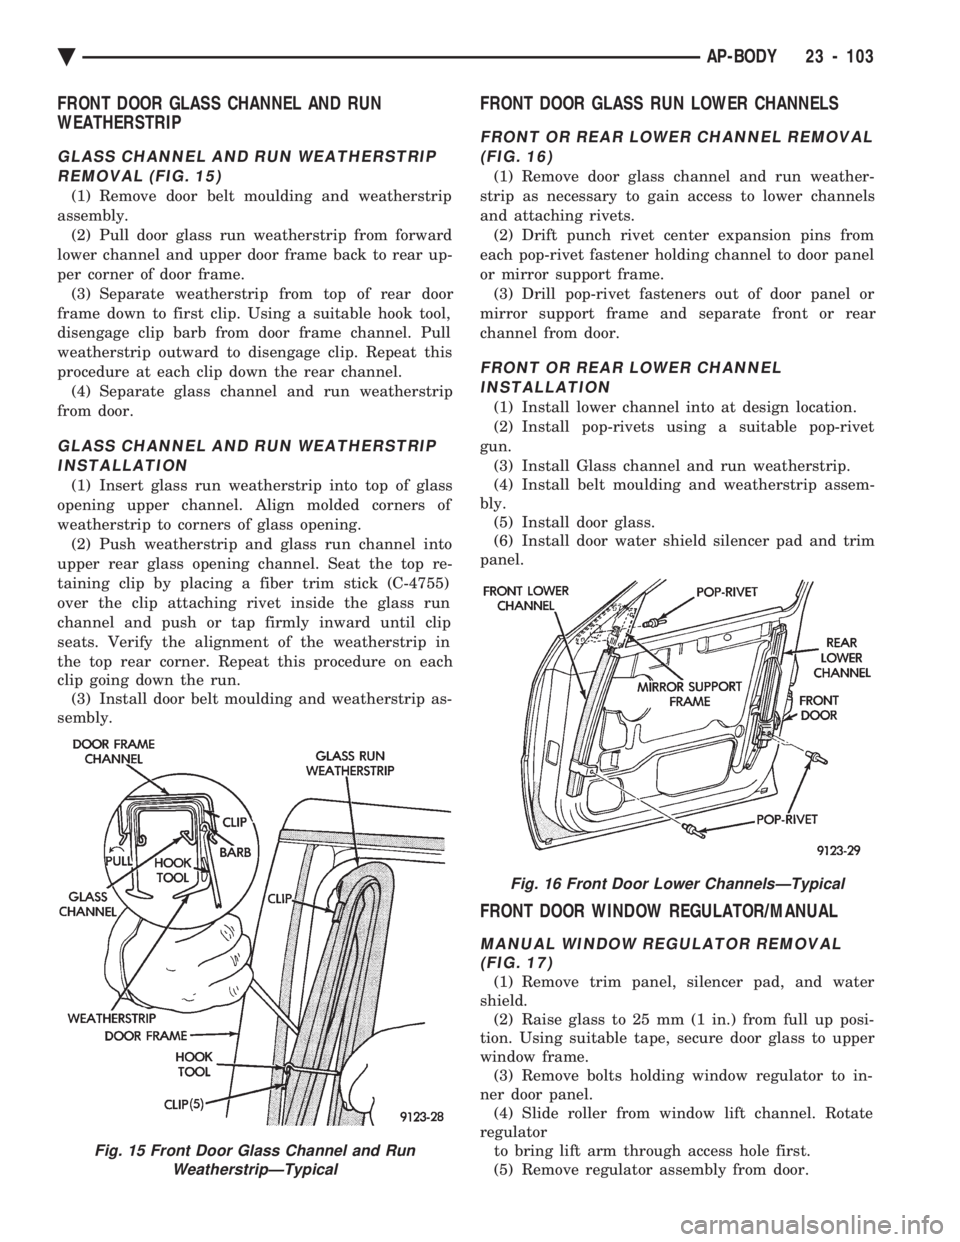
GLASS CHANNEL AND RUN WEATHERSTRIP
REMOVAL (FIG. 15)
(1) Remove door belt moulding and weatherstrip
assembly. (2) Pull door glass run weatherstrip from forward
lower channel and upper door frame back to rear up-
per corner of door frame. (3) Separate weatherstrip from top of rear door
frame down to first clip. Using a suitable hook tool,
disengage clip barb from door frame channel. Pull
weatherstrip outward to disengage clip. Repeat this
procedure at each clip down the rear channel. (4) Separate glass channel and run weatherstrip
from door.
GLASS CHANNEL AND RUN WEATHERSTRIP INSTALLATION
(1) Insert glass run weatherstrip into top of glass
opening upper channel. Align molded corners of
weatherstrip to corners of glass opening. (2) Push weatherstrip and glass run channel into
upper rear glass opening channel. Seat the top re-
taining clip by placing a fiber trim stick (C-4755)
over the clip attaching rivet inside the glass run
channel and push or tap firmly inward until clip
seats. Verify the alignment of the weatherstrip in
the top rear corner. Repeat this procedure on each
clip going down the run. (3) Install door belt moulding and weatherstrip as-
sembly.
FRONT DOOR GLASS RUN LOWER CHANNELS
FRONT OR REAR LOWER CHANNEL REMOVAL
(FIG. 16)
(1) Remove door glass channel and run weather-
strip as necessary to gain access to lower channels
and attaching rivets. (2) Drift punch rivet center expansion pins from
each pop-rivet fastener holding channel to door panel
or mirror support frame. (3) Drill pop-rivet fasteners out of door panel or
mirror support frame and separate front or rear
channel from door.
FRONT OR REAR LOWER CHANNEL INSTALLATION
(1) Install lower channel into at design location.
(2) Install pop-rivets using a suitable pop-rivet
gun. (3) Install Glass channel and run weatherstrip.
(4) Install belt moulding and weatherstrip assem-
bly. (5) Install door glass.
(6) Install door water shield silencer pad and trim
panel.
FRONT DOOR WINDOW REGULATOR/MANUAL
MANUAL WINDOW REGULATOR REMOVAL (FIG. 17)
(1) Remove trim panel, silencer pad, and water
shield. (2) Raise glass to 25 mm (1 in.) from full up posi-
tion. Using suitable tape, secure door glass to upper
window frame. (3) Remove bolts holding window regulator to in-
ner door panel. (4) Slide roller from window lift channel. Rotate
regulator to bring lift arm through access hole first.
(5) Remove regulator assembly from door.
Fig. 15 Front Door Glass Channel and Run WeatherstripÐTypical
Fig. 16 Front Door Lower ChannelsÐTypical
Ä AP-BODY 23 - 103
Page 2260 of 2438
MANUAL WINDOW REGULATOR INSTALLATION
Reverse the preceding operation.
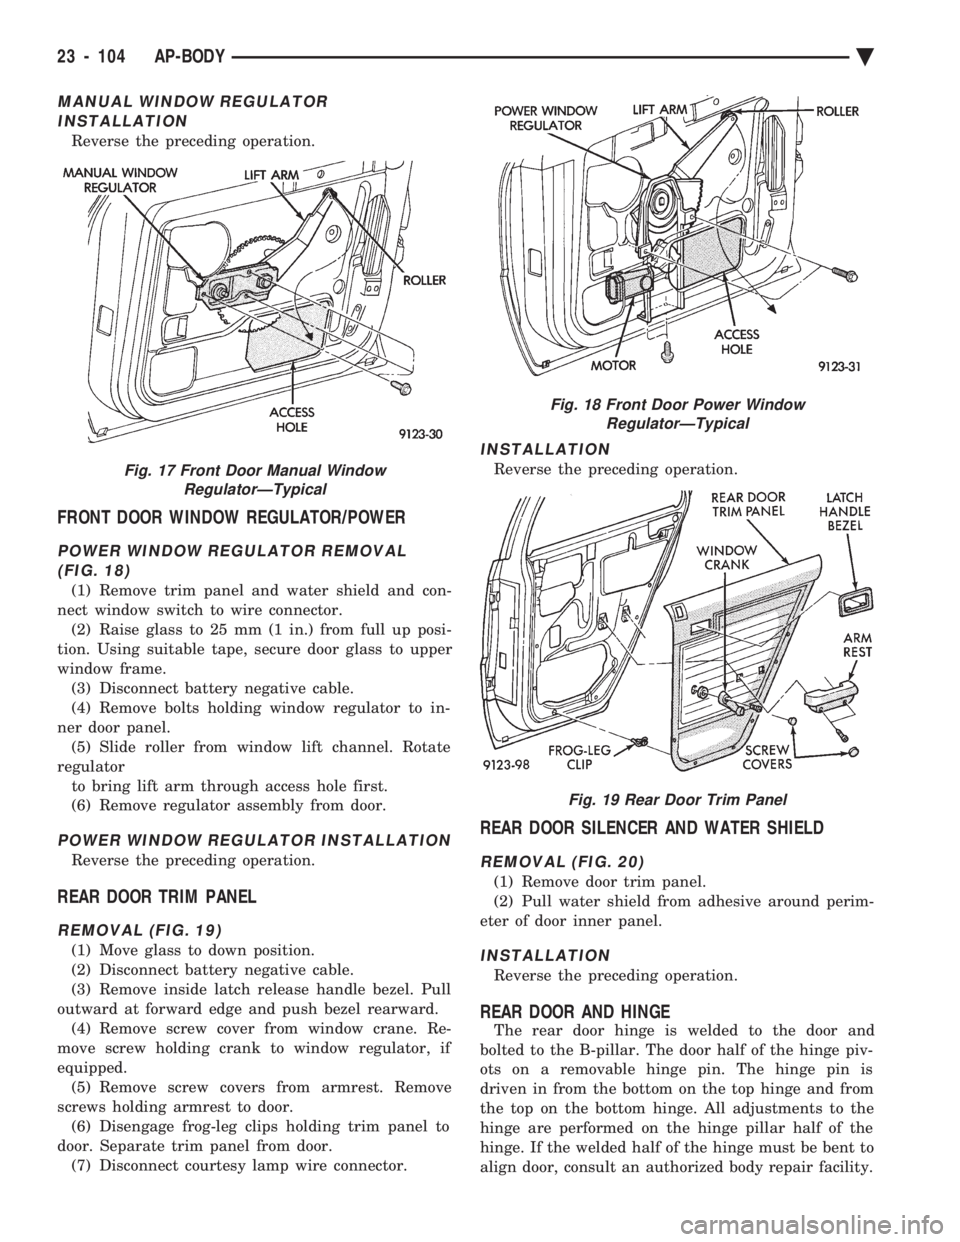
FRONT DOOR WINDOW REGULATOR/POWER
POWER WINDOW REGULATOR REMOVAL(FIG. 18)
(1) Remove trim panel and water shield and con-
nect window switch to wire connector. (2) Raise glass to 25 mm (1 in.) from full up posi-
tion. Using suitable tape, secure door glass to upper
window frame. (3) Disconnect battery negative cable.
(4) Remove bolts holding window regulator to in-
ner door panel. (5) Slide roller from window lift channel. Rotate
regulator to bring lift arm through access hole first.
(6) Remove regulator assembly from door.
POWER WINDOW REGULATOR INSTALLATION
Reverse the preceding operation.
REAR DOOR TRIM PANEL
REMOVAL (FIG. 19)
(1) Move glass to down position.
(2) Disconnect battery negative cable.
(3) Remove inside latch release handle bezel. Pull
outward at forward edge and push bezel rearward. (4) Remove screw cover from window crane. Re-
move screw holding crank to window regulator, if
equipped. (5) Remove screw covers from armrest. Remove
screws holding armrest to door. (6) Disengage frog-leg clips holding trim panel to
door. Separate trim panel from door. (7) Disconnect courtesy lamp wire connector.
INSTALLATION
Reverse the preceding operation.
REAR DOOR SILENCER AND WATER SHIELD
REMOVAL (FIG. 20)
(1) Remove door trim panel.
(2) Pull water shield from adhesive around perim-
eter of door inner panel.
INSTALLATION
Reverse the preceding operation.
REAR DOOR AND HINGE
The rear door hinge is welded to the door and
bolted to the B-pillar. The door half of the hinge piv-
ots on a removable hinge pin. The hinge pin is
driven in from the bottom on the top hinge and from
the top on the bottom hinge. All adjustments to the
hinge are performed on the hinge pillar half of the
hinge. If the welded half of the hinge must be bent to
align door, consult an authorized body repair facility.
Fig. 17 Front Door Manual Window RegulatorÐTypical
Fig. 18 Front Door Power WindowRegulatorÐTypical
Fig. 19 Rear Door Trim Panel
23 - 104 AP-BODY Ä