1993 CHEVROLET PLYMOUTH ACCLAIM clock
[x] Cancel search: clockPage 1994 of 2438
plus (constant) preload of 0.254mm (.010 in.).
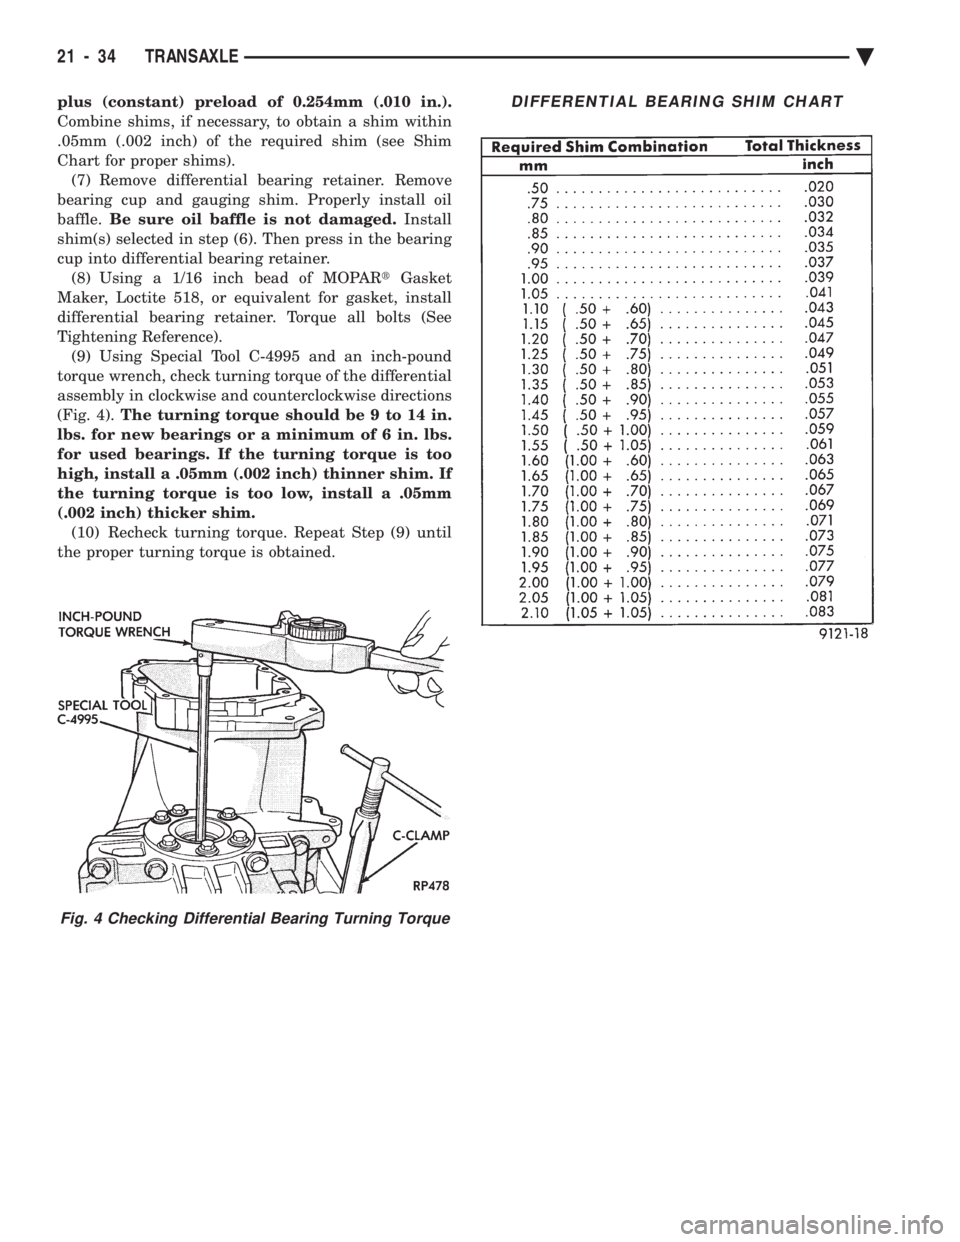
Combine shims, if necessary, to obtain a shim within
.05mm (.002 inch) of the required shim (see Shim
Chart for proper shims).(7) Remove differential bearing retainer. Remove
bearing cup and gauging shim. Properly install oil
baffle. Be sure oil baffle is not damaged. Install
shim(s) selected in step (6). Then press in the bearing
cup into differential bearing retainer. (8) Using a 1/16 inch bead of MOPAR tGasket
Maker, Loctite 518, or equivalent for gasket, install
differential bearing retainer. Torque all bolts (See
Tightening Reference). (9) Using Special Tool C-4995 and an inch-pound
torque wrench, check turning torque of the differential
assembly in clockwise and counterclockwise directions
(Fig. 4). The turning torque should be 9 to 14 in.
lbs. for new bearings or a minimum of 6 in. lbs.
for used bearings. If the turning torque is too
high, install a .05mm (.002 inch) thinner shim. If
the turning torque is too low, install a .05mm
(.002 inch) thicker shim. (10) Recheck turning torque. Repeat Step (9) until
the proper turning torque is obtained.
Fig. 4 Checking Differential Bearing Turning Torque
DIFFERENTIAL BEARING SHIM CHART
21 - 34 TRANSAXLE Ä
Page 2002 of 2438
Unless the condition is obvious, like no drive in D
range first gear only. The transaxle should never be
disassembled until hydraulic pressure tests have
been performed.
HYDRAULIC PRESSURE TESTS
Pressure testing is a very important step in the di-
agnostic procedure. These tests usually reveal the
cause of most transaxle problems. Before performing pressure tests, be certain that
fluid level and condition, and control cable adjust-
ments have been checked and approved. Fluid must be at operating temperature (150 to 200
degrees F.). Install an engine tachometer, raise vehicle on hoist
which allows front wheels to turn, and position ta-
chometer so it can be read. Disconnect throttle cable and shift cable from tran-
saxle levers so they can be controlled from outside
the vehicle. Attach 150 psi gauges to ports required for test be-
ing conducted. A 300 psi gauge (C-3293) is required
for reverse pressure test at rear servo.
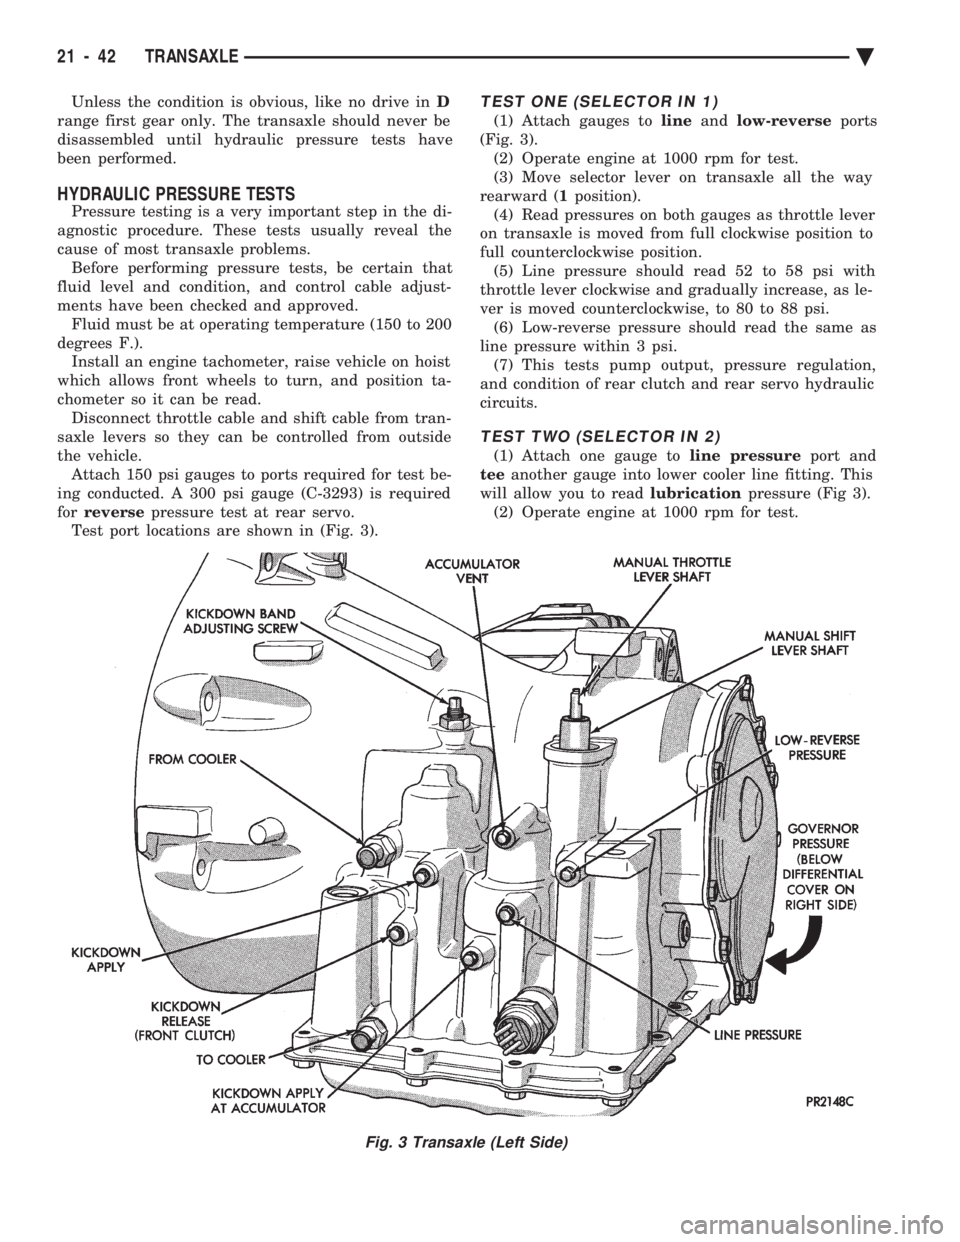
Test port locations are shown in (Fig. 3).
TEST ONE (SELECTOR IN 1)
(1) Attach gauges to lineandlow-reverse ports
(Fig. 3). (2) Operate engine at 1000 rpm for test.
(3) Move selector lever on transaxle all the way
rearward ( 1position).
(4) Read pressures on both gauges as throttle lever
on transaxle is moved from full clockwise position to
full counterclockwise position. (5) Line pressure should read 52 to 58 psi with
throttle lever clockwise and gradually increase, as le-
ver is moved counterclockwise, to 80 to 88 psi. (6) Low-reverse pressure should read the same as
line pressure within 3 psi. (7) This tests pump output, pressure regulation,
and condition of rear clutch and rear servo hydraulic
circuits.
TEST TWO (SELECTOR IN 2)
(1) Attach one gauge to line pressureport and
tee another gauge into lower cooler line fitting. This
will allow you to read lubricationpressure (Fig 3).
(2) Operate engine at 1000 rpm for test.
Fig. 3 Transaxle (Left Side)
21 - 42 TRANSAXLE Ä
Page 2003 of 2438
(3) Move selector lever on transaxle one detent
forward from full rearward position. This is selector
2 position.
(4) Read pressures on both gauges as throttle lever
on transaxle is moved from full clockwise position to
full counterclockwise position. (5) Line pressure should read 52 to 58 psi with
throttle lever clockwise and gradually increase, as le-
ver is moved counterclockwise, to 80 to 88 psi. (6) Lubrication pressure should be 10 to 25 psi
with lever clockwise and 10 to 35 psi with lever full
counterclockwise. (7) This tests pump output, pressure regulation,
and condition of rear clutch and lubrication hydrau-
lic circuits.
TEST THREE (SELECTOR IN D)
(1) Attach gauges to lineandkickdown release
ports (Fig. 3). (2) Operate engine at 1600 rpm for test.
(3) Move selector lever on transaxle two detents
forward from full rearward position. This is selector
D position.
(4) Read pressures on both gauges as throttle lever
on transaxle is moved from full clockwise position to
full counterclockwise position. (5) Line pressure should read 52 to 58 psi with
throttle lever clockwise and gradually increase, as le-
ver is moved counterclockwise to 80 to 88 psi. (6) Kickdown release is pressurized only in direct
drive and should be same as line pressure within 3
psi, up to kickdown point. (7) This tests pump output, pressure regulation,
and condition of rear clutch, front clutch, and hy-
draulic circuits.
TEST FOUR (SELECTOR IN REVERSE)
(1) Attach 300 psi gauge to low-reverseport (Fig.
3). (2) Operate engine at 1600 rpm for test.
(3) Move selector lever on transaxle four detents
forward from full rearward position. This is selector
R position.
(4) Low-reverse pressure should read 180 to 220
psi with throttle lever clockwise and gradually in-
crease, as lever is moved counterclockwise to 260 to
300 psi. (5) This tests pump output, pressure regulation,
and condition of front clutch and rear servo hydraulic
circuits. (6) Move selector lever on transaxle to Dposition
to check that low-reverse pressure drops to zero. (7) This tests for leakage into rear servo, due to
case porosity, which can cause reverse band burn
out.
TEST RESULT INDICATIONS
(1) If proper line pressure, minimum to maximum, is
found in any one test, the pump and pressure regulator
are working properly. (2) Low pressure in D, 1, and 2but correct pressure
in Rindicates rear clutch circuit leakage.
(3) Low pressure in D and Rbut correct pressure in
1 indicates front clutch circuit leakage.
(4) Low pressure in R and 1but correct pressure in
2 indicates rear servo circuit leakage.
(5) Low line pressure in all positions indicates a
defective pump, a clogged filter, or a stuck pressure
regulator valve.
GOVERNOR PRESSURE
Test only if transaxle shifts at wrong vehicle speeds
when throttle cable is correctly adjusted. (1) Connect a 0-150 psi pressure gauge to governor
pressure take-off point, located at lower right side of
case, below differential cover (Fig. 3). (2) Operate transaxle in third gear to read pres-
sures. The governor pressure should respond smoothly
to changes in mph and should return to 0 to 3 psi when vehicle is stopped. High pressure at
standstill (above 3 psi) will prevent the transaxle from
downshifting.
THROTTLE PRESSURE
No gauge port is provided for throttle pressure.
Incorrect throttle pressure should only be suspected if
part throttle upshift speeds are either delayed or occur
too early, with a correctly adjusted throttle cable.
Engine runaway on either upshifts or downshifts can
also be an indicator of incorrect (low) throttle pressure
setting, or misadjusted throttle cable. In no case should throttle pressure be adjusted until
the transaxle throttle cable adjustment has been veri-
fied to be correct.
CLUTCH AND SERVO AIR PRESSURE TESTS
A no drive condition might exist even with correct
fluid pressure, because of inoperative clutches or
bands. The inoperative units, clutches, bands, and
servos can be located through a series of tests by
substituting air pressure for fluid pressure (Fig. 4). The front and rear clutches, kickdown servo, and
low-reverse servo may be tested by applying air pres-
sure to their respective passages after the valve body assembly has been removed. To make
air pressure tests, proceed as follows: Compressed air supply must be free of all dirt
or moisture. Use a pressure of 30 psi. Remove oil pan and valve body See Disassembly-
Subassembly Removal .
FRONT CLUTCH
Apply air pressure to front clutch applypassage and
listen for a dull thudwhich indicates that front
Ä TRANSAXLE 21 - 43
Page 2006 of 2438
so that pump housing and case front may be covered
with soapy solution or water. Leaks are sometimes
caused by porosity in the case or pump housing.If a leak source is located, that part and all associ-
ated seals, O-rings, and gaskets should be replaced
with new parts.
GEARSHIFT LINKAGE ADJUSTMENT
Normal operation of the Park/Neutral Position
Switch provides a quick check to confirm proper
manual linkage adjustment. Move the selector level slowly upward until it
clicks into the ``P'' Park notch in the selector gate. If
the starter will operate the ``P'' position is correct. After checking ``P'' position, move selector slowly
toward ``N'' Neutral position until lever drops in the
``N'' stop. If the starter will also operate at this point
the gearshift linkage is properly adjusted. If the
starter fails to operate in either position, linkage ad-
justment is required.
CAUTION: When it is necessary to disassemble
linkage cable from levers, which use plastic grom-
mets as retainers, the grommets should be replaced
with new grommets. Use a prying tool to force rod
from grommet in lever, then cut away old grommet.
Use pliers to snap new grommet into lever and rod
into grommet.
(1) Set parking brake.
(2) Place gearshift lever in P(PARK) position.
(3) Loosen clamp bolt on gearshift cable bracket.
(4) Column shift: Insure that preload adjustment
spring engages fork on transaxle bracket. (5) Pull the shift lever by hand to the front detent
position (PARK) and tighten lock. Tighten screw to
11 N Im (100 in. lbs.). Gearshift linkage should now
be properly adjusted. (6) Check adjustment as follows:(a) Detent position for neutral and drive should
be within limits of hand lever gate stops. (b) Key start must occur only when shift lever is
in park or neutral positions.
THROTTLE PRESSURE LINKAGE ADJUSTMENT
The throttle pressure cable adjustment is very im-
portant to proper transaxle operation. This adjust-
ment positions a valve which controls shift speed,
shift quality, and part throttle downshift sensitivity.
If the setting is too long, early shifts and slippage be-
tween shifts may occur. If the setting is too short,
shifts may be delayed and part throttle downshifts
may be very sensitive.
CABLE ADJUSTMENT PROCEDURE (4-CYL.)
(1) Perform transaxle throttle pressure cable ad-
justment while engine is at normal operating tem-
perature. (2) Loosen cable mounting bracket lock screw.
(3) Bracket should be positioned with both bracket
alignment tabs touching the transaxle cast surface.
Tighten lock screw to 12 N Im (105 in. lbs.) see Fig-
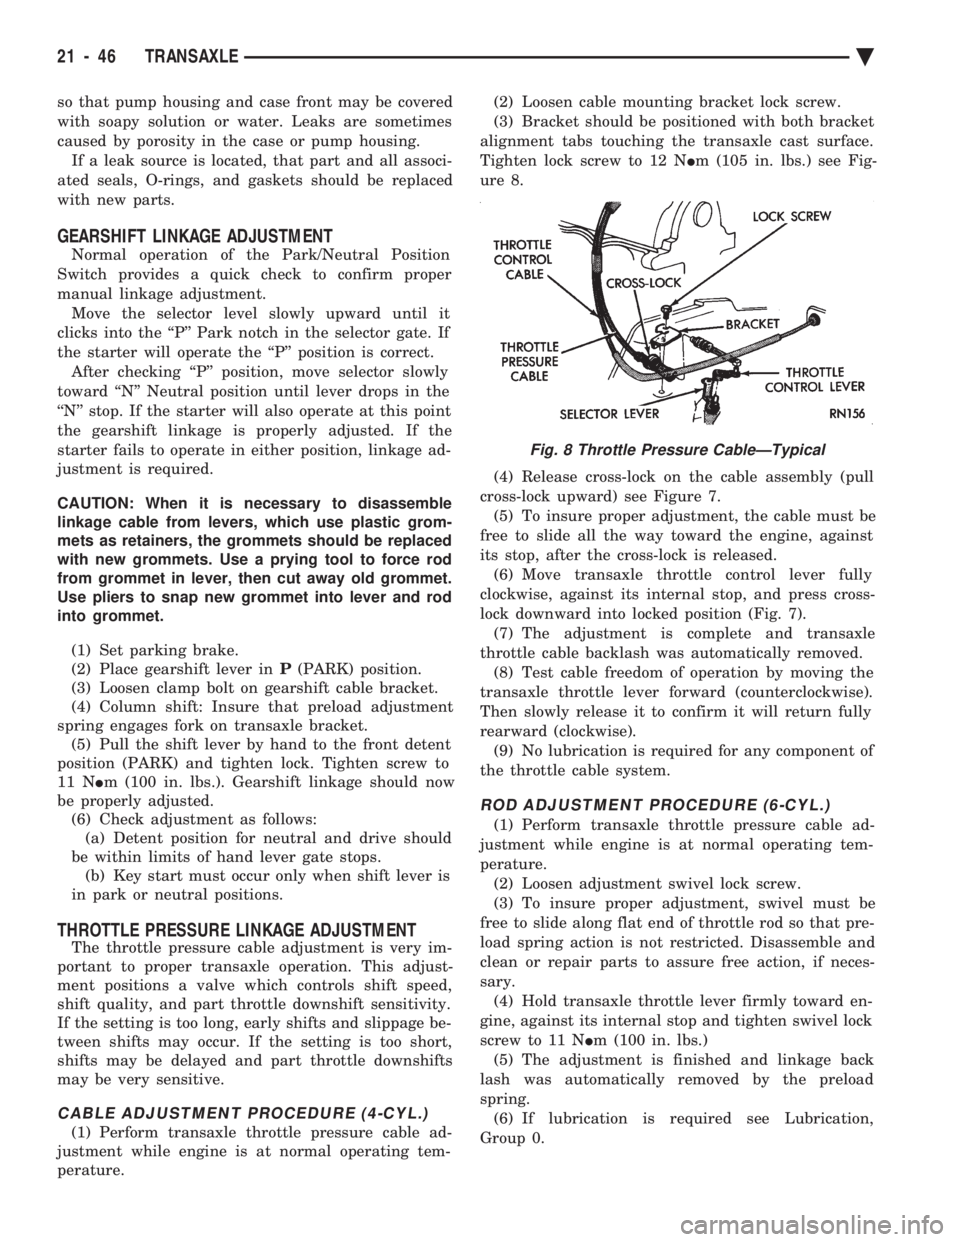
ure 8.
(4) Release cross-lock on the cable assembly (pull
cross-lock upward) see Figure 7. (5) To insure proper adjustment, the cable must be
free to slide all the way toward the engine, against
its stop, after the cross-lock is released. (6) Move transaxle throttle control lever fully
clockwise, against its internal stop, and press cross-
lock downward into locked position (Fig. 7). (7) The adjustment is complete and transaxle
throttle cable backlash was automatically removed. (8) Test cable freedom of operation by moving the
transaxle throttle lever forward (counterclockwise).
Then slowly release it to confirm it will return fully
rearward (clockwise). (9) No lubrication is required for any component of
the throttle cable system.
ROD ADJUSTMENT PROCEDURE (6-CYL.)
(1) Perform transaxle throttle pressure cable ad-
justment while engine is at normal operating tem-
perature. (2) Loosen adjustment swivel lock screw.
(3) To insure proper adjustment, swivel must be
free to slide along flat end of throttle rod so that pre-
load spring action is not restricted. Disassemble and
clean or repair parts to assure free action, if neces-
sary. (4) Hold transaxle throttle lever firmly toward en-
gine, against its internal stop and tighten swivel lock
screw to 11 N Im (100 in. lbs.)
(5) The adjustment is finished and linkage back
lash was automatically removed by the preload
spring. (6) If lubrication is required see Lubrication,
Group 0.
Fig. 8 Throttle Pressure CableÐTypical
21 - 46 TRANSAXLE Ä
Page 2007 of 2438
BAND ADJUSTMENT
KICKDOWN BAND (FRONT)
The kickdown band adjusting screw is located on
left side (top front) of the transaxle case. (1) Loosen locknut and back off nut approximately
five turns. Test adjusting screw for free turning in
the transaxle case. (2) Using wrench, Tool C-3880-A with adapter Tool
C-3705, tighten band adjusting screw to 5 N Im (47 to
50 in. lbs.). If adapter C-3705 is not used, tighten ad-
justing screw to 8 N Im (72 in. lbs.) which is the true
torque. (3) Back off adjusting screw the number of turns
listed in Specifications . Hold adjusting screw in this
position and tighten locknut to 47 N Im (35 ft. lbs.)
LOW/REVERSE BAND-REAR
To adjust low-reverse band, proceed as follows:
(1) Loosen and back off locknut approximately 5
turns. (2) Using an inch-pound torque wrench, tighten
adjusting screw to 5 N Im (41 in. lbs.) true torque.
(3) Back off adjusting screw the number of turns
listed under Specifications in the rear of the Tran-
saxle Section in this service manual. (4) Tighten locknut to 14 N Im (10 ft. lbs.).
HYDRAULIC CONTROL PRESSURE ADJUSTMENTS
LINE PRESSURE
An incorrect throttle pressure setting will cause in-
correct line pressure readings even though line pres-
sure adjustment is correct. Always inspect and
correct throttle pressure adjustment before adjusting
the line pressure. The approximate adjustment for line pressure is
1-5/16 inches, measured from valve body to inner
edge of adjusting nut. However, due to manufactur-
ing tolerances, the adjustment can be varied to ob-
tain specified line pressure. The adjusting screw may be turned with an Allen
wrench. One complete turn of adjusting screw
changes closed throttle line pressure approximately
1-2/3 psi. Turning adjusting screw counterclockwise
increases pressure, and clockwise decreases pressure.
THROTTLE PRESSURE
Throttle pressures cannot be tested accurately;
therefore, the adjustment should be measured if a
malfunction is evident. (1) Insert gauge pin of Tool C-3763 between the
throttle lever cam and kickdown valve. (2) By pushing in on tool, compress kickdown
valve against its spring so throttle valve is com-
pletely bottomed inside the valve body. (3) While compressing spring, turn throttle lever
stop screw with adapter C-4553. Turn until head of screw touches throttle lever tang, with throttle lever
cam touching tool and throttle valve bottomed. Be sure
adjustment is made with spring fully compressed and
valve bottomed in the valve body.
VEHICLE SPEED SENSOR PINION GEAR
When the speed sensor is removed for any reason, a
NEW O-ring must be installed on its outside diameter.
REMOVAL AND INSTALLATION
(1) Remove speedometer cable (if so equipped).
(2) Remove harness connector from sensor. Make
sure weatherseal stays on harness connector. (3) Remove bolt securing the distance sensor in the
extension housing. (4) Carefully pull sensor and pinion gear assembly
out of extension housing. (5) Remove pinion gear from sensor.
(6) To install, reverse the above procedure. Make
sure extension housing and sensor flange are clean
prior to installation. Always use a NEW sensor O-ring. (7) Tighten securing bolt to 7 N Im (60 in. lbs.).
Tighten speedometer cable to 4 N Im (35 in. lbs.).
PARK/NEUTRAL POSITION AND BACK-UP LAMP
SWITCH
REPLACEMENT AND TEST
The Park/Neutral switch is the center terminal of the
3 terminal switch. It provides ground for the starter
solenoid circuit through the selector lever in only Park
and Neutral positions. (1) To test switch, remove wiring connector from
switch and test for continuity between center pin of
switch and transaxle case. Continuity should exist only
when transaxle is in Park or Neutral. (2) Check gearshift cable adjustment before replac-
ing a switch which tests bad. (3) Unscrew switch from transaxle case allowing
fluid to drain into a container. Move selector lever to
Park and then to Neutral positions. Inspect to see that
the switch operating lever fingers are centered in
switch opening in the case. (4) Screw the switch with a new seal into transaxle
case and tighten to 33 N Im (24 ft. lbs.). Retest switch
with the test lamp. (5) Add fluid to transaxle to bring up to proper level.
(6) The back-up lamp switch circuit is through the
two outside terminals of the 3 terminal switch. (7) To test switch, remove wiring connector from
switch and test for continuity between the two outside
pins. (8) Continuity should exist only with transaxle in
Reverse position. (9) No continuity should exist from either pin to the
case.
Ä TRANSAXLE 21 - 47
Page 2194 of 2438
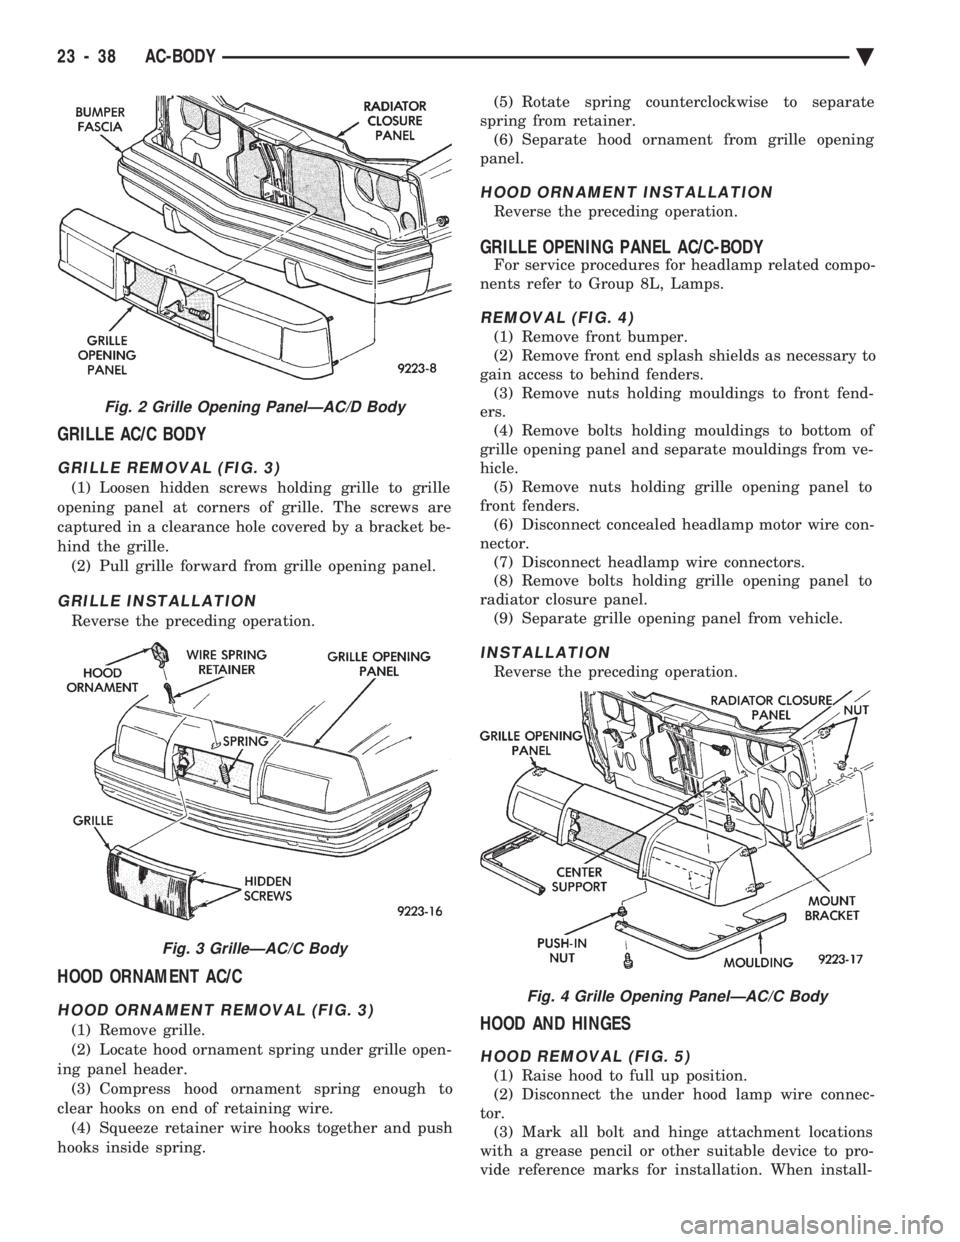
GRILLE AC/C BODY
GRILLE REMOVAL (FIG. 3)
(1) Loosen hidden screws holding grille to grille
opening panel at corners of grille. The screws are
captured in a clearance hole covered by a bracket be-
hind the grille. (2) Pull grille forward from grille opening panel.
GRILLE INSTALLATION
Reverse the preceding operation.
HOOD ORNAMENT AC/C
HOOD ORNAMENT REMOVAL (FIG. 3)
(1) Remove grille.
(2) Locate hood ornament spring under grille open-
ing panel header. (3) Compress hood ornament spring enough to
clear hooks on end of retaining wire. (4) Squeeze retainer wire hooks together and push
hooks inside spring. (5) Rotate spring counterclockwise to separate
spring from retainer. (6) Separate hood ornament from grille opening
panel.
HOOD ORNAMENT INSTALLATION
Reverse the preceding operation.
GRILLE OPENING PANEL AC/C-BODY
For service procedures for headlamp related compo-
nents refer to Group 8L, Lamps.
REMOVAL (FIG. 4)
(1) Remove front bumper.
(2) Remove front end splash shields as necessary to
gain access to behind fenders. (3) Remove nuts holding mouldings to front fend-
ers. (4) Remove bolts holding mouldings to bottom of
grille opening panel and separate mouldings from ve-
hicle. (5) Remove nuts holding grille opening panel to
front fenders. (6) Disconnect concealed headlamp motor wire con-
nector. (7) Disconnect headlamp wire connectors.
(8) Remove bolts holding grille opening panel to
radiator closure panel. (9) Separate grille opening panel from vehicle.
INSTALLATION
Reverse the preceding operation.
HOOD AND HINGES
HOOD REMOVAL (FIG. 5)
(1) Raise hood to full up position.
(2) Disconnect the under hood lamp wire connec-
tor. (3) Mark all bolt and hinge attachment locations
with a grease pencil or other suitable device to pro-
vide reference marks for installation. When install-
Fig. 2 Grille Opening PanelÐAC/D Body
Fig. 3 GrilleÐAC/C Body
Fig. 4 Grille Opening PanelÐAC/C Body
23 - 38 AC-BODY Ä
Page 2290 of 2438
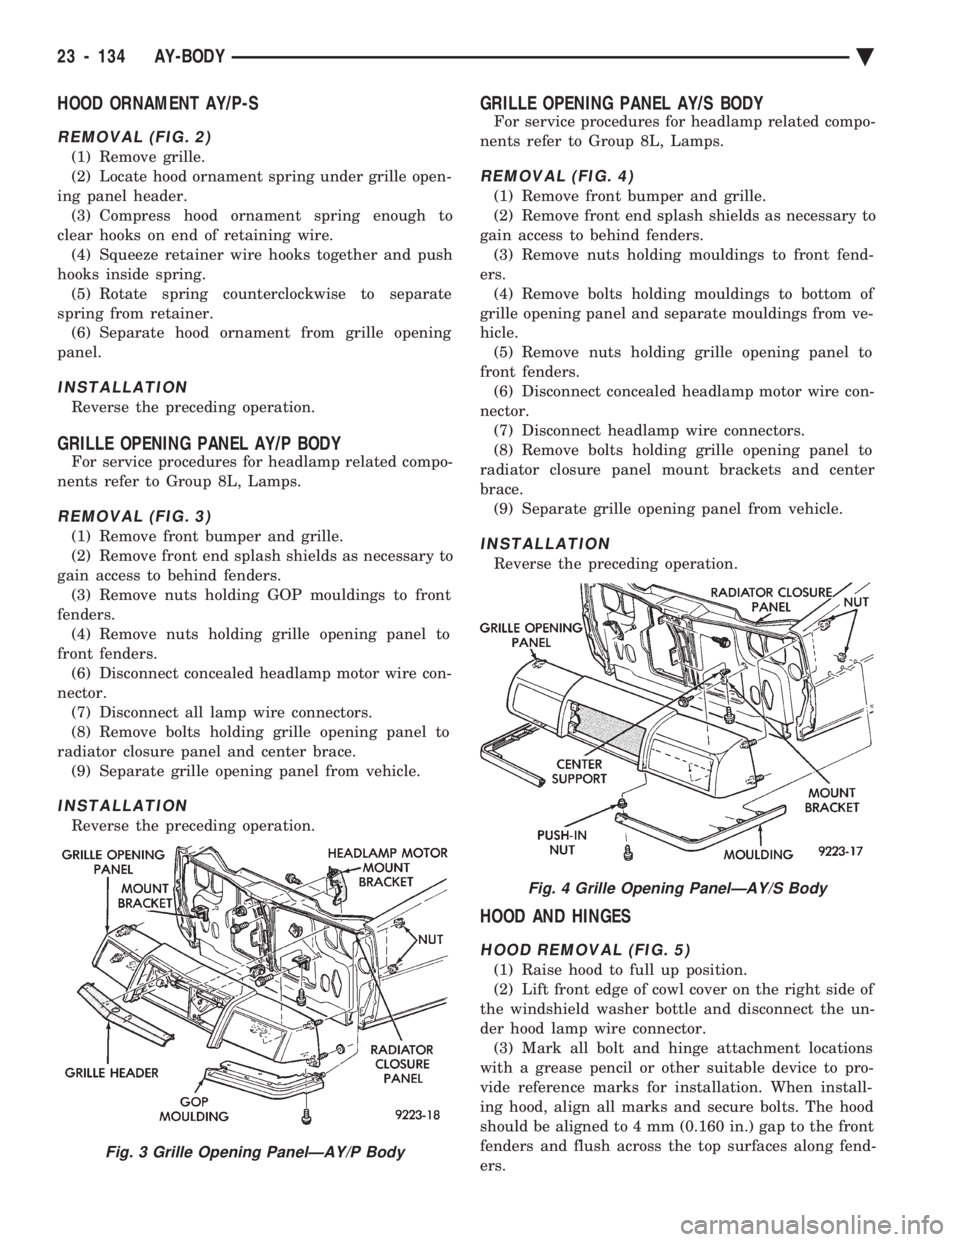
HOOD ORNAMENT AY/P-S
REMOVAL (FIG. 2)
(1) Remove grille.
(2) Locate hood ornament spring under grille open-
ing panel header. (3) Compress hood ornament spring enough to
clear hooks on end of retaining wire. (4) Squeeze retainer wire hooks together and push
hooks inside spring. (5) Rotate spring counterclockwise to separate
spring from retainer. (6) Separate hood ornament from grille opening
panel.
INSTALLATION
Reverse the preceding operation.
GRILLE OPENING PANEL AY/P BODY
For service procedures for headlamp related compo-
nents refer to Group 8L, Lamps.
REMOVAL (FIG. 3)
(1) Remove front bumper and grille.
(2) Remove front end splash shields as necessary to
gain access to behind fenders. (3) Remove nuts holding GOP mouldings to front
fenders. (4) Remove nuts holding grille opening panel to
front fenders. (6) Disconnect concealed headlamp motor wire con-
nector. (7) Disconnect all lamp wire connectors.
(8) Remove bolts holding grille opening panel to
radiator closure panel and center brace. (9) Separate grille opening panel from vehicle.
INSTALLATION
Reverse the preceding operation.
GRILLE OPENING PANEL AY/S BODY
For service procedures for headlamp related compo-
nents refer to Group 8L, Lamps.
REMOVAL (FIG. 4)
(1) Remove front bumper and grille.
(2) Remove front end splash shields as necessary to
gain access to behind fenders. (3) Remove nuts holding mouldings to front fend-
ers. (4) Remove bolts holding mouldings to bottom of
grille opening panel and separate mouldings from ve-
hicle. (5) Remove nuts holding grille opening panel to
front fenders. (6) Disconnect concealed headlamp motor wire con-
nector. (7) Disconnect headlamp wire connectors.
(8) Remove bolts holding grille opening panel to
radiator closure panel mount brackets and center
brace. (9) Separate grille opening panel from vehicle.
INSTALLATION
Reverse the preceding operation.
HOOD AND HINGES
HOOD REMOVAL (FIG. 5)
(1) Raise hood to full up position.
(2) Lift front edge of cowl cover on the right side of
the windshield washer bottle and disconnect the un-
der hood lamp wire connector. (3) Mark all bolt and hinge attachment locations
with a grease pencil or other suitable device to pro-
vide reference marks for installation. When install-
ing hood, align all marks and secure bolts. The hood
should be aligned to 4 mm (0.160 in.) gap to the front
fenders and flush across the top surfaces along fend-
ers.
Fig. 3 Grille Opening PanelÐAY/P Body
Fig. 4 Grille Opening PanelÐAY/S Body
23 - 134 AY-BODY Ä
Page 2312 of 2438
REFRIGERANT SERVICE PROCEDURES INDEX
page page
Adding Partial Refrigerant Charge ............ 10
Charging Refrigerant SystemÐEmpty System . . . 11
Discharging Refrigerant System .............. 11
Evacuating Refrigerant System .............. 11
Manifold Gauge Set Connections ............. 9 Oil Level
............................... 12
R-12 Refrigerant Equipment ................. 8
Refrigerant Recycling ...................... 9
Sight Glass Refrigerant Level Inspection ........ 8
Testing for Refrigerant Leaks ............... 10
SIGHT GLASS REFRIGERANT LEVEL INSPECTION
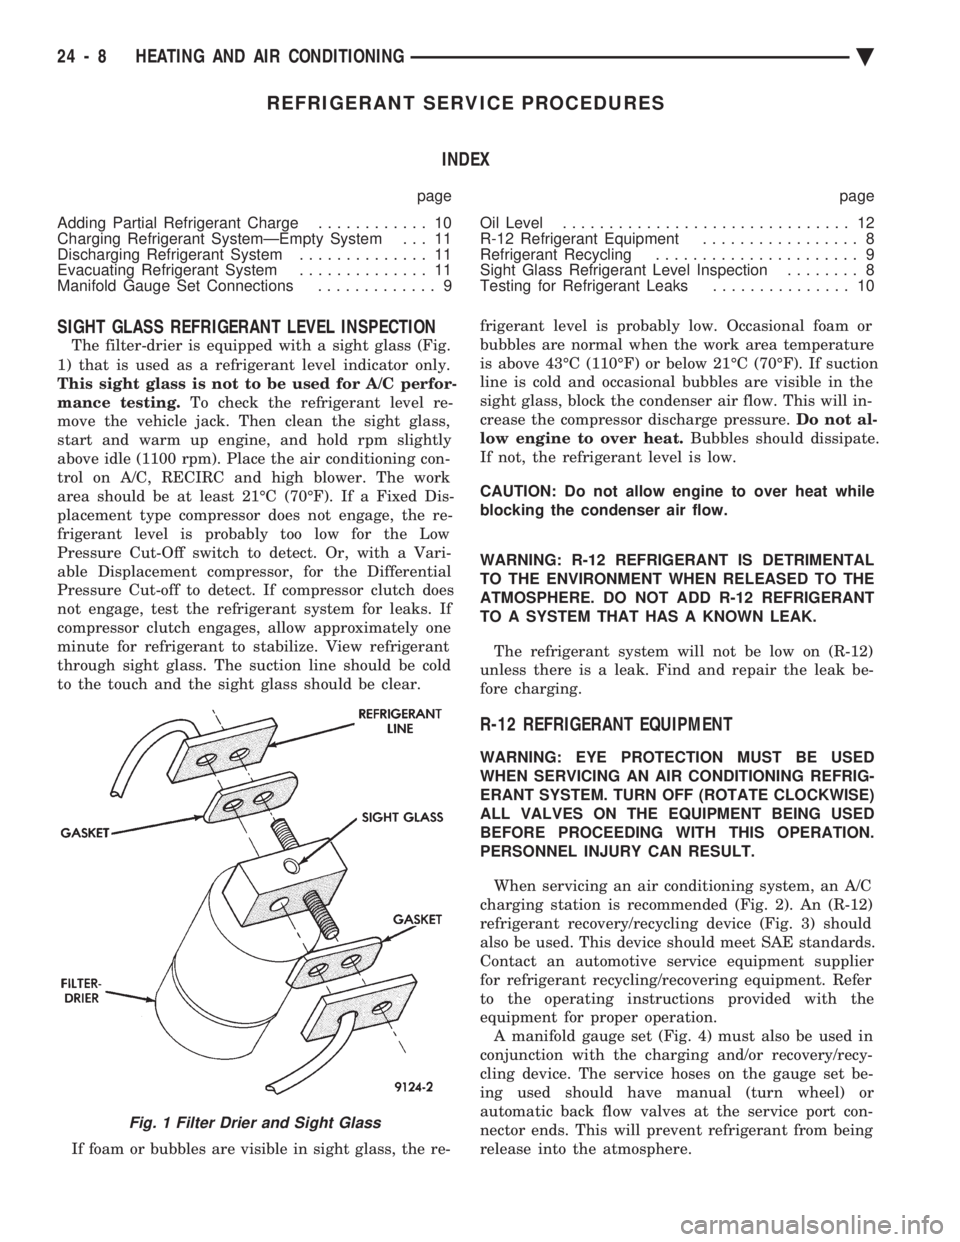
The filter-drier is equipped with a sight glass (Fig.
1) that is used as a refrigerant level indicator only.
This sight glass is not to be used for A/C perfor-
mance testing. To check the refrigerant level re-
move the vehicle jack. Then clean the sight glass,
start and warm up engine, and hold rpm slightly
above idle (1100 rpm). Place the air conditioning con-
trol on A/C, RECIRC and high blower. The work
area should be at least 21ÉC (70ÉF). If a Fixed Dis-
placement type compressor does not engage, the re-
frigerant level is probably too low for the Low
Pressure Cut-Off switch to detect. Or, with a Vari-
able Displacement compressor, for the Differential
Pressure Cut-off to detect. If compressor clutch does
not engage, test the refrigerant system for leaks. If
compressor clutch engages, allow approximately one
minute for refrigerant to stabilize. View refrigerant
through sight glass. The suction line should be cold
to the touch and the sight glass should be clear.
If foam or bubbles are visible in sight glass, the re- frigerant level is probably low. Occasional foam or
bubbles are normal when the work area temperature
is above 43ÉC (110ÉF) or below 21ÉC (70ÉF). If suction
line is cold and occasional bubbles are visible in the
sight glass, block the condenser air flow. This will in-
crease the compressor discharge pressure. Do not al-
low engine to over heat. Bubbles should dissipate.
If not, the refrigerant level is low.
CAUTION: Do not allow engine to over heat while
blocking the condenser air flow.
WARNING: R-12 REFRIGERANT IS DETRIMENTAL
TO THE ENVIRONMENT WHEN RELEASED TO THE
ATMOSPHERE. DO NOT ADD R-12 REFRIGERANT
TO A SYSTEM THAT HAS A KNOWN LEAK.
The refrigerant system will not be low on (R-12)
unless there is a leak. Find and repair the leak be-
fore charging.
R-12 REFRIGERANT EQUIPMENT
WARNING: EYE PROTECTION MUST BE USED
WHEN SERVICING AN AIR CONDITIONING REFRIG-
ERANT SYSTEM. TURN OFF (ROTATE CLOCKWISE)
ALL VALVES ON THE EQUIPMENT BEING USED
BEFORE PROCEEDING WITH THIS OPERATION.
PERSONNEL INJURY CAN RESULT.
When servicing an air conditioning system, an A/C
charging station is recommended (Fig. 2). An (R-12)
refrigerant recovery/recycling device (Fig. 3) should
also be used. This device should meet SAE standards.
Contact an automotive service equipment supplier
for refrigerant recycling/recovering equipment. Refer
to the operating instructions provided with the
equipment for proper operation. A manifold gauge set (Fig. 4) must also be used in
conjunction with the charging and/or recovery/recy-
cling device. The service hoses on the gauge set be-
ing used should have manual (turn wheel) or
automatic back flow valves at the service port con-
nector ends. This will prevent refrigerant from being
release into the atmosphere.
Fig. 1 Filter Drier and Sight Glass
24 - 8 HEATING AND AIR CONDITIONING Ä