Page 374 of 1216

9-90ENGINE <2.0L DOHC Engine> - Cylinder Head Gasket
CYLINDER HEAD GASKETNOSJA-S2.5-3.5 Nm 19
3 4 K
REIVIOVAL AND INSTALLATION2-3 ft.lbs.\ I i-6
Pre-removal Operation*Eliminating Fuel Pressure in Fuel20Line1\(Refer to GROUP 14-Service Ad-justment Procedures.)eDraining of Engine Coolant(Refer to GROUP 7-Service Adjust-
ment Procedures.)
,,vs4-6 Nm
’
II28
2936’
/w,=
3i38OlAO5.69
Removal stepsl
1. Connection for accelerator cable orthrottle cable
2. Connection for accelerator cable (Auto-
cruise control)3. Connection for oxygen sensor
temperature sensor
5. Connection for engine coolant
temperature gauge unit6. Connection for engine coolant
7. Connection for crank angle sensor
8. Connection for TPS
ISC and idle switch
10. Connection for fuel injector
12. Connection for power transistor
13. Connection for knock sensor (Turbo)
14. Connection for EGR temperature sensor
(California vehicles only)
15. Connection for ground cable
+e l + 17. Connection for radiator upper hose
/\05ADl9019. Center cover
20. Connection for spark plug cable assembly
21. Connection for air intake hose (Turbo)
22. Connection for breather hose (Turbo)
23.Airintakehose24. Connection for breather hose+e l 25. Connection for fuel high pressure hose26. O-ring
27. Connection for vacuum hoses
28. Connection for heater hose
29. Connection for water by-pass hose
30. Connection for PCV hose
31. Connection for vacuum hose (Turbo)
32. Connection for water hose (Turbo)
33. Eye-bolt (Turbo)
34. Gasket (Turbo)
35. Connection for oil pipe (Turbo)
36. Connection for vacuum hoses (Turbo)
37. Connection for fuel return hose
38. Connection for brake booster vacuum
hoseA
NOTE(1) Reverse the removal procedures to reinstall.(2) +I) : Refer to “Service Points of Removal”.
(3) ~~ : Refer to “Service Points of Installation”.
(4) m : Non-reusable parts
Page 376 of 1216
9-92ENGINE <2.0L DOHC Engine> - Cylinder Head Gasket
04A0090
r00
0
697
105
\Front of engine
*Intake side
Exhaust sideSERVICE POINTS OF REMOVAL
NOSJSAP
17. REMOVAL OF RADIATOR UPPER HOSEF-isMake mating marks on the radiator hose and hose clamp,
and then disconnect the radiator hose.
25. DISCONNECTION OF HIGH PRESSURE FUEL HOSE
Caution
Cover the hose connection with rags to prevent splash
of fuel that could be caused by some residual ljressure
in the fuel pipe line.For information concerning the bleeding of the residual
pressure, refer to GROUP 14-Service Adjustment Proce-
dures.
39. REMOVAL OF TIMING BELTRefer to
P.9-98.
47. REMOVAL OF CYLINDER HEAD ASSEMBLYUsing the special tool, loosen the bolts in the order shown
in the figure (in 2 or 3 cycles) and remove. Then remove thecylinder head assembly.A
Page 378 of 1216

9-94
ENGINE <2.0L DOHC Engine> - Cvlinder Head Gasket
olAoo41Delivery pipe
/High pressure
hoseb-ringD3AOQ79
04AOD98
40. INSTALLATION OF ROCKER COVER
Apply a coating of the specified sealant where shown in$e
figure, and then install the rocker cover to the cylinder Head
assembly.
Specified sealant: MOPAR Part No.4318034 or equiva-
lent
39. INSTALLATION AND ADJUSTMENT OF TIMING BELTRefer to
P.9-104.
25. CONNECTION OF FUEL HIGH PRESSURE HOSEWhen connecting the fuel high-pressure hose to the
delivery pipe, apply a coating of gasoline to the hose union,and insert so that the O-ring is not damaged.
17. INSTALLATION OF RADIATOR UPPER HOSEAlign the mating marks (of the radiator hose and hose
clamp), and then, while applying force in the direction of thearrow in the illustration, set the hose clamp to the trace
marks (on the hose) remaining from the prior connection.
Caution
Be sure to install the hose clamp at the trace marks (on
the hose) remaining from the prior connection.
1. ADJUSTMENT OF ACCELERATOR CABLERefer to GROUP
14-Service Adjustment Procedures.
Page 425 of 1216

--
INTAKE AND EXHAUST - SDecificationsII-3
ItemsIntake manifold
<1.8L Engine>
Accelerator cable to air intake plenum
Fuel high pressure hose to delivery pipe
Delivery pipe to intake manifold
Intake manifold stay
Engine hanger
Intake manifold to engine
Throttle body
Air intake plenum stay
Air intake plenum to intake manifold
Water outlet fitting
EGR valveEGR temperature sensor
Ground cable to air intake plenum
Control harness protector to air intake plenum
CoverIntake manifold
<2.0L DOHC Engine>
Accelerator cable to intake manifold
Throttle body stay
Fuel high pressure hose to delivery pipe
Delivery pipe to engine
Intake manifold stay
Intake manifold to engine
Mounting bolt
(M8)Mounting nut and bolt (MIO)
Ignition coil
Power transistor unit
Throttle body
EGR valveEGR temperature sensor
Control harness protector to intake manifold
Control harness clamp bolt
ixhaust manifold
<1.8L Engine>
Front exhaust pipe to exhaust manifold
Front exhaust pipe to engine
Exhaust manifold cover (A) to exhaust manifold
Exhaust manifold cover (B) to exhaust manifold
Exhaust manifold cover (A) to exhaust manifold cover (B)
Exhaust manifold to engine
Oxygen sensor
Engine oil level gauge guide mounting bolt
ixhaust manifold
<2.0L DOHC Engine (Non-Turbo)>
Front exhaust pipe to exhaust manifold
Front exhaust pipe to engine
Heat protector (A), (B)
Exhaust manifold to engine
Oxygen sensor
Engine hanger to engine
ixhaust manifold and turbocharger
<2.0L DOHC Engine (Turbo)>
Front exhaust pipe to exhaust fitting
Front exhaust pipe to engine
Heat protector (A),
(B)
Nmft.lbs.
4-6
3-4
4-6
3-4
IO-137-9
18-25
13-18
15-20II-14
15-2011-14
15-22II-16
15-2011-14
15-2011-14
17-2012-14
IO-157-11
IO-127-9
10-127-9
4-6
3-4
IO-137-9
4-6
3-4
15-22
11-16
4-6
3-4
IO-137-9
25-3018-22
15-2011-14
30-4222-30
20-2714-20
IO-127-9
15-22
11-16
15-22II-16
IO-127-9
4-6
3-4
IO-127-9
30-4022-29
30-4022-29
27-33
20-24
20-2814-20
8-106-7
15-2011-14
40-5029-36
12-15
9-l 1
30-4022-29
30-4022-29
12-15
9-l 1
25-3018-22
40-5029-36
12-15
9-l 1
40-6029-43
30-4022-29
12-15
9-11
Page 435 of 1216

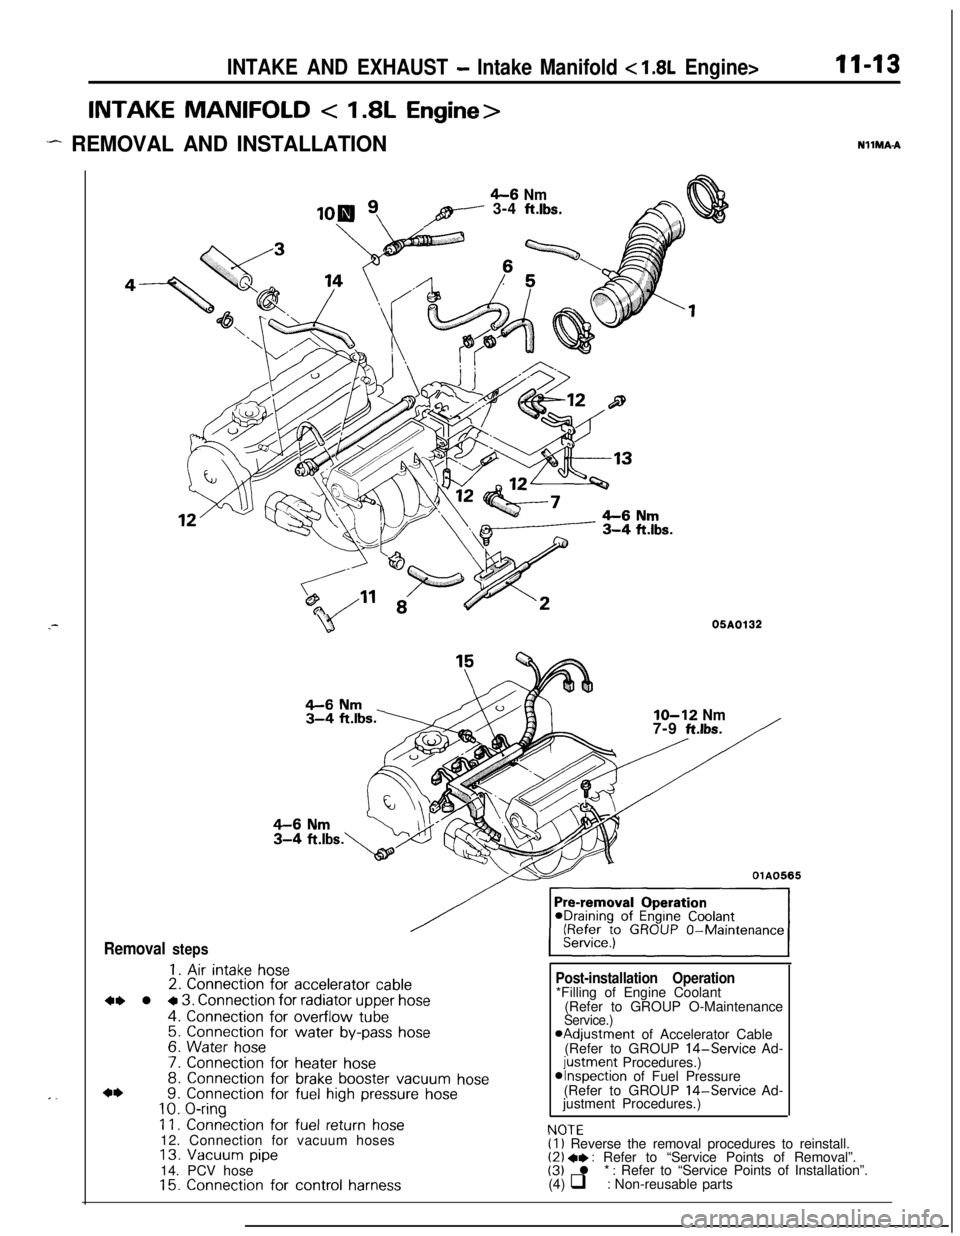
INTAKE AND EXHAUST - Intake Manifold < 1.8L Engine>
INTAKE MANIFOLD < 1.8L Engine>
.- REMOVAL AND INSTALLATION
11-13NllMA-A.-
. .
4-6 Nmpy---- 3-4 ft.lbs.
B05A0132
Removal steps
1. Air intake hose2. Connection for accelerator cable
4, l + 3. Connection for radiator upper hose
4. Connection for overflow tube5. Connection for water by-pass hose6. Water hose
7. Connection for heater hose8. Connection for brake booster vacuum hose9. Connection for fuel high pressure hose10. O-ring
11. Connection for fuel return hose12. Connection for vacuum hoses
13. Vacuum pipe14. PCV hose
15. Connection for control harness
IO-12 Nm7-9 ft.lbs.
OlA0565
Post-installation Operation
NfJTF*Filling of Engine Coolant
(Refer to GROUP O-Maintenance
Service.)aAdjustment of Accelerator Cable
(Refer to GROUP 14-Service Ad-
justment Procedures.)*Inspection of Fuel Pressure
(Refer to GROUP 14-Service Ad-
justment Procedures.)
I.” IL(1) Reverse the removal procedures to reinstall.(2) +* : Refer to “Service Points of Removal”.(3) l * : Refer to “Service Points of Installation”.
(4) q : Non-reusable parts
Page 436 of 1216
II-14INTAKE AND EXHAUST -Intake Manifold < 1.8L Engine>
/15-20 Nm
11-14
ft.lbs.
lo-13 Nm
18167-9 ft.lbs.15-20 Nm11-14
ft.lbs.I/15-20 Nm
I26IO-15 Nm7-11
ftm’bs.
-17-20 Nm
12-14 ft.lbs.15-20 Nm
Removal steps05AO180
+* l a 16. Delivery pipe, fuel injector and pressureregulator17.Insulator
18.Insulator19. Intake manifold stay20.Engine hanger
2 1.Thermostat housing22.Intake manifold23. Intake manifold gasket24. Throttle body assembly25.Gasket26. Air intake plenum stay
27. Air intake plenum
28. Air intake plenum gasket
lb+ 29. Cover 30. Gasket 31. EGR valve 32. EGR gasket
33. EGR temperature sensor 34. Water outlet fitting35. Gasket36. Thermostat
NOTE(1) Reverse the removal procedures to reinstall.
(2) a* : Refer to “Service Points of Removal”.
(3) l * : Refer to “Service Points of Installation”
(4) q : Non-reusable parts
Page 437 of 1216

INTAKE AND EXHAUST - Intake Manifold < 1.8L Engine>1145
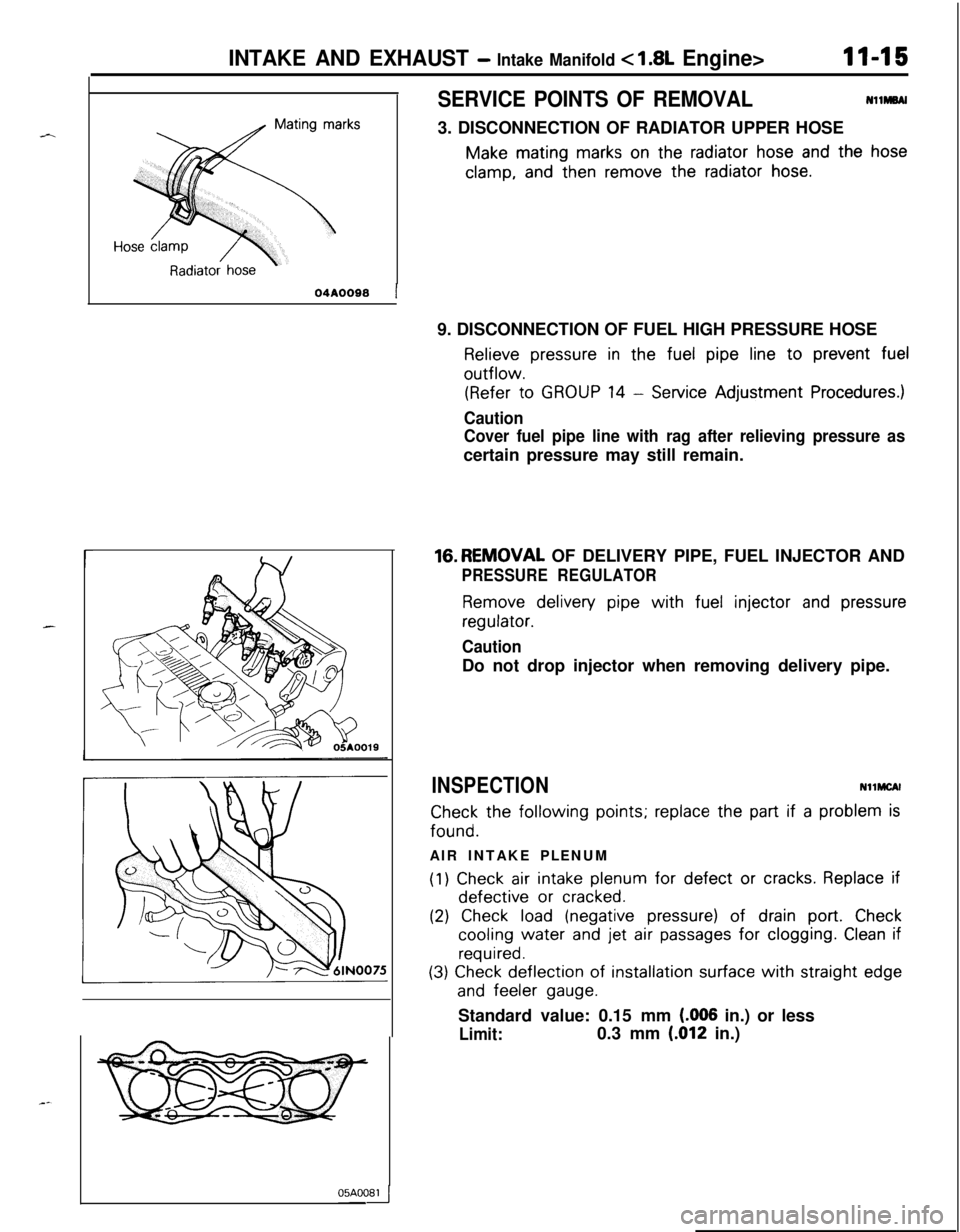
SERVICE POINTS OF REMOVALNllMBAI
3. DISCONNECTION OF RADIATOR UPPER HOSE
Make mating marks on the radiator hose and the hose
clamp, and then remove the radiator hose.
r
04A0088 19. DISCONNECTION OF FUEL HIGH PRESSURE HOSE
Relieve pressure in the fuel pipe line to prevent fueloutflow.
(Refer to GROUP 14 - Service Adjustment Procedures.)
Caution
Cover fuel pipe line with rag after relieving pressure ascertain pressure may still remain.16.REMOVAL OF DELIVERY PIPE, FUEL INJECTOR AND
PRESSURE REGULATOR
Remove delivery pipe with fuel injector and pressure
regulator.
CautionDo not drop injector when removing delivery pipe.
INSPECTIONNllMCAl
Check the following points; replace the part if a problem isfound.
AIR INTAKE PLENUM
(1) Check air intake plenum for defect or cracks. Replace ifdefective
or cracked.
(2) Check load (negative pressure) of drain port. Check
cooling water and jet air passages for clogging. Clean if
required.
(3) Check deflection of installation surface with straight edge
and feeler gauge.Standard value: 0.15 mm
(.006 in.) or less
Limit:0.3 mm (.012 in.)05AOOB4
Page 438 of 1216

II-16INTAKE AND EXHAUST - Intake Manifold c 1.8L Engine>
05A0033
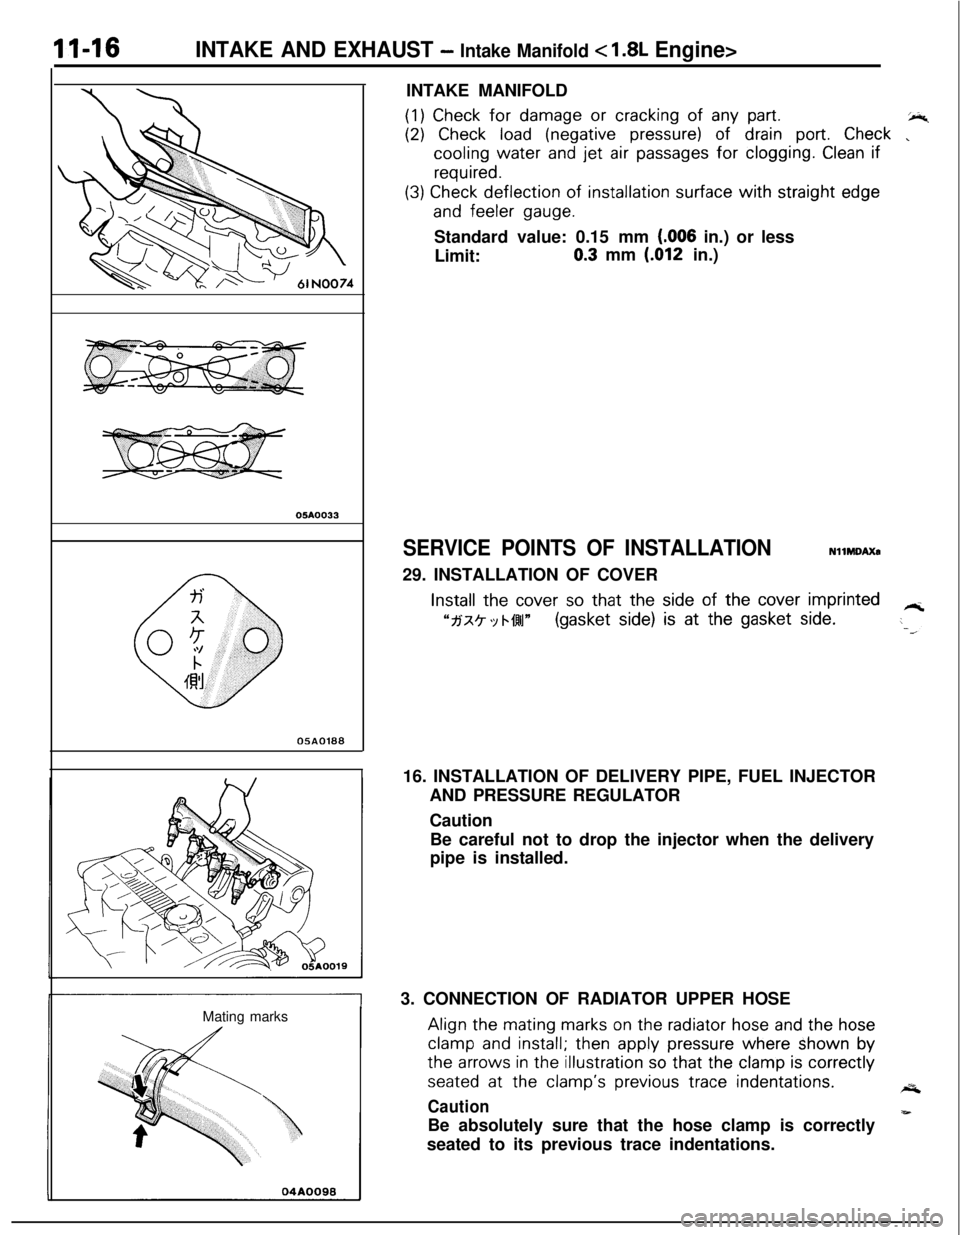
0580188Mating marksINTAKE MANIFOLD
(1) Check for damage or cracking of any part.+4
(2) Check load (negative pressure) of drain port. Check ,cooling water
and jet air passages for clogging. Clean if
required.
(3) Check deflection of installation surface with straight edge
and feeler gauge.Standard value: 0.15 mm
(006 in.) or less
Limit:
0.3 mm (.012 in.)
SERVICE POINTS OF INSTALLATIONNllMDAXa
29. INSTALLATION OF COVER
Install the cover so that the side of the cover imprinted
“fj‘x? ‘Y bf4l~(gasket side) is at the gasket side.-T16. INSTALLATION OF DELIVERY PIPE, FUEL INJECTOR
AND PRESSURE REGULATOR
Caution
Be careful not to drop the injector when the delivery
pipe is installed.
3. CONNECTION OF RADIATOR UPPER HOSEAlign the
mating marks on the radiator hose and the hose
clamp and install; then apply pressure where shown bythe
arrows in the illustration so that the clamp is correctly
seated at the clamp’s previous trace indentations.A
Caution
-Be absolutely sure that the hose clamp is correctly
seated to its previous trace indentations.