Page 1828 of 4087
COMPONENTS FOR SEPARATION AND
ASSEMBLY OF ENGINE AND
TRANSMISSION
SEPARATION OF ENGINE AND
TRANSMISSION
1. (A/T)REMOVE OIL DIPSTICK GUIDE FOR TRANSMISSION
2. (A/T) REMOVE OIL COOLER PIPES FOR TRANSMISSION
3. DISCONNECT ENGINE WIRE FROM TRANSMISSION
4. REMOVE STARTER
5. SEPARATE ENGINE AND TRANSMISSION
6. (M/T) REMOVE CLUTCH COVER AND DISC
±
ENGINE MECHANICAL Cylinder BlockEM±73
WhereEverybodyKnowsYourName
Page 1858 of 4087
ASSEMBLY OF ENGINE AND
TRANSMISSION
(See Components on page EM±73)1. (M/T) INSTALL CLUTCH DISC AND COVER
Torque: 19 N Vm (195 kgf Vcm, 14 ft Vlbf)
2. ASSEMBLE ENGINE AND TRANSMISSION
(See page AT±31)
Torque:
14 mm head bolt 37 N Vm (380 kgf Vcm, 27 ft Vlbf)
17 mm head bolt 72 N Vm (730 kgf Vcm, 53 ft Vlbf)
3. INSTALL STARTER
Torque: 39 N Vm (400 kgf Vcm, 29 ft Vlbf)
4. CONNECT ENGINE WIRE TO TRANSMISSION
5. (A/T)
INSTALL OIL COOLER PIPE
Torque: 34 N Vm (350 kgf Vcm, 25 ft Vlbf)
6. (A/T)
INSTALL OIL DIPSTICK GUIDE FOR TRANSMISSION
±
ENGINE MECHANICAL Cylinder BlockEM±103
WhereEverybodyKnowsYourName
Page 1867 of 4087
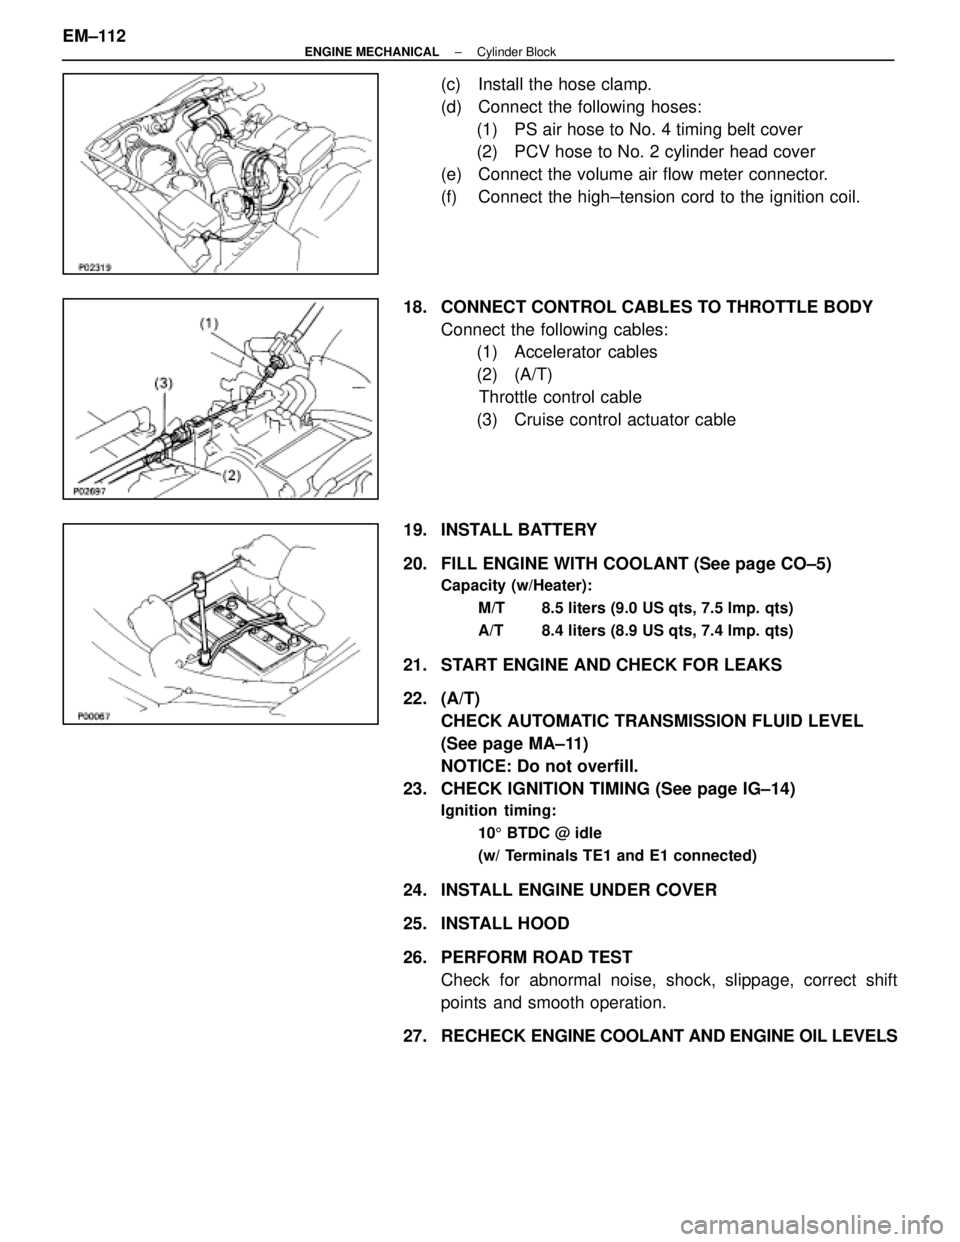
(c) Install the hose clamp.
(d) Connect the following hoses:(1) PS air hose to No. 4 timing belt cover
(2) PCV hose to No. 2 cylinder head cover
(e) Connect the volume air flow meter connector.
(f) Connect the high±tension cord to the ignition coil.
18. CONNECT CONTROL CABLES TO THROTTLE BODY Connect the following cables:(1) Accelerator cables
(2) (A/T)
Throttle control cable
(3) Cruise control actuator cable
19. INSTALL BATTERY
20. FILL ENGINE WITH COOLANT (See page CO±5)
Capacity (w/Heater): M/T 8.5 liters (9.0 US qts, 7.5 lmp. qts)
A/T 8.4 liters (8.9 US qts, 7.4 lmp. qts)
21. START ENGINE AND CHECK FOR LEAKS
22. (A/T)CHECK AUTOMATIC TRANSMISSION FLUID LEVEL
(See page MA±11)
NOTICE: Do not overfill.
23. CHECK IGNITION TIMING (See page IG±14)
Ignition timing:
105 BTDC @ idle
(w/ Terminals TE1 and E1 connected)
24. INSTALL ENGINE UNDER COVER
25. INSTALL HOOD
26. PERFORM ROAD TEST Check for abnormal noise, shock, slippage, correct shift
points and smooth operation.
27. RECHECK ENGINE COOLANT AND ENGINE OIL LEVELS
EM±112
±
ENGINE MECHANICAL Cylinder Block
WhereEverybodyKnowsYourName
Page 1872 of 4087
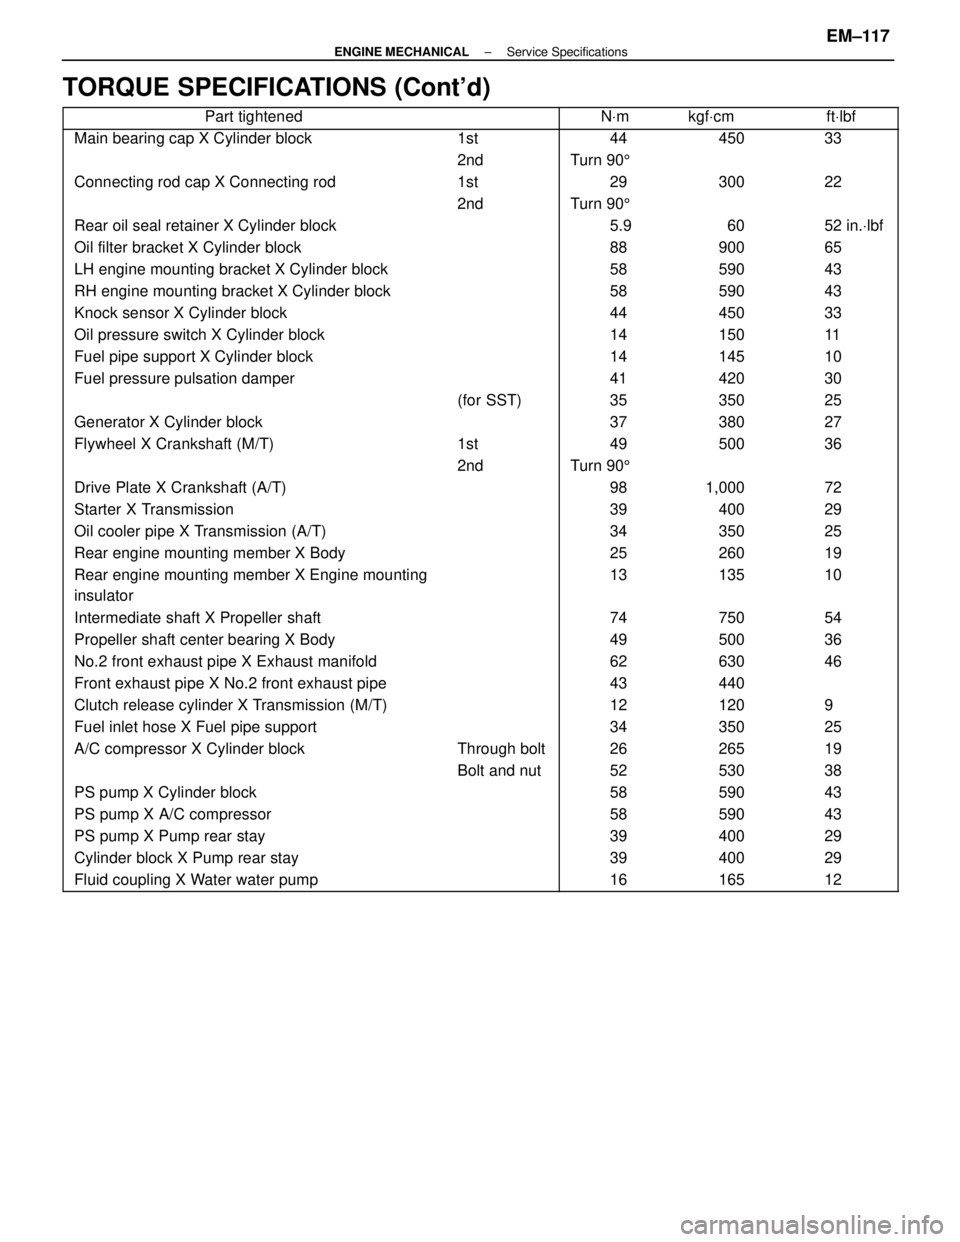
TORQUE SPECIFICATIONS (Cont'd)
����������������� �����������������Part tightened������ ����������� �����NVm������ ������kgf Vcm������ ������ft Vlbf
����������������� �����������������Main bearing cap X Cylinder block������ ������1st����� �����44������ ������450������ ������33
����������������� ����������������������� ������2nd����� �����Turn 90 5������ ������������ ������
����������������� �����������������Connecting rod cap X Connecting rod������ ������1st����� �����29������ ������300������ ������22
�����������������������2nd�����Turn 905����������������������������� �����������������Rear oil seal retainer X Cylinder block������ ����������� �����5.9������ ������60������ ������52 in.Vlbf����������������� �����������������Oil filter bracket X Cylinder block������ ����������� �����88������ ������900������ ������65����������������� �����������������LH engine mounting bracket X Cylinder block������ ����������� �����58������ ������590������ ������43����������������� �����������������RH engine mounting bracket X Cylinder block������ ����������� �����58������ ������590������ ������43
����������������� �����������������Knock sensor X Cylinder block������ ����������� �����44������ ������450������ ������33
����������������� �����������������Oil pressure switch X Cylinder block������ ����������� �����14������ ������150������ ������11
����������������� �����������������Fuel pipe support X Cylinder block������ ����������� �����14������ ������145������ ������10
����������������� �����������������Fuel pressure pulsation damper������ ����������� �����41������ ������420������ ������30
����������������� ����������������������� ������(for SST)����� �����35������ ������350������ ������25
����������������� �����������������Generator X Cylinder block������ ����������� �����37������ ������380������ ������27
�����������������Flywheel X Crankshaft (M/T)������1st�����49������500������36����������������� ����������������������� ������2nd����� �����Turn 90 5������ ������������ ������
����������������� �����������������Drive Plate X Crankshaft (A/T)������ ����������� �����98������ ������1,000������ ������72����������������� �����������������Starter X Transmission������ ����������� �����39������ ������400������ ������29����������������� �����������������Oil cooler pipe X Transmission (A/T)������ ����������� �����34������ ������350������ ������25
����������������� �����������������Rear engine mounting member X Body������ ����������� �����25������ ������260������ ������19
����������������� �
����������������
�����������������
Rear engine mounting member X Engine mounting
insulator������ �
�����
������
����� �
����
�����
13������ �
�����
������
135������ �
�����
������
10
����������������� �����������������Intermediate shaft X Propeller shaft������ ����������� �����74������ ������750������ ������54
����������������� �����������������Propeller shaft center bearing X Body������ ����������� �����49������ ������500������ ������36
�����������������No.2 front exhaust pipe X Exhaust manifold�����������62������630������46����������������� �����������������Front exhaust pipe X No.2 front exhaust pipe������ ����������� �����43������ ������440������ ������
����������������� �����������������Clutch release cylinder X Transmission (M/T)������ ����������� �����12������ ������120������ ������9����������������� �����������������Fuel inlet hose X Fuel pipe support������ ����������� �����34������ ������350������ ������25����������������� �����������������A/C compressor X Cylinder block������ ������Through bolt����� �����26������ ������265������ ������19
����������������� ����������������������� ������Bolt and nut����� �����52������ ������530������ ������38
����������������� �����������������PS pump X Cylinder block������ ����������� �����58������ ������590������ ������43
����������������� �����������������PS pump X A/C compressor������ ����������� �����58������ ������590������ ������43
����������������� �����������������PS pump X Pump rear stay������ ����������� �����39������ ������400������ ������29
����������������� �����������������Cylinder block X Pump rear stay������ ����������� �����39������ ������400������ ������29
����������������� �����������������Fluid coupling X Water water pump������ ����������� �����16������ ������165������ ������12
±
ENGINE MECHANICAL Service SpecificationsEM±117
WhereEverybodyKnowsYourName
Page 1894 of 4087
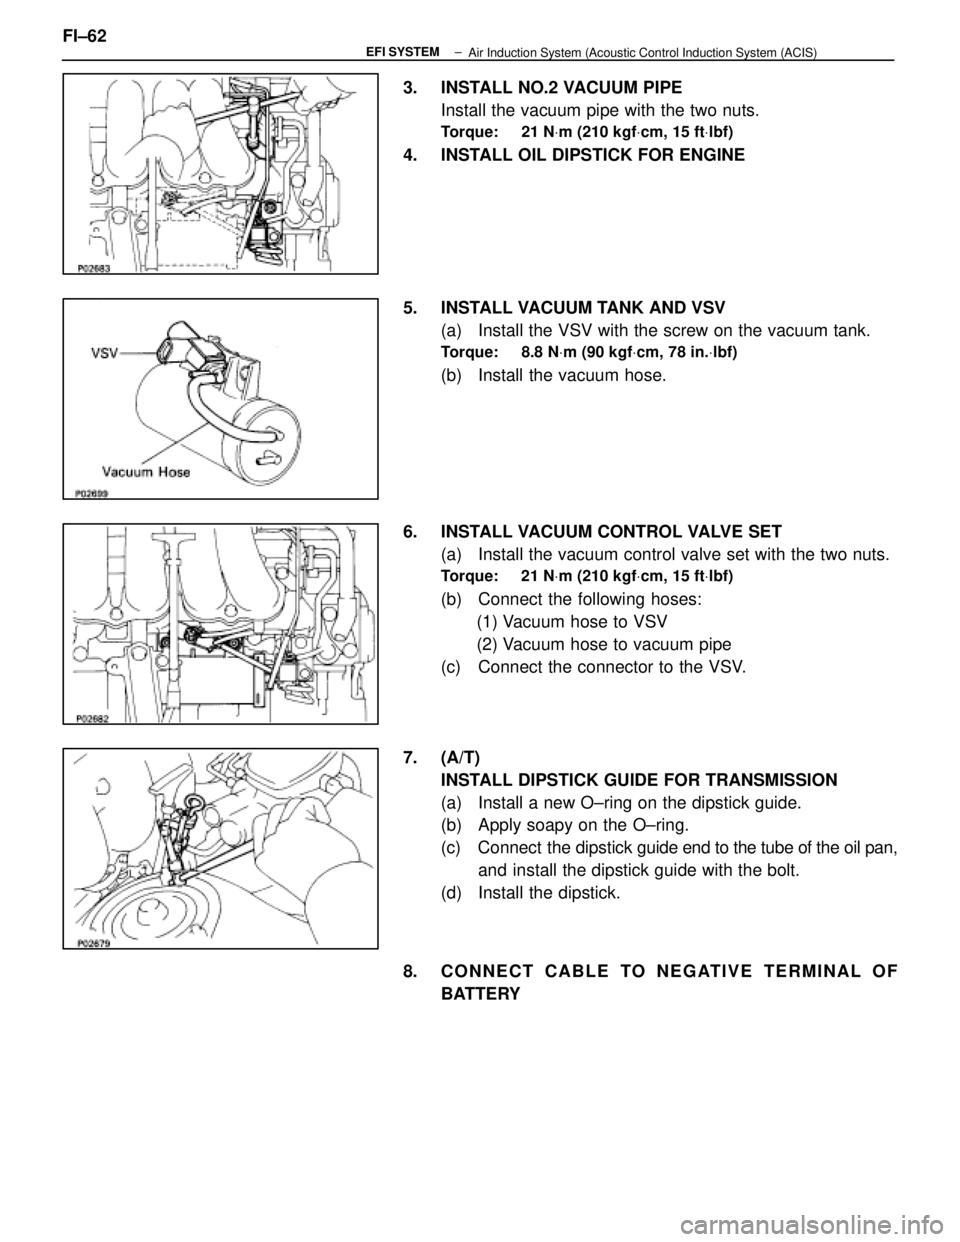
3. INSTALL NO.2 VACUUM PIPEInstall the vacuum pipe with the two nuts.
Torque: 21 N Vm (210 kgf Vcm, 15 ft Vlbf)
4. INSTALL OIL DIPSTICK FOR ENGINE
5. INSTALL VACUUM TANK AND VSV
(a) Install the VSV with the screw on the vacuum tank.
Torque: 8.8 N Vm (90 kgf Vcm, 78 in. Vlbf)
(b) Install the vacuum hose.
6. INSTALL VACUUM CONTROL VALVE SET (a) Install the vacuum control valve set with the two nuts.
Torque: 21 N Vm (210 kgf Vcm, 15 ft Vlbf)
(b) Connect the following hoses:
(1) Vacuum hose to VSV
(2) Vacuum hose to vacuum pipe
(c) Connect the connector to the VSV.
7. (A/T) INSTALL DIPSTICK GUIDE FOR TRANSMISSION
(a) Install a new O±ring on the dipstick guide.
(b) Apply soapy on the O±ring.
(c) Connect the dipstick guide end to the tube of the oil pan,
and install the dipstick guide with the bolt.
(d) Install the dipstick.
8. CONNECT CABLE TO NEGATIVE TERMINAL OF BATTERY
FI±62
±
EFI SYSTEM
Air Induction System (Acoustic Control Induction System (ACIS)
WhereEverybodyKnowsYourName
Page 2073 of 4087
INSTALLATION OF FUEL PRESSURE
PULSATION DAMPER
(See Components on page FI±35)
1. INSTALL FUEL PRESSURE PULSATION DAMPER (a) In sta ll two ne w ga ske ts, th e No . 1 fu e l pip e an dpulsation damper.
(b) Using SST, torque the pulsation damper.
SST 09612±24014 (09617±24011)
Torque: 41 N Vm (420 kgf Vcm, 30 ft Vlbf)
35 N Vm (350 kgf Vcm, 25 ft Vlbf) for SST
HINT: Use a torque wrench with a fulcrum length of 30 cm
(11.81 in.).
2. INSTALL STARTER (See page ST±5)
Torque: 39 N Vm (400 kgf Vcm, 29 ft Vlbf)
3. (A/T)
INSTALL DIPSTICK GUIDE FOR TRANSMISSION
(a) Install a new O±ring to the dipstick guide.
(b) Apply soapy water to the O±ring.
(c) Connect the dipstick guide end to the tube of the oil pan,
and install the dipstick guide with the bolt.
(d) Install the dipstick.
4. CHECK FOR FUEL LEAKS (See page FI±15)
FI±36
±
EFI SYSTEM Fuel System (Fuel Pressure Pulsation Damper)
WhereEverybodyKnowsYourName
Page 2130 of 4087
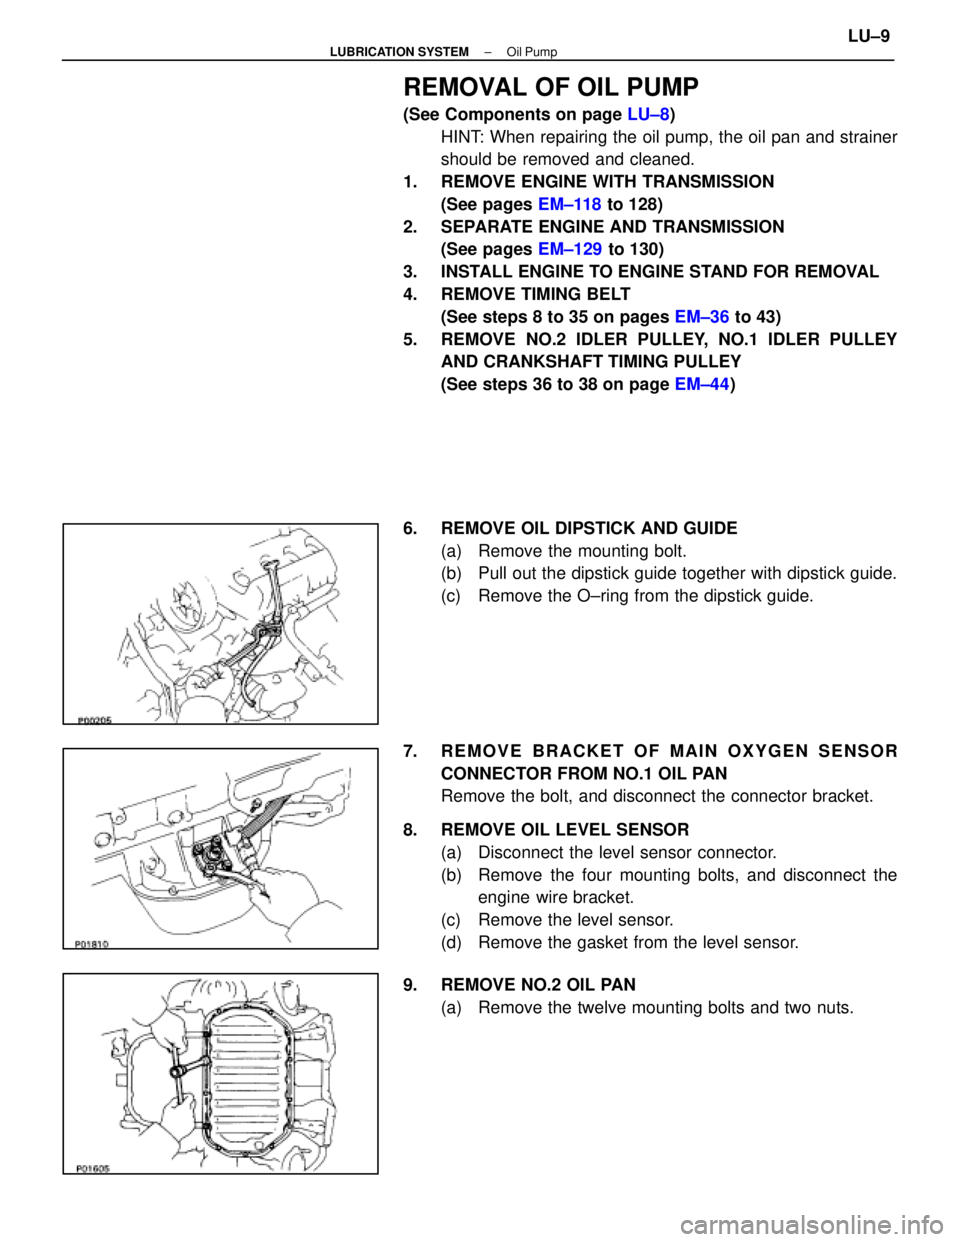
REMOVAL OF OIL PUMP
(See Components on page LU±8)
HINT: When repairing the oil pump, the oil pan and strainer
should be removed and cleaned.
1. REMOVE ENGINE WITH TRANSMISSION (See pages EM±118 to 128)
2. SEPARATE ENGINE AND TRANSMISSION (See pages EM±129 to 130)
3. INSTALL ENGINE TO ENGINE STAND FOR REMOVAL
4. REMOVE TIMING BELT (See steps 8 to 35 on pages EM±36 to 43)
5. REMOVE NO.2 IDLER PULLEY, NO.1 IDLER PULLEY AND CRANKSHAFT TIMING PULLEY
(See steps 36 to 38 on page EM±44)
6. REMOVE OIL DIPSTICK AND GUIDE (a) Remove the mounting bolt.
(b) Pull out the dipstick guide together with dipstick guide.
(c) Remove the O±ring from the dipstick guide.
7. REMOVE BRACKET OF MAIN OXYGEN SENSOR CONNECTOR FROM NO.1 OIL PAN
Remove the bolt, and disconnect the connector bracket.
8. REMOVE OIL LEVEL SENSOR (a) Disconnect the level sensor connector.
(b) Remove the four mounting bolts, and disconnect theengine wire bracket.
(c) Remove the level sensor.
(d) Remove the gasket from the level sensor.
9. REMOVE NO.2 OIL PAN (a) Remove the twelve mounting bolts and two nuts.
±
LUBRICATION SYSTEM Oil PumpLU±9
WhereEverybodyKnowsYourName
Page 2140 of 4087
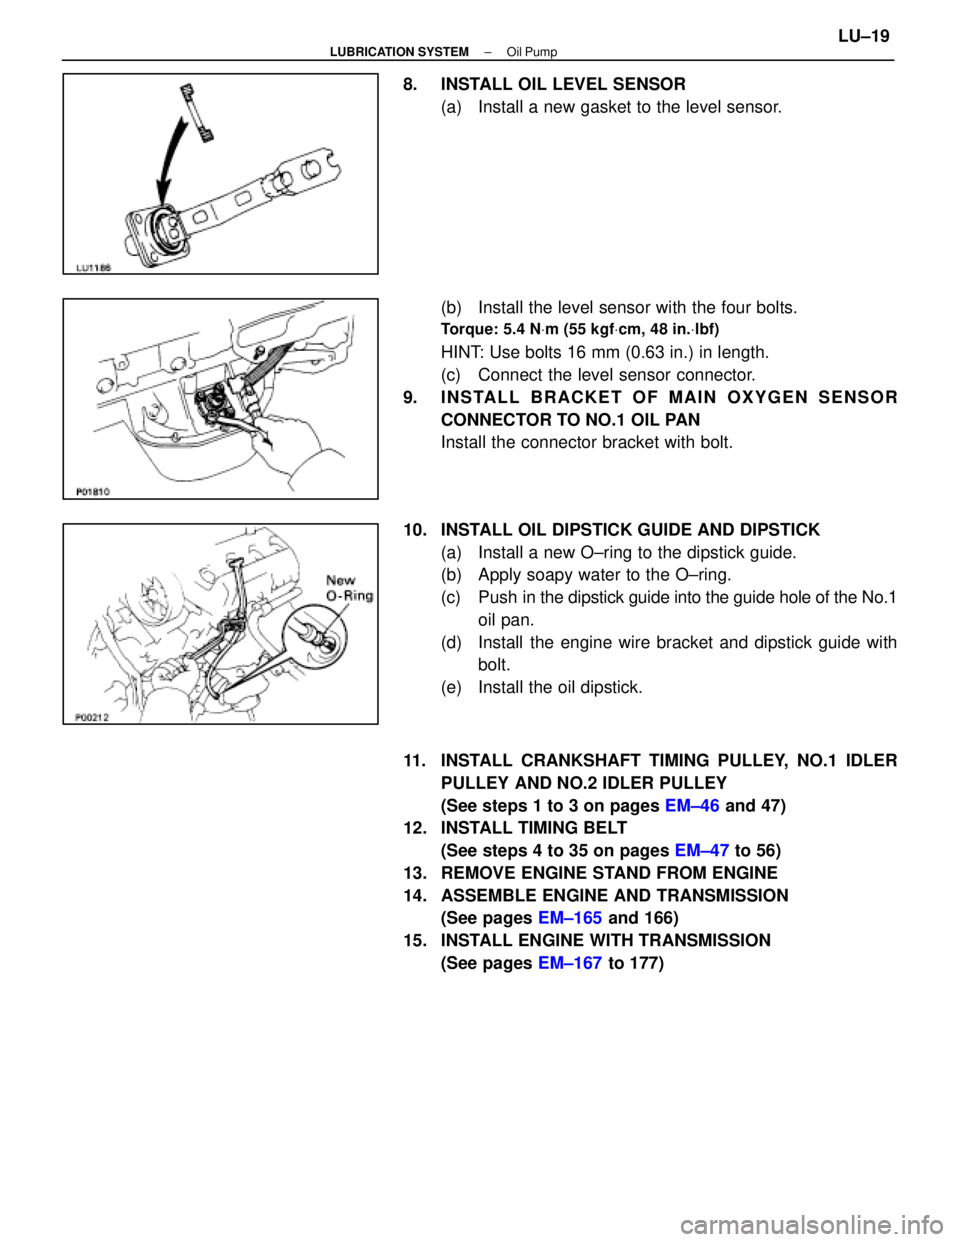
8. INSTALL OIL LEVEL SENSOR(a) Install a new gasket to the level sensor.
(b) Install the level sensor with the four bolts.
Torque: 5.4 N Vm (55 kgf Vcm, 48 in. Vlbf)
HINT: Use bolts 16 mm (0.63 in.) in length.
(c) Connect the level sensor connector.
9. INSTALL BRACKET OF MAIN OXYGEN SENSOR CONNECTOR TO NO.1 OIL PAN
Install the connector bracket with bolt.
10. INSTALL OIL DIPSTICK GUIDE AND DIPSTICK (a) Install a new O±ring to the dipstick guide.
(b) Apply soapy water to the O±ring.
(c) Push in the dipstick guide into the guide hole of the No.1
oil pan.
(d) Install the engine wire bracket and dipstick guide with bolt.
(e) Install the oil dipstick.
11. INSTALL CRANKSHAFT TIMING PULLEY, NO.1 IDLER PULLEY AND NO.2 IDLER PULLEY
(See steps 1 to 3 on pages EM±46 and 47)
12. INSTALL TIMING BELT
(See steps 4 to 35 on pages EM±47 to 56)
13. REMOVE ENGINE STAND FROM ENGINE
14. ASSEMBLE ENGINE AND TRANSMISSION (See pages EM±165 and 166)
15. INSTALL ENGINE WITH TRANSMISSION (See pages EM±167 to 177)
±
LUBRICATION SYSTEM Oil PumpLU±19
WhereEverybodyKnowsYourName