1991 FORD FESTIVA wheel bolt torque
[x] Cancel search: wheel bolt torquePage 21 of 454
3. Position Steering Wheel Remover (T67L-3600-A) on steering wheel. Tighten bolt on remover until steering wheel is loose. Remove
steering wheel puller, steering wheel retaining bolt, and steering wheel.
Installation
1. Ensure front wheels are in straight-ahead position. Route clockspring wiring harness through steering wheel opening. Position steering
wheel on steering shaft and align reference marks.
2. Ensure clockspring wire is not pinched when positioning steering wheel. Install new steering wheel retaining bolt and tighten to
specification. See TORQUE SPECIFICATIONS table at end of article. Connect horn and speed control wiring connectors (if equipped)
to steering wheel.
3. Connect air bag module-to-clockspring connector. Install air bag module. Tighten air bag module retaining nuts to specification.
Activate SRS. See SAFETY PRECAUTIONS. Check AIR BAG light to ensure system is functioning properly.
Removal (Festiva)
From back of steering wheel, remove 2 screws securing horn pad. Disconnect horn wire from horn pad and remove pad. Remove steering
wheel nut. Scribe reference mark on steering shaft and steering wheel hub for reassembly. Using Steering Wheel Puller (T67L-3600-A),
remove steering wheel.
Installation
Position steering wheel on steering shaft and align reference marks. Be sure cutouts in rear cover engage turn signal canceling cam. To
complete installation, reverse removal procedure.
COMBINATION SW ITCH
Removal (Capri)
1. Disconnect negative battery cable. Remove lower steering column cover. Remove center access panel and trim cover under steering
column. Remove left side defroster connector tube. Remove steering column upper retaining bolts. Column will pivot downward and
rest on instrument panel brace.
2. Remove 2 switch retaining screws and remove switch. Grasp switch and lever and pull lever out of switch. Disconnect switch electrical
connectors and remove switch.
Installation
Align key with slot and install lever in switch assembly. Position switch on steering column and install retaining screws. To complete
installation, reverse removal procedure.
Removal (Festiva)
1. Disconnect negative battery cable. Remove steering wheel. See STEERING WHEEL & HORN PAD under REMOVAL &
INSTALLATION. Remove 4 screws from upper half of lower steering column cover and remove cover. Remove upper steering column
cover. Remove 5 clips from lower half of lower steering column cover and remove cover.
2. Release wiring harness clip and unplug 4 harness connectors from back of combination switch. From below steering column, loosen
band clamp securing switch hub to steering column jacket. Pull switch assembly from steering column.
Installation
Slide combination switch assembly onto steering column. Make sure switch assembly is seated and level against end of column jacket. To
complete installation, reverse removal procedure.
HEADLIGHT SWITCH
Removal & Installation (Capri)
1. Headlight off/on switch is located on left side of instrument panel bezel. Disconnect negative battery cable. Pull out center storage
compartment. Remove 2 upper screws, 2 lower screws and heater/radio bezel. Pull outward and remove trim covers located on both
sides of steering column.
2. Remove retaining screws and carefully pull instrument panel bezel partially away from dash. Disconnect electrical connector from
headlight switch. Depress tangs on both sides of switch and remove switch from bezel. To install, reverse removal procedure.
IGNITION SWITCH & LOCK CYLINDER
Removal (Capri)
1. Disconnect negative battery cable. Remove lower steering column cover. Remove center access panel and trim cover under steering
column. Remove left side defroster connector tube. Remove steering column upper retaining bolts. Column will pivot downward and
rest on instrument panel brace. steering colum n.
CAUT ION: Rem ove steering wheel carefully to avoid dam aging clockspring wiring, air bag m odule connector, or
accidentally turning clockspring. After steering wheel rem oval, tape clockspring in position to prevent
dam age and keep it from being turned accidentally.
CAUTION: Ensure that no wiring is pinched beneath steering colum n when lowered.
Page 4 of 5 MITCHELL 1 ARTICLE - STEERING COLUMN SWITCHES 1991 ACCESSORIES & SAFETY EQUIPMENT Ford Motor C
...
3/10/2009 http://www.eautorepair.net/app/PrintItems.asp?S0=2097152&S1=0&SG=%7B7DD6473C%2DB5BB%2D4F20%2D9D70%2D
...
Page 22 of 454
2. With ignition key inserted in lock assembly, rotate tumbler while pushing release pin with a .125" (3.17 mm) drift punch. Pull tumbler
assembly out of housing. Remove upper column cover. Remove column lock shield. Disconnect ignition switch electrical connector.
Remove switch retaining screws and remove switch.
Installation
Position ignition switch on column lock assembly. Make sure actuator pin of lock assembly fits into slot in ignition switch. To complete
installation, reverse removal procedure.
Removal & Installation (Festiva)
1. Disconnect negative battery cable. Remove 4 screws from upper half of lower steering column cover and remove cover. Remove upper
steering column cover. Remove 5 clips from lower half of lower steering column cover and remove cover.
2. Remove 4 steering column shield nuts and remove shield. Remove 2 shield bracket bolts and remove bracket. Remove air discharge duct
from below steering column. Remove steering column attaching nuts then lower steering column mounting bracket.
3. Remove tie strap securing key warning buzzer switch wires. Remove ignition switch attaching screw. Pull switch loose from switch
housing. Remove switch harness from routing clip and disconnect electrical connectors. Remove switch. To install, reverse removal
procedure.
TURN SIGNAL SWITCH
See COMBINATION SWITCH under REMOVAL & INSTALLATION.
WIPER SWITCH
Removal & Installation (Capri)
Remove center trim panel and lower steering column cover. Disconnect wiper switch electrical connector and pull wiring from routing clip.
Firmly grasp switch and lever and pull out to remove. To install, reverse removal procedure.
Removal & installation (Festiva)
See COMBINATION SWITCH under REMOVAL & INSTALLATION.
TORQUE SPECIFICATIONS
TORQUE SPECIFICATIONS CAUTION: Ensure that no wiring is pinched beneath steering colum n when it is lowered.
ApplicationFt. Lbs. (N.m)
Capri
Column Lock Shield Screw & Nut11-14 (15-19)
Ignition Lock Housing Bolt12-13 (16-18)
Steering Wheel Bolt23-33 (31-45)
Upper Column Retaining Bolts17-23 (23-31)
Festiva
Steering Wheel Nut29-36 (39-49)
Upper Column Retaining Bolts23-34 (31-46)
INCH Lbs. (N.m)
Capri
Ign it io n Swit ch Screw50-70 (5.6-7.9)
Capri & Festiva
Air Bag Module-To-Steering Wheel Nuts35-53 (4-6)
Copyr ight 2009 Mitchell Repair Information Company, LLC. All Rights Reserved.
Article GUID: A00028303
Page 5 of 5 MITCHELL 1 ARTICLE - STEERING COLUMN SWITCHES 1991 ACCESSORIES & SAFETY EQUIPMENT Ford Motor C
...
3/10/2009 http://www.eautorepair.net/app/PrintItems.asp?S0=2097152&S1=0&SG=%7B7DD6473C%2DB5BB%2D4F20%2D9D70%2D
...
Page 33 of 454
Removal
Remove rotor and hub assembly from steering knuckle. Separate rotor, knuckle and hub. See FRONT BRAKE ROTOR & HUB under
REMOVAL & INSTALLATION. Press outer bearing from hub using Bearing Splitter (D84L-1123-A) and Shaft Protector (D80L-625-2).
Remove and discard outer grease seal. Pry inner wheel bearing grease seal from steering knuckle using a large screwdriver. Discard seal.
R e mo ve in n e r b e a r in g.
Bearing Preload
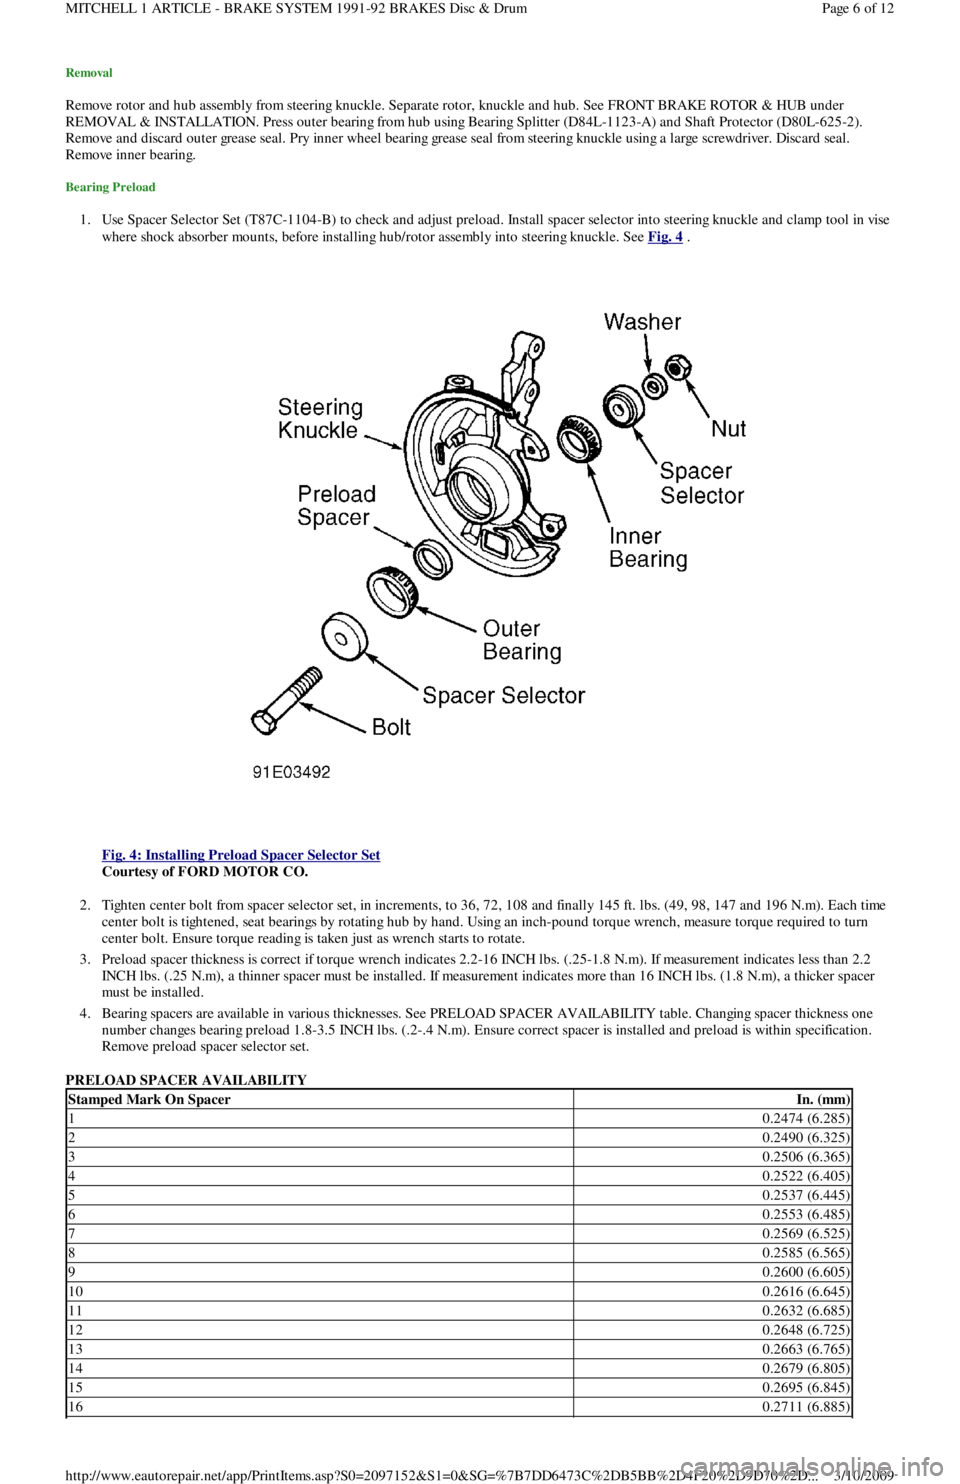
1. Use Spacer Selector Set (T87C-1104-B) to check and adjust preload. Install spacer selector into steering knuckle and clamp tool in vise
where shock absorber mounts, before installing hub/rotor assembly into steering knuckle. See Fig. 4
.
Fig. 4: Installing Preload Spacer Selector Set
Courtesy of FORD MOTOR CO.
2. Tighten center bolt from spacer selector set, in increments, to 36, 72, 108 and finally 145 ft. lbs. (49, 98, 147 and 196 N.m). Each time
center bolt is tightened, seat bearings by rotating hub by hand. Using an inch-pound torque wrench, measure torque required to turn
center bolt. Ensure torque reading is taken just as wrench starts to rotate.
3. Preload spacer thickness is correct if torque wrench indicates 2.2-16 INCH lbs. (.25-1.8 N.m). If measurement indicates less than 2.2
INCH lbs. (.25 N.m), a thinner spacer must be installed. If measurement indicates more than 16 INCH lbs. (1.8 N.m), a thicker spacer
must be installed.
4. Bearing spacers are available in various thicknesses. See PRELOAD SPACER AVAILABILITY table. Changing spacer thickness one
number changes bearing preload 1.8-3.5 INCH lbs. (.2-.4 N.m). Ensure correct spacer is installed and preload is within specification.
Remove preload spacer selector set.
PRELOAD SPACER AVAILABILITY
Stamped Mark On SpacerIn. (mm)
10.2474 (6.285)
20.2490 (6.325)
30.2506 (6.365)
40.2522 (6.405)
50.2537 (6.445)
60.2553 (6.485)
70.2569 (6.525)
80.2585 (6.565)
90.2600 (6.605)
100.2616 (6.645)
110.2632 (6.685)
120.2648 (6.725)
130.2663 (6.765)
140.2679 (6.805)
150.2695 (6.845)
160.2711 (6.885)
Page 6 of 12 MITCHELL 1 ARTICLE - BRAKE SYSTEM 1991-92 BRAKES Disc & Drum
3/10/2009 http://www.eautorepair.net/app/PrintItems.asp?S0=2097152&S1=0&SG=%7B7DD6473C%2DB5BB%2D4F20%2D9D70%2D
...
Page 38 of 454
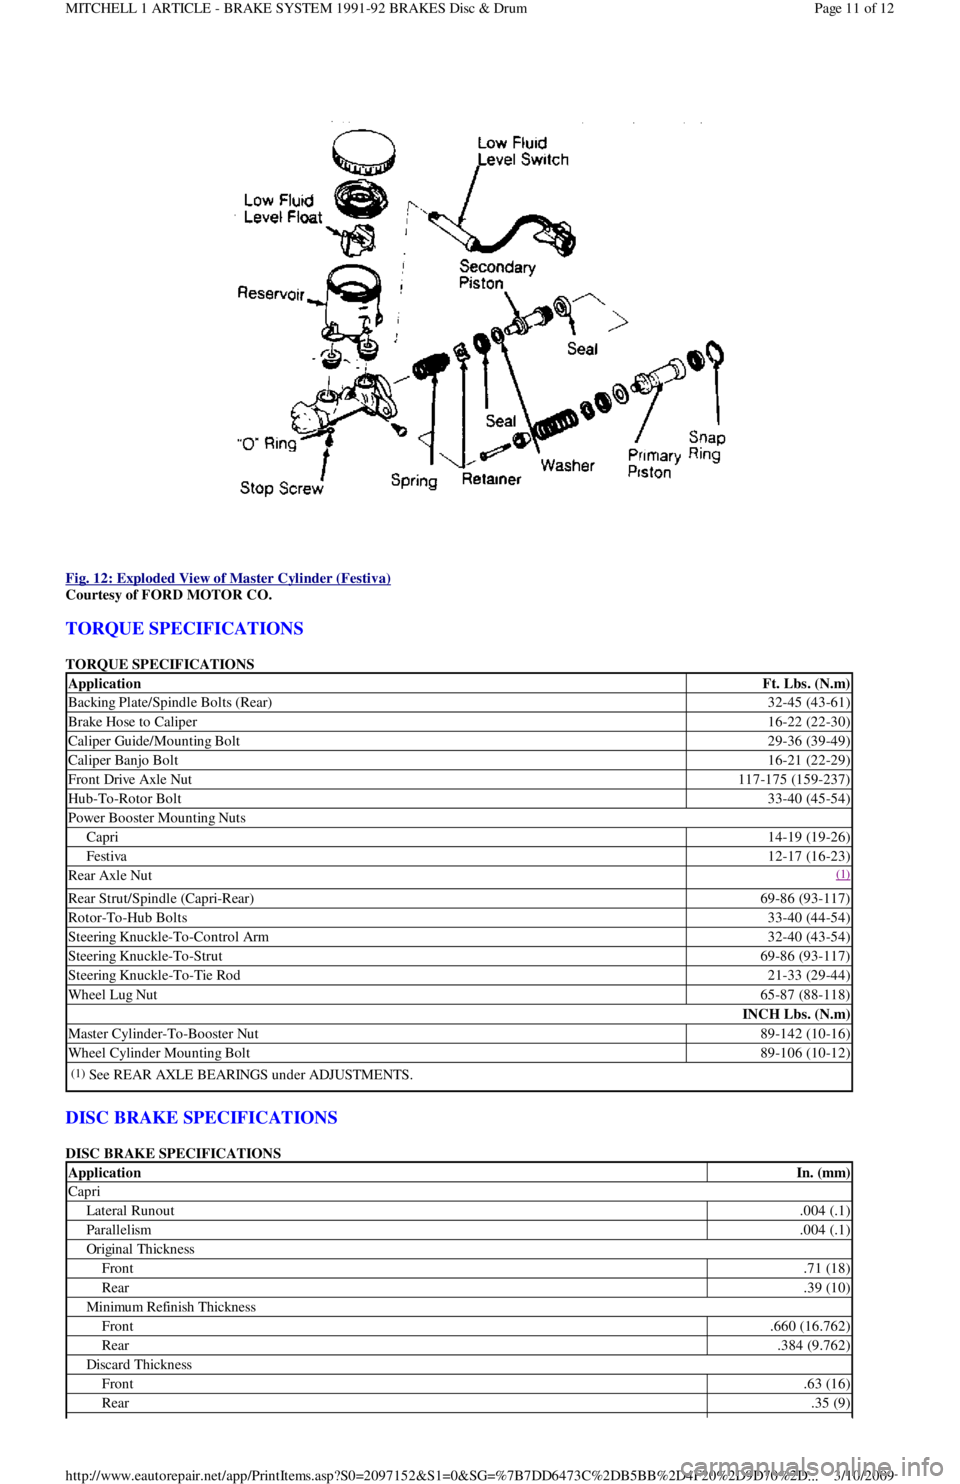
Fig. 12: Exploded View of Master Cylinder (Festiva)
Courtesy of FORD MOTOR CO.
TORQUE SPECIFICATIONS
TORQUE SPECIFICATIONS
DISC BRAKE SPECIFICATIONS
DISC BRAKE SPECIFICATIONS
ApplicationFt. Lbs. (N.m)
Backing Plate/Spindle Bolts (Rear)32-45 (43-61)
Brake Hose to Caliper16-22 (22-30)
Caliper Guide/Mounting Bolt29-36 (39-49)
Caliper Banjo Bolt16-21 (22-29)
Front Drive Axle Nut117-175 (159-237)
Hub-To-Rotor Bolt33-40 (45-54)
Power Booster Mounting Nuts
Capri14-19 (19-26)
Festiva12-17 (16-23)
Rear Axle Nut(1)
Rear Strut/Spindle (Capri-Rear)69-86 (93-117)
Rotor-To-Hub Bolts33-40 (44-54)
Steering Knuckle-To-Control Arm32-40 (43-54)
Steering Knuckle-To-Strut69-86 (93-117)
Steering Knuckle-To-Tie Rod21-33 (29-44)
Wheel Lug Nut65-87 (88-118)
INCH Lbs. (N.m)
Master Cylinder-To-Booster Nut89-142 (10-16)
Wheel Cylinder Mounting Bolt89-106 (10-12)
(1)See REAR AXLE BEARINGS under ADJUSTMENTS.
ApplicationIn. (mm)
Capri
Lateral Runout.004 (.1)
Parallelism.004 (.1)
Original Thickness
Front.71 (18)
Rear.39 (10)
Min imu m Refin ish Th ickn ess
Front.660 (16.762)
Rear.384 (9.762)
Discard Thickness
Front.63 (16)
Rear.35 (9)
Page 11 of 12 MITCHELL 1 ARTICLE - BRAKE SYSTEM 1991-92 BRAKES Disc & Drum
3/10/2009 http://www.eautorepair.net/app/PrintItems.asp?S0=2097152&S1=0&SG=%7B7DD6473C%2DB5BB%2D4F20%2D9D70%2D
...
Page 40 of 454
Back To Article
AXLE SHAFT S - FRONT
1988-93 Drive Axles - FWD Axle Shafts
DESCRIPTION & OPERATION
Axle shafts transfer power from transaxle to driving wheels. All axle shafts consist of a shaft with a flexible Constant Velocity (CV) joint at
each end. Inner CV joint is coupled to transaxle by splines. Outer CV joint is splined to hub assembly and secured by axle shaft nut.
Three different types of axle shaft CV joints are used: Double Offset Joint (DOJ) or Rzeppa type, Birfield Joint (BJ) and the Tripot Joint (TJ).
CV joint boots protect CV joints by maintaining proper lubrication and preventing contaminants from entering joint. Boots must be replaced
when signs of leakage or cracks are present. Inner CV joint may be disassembled and serviced. Outer CV joint boot may be replaced, but outer
Birfield CV joint must NOT be disassembled. It must be replaced as an assembly, if faulty.
To prevent torsional vibration and torque steer on turbocharged Capri vehicles, an intermediate shaft and conventional axle shaft are used on
the right side. Both shafts are of similar length and are supported by a bearing, which is attached to engine.
CV JOINT IDENTIFICATION
TROUBLE SHOOTING
REMOVAL, DISASSEMBLY, REASSEMBLY & INSTALLATION
FWD AXLE SHAFTS
Removal
1. Raise and support vehicle. Remove lower underbody splash shields. Drain transaxle fluid. Remove front wheels and loosen axle shaft
lock nut. On Capri, remove stabilizer bar-to-control arm attaching nuts, bolt, washers and bushings. On Festiva, remove stabilizer bar
attaching nuts and bracket. On all models, remove joint clamp bolt from lower control arm. Pry downward and separate steering knuckle
from ball joint, taking care not to damage ball joint dust boot.
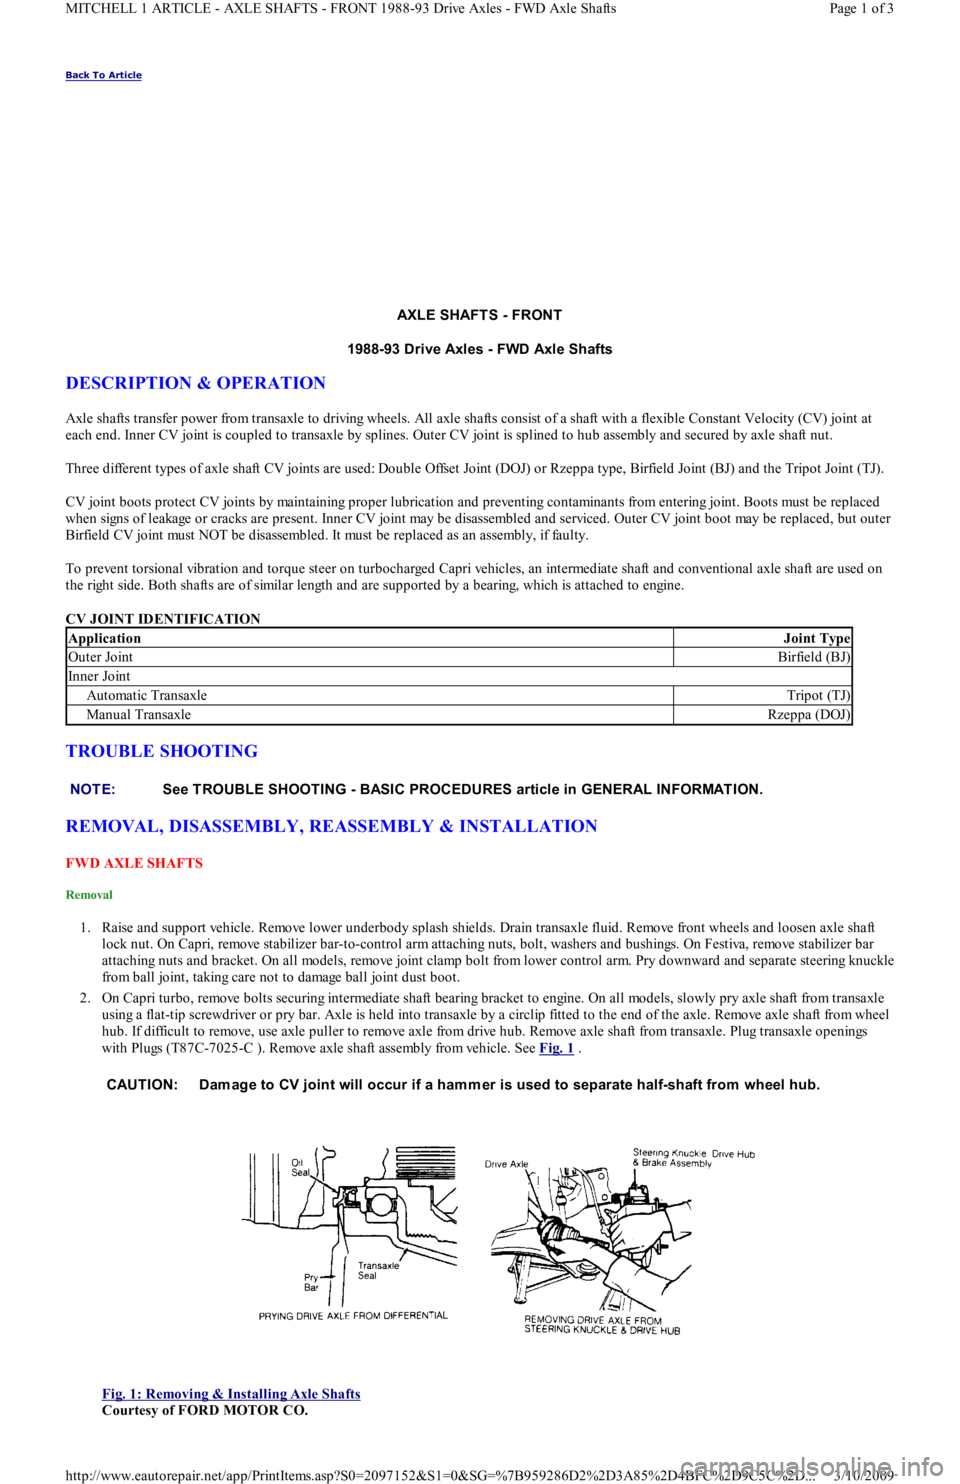
2. On Capri turbo, remove bolts securing intermediate shaft bearing bracket to engine. On all models, slowly pry axle shaft from transaxle
using a flat-tip screwdriver or pry bar. Axle is held into transaxle by a circlip fitted to the end of the axle. Remove axle shaft from wheel
hub. If difficult to remove, use axle puller to remove axle from drive hub. Remove axle shaft from transaxle. Plug transaxle openings
with Plugs (T87C-7025-C ). Remove axle shaft assembly from vehicle. See Fig. 1
.
Fig. 1: Removing & Installing Axle Shafts
Courtesy of FORD MOTOR CO.
ApplicationJoint Type
Outer JointBirfield (BJ)
In n er Jo in t
Automatic TransaxleTripot (TJ)
Manual TransaxleRzeppa (DOJ)
NOTE:See TROUBLE SHOOTING - BASIC PROCEDURES article in GENERAL INFORMATION.
CAUTION: Dam age to CV joint will occur if a ham mer is used to separate half-shaft from wheel hub.
Page 1 of 3 MITCHELL 1 ARTICLE - AXLE SHAFTS - FRONT 1988-93 Drive Axles - FWD Axle Shafts
3/10/2009 http://www.eautorepair.net/app/PrintItems.asp?S0=2097152&S1=0&SG=%7B959286D2%2D3A85%2D4BFC%2D9C5C%2D
...
Page 42 of 454
Installation (All)
1. To install axle shaft, reverse removal procedure. Always install a NEW retaining circlip. Check seals at both ends of axle shaft. If
necessary, replace seals prior to installation. Lubricate transaxle seal lip with transaxle oil. See Fig. 1
.
2. After installing axle shaft into transaxle, pull axle shaft outward by hand to ensure proper engagement of retaining circlip and snap ring.
Install axle shaft into wheel hub. Align suspension alignment marks and tighten nuts.
INTERMEDIATE SHAFT
Removal
Intermediate shaft and axle shaft are removed as an assembly. See FWD AXLE SHAFTS under REMOVAL, DISASSEMBLY,
REASSEMBLY & INSTALLATION.
Disassembly
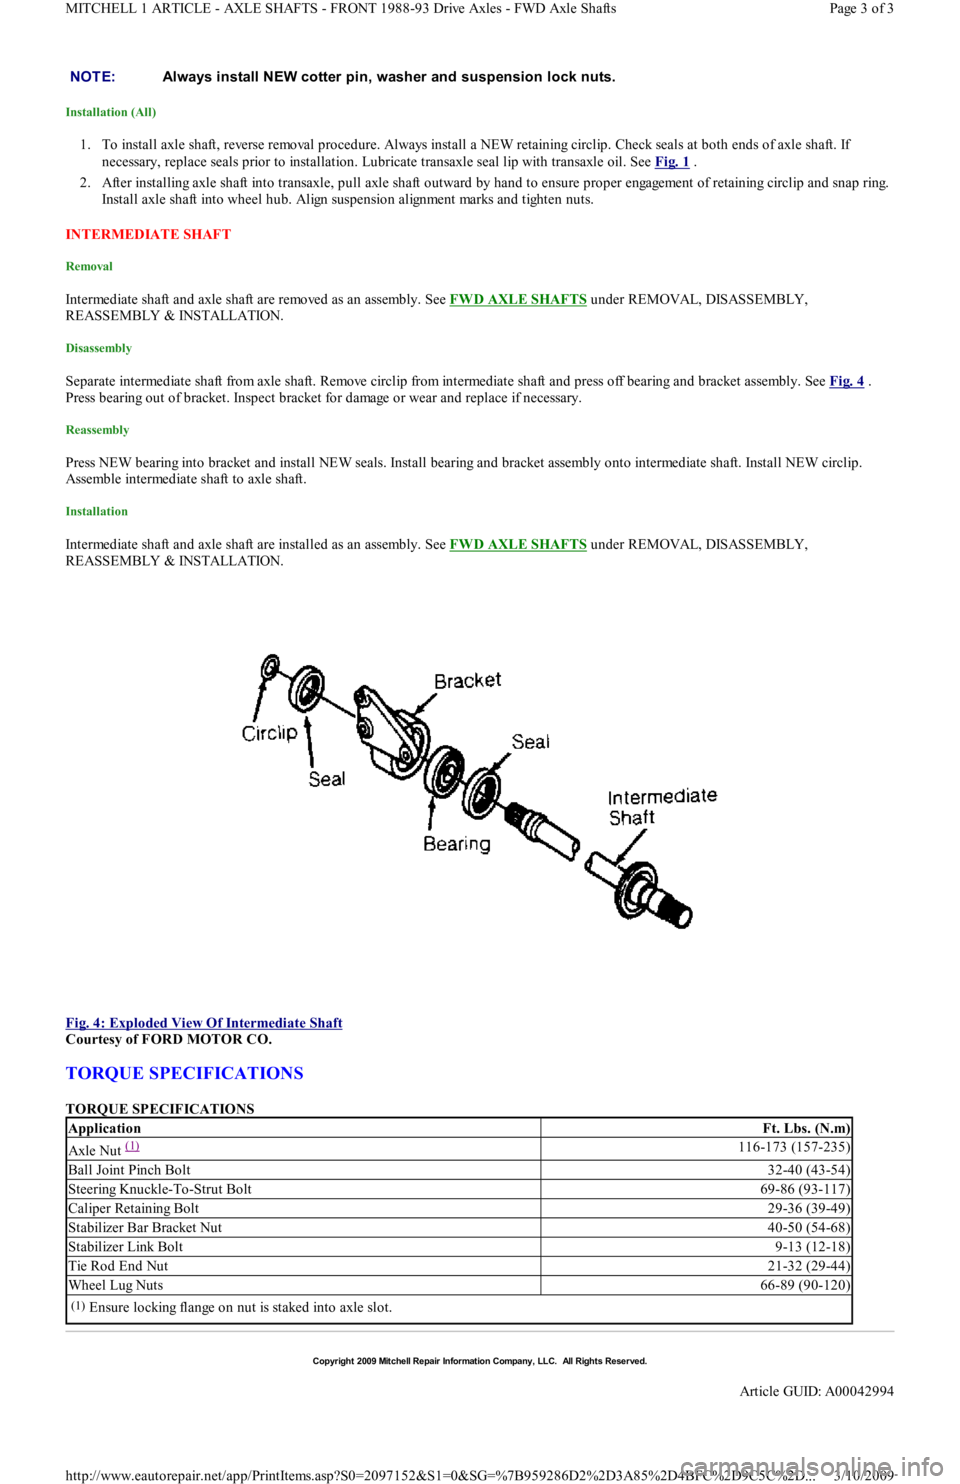
Separate intermediate shaft from axle shaft. Remove circlip from intermediate shaft and press off bearing and bracket assembly. See Fig. 4 .
Press bearing out of bracket. Inspect bracket for damage or wear and replace if necessary.
Reassembly
Press NEW bearing into bracket and install NEW seals. Install bearing and bracket assembly onto intermediate shaft. Install NEW circlip.
Assemble intermediate shaft to axle shaft.
Installation
Intermediate shaft and axle shaft are installed as an assembly. See FWD AXLE SHAFTS under REMOVAL, DISASSEMBLY,
REASSEMBLY & INSTALLATION.
Fig. 4: Exploded View Of Intermediate Shaft
Courtesy of FORD MOTOR CO.
TORQUE SPECIFICATIONS
TORQUE SPECIFICATIONS NOTE:Always install NEW cotter pin, washer and suspension lock nuts.
ApplicationFt. Lbs. (N.m)
Axle Nut (1) 116-173 (157-235)
Ball Joint Pinch Bolt32-40 (43-54)
Steering Knuckle-To-Strut Bolt69-86 (93-117)
Caliper Retaining Bolt29-36 (39-49)
Stabilizer Bar Bracket Nut40-50 (54-68)
Stabilizer Link Bolt9-13 (12-18)
Tie Rod End Nut21-32 (29-44)
Wheel Lug Nuts66-89 (90-120)
(1)Ensure locking flange on nut is staked into axle slot.
Copyr ight 2009 Mitchell Repair Information Company, LLC. All Rights Reserved.
Article GUID: A00042994
Page 3 of 3 MITCHELL 1 ARTICLE - AXLE SHAFTS - FRONT 1988-93 Drive Axles - FWD Axle Shafts
3/10/2009 http://www.eautorepair.net/app/PrintItems.asp?S0=2097152&S1=0&SG=%7B959286D2%2D3A85%2D4BFC%2D9C5C%2D
...
Page 101 of 454
Back To Article
ENGINE OVERHAUL
1991-92 FORD MOT OR CO. ENGINES 1.3L & 1.6L 4-Cylinder
ENGINE IDENTIFICATION
Engine can be identified by Vehicle Identification Number (VIN) on metal tab attached to instrument panel. Tab is close to windshield on
driver's side and is visible through windshield. VIN has 17 characters. The 8th character identifies engine.
ENGINE IDENTIFICATION CODES
ADJUSTMENTS
VALVE ARRANGEMENT
Firewall Side
In t ake val ves.
Radiator Side
Exhaust valves.
VALVE CLEARANCE ADJUSTMENT
Hydraulic lifters are used. Adjustment is NOT possible nor necessary.
REMOVAL & INSTALLATION
FUEL PRESSURE RELEASE
Remove rear seat. Remove fuel pump access panel. Disconnect fuel pump electrical connector. Start engine and allow to idle until engine dies.
ENGINE
Removal (1.3L)
1. Remove battery and battery tray. Index hood-to-hinge and remove hood. Drain coolant. Drain engine oil and transaxle fluid. Disconnect
vane airflow meter connector, vane airflow meter and hose.
2. Remove oil dipstick, cooling fan and radiator assembly. Disconnect accelerator cable from mounting bracket and throttle lever.
Disconnect speedometer cable at transaxle. Mark and disconnect fuel lines at fuel pump. Plug fuel lines. Remove heater hoses. Remove
brake booster vacuum hose. Disconnect transaxle vacuum hose.
3. Remove charcoal canister hoses from engine. Disconnect engine wiring harness. Remove alternator and brackets. Remove engine ground
strap. Raise vehicle and remove catalytic converter.
4. Disconnect A/C compressor without removing hoses, and set compressor aside. Disconnect distributor wiring at coil. On automatic
transaxle models, remove shift lever-to-manual shaft assembly nut. Remove shift cable from transaxle. Loosen front wheel bolts. Raise
vehicle and remove wheel assemblies.
5. Remove stabilizer mounting nuts and brackets. Remove lower arm clamp bolts and nuts. Pull lower arms downward, separating lower
arms from knuckles. Separate halfshafts and install Differential Plugs (T87C-7025-C) between differential side gears. See FWD AXLE
SHAFTS article in DRIVE AXLES Section.
6. On manual transaxle vehicles, disconnect clutch control cable and shift control cable rod. Remove stabilizer bar from transaxle. Remove
catalytic converter inlet pipe. Support engine assembly with hoist. Remove rear crossmember mount bolts. Remove front and rear engine
mount nuts.
7. Remove crossmember. Lower vehicle and attach engine lift hooks. Remove right engine mount bolt. Remove engine/transaxle assembly.
Remove gusset plates. Remove starter and flywheel cover. Remove torque converter bolts on automatic transaxle. Remove engine-to-
transaxle bolts. Separate transaxle from engine.
Installation (1.3L)
1. Install transaxle to engine in reverse order of removal. Attach hoist to engine/transaxle assembly and position in vehicle. Support engine
in chassis and install engine mount bolts. Raise vehicle and install front engine mount nut. Tighten nuts to specification. See TORQUE
SPECIFICATIONS table at end of article.
2. Position crossmember onto mounts and chassis. Tighten rear nut. Install mount-to-crossmember nuts and tighten. Remove differential
plugs and install halfshafts. To complete installation, reverse removal procedure. Tighten all bolts/nuts to specifications. Fill all fluid NOTE:For engine repair procedures not covered in this article, see ENGINE OVERHAUL PROCEDURES
-
GENERAL INFORMATION
article in the GENERAL INFORMAT ION section.
ApplicationVIN Code
Festiva
1.3L SOHC PFIH
Capri
1.6L DOHC PFIZ
1.6L DOHC PFI TURBO6
NOTE:When rem oving engine m ounts, m ark and note location and position to ensure proper installation.
Engine and transaxle are rem oved as an assem bly.
Page 1 of 19 MITCHELL 1 ARTICLE - ENGINE OVERHAUL 1991-92 FORD MOTOR CO. ENGINES 1.3L & 1.6L 4-Cylinder
3/10/2009 http://www.eautorepair.net/app/PrintItems.asp?S0=2097152&S1=0&SG=%7B959286D2%2D3A85%2D4BFC%2D9C5C%2D
...
Page 102 of 454

levels to proper level.
Removal (1.6L & 1.6L Turbo)
1. Relieve fuel pressure and discharge air conditioning system (if equipped). See FUEL PRESSURE RELEASE under REMOVAL &
INSTALLATION. Disconnect and remove battery, battery tray and battery tray support bracket.
2. Release wiring harness retaining straps from battery support tray. Disconnect windshield washer supply hose between fluid reservoir and
hood. Mark hinge locations and remove hood.
3. Disconnect intake air tube and wiring to ignition coil and vane airflow meter. Remove air cleaner/vane airflow meter assembly. Remove
air cleaner assembly support brackets. Disconnect intercooler hoses from turbocharger (if equipped).
4. Drain engine coolant and remove radiator. Disconnect accelerator cable, and remove retaining bracket from cam cover. Position cable to
one side.
5. Disconnect and plug fuel lines at fuel filter and pressure regulator. Disconnect power brake booster manifold vacuum hose from
manifold. Disconnect heater hoses at heater core tubes. Label and remove vacuum hoses located at throttle body.
6. For manual transaxle turbocharged vehicles, disconnect clutch cable and remove support bracket and cable from transmission. On non-
turbo vehicles, disconnect clutch slave hydraulic line. For automatic transaxle, remove transaxle cooler lines.
7. Disconnect starter wiring at starter. Remove harness from locating strap on bracket. Disconnect alternator wiring. Disconnect wiring
from engine coolant sensors located on rear of engine block. Remove ground connection at bracket on thermostat cover. Disconnect O2
sensor wire, main wiring harness connector, TPS connector (turbocharged only), knock sensor connector, distributor wiring and
transaxle wiring. Disconnect ground wire and strap at front of engine, and reinstall lifting eye.
8. Remove engine oil dipstick and retaining clip. Remove power steering pump from mounting bracket. Remove power steering pump
mounting bracket. With hoses attached, position pump aside. Remove upper air conditioning compressor retaining bolts (if equipped).
9. Raise vehicle on hoist. Drain engine oil and cooling system. On vehicles with air conditioning, remove lower air conditioning
compressor mounting bolts, and position compressor out of way.
10. Remove front wheels and tires. Remove front ball joints-to-ste e r in g kn u c kl e s r e t a in in g b o l t s. R e mo ve sp l a sh gu a r d s. Dr a in t ransmission
oil and remove half shafts from differential. Remove front exhaust pipe bracket located on lower side of engine. Disconnect front
exhaust pipe from exhaust manifold, or turbocharger (if equipped).
11. Remove frame support bar-to-engine support bolt. Loosen right control arm bolt and, pivot support bar downward. Disengage rubber
exhaust hangers located directly behind catalytic converter. Allow exhaust system to hang down 6 inches, and support system with
mechanic's wire. Unbolt shift linkage and stabilizer bar at transaxle. Remove nuts from front and rear engine mounts, and lower vehicle.
12. Attach chains onto lift eyes at ends of cylinder head, and support engine with hoist. Remove RH engine mount through bolt. Raise
engine off mounts and slightly pivot engine/transaxle assembly. Disconnect oil pressure sensor and route starter/alternator wiring
harness from engine. Carefully lift engine/transaxle assembly, turn assembly while raising to clear brake master cylinder, shift linkage
universal joint, radiator support and air conditioning lines (if equipped).
13. Remove intake manifold support bracket. Remove gusset plate(s) (if equipped). Remove starter. Remove transaxle-to-engine retaining
bolts. Identify bolts to ensure correct installation. Separate transaxle from engine. On manual transaxle, remove pressure plate, clutch
disc and flywheel. On automatic transaxle, remove flexplate.
Installation (1.6L & 1.6L Turbo)
1. Install transaxle to engine in reverse order of removal. Attach hoist to engine/transaxle assembly and position assembly in vehicle.
Before engine contacts mounts, route starter, alternator and oil pressure sensor wiring, and connect oil pressure sensor. Lower engine
until front mount seats on crossmember. Install through bolt on RH engine mount. DO NOT tighten bolt.
2. Remove hoist. Raise vehicle and support with jackstands. Align rear engine mount to crossmember, and install retaining nuts to front
and rear engine mounts. Tighten nuts to specification. See TORQUE SPECIFICATIONS
table at end of article.
3. On manual transaxles, connect shift coupling and stabilizer. Tighten to specification. On automatic transaxles, connect shift linkage and
oil cooler lines. Tighten linkage retaining bolt, shift cable pivot and oil cooler hose clamps to specification. Connect front exhaust pipe
to manifold (or turbocharger). Install exhaust pipe to support bracket. Tighten bolts to specification. Tighten manifold (or turbocharger)
to specification. Attach rubber exhaust hangers. Position cross brace. Tighten retaining nut and bolt and right control arm front bolt.
4. Install drive axles. Install ball joint retaining bolts and tighten to specification. Mount A/C Compressor to engine (if equipped). Tighten
lower retaining bolts to specification. Install splash guards. Install tire and wheel assemblies. Tighten retaining nuts to specification.
5. Lower vehicle. Install upper A/C compressor retaining bolts (if equipped). Tighten bolts to specification. Tighten RH engine mo u n t
through bolt to specification. Connect alternator wiring.
6. Position power steering pump bracket on stud. Lower pump into engine compartment. Install power steering pump bracket retaining
bolts and nut. Tighten to specification. Install power steering pump and belt. Tighten adjustment nut and pivot bolt to specification.
7. Install engine oil dipstick and retaining clip. Install ground strap and ground wire to cylinder head. Install clutch cable (if equipped).
Connect clutch hydraulic line if equipped with manual transaxle or naturally aspirated. Connect transmission electrical connectors.
Connect fuel lines to fuel filter and pressure regulator. Install intake air tube to throttle body.
8. Install intercooler hoses on turbocharged models. Install air cleaner assembly brackets. Install air cleaner assembly with airflow meter
attached. Install intake air tube. Install coil and airflow meter connectors. Connect coolant crankcase and air bypass hoses. Install
vacuum hoses as noted in disassembly.
9. Connect accelerator cable. Install retaining bracket. Install power brake booster hose. Remove speedometer cable from transaxle. Fill
transaxle to specification. See CAPACITIES in SERVICE & ADJUSTMENT SPECIFICATIONS article. Install speedometer cable.
Connect speedometer cable connector. Fill engine oil to capacity.
10. Install radiator/fan assembly. Tighten bracket retaining bolts to specification. Connect coolant hoses and fan electrical connector. Fill
coolant to specification.
11. Install hood and connect washer hose. Install battery tray support, battery tray, battery and battery hold-down. Connect battery
terminal. Evacuate and charge air conditioning system (if equipped). Road test vehicle and inspect for leaks.
INTAKE MANIFOLD
Removal (1.3L)
CAUT ION: DO NOT allow com pressor to hang by hoses. T ie up com pressor with m echanic's wire.
Page 2 of 19 MITCHELL 1 ARTICLE - ENGINE OVERHAUL 1991-92 FORD MOTOR CO. ENGINES 1.3L & 1.6L 4-Cylinder
3/10/2009 http://www.eautorepair.net/app/PrintItems.asp?S0=2097152&S1=0&SG=%7B959286D2%2D3A85%2D4BFC%2D9C5C%2D
...