1991 ACURA NSX wheel torque
[x] Cancel search: wheel torquePage 1326 of 1640
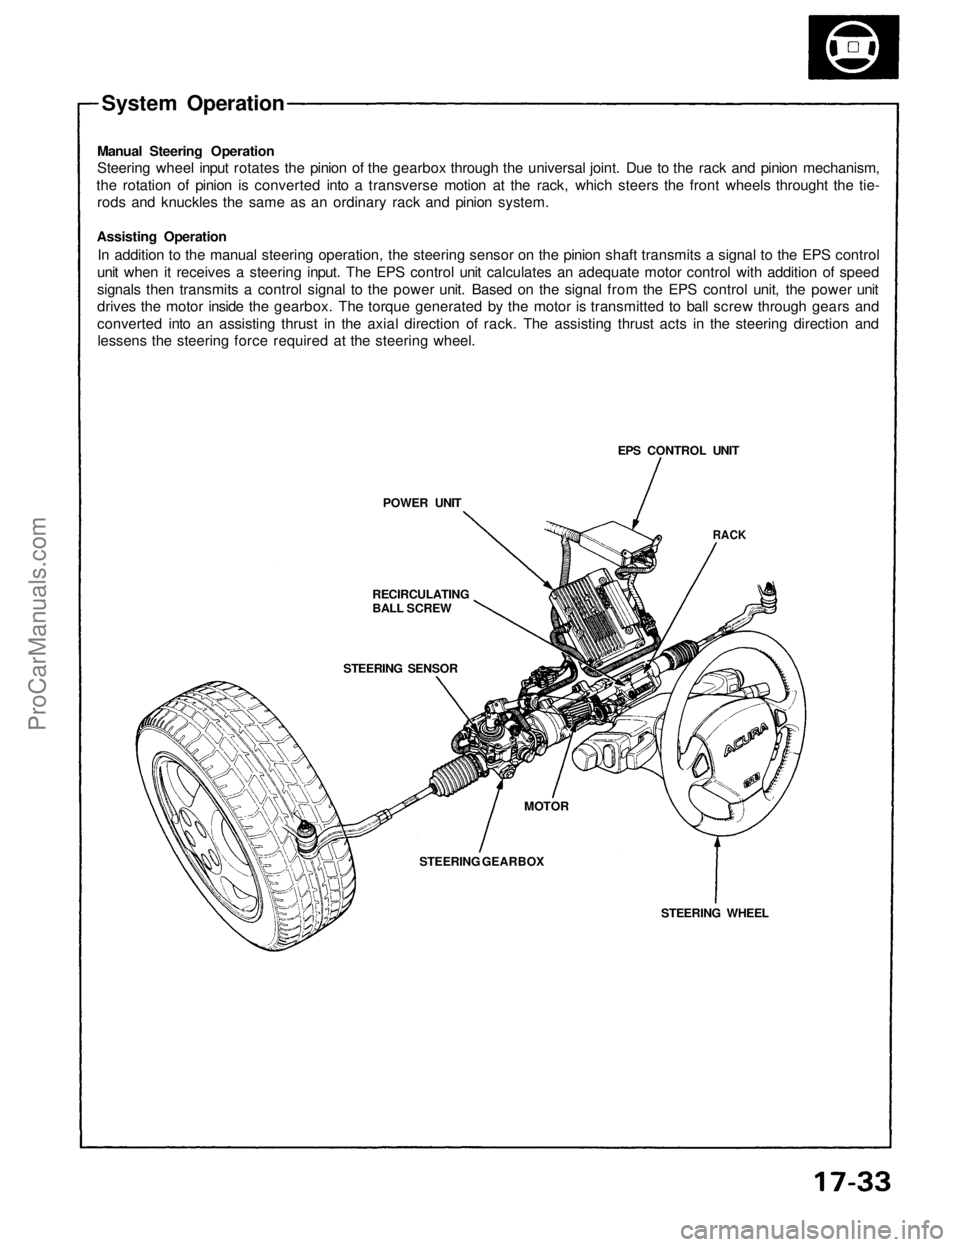
System Operation
Manual Steering Operation
Steering wheel input rotates the pinion of the gearbox through the universal joint. Due to the rack and pinion mechanism,
the rotation of pinion is converted into a transverse motion at the rack, which steers the front wheels throught the tie-
rods and knuckles the same as an ordinary rack and pinion system.
Assisting Operation
In addition to the manual steering operation, the steering sensor on the pinion shaft transmits a signal to the EPS control
unit when it receives a steering input. The EPS control unit calculates an adequate motor control with addition of speed
signals then transmits a control signal to the power unit. Based on the signal from the EPS control unit, the power unit
drives the motor inside the gearbox. The torque generated by the motor is transmitted to ball screw through gears and
converted into an assisting thrust in the axial direction of rack. The assisting thrust acts in the steering direction and
lessens the steering force required at the steering wheel.
POWER UNIT
RECIRCULATING
BALL SCREW
STEERING SENSOR
STEERING GEARBOX
MOTOR
STEERING WHEEL
RACK
EPS CONTROL UNITProCarManuals.com
Page 1327 of 1640
System Description
Function and Operation
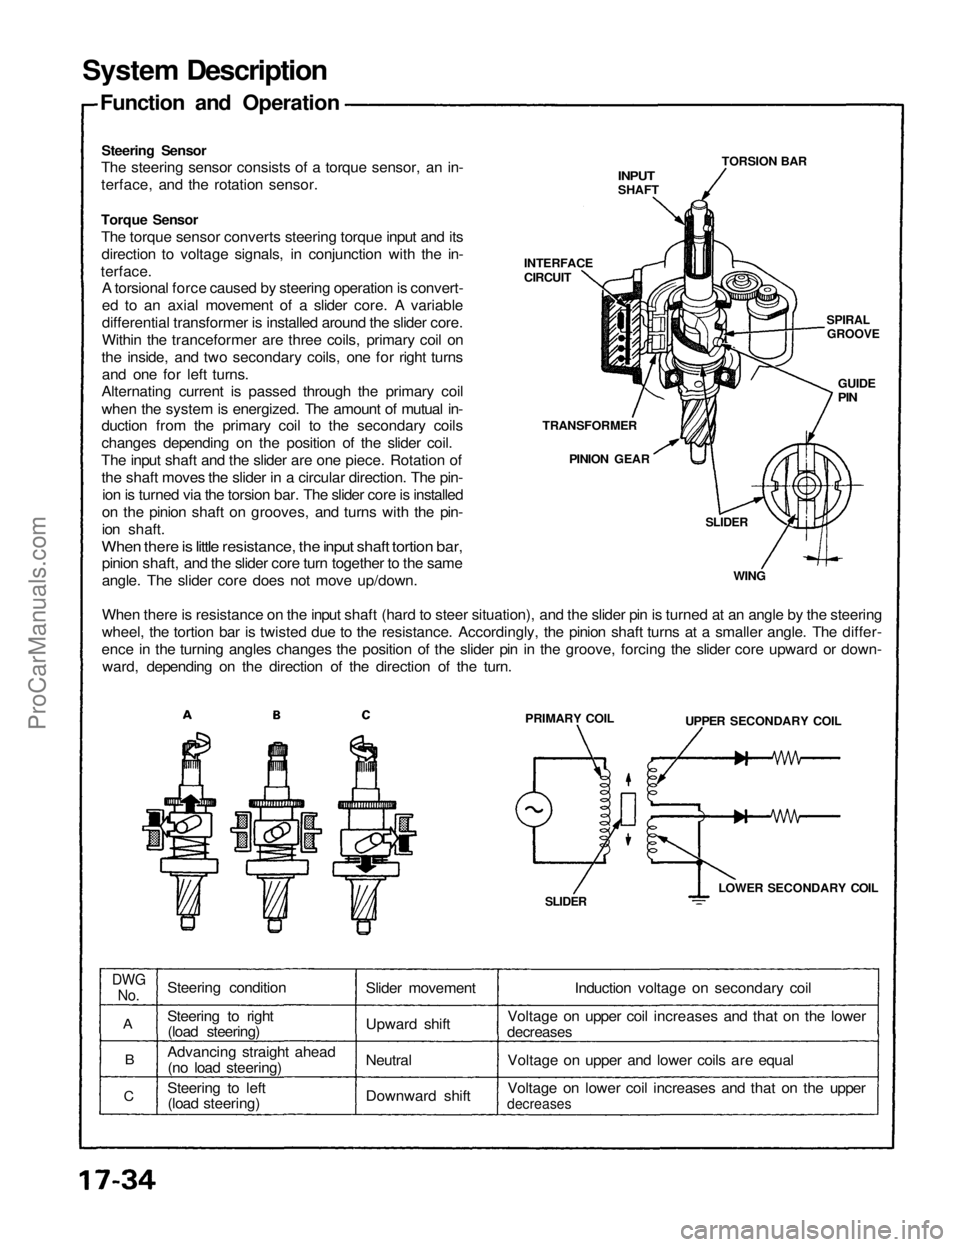
Steering Sensor
The steering sensor consists of a torque sensor, an in-
terface, and the rotation sensor.
INPUT
SHAFT
TORSION BAR
SPIRAL
GROOVE
GUIDE
PIN
INTERFACE
CIRCUIT
Torque Sensor
The torque sensor converts steering torque input and its
direction to voltage signals, in conjunction with the in-
terface.
A torsional force caused by steering operation is convert-
ed to an axial movement of a slider core. A variable
differential transformer is installed around the slider core.
Within the tranceformer are three coils, primary coil on
the inside, and two secondary coils, one for right turns
and one for left turns.
Alternating current is passed through the primary coil
when the system is energized. The amount of mutual in-
duction from the primary coil to the secondary coils
changes depending on the position of the slider coil.
The input shaft and the slider are one piece. Rotation of
the shaft moves the slider in a circular direction. The pin-
ion is turned via the torsion bar. The slider core is installed
on the pinion shaft on grooves, and turns with the pin-
ion shaft.
When there is little resistance, the input shaft tortion bar,
pinion shaft, and the slider core turn together to the same
angle. The slider core does not move up/down.
When there is resistance on the input shaft (hard to steer situation), and the slider pin is turned at an angle by the steering
wheel, the tortion bar is twisted due to the resistance. Accordingly, the pinion shaft turns at a smaller angle. The differ-
ence in the turning angles changes the position of the slider pin in the groove, forcing the slider core upward or down-
ward, depending on the direction of the direction of the turn.
TRANSFORMER
PINION GEAR
SLIDER
WING
PRIMARY COIL
UPPER SECONDARY COIL
LOWER SECONDARY COIL
SLIDER
DWG
No.
A
B
C
Steering condition
Steering to right
(load steering)
Advancing straight ahead
(no load steering)
Steering to left
(load steering)
Slider movement
Upward shift
Neutral
Downward shift
Induction voltage on secondary coil
Voltage on upper coil increases and that on the lower
decreases
Voltage on upper and lower coils are equal
Voltage on lower coil increases and that on the upper
decreasesProCarManuals.com
Page 1328 of 1640
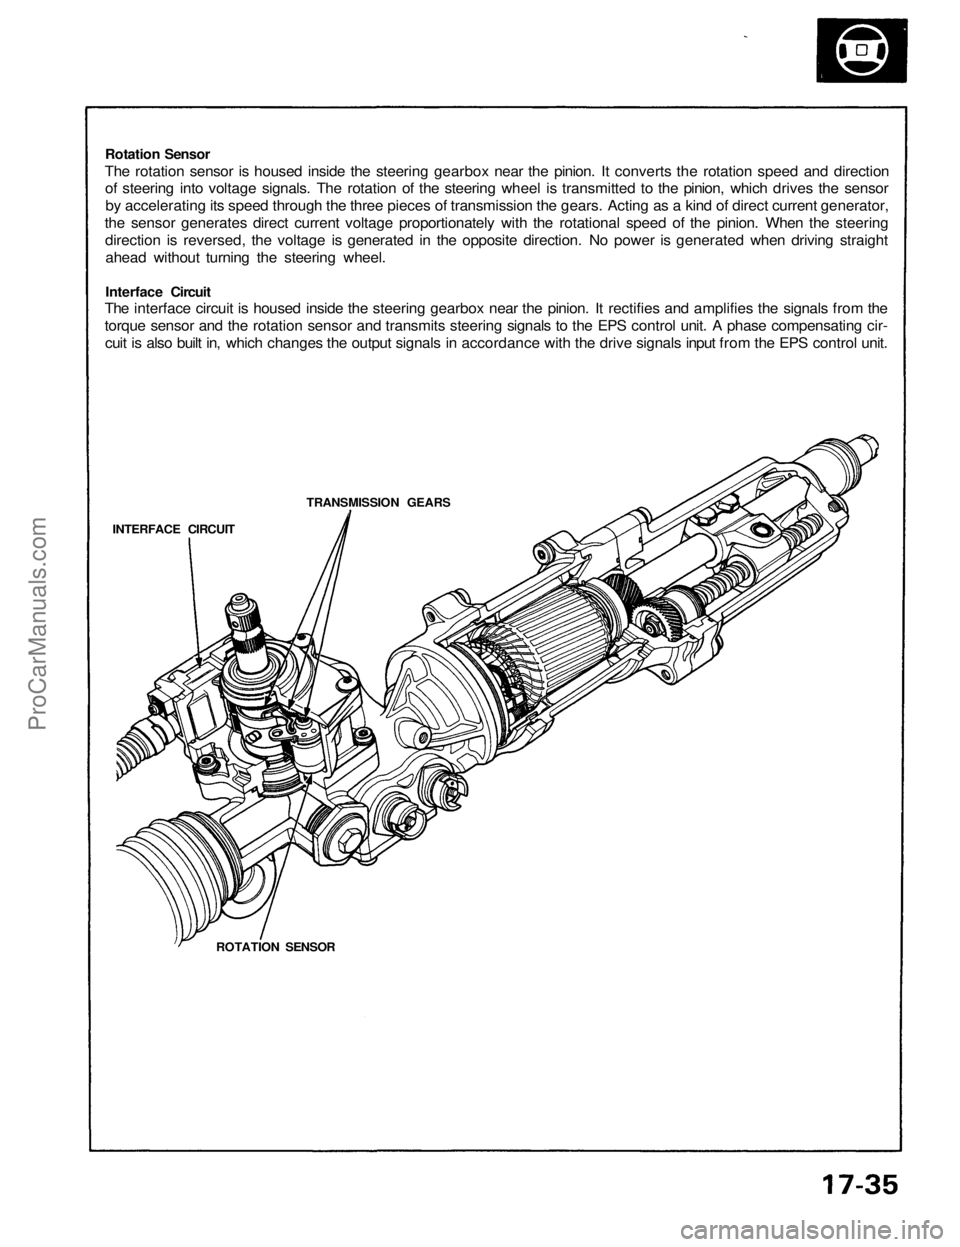
Rotation Sensor
The rotation sensor is housed inside the steering gearbox near the pinion. It converts the rotation speed and direction
of steering into voltage signals. The rotation of the steering wheel is transmitted to the pinion, which drives the sensor
by accelerating its speed through the three pieces of transmission the gears. Acting as a kind of direct current generator,
the sensor generates direct current voltage proportionately with the rotational speed of the pinion. When the steering
direction is reversed, the voltage is generated in the opposite direction. No power is generated when driving straight
ahead without turning the steering wheel.
Interface Circuit
The interface circuit is housed inside the steering gearbox near the pinion. It rectifies and amplifies the signals from the
torque sensor and the rotation sensor and transmits steering signals to the EPS control unit. A phase compensating cir-
cuit is also built in, which changes the output signals in accordance with the drive signals input from the EPS control unit.
TRANSMISSION GEARS
INTERFACE CIRCUIT
ROTATION SENSORProCarManuals.com
Page 1330 of 1640
Self-Diagnosis Function
The EPS control unit monitors the system inputs and outputs, and the driving current of the motor. If there is a problem
in the system, the control unit turns the system off by actuating the relay in the power unit. Power assist stops and
normal manual steering operation resumes. The control unit also turns the EPS indicator light on to alert the driver, and
memorizes the problem in the form of a code. Connecting the terminals of the service check connector with a jumper
wire enables the EPS indicator light to blink the problem code when the ignition switch is turned on.
Unloader Control
If the steering wheel is turned fully and held in the full-lock position, the steering torque reaches the maximum point,
and an over-current flows to the motor and the power unit. The control unit detects this and reduces the current flow
to the motor.
Average Moving Current Control
The electric current flow to the motor is estimated from the current values detected by the current sensor, and the aver-
age current is obtained at two second intervals. The motor driving current is suppressed when the average current value
exceeds a predetermined marginal value. The control unit regurates the motor current during continuous loading to sup-
press any excessive temperature rise in the power unit and the motor.
Over-Voltage Control
If there is an excessive increase in power source voltage due to a poor battery condition, an alternator voltage regulator
problem, etc., the motor assisting force increases, resulting in excessive control. To prevent this, the control unit signals
to the power unit are corrected to ensure that adequate assisting force is generated.ProCarManuals.com
Page 1332 of 1640
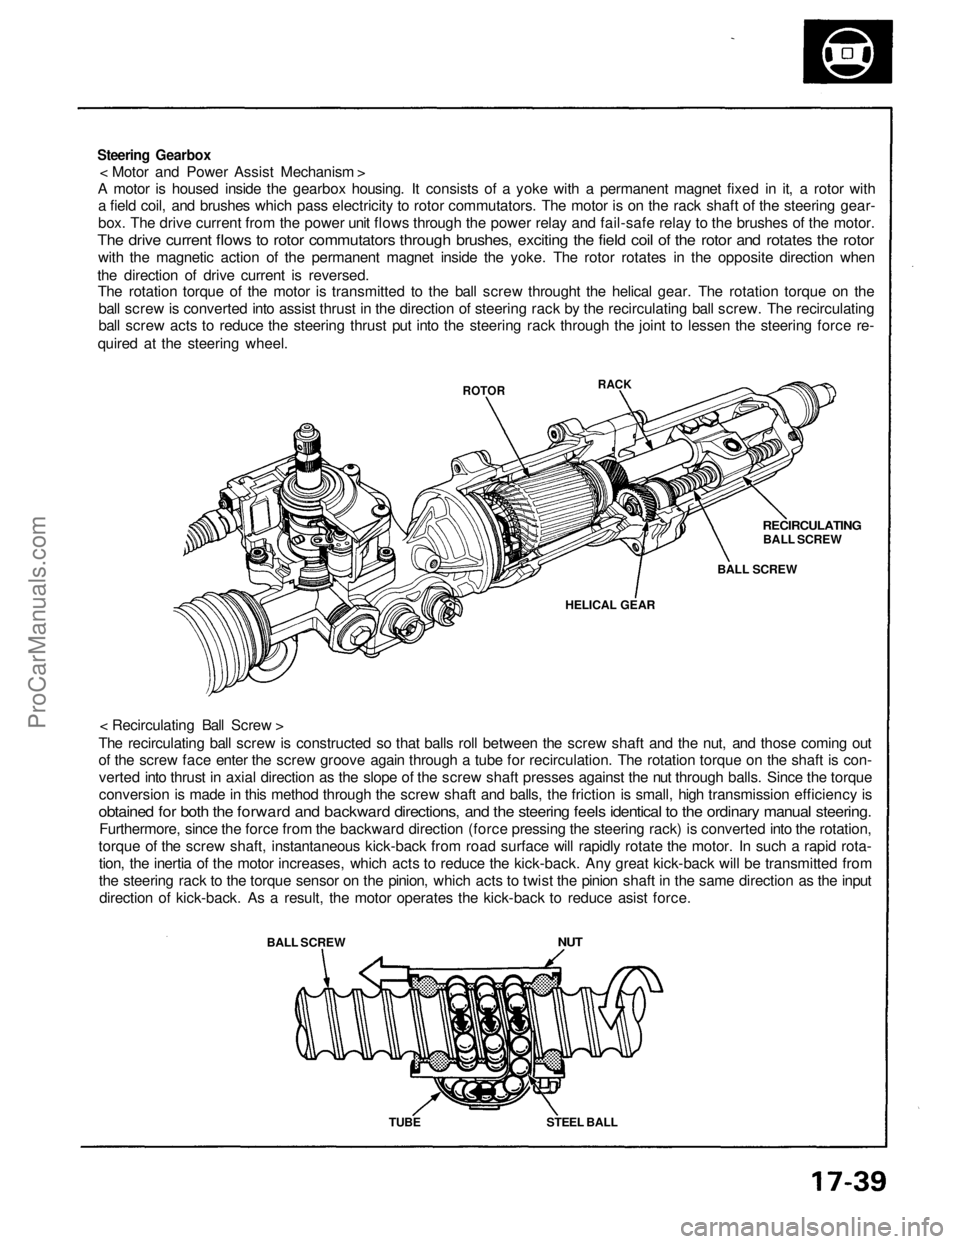
Steering Gearbox
< Motor and Power Assist Mechanism >
A motor is housed inside the gearbox housing. It consists of a yoke with a permanent magnet fixed in it, a rotor with
a field coil, and brushes which pass electricity to rotor commutators. The motor is on the rack shaft of the steering gear-
box. The drive current from the power unit flows through the power relay and fail-safe relay to the brushes of the motor.
The drive current flows to rotor commutators through brushes, exciting the field coil of the rotor and rotates the rotor
with the magnetic action of the permanent magnet inside the yoke. The rotor rotates in the opposite direction when
the direction of drive current is reversed.
The rotation torque of the motor is transmitted to the ball screw throught the helical gear. The rotation torque on the
ball screw is converted into assist thrust in the direction of steering rack by the recirculating ball screw. The recirculating
ball screw acts to reduce the steering thrust put into the steering rack through the joint to lessen the steering force re-
quired at the steering wheel.
< Recirculating Ball Screw >
The recirculating ball screw is constructed so that balls roll between the screw shaft and the nut, and those coming out
of the screw face enter the screw groove again through a tube for recirculation. The rotation torque on the shaft is con-
verted into thrust in axial direction as the slope of the screw shaft presses against the nut through balls. Since the torque
conversion is made in this method through the screw shaft and balls, the friction is small, high transmission efficiency is
obtained for both the forward and backward directions, and the steering feels identical to the ordinary manual steering.
Furthermore, since the force from the backward direction (force pressing the steering rack) is converted into the rotation,
torque of the screw shaft, instantaneous kick-back from road surface will rapidly rotate the motor. In such a rapid rota-
tion, the inertia of the motor increases, which acts to reduce the kick-back. Any great kick-back will be transmitted from
the steering rack to the torque sensor on the pinion, which acts to twist the pinion shaft in the same direction as the input
direction of kick-back. As a result, the motor operates the kick-back to reduce asist force.
BALL SCREW
ROTOR
NUT
TUBE
STEEL BALL
HELICAL GEAR
BALL SCREW
RECIRCULATING
BALL SCREW
RACKProCarManuals.com
Page 1333 of 1640
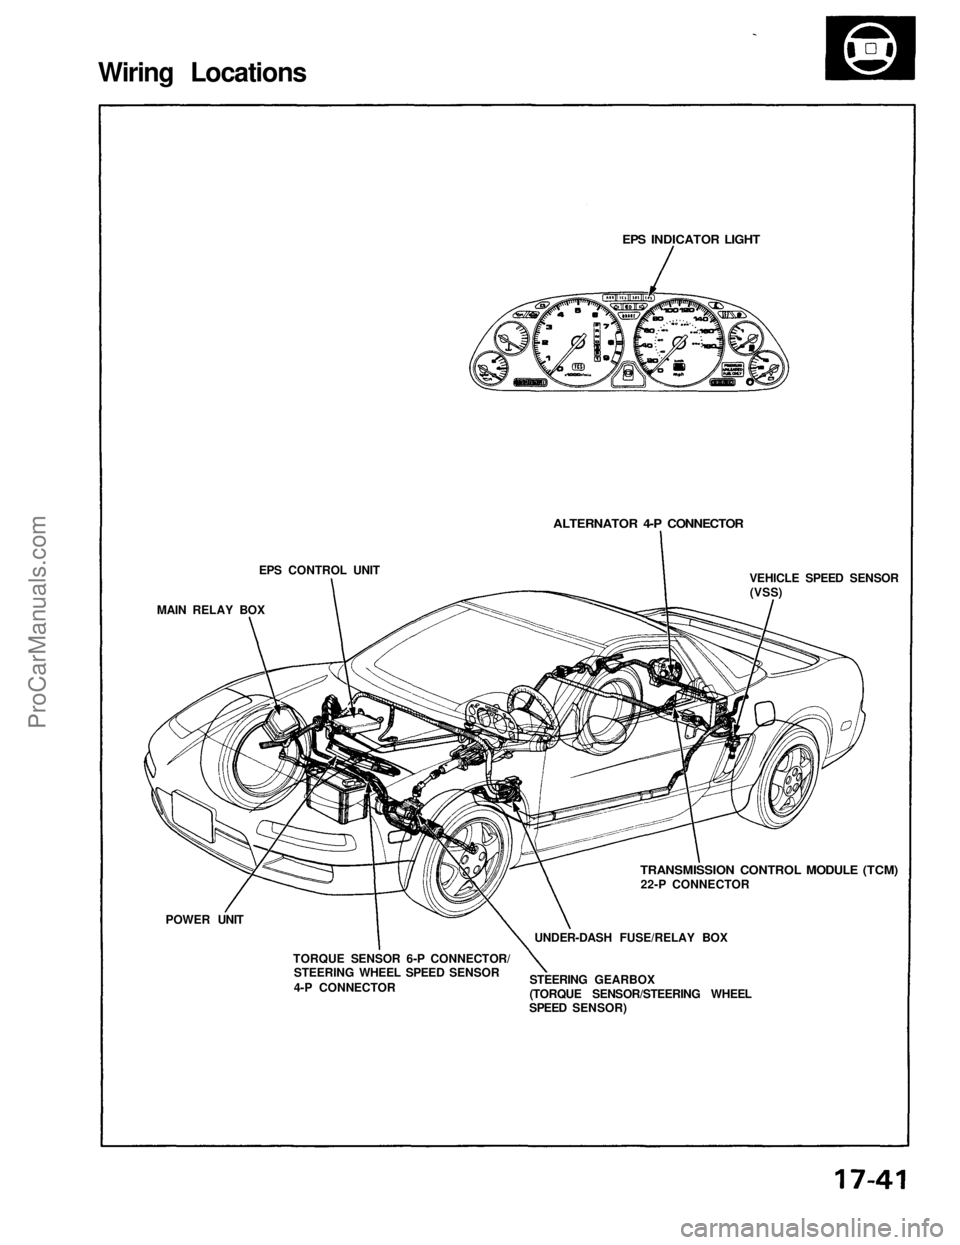
Wiring Locations
EPS CONTROL UNIT
MAIN RELAY BOX
POWER UNIT
TORQUE SENSOR 6-P CONNECTOR/
STEERING WHEEL SPEED SENSOR
4-P CONNECTOR
STEERING GEARBOX
(TORQUE SENSOR/STEERING WHEEL
SPEED SENSOR)
UNDER-DASH FUSE/RELAY BOX
TRANSMISSION CONTROL MODULE (TCM)
22-P CONNECTOR
VEHICLE SPEED SENSOR
(VSS)
ALTERNATOR 4-P CONNECTOR
EPS INDICATOR LIGHTProCarManuals.com
Page 1334 of 1640
Troubleshooting
Troubleshooting Precautions
Always use the test harness to verify the resistance, voltage, current and other electrical characteristics for the EPS
control unit, torque sensor, steering wheel speed sensor, power unit, and their connectors.
The test probe must not make direct contact with the connector terminals. Make sure that the terminals are not bent or damaged in any way when a test harness is installed.
A digital circuit tester must be used to perform the inspections.
An analog circuit tester must be used only when this procedure is indicated in the specification figures.
The EPS system connector should not be disconnected except when necessary.
Inspect the connection condition and ground of each EPS system connector before peforming the troubleshooting
procedures.ProCarManuals.com
Page 1561 of 1640
Removal
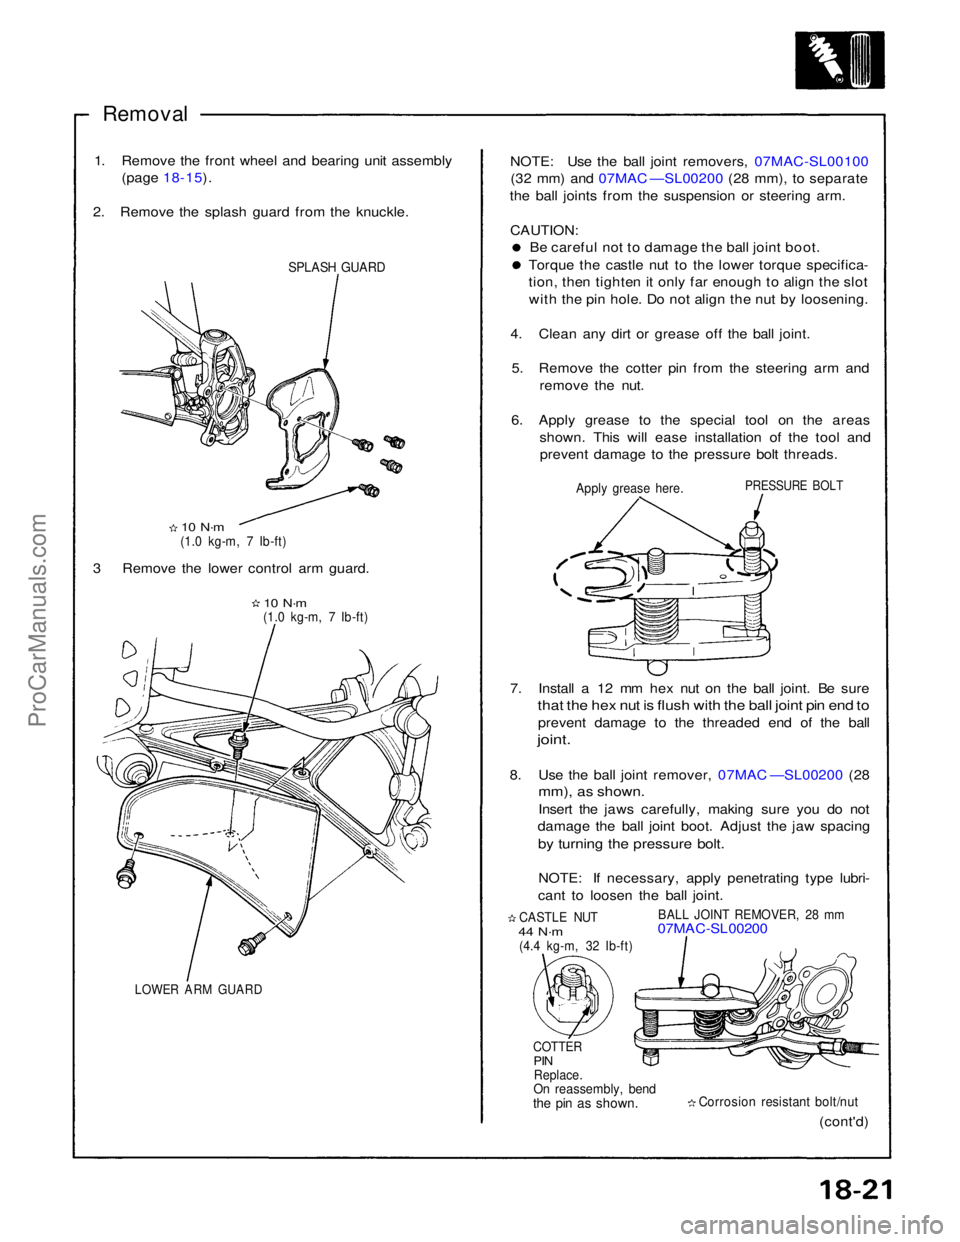
1. Remove the front wheel and bearing unit assembly (page 18-15).
2. Remove the splash guard from the knuckle.
SPLASH GUARD
10 N·m
(1.0 kg-m, 7 Ib-ft)
3 Remove the lower control arm guard.
10 N·m
(1.0 kg-m, 7 Ib-ft)
LOWER ARM GUARD
(cont'd)
Corrosion resistant bolt/nut
COTTER
PIN
Replace.
On reassembly, bend
the pin as shown.
CASTLE NUT
44 N·m
(4.4 kg-m, 32 Ib-ft)
BALL JOINT REMOVER, 28 mm
07MAC-SL00200
7. Install a 12 mm hex nut on the ball joint. Be sure
that the hex nut is flush with the ball joint pin end to
prevent damage to the threaded end of the ball
joint.
8. Use the ball joint remover, 07MAC —SL00200 (28
mm), as shown.
Insert the jaws carefully, making sure you do not
damage the ball joint boot. Adjust the jaw spacing
by turning the pressure bolt.
NOTE: If necessary, apply penetrating type lubri-
cant to loosen the ball joint.
PRESSURE BOLT
Apply grease here.
NOTE: Use the ball joint removers, 07MAC-SL00100
(32 mm) and 07MAC —SL00200 (28 mm), to separate
the ball joints from the suspension or steering arm.
CAUTION: Be careful not to damage the ball joint boot. Torque the castle nut to the lower torque specifica-
tion, then tighten it only far enough to align the slot
with the pin hole. Do not align the nut by loosening.
4. Clean any dirt or grease off the ball joint. 5. Remove the cotter pin from the steering arm and remove the nut.
6. Apply grease to the special tool on the areas shown. This will ease installation of the tool andprevent damage to the pressure bolt threads.ProCarManuals.com