Page 73 of 1640
Engine Removal/Installation
Removal
20. Disconnect the engine wire harness connectors.
21. Remove the battery cable from the main fuse box.
ENGINE WIRE
HARNESS CONNECTORS
BATTERY
CABLE
6 x 1.0 mm
10 N-m
(1.0 kg-m,
7 Ib-ft)
22. Disconnect the throttle body 6P connector, and
remove the ground cable and starter cable.
STARTER CABLE
THROTTLE BODY
6P CONNECTOR
GROUND CABLE
CORROSION RESISTANT BOLT
23. Disconnect the two connectors from the emission
control box, then remove the control box.
• Do not disconnect the vacuum hoses.
6 x 1.0 mm
10 N-m (1.0 kg-m, 7 Ib-ft)
CONNECTORS
CONTROL BOX
24. Remove the radiator hoses and heater hose.
HEATER HOSE
RADIATOR
HOSESProCarManuals.com
Page 100 of 1640

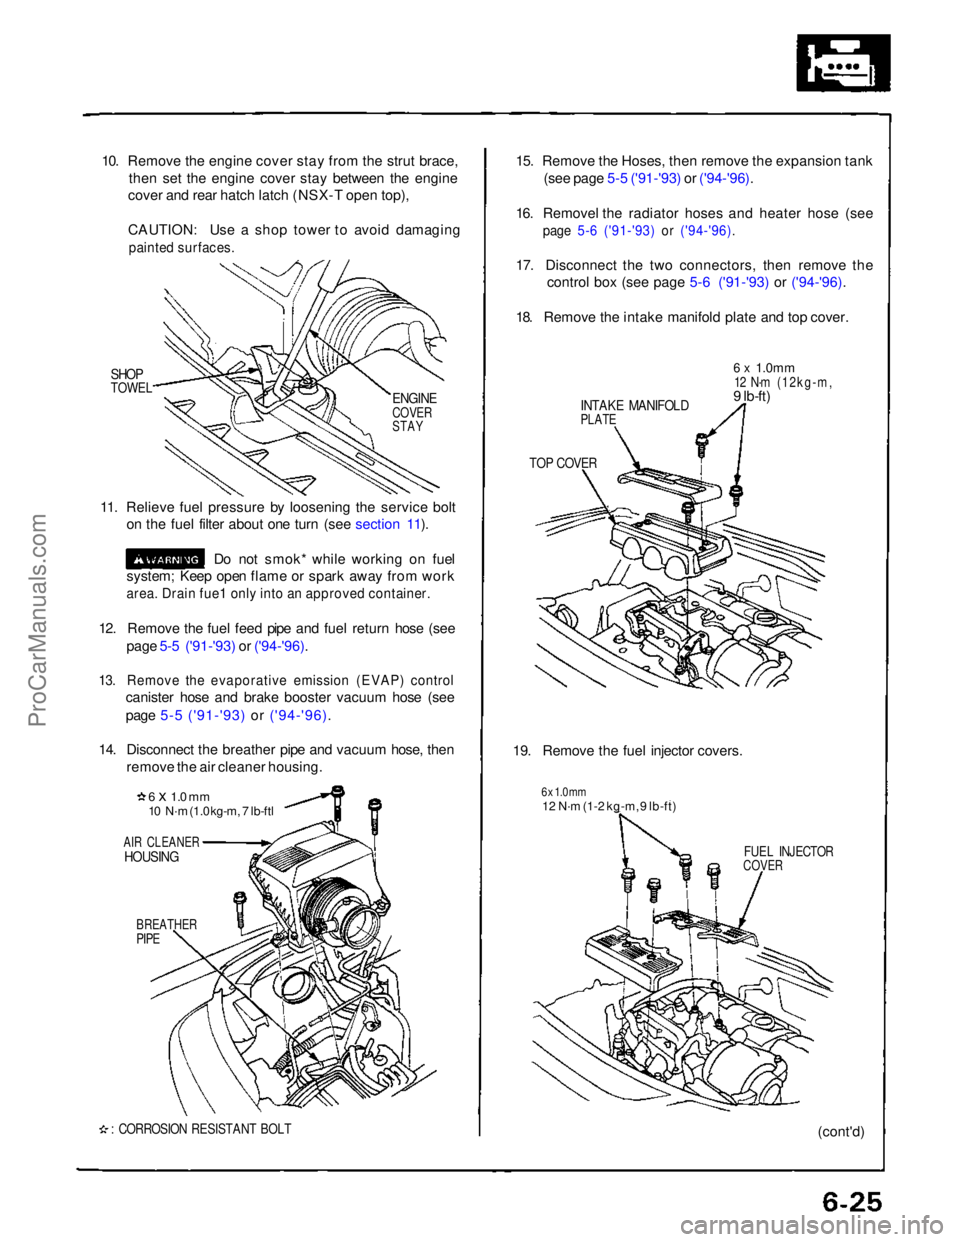
10. Remove the engine cover stay from the strut brace,
then set the engine cover stay between the engine
cover and rear hatch latch (NSX-T open top),
CAUTION: Use a shop tower to avoid damaging
painted surfaces.
SHOP
TOWEL
11. Relieve fuel pressure by loosening the service bolt on the fuel filter about one turn (see section 11).
Do not smok* while working on fuel
system; Keep open flame or spark away from work
area. Drain fue1 only into an approved container.
12. Remove the fuel feed pipe and fuel return hose (see page 5-5 ('91-'93) or ('94-'96).
13. Remove the evaporative emission (EVAP) control
canister hose and brake booster vacuum hose (see
page 5-5 ('91-'93) or ('94-'96).
14. Disconnect the breather pipe and vacuum hose, then remove the air cleaner housing.
6 x 1.0 mm
10 N·m (1.0 kg-m, 7 lb-ftl
AIR CLEANER
HOUSING
BREATHER
PIPE
: CORROSION RESISTANT BOLT
15. Remove the Hoses, then remove the expansion tank
(see page 5-5 ('91-'93) or ('94-'96).
16. Removel the radiator hoses and heater hose (see
page 5-6 ('91-'93) or ('94-'96).
17. Disconnect the two connectors, then remove the
control box (see page 5-6 ('91-'93) or ('94-'96).
18. Remove the intake manifold plate and top cover.
INTAKE MANIFOLD
PLATE
6 x
1.0mm
12 N·m (12kg-m,
9 lb-ft)
TOP COVER
19. Remove the fuel injector covers.
6 x 1.0 mm
12 N·m (1-2 kg-m, 9 lb-ft)
FUEL INJECTOR
COVER
(cont'd)
ENGINE
COVER
STAYProCarManuals.com
Page 162 of 1640

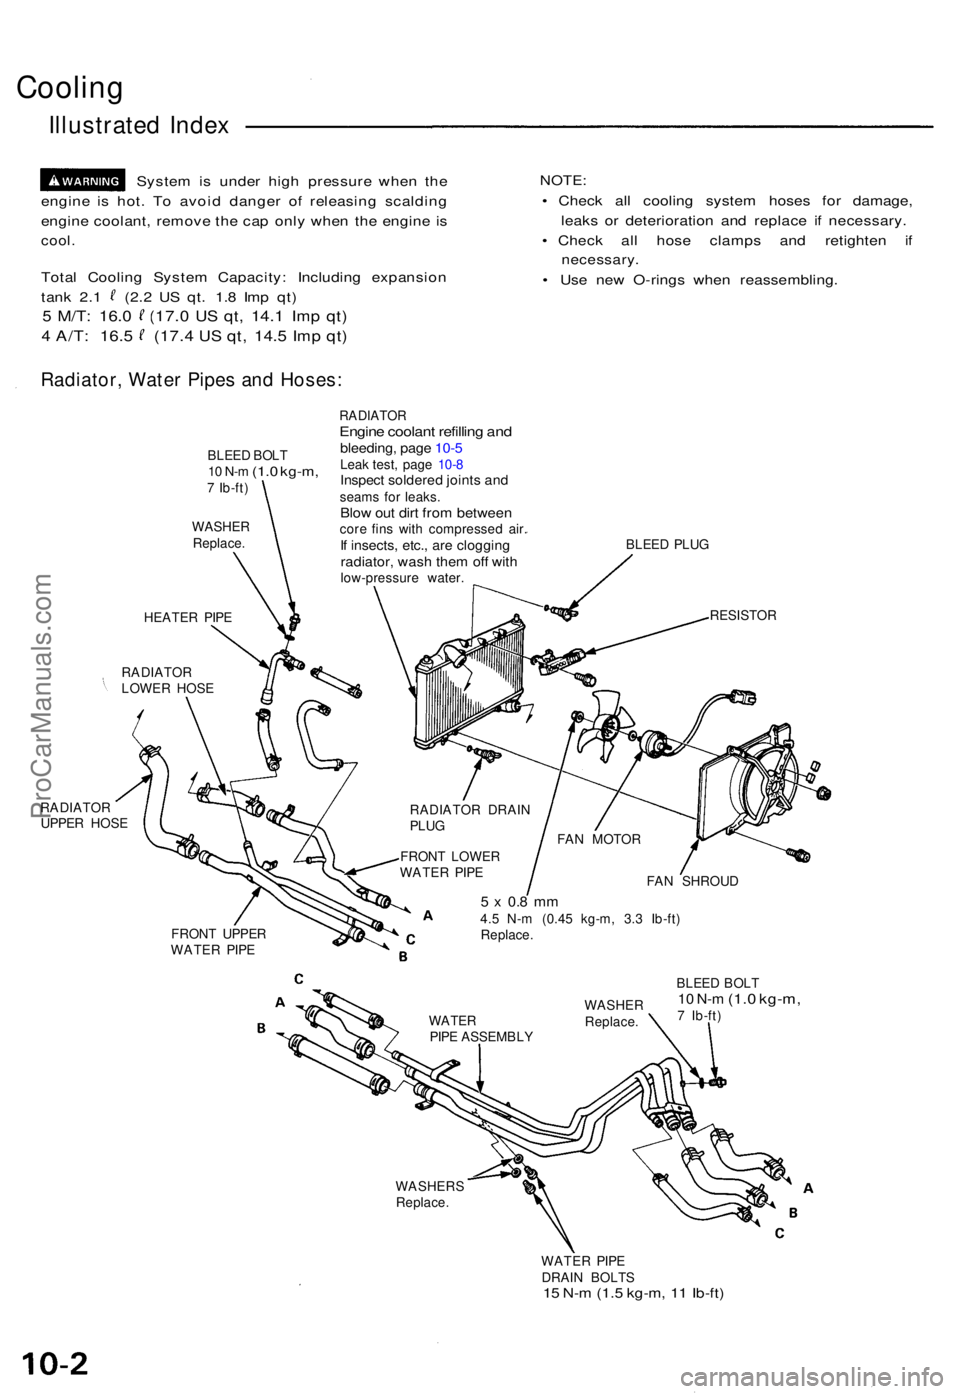
Cooling
Illustrated Index
Syste m is unde r hig h pressur e whe n th e
engin e i s hot . T o avoi d dange r o f releasin g scaldin g
engin e coolant , remov e th e ca p onl y whe n th e engin e i s
cool .
Tota l Coolin g Syste m Capacity : Includin g expansio n
tank 2. 1 (2. 2 U S qt . 1. 8 Im p qt )
5 M/T : 16. 0 (17. 0 US qt , 14. 1 Imp qt )
4 A/T : 16. 5 (17. 4 US qt , 14. 5 Imp qt )
NOTE :
• Chec k al l coolin g syste m hose s fo r damage ,
leak s o r deterioratio n an d replac e i f necessary .
• Chec k al l hos e clamp s an d retighte n i f
necessary .
• Us e ne w O-ring s whe n reassembling .
Radiator, Wate r Pipe s an d Hoses :
BLEED BOL T10 N- m (1. 0 kg-m ,7 Ib-ft )
WASHE RReplace .
HEATER PIP E
RADIATO R
LOWE R HOS E
RADIATO R
UPPE R HOS E
RADIATO REngine coolan t refillin g an dbleeding , pag e 10- 5Leak test , pag e 10- 8Inspec t soldere d joint s an dseam s fo r leaks .Blow ou t dir t fro m betwee ncore fin s wit h compresse d air .If insects , etc. , ar e cloggin gradiator, was h the m of f wit hlow-pressur e water . BLEE
D PLU G
RESISTO R
RADIATO R DRAI N
PLU G
FRON T LOWE R
WATE R PIP E
FRON T UPPE R
WATE R PIP E FA
N SHROU D
5 x 0. 8 m m4.5 N- m (0.4 5 kg-m , 3. 3 Ib-ft )
Replace .
BLEED BOL T
10 N- m (1. 0 kg-m ,7 Ib-ft )
WASHER S
Replace .
WATER PIP E
DRAI N BOLT S
15 N- m (1. 5 kg-m , 1 1 Ib-ft )
WATE RPIPE ASSEMBL YWASHE
RReplace .
FAN MOTO R
ProCarManuals.com
Page 165 of 1640

Engine Coolant Refilling and Bleeding
CAUTION: When pouring engine coolant, be sure to
shut the relay box lid and not let coolant spill on the
electrical parts or the paint. If any coolant spills, rinse it
off immediately.
NOTE:
• Perform this maintenance when the engine is cool.
• Before replacing the coolant, turn the ignition ON,
slowly turn the climate control temperature knob to
90° and turn off the ignition. This will allow the
coolant in the heater to drain out with the rest of the
system.
1. Open the hood, the rear window and the engine
cover.
2. Remove the cover protecting the water pipes and
shift cables on the underside of the car.
3. Before removing the expansion tank cap, first
loosen the cap to lower pressure.
CAUTION: Do not remove the expansion tank cap
when engine is hot. The coolant is under pressure
and may blow out and scald you. Open the cap
slowly when the engine is cool.
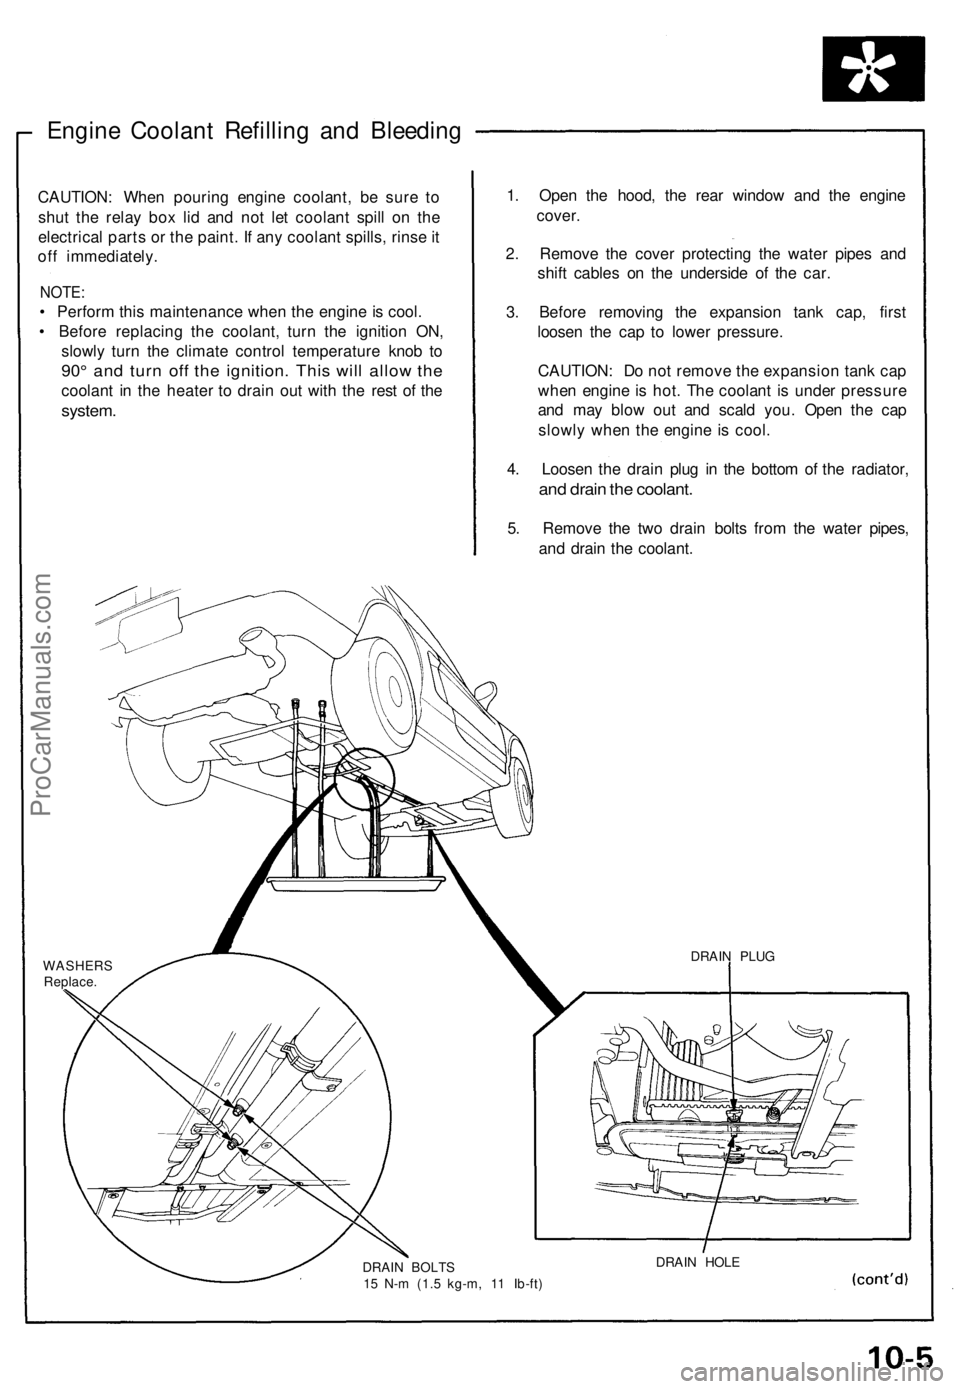
4. Loosen the drain plug in the bottom of the radiator,
and drain the coolant.
5. Remove the two drain bolts from the water pipes,
and drain the coolant.
WASHERS
Replace.
DRAIN BOLTS
15 N-m (1.5 kg-m, 11 Ib-ft)
DRAIN HOLE
DRAIN PLUGProCarManuals.com
Page 604 of 1640
Carpet
Replacement
SRS components are located in this area. Review the SRS component locations, precautions, and procedures in the SRS
section (24) before performing repairs or service.
DASHBOARD
INSIDE SCREW
CARPET
HOOK
(3)
AIR VENT
AM VENT
AIR DUCT
CUPS
FLOOR
CARPET
CONSOLE
CARPET
CONSOLE CARPET
SRS UNIT
SCREW
(cont'd)
1. Remove:
Seats (see page 20-39('93-'96), 38('91-'92)
Footrest
Under-dash fuse box lid (see page 20-38('93-'96),37('91-'92)
Side sill trim (see page 20-38 ('93-'96), 37('91-'92)
Side sill pad (see page 20-38('93-'96), 37('91-'92)
Rear side trim panel (see page 20-38('93-'96), 37('91-'92)
Center armrest (see page 20-49('94-'96)('91-'93)
Center console panel (see page 20-52('94-'96)('91-'93)
2. Detach the clips at The front edge (passenger's).
3. Remove the console carpet attaching screw from the heater unit (passenger's).
4. Disconnect the air duct (driver's) and air vent, then remove the carpet hooks from the dashboard inside screws.ProCarManuals.com
Page 678 of 1640

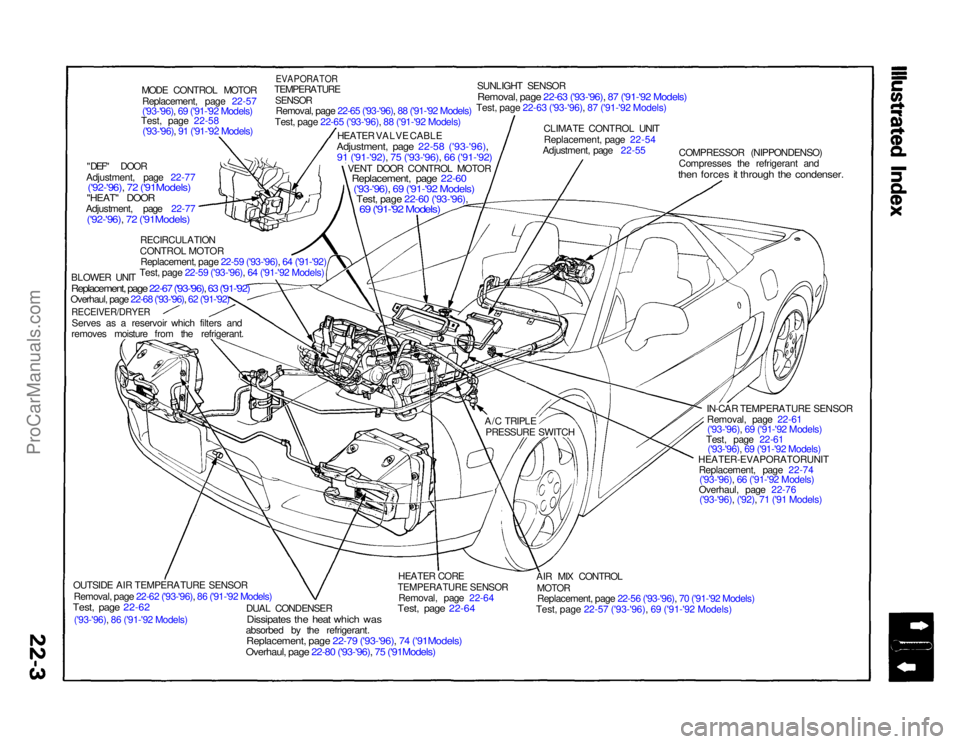
('93-'96), 86 ('91-'92 Models)
MODE CONTROL MOTOR
Replacement, page 22-57
('93-'96), 69 ('91-'92 Models)
Test, page 22-58
('93-'96), 91 ('91-'92 Models)
"DEF" DOOR
Adjustment, page 22-77
('92-'96), 72 ('91Models)
"HEAT" DOOR
Adjustment, page 22-77
('92-'96), 72 ('91Models)
RECIRCULATION
CONTROL MOTOR
Replacement, page 22-59 ('93-'96), 64 ('91-'92)
Test, page 22-59 ('93-'96), 64 ('91-'92 Models)
BLOWER UNIT
Replacement, page 22-67 ('93-'96), 63 ('91-'92)Overhaul, page 22-68 ('93-'96), 62 ('91-'92)
RECEIVER/DRYER
Serves as a reservoir which filters and
removes moisture from the refrigerant.
OUTSIDE AIR TEMPERATURE SENSOR
Removal, page 22-62 ('93-'96), 86 ('91-'92 Models)
Test, page 22-62
DUAL CONDENSER
Dissipates the heat which was
absorbed by the refrigerant.
Replacement, page 22-79 ('93-'96), 74 ('91Models)Overhaul, page 22-80 ('93-'96), 75 ('91Models)
HEATER CORE
TEMPERATURE SENSOR
Removal, page 22-64
Test, page 22-64
AIR MIX CONTROL
MOTOR
Replacement, page 22-56 ('93-'96), 70 ('91-'92 Models)
Test, page 22-57 ('93-'96), 69 ('91-'92 Models)
HEATER-EVAPORATORUNIT
Replacement, page 22-74('93-'96), 66 ('91-'92 Models)
Overhaul, page 22-76 ('93-'96), ('92), 71 ('91 Models) IN-CAR TEMPERATURE SENSOR
Removal, page 22-61('93-'96), 69 ('91-'92 Models)
Test, page 22-61 ('93-'96), 69 ('91-'92 Models)
COMPRESSOR (NIPPONDENSO)
Compresses the refrigerant and
then forces it through the condenser.
CLIMATE CONTROL UNIT
Replacement, page 22-54
Adjustment, page 22-55
SUNLIGHT SENSOR
Removal, page 22-63 ('93-'96), 87 ('91-'92 Models)Test, page 22-63 ('93-'96), 87 ('91-'92 Models)
EVAPORATOR
TEMPERATURE
SENSOR
Removal, page 22-65 ('93-'96), 88 ('91-'92 Models)
Test, page 22-65 ('93-'96), 88 ('91-'92 Models)
HEATER VALVE CABLE
Adjustment, page 22-58 ('93-'96),
91 ('91-'92), 75 ('93-'96), 66 ('91-'92)
VENT DOOR CONTROL MOTOR
Replacement, page 22-60
('93-'96)
, 69 ('91-'92 Models)
Test, page 22-60 ('93-'96),
69 ('91-'92 Models)
A/C TRIPLE
PRESSURE SWITCHProCarManuals.com
Page 679 of 1640
Heater-Evaporator Doo r Positio n
ProCarManuals.com
Page 684 of 1640
SRS components are located in this area. Review the SRS component locations, precautions, and procedures in the SRS
section 24 before performing repairs or service.
POWER TRANSISTORBLOWER MOTOR
RECIRCULATION
CONTROL
MOTOR
CONDENSER
FAN MOTOR UNDER-HOOD RELAY BOX A
(CONDENSER FAN RELAY, COMPRESSOR CLUTCH RELAY,
BLOWER MOTOR HIGH RELAY, BLOWER MOTOR RELAY)
UNDER-HOOD
FUSE/RELAY
BOX
HEATER CORE TEMPERATURE SENSOR
CLIMATE CONTROL UNIT VENT DOOR
CONTROL MOTOR
OUTSIDE AIR
TEMPERATURE SENSOR ENGINE COMPARTMENT
FUSE/RELAY BOX
A/C TRIPLE PRESSURE SWITCH
FAN CONTROL UNIT (Fan radiator and con-
denser fans inside car,
behind seats)
EVAPORATOR
TEMPERATURE
SENSOR
IN-CAR
TEMPERATURE
SENSOR
MODE CONTROL
MOTOR
AIR MIX CONTROL MOTOR
SUNLIGHT
SENSORProCarManuals.com