1989 FORD FIESTA sensor
[x] Cancel search: sensorPage 124 of 296
4B
1595Ford Fiesta Remake
General
System type . . . . . . . . . . . . . . . . . . . . . . . . . . . . . . . . . . . .\
. . . . . . . . . . Central Fuel injection (CFi)
Application . . . . . . . . . . . . . . . . . . . . . . . . . . . . . . . . . . . .\
. . . . . . . . . . . 1.1 and 1.3 litre HCS engines and 1.4 litre CVH engines
Fuel grade
Fuel octane requirement . . . . . . . . . . . . . . . . . . . . . . . . . . . . . . . . . . . .\
. 95 RON unleaded
Fuel system data
Regulated fuel pressure - engine running at idle speed . . . . . . . . . . . . . 1.0 ± 0.1 bars
Hold pressure - engine stopped after 1 minute . . . . . . . . . . . . . . . . . . . 0.5 bars minimum
Torque wrench settingsNmlbf ft
CFi unit-to-inlet manifold . . . . . . . . . . . . . . . . . . . . . . . . . . . . . . . . . . . .\
12 to 15 9 to 11
Inlet manifold . . . . . . . . . . . . . . . . . . . . . . . . . . . . . . . . . . . .\
. . . . . . . . . 16 to 20 12 to 15
Inlet air temperature sensor . . . . . . . . . . . . . . . . . . . . . . . . . . . . . . . . . . 20 to 25 15 to 18
Oxygen sensor . . . . . . . . . . . . . . . . . . . . . . . . . . . . . . . . . . . .\
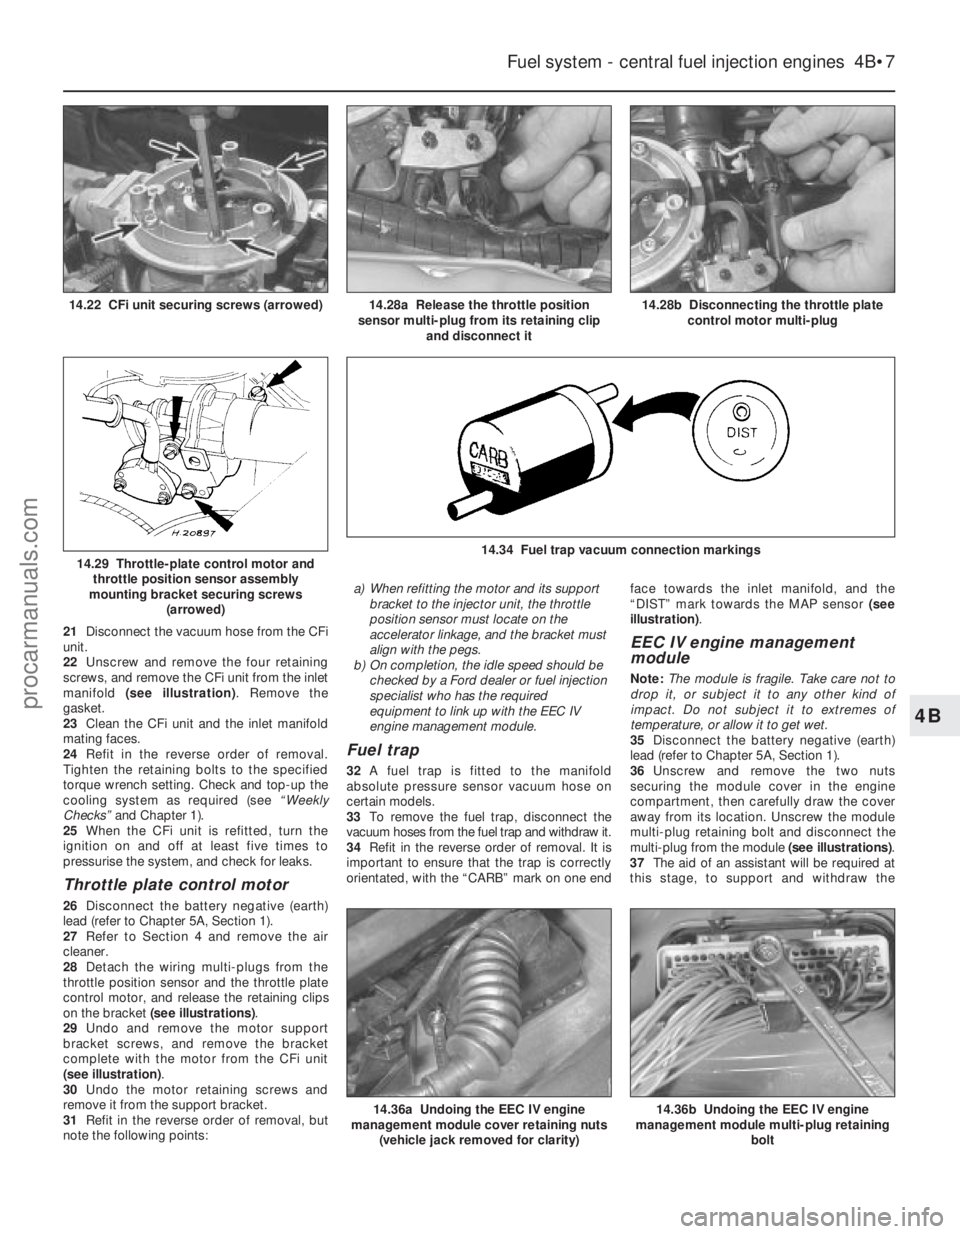
. . . . . . . . 50 to 70 37 to 52
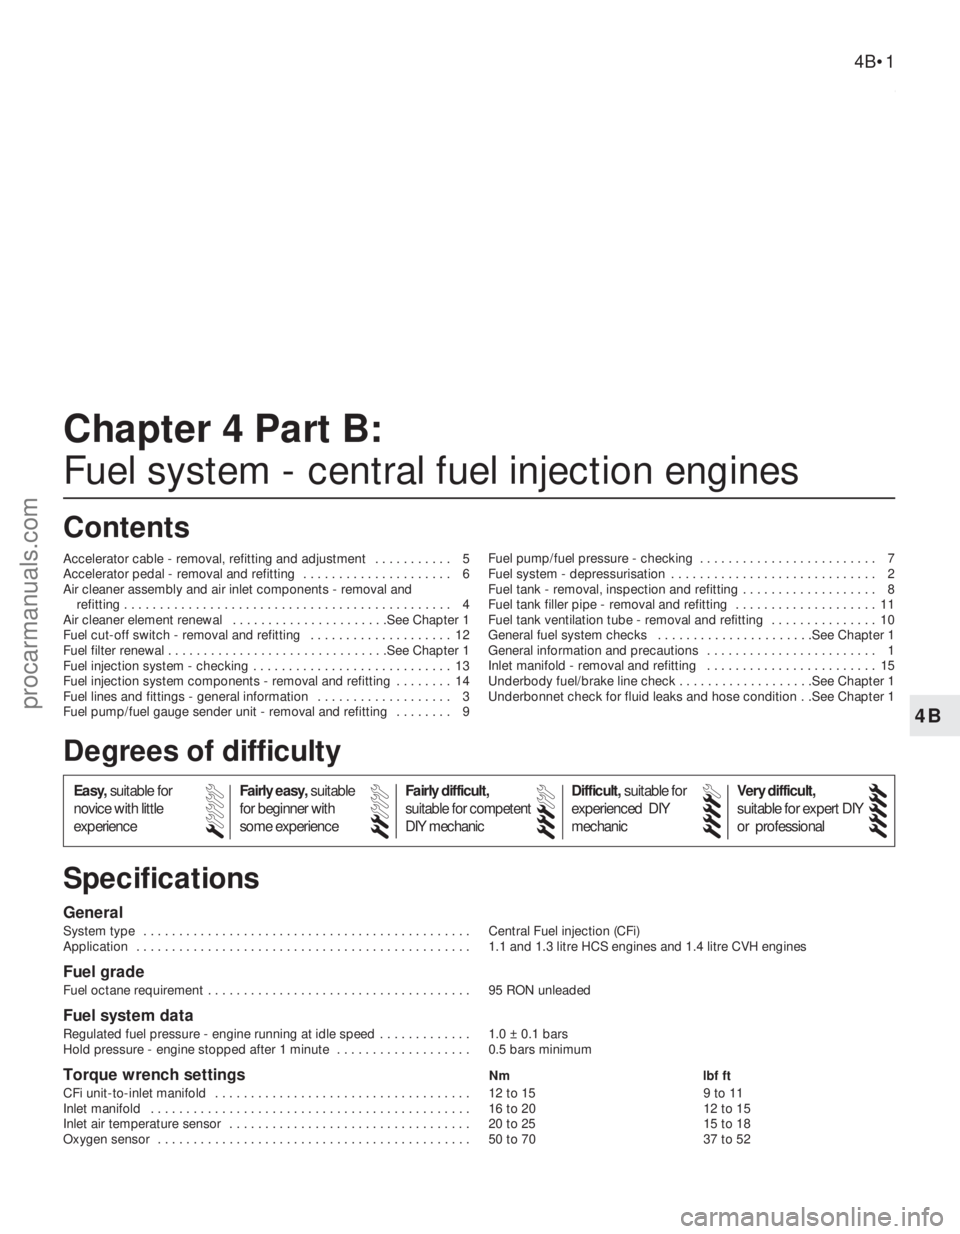
Chapter 4 Part B:
Fuel system - central fuel injection engines
Accelerator cable - removal, refitting and adjustment . . . . . . . . . . . 5
Accelerator pedal - removal and refitting . . . . . . . . . . . . . . . . . . . . . 6
Air cleaner assembly and air inlet components - removal and refitting . . . . . . . . . . . . . . . . . . . . . . . . . . . . . . . . . . . .\
. . . . . . . . . . 4
Air cleaner element renewal . . . . . . . . . . . . . . . . . . . . . .See Chapter 1
Fuel cut-off switch - removal and refitting . . . . . . . . . . . . . . . . . . . . 12
Fuel filter renewal . . . . . . . . . . . . . . . . . . . . . . . . . . \
. . . . .See Chapter 1
Fuel injection system - checking . . . . . . . . . . . . . . . . . . . . . . . . . . . . 13
Fuel injection system components - removal and refitting . . . . . . . . 14
Fuel lines and fittings - general information . . . . . . . . . . . . . . . . . . . 3
Fuel pump/fuel gauge sender unit - removal and refitting . . . . . . . . 9 Fuel pump/fuel pressure - checking . . . . . . . . . . . . . . . . . . . . . . . . . 7
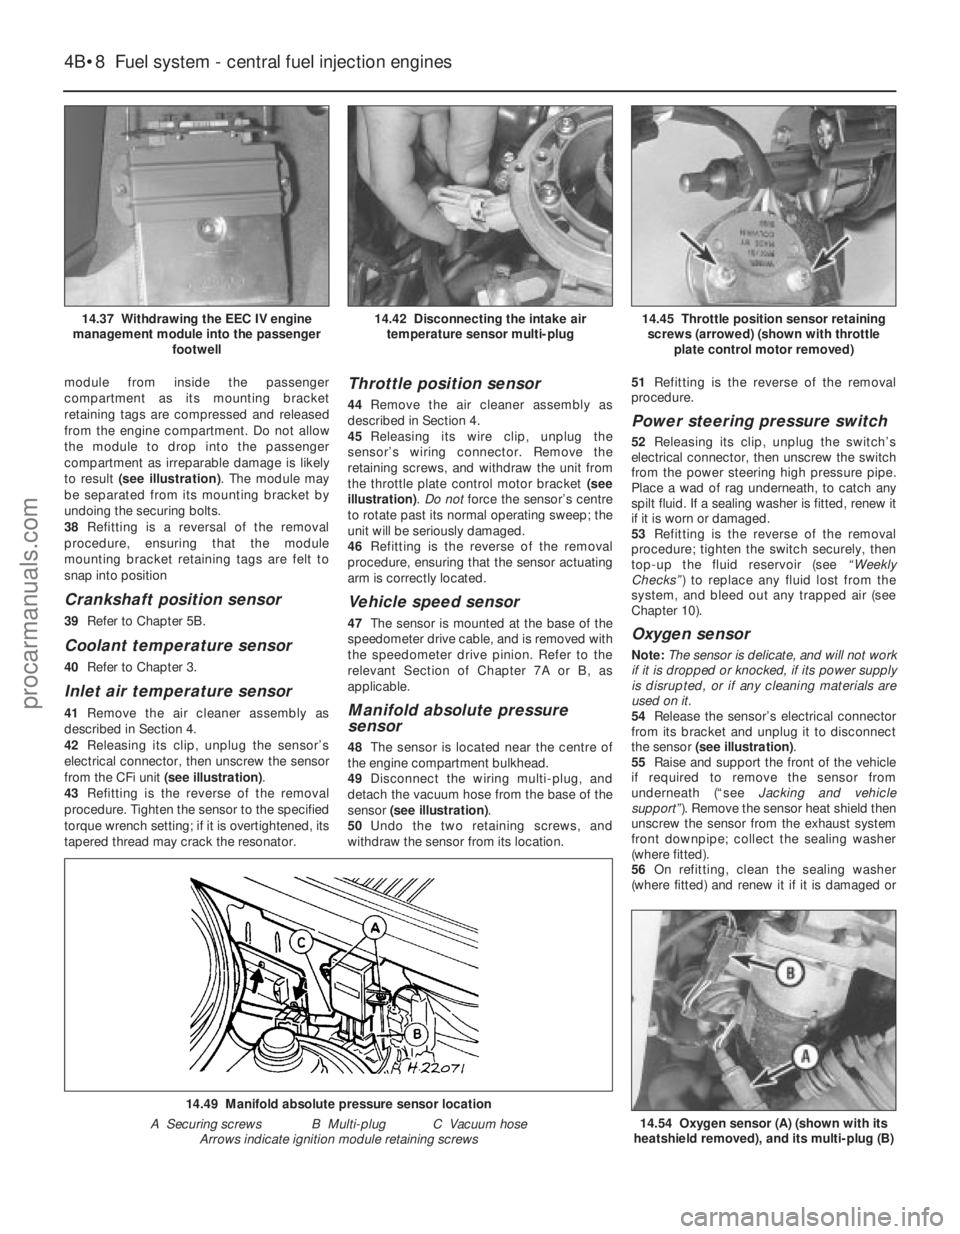
Fuel system - depressurisation . . . . . . . . . . . . . . . . . . . . . . . . . . . . . 2
Fuel tank - removal, inspection and refitting . . . . . . . . . . . . . . . . . . . 8
Fuel tank filler pipe - removal and refitting . . . . . . . . . . . . . . . . . . . . 11
Fuel tank ventilation tube - removal and refitting . . . . . . . . . . . . . . . 10
General fuel system checks . . . . . . . . . . . . . . . . . . . . . .See Chapter 1
General information and precautions . . . . . . . . . . . . . . . . . . . . . . . . 1
Inlet manifold - removal and refitting . . . . . . . . . . . . . . . . . . . . . . . . 15
Underbody fuel/brake line check . . . . . . . . . . . . . . . . . . .See\
Chapter 1
Underbonnet check for fluid leaks and hose condition . .See Chapter 1
4B•1
Specifications Contents
Easy,
suitable for
novice with little
experience Fairly easy,
suitable
for beginner with
some experience Fairly difficult,
suitable for competent
DIY mechanic
Difficult,
suitable for
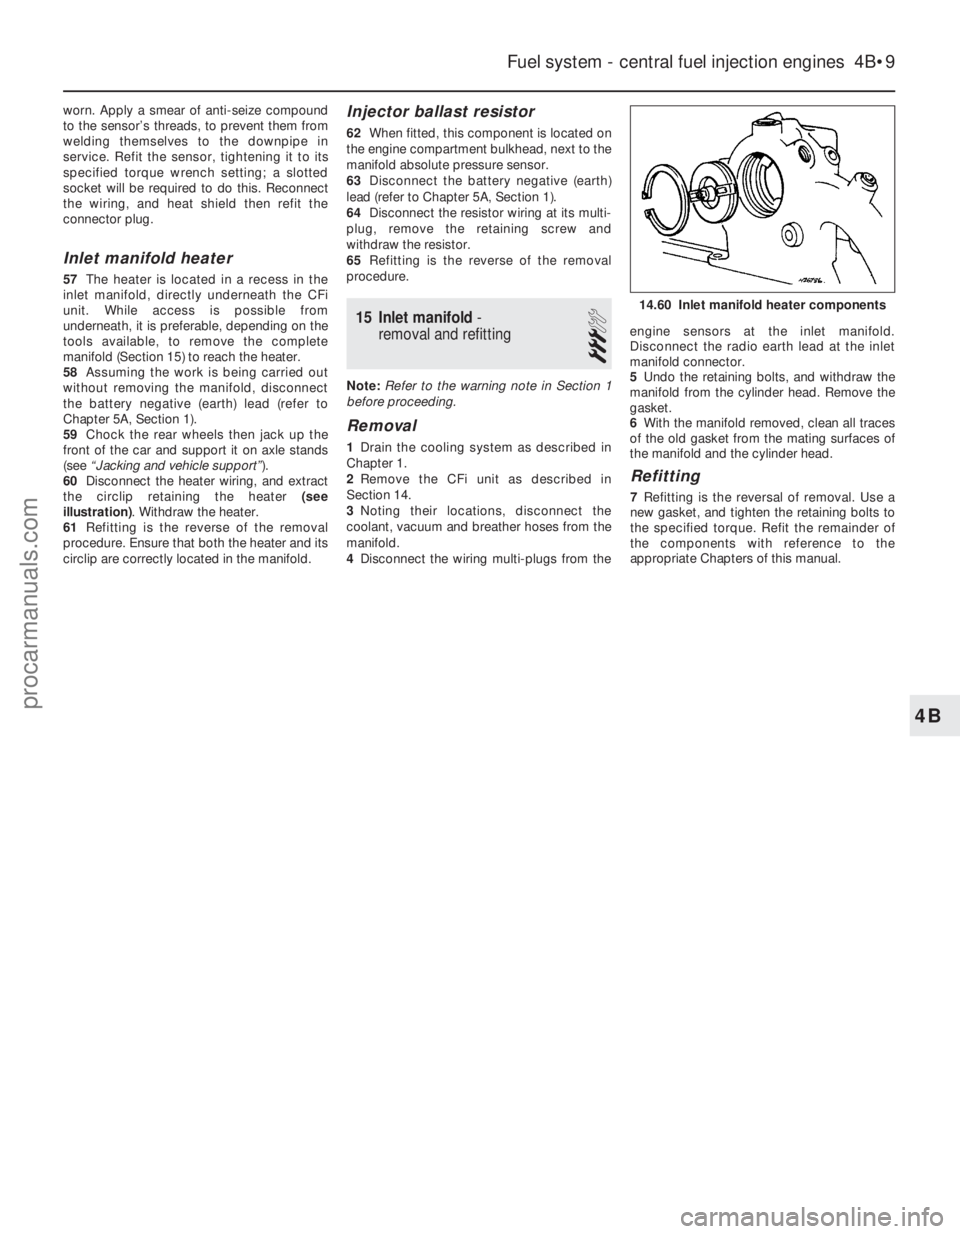
experienced DIY
mechanic Very difficult,
suitable for expert DIY
or professional
Degrees of difficulty
54321
procarmanuals.com
http://vnx.su
Page 125 of 296
1 General information andprecautions
General information
The fuel system consists of a fuel tank
(mounted under the body, beneath the rear
seats), fuel hoses, an electric fuel pump
mounted in the fuel tank, and a central fuel
injection (CFi) system. Fuel is supplied from the tank by an integral
electric fuel pump (and combined fuel gauge
sender unit). The fuel is passed through an in-
line filter within the engine compartment, then
to the fuel injection unit. The fuel is maintained
at the required operating pressure by a
pressure regulator unit. The CFi unit itself is a relatively simple
device when compared with a conventional
carburettor. Fuel is injected by a single
solenoid valve (fuel injector) which is mounted
centrally on top of the unit. It is this feature
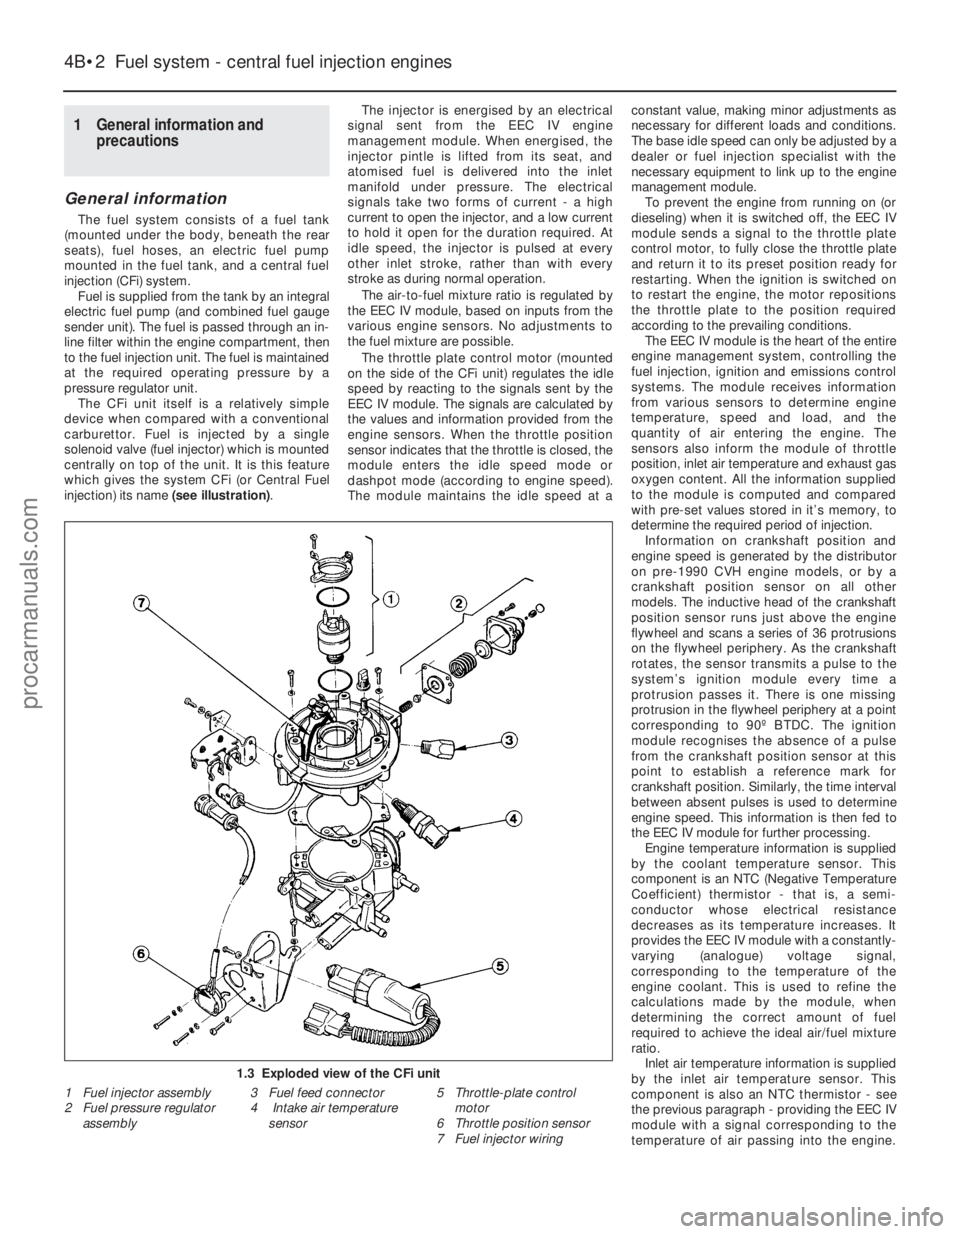
which gives the system CFi (or Central Fuel
injection) its name (see illustration).The injector is energised by an electrical
signal sent from the EEC IV engine
management module. When energised, the
injector pintle is lifted from its seat, and
atomised fuel is delivered into the inlet
manifold under pressure. The electrical
signals take two forms of current - a high
current to open the injector, and a low current
to hold it open for the duration required. At
idle speed, the injector is pulsed at every
other inlet stroke, rather than with every
stroke as during normal operation.
The air-to-fuel mixture ratio is regulated by
the EEC IV module, based on inputs from the
various engine sensors. No adjustments to
the fuel mixture are possible.
The throttle plate control motor (mounted
on the side of the CFi unit) regulates the idle
speed by reacting to the signals sent by the
EEC IV module. The signals are calculated by
the values and information provided from the
engine sensors. When the throttle position
sensor indicates that the throttle is closed, the
module enters the idle speed mode or
dashpot mode (according to engine speed).
The module maintains the idle speed at a constant value, making minor adjustments as
necessary for different loads and conditions.
The base idle speed can only be adjusted by a
dealer or fuel injection specialist with the
necessary equipment to link up to the engine
management module.
To prevent the engine from running on (or
dieseling) when it is switched off, the EEC IV
module sends a signal to the throttle plate
control motor, to fully close the throttle plate
and return it to its preset position ready for
restarting. When the ignition is switched on
to restart the engine, the motor repositions
the throttle plate to the position required
according to the prevailing conditions. The EEC IV module is the heart of the entire
engine management system, controlling the
fuel injection, ignition and emissions control
systems. The module receives information
from various sensors to determine engine
temperature, speed and load, and the
quantity of air entering the engine. The
sensors also inform the module of throttle
position, inlet air temperature and exhaust gas
oxygen content. All the information supplied
to the module is computed and compared
with pre-set values stored in it’s memory, to
determine the required period of injection. Information on crankshaft position and
engine speed is generated by the distributor
on pre-1990 CVH engine models, or by a
crankshaft position sensor on all other
models. The inductive head of the crankshaft
position sensor runs just above the engine
flywheel and scans a series of 36 protrusions
on the flywheel periphery. As the crankshaft
rotates, the sensor transmits a pulse to the
system’s ignition module every time a
protrusion passes it. There is one missing
protrusion in the flywheel periphery at a point
corresponding to 90º BTDC. The ignition
module recognises the absence of a pulse
from the crankshaft position sensor at this
point to establish a reference mark for
crankshaft position. Similarly, the time interval
between absent pulses is used to determine
engine speed. This information is then fed to
the EEC IV module for further processing. Engine temperature information is supplied
by the coolant temperature sensor. This
component is an NTC (Negative Temperature
Coefficient) thermistor - that is, a semi-
conductor whose electrical resistance
decreases as its temperature increases. It
provides the EEC IV module with a constantly-
varying (analogue) voltage signal,
corresponding to the temperature of the
engine coolant. This is used to refine the
calculations made by the module, when
determining the correct amount of fuel
required to achieve the ideal air/fuel mixture
ratio. Inlet air temperature information is supplied
by the inlet air temperature sensor. This
component is also an NTC thermistor - see
the previous paragraph - providing the EEC IV
module with a signal corresponding to the
temperature of air passing into the engine.
4B•2 Fuel system - central fuel injection engines
1.3 Exploded view of the CFi unit
1 Fuel injector assembly
2 Fuel pressure regulator
assembly 3 Fuel feed connector
4 Intake air temperature
sensor 5 Throttle-plate control
motor
6 Throttle position sensor
7 Fuel injector wiring
1595Ford Fiesta Remakeprocarmanuals.com
http://vnx.su
Page 126 of 296
This is used to refine the calculations made by
the module, when determining the correct
amount of fuel required to achieve the ideal
air/fuel mixture ratio.A throttle position sensor is mounted on the
end of the throttle valve spindle, to provide
the EEC IV module with a constantly-varying
(analogue) voltage signal corresponding to the
throttle opening. This allows the module to
register the driver’s input when determining
the amount of fuel required by the engine. Road speed is monitored by the vehicle
speed sensor. This component is a Hall-effect
generator, mounted on the transmission’s
speedometer drive. It supplies the EEC IV
module with a series of pulses corresponding
to the vehicle’s road speed, enabling the
module to control features such as the fuel
shut-off on overrun. A manifold absolute pressure sensor
measures inlet manifold vacuum, and supplies
this information to the module for calculation
of engine load at any given throttle position. Where power steering is fitted, a pressure-
operated switch is screwed into the power
steering system’s high-pressure pipe. The
switch sends a signal to the EEC IV module to
reduce engine speed should the power
steering fluid pressure become excessively
high. Certain later engines may be fitted with a
heater in the inlet manifold. This is controlled
by the EEC IV module to ensure that, even
before the effect of the coolant heating
becomes apparent, the manifold is warmed-
up. This prevents fuel droplets condensing in
the manifold, thus improving driveability and
reducing exhaust emissions when the engine
is cold.
The oxygen sensor in the exhaust system
provides the EEC IV module with constant
feedback - “closed-loop” control - which
enables it to adjust the mixture to provide the
best possible conditions for the catalytic
converter to operate.
Precautions
Warning: Petrol is extremely
flammable - great care must be
taken when working on any part
of the fuel system. Do not
smoke or allow any naked flames or
uncovered light bulbs near the work area.
Note that gas powered domestic
appliances with pilot flames, such as
heaters, boilers and tumble dryers, also
present a fire hazard - bear this in mind if
you are working in an area where such
appliances are present. Always keep a
suitable fire extinguisher close to the work
area and familiarise yourself with its
operation before starting work. Wear eye
protection when working on fuel systems
and wash off any fuel spilt on bare skin
immediately with soap and water. Note
that fuel vapour is just as dangerous as
liquid fuel; a vessel that has just been
emptied of liquid fuel will still contain vapour and can be potentially explosive.
Petrol is a highly dangerous and volatile
liquid, and the precautions necessary
when handling it cannot be overstressed.
Many of the operations described in this
Chapter involve the disconnection of fuel
lines, which may cause an amount of fuel
spillage. Before commencing work, refer
to the above Warning and the information
in “Safety first” at the beginning of this
manual. When working with fuel system
components, pay particular attention to
cleanliness - dirt entering the fuel system
may cause blockages which will lead to
poor running.
Note: Residual pressure will remain in the fuel
lines long after the vehicle was last used,
when disconnecting any fuel line, it will be
necessary to depressurise the fuel system as
described in Section 2 .
2 Fuel system-
depressurisation
1
Note: Refer to the warning note in Section 1
before proceeding.
Warning: The following
procedure will merely relieve the
pressure in the fuel system -
remember that fuel will still be present in
the system components, and take
precautions accordingly before
disconnecting any of them.
1 The fuel system referred to in this Chapter
is defined as the fuel tank and tank-mounted
fuel pump/fuel gauge sender unit, the fuel
filter, the fuel injector, fuel pressure regulator,
and the metal pipes and flexible hoses of the
fuel lines between these components. All
these contain fuel, which will be under
pressure while the engine is running and/or
while the ignition is switched on.
2 The pressure will remain for some time after
the ignition has been switched off, and must
be relieved before any of these components is
disturbed for servicing work.
3 The simplest depressurisation method is to
disconnect the fuel pump electrical supply by
removing the fuel pump fuse (No 19) and
starting the engine; allow the engine to idle
until it dies through lack of fuel pressure. Turn
the engine over once or twice on the starter to
ensure that all pressure is released, then
switch off the ignition; do not forget to refit the
fuse when work is complete.
4 Note that, once the fuel system has been
depressurised and drained (even partially), it
will take significantly longer to restart the
engine - perhaps several seconds of cranking
- before the system is refilled and pressure
restored.
3 Fuel lines and fittings -
general information
Note: Refer to the warning note in Section 1
before proceeding.
Disconnecting and connecting
quick-release couplings
1 Quick-release couplings are employed at
many of the unions in the fuel feed and return
lines.
2 Before disconnecting any fuel system
component, relieve the residual pressure in
the system (see Section 2), and equalise tank
pressure by removing the fuel filler cap.
Warning: This procedure will
merely relieve the increased
pressure necessary for the
engine to run - remember that
fuel will still be present in the system
components, and take precautions
accordingly before disconnecting any of
them.
3 Release the protruding locking lugs on each
union, by squeezing them together and
carefully pulling the coupling apart. Use rag to
soak up any spilt fuel. Where the unions are
colour-coded, the pipes cannot be confused.
Where both unions are the same colour, note
carefully which pipe is connected to which,
and ensure that they are correctly
reconnected on refitting.
4 To reconnect one of these couplings, press
them together until the locking lugs snap into
their groove. Switch the ignition on and off
five times to pressurise the system, and check
for any sign of fuel leakage around the
disturbed coupling before attempting to start
the engine.
Checking
5 Checking procedures for the fuel lines are
included in Chapter 1.
Component renewal
6 If any damaged sections are to be renewed,
use original-equipment replacement hoses or
pipes, constructed from exactly the same
material as the section being replaced. Do not
install substitutes constructed from inferior or
inappropriate material; this could cause a fuel
leak or a fire.
7 Before detaching or disconnecting any part
of the fuel system, note the routing of all
hoses and pipes, and the orientation of all
clamps and clips. Replacement sections must
be installed in exactly the same manner.
8 Before disconnecting any part of the fuel
system, be sure to relieve the fuel system
pressure (see Section 2), and equalise tank
pressure by removing the fuel filler cap. Also
disconnect the battery negative (earth) lead -
see Chapter 5A, Section 1. Cover the fitting
being disconnected with a rag, to absorb any
fuel that may spray out.
Fuel system - central fuel injection engines 4B•3
4B
1595Ford Fiesta Remakeprocarmanuals.com
http://vnx.su
Page 129 of 296
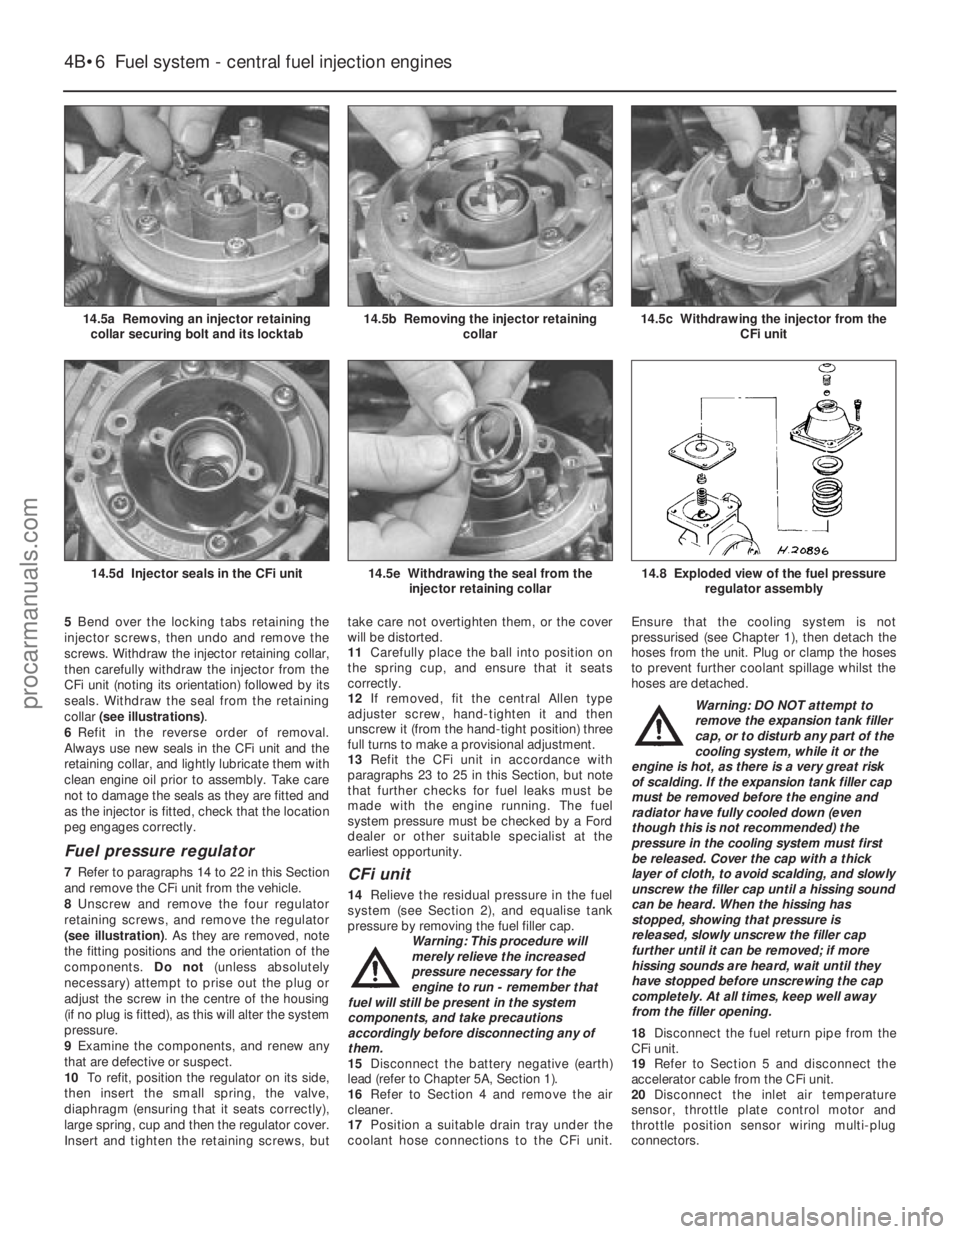
5Bend over the locking tabs retaining the
injector screws, then undo and remove the
screws. Withdraw the injector retaining collar,
then carefully withdraw the injector from the
CFi unit (noting its orientation) followed by its
seals. Withdraw the seal from the retaining
collar (see illustrations) .
6 Refit in the reverse order of removal.
Always use new seals in the CFi unit and the
retaining collar, and lightly lubricate them with
clean engine oil prior to assembly. Take care
not to damage the seals as they are fitted and
as the injector is fitted, check that the location
peg engages correctly.
Fuel pressure regulator
7 Refer to paragraphs 14 to 22 in this Section
and remove the CFi unit from the vehicle.
8 Unscrew and remove the four regulator
retaining screws, and remove the regulator
(see illustration) . As they are removed, note
the fitting positions and the orientation of the
components. Do not(unless absolutely
necessary) attempt to prise out the plug or
adjust the screw in the centre of the housing
(if no plug is fitted), as this will alter the system
pressure.
9 Examine the components, and renew any
that are defective or suspect.
10 To refit, position the regulator on its side,
then insert the small spring, the valve,
diaphragm (ensuring that it seats correctly),
large spring, cup and then the regulator cover.
Insert and tighten the retaining screws, but take care not overtighten them, or the cover
will be distorted.
11
Carefully place the ball into position on
the spring cup, and ensure that it seats
correctly.
12 If removed, fit the central Allen type
adjuster screw, hand-tighten it and then
unscrew it (from the hand-tight position) three
full turns to make a provisional adjustment.
13 Refit the CFi unit in accordance with
paragraphs 23 to 25 in this Section, but note
that further checks for fuel leaks must be
made with the engine running. The fuel
system pressure must be checked by a Ford
dealer or other suitable specialist at the
earliest opportunity.CFi unit
14 Relieve the residual pressure in the fuel
system (see Section 2), and equalise tank
pressure by removing the fuel filler cap. Warning: This procedure will
merely relieve the increased
pressure necessary for the
engine to run - remember that
fuel will still be present in the system
components, and take precautions
accordingly before disconnecting any of
them.
15 Disconnect the battery negative (earth)
lead (refer to Chapter 5A, Section 1).
16 Refer to Section 4 and remove the air
cleaner.
17 Position a suitable drain tray under the
coolant hose connections to the CFi unit. Ensure that the cooling system is not
pressurised (see Chapter 1), then detach the
hoses from the unit. Plug or clamp the hoses
to prevent further coolant spillage whilst the
hoses are detached.
Warning: DO NOT attempt to
remove the expansion tank filler
cap, or to disturb any part of the
cooling system, while it or the
engine is hot, as there is a very great risk
of scalding. If the expansion tank filler cap
must be removed before the engine and
radiator have fully cooled down (even
though this is not recommended) the
pressure in the cooling system must first
be released. Cover the cap with a thick
layer of cloth, to avoid scalding, and slowly
unscrew the filler cap until a hissing sound
can be heard. When the hissing has
stopped, showing that pressure is
released, slowly unscrew the filler cap
further until it can be removed; if more
hissing sounds are heard, wait until they
have stopped before unscrewing the cap
completely. At all times, keep well away
from the filler opening.
18 Disconnect the fuel return pipe from the
CFi unit.
19 Refer to Section 5 and disconnect the
accelerator cable from the CFi unit.
20 Disconnect the inlet air temperature
sensor, throttle plate control motor and
throttle position sensor wiring multi-plug
connectors.
4B•6 Fuel system - central fuel injection engines
14.8 Exploded view of the fuel pressure
regulator assembly14.5e Withdrawing the seal from theinjector retaining collar14.5d Injector seals in the CFi unit
14.5c Withdrawing the injector from the CFi unit14.5b Removing the injector retainingcollar14.5a Removing an injector retainingcollar securing bolt and its locktab
1595Ford Fiesta Remakeprocarmanuals.com
http://vnx.su
Page 130 of 296
21Disconnect the vacuum hose from the CFi
unit.
22 Unscrew and remove the four retaining
screws, and remove the CFi unit from the inlet
manifold (see illustration) . Remove the
gasket.
23 Clean the CFi unit and the inlet manifold
mating faces.
24 Refit in the reverse order of removal.
Tighten the retaining bolts to the specified
torque wrench setting. Check and top-up the
cooling system as required (see “Weekly
Checks” and Chapter 1).
25 When the CFi unit is refitted, turn the
ignition on and off at least five times to
pressurise the system, and check for leaks.
Throttle plate control motor
26 Disconnect the battery negative (earth)
lead (refer to Chapter 5A, Section 1).
27 Refer to Section 4 and remove the air
cleaner.
28 Detach the wiring multi-plugs from the
throttle position sensor and the throttle plate
control motor, and release the retaining clips
on the bracket (see illustrations) .
29 Undo and remove the motor support
bracket screws, and remove the bracket
complete with the motor from the CFi unit
(see illustration) .
30 Undo the motor retaining screws and
remove it from the support bracket.
31 Refit in the reverse order of removal, but
note the following points: a) When refitting the motor and its support
bracket to the injector unit, the throttle
position sensor must locate on the
accelerator linkage, and the bracket must
align with the pegs.
b) On completion, the idle speed should be
checked by a Ford dealer or fuel injection
specialist who has the required
equipment to link up with the EEC IV
engine management module.
Fuel trap
32 A fuel trap is fitted to the manifold
absolute pressure sensor vacuum hose on
certain models.
33 To remove the fuel trap, disconnect the
vacuum hoses from the fuel trap and withdraw it.
34 Refit in the reverse order of removal. It is
important to ensure that the trap is correctly
orientated, with the “CARB” mark on one end face towards the inlet manifold, and the
“DIST” mark towards the MAP sensor
(see
illustration) .
EEC IV engine management
module
Note: The module is fragile. Take care not to
drop it, or subject it to any other kind of
impact. Do not subject it to extremes of
temperature, or allow it to get wet.
35 Disconnect the battery negative (earth)
lead (refer to Chapter 5A, Section 1).
36 Unscrew and remove the two nuts
securing the module cover in the engine
compartment, then carefully draw the cover
away from its location. Unscrew the module
multi-plug retaining bolt and disconnect the
multi-plug from the module (see illustrations).
37 The aid of an assistant will be required at
this stage, to support and withdraw the
Fuel system - central fuel injection engines 4B•7
14.28b Disconnecting the throttle plate control motor multi-plug14.28a Release the throttle position
sensor multi-plug from its retaining clip and disconnect it14.22 CFi unit securing screws (arrowed)
14.36b Undoing the EEC IV engine
management module multi-plug retaining
bolt
14.34 Fuel trap vacuum connection markings14.29 Throttle-plate control motor andthrottle position sensor assembly
mounting bracket securing screws (arrowed)
14.36a Undoing the EEC IV engine
management module cover retaining nuts
(vehicle jack removed for clarity)
4B
1595Ford Fiesta Remakeprocarmanuals.com
http://vnx.su
Page 131 of 296
module from inside the passenger
compartment as its mounting bracket
retaining tags are compressed and released
from the engine compartment. Do not allow
the module to drop into the passenger
compartment as irreparable damage is likely
to result (see illustration) . The module may
be separated from its mounting bracket by
undoing the securing bolts.
38 Refitting is a reversal of the removal
procedure, ensuring that the module
mounting bracket retaining tags are felt to
snap into position
Crankshaft position sensor
39 Refer to Chapter 5B.
Coolant temperature sensor
40Refer to Chapter 3.
Inlet air temperature sensor
41Remove the air cleaner assembly as
described in Section 4.
42 Releasing its clip, unplug the sensor’s
electrical connector, then unscrew the sensor
from the CFi unit (see illustration).
43 Refitting is the reverse of the removal
procedure. Tighten the sensor to the specified
torque wrench setting; if it is overtightened, its
tapered thread may crack the resonator.
Throttle position sensor
44 Remove the air cleaner assembly as
described in Section 4.
45 Releasing its wire clip, unplug the
sensor’s wiring connector. Remove the
retaining screws, and withdraw the unit from
the throttle plate control motor bracket (see
illustration) . Do not force the sensor’s centre
to rotate past its normal operating sweep; the
unit will be seriously damaged.
46 Refitting is the reverse of the removal
procedure, ensuring that the sensor actuating
arm is correctly located.
Vehicle speed sensor
47 The sensor is mounted at the base of the
speedometer drive cable, and is removed with
the speedometer drive pinion. Refer to the
relevant Section of Chapter 7A or B, as
applicable.
Manifold absolute pressure
sensor
48 The sensor is located near the centre of
the engine compartment bulkhead.
49 Disconnect the wiring multi-plug, and
detach the vacuum hose from the base of the
sensor (see illustration) .
50 Undo the two retaining screws, and
withdraw the sensor from its location. 51
Refitting is the reverse of the removal
procedure.
Power steering pressure switch
52 Releasing its clip, unplug the switch’s
electrical connector, then unscrew the switch
from the power steering high pressure pipe.
Place a wad of rag underneath, to catch any
spilt fluid. If a sealing washer is fitted, renew it
if it is worn or damaged.
53 Refitting is the reverse of the removal
procedure; tighten the switch securely, then
top-up the fluid reservoir (see “Weekly
Checks” ) to replace any fluid lost from the
system, and bleed out any trapped air (see
Chapter 10).
Oxygen sensor
Note: The sensor is delicate, and will not work
if it is dropped or knocked, if its power supply
is disrupted, or if any cleaning materials are
used on it.
54 Release the sensor’s electrical connector
from its bracket and unplug it to disconnect
the sensor (see illustration) .
55 Raise and support the front of the vehicle
if required to remove the sensor from
underneath (“see Jacking and vehicle
support” ). Remove the sensor heat shield then
unscrew the sensor from the exhaust system
front downpipe; collect the sealing washer
(where fitted).
56 On refitting, clean the sealing washer
(where fitted) and renew it if it is damaged or
4B•8 Fuel system - central fuel injection engines
14.54 Oxygen sensor (A) (shown with its
heatshield removed), and its multi-plug (B)
14.49 Manifold absolute pressure sensor location
A Securing screws B Multi-plug C Vacuum hose\
Arrows indicate ignition module retaining screws
14.45 Throttle position sensor retainingscrews (arrowed) (shown with throttle plate control motor removed)14.42 Disconnecting the intake airtemperature sensor multi-plug
1595Ford Fiesta Remake
14.37 Withdrawing the EEC IV engine
management module into the passenger footwellprocarmanuals.com
http://vnx.su
Page 132 of 296
worn. Apply a smear of anti-seize compound
to the sensor’s threads, to prevent them from
welding themselves to the downpipe in
service. Refit the sensor, tightening it to its
specified torque wrench setting; a slotted
socket will be required to do this. Reconnect
the wiring, and heat shield then refit the
connector plug.
Inlet manifold heater
57The heater is located in a recess in the
inlet manifold, directly underneath the CFi
unit. While access is possible from
underneath, it is preferable, depending on the
tools available, to remove the complete
manifold (Section 15) to reach the heater.
58 Assuming the work is being carried out
without removing the manifold, disconnect
the battery negative (earth) lead (refer to
Chapter 5A, Section 1).
59 Chock the rear wheels then jack up the
front of the car and support it on axle stands
(see “Jacking and vehicle support” ).
60 Disconnect the heater wiring, and extract
the circlip retaining the heater (see
illustration) . Withdraw the heater.
61 Refitting is the reverse of the removal
procedure. Ensure that both the heater and its
circlip are correctly located in the manifold.
Injector ballast resistor
62 When fitted, this component is located on
the engine compartment bulkhead, next to the
manifold absolute pressure sensor.
63 Disconnect the battery negative (earth)
lead (refer to Chapter 5A, Section 1).
64 Disconnect the resistor wiring at its multi-
plug, remove the retaining screw and
withdraw the resistor.
65 Refitting is the reverse of the removal
procedure.
15 Inlet manifold -
removal and refitting
3
Note: Refer to the warning note in Section 1
before proceeding.
Removal
1 Drain the cooling system as described in
Chapter 1.
2 Remove the CFi unit as described in
Section 14.
3 Noting their locations, disconnect the
coolant, vacuum and breather hoses from the
manifold.
4 Disconnect the wiring multi-plugs from the engine sensors at the inlet manifold.
Disconnect the radio earth lead at the inlet
manifold connector.
5
Undo the retaining bolts, and withdraw the
manifold from the cylinder head. Remove the
gasket.
6 With the manifold removed, clean all traces
of the old gasket from the mating surfaces of
the manifold and the cylinder head.
Refitting
7 Refitting is the reversal of removal. Use a
new gasket, and tighten the retaining bolts to
the specified torque. Refit the remainder of
the components with reference to the
appropriate Chapters of this manual.
Fuel system - central fuel injection engines 4B•9
14.60 Inlet manifold heater components
4B
1595Ford Fiesta Remakeprocarmanuals.com
http://vnx.su
Page 135 of 296
Torque wrench settingsNmlbf ft
Idle speed control valve bolts . . . . . . . . . . . . . . . . . . . . . . . . . . . . . . . . . 4 to 5 3 to 4
Fuel pressure regulator bolts . . . . . . . . . . . . . . . . . . . . . . . . . . . . . . . . . 8 to 12 6 to 9
Fuel rail bolts . . . . . . . . . . . . . . . . . . . . . . . . . . . . . . . . . . . .\
. . . . . . . . . 20 to 26 15 to 19
Inlet air temperature sensor . . . . . . . . . . . . . . . . . . . . . . . . . . . . . . . . . . 20 to 25 15 to 18
Inlet manifold . . . . . . . . . . . . . . . . . . . . . . . . . . . . . . . . . . . .\
. . . . . . . . . 16 to 20 12 to 15
Oxygen sensor . . . . . . . . . . . . . . . . . . . . . . . . . . . . . . . . . . . .\
. . . . . . . . 50 to 70 37 to 52
Intercooler-to-radiator bolts . . . . . . . . . . . . . . . . . . . . . . . . . . . . . . . . . . 4 to 6 3 to 5
Boost control valve screws . . . . . . . . . . . . . . . . . . . . . . . . . . . . . . . . . . . 2.2 to 2.7 1.5 to 2
Exhaust manifold heatshield bolts . . . . . . . . . . . . . . . . . . . . . . . . . . . . . 21 to 26 16 to 19
Exhaust manifold-to-engine nuts (non-Turbo models) . . . . . . . . . . . . . . 14 to 17 11 to 13
Exhaust manifold-to-engine nuts (Turbo models) . . . . . . . . . . . . . . . . . 28 to 31 21 to 23
Exhaust manifold-to-turbocharger bolts . . . . . . . . . . . . . . . . . . . . . . . . 20 to 28 15 to 21
Turbocharger-to-exhaust downpipe nuts . . . . . . . . . . . . . . . . . . . . . . . . 35 to 47 26 to 35
Turbocharger cooling pipe banjo union bolts . . . . . . . . . . . . . . . . . . . . . 22 to 29 17 to 22
Turbocharger oil feed and return line couplings . . . . . . . . . . . . . . . . . . . 15 to 20 11 to 15
4C•2 Fuel system - electronic fuel injection engines
1595Ford Fiesta Remake
1 General information and
precautions
General information
The fuel system consists of a fuel tank
(mounted under the body, beneath the rear
seats), fuel hoses, an electric fuel pump
mounted in the fuel tank, and an electronic
fuel injection system. Fuel is supplied under pressure from the
fuel pump to the fuel distributor rail mounted
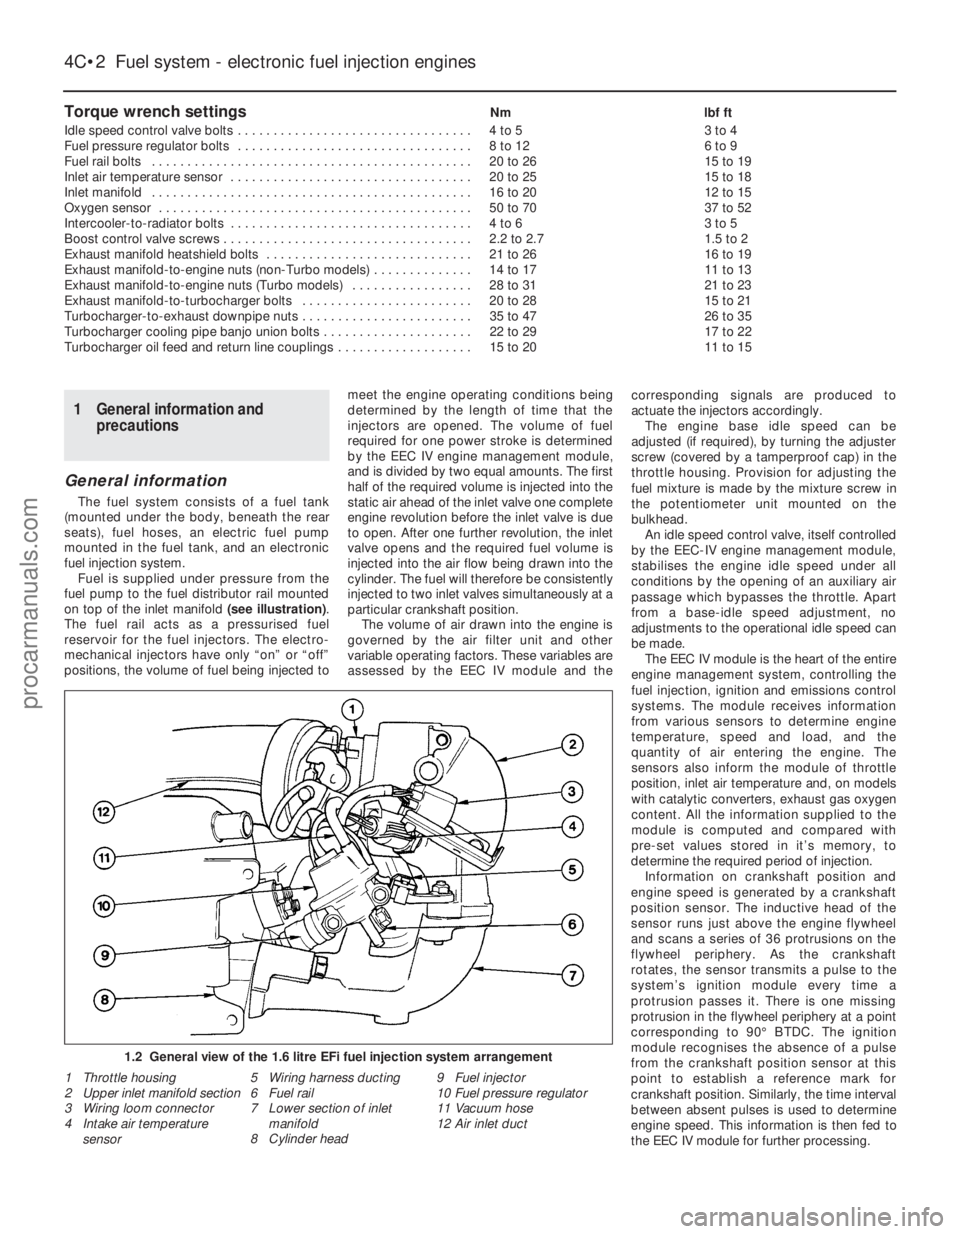
on top of the inlet manifold (see illustration).
The fuel rail acts as a pressurised fuel
reservoir for the fuel injectors. The electro-
mechanical injectors have only “on” or “off”
positions, the volume of fuel being injected to meet the engine operating conditions being
determined by the length of time that the
injectors are opened. The volume of fuel
required for one power stroke is determined
by the EEC IV engine management module,
and is divided by two equal amounts. The first
half of the required volume is injected into the
static air ahead of the inlet valve one complete
engine revolution before the inlet valve is due
to open. After one further revolution, the inlet
valve opens and the required fuel volume is
injected into the air flow being drawn into the
cylinder. The fuel will therefore be consistently
injected to two inlet valves simultaneously at a
particular crankshaft position.
The volume of air drawn into the engine is
governed by the air filter unit and other
variable operating factors. These variables are
assessed by the EEC IV module and the corresponding signals are produced to
actuate the injectors accordingly.
The engine base idle speed can be
adjusted (if required), by turning the adjuster
screw (covered by a tamperproof cap) in the
throttle housing. Provision for adjusting the
fuel mixture is made by the mixture screw in
the potentiometer unit mounted on the
bulkhead. An idle speed control valve, itself controlled
by the EEC-IV engine management module,
stabilises the engine idle speed under all
conditions by the opening of an auxiliary air
passage which bypasses the throttle. Apart
from a base-idle speed adjustment, no
adjustments to the operational idle speed can
be made. The EEC IV module is the heart of the entire
engine management system, controlling the
fuel injection, ignition and emissions control
systems. The module receives information
from various sensors to determine engine
temperature, speed and load, and the
quantity of air entering the engine. The
sensors also inform the module of throttle
position, inlet air temperature and, on models
with catalytic converters, exhaust gas oxygen
content. All the information supplied to the
module is computed and compared with
pre-set values stored in it’s memory, to
determine the required period of injection.
Information on crankshaft position and
engine speed is generated by a crankshaft
position sensor. The inductive head of the
sensor runs just above the engine flywheel
and scans a series of 36 protrusions on the
flywheel periphery. As the crankshaft
rotates, the sensor transmits a pulse to the
system’s ignition module every time a
protrusion passes it. There is one missing
protrusion in the flywheel periphery at a point
corresponding to 90° BTDC. The ignition
module recognises the absence of a pulse
from the crankshaft position sensor at this
point to establish a reference mark for
crankshaft position. Similarly, the time interval
between absent pulses is used to determine
engine speed. This information is then fed to
the EEC IV module for further processing.
1.2 General view of the 1.6 litre EFi fuel injection system arrangement\
1 Throttle housing
2 Upper inlet manifold section
3 Wiring loom connector
4 Intake air temperature sensor 5 Wiring harness ducting
6 Fuel rail
7 Lower section of inlet
manifold
8 Cylinder head 9 Fuel injector
10
Fuel pressure regulator
11 Vacuum hose
12 Air inlet duct
procarmanuals.com
http://vnx.su