Page 46 of 962

ConditionPossible causeCorrection
High fuel consumptionAbnormal condition ignition system
1. Improper ignition timingAdjust
2. Leak or loose connection of high tension cordRepair or replace
3. Defective spark plug (improper gap, heavyClean, adjust or replace
deposits, and burned electrodes, etc..)
4. Cracked distributor cap or rotorReplace
5. Malfunctioning mechanical and vacuumCheck and repair or
advancers in distributorreplace
Abnormal condition in fuel system
1. Improper float levelAdjust
2. Fuel leakage from tank, pipe or carburetorRepair or replace
3. Malfunctioning carburetor choke systemRepair or replace
4. Dirty or clogged carburetor jetsClean
5. Clogged air cleaner elementClean or replace
6. Malfunctioning thermostatically controlledCheck and repair or
air cleanerreplace
Abnormal condition in engine
1. Low compressionPreviously outlined
2. Poor valve seatingRepair or replace
3. Improper valve clearanceAdjust
Emission control
1. Air leaks at exhaust manifoldTighten manifold bolts
and nuts.
Replace gasket.
2. Oxygen sensor out of orderReplace.
3. Water temperature switch out of orderReplace.
4. Malfunctioning throttle position switchReplace
5. Malfunctioning MCS (mixture controlReplace
solenoid) valve in carburetor
6. Malfunctioning EGR valveReplace
Others
1. Dragging brakesRepair or replace
2. Slipping clutchAdjust or replace
3. Improper tire pressureAdjust
Excessive engine oilOil leakage
consumption1. Loose oil drain plugTighten
2. Loose oil pan securing boltsTighten
3. Deteriorated or broken oil pan sealantReplace sealant
4. Leaky oil sealsReplace
5. Blown cylinder head gasketReplace
6. Improper tightening of oil filterTighten
7. Loose oil pressure switchTighten
2-8
Page 47 of 962

Condition
Excessive engine oil
consumption
Possible cause
“Oil pumping” (Oil finding its way into
combustion chambers.)
1. Sticky piston ring
2. Worn piston ring groove and ring
3. Worn pistons or cylinders
Correction
Remove carbon and
replace rings
Replace piston and ring
Replace pistons and
rebore as necessary
Oil leakage along valve stems
1. Defective valve stem oil sealsReplace
2. Badly worn valve stemReplace
2-2. CARBURETOR
ConditionPossible causeICorrection
Fuel overflow from
carburetor
1, Float valve worn or dirty with foreign matterClean or replace
2. Float level set too highAdjust as prescribed
3. Float ruptured and containing some fuelReplace
4. Broken or otherwise defective gasketReplace
5. Loose float chamber securing screwsRetighten
2-3. EXHAUST AND MUFFLER
Condition
Poor muffling per-
formance
Possible cause
1. Loose exhaust pipe connection
2. Broken muffler gasket
3. Broken manifold, pipe or muffler
4. Exhaust manifold loose in place
5. Interference between body and muffler
Correction
Retighten
Replace
Repair or replace
Retighten
Repair, eliminating any
contact
2-4. CLUTCH
ConditionPossible causeICorrection
Slipping clutch Loss of clearance at the tip of release fork
2. Clutch facings dirty with oil
3. Clutch facings excessively worn
4. Weakened diaphragm spring
5. Distorted pressure plate or flywheel surface
6. Improper clutch pedal free travel
Adjust as prescribed
Replace
Replace
Replace
Replace
Adjust and, as necessary,
replace clutch facings
2-9
1.
Page 144 of 962

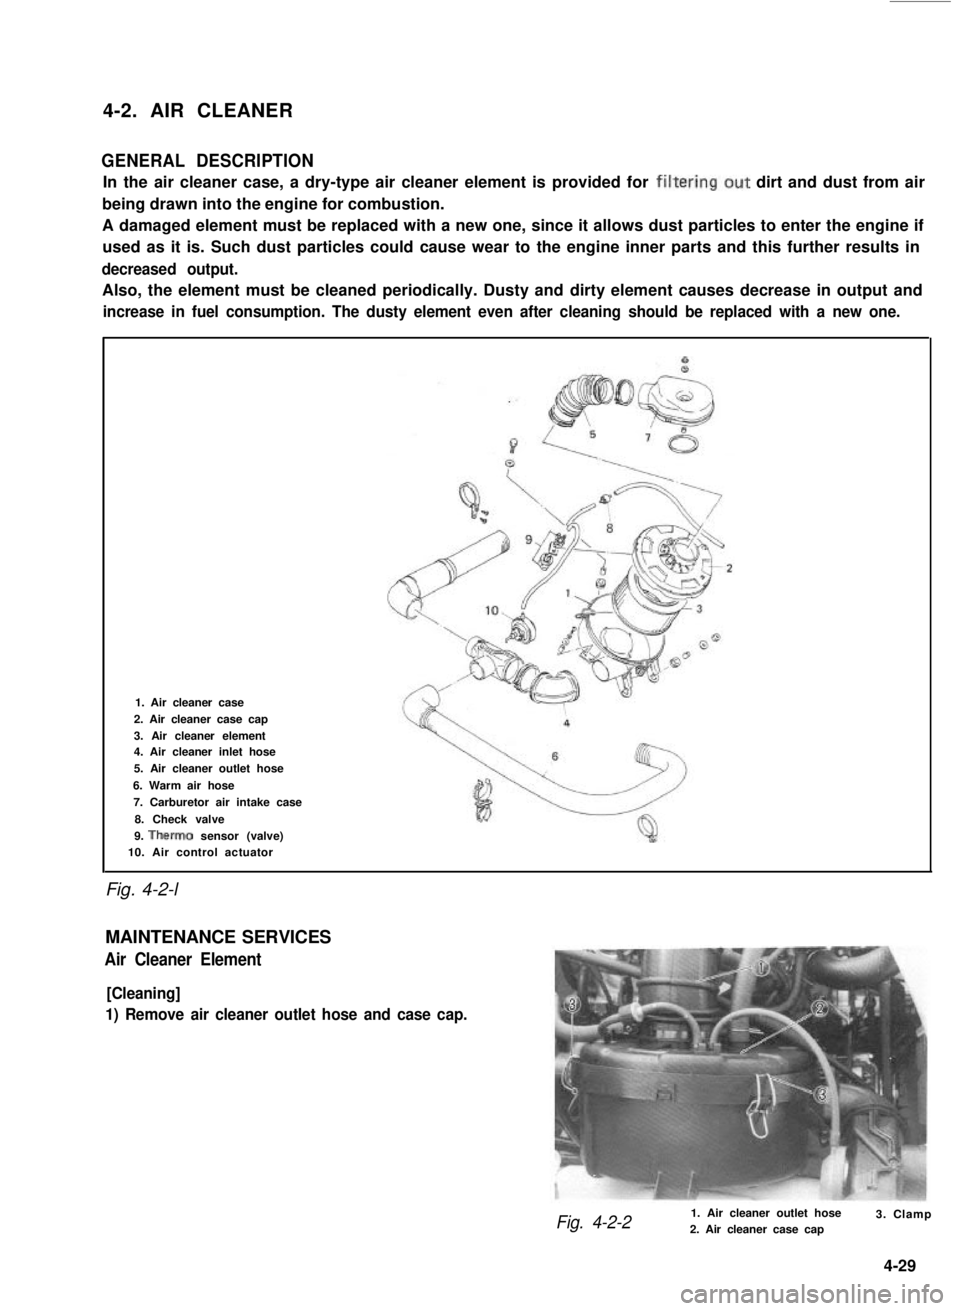
4-2. AIR CLEANER
GENERAL DESCRIPTION
In the air cleaner case, a dry-type air cleaner element is provided for filtering.out dirt and dust from air
being drawn into the engine for combustion.
A damaged element must be replaced with a new one, since it allows dust particles to enter the engine if
used as it is. Such dust particles could cause wear to the engine inner parts and this further results in
decreased output.
Also, the element must be cleaned periodically. Dusty and dirty element causes decrease in output and
increase in fuel consumption. The dusty element even after cleaning should be replaced with a new one.
Fig. 4-2-l
1. Air cleaner case
2. Air cleaner case cap
3. Air cleaner element4. Air cleaner inlet hose
5. Air cleaner outlet hose
6. Warm air hose
7. Carburetor air intake case
8. Check valve
9. Therm0 sensor (valve)10. Air control actuator
MAINTENANCE SERVICES
Air Cleaner Element
[Cleaning]
1) Remove air cleaner outlet hose and case cap.
Fig. 4-2-21. Air cleaner outlet hose2. Air cleaner case cap3. Clamp
4-29
Page 173 of 962

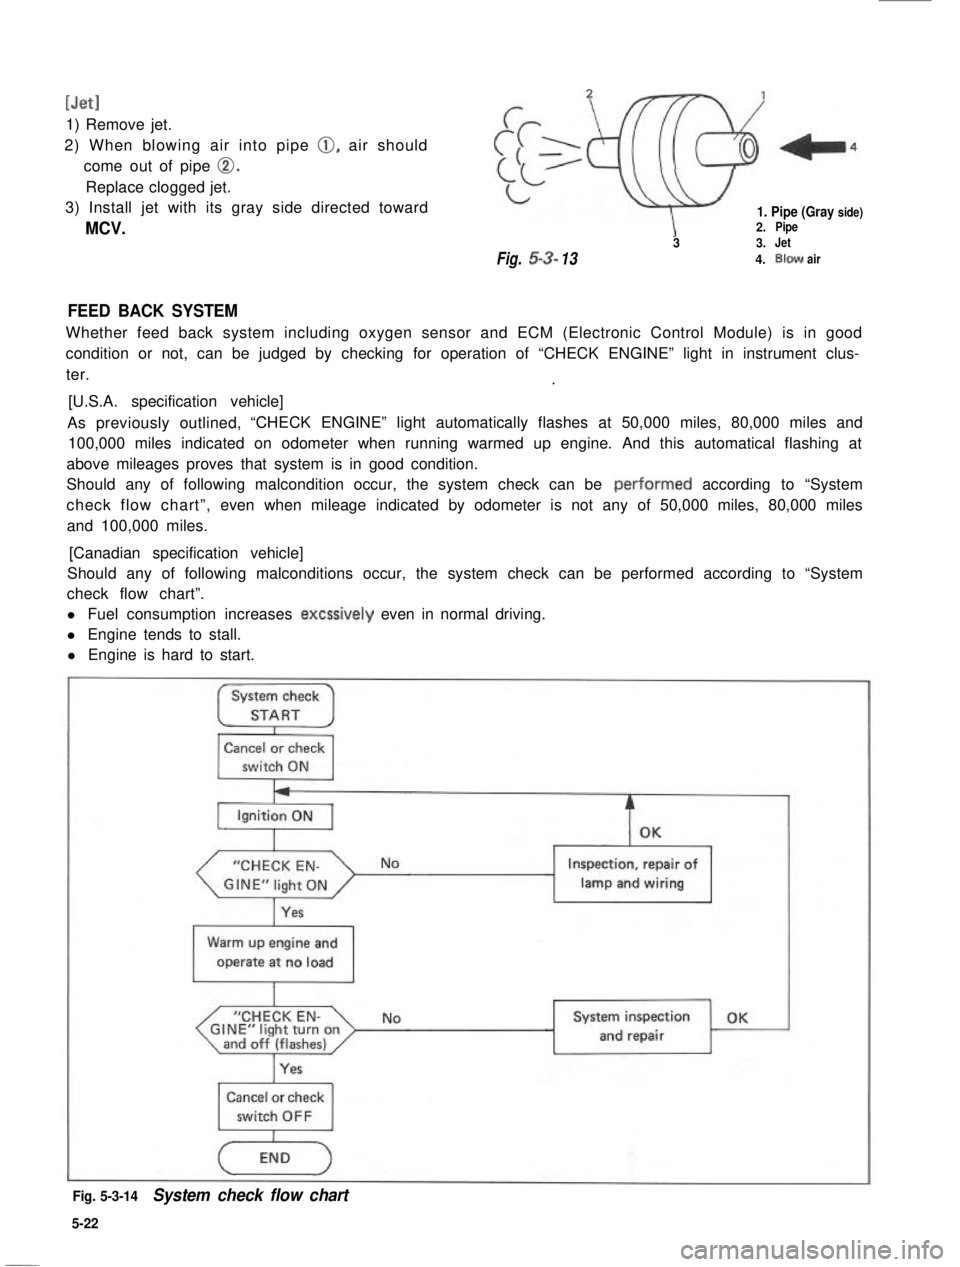
[Jet1
1) Remove jet.
2) When blowing air into pipe 0, air should
come out of pipe 0.
Replace clogged jet.
3) Install jet with its gray side directed toward
MCV.
1. Pipe (Gray side)2.Pipe
33.Jet
Fig.53-134.Blowair
FEED BACK SYSTEM
Whether feed back system including oxygen sensor and ECM (Electronic Control Module) is in good
condition or not, can be judged by checking for operation of “CHECK ENGINE” light in instrument clus-
ter..
[U.S.A. specification vehicle]
As previously outlined,“CHECK ENGINE” light automatically flashes at 50,000 miles, 80,000 miles and
100,000 miles indicated on odometer when running warmed up engine. And this automatical flashing at
above mileages proves that system is in good condition.
Should any of following malcondition occur, the system check can be .performed according to “System
check flow chart”,even when mileage indicated by odometer is not any of 50,000 miles, 80,000 miles
and 100,000 miles.
[Canadian specification vehicle]
Should any of following malconditions occur, the system check can be performed according to “System
check flow chart”.
l Fuel consumption increases excssively even in normal driving.
l Engine tends to stall.
l Engine is hard to start.
System check
STARTI
Cancel or check
switch ON
“CHECK EN-
Yes
Inspection, repair of
lamp and wiring1
Warm up engine and
operate at no load
I
“CHECK EN-GINE”light turnonand off (flashes)I
NoSystem inspection OK
and repair
Cancel or check
Fig. 5-3-14System check flow chart
5-22
Page 187 of 962

[Replacing ECMIFUEL CUT SYSTEM
If a malcondition such as those listed below still
occurs even after confirming proper function
and condition of the sensors of the feed back
system and their circuits through the above
checks, a trouble may exist within the ECM. In
such a cause, replace the ECM.
l Fuel consumption increases even in normal
Checking fuel cut system
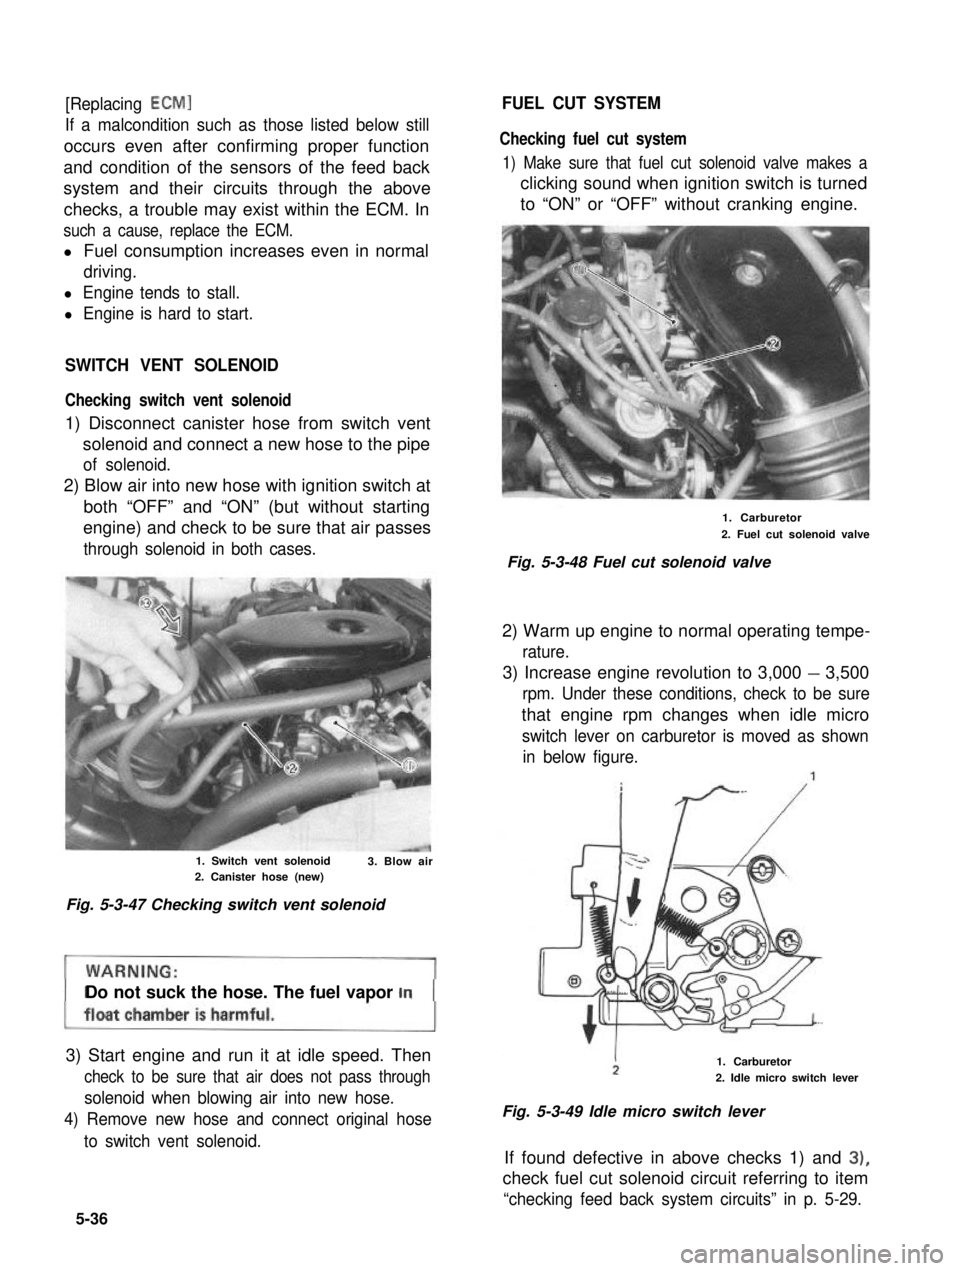
1) Make sure that fuel cut solenoid valve makes a
clicking sound when ignition switch is turned
to “ON” or “OFF” without cranking engine.
driving.
l Engine tends to stall.
l Engine is hard to start.
SWITCH VENT SOLENOID
Checking switch vent solenoid
1) Disconnect canister hose from switch vent
solenoid and connect a new hose to the pipe
of solenoid.
2) Blow air into new hose with ignition switch at
both “OFF” and “ON” (but without starting
engine) and check to be sure that air passes
through solenoid in both cases.
1. Carburetor
2. Fuel cut solenoid valve
Fig. 5-3-48 Fuel cut solenoid valve
2) Warm up engine to normal operating tempe-
rature.
3) Increase engine revolution to 3,000 - 3,500
rpm. Under these conditions, check to be sure
that engine rpm changes when idle micro
switch lever on carburetor is moved as shown
in below figure.
1. Switch vent solenoid2. Canister hose (new)3. Blow air
Fig. 5-3-47 Checking switch vent solenoid
Do not suck the hose. The fuel vapor m
3) Start engine and run it at idle speed. Then
check to be sure that air does not pass through
solenoid when blowing air into new hose.
4) Remove new hose and connect original hose
to switch vent solenoid.
1. Carburetor
2. Idle micro switch lever
Fig. 5-3-49 Idle micro switch lever
If found defective in above checks 1) and 3),
check fuel cut solenoid circuit referring to item
“checking feed back system circuits” in p. 5-29.
5-36