Page 17 of 66
. The system only operates when t")
944 / 944 S
944 Turbo
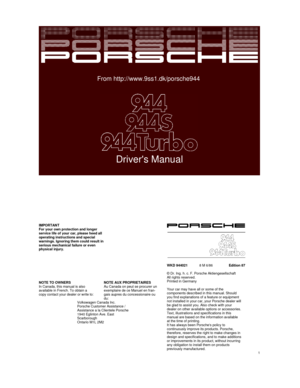
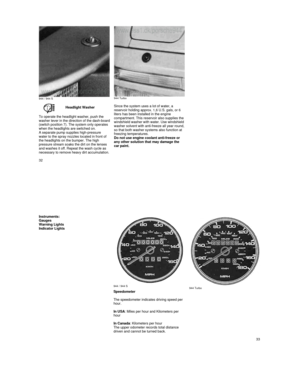
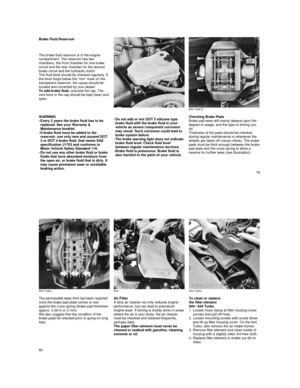
Headlight Washer
To operate the headlight washer, push the
washer lever in the direction of the dash-board (switch position 7). The system only operates when the headlights are switched on. A separate pump supplies high-pressure water to the spray nozzles located in front of the headlights on the bumper. The high
pressure stream soaks the dirt on the lenses
and washes it off. Repeat the wash cycle as
necessary to remove heavy dirt accumulation.
Since the system uses a lot of water, a
reservoir holding approx. 1,6 U.S. gals, or 6
liters has been installed in the engine
compartment. This reservoir also supplies the
windshield washer with water. Use windshield washer solvent with anti-freeze all year round,
so that both washer systems also function at
freezing temperatures.
Do not use engine coolant anti-freeze or
any other solution that may damage the
car paint.
32
Instruments: Gauges
Warning Lights
Indicator Lights
944 / 944 S 944 Turbo
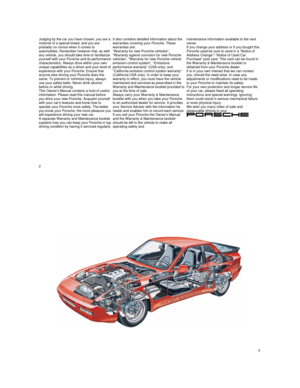
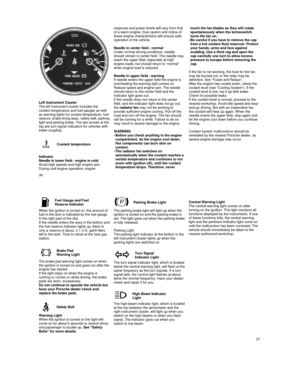
Speedometer
The speedometer indicates driving speed per
hour.
In USA : Miles per hour and Kilometers per
hour
In Canada : Kilometers per hour
The upper odometer records total distance
driven and cannot be turned back.
33
Page 18 of 66

944 / 944 S
944 Turbo The trip odometer
in the lower part of the
speedometer can be turned back to zero by
pressing the reset-button, located in the left
section of the center dashboard vent. The
ignition must be on. Tachometer
The transistorized tachometer operates on the pulse count principle and shows engine speed in revolutions per minute (rpm).
The mark at the end of the scale indicates the
maximum permissible engine rpm. Before
reaching this area, the next higher gear
should be selected. Earlier shifting saves fuel.
Shift to the next lower gear when the engine
rpm drops below 1500 rpm.
The speed limiting governor prevents the
engine from being overrevved under load.
Boost Pressure Gauge
On the 944 Turbo there is a boost pressure
gauge in the lower part of the tachometer.
This instrument indicates the pressure in the
intake manifold.
With the ignition on and the engine stopped,
the indicated pressure corresponds to the
ambient air pressure (atmospheric pressure)
of approx. 1 bar.
Should an excessively high boost pressure
occur as a result of a defect, the fuel supply or the ignition is cut off automatically.
34
944 / 944 S
CASIS
Computer Assisted Shift Indicator System (Manual Transmission only) A computer continually evaluates vehicle data, such as driving speed, engine rpm, engine
load and engine temperature.
When the CASIS arrow in the tachometer
lights up, it means the engine could operate
more economically. The light indicates that
you can increase fuel efficiency by shifting into a higher gear. The CASIS light will go out when a higher gear has been engaged, when taking your foot off the accelerator pedal or when accelerating at a higher rate. In fifth gear the CASIS light is inoperative.
During maximum acceleration, the CASIS
arrow light will only light up at a point where
engine rpm is such that improved acceleration
can be obtained by shifting into the next higher gear. This means the CASIS arrow does not
indicate any set shift point, but that the
computer calculated shift points will depend on the way you drive. The arrow will light up at
the lowest speed range when cruising, and at
the highest speed range when accelerating
with wide open throttle.
How to use CASIS
Drive your Porsche shifting as you normally
would. As soon as the engine reaches uneconomical load range, the CASIS light will remind you to
shift into the next higher gear to keep the
engine at the same performance level but with lower fuel consumption.
You will get used to CASIS quickly and there
fore operate your Porsche with the CASIS
arrow light coming on only now and then.
WARNING
Use CASIS to your best advantage but
remember that traffic, road and weather
conditions must always have priority when shifting gears or changing speeds.
35
Page 19 of 66

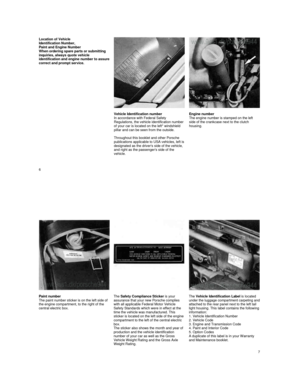
Left Instrument Cluster
The left instrument cluster includes the
coolant temperature and fuel gauges as well
as warning lights for coolant temperature, fuel
reserve, brake-
lining wear, safety belt, parking light and parking brake. The two arrows at the
top are turn signal indicators for vehicles with
trailer coupling.
Coolant temperature
Indicator
Needle in lower field - engine is cold
Avoid high speeds and high engine rpm. During cold engine operation, engine
response and power levels will vary from that
of a warm engine. Due caution and notice of
these engine characteristics will ensure safe
operation of the vehicle.
Needle in center field - normal
Under normal driving conditions, needle
should remain in center field. The needle may
reach the upper field, especially at high
engine loads, but should return to "normal"
when engine load is reduced.
Needle in upper field - warning
If needle enters the upper field the engine is
overheating the warning light comes on.
Reduce speed and engine rpm. The needle
should return to the center field and the
indicator light goes out.
If the needle does not return to the center
field, and the indicator light does not go out,
the radiator fan may not be working to
provide sufficient engine cooling. Pull off the
road and turn off the engine. The fan should
still be running for a while. Failure to do so
may result in severe damage to the engine.
WARNING
Before you check anything in the engine compartment, let the engine cool down.
Hot components can burn skin on
contact. The radiator fan switches on automatically when the coolant reaches a
certain temperature and continues to run
(even with ignition off), until the coolant
temperature drops. Therefore, never
touch the fan blades as they will rotate spontaneously when the termoswitch
turns the fan on.
Be careful if you have to remove the cap from a hot coolant fluid reservoir. Protect
your hands, arms and face against
scalding. Use a thick rag and open the
cap carefully one turn to allow excess
pressure to escape before removing the
cap.
If the fan is not working, the fuse for the fan
may be burned out, or the relay may be
defective. See "Fuses and Relays".
After the engine has cooled down, check the coolant level (see "Cooling System"). If the
coolant level is low, top it up with water.
Check for possible leaks.
If the coolant level is normal, proceed to the
nearest workshop. Avoid idle speed and stop-
and-go driving. But with an inoperative fan,
the coolant will heat up again. When the
needle enters the upper field, stop again and
let the engine cool down before you continue
driving.
Coolant system malfunctions should be
remedied by the nearest Porsche dealer, as
severe engine damage may occur.
36
Fuel Gauge and FuelReserve Indicator
When the ignition is turned on, the amount of
fuel in the tank is indicated by the fuel gauge
in the right part of the dial.
If the needle enters the area in the bottom and the fuel reserve indicator lights up, there is
only a reserve of about. 2.1 U.S. gal/8 liters
left in the tank. Time to refuel at the next gas
station.
Brake Pad
Warning Light
The brake pad warning light comes on when the ignition is turned on and goes out after the engine has started.
If the light stays on when the engine is
running or comes on while driving, the brake
pads are worn, excessively.
Do not continue to operate the vehicle but
have your Porsche dealer check and
replace the brake pads.
Safety Belt
Warning Light
When the ignition is turned on the light will
come on for about 6 seconds to remind driver
and passenger to buckle up. See "Safety
Belts" for more details.
Parking Brake Light
The parking brake light will light up when the
ignition is turned on and the parking brake is
set.
The light goes out when the parking brake is fully released.
Parking Light
The parking light indicator at the bottom in the
left instrument cluster lights up when the
parking lights are switched on.
Turn Signal
Indicator Light
The turn signal indicator light, which is located below the central warning light, will flash at the same frequency as the turn signals. If a turn
signal fails, the control light flashes at about
twice the normal frequency. Have your dealer
check and repair it for you.
High Beam Indicator
Light
The high-beam indicator light, which is located at the top between the tachometer and the
right instrument cluster, will light up when you
switch on the high beams or when you flash
signal. The indicator goes out when you
switch to low beam.
Central Warning Light
The central warning light comes on after
turning on the ignition. This light monitors all
functions displayed by the instruments. If one
of these functions fails, the central warning
light and the pertinent indicator light come on
until the malfunction has been corrected. The
vehicle should immediately be taken to the
nearest authorized workshop.
37
Page 20 of 66

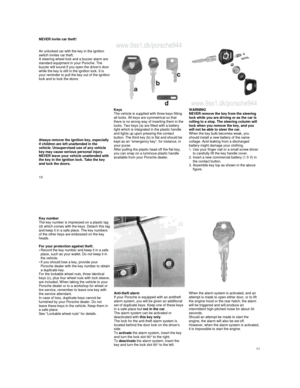
Right Instrument Cluster
The right instrument cluster combines the oil
pressure gauge with the oil pressure warning
light, the voltmeter with the alternator warning
light as well as the brake fluid warning light.
Oil Pressure Gauge
Engine oil pressure is shown in bars. At 5.000 rpm, with the engine at normal operating temperature (approx. 90°C / 194°F), the pressure should be approx. 4 bar. A slight
drop in oil pressure is normal under certain
operating conditions such as prolonged
highway driving in hot weather.
At idle speed, with the engine oil hot, the oil pressure can sink to 0.5 bar - this does not
indicate any loss of engine performance.
However, if the oil pressure drops suddenly
while you are driving, or if the warning light comes on, pull off the road,
stop the engine
and wait for it to cool down. Check the
engine oil level. If the oil level is normal,
contact the nearest dealer.
Oil Pressure
Warning Light
The oil pressure warning light comes on when the ignition is turned on. It should go out when the engine is started and has reached the
correct oil pressure.
If the oil pressure warning light
does not light up when turning the ignition on, or if it does
not go out after starting the engine, contact
your Porsche dealer immediately.
If the oil pressure warning light comes on
while you are driving, pull off the road and stop the engine .
Check the oil level to make sure you have
enough oil. If oil level is correct and the oil pressure warning light is still on, do not driv
e
the vehicle as severe engine damage may
result. Contact your nearest Porsche dealer
for assistance.
An occasional brief flickering of the oil pressure warning light at idle speed and
normal engine temperature is no cause for
concern if the light goes out upon
acceleration.
The oil pressure warning light is not an
indicator for low engine oil level. To check the
oil level, always use the dipstick.
Make it a habit to have the oil level checked
with every fuel filling.
Voltmeter
The voltmeter shows the overall condition of
the charging system. The needle should
normally stay in the 12-
14 volt range when the engine is running. A temporary drop below 12
volts when starting the engine is normal.
38
Alternator Warning Light
The alternator warning light comes on when
the ignition is turned on. It should go out after
the engine is started.
If the alternator warning light does not light
up when turning the ignition on, or if it does
not go out
after starting the engine, there is a malfunction in the electrical system. If this is
the case, contact your Porsche dealer.
WARNING
If the alternator warning light comes on
while you are driving, pull off the road and
stop the engine.
Check whether the Polyrib-belt is slipping or
broken. The Polyrib-belt not only drives the
alternator for battery charging, but also the air
conditioner compressor.
If the light just flickers lightly, the Polyrib bel t
may be loose and is slipping.
The belt should be tightened or replaced
before you continue driving.
Brake Fluid Warning
Light
The brake warning light monitors the hydraulic dual-circuit brake system. It lights up when the ignition is turned on and should go out after
the engine has been started.
If the brake warning light fails to light up when
the ignition is turned on, or if it fails to go out
after the engine is started, there may be a
malfunction in the electrical system. Let your
Porsche dealer locate and correct the
condition promptly.
Should the light come on while driving, the
brake fluid level in the reservoir could be too
low, or one of the dual brake circuits may
have failed. In either case, the brakes will
function but a much longer distance and a far
greater pedal pressure are required to bring
the car to a halt. See "Brakes" for more
details.
Carefully pull off the road and stop. Have
your car towed to the nearest dealer for
repair. Continued operation of a car with
defective brakes is dangerous.
Antilock
The warning light goes on in the event of a
malfunction in the ABS system. The system is
switched off; the normal brake system
remains fully operational. If the light comes
on, take your vehicle to your authorized dealer for service immediately.
Air Bag
See "Air Bag System" for details.
39
Page 21 of 66
 depressed for 4 seconds -12 AM, PM or 24.00 flashin g. After pushing button (1), either a 12-hou")
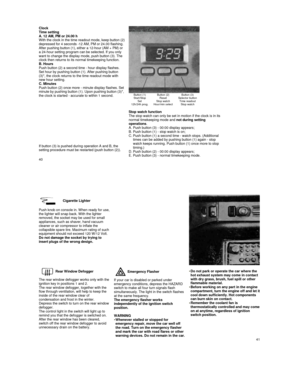
Clock Time setting
A. 12 AM, PM or 24.00 h
With the clock in the time readout mode, keep butto n (2) depressed for 4 seconds -12 AM, PM or 24.00 flashin g. After pushing button (1), either a 12-hour (AM + PM) or
a 24-hour setting program can be selected. If you o nly
want to change the display mode, push button (3). The
clock then returns to its normal timekeeping functi on.
B. Hours
Push button (2) a second time - hour display flashe s.
Set hour by pushing button (1). After pushing butto n
(3)*, the clock returns to the time readout mode wi th
new hour setting.
C. Minutes
Push button (2) once more -
minute display flashes. Set minute by pushing button (1). Upon pushing button ( 3)*, the clock is started - accurate to within 1 second.
Button (1)
Start/Stop Set
12h/24h prog.
Button (2) Reset
Stop watch
Hour/min select
Button (3)
Selector button Time readout Stop watch
If button (3) is pushed during operation A and B, t he
setting procedure must be restarted (push button (2 )).
Stop watch function
The stop watch can only be set in motion if the clo ck is in its
normal timekeeping mode and not during setting
operations .
A. Push button (3) - 00:00 display appears;
B. Push button (1) - stop watch is on;
C. Push button (1) a second time - watch stops. (Addit ional
times can be added by pushing button (1) again - st op
watch keeps running. Push button (1) once more to s top timing.)
D. Push button (2) - 00:00 display appears;
E. Push button (3) - normal timekeeping mode.
40
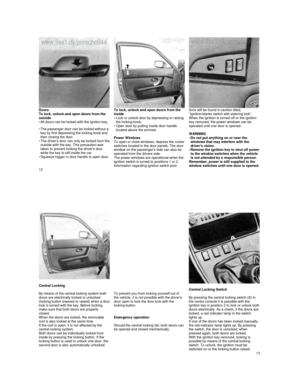
Cigarette Lighter
Push knob on console in. When ready for use, the lighter will snap back. With the lighter
removed, the socket may be used for small
appliances, such as shaver, hand vacuum
cleaner or air compressor to inflate the
collapsible spare tire. Maximum rating of such
equipment should not exceed 120 W/12 Volt.
Do not damage the socket by trying to
insert plugs of the wrong design.
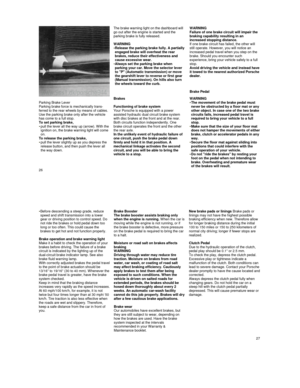
Rear Window Defogger
The rear window defogger works only with the
ignition key in positions 1 and 2.
The rear window defogger, together with the
flow through ventilation, will help to keep the
inside of the rear window clear of
condensation and frost in the winter.
Depress the switch to turn on the rear window
defogger.
The control light in the switch will light up to
remind you that the defogger is switched on.
After the rear window has been cleared, switch off the rear window defogger to avoid
unnecessary drain on the battery.
Emergency Flasher
If your car is disabled or parked under
emergency conditions, depress the HAZARD
switch to make all four turn signals flash
simultaneously. The light in the switch flashes
at the same frequency.
The emergency flasher works
independently of the ignition switch
position.
WARNING
Whenever stalled or stopped for emergency repair, move the car well off
the road. Turn on the emergency flasher
and mark the car with road flares or other
warning devices. Do not remain in the car.
Do not park or operate the car where the hot exhaust system may come in contact
with dry grass, brush, fuel spill or other
flammable material.
Before working on any part in the engine compartment, turn the engine off and let it cool down sufficiently. Hot components
can burn skin on contact.
Remember the coolant fan is thermostatically controlled and may come on at anytime, regardless of ignition
switch position.
41
Page 22 of 66
 on the center console. The rear
window must be sufficiently wet to prevent the glass surface from being s")
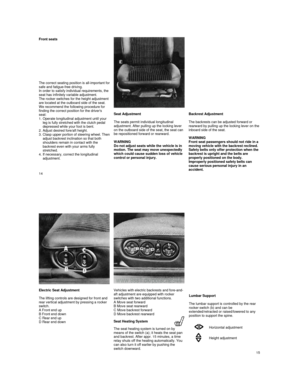
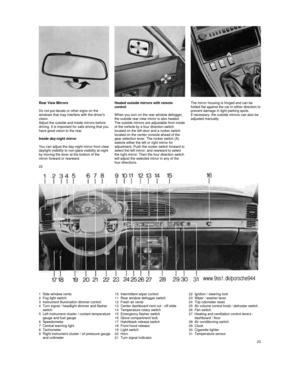
Rear Window Wiper
To operate the wiper, depress the rocker
switch (A) on the center console. The rear
window must be sufficiently wet to prevent the glass surface from being scratched.
Ashtray
The ashtray is in the center console. To empty the tray, pull it out of its well.
Reinsert it so that the light "window" points
toward the bulb on the back inside the well.
WARNING
Never use ashtray as waste paper
disposal. Fire hazard!
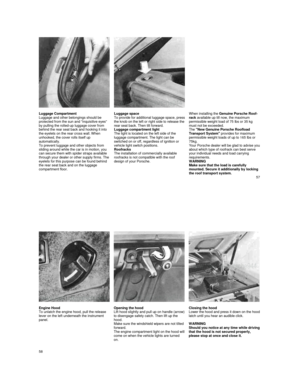
Glove Compartment
Press locking button to open glove
compartment. With the car lights turned on,
the glove compartment light is automatically
switched on when the glove compartment is
opened.
The compartment is lockable with the ignition
key to help prevent theft.
WARNING
Keep glove compartment door closed
while driving to prevent injury during a
collision.
42
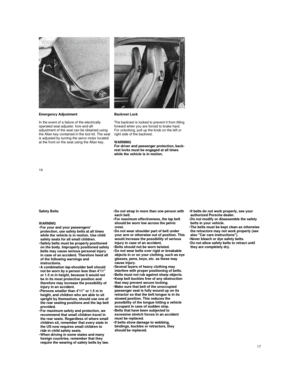
Overhead Interior Light
Located between the two sun visors the
interior light has a three position switch.
Switch Positions
Rearward (a) - on continuously
Center (b) - off
Foreward (c) - on, only with doors open Sun Visors
To protect driver and passenger from side
glare, the sun visors can be moved to the
sides after lifting them out of their center
mounting.
The make-up mirror on the rear of the visor is
fitted with a protective sliding shutter.
43
Page 23 of 66

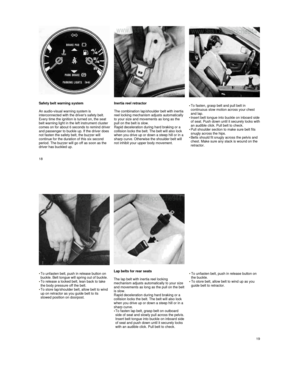
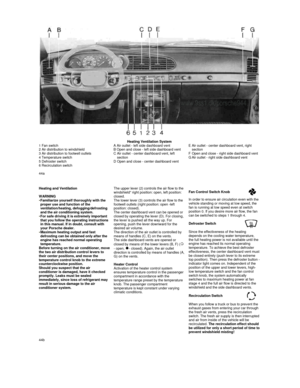
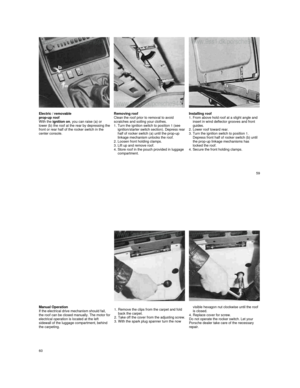
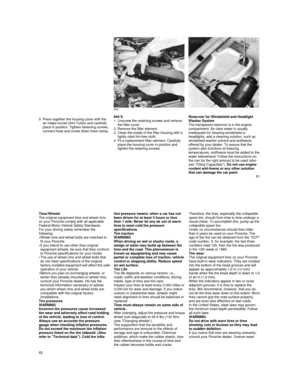
Heating Ventilation System
1 Fan switch
2 Air distribution to windshield
3 Air distribution to footwell outlets
4 Temperature switch
5 Defroster switch
6 Recirculation switch
A Air outlet - left side dashboard vent
B Open and close - left side dashboard vent
C
Air outlet - center dashboard vent, left
section
D Open and close - center dashboard vent
E Air outlet - center dashboard vent, right
section
F
Open and close - right side dashboard vent
G Air outlet - right side dashboard vent
44a
Heating and Ventilation
WARNING
Familiarize yourself thoroughly with the proper use and function of the
ventilation/heating, defogging/defrosting
and the air conditioning system.
For safe driving it is extremely important that you follow the operating instructions
in this manual. If in doubt, consult with
your Porsche dealer.
Maximum heating output and fast defrosting can be obtained only after the
engine has reached normal operating
temperature.
Before turning on the air conditioner, move the two air distribution control levers to
their center positions, and move the
temperature control knob to the extreme
counterclockwise position.
Should you suspect that the air
conditioner is damaged, have it checked
promptly. Leaks must be sealed
immediately, since loss of refrigerant may
result in serious damage to the air
conditioner system.
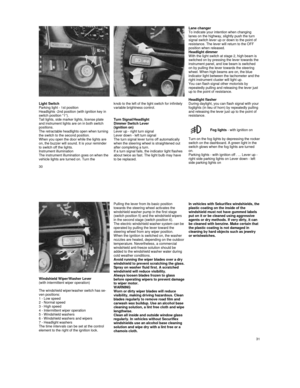
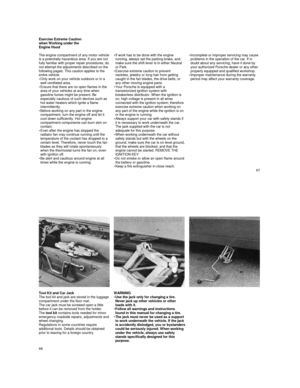
The upper lever (2) controls the air flow to the windshield" right position: open, left position: closed.
The lower lever (3) controls the air flow to the
footwell outlets (right position: open -left
position: closed).
The center dashboard vent can be opened or
closed by operating the lever (D). For closing,
the lever is pushed all the way up. For
opening, push the lever downward for the
desired air volume.
The direction of the air outlet is controlled by
means of handles (C, E) on the vents.
The side dashboard vents are opened or
closed by means of the lower levers (B, F) (
- open, - closed). Again, the air outlet direction is controlled by means of handles (A, G) on the vents.
Heater Control
Activation of the heater control system ensures temperature control in the passenger
compartment in accordance with the
temperature range preset by the temperature
knob. The passenger compartment
temperature is kept constant under varying
climatic conditions.
Fan Control Switch Knob
In order to ensure air circulation even with the
vehicle standing or moving at low speed, the
fan is running at low speed even at switch
position 0. If you desire more air flow, the fan
can be switched to steps 1 through 4.
Defroster Switch
Since the effectiveness of the heating
depends on the cooling water temperature,
the full heating power is not available until the
engine has reached its normal operating
temperature. To achieve the best defroster
effectiveness, the center dashboard vent must be closed entirely (push lever to its extreme
top position). Then press the defroster button - indicator light comes on. Independent of the
position of the upper and lower levers, high-
low temperature switch and the fan control
switch knob, the system automatically
switches to maximum heating power at fan
stage 4 and the full air flow is directed to the
windshield and the side dashboard vents.
Recirculation Switch
When you follow a truck or bus to prevent the
exhaust gases from entering your car through
the fresh air vents, press the recirculation
switch. The fresh air supply is then interrupted and air from inside of the vehicle will be
recirculated. The recirculation effect should
be utilized for only a short period of time to prevent windshield misting! 44b
Page 24 of 66

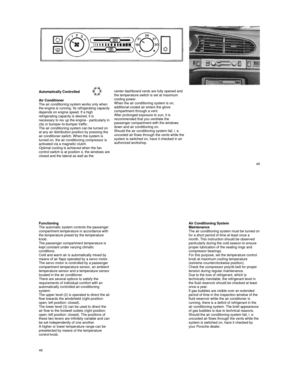
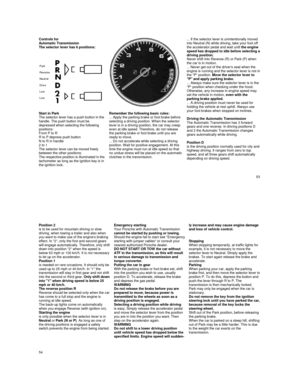
Automatically Controlled
Air Conditioner
The air conditioning system works only when
the engine is running. Its refrigerating capacity depends on engine speed. If a high
refrigerating capacity is desired, it is
necessary to rev up the engine -
particularly in city or bumper-to-bumper traffic.
The air conditioning system can be turned on
at any air distribution position by pressing the
air conditioner switch. When the system is
turned on, the air conditioning compressor is
activated via a magnetic clutch.
Optimal cooling is achieved when the fan
control switch is at position 4, the windows are closed and the lateral as well as the
center dashboard vents are fully opened and
the temperature switch is set at maximum
cooling power.
When the air conditioning system is on,
additional cooled air enters the glove
compartment through a vent.
After prolonged exposure to sun, it is recommended that you ventilate the
passenger compartment with the windows
down and air conditioning on.
Should the air conditioning system fail, i. e.
uncooled air flows through the vents while the
system is switched on, have it checked in an
authorized workshop.
45
Functioning
The automatic system controls the passenger
compartment temperature in accordance with
the temperature preset by the temperature
knob.
The passenger compartment temperature is
kept constant under varying climatic
conditions.
Cold and warm air is automatically mixed by
means of air flaps operated by a servo motor.
The servo motor is controlled by a passenger
compartment temperature sensor, an ambient
temperature sensor and a temperature sensor located in the air conditioner.
There are several options to satisfy the
requirements of individual comfort with an
automatically controlled air-conditioning
system:
The upper level (2) is operated to direct the air flow towards the windshield (right position:
open; left position: closed).
The lower level (3) can be used to direct the
air flow to the footwell outlets (right position:
open; left position: closed). The positions of
these two levers are infinitely variable and can be set independently of one another. A higher or lower temperature range can be preselected by means of the temperature
control knob.
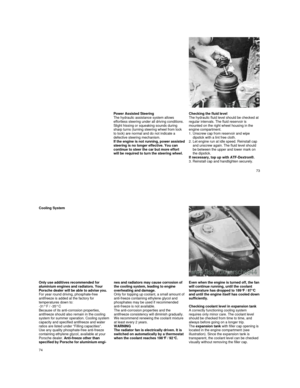
Air Conditioning System Maintenance The air conditioning system must be turned on for a short period of time at least once a
month. This instruction should be observed
particularly during the cold season to ensure
proper lubrication of the sealing rings and
compressor bearings.
For this purpose, set the temperature control
knob at maximum cooling temperature
(extreme counterclockwise position).
Check the compressor polyrib belt for proper
tension during regular maintenance.
Due to the loss of refrigerant, which is
technically inevitable, the refrigerant level in
the fluid reservoir should be checked at least
once a year.
If gas bubbles are visible over an extended
period of time in the inspection window of the
fluid reservoir while the air conditioner is
running, there is a deficit of refrigerant in the
air conditioning system. The brief appearance
of gas bubbles is due to technical reasons.
Should the air conditioning system fail, i. e.
uncooled air flows through the vents while the
system is switched on, have it checked by
your Porsche dealer.
46