Page 33 of 66

Tar or oil
Do not allow tar or oil to remain on the paint.
Remove as soon as possible with a cloth
soaked with a special paint cleaner. If you do
not have a tar or oil remover, you may
substitute with turpentine. After applying a
cleaning fluid, always wash with a lukewarm
soap water solution and apply a new wax
coat.
Insects
Remove as soon as possible with a lukewarm
soap/water solution or apply insect remover.
Tree sap Remove with a lukewarm soap/water solution. Do not allow tree sap or bird droppings to
harden on the paint.
Windows
Keep silicone sprays off the windshield to
avoid wiper smear in rain.
Generally, highway dust that settles on the
outside of the windshield contains material
worn from tires and oil residues. On the inside surfaces of the windshields, particularly in
strong sunlight, there are build-ups of dust
from the interior decor. These buildups are
reinforced by pollution in the air
brought in with the fresh air supply. Use a
lukewarm soap/water solution or an alcohol
based commercial window cleaning agent for t
he inside and outside. If a chamois is used for polishing the glass, it should exclusively be
used for that purpose.
To assure that windshield washers also
function at freezing temperatures, antifreeze
must be added to the washer fluids reservoirs
beforehand. It is advisable to use window
washer solvent with anti-freeze all year round. Follow directions on the can for the right
amounts to be used. Do not use engine
coolant anti-freeze or any other solution
that can damage the paint.
In vehicles with Sekurif
lex windshields, the plastic coating on the inside of the
windshield must not have gummed labels
put on it or be cleaned using abrasive
agents or dry methods. If very dirty, it can
be cleaned with benzine. The use of
benzine in a confined environment may be
dangerous to your health. Make certain
that the plastic coating is not damaged in
cleaning by hard objects such as jewelry
or wristwatches.
Do not remove ice on the inside of the
windshield by any means except warm air
from the defroster nozzles. Do not use any
deicer sprays, scratching tools, or
scrapers!
A foil base must be applied to the windshield prior to application of any labels or stickers
such as those used for state registration or
inspections. Failure to utilize foil base
between sticker or label and the Sekuriflex
coating will result in damage to the Sekuriflex
coating. Three foil bases were included with
the vehicle and additional foil bases may be
ordered from any Porsche dealer.
Instructions:
1. Clean the windshield in the area for
application.
2.
Cut the base of the foil to the required size.
Round off the edges.
3.
Pull off the protective film.
4. Spray the gummed side of the foil base and the windshield with a soap solution (distilled water and liquid soap or grease-free
detergent in a mixing ratio 10:1).
5.
Apply the foil base to the windshield and spray it once again.
6. Any liquid and bubbles under the foil base must be brushed out using a flexible plastic
scraper.
7.
Dry the windshield using a soft cloth.
8. Install label/sticker on the foil base.
63
When removing the label/sticker or the
backing foil, first spray the foil with a soapy
solution (see point 4).
Wiper blades
Always loosen frozen wiper blades from glass as they may tear otherwise.
Remove all wiper blades periodically and
clean them thoroughly with an alcohol base
cleaning solution. Use a sponge or soft cloth
and wipe lengthwise.
Weatherstrips
To seal properly, weatherstrips around hood,
hatch, windows, doors, etc., must be pliable.
Spray with silicone or coat with talcum powder or glycerin to retain flexibility of the rubber and to protect against freezing in the winter.
Light alloy wheels
To preserve the decorative appearance of the
light aluminium castings, some special care is
necessary. Aside from road dirt and salt
sprays, brake metal dust will exert corrosive
effects.
If left on too long, brake metal dust can cause
pitting. Wash the wheels with a sponge or
hose brush every other week.
Roads salts should be removed weekly with
an acid free cleaning solution.
The acid free cleaning solution must not have
a pH value greater than 10 (see explanation),
in case of doubt, it is recommended to check
with the manufacturer of that particular cleaner.
Every three months (after regular cleaning)
the wheels should be coated with petroleum
jelly. Rub it in firmly with a soft cloth. Never use abrasive or metal polishing cleaning
agents.
Explanation of pH value
The pH value is a measurement for the
hydrogen-ion concentration in a liquid. This
value tells if the liquid reaction is sour (acid) o r alkaline (lye solution). At a pH value of 7, the reaction of the liquid is
neutral (that is, chemically clean water), it is
not an acid or alkaline. Acids have a pH value
under 7, the strength of the acid increases
with a lower pH value. Alkaline lies between a pH value of 7 and 14, the strength of the
alkaline increases with higher pH values.
For example: a mineral water mixed with
carbon dioxide has a pH value of 6-6.5,
reaction is also light sour. Battery acid in
comparison has a pH value of 1.
or
the pH value for normal soap solution is 8-9,
but the soap solution for a dishwasher is
approximately 12.5, this would not be suitable
for wheel cleaning.
Your Porsche dealer can advise you which
product to use.
Remember that moisture and road salt on
brakes may affect braking efficiency. Test
the brakes after each car or wheel wash.
64
Page 34 of 66

Interior Glass
Use the same cleaning agents as for the
exterior and polish dry with a soft cloth or
paper towel.
Fabric
Use a vacuum cleaner or a soft bristle brush
to remove dust and loose dirt from carpeting,
upholstery, headliner and other trim. Dirt
stains can usually be removed with lukewarm
soap water or an all purpose cleaner solution,
or a dry foam cleaner. For greasy, oily and
other stubborn stains, use a spot remover. Do
not pour the liquid on the fabric. Dampen a
clean cloth and rub carefully, starting at the
edge and working inward.
Safety belts
Keep belts clean. Very dirty belts may not
retract properly. Do not remove belts from the
vehicle to be cleaned. Do not use chemical
cleaning agents, bleach or dyes. They
contain corrosive properties which will
weaken the webbing. Do not allow inertia
reel safety belts to retract before they are
completely dry.
For cleaning, use a mild soap water solution.
Let belts dry out thoroughly and away from
direct sun light.
Plastic, vinyl and leatherette
Use a clean, damp cloth or sponge to keep
this trim free from dust. For other spoilage,
use a lukewarm all purpose cleaning solution
or a mild saddle soap for vinyl and leather
trim. Remove water spots and soap traces
with a clean, damp cloth or sponge. Use a clean, soft cloth to rub dry.
Grease, tar or oil stains can be removed with
a clean cloth or sponge soaked with all
purpose cleaner or with a solvent type vinyl or
leather cleaning agent.
Occasionally apply a colorless vinyl or leather
preservative to retain the material's luster and
pliability.
Leather and leather trim
To keep leather seats and trim beautiful and
soft, they should be cleaned and cared for
regularly. Clean leather with a soft, white
woolen cloth and a mild soapwater solution. Do not use chemical or abrasive cleaning
agents. Do not let moisture seep through
perforated surfaces to safeguard against
corrosion and cracking from underneath. After cleaning, apply a leather preservative re-
commended by Porsche to all dry surfaces with a clean and soft woolen cloth. Let your
Porsche dealer advise you on the use of the
leather preservation product.
Corrosion protection
The engine compartment, as well as all
engine, transmission, front and rear axle
assembly surfaces have been treated with a
wax based coating at the factory for protection against corrosion.
WARNING
Do not apply additional undercoating or
rustproofing on or near the exhaust
manifold, exhaust pipes, catalytic
converter or heat shields. During driving,
the substance used for undercoating could overheat and cause a fire.
Engine Compartment
If it becomes necessary to steam clean or
otherwise wash the engine compartment, the
wax based protective coating is usually lost. It is therefore important to reapply this
protective coating to all engine compart-
65
ment panels, flanges, cavities, seams and
engine assembly surfaces.
When washing the engine compartment,
only use commercially available grease
cutting solvents made especially for this
purpose. Carefully fol
low directions printed on the container by the manufacturer.
Chassis
The lower body shell of your Porsche is
thoroughly protected against corrosion.
However, it is recommended to have the
underbody inspected twice a year. Any
detected damage to the undercoating, due to
road hazards, should be repaired promptly. Oil based protective sprays must not be applied. Only tar or wax based anti corrosion protectors are compatible with the factory applied undercoating. Before application, road dirt and oily substances must be removed.
Whenever the lower body shell, axle,
transmission or engine assemblies are
repaired, the lost anti-corrosion coating of
the affected surfaces should be renewed.
Let your Porsche dealer advise and assist you.
66
Page 35 of 66

Exercise Extreme Caution when Working under the
Engine Hood
The engine compartment of any motor vehicle is a potentially hazardous area. If you are not
fully familiar with proper repair procedures, do
not attempt the adjustments described on the
following pages. This caution applies to the
entire vehicle.
Only work on your vehicle outdoors or in a well ventilated area. Ensure that there are no open flames in the
area of your vehicles at any time when
gasoline fumes might be present. Be
especially cautious of such devices such as
hot water heaters which ignite a flame
intermittently.
Before working on any part in the engine
compartment, turn the engine off and let it
cool down sufficiently. Hot engine
compartment components can burn skin on
contact.
Even after the engine has stopped the
radiator fan may continue running until the
temperature of the coolant has dropped to a
certain level. Therefore, never touch the fan
blades as they will rotate spontaneously
when the thermostat turns the fan on, even with ignition off. Be alert and cautious around engine at all
times while the engine is running.
If work has to be done with the engine
running, always set the parking brake, and
make sure the shift lever is in either Neutral
or Park.
Exercise extreme caution to prevent
neckties, jewelry or long hair from getting
caught in the fan blades, the drive belts, or
any other moving engine parts.
Your Porsche is equipped with a
transistorized ignition system with
breakerless distributor. When the ignition is
on, high voltage is present in all wires
connected with the ignition system; therefore
exercise extreme caution when working on
any part of the engine while the ignition is on
or the engine is running.
Always support your car with safety stands if it is necessary to work underneath the car.
The jack supplied with the car is not
adequate for this purpose.
When working underneath the car without
safety stands but with the wheels on the
ground, make sure the car is on level ground, that the wheels are blocked, and that the
engine cannot be started. REMOVE THE
IGNITION KEY.
Do not smoke or allow an open flame around the battery or gasoline. Keep a fire extinguisher in close reach.
Incomplete or improper servicing may cause
problems in the operation of the car. If in
doubt about any servicing, have it done by
your authorized Porsche dealer or any other
properly equipped and qualified workshop.
Improper maintenance during the warranty
period may affect your warranty coverage.
67
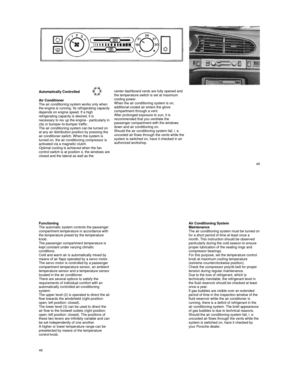
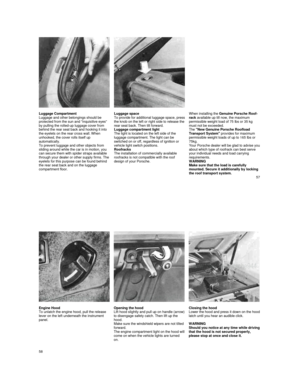
Tool Kit and Car Jack
The tool kit and jack are stored in the luggage
compartment under the floor mat.
The car jack must be screwed open a little
before it can be removed from the holder.
The tool kit contains tools needed for minor
emergency roadside repairs, adjustments and
wheel changing.
Regulations in some countries require
additional tools. Details should be obtained
prior to leaving for a foreign country.
WARNING
Use the jack only for changing a tire. Never jack up other vehicles or other loads with it. Follow all warnings and instructions found in this manual for changing a tire. The jack must never be used as a support to work underneath the vehicle. If the jack is accidently dislodged, you or bystanders could be seriously injured. When working
under the vehicle, always use safety
stands specifically designed for this
purpose.
68
Page 36 of 66

944
944 S
944 Turbo Engine Oil Level
Engine oil consumption
It is normal for your engine to consume oil.
The rate of oil consumption depends on the
quality and viscosity of oil, the speed at which
the engine is operated, the climate, road
conditions as well as the amount of dilution
and oxidation of the lubricant.
Because of these variables, no standard rate
of oil consumption can be established, but
drivers should expect an increased oil
consumption at high speeds and when the
engine is new.
The engine in your vehicle depends on oil to lubricate and cool all of its moving
parts. Therefore, the engine oil should be
checked regularly and kept at the required level.
Make it a habit to have the engine oil level checked with every fuel filling. Lack of sufficient engine oil may lead to severe engine damage. The oil pressure warning light is not an oil level indicator.
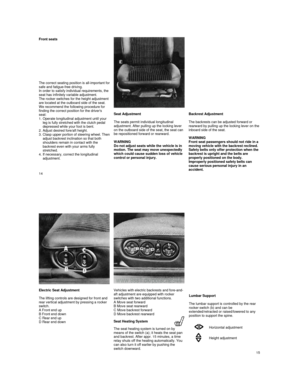
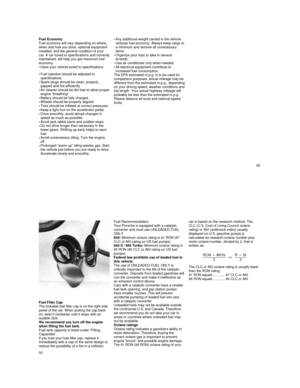
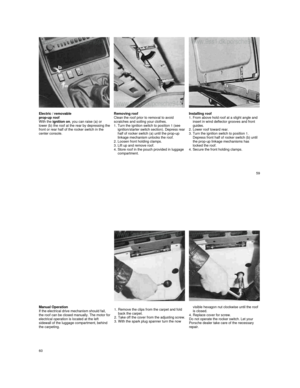
Checking oil level
To get a true reading, the car should be on
level ground. After turning off the engine, wait
a few minutes for the oil to return to the oil
sump.
1. Pull out dipstick and wip
e it dry with a clean cloth or paper towel.
2. Reinsert dipstick: push it in all the way
down for an accurate reading.
3.
Pull dipstick out again. The oil level is
correct if it is between the "max" and "min"
marks on the dipstick.
4.
If oil level is below "min" mark, or not
showing on dipstick, add oil immediately.
The difference between the "max" and "min",
marks is about 1 U.S. quart or 1 liter. 69
Adding engine oil Only add the amount of oil that is needed. The correct oil grade and viscosity
recommendation is given under "Engine Oils". 1. Remove oil filler cap and remove dipstick.
2. Top up with quality oil labeled "API Service
SE or SF".
3.
Check oil level with the dipstick. The "max"
mark should not be exceeded.
4.
Replace cap and tighten securely.
WARNING
The oil filler cap and dipstick must be
secure to avoid oil spills and resulting fire
hazard.
944-Turbo
Engine Guard
Before working on the underside of the engine for the 944 Turbo, remove the two-part engine guard.
70
Page 37 of 66

Changing Engine Oil
and Filter
High quality-multi-
grade oils are suitable for all year round driving. Seasonal oil changes are
therefore not necessary. Only if multi-grade
oils are not readily available, a single-
grade oil of the correct viscosity can be used.
Specifications of the various oils to be used
are detailed under "Filling Capacities and
Engine Oil". The use of oil additives is not
recommended by Porsche.
WARNING
When removing oil drain plug with your fingers, keep your arms as high as
possible. This will prevent hot oil from
running down your arm. Wear eye
protection.
Always use a new gasket when reinstalling the plug. Do not overtighten
the plug.
Before changing the engine oil yourself,
make sure that the disposal of the engine
oil and the oil filter, as special wastes, can
be carried out in the proper manner. Under absolutely no circumstance should used
oil find its way into the sewage system,
soil, rivers, ponds, or other
environmentally damaging areas. If there is no possibility of disposing of used oil in the proper manner
(when in doubt, consult local authorities),
please have the oil changed by your dealer or a service station.
Oil change intervals specified in the Warranty
& Maintenance booklet accompanying the
vehicle apply to normal operating conditions
and must be adhered to, including intervals for oil filter change.
If you drive mostly short distances, or if you
operate the vehicle in dusty areas, or under
predominantly stop-and-go traffic conditions,
or when temperatures remain below freezing
for extended periods, the engine oil should be
changed more frequently.
When chang
ing the engine oil and the oil filter, the splash shield under the car has to be
removed first.
Drain the oil when the engine is still warm.
71
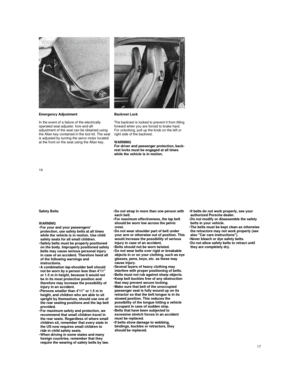
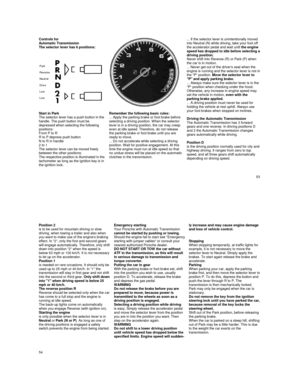
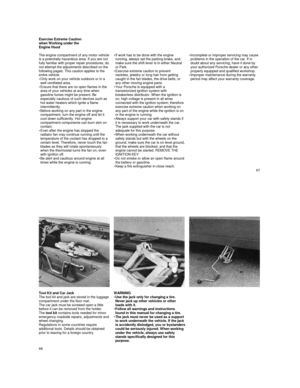
The oil filter should be changed at the inter-
vals listed in your Maintenance Schedule.
1. Unscrew the oil drain plug (arrow), remove the oil filler cap and allow oil to drain
completely.
2.
Loosen oil filter element with appropriate wrench and remove.
3. Lightly coat new filter seal with engine oil.
4. Screw on filter by hand until gasket
contacts, tighten by one further turn and
finally recheck tightness of filter with the oil
filter wrench.
Specified tightening torque:
20 Nm (14 ftlb).
5.
Clean oil drain plug. Always use a new
gasket when reinstalling the plug. Do not
overtighten the plug. Correct tightening
torque is 43 ft. Ib. or 60 Nm.
6.
Fill the crankcase with the required amount of engine oil labeled "API Service SE or SF" (see "Filling Capacities"). Do not overfill.
7. Check oil level with dipstick. Top up if necessary. Reinstall oil filler cap and tighten securely.
8. Run the engine at various speeds for 3-5
minutes and check for leaks.
See Exercise Extreme Caution
72
Page 38 of 66

Power Assisted Steering
The hydraulic assistance system allows
effortless steering under all driving conditions.
Slight hissing or squeaking sounds during
sharp turns (turning steering wheel from lock
to lock) are normal and do not indicate a
defective steering mechanism.
If the engine is not running, po
wer assisted steering is no longer effective. You can
continue to steer the car but more effort
will be required to turn the steering wheel.
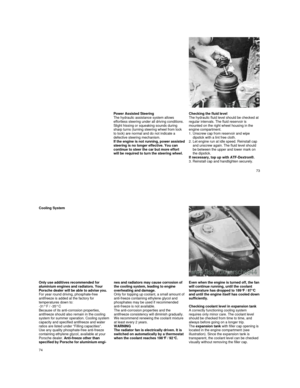
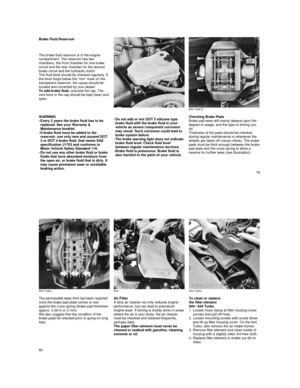
Checking the fluid level
The hydraulic fluid level should be checked at
regular intervals. The fluid reservoir is
mounted on the right wheel housing in the
engine compartment.
1.
Unscrew cap from reservoir and wipe
dipstick with a lint free cloth.
2.
Let engine run at idle speed. Reinstall cap
and unscrew again. The fluid level should
be between the upper and lower mark on
the dipstick.
If necessary, top up with ATF-Dextron®.
3. Reinstall cap and handtighten securely.
73
Cooling System
Only use additives recommended for
aluminium engines and radiators. Your
Porsche dealer will be able to advise you.
For year round driving, phosphate-free
antifreeze is added at the factory for
temperatures down to:
-31° F / -35° C
Because of its anti-corrosion properties,
antifreeze should also remain in the cooling
system for summer operation. Cooling system capacity and specified antifreeze and water
ratios are listed under "Filling capacities".
Use any quality phosphate-free anti-freeze
containing ethylene glycol, available at your
Porsche dealer. Anti-freeze other than
specified by Porsche for aluminium engi-
nes and radiators may cause corrosion of
the cooling system, leading to engine
overheating and damage.
Only
for topping up coolant, a small amount of anti-freeze containing ethylene glycol and
phosphates may be used if recommended
anti-freeze is not available.
The anti-corrosion properties and the
antifreeze consistency will diminish gradually.
We recommend renewing the coolant mixture
at least every 2 years.
WARNING
The radiator fan is electrically driven. It is
switched on automatically by a thermostat
when the coolant reaches 198°F / 92°C.
Even when the engine is turned off, the fan will continue running, until the coolant
temperature has dropped to 189°F / 87°C
and until the engine itself has cooled down sufficiently.
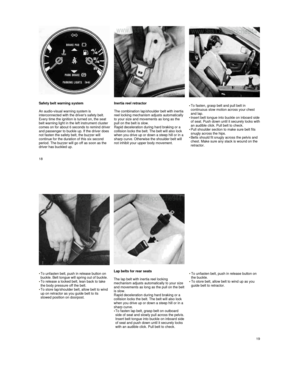
Checking coolant level in expansion tank
A correctly functioning cooling system requires only minor care. The coolant level
should be checked from time to time, and
always before going on a longer trip.
The
expansion tank with filler cap opening is
located in the engine compartment (see
illustration). Since the expansion tank is
transparent, the coolant level can be checked
visually without removing the filler cap.
74
Page 39 of 66

When the engine is cold, the coolant level
should reach the minimum mark on the
expansion tank. When the engine is warm, the coolant level will be above the minimum mark. Since the closed cooling system loses almost
no coolant, topping up is normally not
required. An obvious loss of coolant indicates
leakage. In this case contact your dealer.
WARNING
Do not open the filler cap when the engine is hot because of the danger of
scalding. Allow the engine to cool down.
Protect your hands, arms and face.
Using a thick rag, open the cap carefully and only enough to allow excess
pressure to escape before removing the
cap.
To avoid damage to the engine, only add
cold antifreeze and cold water
to the cooling system when the engine is also cold. A warm engine should only be topped up if the coolant level has dropped appreciably below
the minimum mark. Too much added coolant
will escape through the pressure cap when coolant warms up.
If more than about 1.06 U.S qt or 1 liter must
be added, the cooling system should be bled.
Winter operation At the beginning of the winter season, have the coolant checked for anti-freeze
concentration.
The ratio between water and anti-freeze
necessary to prevent freezing depends on the
anticipated outside temperatures. The ratios
can be taken from the mixing chart listed
under "Filling Capacities" or from the container of the antifreeze manufacturer.
Increasing the anti-freeze in the coolant
further than shown on the container is not
only uneconomical, it is also detrimental to engine cooling.
75
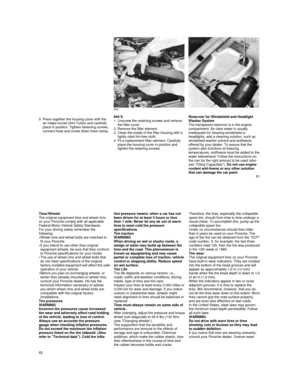
944 Draining the coolant
Engine must be cold
1. Move temperature control lever to "warm".
2.
Remove filler cap from expansion tank.
3. Unscrew drain plug on radiator and on engine block (curved arrows). Allow coolant to drain completely.
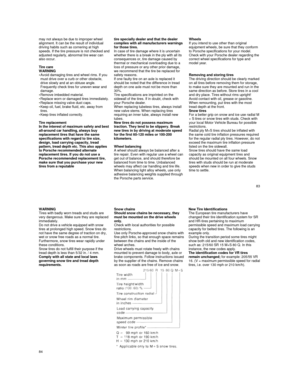
Bleeding cooling system and topping up
coolant
1. Reinstall radiator drain plug. Do not overtighten plug (required torque is 43 in.
lb/5 Nm).
2.
When reinstalling engine block drain-plug,
use a new gasket. Do not overtighten plug
(required torque is 14 ft lb/20 Nm).
3.
Move temperature control lever to "warm".
4. Unscrew the vent plug (single white arrow)
and remove.
5. Remove the expansion tank filler cap and
slowly pour coolant into the tank. Stop
pouring as soon as fluid runs out of vent
plug opening.
6.
The expansion tank should only be about
half full so as to prevent any overflow once
the engine is warm.
7.
Screw in the vent plug loosely.
8. Start the engine. Let engine run at increased idle until it has reached operating temperature (the radiator fan will turn on
and off).
76
Page 40 of 66
.
10.
Check coolant level in tank and top up to
\"max\"")
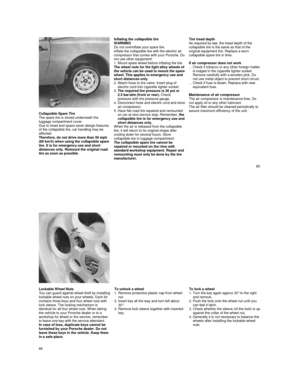
944 S
944 Turbo
9. When air bubbles at vent plug disappear, tighten the plug (required torque is 15-18
Nm or 11-13 ft lb).
10.
Check coolant level in tank and top up to
"max" mark, if necessary.
11.
Reinstall the expansion tank filler cap. After a test drive recheck the coolant level. See "filling capacities" for amount
required.
Manual Transmission oil
Both transmission and final drive are
combined in one housing. The lubricant used
is hypoid oil.
The manual transmission oil should be
checked and changed by your Porsche dealer
and at the intervals specified in your
Maintenance Schedule.
77
Automatic Transmission Fluid The torque converter and the transmission are lubricated with Automatic Transmission Fluid
(ATF). The final drive requires hypoid oil SAE
90 only.
Do not tow the car or run the engine
without ATF in the transmission.
Checking the ATF level
The ATF has to be checked at frequent
intervals, for instance, when the engine oil is
being checked or at least at the specified
intervals (see Maintenance schedule). A
correct ATF level is very important for the
proper functioning of the transmission. The
reading should be done when the ATF is warm, with the engine idling, the selector lever in Neutral and the parking brake applied.
The level of the ATF fluid can be checked
visually through the transparent reservoir. This reservoir is located at the rear end of the
transmission housing. You have enough ATF
if the fluid level is between the Min. and Max.
marks. It should never be above or below
these marks.
The difference between the two marks is 1
U.S. pint or 0.4 liter.
If level is too high or too low do not just add or
drain ATF. Have your dealer check and
correct the cause as soon as possible.
For correct ATF specifications, see "Filling
Capacities".
Changing the ATF
The ATF and the hypoidoil in the final drive
has to be changed at specified intervals (see
Maintenance schedule).
78