1987 PORSCHE 944 alternator
[x] Cancel search: alternatorPage 3 of 66

INDEX
A
ABS Acceleration diagram Accelerator pedal Air Bag System Air - cleaner
- conditioner
- filter
Alternator warning light Antifreeze Antilock, Brake system Anti-theft alarm Ashtray Automatic- garage door
- speed control
- transmission
- transmission fluid B
Battery
Boost pressure gauge
Brake - booster
- fluid
- fluid warning light
- pads
- parking
- pedal
- system
- warning light
Break-in hints
Bulb replacing
Buzzer 28,39
118-129
55
20, 21, 38, 3980, 8144-4680,81 39
74,75,11028, 39
11
42, 98
25
29
53-55
78,110,128
90-9234
27
39,79,11039
27,37,47,79,80 26
26, 27
26,27,11537
47
93-98
10,18,24,30
C/D
CASIS
Capacities
Car care instructions
Casis
Catalytic Converter
Cautions
Central locking
Central warning light
Cigarette lighter
Cleaning
Clock
Clutch pedal
Collapsible spare tire
Control warning light system
Coolant Temperature Gauge
Cooling system
Corrosion prevention
Dashboard
Defogging/defrosting
Dimensions
Doors
Driving hints
E/F
Electrical system
Emergency- flasher
- starting
Emission Control System
Engine - cooling
- exhaust
- hood
- number
- oil checking & changing
- oil
-speed, max 35
110
61-66
35
50,10267
13
37
41
61-66 40
27
85
36-39 36
74-77
65-66
24
44-46 114
12,138-9, 48, 49
89-92
41
92
100-103 74-77
48
586
69-72
69,110,111,128
34,47,52,106-
108
Fan control switch knob
Fan, radiator
Filling capacities
Fog lights
Fuel - economy
- evaporation control
- gauge
- recommendation
- tank
Fuses and relays
G/H
Gas Station Information
Gasohol
Gasoline
Gear ratio diagram
Gearshift lever
Glove compartment
Hatchback
Headlights
Headlight- dimmer
- flasher
- switch
- washing system
Heater/ventilation controls
Hood - front
- rear
Horn
I/J
Ignition/steering lock
Instrument illumination
Instruments
Interior ligh 44
36, 74 110
30, 96, 97
49
103 37
50, 51
50,110
89,126
126-129 51
50,51
122-125 52-55
42
56
30,95,99 30
30
30
31,32,81,11044-4658
56,57
21,24
24
30
33-40
43, 98
4
Jack
- supports
K/L
Keys
Kickdown
Lane changer
Leather
License plate light
Light switch
Lights - ashtray
- fog
- interior
- license plate
- parking
- turn signal
Locks - doors, wheels
Loudspeakers
Lubricants
Luggage compartment
M/O
Manual transmission
- oil
Mirrors
Oil- change
- consumption
- filter changing
- pressure gauge
- pressure warning light
Octane rating
Oxygen Sensor
P/R
Paint code number 68
87, 88, 129
10-11,86 55
30
65
98
30
98
30, 96, 97
43, 9898
30, 37, 93, 94
30,93,94
10-13, 86 89
110,111 57
52,122-125 77,11022,43
71,72
47, 69
71, 72 38
38
50, 51,106-108 101,102
7
Parking- brake
- lights
Performance
Power assisted steering
Power train
Power windows
Prop-up roof
Radiator fan
Rear - hood
- view mirrors
- window defogger
- wiper
Recirculation Switch
Refrigerant
Relays
Rims
Roof racks
Roof, removable S
Safe driving hints
Safetybelts
Safety belt warning light
Safety compliance sticker
Seat heating System
Seats
Sekuriflex windshield
Shift indicator
Shift points
Side marker lights
Ski racks
Snow- chains
- tires
Spare tire, collapsible
Spark plugs
Specifications, engine
26, 3730,37,93,94116731091259, 6036, 7456,572241424446,11089,12664,112,11357,11459, 60
8-9
17-21,6518,3771514-1631, 63, 643552-559457,11483, 84,112,113
83,84, 111,113
85106-108106-109
Speedometer
Starting procedures
Sun visors
T/U
Tachometer
Technical data
Tirepressure
Tires
Tool kit
Trip odometer
Transmission oil
Trunk
Turn signal lights
Undercoating
Unleaded fuel
V/W
Vehicle identification
Ventilation
Voltmeter
Warning/indicator lights
Washer reservoir
Washing
Water temperature gauge
Weatherstrips
Weights
Wheel alignment
Wheel nuts, lockable
Wheels
Wheel changing
Windows
Windshield- washer reservoir
- wiper/washer lever 3324, 2543
34, 35105-12582,112,113,12947,82-87,112,113683377, 78,11056,5730, 37, 93, 9465, 66,10050, 51,106-108,110
6-744-463835-4081,11061-6636641141158647,64,82-87,11285-8812,63,6481,11031
5
Page 13 of 66
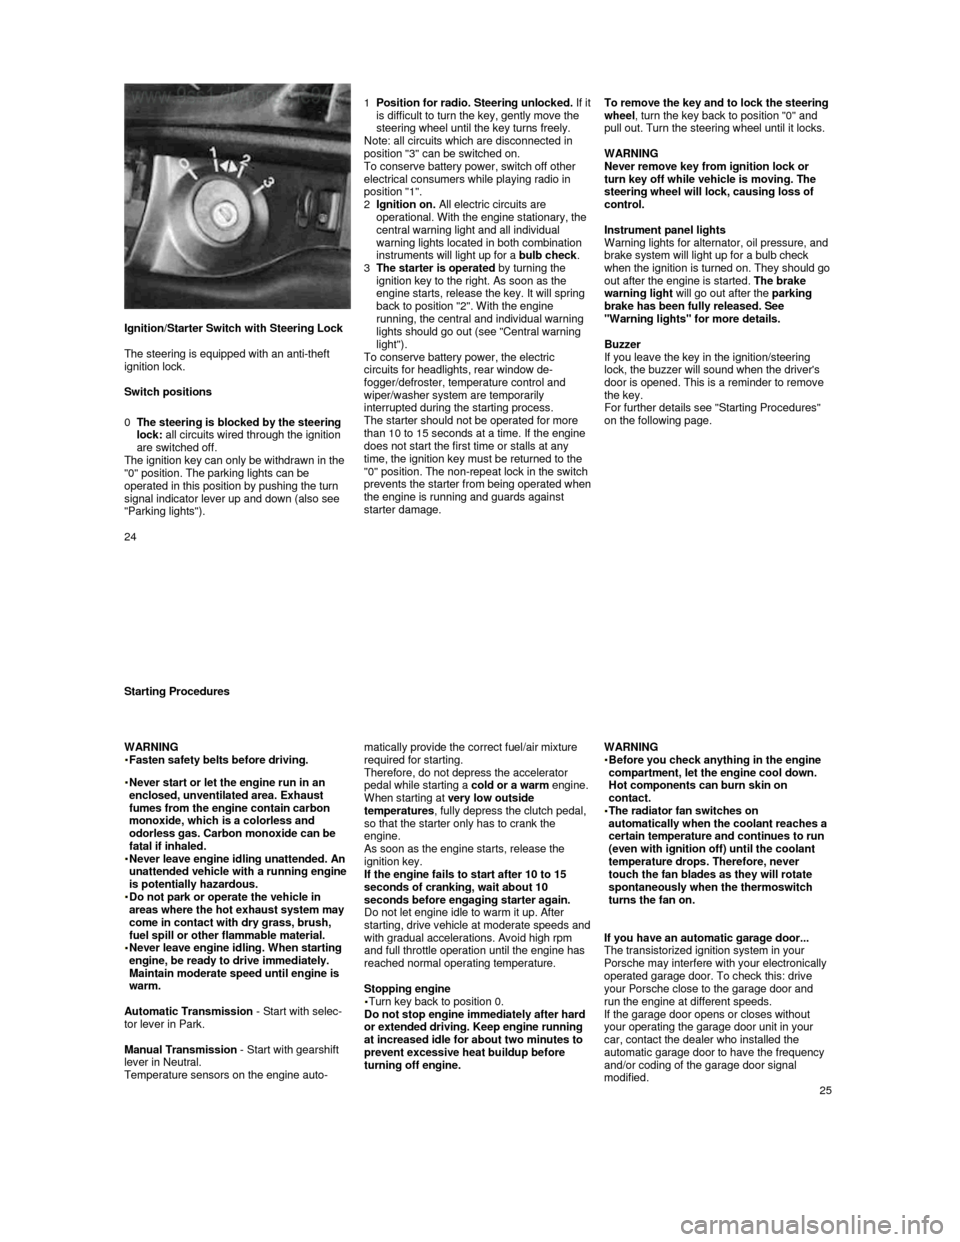
Ignition/Starter Switch with Steering Lock
The steering is equipped with an anti-theft
ignition lock.
Switch positions
0
The steering is blocked by the steering lock: all circuits wired through the ignition
are switched off.
The ignition key can only be withdrawn in the
"0" position. The parking lights can be
operated in this position by pushing the turn
signal indicator lever up and down (also see
"Parking lights").
1 Position for radio. Steering unlocked. If it is difficult to turn the key, gently move the
steering wheel until the key turns freely.
Note: all circuits which are disconnected in
position "3" can be switched on.
To conserve battery power, switch off other
electrical consumers while playing radio in
position "1".
2
Ignition on. All electric circuits are
operational. With the engine stationary, the
central warning light and all individual
warning lights located in both combination
instruments will light up for a bulb check.
3
The starter is operated by turning the
ignition key to the right. As soon as the
engine starts, release the key. It will spring
back to position "2". With the engine
running, the central and individual warning
lights should go out (see "Central warning
light").
To conserve battery power, the electric
circuits for headlights, rear window de-
fogger/defroster, temperature control and
wiper/washer system are temporarily interrupted during the starting process.
The starter should not be operated for more
than 10 to 15 seconds at a time. If the engine
does not start the first time or stalls at any
time, the ignition key must be returned to the
"0" position. The non-repeat lock in the switch
prevents the
starter from being operated when the engine is running and guards against
starter damage.
To remove the key and to lock the steering
wheel
, turn the key back to position "0" and
pull out. Turn the steering wheel until it locks.
WARNING
Never remove key from ignition lock or
turn key off while vehicle is moving. The
steering wheel will lock, causing loss of
control.
Instrument panel lights
Warning lights for alternator, oil pressure, and
brake system will light up for a bulb check
when the ignition is turned on. They should go out after the engine is started. The brake
warning light will go out after the parking
brake has been fully released. See
"Warning lights" for more details.
Buzzer
If you leave the key in the ignition/steering
lock, the buzzer will sound when the driver's
door is opened. This is a reminder to remove
the key.
For further details see "Starting Procedures"
on the following page.
24
Starting Procedures
WARNING
Fasten safety belts before driving.
Never start or let the engine run in an enclosed, unventilated area. Exhaust
fumes from the engine contain carbon
monoxide, which is a colorless and
odorless gas. Carbon monoxide can be
fatal if inhaled.
Never leave engine idling unattended. An unattended vehicle with a running engine
is potentially hazardous.
Do not park or operate the vehicle in areas where the hot exhaust system may
come in contact with dry grass, brush,
fuel spill or other flammable material.
Never leave engine idling. When starting engine, be ready to drive immediately.
Maintain moderate speed until engine is
warm.
Automatic Transmission - Start with selec-
tor lever in Park.
Manual Transmission - Start with gearshift
lever in Neutral.
Temperature sensors on the engine auto- matically provide the correct fuel/air mixture
required for starting.
Therefore, do not depress the accelerator
pedal while starting a cold or a warm engine.
When starting at very low outside
temperatures , fully depress the clutch pedal,
so that the starter only has to crank the
engine.
As soon as the engine starts, release the ignition key.
If the engine fails to start after 10 to 15
seconds of cranking, wait about 10
seconds before engaging starter again.
Do not let engine idle to warm it up. After
starting, drive vehicle at moderate speeds and with gradual accelerations. Avoid high rpm
and full throttle operation until the engine has
reached normal operating temperature.
Stopping engine
Turn key back to position 0.
Do not stop engine immediately after hard
or extended driving. Keep engine running
at increased idle for about two minutes to
prevent excessive heat buildup before
turning off engine.
WARNING
Before you check anything in the engine compartment, let the engine cool down.
Hot components can burn skin on
contact.
The radiator fan switches on automatically when the coolant reaches a
certain temperature and continues to run
(even with ignition off) until the coolant
temperature drops. Therefore, never
touch the fan blades as they will rotate
spontaneously when the thermoswitch
turns the fan on.
If you have an automatic garage door...
The transistorized ignition system in your
Porsche may interfere with your electronically
operated garage door. To check this: drive
your Porsche close to the garage door and
run the engine at different speeds.
If the garage door opens or closes without
your operating the garage door unit in your
car, contact the dealer who installed the
automatic garage door to have the frequency
and/or coding of the garage door signal
modified.
25
Page 20 of 66
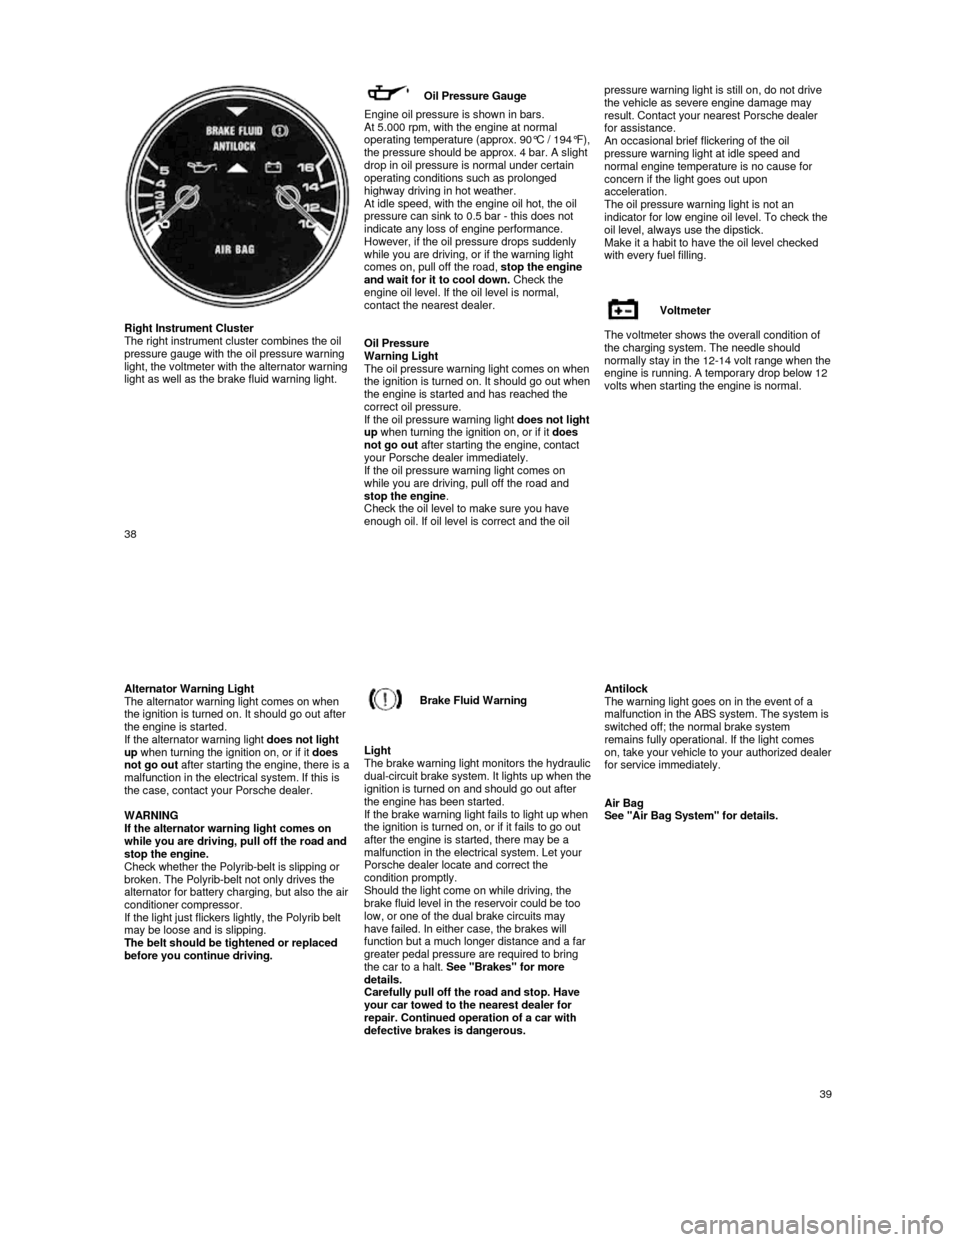
Right Instrument Cluster
The right instrument cluster combines the oil
pressure gauge with the oil pressure warning
light, the voltmeter with the alternator warning
light as well as the brake fluid warning light.
Oil Pressure Gauge
Engine oil pressure is shown in bars. At 5.000 rpm, with the engine at normal operating temperature (approx. 90°C / 194°F), the pressure should be approx. 4 bar. A slight
drop in oil pressure is normal under certain
operating conditions such as prolonged
highway driving in hot weather.
At idle speed, with the engine oil hot, the oil pressure can sink to 0.5 bar - this does not
indicate any loss of engine performance.
However, if the oil pressure drops suddenly
while you are driving, or if the warning light comes on, pull off the road,
stop the engine
and wait for it to cool down. Check the
engine oil level. If the oil level is normal,
contact the nearest dealer.
Oil Pressure
Warning Light
The oil pressure warning light comes on when the ignition is turned on. It should go out when the engine is started and has reached the
correct oil pressure.
If the oil pressure warning light
does not light up when turning the ignition on, or if it does
not go out after starting the engine, contact
your Porsche dealer immediately.
If the oil pressure warning light comes on
while you are driving, pull off the road and stop the engine .
Check the oil level to make sure you have
enough oil. If oil level is correct and the oil pressure warning light is still on, do not driv
e
the vehicle as severe engine damage may
result. Contact your nearest Porsche dealer
for assistance.
An occasional brief flickering of the oil pressure warning light at idle speed and
normal engine temperature is no cause for
concern if the light goes out upon
acceleration.
The oil pressure warning light is not an
indicator for low engine oil level. To check the
oil level, always use the dipstick.
Make it a habit to have the oil level checked
with every fuel filling.
Voltmeter
The voltmeter shows the overall condition of
the charging system. The needle should
normally stay in the 12-
14 volt range when the engine is running. A temporary drop below 12
volts when starting the engine is normal.
38
Alternator Warning Light
The alternator warning light comes on when
the ignition is turned on. It should go out after
the engine is started.
If the alternator warning light does not light
up when turning the ignition on, or if it does
not go out
after starting the engine, there is a malfunction in the electrical system. If this is
the case, contact your Porsche dealer.
WARNING
If the alternator warning light comes on
while you are driving, pull off the road and
stop the engine.
Check whether the Polyrib-belt is slipping or
broken. The Polyrib-belt not only drives the
alternator for battery charging, but also the air
conditioner compressor.
If the light just flickers lightly, the Polyrib bel t
may be loose and is slipping.
The belt should be tightened or replaced
before you continue driving.
Brake Fluid Warning
Light
The brake warning light monitors the hydraulic dual-circuit brake system. It lights up when the ignition is turned on and should go out after
the engine has been started.
If the brake warning light fails to light up when
the ignition is turned on, or if it fails to go out
after the engine is started, there may be a
malfunction in the electrical system. Let your
Porsche dealer locate and correct the
condition promptly.
Should the light come on while driving, the
brake fluid level in the reservoir could be too
low, or one of the dual brake circuits may
have failed. In either case, the brakes will
function but a much longer distance and a far
greater pedal pressure are required to bring
the car to a halt. See "Brakes" for more
details.
Carefully pull off the road and stop. Have
your car towed to the nearest dealer for
repair. Continued operation of a car with
defective brakes is dangerous.
Antilock
The warning light goes on in the event of a
malfunction in the ABS system. The system is
switched off; the normal brake system
remains fully operational. If the light comes
on, take your vehicle to your authorized dealer for service immediately.
Air Bag
See "Air Bag System" for details.
39
Page 46 of 66
If it fails to light up, the fuse is defective and
must be replaced. Replace black plastic
cover.
The central electrical system contains plug in
relays for various electrical switching
functions.
Defective relays should be tested and
replaced by an authorized Porsche dealer.
To prevent damage to the electrical system
we recommend having all work - including the
installation of electrical accessories -carried
out by your authorized Porsche dealer. . ,
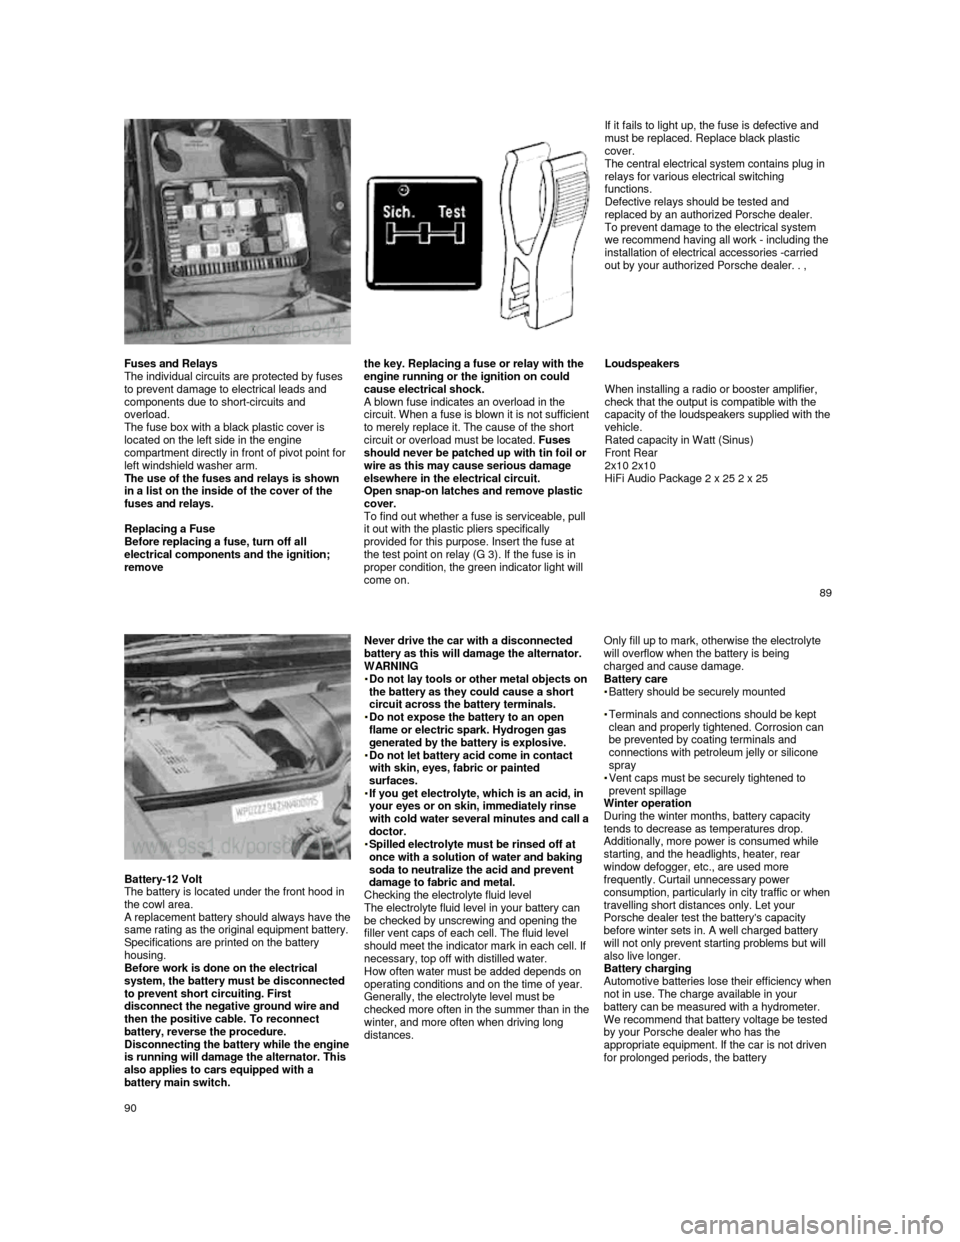
Fuses and Relays
The individual circuits are protected by fuses
to prevent damage to electrical leads and
components due to short-circuits and
overload.
The fuse box with a black plastic cover is
located on the left side in the engine
compartment directly in front of pivot point for
left windshield washer arm.
The use of the fuses and relays is shown
in a list on the inside of the cover of the
fuses and relays.
Replacing a Fuse
Before replacing a fuse, turn off all
electrical components and the ignition;
remove the key. Replacing a fuse or relay with the
engine running or the ignition on could
cause electrical shock.
A blown fuse indicates an overload in the circuit. When a fuse is blown it is not sufficient
to merely replace it. The cause of the short
circuit or overload must be located. Fuses
should never be patched up with tin foil or
wire as this may cause serious damage
elsewhere in the electrical circuit.
Open snap-on latches and remove plastic
cover.
To find out whether a fuse is serviceable, pull
it out with the plastic pliers specifically
provided for this purpose. Insert the fuse at
the test point on relay (G 3). If the fuse is in
proper condition, the green indicator light will
come on.
Loudspeakers
When installing a radio or booster amplifier,
check that the output is compatible with the
capacity of the loudspeakers supplied with the vehicle.
Rated capacity in Watt (Sinus)
Front Rear
2x10 2x10
HiFi Audio Package 2 x 25 2 x 25
89
Battery-12 Volt
The battery is located under the front hood in
the cowl area.
A replacement battery should always have the same rating as the original equipment battery.
Specifications are printed on the battery
housing.
Before work is done on the electrical
system, the battery must be disconnected
to prevent short circuiting. First
disconnect the negative ground wire and
then the positive cable. To reconnect
battery, reverse the procedure.
Disconnecting the battery while the engine is running will damage the alternator. This
also applies to cars equipped with a
battery main switch.
Never drive the car with a disconnected battery as this will damage the alternator. WARNING
Do not lay tools or other metal objects on the battery as they could cause a short
circuit across the battery terminals.
Do not expose the battery to an open flame or electric spark. Hydrogen gas
generated by the battery is explosive.
Do not let battery acid come in contact with skin, eyes, fabric or painted
surfaces.
If you get electrolyte, which is an acid, in your eyes or on skin, immediately rinse
with cold water several minutes and call a doctor. Spilled electrolyte must be rinsed off at once with a solution of water and baking
soda to neutralize the acid and prevent
damage to fabric and metal.
Checking the electrolyte fluid level
The electrolyte fluid level in your battery can
be checked by unscrewing and opening the
filler vent caps of each cell. The fluid level
should meet the indicator mark in each cell. If
necessary, top off with distilled water.
How often water must be added depends on
operating conditions and on the time of year.
Generally, the electrolyte level must be
checked more often in the summer than in the winter, and more often when driving long distances.
Only fill up to mark, otherwise the electrolyte will overflow when the battery is being charged and cause damage.
Battery care
Battery should be securely mounted
Terminals and connections should be kept
clean and properly tightened. Corrosion can
be prevented by coating terminals and
connections with petroleum jelly or silicone
spray
Vent caps must be securely tightened to
prevent spillage
Winter operation
During the winter months, battery capacity
tends to decrease as temperatures drop.
Additionally, more power is consumed while starting, and the headlights, heater, rear window defogger, etc., are used more
frequently. Curtail unnecessary power
consumption, particularly in city traffic or when travelling short distances only. Let your
Porsche dealer test the battery's capacity
before winter sets in. A well charged battery
will not only prevent starting problems but will
also live longer.
Battery charging
Automotive batteries lose their efficiency when not in use. The charge available in your
battery can be measured with a hydrometer.
We recommend that battery voltage be tested
by your Porsche dealer who has the
appropriate equipment. If the car is not driven
for prolonged periods, the battery
90
Page 47 of 66
must be charged at least every 6 weeks. A
discharged battery allows rapid formation of
sulfates, leading to premature deterioration of
the plates.
WARNING
Charge battery in a well ventilated area.
Keep away from open flame or electrical
spark. Do not smoke. Hydrogen gas
generated by the battery is explosive.
Electrolyte fluid that may spill during charging should be washed off with a solution of warm water and baking soda to neutralize the acid. If you get electrolyte in your eyes or on your
skin, immediately rinse with cold water for
several minutes and call a doctor.
Never charge a frozen battery. It may
explode because of gas trapped in the ice.
Allow a frozen battery to thaw out first. Never use a fast charger as a booster to start the engine. This may seriously damage the
vehicle's electrical system and the charger.
Fast charging a battery is dangerous and
should only be attempted by a competent
mechanic with the proper equipment.
Slow battery charging
WARNING
Heed all warnings and follow instructions
that come with your battery charger.
Disconnect battery cables and remove the
battery.
All vent caps should be open. If fluid level is low, it should be topped up to the full mark in
each cell.
Connect charger cables.
Charger cables must be connected
POSITIVE (+) to POSITIVE (+) and
NEGATIVE (-) to NEGATIVE (-).
Do not connect or disconnect charger cables while charger is operating. Switch on charger. Normally, a battery should be charged at no
more than 10 percent of its rated capacity.
Rated capacity of the battery in your vehicle
is listed on the battery housing.
After charging, turn off charger and disconnect charger cables. Tighten the vent caps and reinstall battery.
91
Emergency Starting with Jumper Cables
WARNING
Improper use of booster battery to start a
vehicle may cause an explosion.
Lead-acid batteries generate explosive
gases. Keep sparks, flame and lighted
cigarettes away from batteries.
Do not charge a frozen battery, thaw it out
first. Gas trapped in the ice may cause an
explosion.
No attempt should be made to jump start any vehicle with a low electrolyte level in the
battery.
Check electrolyte level of each cell. If
necessary, fill with distilled water to just
above plates.
Make sure the voltage of both batteries is the same. The capacity (Ah) of the booster battery
should not be lower than that of the
discharged battery.
Vehicle with discharged battery: turn off
lights and accessories, remove key, move
lever to N or P and set parking brake.
Vehicle with booster battery should not be
running. Disconnect ground cable.
Remove vent caps from booster battery and
discharged battery. Preferably lay a cloth
over open vents to reduce explosion hazard.
How to use jumper cables WARNING
To avoid serious personal injury and damage to the vehicle, heed all warnings
and instructions of the jumper cable
manufacturer. The jumper cables must be long enough so that neither vehicles nor cables touch
another.
Improper hook-up of jumper cables can
ruin the alternator.
Always connect POSITIVE (+) to POSITIVE
(+), and NEGATIVE (-) to ground on engine
block.
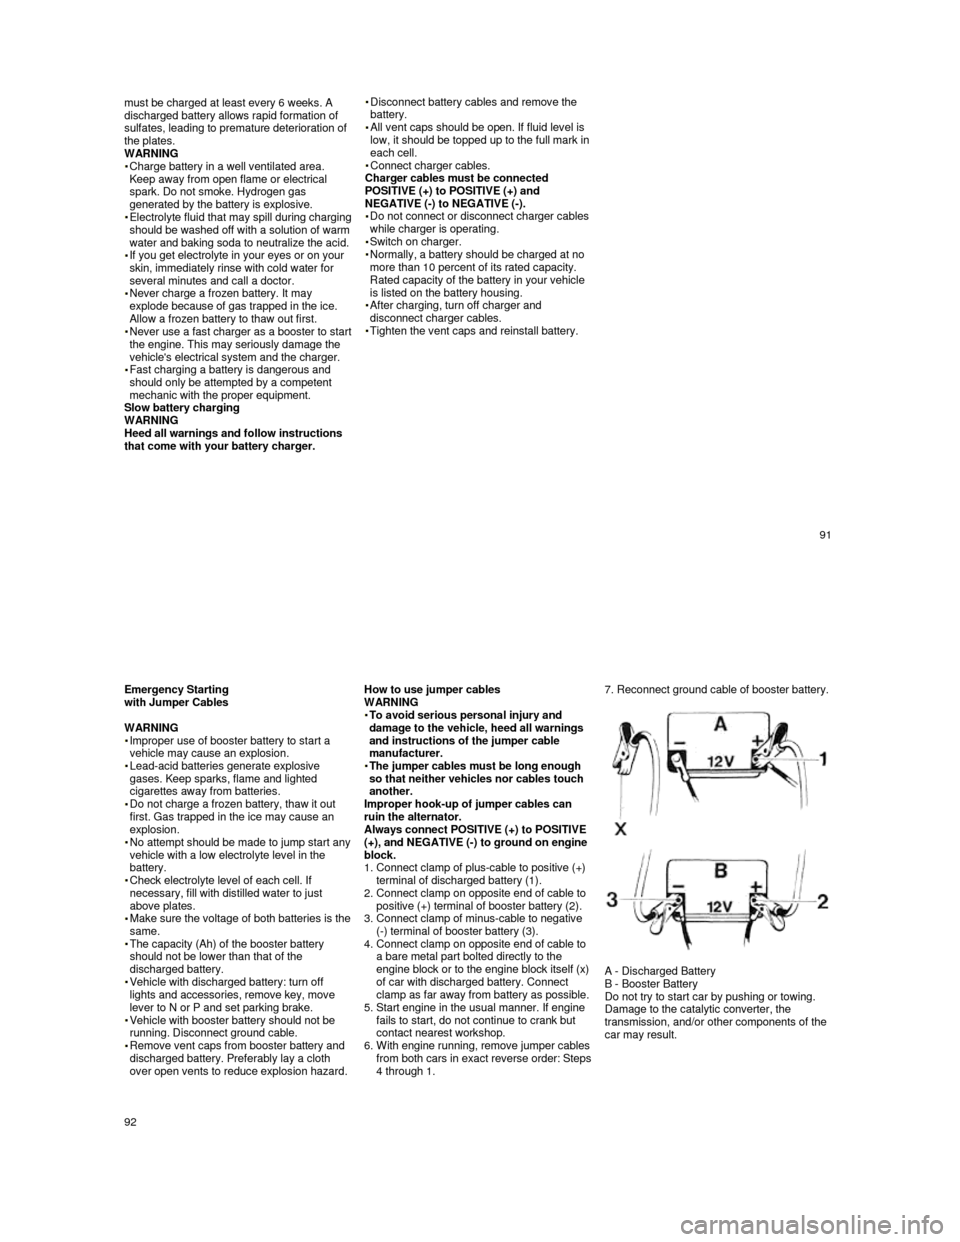
1. Connect clamp of plus-cable to positive (+) terminal of discharged battery (1).
2.
Connect clamp on opposite end of cable to
positive (+) terminal of booster battery (2).
3.
Connect clamp of minus-cable to negative
(-) terminal of booster battery (3).
4.
Connect clamp on opposite end of cable to
a bare metal part bolted directly to the
engine block or to the engine block itself (x)
of car with discharged battery. Connect
clamp as far away from battery as possible.
5. Start engine in the usual manner. If engine
fails to start, do not continue to crank but
contact nearest workshop.
6.
With engine running, remove jumper cables from both cars in exact reverse order: Steps 4 through 1.
7. Reconnect ground cable of booster battery.
A - Discharged Battery
B - Booster Battery
Do not try to start car by pushing or towing.
Damage to the catalytic converter, the
transmission, and/or other components of the
car may result.
92
Page 54 of 66

Technical Data
105
Engine 944 Number of cylinders
4
Bore 3.94 in. / 100 mm
Stroke 3.11 in. / 78.9 mm
Displacement 151 cu. in. / 2479 cm
3
Compression ratio 9.7:1
SAE net-power 147 hp/ 110 kW at 5800 rpm
SAE net-torque 140 ft lb / 190 Nm at 3000 rpm
Output per liter 59,3 SAE net-hp / 44,4 SAE net-kW
Max. permissible rpm 6500
Fuel octane rating Unleaded fuel only 91 RON (87 CLC or AKI ((R+M)/2) rating on fuel pump s in U.S.A.)
Spark plugs Bosch WR 7 DC or
Champion RN 9 YC
Electrode gap 0.028 + 0.004 in. / 0.7 + 0.1 mm
Battery capacity 12 volts, 63 Ah
Alternator output 1610W/115A
Firing order 1-3-4-2
Ignition timing Self-adjusting DME (Digital-Motor-E lectronic)
Ignition Transistorized ignition system with breake r less distributor
Belt for alternator Polyrib K6 1000 Lw
Belt for servo pump 9.5 x 950 LA
Valve clearance Hydraulic valve clearance compensat ion
106
Page 55 of 66

Engine 944 S Number of cylinders
4
Bore 3.94 in. / 100 mm
Stroke 3.11 in. / 78.9 mm
Displacement 151 cu. in. / 2479 cm
3
Compression ratio 10.9:1
SAE net-power 188 hp/ 140 kW at 6000 rpm
SAE net-torque 170 ft lb / 230 Nm at 4300 rpm
Output per liter 75,8 SAE net-hp / 56,5 SAE net-kW
Max. permissible rpm 6800
Fuel octane rating Unleaded fuel only 95 RON (90 CLC or AKI ((R+M)/2) rating on fuel pump s in U.S.A.)
Spark plugs Bosch WR 7 DC
Electrode gap 0.028 + 0.004 in. / 0.7 + 0.1 mm
Battery capacity 12 volts, 63 Ah
Alternator output 1610W/115A
Firing order 1-3-4-2
Ignition timing Self-adjusting DME (Digital-Motor-E lectronic)
Ignition Transistorized ignition system with breake r less distributor
Belt for alternator Polyrib K6 1000 Lw
Belt for servo pump 9.5 x 950 LA
Valve clearance Hydraulic valve clearance compensat ion
107
Engine 944 Turbo
Number of cylinders
4
Bore 3.94 in. / 100 mm
Stroke 3.11 in. / 78.9 mm
Displacement 151 cu. in. / 2479 cm
3
Compression ratio 8.0:1
SAE net-power 217 hp/ 162 kW at 5800 rpm
SAE net-torque 243 ft lb / 330 Nm at 3500 rpm
Output per liter 87,5 SAE net-hp / 65,3 SAE net-kW
Max. permissible rpm 6500
Fuel octane rating Unleaded fuel only 90 RON (90 CLC or AKI ((R+M)/2) rating on fuel pump s in U.S.A.)
Spark plugs Bosch WR 7 DC
Electrode gap 0.028 + 0.004 in. / 0.7 + 0.1 mm
Battery capacity 12 volts, 63 Ah
Alternator output 1610W/115A
Firing order 1-3-4-2
Ignition timing Self-adjusting DME (Digital-Motor-E lectronic)
Ignition Transistorized ignition system with breake r less distributor
Belt for alternator Polyrib K6 1000 Lw
Belt for servo pump 9.5 x 950 LA
Valve clearance Hydraulic valve clearance compensat ion
108
Page 65 of 66
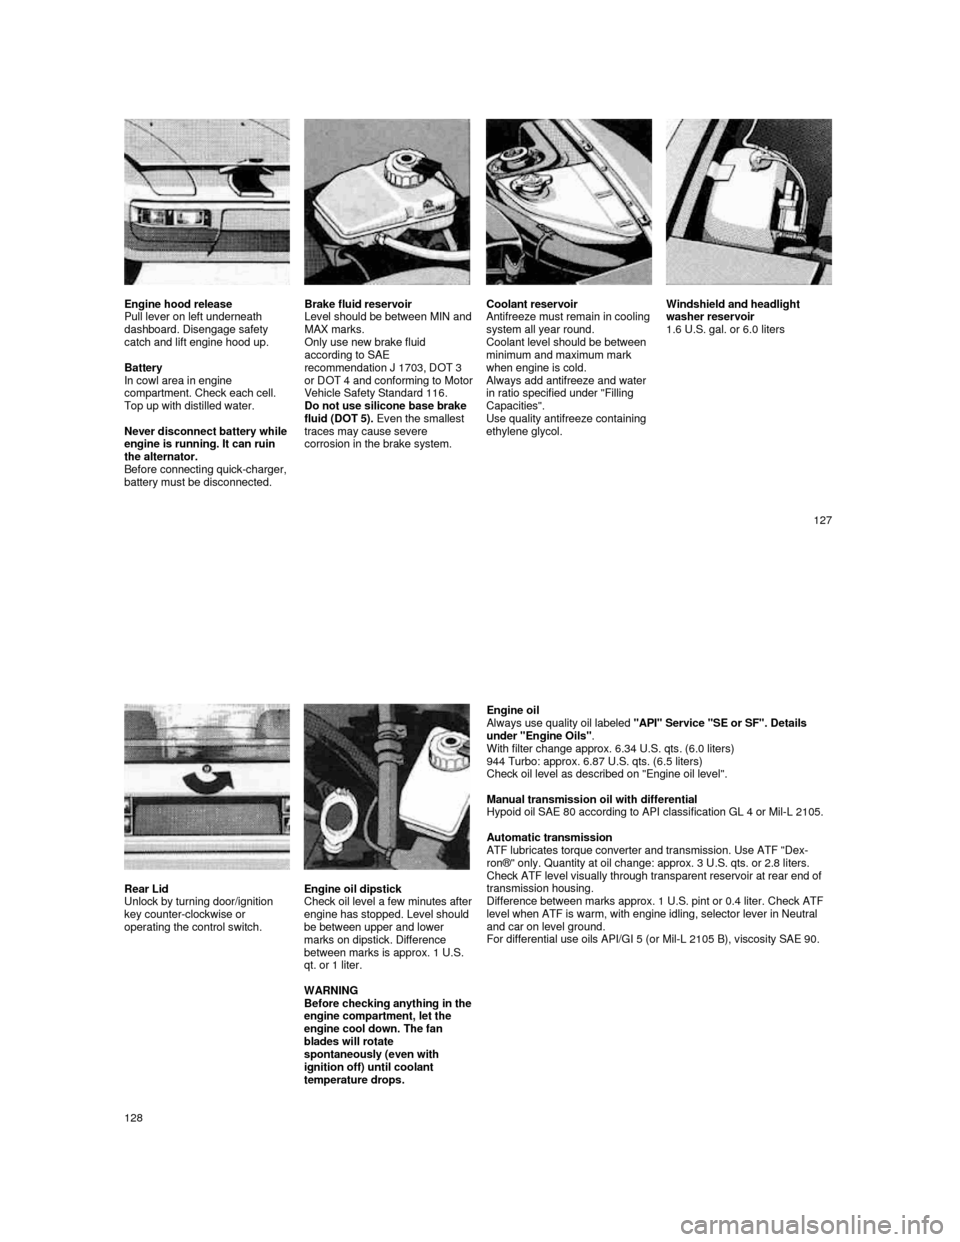
Engine hood release
Pull lever on left underneath
dashboard. Disengage safety
catch and lift engine hood up.
Battery
In cowl area in engine
compartment. Check each cell.
Top up with distilled water.
Never disconnect battery while
engine is running. It can ruin
the alternator.
Before connecting quick-charger,
battery must be disconnected. Brake fluid reservoir
Level should be between MIN and MAX marks.
Only use new brake fluid
according to SAE
recommendation J 1703, DOT 3
or DOT 4 and conforming to Motor Vehicle Safety Standard 116.
Do not use silicone base brake
fluid (DOT 5). Even the smallest
traces may cause severe
corrosion in the brake system.
Coolant reservoir
Antifreeze must remain in cooling
system all year round.
Coolant level should be between
minimum and maximum mark
when engine is cold. Always add antifreeze and water in ratio specified under "Filling
Capacities".
Use quality antifreeze containing
ethylene glycol.
Windshield and headlight
washer reservoir
1.6 U.S. gal. or 6.0 liters
127
Rear Lid
Unlock by turning door/ignition
key counter-clockwise or
operating the control switch.
Engine oil dipstick
Check oil level a few minutes after engine has stopped. Level should
be between upper and lower
marks on dipstick. Difference
between marks is approx. 1 U.S.
qt. or 1 liter.
WARNING
Before checking anything in
the engine compartment, let the
engine cool down. The fan
blades will rotate
spontaneously (even with
ignition off) until coolant
temperature drops.
Engine oil Always use quality oil labeled "API" Service "SE or SF". Details
under "Engine Oils" .
With filter change approx. 6.34 U.S. qts. (6.0 lite rs)
944 Turbo: approx. 6.87 U.S. qts. (6.5 liters)
Check oil level as described on "Engine oil level".
Manual transmission oil with differential
Hypoid oil SAE 80 according to API classification G L 4 or Mil-L 2105.
Automatic transmission
ATF lubricates torque converter and transmission. U se ATF "Dex-
ron®" only. Quantity at oil change: approx. 3 U.S. qts. or 2.8 liters.
Check ATF level visually through transparent reserv oir at rear end of
transmission housing.
Difference between marks approx. 1 U.S. pint or 0.4 liter. Check ATF
level when ATF is warm, with engine idling, selecto r lever in Neutral
and car on level ground.
For differential use oils API/GI 5 (or Mil-L 2105 B ), viscosity SAE 90.
128