Page 1211 of 1865
ASSEMBLY 7C
76G07C-249
(16) Install the transaxle case.
Tightening torque:
29—46 N-m (3.0—4.7 m-kg, 22—34 ft-lb)
(17) Check that the preload is within specification.
If not within specification, return to step (2).
Preload: 2.1—3.0 N-m
(21—31 cm-kg, 18—27 in-lb)
Reading on pull scale: 20—30 N
(2.1—3.1 kg, 4.6—6.8 lb)
(18) Remove the transaxle case.
3. Install the idle gear and output gear as an assem-
bly by tapping in with a plastic hammer.
83U07B-391
4. Install the bearing housing.
(1) Mount the bearing housing onto the convert-
er housing.
Tightening torque:
19—26 N-m (1.9—2.6 m-kg, 14—19 ft-lb)
(2) Align the groove on the idle shaft as shown.
(3) Tap the roll pin in with a pin punch and
hammer.
76G07C-250
7C-97
Page 1219 of 1865
ASSEMBLY 7C
15. Install the drum hub assembly.
76G07C-274
76G07C-275
16. Apply petroleum jelly to the thrust bearing to se-
cure it; then install it into the drum hub assembly.
Thrust bearing outer diameter:
52.9 mm (2.08 in)
17. Apply petroleum jelly to the bearing race to secure
it; then install it into the transaxle case.
Bearing race outer diameter:
51.5 mm (2.03 in)
18. Install the parking pawl assembly.
19. Move the manual shaft and check that the park-
ing pawl meshes properly with the parking gear
when the manual shaft is at P.
76G07C-276
20. Install the governor inlet and outlet pipe.
76G07C-277
7C—105
Page 1221 of 1865
ASSEMBLY 7C
76G07C-279
76G07C-280
76G07C-281
Procedure
1. Install the governor assembly.
(1) Mount the governor along with a new gasket
onto the transaxle case so that the sleeve
projection is aligned with the alignment mark
on the transaxle case.
(2) Install the governor cover along with a new
gasket.
Tightening torque:
8—11 N-m (80—110 cm-kg, 69—95 in-lb)
2. Apply a thin coat of silicone sealant to the contact
surfaces of the converter housing and transaxle
case.
3. Install the transaxle case onto the converter
housing.
Tightening torque:
29—46 N-m (3.0—4.7 m-kg, 22—34 ft-lb)
4. Install the SST into the differential side gear.
Caution
Failure to install the SST may allow the
differential side gears to become misaligned.
76G07C-282
7C-107
Page 1222 of 1865
7C ASSEMBLY
76G07C-283
76G07C-284
5. Install the servo into the transaxle case.
(1) Install the return spring and servo retainer.
(2) Compress the servo retainer with the SST.
(3) Install the snap ring.
(4) Remove the SST.
6. Install the spacer onto the sun gear.
7. Install the sun gear into the connecting shell.
8. Apply petroleum jelly to the bearing race to secure
it; then install it onto the connecting shell.
Bearing race outer diameter:
70.0 mm (2.76 in)
9. Apply petroleum jelly to the thrust bearing to se-
cure it; then install it onto the one-way clutch inner
race.
Thrust bearing outer diameter:
69.9 mm (2.75 in)
76G07C-285 10. Install the sun gear and connecting shell into the
drum hub assembly.
11. Apply petroleum jelly to the thrust bearing to se-
cure it; then install it into the front planetary carrier.
Thrust bearing outer diameter:
46.9 mm (1.85 in)
12. Install the seal sleeve.
76G07C-286
7C—108
Page 1226 of 1865

7C ASSEMBLY
7C-112
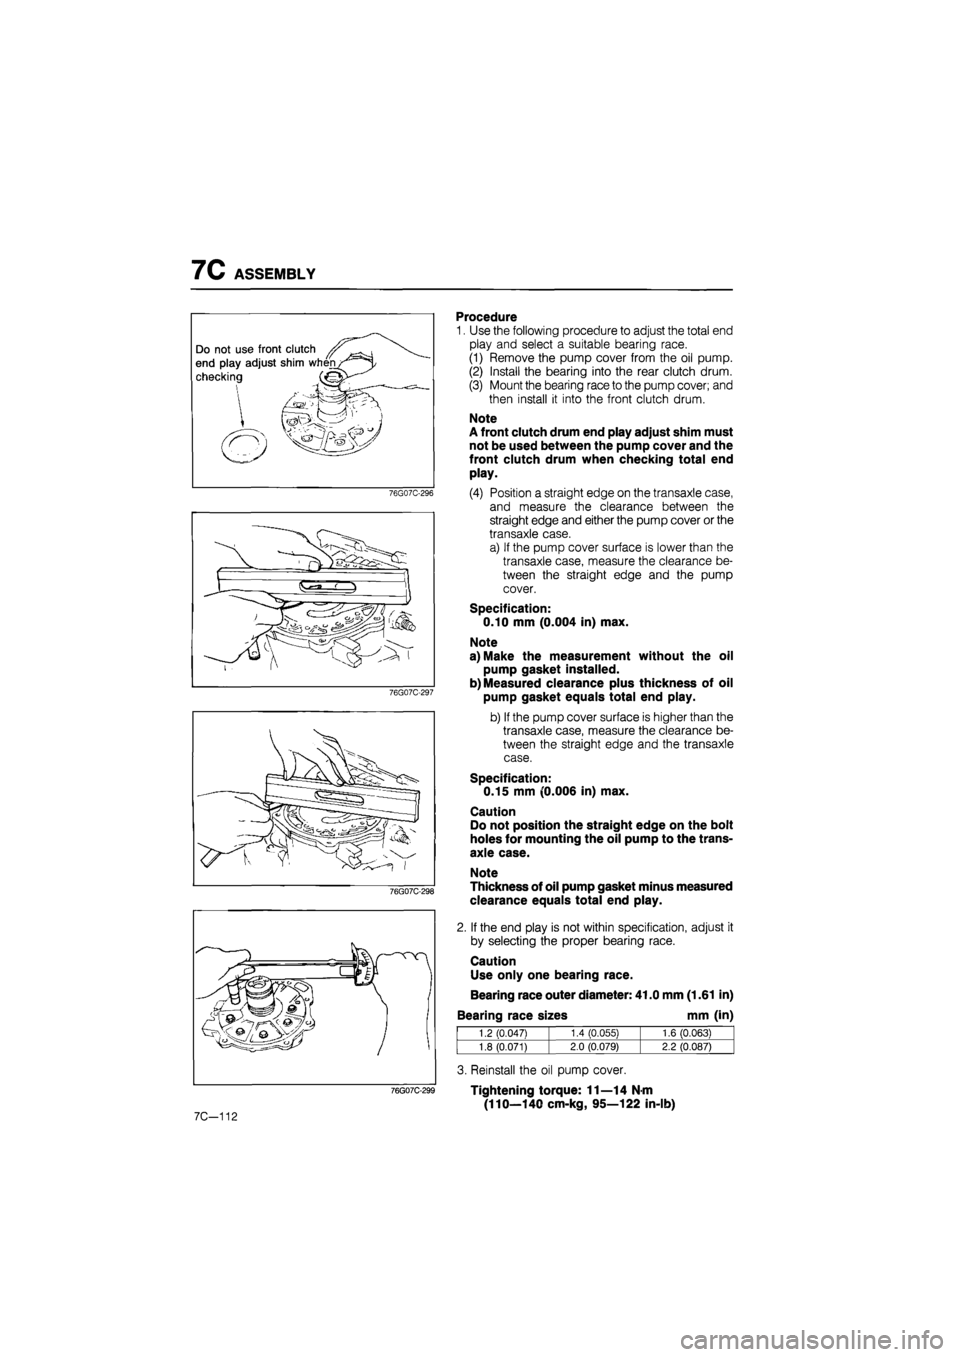
Procedure
1. Use the following procedure to adjust the total end
play and select a suitable bearing race.
(1) Remove the pump cover from the oil pump.
(2) Install the bearing into the rear clutch drum.
(3) Mount the bearing race to the pump cover; and
then install it into the front clutch drum.
Note
A front clutch drum end play adjust shim must
not be used between the pump cover and the
front clutch drum when checking total end
play.
(4) Position a straight edge on the transaxle case,
and measure the clearance between the
straight edge and either the pump cover or the
transaxle case.
a) If the pump cover surface is lower than the
transaxle case, measure the clearance be-
tween the straight edge and the pump
cover.
Specification:
0.10 mm (0.004 in) max.
Note
a) Make the measurement without the oil
pump gasket installed.
b) Measured clearance plus thickness of oil
pump gasket equals total end play.
b) If the pump cover surface is higher than the
transaxle case, measure the clearance be-
tween the straight edge and the transaxle
case.
Specification:
0.15 mm (0.006 in) max.
Caution
Do not position the straight edge on the bolt
holes for mounting the oil pump to the trans-
axle case.
Note
Thickness of oil pump gasket minus measured
clearance equals total end play.
2. If the end play is not within specification, adjust it
by selecting the proper bearing race.
Caution
Use only one bearing race.
Bearing race outer diameter: 41.0 mm (1.61 in)
Bearing race sizes mm (in)
1.2 (0.047) 1.4 CO.055) 1.6 (0.063)
1.8 (0.071) 2.0 (0.079) 2.2 (0.087)
3. Reinstall the oil pump cover.
Tightening torque: 11—14 N-m
(110—140 cm-kg, 95—122 in-lb)
Page 1227 of 1865

ASSEMBLY 7C
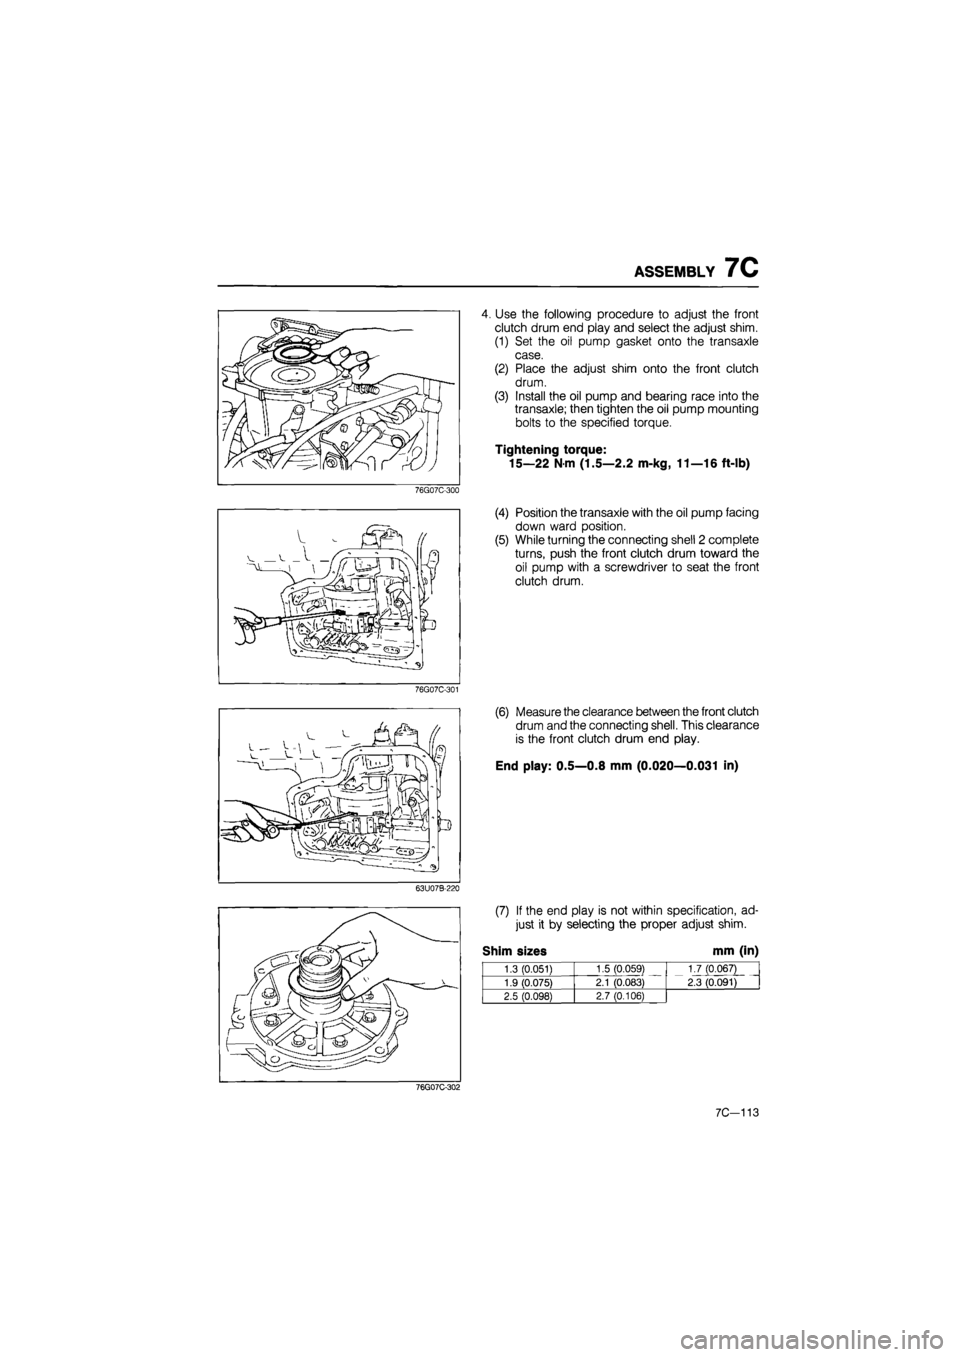
4. Use the following procedure to adjust the front
clutch drum end play and select the adjust shim.
(1) Set the oil pump gasket onto the transaxle
case.
(2) Place the adjust shim onto the front clutch
drum.
(3) Install the oil pump and bearing race into the
transaxle; then tighten the oil pump mounting
bolts to the specified torque.
Tightening torque:
15—22 N m (1.5—2.2 m-kg, 11—16 ft-lb)
76G07C-300
76G07C-301
63U07B-220
(4) Position the transaxle with the oil pump facing
down ward position.
(5) While turning the connecting shell 2 complete
turns, push the front clutch drum toward the
oil pump with a screwdriver to seat the front
clutch drum.
(6) Measure the clearance between the front clutch
drum and the connecting shell. This clearance
is the front clutch drum end play.
End play: 0.5—0.8 mm (0.020—0.031 in)
(7) If the end play is not within specification, ad-
just it by selecting the proper adjust shim.
Shim sizes mm (in)
1.3 (0.051) 1.5 (0.059) 1.7 (0.067)
2.3 (0.091) 1.9 (0.075) 2.1 (0.083)
1.7 (0.067)
2.3 (0.091)
2.5 (0.098) 2.7 (0.106)
76G07C-302
7C-113
Page 1230 of 1865
7C ASSEMBLY
76G07C-311
76G07C-312
76G07C-313
12. Install the speedometer driven gear.
Tightening torque:
8—11 Nm (80—110 cm-kg, 69—95 in-lb)
13. Install the oil level gauge and tube along with a new
O-ring to the transaxle case.
Tightening torque:
7—10 N m (70—100 cm-kg, 61-87 in-lb)
14. Install a new O-ring on the vacuum diaphragm.
15. Select the proper diaphragm rod.
(1) Measure the N dimension with the SST and
a scale.
(2) Select the diaphragm rod in accordance with
the table below.
N dimension Applicable diaphragm
rod
length
Below 25.4 mm (1.000
in)
29.5
mm
(1.161
in)
25.4—25.9
mm
(1.000-1.020
in)
30.0
mm
(1.181
in)
25.9—26.4
mm
(1.020-1.039
in)
30.5
mm
(1.200
in)
26.4—26.9
mm
(1.039-1.059
in)
31.0
mm
(1.220
in)
26.9 mm (1,059 in)
or
over 31.5
mm
(1.240
in)
16. Install the vacuum diaphragm.
76G07C-314
7C—116
Page 1231 of 1865
ASSEMBLY 7C
17. Install a new O-ring on the kick-down solenoid.
18. Install the kick-down solenoid.
76G07C-315
19. Apply sealant to the threads and seat face of the
switch; and install the inhibitor switch.
Tightening torque:
19—26 N-m (1.9—2.6 m-kg, 14—19 ft-lb)
76G07C-316
20. Remove the transaxle from the transaxle hanger.
21. Install a new clip on the turbine shaft.
76G07C-317
22. Install the turbine shaft.
23. Install the oil pump shaft.
76G07C-318
7C-117