Page 629 of 3115
Parts Name
Code
Radiator Grille
ABS
Front Bumper Cover
TSOP
Fog Light
PC/PP
Front Turn Signal Light
PMMA/PC/AAS
Side Turn Signal Light
SAN/AAS
Cowl Top Ventirator Louver
TSOP
Outer Rear View Mirror
ABS
Outside Moulding (Fender, Front & Rear Door, Quarter)
TSOP
Outside Handle (Front & Rear Door)
PC
Rocker Panel Moulding
TSOP
Side Door Step Plate Cover (Front, Rear)
PP
Quarter Ventirator Louver
PPO/PA
Rear Combination Light
PMMA/PP/AAS
Rear Light
PMMA/PP
Back Door Outside Moulding
TSOP
License Plate Light
PC
License Plate Light Cover
AAS
Back Door Outside Handle
POM
Rear Bumper Cover
TSOP
Reflex Refrector
PMMA/ABS
Rear Fog Light
PC/PP
Outer Under Rear View Mirror
PC/PBT
Roof Moulding
PVC
LOCATION OF PLASTIC BODY PARTS
HINT:
wResin material differs with model.
/ Made up of 2 or more kinds of materials.
PLASTIC BODY PARTSPP-4
Page 630 of 3115

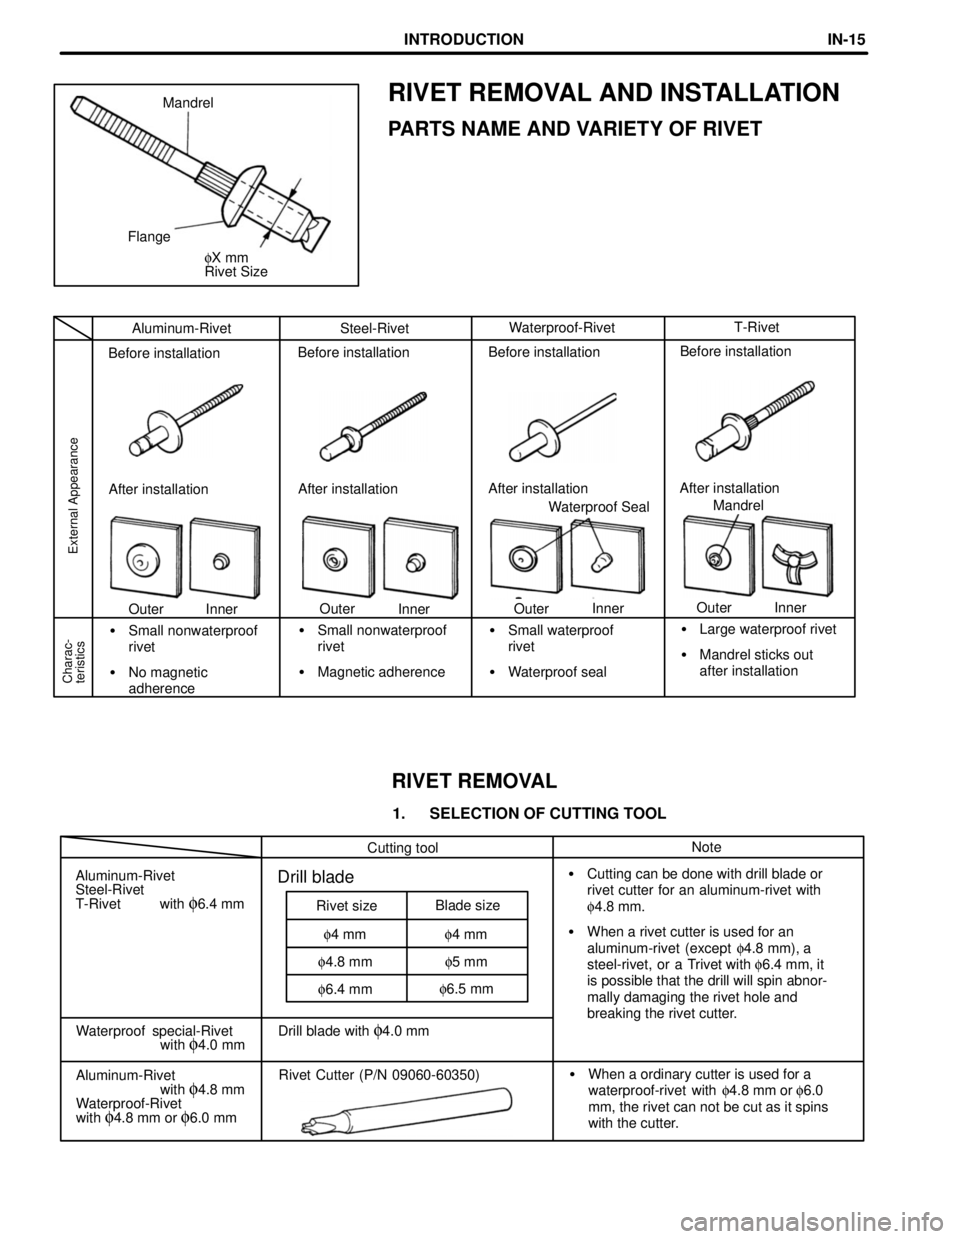
Cutting toolNote
Aluminum-Rivet
Steel-Rivet
T-Rivet with
f6.4 mm
f6.4 mmf6.5 mm f4.8 mmf5 mm f4 mmf4 mm Rivet sizeBlade size
Drill blade�Cutting can be done with drill blade or
rivet cutter for an aluminum-rivet with
f4.8 mm.
�When a rivet cutter is used for an
aluminum-rivet (except f4.8 mm), a
steel-rivet, or a Trivet with f6.4 mm, it
is possible that the drill will spin abnor-
mally damaging the rivet hole and
breaking the rivet cutter.
Waterproof special-Rivet
with
f4.0 mmDrill blade with f4.0 mm
Aluminum-Rivet
with
f4.8 mm
Waterproof-Rivet
with
f4.8 mm or f6.0 mmRivet Cutter (P/N 09060-60350)�When a ordinary cutter is used for a
waterproof-rivet with f4.8 mm or f6.0
mm, the rivet can not be cut as it spins
with the cutter. Aluminum-RivetSteel-RivetWaterproof-RivetT-Rivet
External Appearance
Inner Outer After installation Before installation
Outer
Inner After installation Before installation
Inner
Outer After installationBefore installation
Waterproof Seal
Outer Inner After installationBefore installation
Mandrel
Charac-
teristics
�Small nonwaterproof
rivet
�No magnetic
adherence�Small nonwaterproof
rivet
�Magnetic adherence�Small waterproof
rivet
�Waterproof seal�Large waterproof rivet
�Mandrel sticks out
after installation fX mm
Rivet Size FlangeMandrel
RIVET REMOVAL AND INSTALLATION
PARTS NAME AND VARIETY OF RIVET
RIVET REMOVAL
1. SELECTION OF CUTTING TOOL
INTRODUCTIONIN-15
Page 631 of 3115

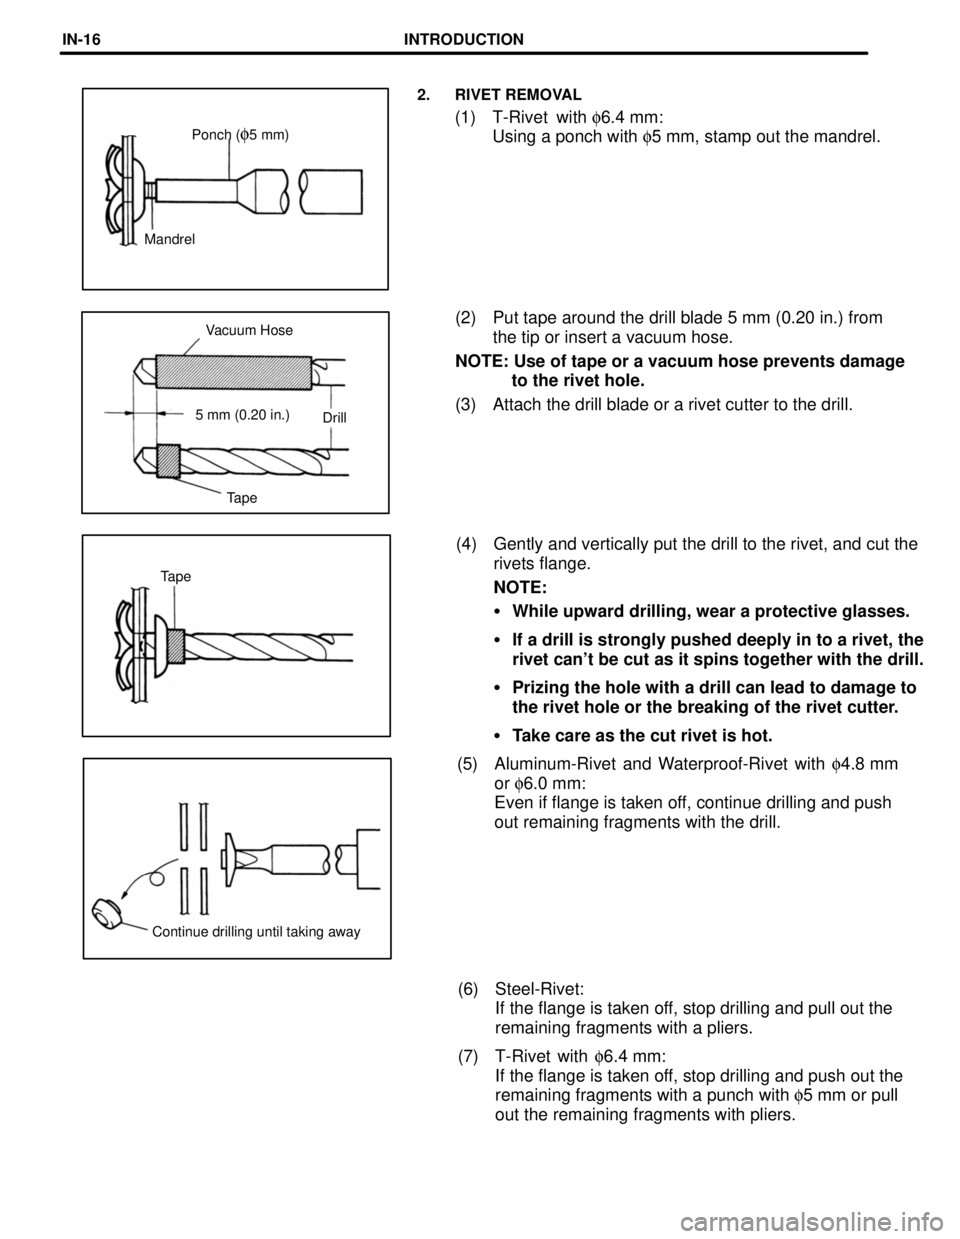
Continue drilling until taking awayTapeTapeDrill 5 mm (0.20 in.)Vacuum Hose MandrelPonch (
f5 mm)
2. RIVET REMOVAL
(1) T-Rivet with f6.4 mm:
Using a ponch with f5 mm, stamp out the mandrel.
(2) Put tape around the drill blade 5 mm (0.20 in.) from
the tip or insert a vacuum hose.
NOTE: Use of tape or a vacuum hose prevents damage
to the rivet hole.
(3) Attach the drill blade or a rivet cutter to the drill.
(4) Gently and vertically put the drill to the rivet, and cut the
rivets flange.
NOTE:
�While upward drilling, wear a protective glasses.
�If a drill is strongly pushed deeply in to a rivet, the
rivet can't be cut as it spins together with the drill.
�Prizing the hole with a drill can lead to damage to
the rivet hole or the breaking of the rivet cutter.
�Take care as the cut rivet is hot.
(5) Aluminum-Rivet and Waterproof-Rivet with f4.8 mm
or f6.0 mm:
Even if flange is taken off, continue drilling and push
out remaining fragments with the drill.
(6) Steel-Rivet:
If the flange is taken off, stop drilling and pull out the
remaining fragments with a pliers.
(7) T-Rivet with f6.4 mm:
If the flange is taken off, stop drilling and push out the
remaining fragments with a punch with f5 mm or pull
out the remaining fragments with pliers.
INTRODUCTIONIN-16
Page 632 of 3115

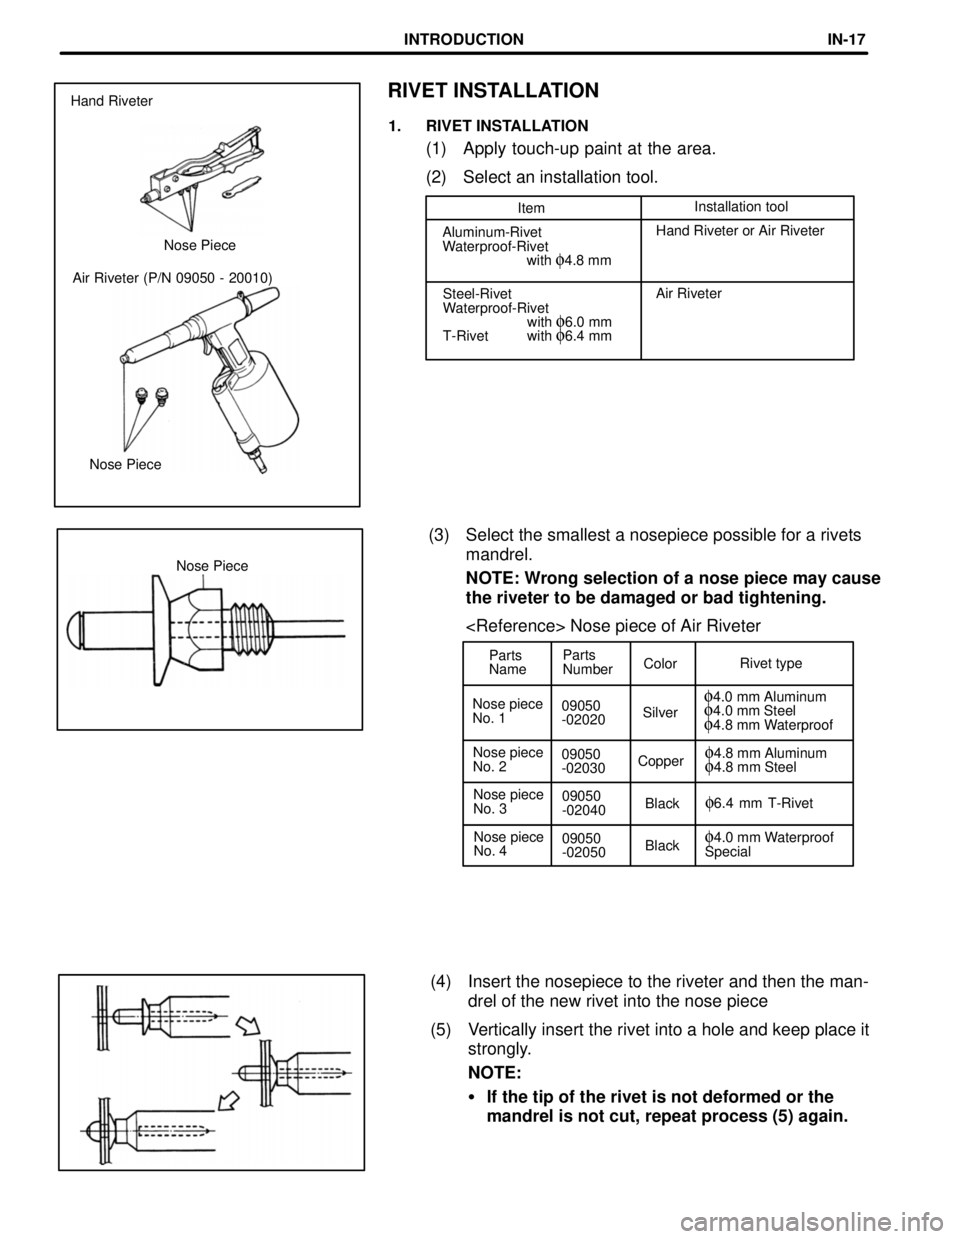
Parts
NameParts
NumberColorRivet type
Nose piece
No. 109050
-02020Silver
f4.0 mm Aluminumf4.0 mm Steelf4.8 mm Waterproof
Nose piece
No. 209050
-02030Copper
f4.8 mm Aluminumf4.8 mm Steel
Nose piece
No. 309050
-02040Black
f6.4 mm T-Rivet
Nose piece
No. 409050
-02050Black
f4.0 mm Waterproof
Special Nose Piece Air Riveter (P/N 09050 - 20010)Nose Piece Hand Riveter
ItemInstallation tool
Aluminum-Rivet
Waterproof-Rivet
with
f4.8 mmHand Riveter or Air Riveter
Steel-Rivet
Waterproof-Rivet
with
f6.0 mm
T-Rivet with f6.4 mmAir Riveter
Nose Piece
RIVET INSTALLATION
1. RIVET INSTALLATION
(1) Apply touch-up paint at the area.
(2) Select an installation tool.
(3) Select the smallest a nosepiece possible for a rivets
mandrel.
NOTE: Wrong selection of a nose piece may cause
the riveter to be damaged or bad tightening.
Nose piece of Air Riveter
(4) Insert the nosepiece to the riveter and then the man-
drel of the new rivet into the nose piece
(5) Vertically insert the rivet into a hole and keep place it
strongly.
NOTE:
�If the tip of the rivet is not deformed or the
mandrel is not cut, repeat process (5) again.
INTRODUCTIONIN-17
Page 672 of 3115
mm in.
60
2.36
QUARTER WHEEL HOUSING OUTER PANEL
(ASSY): Left Side
REMOVAL (With the quarter panel removed.)
Roof Side Outer Panel
Rocker Panel Reinforcement
60 mm
Cut and Join Location
1. Cut and join the rocker panel reinforcement at
the location as shown above.2. After removing the roof side outer panel, re-
move the quarter wheel housing outer panel.
BODY PANEL REPLACEMENTRE-34
Page 678 of 3115
mm in.
60
2.36
QUARTER WHEEL HOUSING OUTER PANEL
(ASSY): Right Side
REMOVAL (With the quarter panel removed.)
60 mm Roof Side
Outer Panel
Cut and Join
Location
1. Cut and join the rocker panel reinforcement at
the location as shown above.2. After removing the roof side outer panel, re-
move the quarter wheel housing outer panel.
Rocker Panel Reinforcement
BODY PANEL REPLACEMENTRE-32
Page 704 of 3115
ROOF PANEL (ASSY): Moon Roof
REMOVAL
[If reusing the roof panel reinforcement]
Hemming Location
Disc Sander
BODY PANEL REPLACEMENTRE-70
Page 705 of 3115
INSTALLATION
Foamed Material
Application Area
Body Sealer
Swing Type Back Door only:
Cloth Tape
Roof Drip No. 2 Channel
Wooden Hammer
2. Bend the flange hem with a wooden hammer
and dolly.
HINT: Perform hemming three steps, being careful
not to warp the panel.
3. After installing the new parts, apply foamed
materials. Before temporarily installing the new parts, apply
body sealer to the windshield header panel, roof
panel reinforcement and back window frame.
HINT:
1) Apply just enough sealer for the new parts to
make contact.
2) For other sealing points, refer to Section AR.
BODY PANEL REPLACEMENTRE-71