Page 470 of 3115

H05268
H05270
H21423
4 Clips
H18926
BO-100
- BODYROOF HEADLINING
2674 Author�: Date�:
2004 LAND CRUISER (RM1071U)
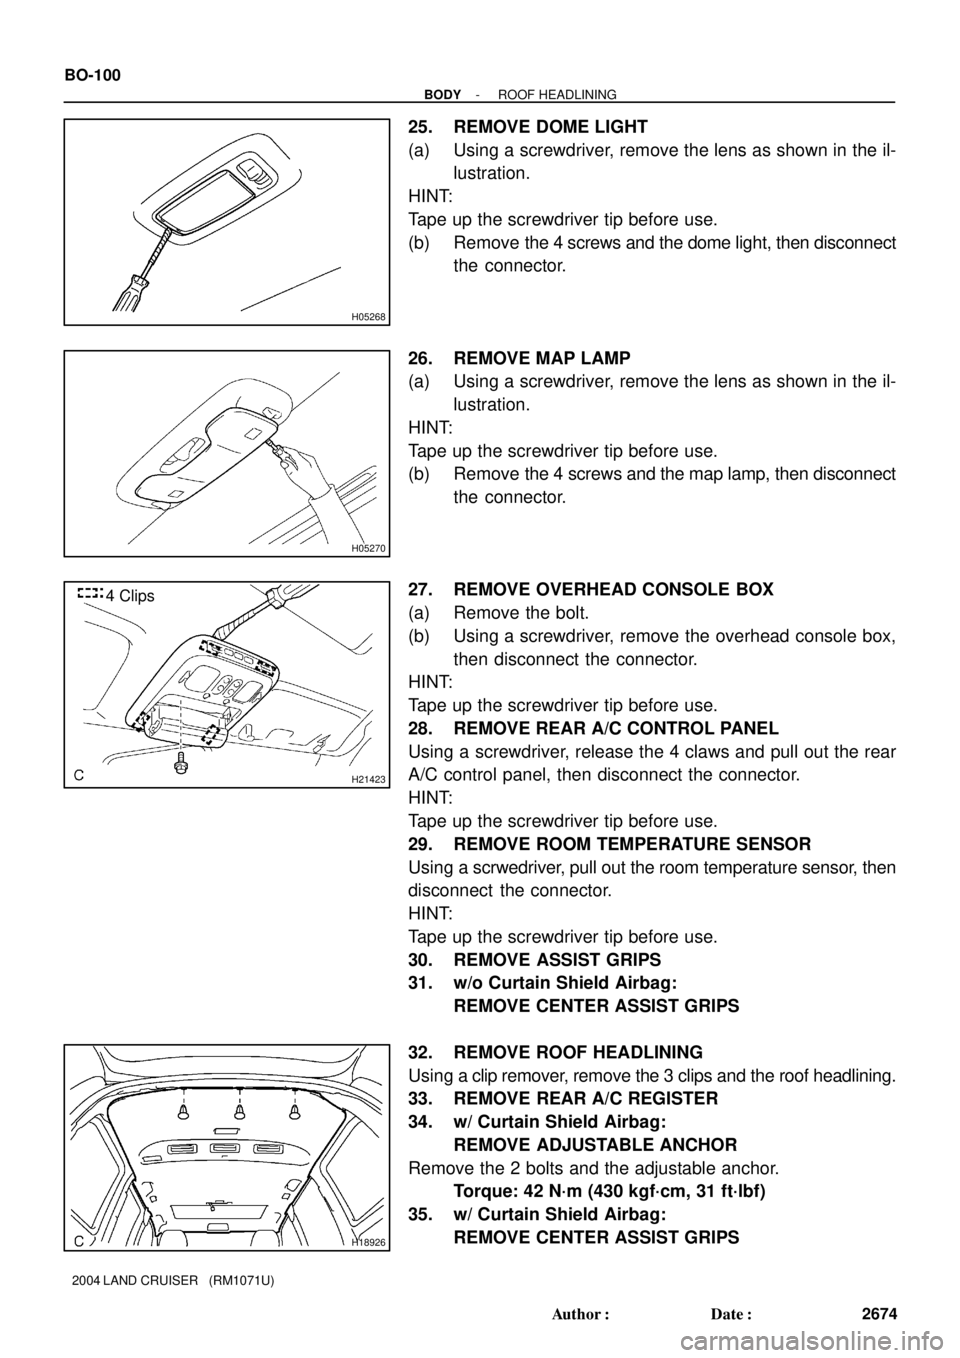
25. REMOVE DOME LIGHT
(a) Using a screwdriver, remove the lens as shown in the il-
lustration.
HINT:
Tape up the screwdriver tip before use.
(b) Remove the 4 screws and the dome light, then disconnect
the connector.
26. REMOVE MAP LAMP
(a) Using a screwdriver, remove the lens as shown in the il-
lustration.
HINT:
Tape up the screwdriver tip before use.
(b) Remove the 4 screws and the map lamp, then disconnect
the connector.
27. REMOVE OVERHEAD CONSOLE BOX
(a) Remove the bolt.
(b) Using a screwdriver, remove the overhead console box,
then disconnect the connector.
HINT:
Tape up the screwdriver tip before use.
28. REMOVE REAR A/C CONTROL PANEL
Using a screwdriver, release the 4 claws and pull out the rear
A/C control panel, then disconnect the connector.
HINT:
Tape up the screwdriver tip before use.
29. REMOVE ROOM TEMPERATURE SENSOR
Using a scrwedriver, pull out the room temperature sensor, then
disconnect the connector.
HINT:
Tape up the screwdriver tip before use.
30. REMOVE ASSIST GRIPS
31. w/o Curtain Shield Airbag:
REMOVE CENTER ASSIST GRIPS
32. REMOVE ROOF HEADLINING
Using a clip remover, remove the 3 clips and the roof headlining.
33. REMOVE REAR A/C REGISTER
34. w/ Curtain Shield Airbag:
REMOVE ADJUSTABLE ANCHOR
Remove the 2 bolts and the adjustable anchor.
Torque: 42 N´m (430 kgf´cm, 31 ft´lbf)
35. w/ Curtain Shield Airbag:
REMOVE CENTER ASSIST GRIPS
Page 488 of 3115
H18931
Upper Roof Side
Inner Garnish
Quarter Trim Panel
Assist Grip
Roof Headlining
Rear Trim Rear Door Scuff Plate
Rear Mat Set Plate
Rear No. 2 Lap
Type Center with
Inner Belt
Rear No. 2 Seat
Inner Belt
Rear No. 1 Seat
Inner BeltRear No. 2 Seat
Outer Belt
Rear Seat Shoulder
Belt Cover Rear Seat Shoulder
Belt Guide
Rear No. 1 Seat Outer
Center BeltRear No. 1 Seat
Outer Belt
: Specified torqueN´m (kgf´cm, ft´lbf)Rear No. 1 Seat
Inner Belt
Adjustable Anchor
42 (430, 31)
42 (430, 31)
Rear Seat Belt:
42 (430, 31)
42 (430, 31)
42 (430, 31)
42 (430, 31)
42 (430, 31)
42 (430, 31)
42 (430, 31)
42 (430, 31)
42 (430, 31)
27 (275, 20)
CRS Tether Anchor
BracketCRS Tether Anchor
Bracket Cover
42 (430, 31)3.9 (40, 35 in.´lbf)
Assist Grip Plug
42 (430, 31)
BO-138
- BODYSEAT BELT
2712 Author�: Date�:
2004 LAND CRUISER (RM1071U)
Page 493 of 3115

BO1KH-02
H05288
H05706
H05708
BO3396
H05296
BO-78
- BODYSLIDING ROOF
2652 Author�: Date�:
2004 LAND CRUISER (RM1071U)
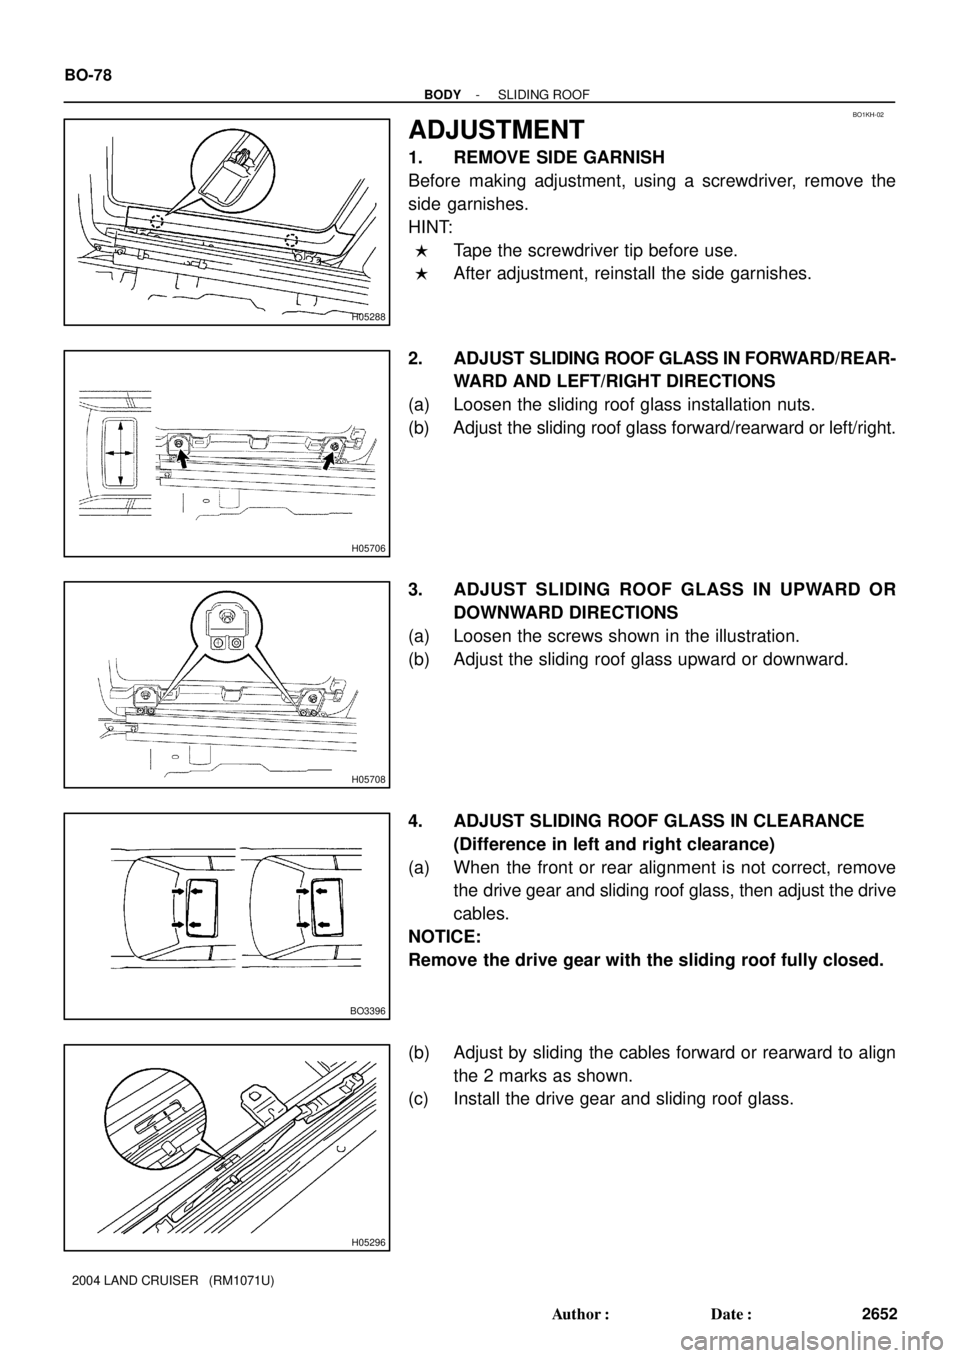
ADJUSTMENT
1. REMOVE SIDE GARNISH
Before making adjustment, using a screwdriver, remove the
side garnishes.
HINT:
�Tape the screwdriver tip before use.
�After adjustment, reinstall the side garnishes.
2. ADJUST SLIDING ROOF GLASS IN FORWARD/REAR-
WARD AND LEFT/RIGHT DIRECTIONS
(a) Loosen the sliding roof glass installation nuts.
(b) Adjust the sliding roof glass forward/rearward or left/right.
3. ADJUST SLIDING ROOF GLASS IN UPWARD OR
DOWNWARD DIRECTIONS
(a) Loosen the screws shown in the illustration.
(b) Adjust the sliding roof glass upward or downward.
4. ADJUST SLIDING ROOF GLASS IN CLEARANCE
(Difference in left and right clearance)
(a) When the front or rear alignment is not correct, remove
the drive gear and sliding roof glass, then adjust the drive
cables.
NOTICE:
Remove the drive gear with the sliding roof fully closed.
(b) Adjust by sliding the cables forward or rearward to align
the 2 marks as shown.
(c) Install the drive gear and sliding roof glass.
Page 494 of 3115
BO1KE-02
H05287
Side Garnish
Rear Garnish Sliding Roof Glass
Front Garnish
Side GarnishSunshade Trim
Rear Drip Channel Sliding Roof Housing
Drive Cable Guide Block Cable Guide Casing
Wind Deflector Panel
Drive GearSliding Roof
Panel Stopper Sliding Roof
Guide Rail
Drive Cable
- BODYSLIDING ROOF
BO-73
2647 Author�: Date�:
2004 LAND CRUISER (RM1071U)
COMPONENTS
Page 495 of 3115
BO1KG-02
H05293
H05294
H05295
H05296
H05297
BO-76
- BODYSLIDING ROOF
2650 Author�: Date�:
2004 LAND CRUISER (RM1071U)
DISASSEMBLY
1. REMOVE REAR DRIP CHANNEL
(a) Using a screwdriver, remove the front side of rear drip
channel.
HINT:
Tape the screwdriver tip before use.
(b) Remove the rear drip channel as shown in the illustration.
2. REMOVE SLIDING ROOF PANEL STOPPERS
Remove the 2 screws and 2 stoppers.
3. REMOVE SUNSHADE TRIM
4. REMOVE DRIVE CABLE
(a) Remove the screw and guide rail stopper.
(b) Slide the drive cable rearward, then remove it.
HINT:
At the time of reassembly, please refer to the following items.
�Adjust the drive cable to a closed and tilted down position.
�Slide the cable forward or backward to align the 2 marks
as shown.
�Slide the cable to the forefront with your hand.
(c) Employ the same manner described above to the other
side.
5. REMOVE WIND DEFLECTOR PANEL
Remove the 2 screws and wind deflector panel as shown in the
illustration.
Page 496 of 3115
H05298
H05299
- BODYSLIDING ROOF
BO-77
2651 Author�: Date�:
2004 LAND CRUISER (RM1071U)
6. REMOVE GUIDE BLOCK
(a) Remove the 2 screws and guide block.
(b) Employ the same manner described above to the other
side.
7. REMOVE SLIDING ROOF HOUSING
Remove the 6 screws and sliding roof housing.
8. REMOVE CABLE GUIDE CASING
Page 497 of 3115
BO1KJ-02
BO-80
- BODYSLIDING ROOF
2654 Author�: Date�:
2004 LAND CRUISER (RM1071U)
INSTALLATION
Installation is in the reverse order of removal (See page BO-74).
Page 498 of 3115
BO1KD-02
H05709
H05707
BO-72
- BODYSLIDING ROOF
2646 Author�: Date�:
2004 LAND CRUISER (RM1071U)
SLIDING ROOF
ON-VEHICLE INSPECTION
1. INSPECT SLIDING ROOF GLASS
(a) Start the engine and check the operation time of the slid-
ing roof.
Operation time:
Approx. 6 secs.
(b) Check for abnormal noise or binding during operation.
(c) With the sliding roof fully closed, check for water leakage.
2. INSPECT DIFFERENCE IN LEVEL
Inspect the difference in level between the roof panel and slid-
ing roof glass (weatherstrip part) when the sliding roof glass is
fully closed.
Except rear end:
0 + 1.5 mm (0 + 0.059 in.)
0 - 1.0 mm (0 - 0.039 in.)
Rear end:
0 ± 1.5 mm (0 ± 0.059 in.)
3. INSPECT SLIDING ROOF GLASS CLEARANCE
Inspect the clearance between the roof panel and sliding roof
glass when the sliding roof is fully closed.
Clearance: Uniform all around