Page 1916 of 2389
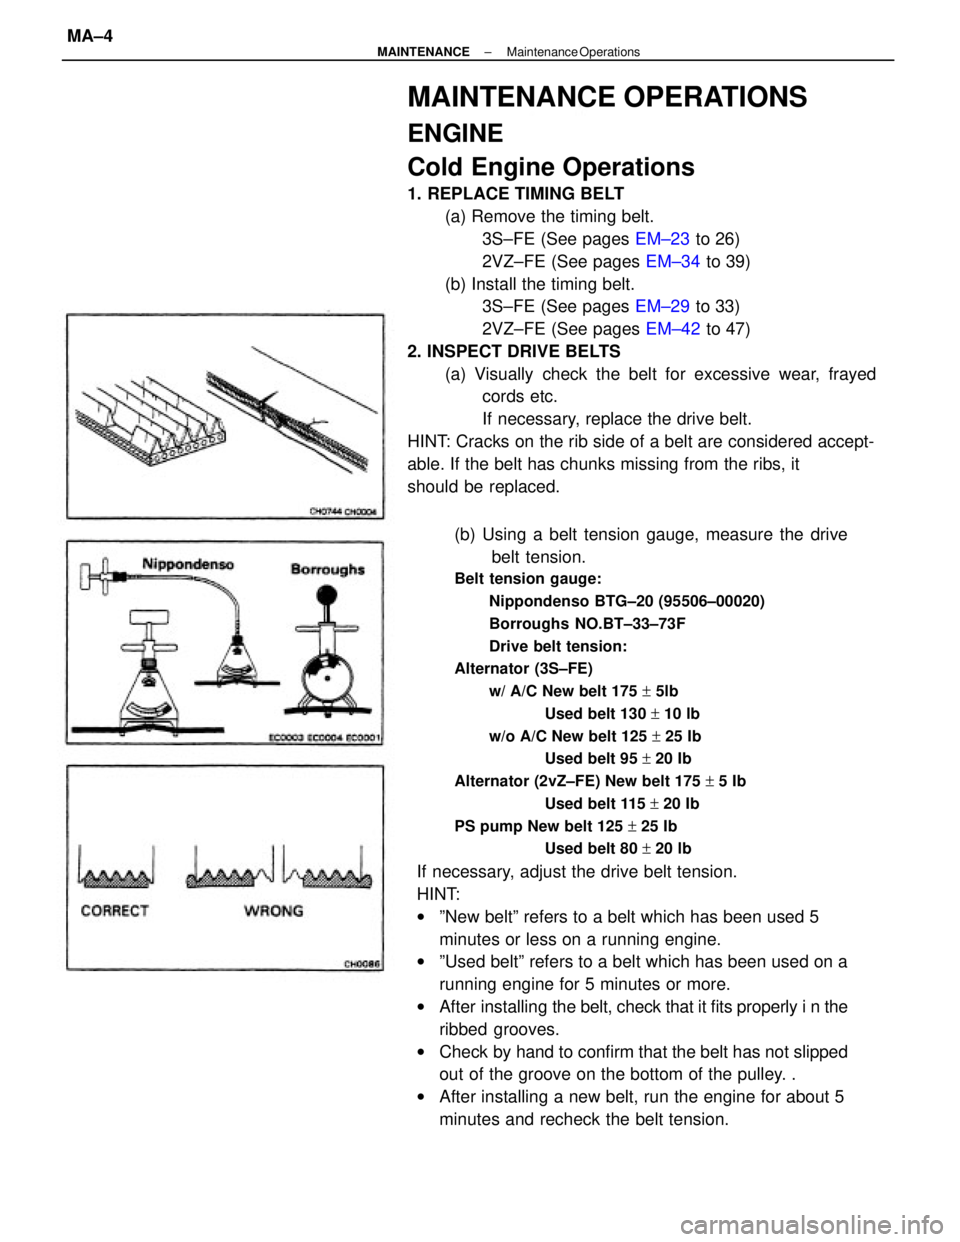
(b) Using a belt tension gauge, measure the drive
belt tension.
Belt tension gauge:
Nippondenso BTG±20 (95506±00020)
Borroughs NO.BT±33±73F
Drive belt tension:
Alternator (3S±FE)
w/ A/C New belt 175 + 5lb
Used belt 130 + 10 lb
w/o A/C New belt 125 + 25 Ib
Used belt 95 + 20 Ib
Alternator (2vZ±FE) New belt 175 + 5 Ib
Used belt 115 + 20 Ib
PS pump New belt 125 + 25 Ib
Used belt 80 + 20 lb
If necessary, adjust the drive belt tension.
HINT:
wºNew beltº refers to a belt which has been used 5
minutes or less on a running engine.
wºUsed beltº refers to a belt which has been used on a
running engine for 5 minutes or more.
wAfter installing the belt, check that it fits properly i n the
ribbed grooves.
wCheck by hand to confirm that the belt has not slipped
out of the groove on the bottom of the pulley. .
wAfter installing a new belt, run the engine for about 5
minutes and recheck the belt tension.
MAINTENANCE OPERATIONS
ENGINE
Cold Engine Operations
1. REPLACE TIMING BELT
(a) Remove the timing belt.
3S±FE (See pages EM±23 to 26)
2VZ±FE (See pages EM±34 to 39)
(b) Install the timing belt.
3S±FE (See pages EM±29 to 33)
2VZ±FE (See pages EM±42 to 47)
2. INSPECT DRIVE BELTS
(a) Visually check the belt for excessive wear, frayed
cords etc.
If necessary, replace the drive belt.
HINT: Cracks on the rib side of a belt are considered accept-
able. If the belt has chunks missing from the ribs, it
should be replaced.
± MAINTENANCEMaintenance OperationsMA±4
Page 1917 of 2389
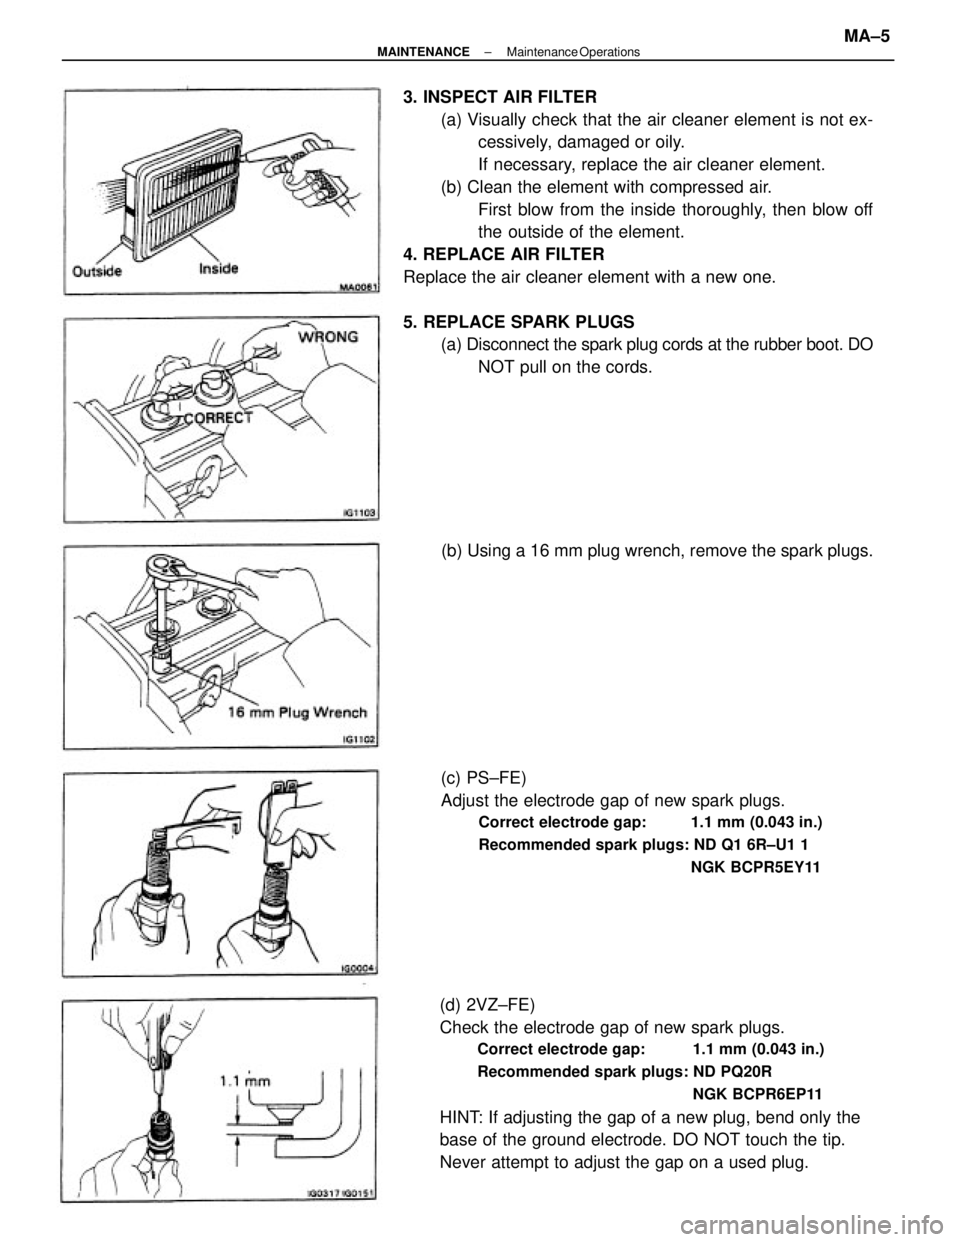
3. INSPECT AIR FILTER
(a) Visually check that the air cleaner element is not ex-
cessively, damaged or oily.
If necessary, replace the air cleaner element.
(b) Clean the element with compressed air.
First blow from the inside thoroughly, then blow off
the outside of the element.
4. REPLACE AIR FILTER
Replace the air cleaner element with a new one.
5. REPLACE SPARK PLUGS
(a) Disconnect the spark plug cords at the rubber boot. DO
NOT pull on the cords.
(d) 2VZ±FE)
Check the electrode gap of new spark plugs.
Correct electrode gap: 1.1 mm (0.043 in.)
Recommended spark plugs: ND PQ20R
NGK BCPR6EP11
HINT: If adjusting the gap of a new plug, bend only the
base of the ground electrode. DO NOT touch the tip.
Never attempt to adjust the gap on a used plug.(c) PS±FE)
Adjust the electrode gap of new spark plugs.
Correct electrode gap: 1.1 mm (0.043 in.)
Recommended spark plugs: ND Q1 6R±U1 1
NGK BCPR5EY11
(b) Using a 16 mm plug wrench, remove the spark plugs.
± MAINTENANCEMaintenance OperationsMA±5
Page 1918 of 2389
6. REPLACE ENGINE OIL AND OIL FILTER
(See page LU±7)
Oil grade: API grade SG, multigrade, fuel±efficient and
recommended viscosity oil
Drain and refill with oil filter change capacity:
3.9 liters (4.1 US qts, 3.4 Imp. qts)
7. REPLACE ENGINE COOLANT
(See page CO±4)
Use a good brand of ethylene±glycol base coolant, mixed
according to the manufacturer's instructions.
Coolant capacity (w/ Heater):
3S±FE M/T 6.4 liters (6.8 US qts, 5.6 Imp. qts)
A/T (2WD)
6.3 liters (6.7 US qts, 5.5 Imp. qts)
A/T (4WD)
6.8 liters (7.2 US qts. 6.0 Imp. qts)
2VZ±FE M/T 9.5 liters (10.0 US qts, 8.4 Imp. qts)
A/T 9.4 liters (9.9 US qts, 8.3 Imp. qts)
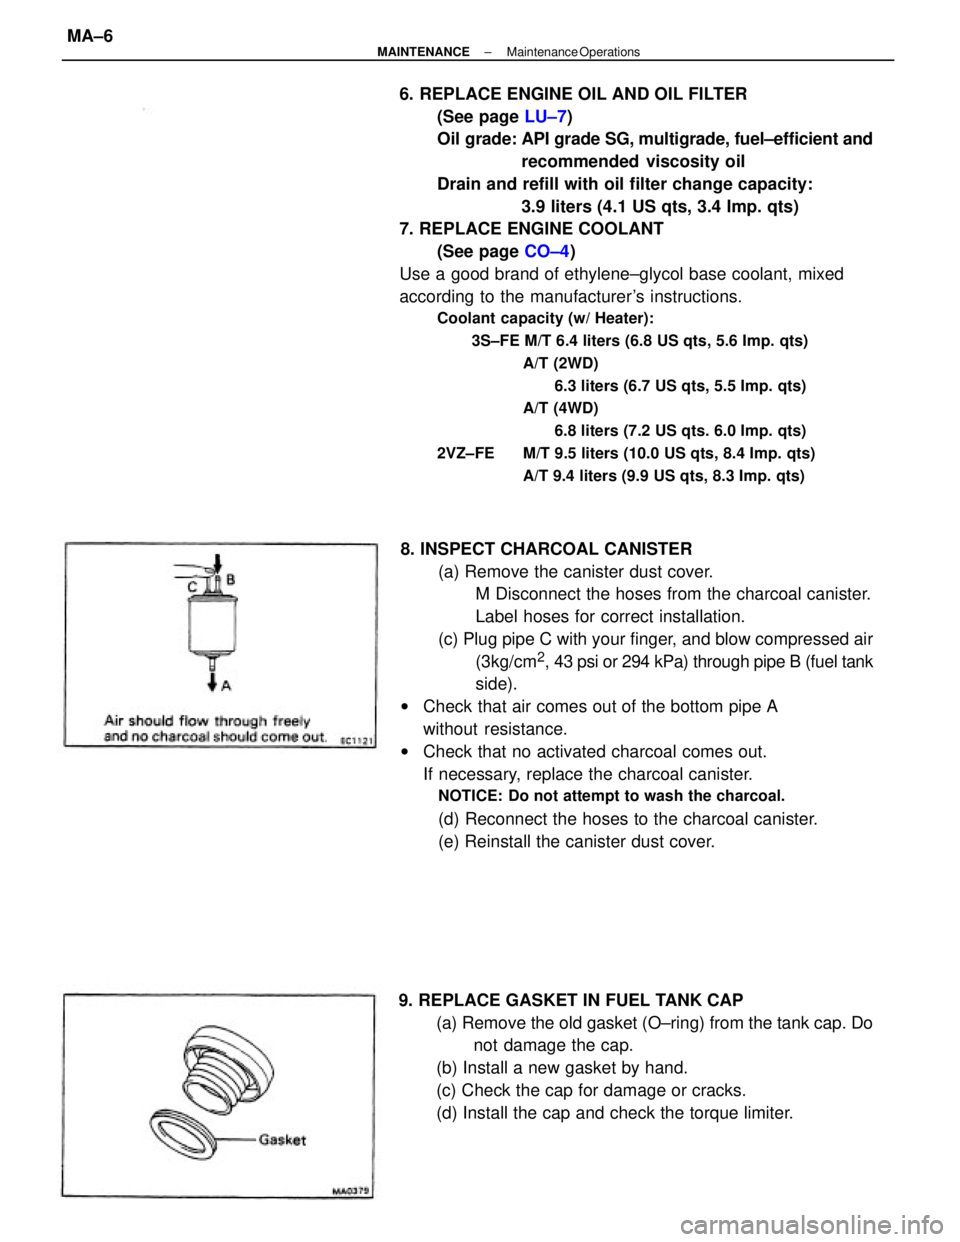
8. INSPECT CHARCOAL CANISTER
(a) Remove the canister dust cover.
M Disconnect the hoses from the charcoal canister.
Label hoses for correct installation.
(c) Plug pipe C with your finger, and blow compressed air
(3kg/cm
2, 43 psi or 294 kPa) through pipe B (fuel tank
side).
wCheck that air comes out of the bottom pipe A
without resistance.
wCheck that no activated charcoal comes out.
If necessary, replace the charcoal canister.
NOTICE: Do not attempt to wash the charcoal.
(d) Reconnect the hoses to the charcoal canister.
(e) Reinstall the canister dust cover.
9. REPLACE GASKET IN FUEL TANK CAP
(a) Remove the old gasket (O±ring) from the tank cap. Do
not damage the cap.
(b) Install a new gasket by hand.
(c) Check the cap for damage or cracks.
(d) Install the cap and check the torque limiter.
± MAINTENANCEMaintenance OperationsMA±6
Page 1919 of 2389
BRAKES
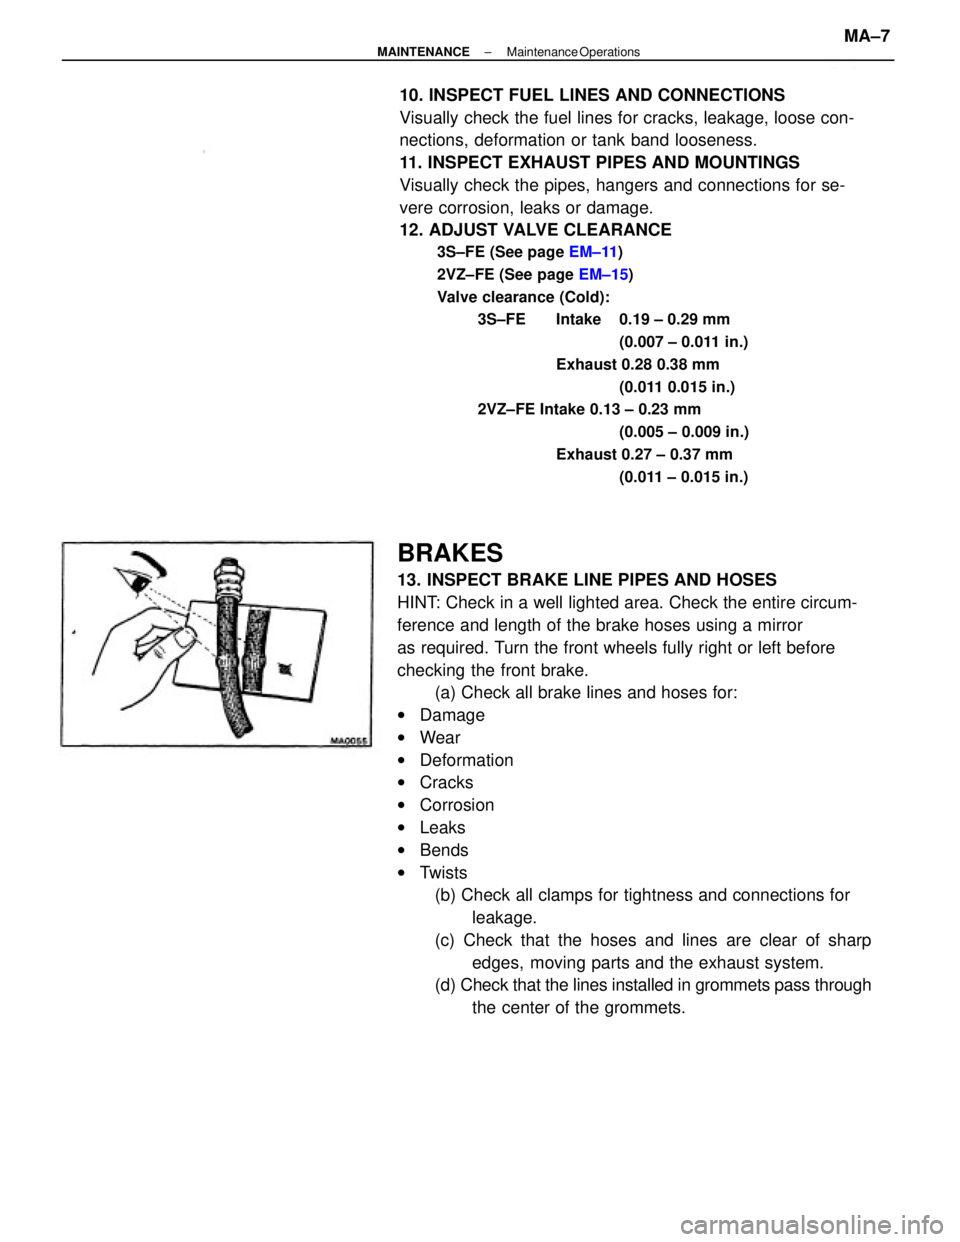
13. INSPECT BRAKE LINE PIPES AND HOSES
HINT: Check in a well lighted area. Check the entire circum-
ference and length of the brake hoses using a mirror
as required. Turn the front wheels fully right or left before
checking the front brake.
(a) Check all brake lines and hoses for:
wDamage
wWear
wDeformation
wCracks
wCorrosion
wLeaks
wBends
wTwists
(b) Check all clamps for tightness and connections for
leakage.
(c) Check that the hoses and lines are clear of sharp
edges, moving parts and the exhaust system.
(d) Check that the lines installed in grommets pass through
the center of the grommets. 10. INSPECT FUEL LINES AND CONNECTIONS
Visually check the fuel lines for cracks, leakage, loose con-
nections, deformation or tank band looseness.
11. INSPECT EXHAUST PIPES AND MOUNTINGS
Visually check the pipes, hangers and connections for se-
vere corrosion, leaks or damage.
12. ADJUST VALVE CLEARANCE
3S±FE (See page EM±11)
2VZ±FE (See page EM±15)
Valve clearance (Cold):
3S±FE Intake 0.19 ± 0.29 mm
(0.007 ± 0.011 in.)
Exhaust 0.28 0.38 mm
(0.011 0.015 in.)
2VZ±FE Intake 0.13 ± 0.23 mm
(0.005 ± 0.009 in.)
Exhaust 0.27 ± 0.37 mm
(0.011 ± 0.015 in.)
± MAINTENANCEMaintenance OperationsMA±7
Page 1920 of 2389
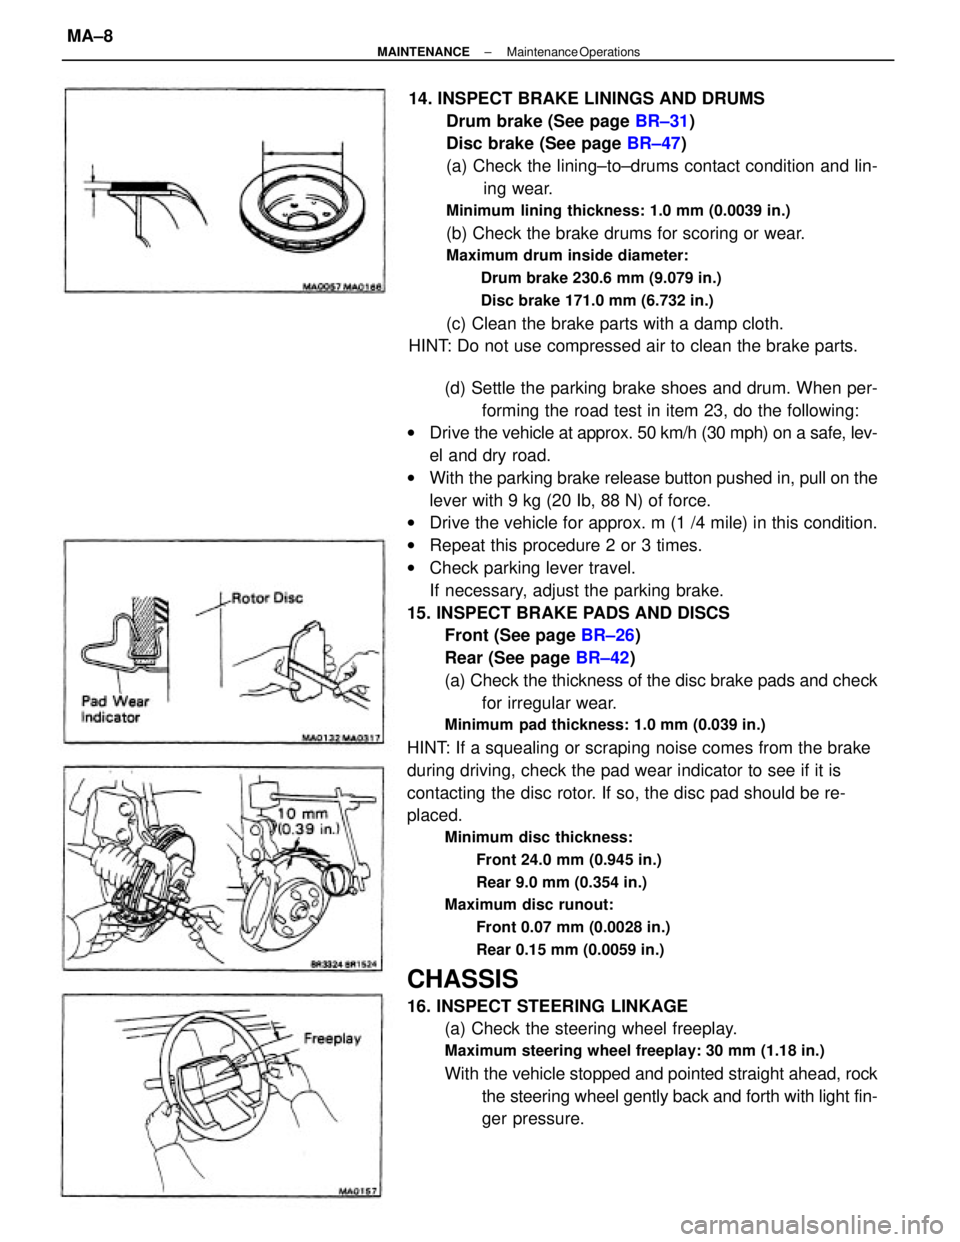
(d) Settle the parking brake shoes and drum. When per-
forming the road test in item 23, do the following:
wDrive the vehicle at approx. 50 km/h (30 mph) on a safe, lev-
el and dry road.
wWith the parking brake release button pushed in, pull on the
lever with 9 kg (20 Ib, 88 N) of force.
wDrive the vehicle for approx. m (1 /4 mile) in this condition.
wRepeat this procedure 2 or 3 times.
wCheck parking lever travel.
If necessary, adjust the parking brake.
15. INSPECT BRAKE PADS AND DISCS
Front (See page BR±26)
Rear (See page BR±42)
(a) Check the thickness of the disc brake pads and check
for irregular wear.
Minimum pad thickness: 1.0 mm (0.039 in.)
HINT: If a squealing or scraping noise comes from the brake
during driving, check the pad wear indicator to see if it is
contacting the disc rotor. If so, the disc pad should be re-
placed.
Minimum disc thickness:
Front 24.0 mm (0.945 in.)
Rear 9.0 mm (0.354 in.)
Maximum disc runout:
Front 0.07 mm (0.0028 in.)
Rear 0.15 mm (0.0059 in.)
CHASSIS
16. INSPECT STEERING LINKAGE
(a) Check the steering wheel freeplay.
Maximum steering wheel freeplay: 30 mm (1.18 in.)
With the vehicle stopped and pointed straight ahead, rock
the steering wheel gently back and forth with light fin-
ger pressure. 14. INSPECT BRAKE LININGS AND DRUMS
Drum brake (See page BR±31)
Disc brake (See page BR±47)
(a) Check the lining±to±drums contact condition and lin-
ing wear.
Minimum lining thickness: 1.0 mm (0.0039 in.)
(b) Check the brake drums for scoring or wear.
Maximum drum inside diameter:
Drum brake 230.6 mm (9.079 in.)
Disc brake 171.0 mm (6.732 in.)
(c) Clean the brake parts with a damp cloth.
HINT: Do not use compressed air to clean the brake parts.
± MAINTENANCEMaintenance OperationsMA±8
Page 1921 of 2389
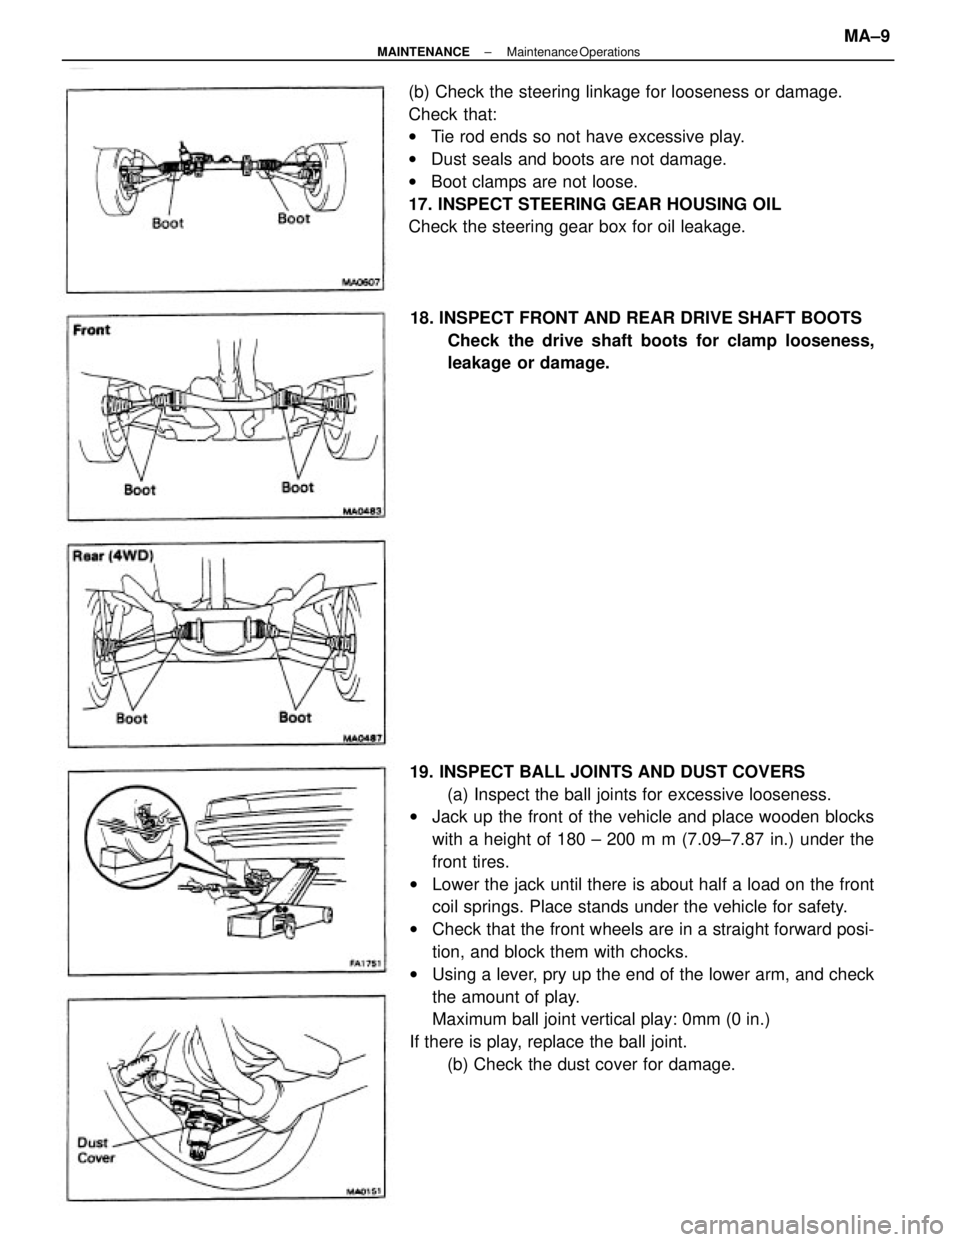
19. INSPECT BALL JOINTS AND DUST COVERS
(a) Inspect the ball joints for excessive looseness.
wJack up the front of the vehicle and place wooden blocks
with a height of 180 ± 200 m m (7.09±7.87 in.) under the
front tires.
wLower the jack until there is about half a load on the front
coil springs. Place stands under the vehicle for safety.
wCheck that the front wheels are in a straight forward posi-
tion, and block them with chocks.
wUsing a lever, pry up the end of the lower arm, and check
the amount of play.
Maximum ball joint vertical play: 0mm (0 in.)
If there is play, replace the ball joint.
(b) Check the dust cover for damage. (b) Check the steering linkage for looseness or damage.
Check that:
wTie rod ends so not have excessive play.
wDust seals and boots are not damage.
wBoot clamps are not loose.
17. INSPECT STEERING GEAR HOUSING OIL
Check the steering gear box for oil leakage.
18. INSPECT FRONT AND REAR DRIVE SHAFT BOOTS
Check the drive shaft boots for clamp looseness,
leakage or damage.
± MAINTENANCEMaintenance OperationsMA±9
Page 1922 of 2389
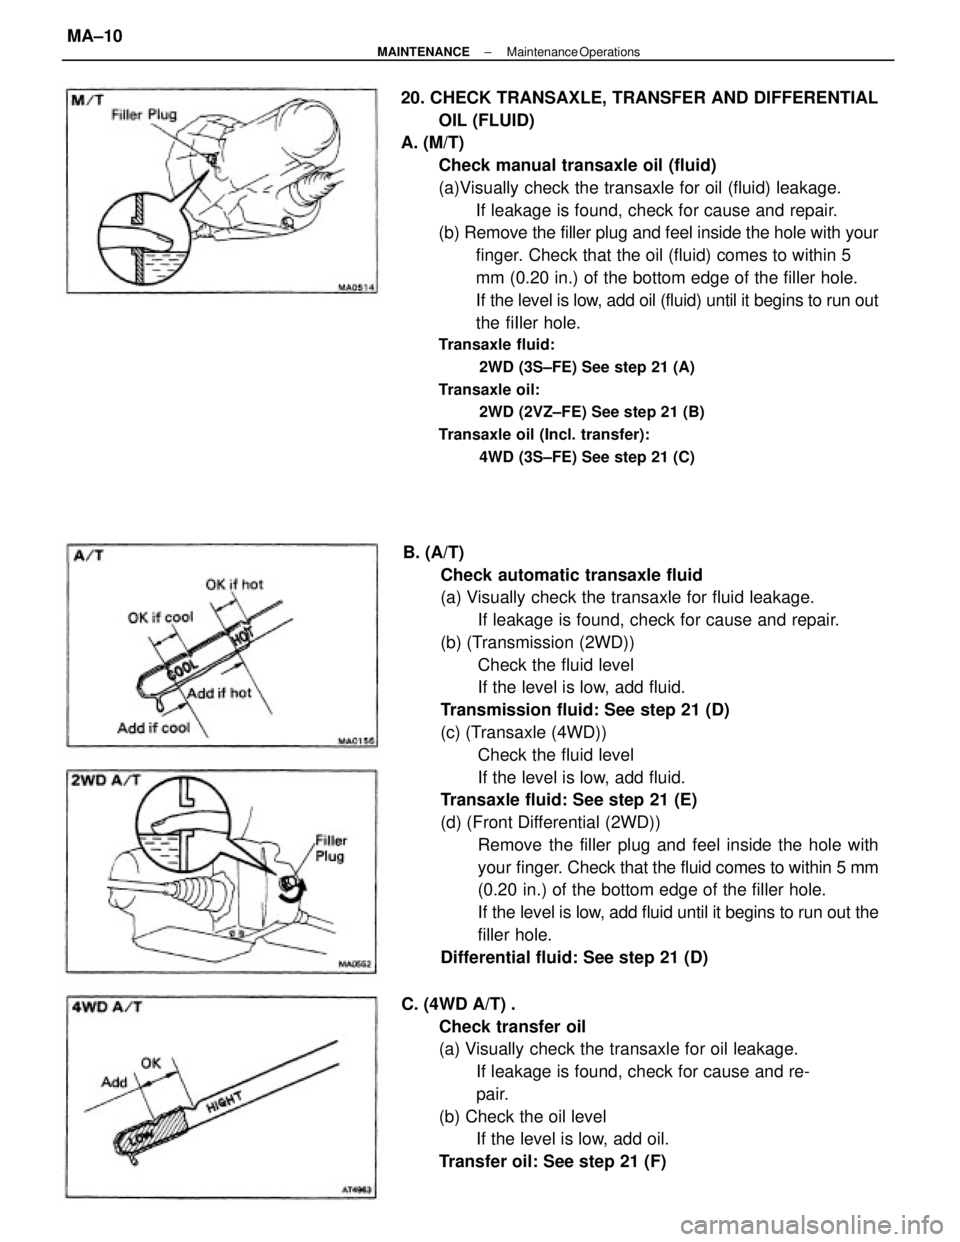
B. (A/T)
Check automatic transaxle fluid
(a) Visually check the transaxle for fluid leakage.
If leakage is found, check for cause and repair.
(b) (Transmission (2WD))
Check the fluid level
If the level is low, add fluid.
Transmission fluid: See step 21 (D)
(c) (Transaxle (4WD))
Check the fluid level
If the level is low, add fluid.
Transaxle fluid: See step 21 (E)
(d) (Front Differential (2WD))
Remove the filler plug and feel inside the hole with
your finger. Check that the fluid comes to within 5 mm
(0.20 in.) of the bottom edge of the filler hole.
If the level is low, add fluid until it begins to run out the
filler hole.
Differential fluid: See step 21 (D) 20. CHECK TRANSAXLE, TRANSFER AND DIFFERENTIAL
OIL (FLUID)
A. (M/T)
Check manual transaxle oil (fluid)
(a)Visually check the transaxle for oil (fluid) leakage.
If leakage is found, check for cause and repair.
(b) Remove the filler plug and feel inside the hole with your
finger. Check that the oil (fluid) comes to within 5
mm (0.20 in.) of the bottom edge of the filler hole.
If the level is low, add oil (fluid) until it begins to run out
the fiIler hole.
Transaxle fluid:
2WD (3S±FE) See step 21 (A)
Transaxle oil:
2WD (2VZ±FE) See step 21 (B)
Transaxle oil (Incl. transfer):
4WD (3S±FE) See step 21 (C)
C. (4WD A/T) .
Check transfer oil
(a) Visually check the transaxle for oil leakage.
If leakage is found, check for cause and re-
pair.
(b) Check the oil level
If the level is low, add oil.
Transfer oil: See step 21 (F)
± MAINTENANCEMaintenance OperationsMA±10
Page 1923 of 2389
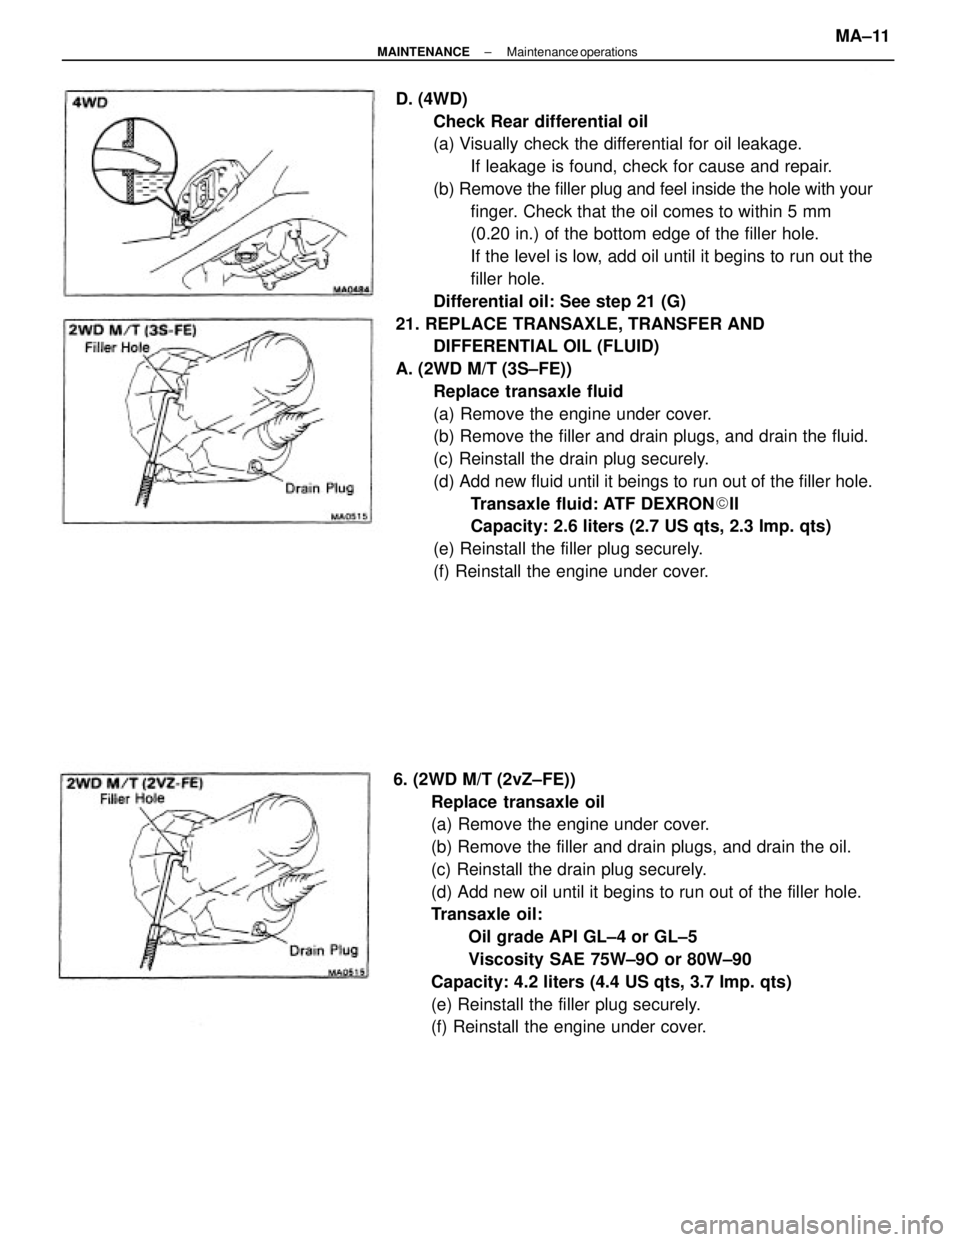
D. (4WD)
Check Rear differential oil
(a) Visually check the differential for oil leakage.
If leakage is found, check for cause and repair.
(b) Remove the filler plug and feel inside the hole with your
finger. Check that the oil comes to within 5 mm
(0.20 in.) of the bottom edge of the filler hole.
If the level is low, add oil until it begins to run out the
filler hole.
Differential oil: See step 21 (G)
21. REPLACE TRANSAXLE, TRANSFER AND
DIFFERENTIAL OIL (FLUID)
A. (2WD M/T (3S±FE))
Replace transaxle fluid
(a) Remove the engine under cover.
(b) Remove the filler and drain plugs, and drain the fluid.
(c) Reinstall the drain plug securely.
(d) Add new fluid until it beings to run out of the filler hole.
Transaxle fluid: ATF DEXRON�II
Capacity: 2.6 liters (2.7 US qts, 2.3 Imp. qts)
(e) Reinstall the filler plug securely.
(f) Reinstall the engine under cover.
6. (2WD M/T (2vZ±FE))
Replace transaxle oil
(a) Remove the engine under cover.
(b) Remove the filler and drain plugs, and drain the oil.
(c) Reinstall the drain plug securely.
(d) Add new oil until it begins to run out of the filler hole.
Transaxle oil:
Oil grade API GL±4 or GL±5
Viscosity SAE 75W±9O or 80W±90
Capacity: 4.2 liters (4.4 US qts, 3.7 Imp. qts)
(e) Reinstall the filler plug securely.
(f) Reinstall the engine under cover.
± MAINTENANCEMaintenance operationsMA±11