1985 FORD GRANADA fuel filter location
[x] Cancel search: fuel filter locationPage 7 of 255
1•6Maintenance Procedures
This Chapter is designed to help the home
mechanic maintain his/her vehicle for safety,
economy, long life and peak performance.
The Chapter contains a master maintenance
schedule, followed by Sections dealing
specifically with each task in the schedule.
Visual checks, adjustments, component
renewal and other helpful items are included.
Refer to the accompanying illustrations of the
engine compartment and the underside of the
vehicle for the locations of the various
components.
Servicing your vehicle in accordance with
the mileage/time maintenance schedule and
the following Sections will provide a planned
maintenance programme, which should result
in a long and reliable service life. This is a
comprehensive plan, so maintaining some
items but not others at the specified service
intervals, will not produce the same results.
As you service your vehicle, you will
discover that many of the procedures can -
and should - be grouped together, because of
the particular procedure being performed, or
because of the close proximity of two
otherwise-unrelated components to one
another. For example, if the vehicle is raised
for any reason, the exhaust can be inspected
at the same time as the suspension and
steering components.
The first step in this maintenanceprogramme is to prepare yourself before the
actual work begins. Read through all the
Sections relevant to the work to be carried out,
then make a list and gather together all the
parts and tools required. If a problem is
encountered, seek advice from a parts
specialist, or a dealer service department.
If, from the time the vehicle is new, the
routine maintenance schedule is followed
closely, and frequent checks are made of fluid
levels and high-wear items, as suggested
throughout this manual, the engine will be kept
in relatively good running condition, and the
need for additional work will be minimised.
It is possible that there will be times when
the engine is running poorly due to the lack of
regular maintenance. This is even more likely if
a used vehicle, which has not received regular
and frequent maintenance checks, is
purchased. In such cases, additional work
may need to be carried out, outside of the
regular maintenance intervals.
If engine wear is suspected, a compression
test will provide valuable information regarding
the overall performance of the main internal
components. Such a test can be used as a
basis to decide on the extent of the work to be
carried out. If, for example, a compression test
indicates serious internal engine wear,
conventional maintenance as described in this
Chapter will not greatly improve theperformance of the engine, and may prove a
waste of time and money, unless extensive
overhaul work is carried out first.
The following series of operations are those
most often required to improve the
performance of a generally poor-running
engine:
Primary operations
a)Clean, inspect and test the battery
(Section 6)
b)Check all the engine-related fluids
(Section 3).
c)Check the condition and tension of the
auxiliary drivebelt (Section 21).
d)Renew the spark plugs (Section 20).
e)Inspect the distributor cap, rotor arm and
HT leads - as applicable (Chapter 5).
f)Check the condition of the air cleaner filter
element, and renew if necessary (Section 38).
g)Renew the fuel filter (Section 41).
h)Check the condition of all hoses, and
check for fluid leaks (Section 10).
i)Check the idle speed and mixture settings
- as applicable (Chapter 4).
If the above operations do not prove fully
effective, carry out the following secondary
operations:
Secondary operations
a)Check the charging system (Chapter 5).
b)Check the ignition system (Chapter 5).
c)Check the fuel system (Chapter 4).
d)Renew the distributor cap and rotor arm -
as applicable (Chapter 5).
f)Renew the ignition HT leads - as
applicable (Chapter 5).
2Intensive maintenance
1Introduction
Engine oil
1Check the oil level as follows.
2With the vehicle parked on level ground,
and with the engine having been stopped for a
few minutes, open and prop the bonnet.
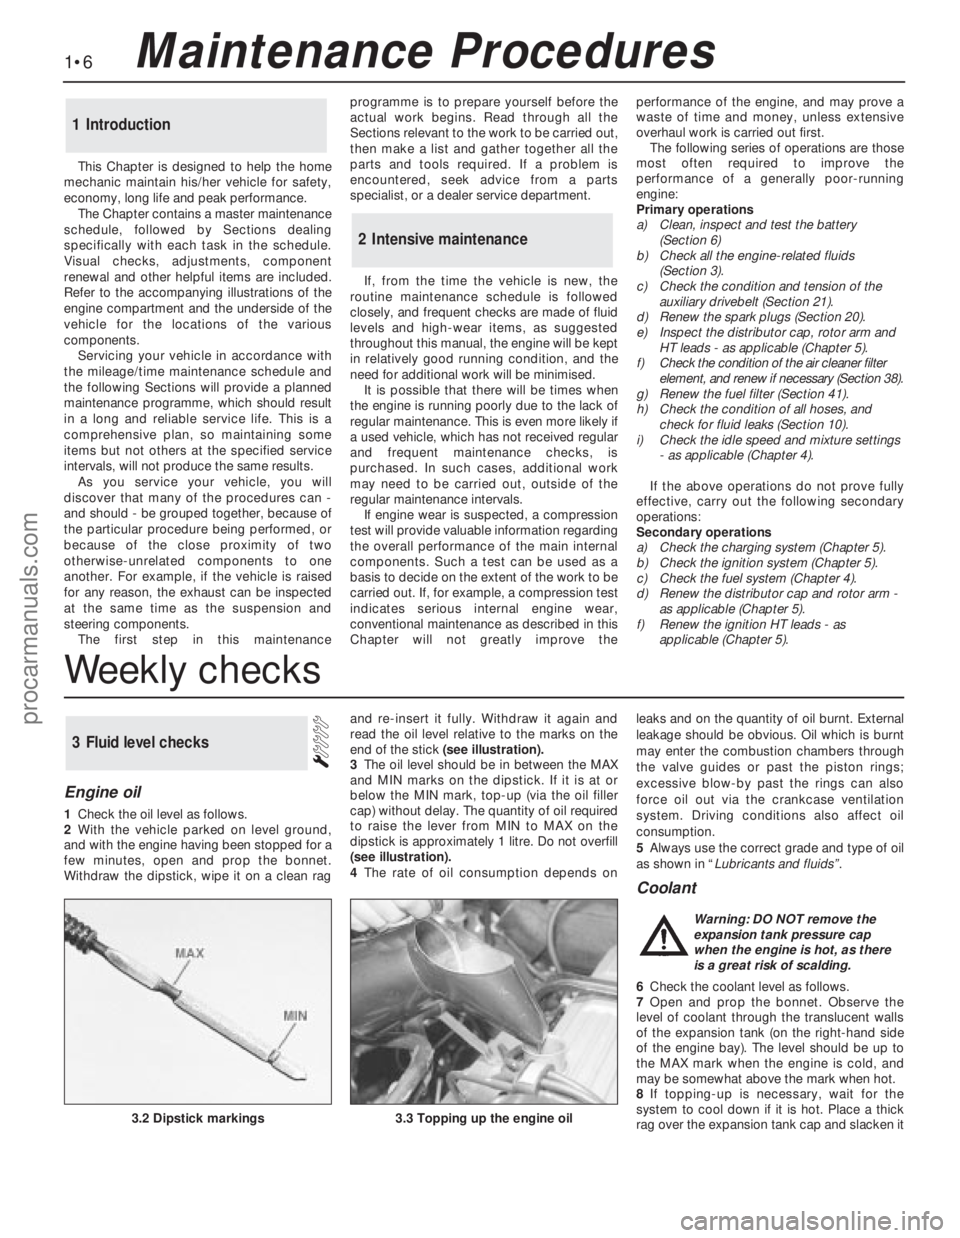
Withdraw the dipstick, wipe it on a clean ragand re-insert it fully. Withdraw it again and
read the oil level relative to the marks on the
end of the stick (see illustration).
3The oil level should be in between the MAX
and MIN marks on the dipstick. If it is at or
below the MIN mark, top-up (via the oil filler
cap) without delay. The quantity of oil required
to raise the lever from MIN to MAX on the
dipstick is approximately 1 litre. Do not overfill
(see illustration).
4The rate of oil consumption depends onleaks and on the quantity of oil burnt. External
leakage should be obvious. Oil which is burnt
may enter the combustion chambers through
the valve guides or past the piston rings;
excessive blow-by past the rings can also
force oil out via the crankcase ventilation
system. Driving conditions also affect oil
consumption.
5Always use the correct grade and type of oil
as shown in “Lubricants and fluids”.
Coolant
6Check the coolant level as follows.
7Open and prop the bonnet. Observe the
level of coolant through the translucent walls
of the expansion tank (on the right-hand side
of the engine bay). The level should be up to
the MAX mark when the engine is cold, and
may be somewhat above the mark when hot.
8If topping-up is necessary, wait for the
system to cool down if it is hot. Place a thick
rag over the expansion tank cap and slacken it
3Fluid level checks
3.2 Dipstick markings3.3 Topping up the engine oil
Warning: DO NOT remove the
expansion tank pressure cap
when the engine is hot, as there
is a great risk of scalding.
Weekly checks
procarmanuals.com
Page 28 of 255
The cylinder head is of crossflow design
with the inlet manifold mounted on the left-
hand side and the exhaust manifold mounted
on the right-hand side.
Lubrication is by means of a bi-rotor pump
which draws oil through a strainer located
inside the sump, and forces it through a full-
flow filter into the engine oil galleries where it
is distributed to the crankshaft, camshaft and
auxiliary shaft. The big-end bearings are
supplied with oil via internal drillings in the
crankshaft.The undersides of the pistons are
supplied with oil from drillings in the big-ends.
The distributor shaft is intermittently supplied
with oil from the drilled auxiliary shaft. The
camshaft and cam followers are supplied with
oil via a drilled spray tube from the centre
camshaft bearing.
A semi-closed crankcase ventilation system
is employed whereby piston blow-by gases
are drawn into the inlet manifold via an oil
separator and on carburettor models a control
valve.
The following operations can be carried out
without removing the engine, although the
work may be easier and quicker with the
engine removed:
a)Removal and refitting of the cylinder head
b)Removal and refitting of the camshaft
(after removing the cylinder head)
c)Removal and refitting of the timing belt
and sprockets
d)Removal and refitting of the sump and oil
pump
e)Removal and refitting of the pistons,
connecting rods and big-end bearings
f)Renewal of the engine mountings
g)Renewal of the crankshaft oil seals
h)Removal and refitting of the auxiliary shaft
j)Removal and refitting of the flywheel
The engine must be removed from the
vehicle for the following operations:
a)Renewal of the crankshaft main bearings
b)Removal and refitting of the crankshaft
The engine may be lifted out either on its
own or together with the gearbox. Unless work
is also necessary on the gearbox it is
recommended that the engine is removed on
its own. Where automatic transmission is
fitted, the engine should be removed on its
own owing to the additional weight. If the
engine and gearbox are removed together,
they will have to be tilted at a very steep angle;
make sure that the range of the lifting tackle is
adequate.1Disconnect the battery negative lead.
2Remove the bonnet.
3On carburettor models, remove the air
cleaner. On fuel-injection models, remove the
air cleaner cover, vane airflow meter and air
inlet trunking.
4If a splash guard is fitted, remove it.
5Release the securing clips and bolts and
remove the upper half of the fan shroud. On
carburettor models remove the lower half of
the shroud too.
6Drain the cooling system.
7Disconnect the radiator top and bottom
hoses from the thermostat housing and water
pump. Disconnect the top hose spur from the
expansion tank and unclip it.
8Disconnect the heater hoses from the water
pump and from the inlet manifold or automatic
choke housing. Unclip the hoses.
9On models with power steering, remove the
steering pump.
10Disconnect the vacuum pipe(s) from the
inlet manifold, labelling them if there is any
possibility of confusion.
11Disconnect the following wiring, as
applicable:
a)Alternator
b)Temperature gauge sender
c)Engine management temperature sensor
d)Distributor
e)Oil pressure switch
f)Automatic choke and thermo-switch
g)Carburettor stepper motor
h)Fuel-injection system sub-harness
j)Inlet manifold heater
12Disconnect the HT lead from the coil.
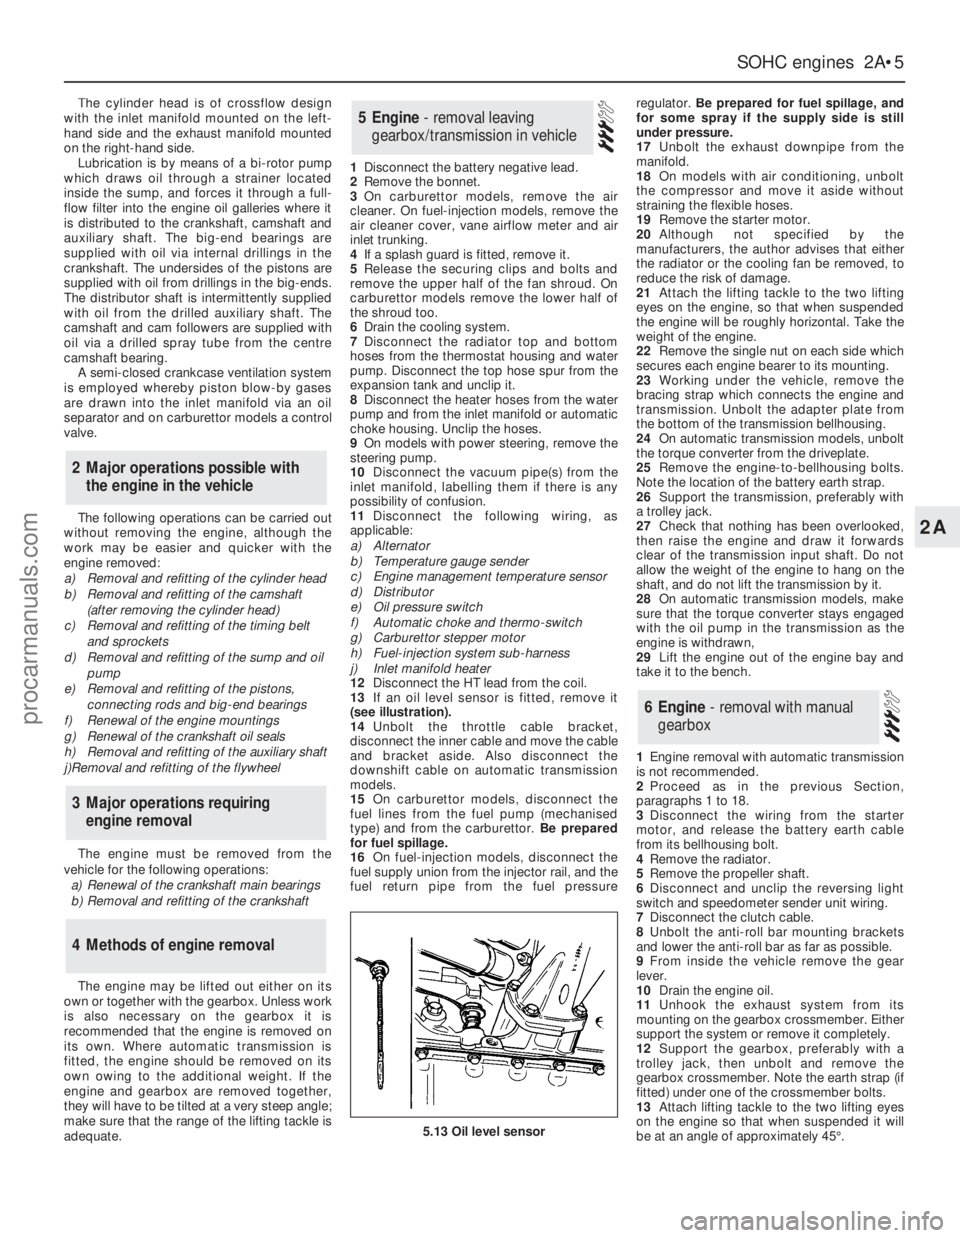
13If an oil level sensor is fitted, remove it
(see illustration).
14Unbolt the throttle cable bracket,
disconnect the inner cable and move the cable
and bracket aside. Also disconnect the
downshift cable on automatic transmission
models.
15On carburettor models, disconnect the
fuel lines from the fuel pump (mechanised
type) and from the carburettor. Be prepared
for fuel spillage.
16On fuel-injection models, disconnect the
fuel supply union from the injector rail, and the
fuel return pipe from the fuel pressureregulator. Be prepared for fuel spillage, and
for some spray if the supply side is still
under pressure.
17Unbolt the exhaust downpipe from the
manifold.
18On models with air conditioning, unbolt
the compressor and move it aside without
straining the flexible hoses.
19Remove the starter motor.
20Although not specified by the
manufacturers, the author advises that either
the radiator or the cooling fan be removed, to
reduce the risk of damage.
21Attach the lifting tackle to the two lifting
eyes on the engine, so that when suspended
the engine will be roughly horizontal. Take the
weight of the engine.
22Remove the single nut on each side which
secures each engine bearer to its mounting.
23Working under the vehicle, remove the
bracing strap which connects the engine and
transmission. Unbolt the adapter plate from
the bottom of the transmission bellhousing.
24On automatic transmission models, unbolt
the torque converter from the driveplate.
25Remove the engine-to-bellhousing bolts.
Note the location of the battery earth strap.
26Support the transmission, preferably with
a trolley jack.
27Check that nothing has been overlooked,
then raise the engine and draw it forwards
clear of the transmission input shaft. Do not
allow the weight of the engine to hang on the
shaft, and do not lift the transmission by it.
28On automatic transmission models, make
sure that the torque converter stays engaged
with the oil pump in the transmission as the
engine is withdrawn,
29Lift the engine out of the engine bay and
take it to the bench.
1Engine removal with automatic transmission
is not recommended.
2Proceed as in the previous Section,
paragraphs 1 to 18.
3Disconnect the wiring from the starter
motor, and release the battery earth cable
from its bellhousing bolt.
4Remove the radiator.
5Remove the propeller shaft.
6Disconnect and unclip the reversing light
switch and speedometer sender unit wiring.
7Disconnect the clutch cable.
8Unbolt the anti-roll bar mounting brackets
and lower the anti-roll bar as far as possible.
9From inside the vehicle remove the gear
lever.
10Drain the engine oil.
11Unhook the exhaust system from its
mounting on the gearbox crossmember. Either
support the system or remove it completely.
12Support the gearbox, preferably with a
trolley jack, then unbolt and remove the
gearbox crossmember. Note the earth strap (if
fitted) under one of the crossmember bolts.
13Attach lifting tackle to the two lifting eyes
on the engine so that when suspended it will
be at an angle of approximately 45°.
6Engine - removal with manual
gearbox
5Engine - removal leaving
gearbox/transmission in vehicle
4Methods of engine removal
3Major operations requiring
engine removal
2Major operations possible with
the engine in the vehicle
SOHCengines 2A•5
2A
5.13 Oil level sensor
procarmanuals.com
Page 29 of 255
14Take the weight of the engine and remove
the two engine bearer-to-mounting nuts.
15Lift the engine/transmission, at the same
time lowering the trolley jack. Draw the unit
forwards and lift it out of the engine bay.
16Temporarily refit the anti-roll bar if the
vehicle is to be moved.
1With the engine and gearbox on the bench,
remove the starter motor.
2Remove the bolt from the engine adapter plate.
3Remove the bracing strap and the
remaining engine-to-bellhousing bolts.
4With the aid of an assistant draw the
gearbox off the engine. Do not allow the weight
of the gearbox to hang on the input shaft.
1It is best to mount the engine on a
dismantling stand, but if this is not available,
stand the engine on a strong bench at a
comfortable working height. Failing this, it will
have to be stripped down on the floor.
2Cleanliness is most important, and if the
engine is dirty, it should be cleaned with
paraffin while keeping it in an upright position.
3Avoid working with the engine on a concrete
floor, as grit can be a real source of trouble.
4As parts are removed, clean them in paraffin.
However, do not immerse parts with internal
oilways in paraffin as it is difficult to remove,
usually requiring a high pressure hose.
5It is advisable to have suitable containers to
hold small items according to their use, as this
will help when reassembling the engine and
also prevent possible losses.
6Always obtain complete sets of gaskets
when the engine is being dismantled, but
retain the old gaskets with a view of using
them as a pattern to make a replacement if a
new one is not available.7When possible, refit nuts, bolts and washers
in their location after being removed, as this
helps protect the threads and will also be
helpful when reassembling the engine.
8Retain unserviceable components in order
to compare them with the new parts supplied.
9A Torx key, size T55, will be needed for
dealing with the cylinder head bolts. A 12-
spline key (to fit bolt size M8) will be needed
for the oil pump bolts. Other Torx and 12-
spline bolts may be encountered; sets of the
keys required to deal with them are available
from most motor accessory shops and tool
factors.
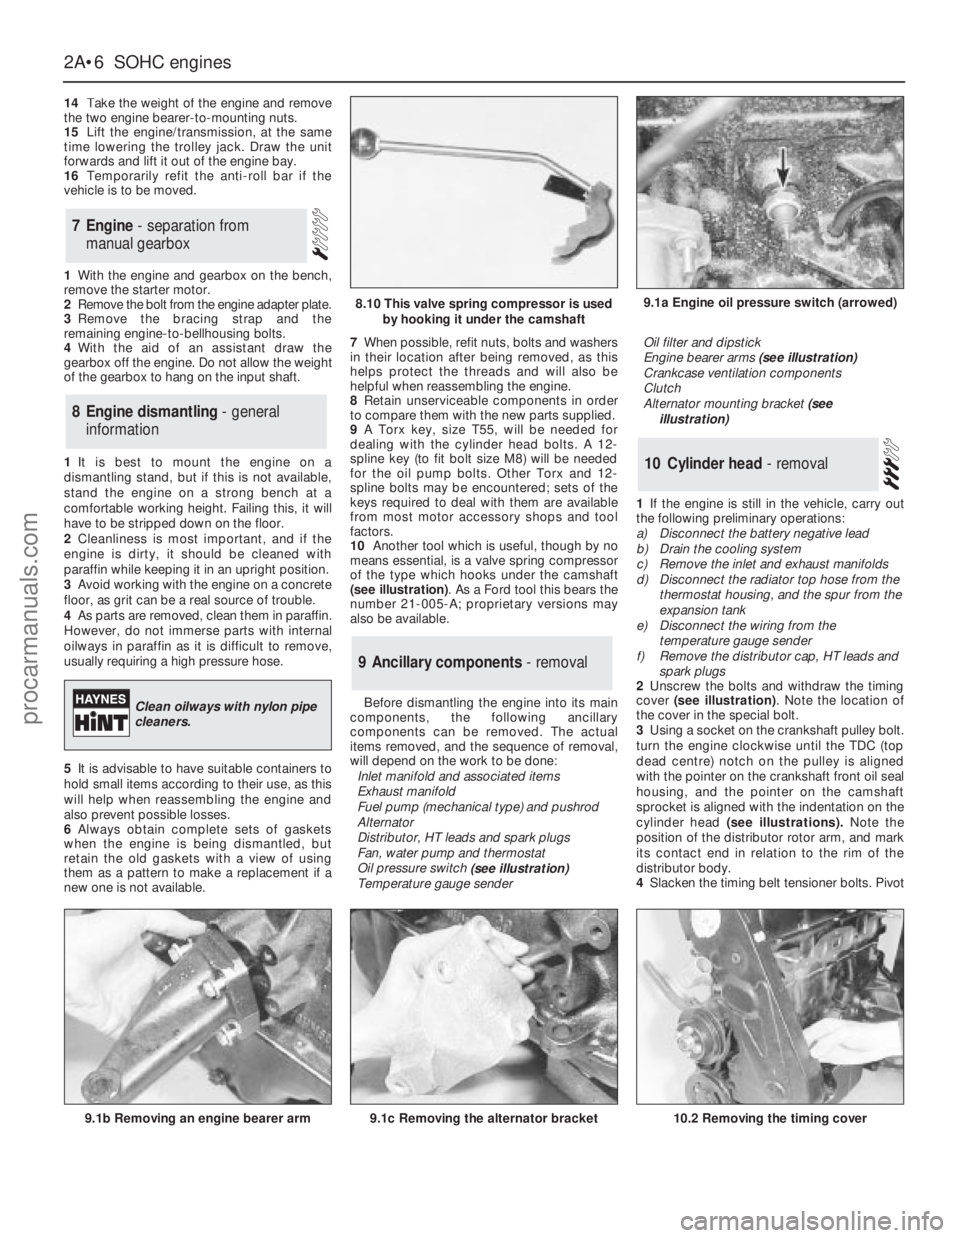
10Another tool which is useful, though by no
means essential, is a valve spring compressor
of the type which hooks under the camshaft
(see illustration). As a Ford tool this bears the
number 21-005-A; proprietary versions may
also be available.
Before dismantling the engine into its main
components, the following ancillary
components can be removed. The actual
items removed, and the sequence of removal,
will depend on the work to be done:
Inlet manifold and associated items
Exhaust manifold
Fuel pump (mechanical type) and pushrod
Alternator
Distributor, HT leads and spark plugs
Fan, water pump and thermostat
Oil pressure switch
(see illustration)
Temperature gauge senderOil filter and dipstick
Engine bearer arms (see illustration)
Crankcase ventilation components
Clutch
Alternator mounting bracket (see
illustration)
1If the engine is still in the vehicle, carry out
the following preliminary operations:
a)Disconnect the battery negative lead
b)Drain the cooling system
c)Remove the inlet and exhaust manifolds
d)Disconnect the radiator top hose from the
thermostat housing, and the spur from the
expansion tank
e)Disconnect the wiring from the
temperature gauge sender
f)Remove the distributor cap, HT leads and
spark plugs
2Unscrew the bolts and withdraw the timing
cover (see illustration). Note the location of
the cover in the special bolt.
3Using a socket on the crankshaft pulley bolt.
turn the engine clockwise until the TDC (top
dead centre) notch on the pulley is aligned
with the pointer on the crankshaft front oil seal
housing, and the pointer on the camshaft
sprocket is aligned with the indentation on the
cylinder head (see illustrations).Note the
position of the distributor rotor arm, and mark
its contact end in relation to the rim of the
distributor body.
4Slacken the timing belt tensioner bolts. Pivot
10Cylinder head - removal
9Ancillary components - removal
8Engine dismantling - general
information
7Engine - separation from
manual gearbox
2A•6SOHCengines
9.1a Engine oil pressure switch (arrowed)
9.1b Removing an engine bearer arm9.1c Removing the alternator bracket
8.10 This valve spring compressor is used
by hooking it under the camshaft
Clean oilways with nylon pipe
cleaners.
10.2 Removing the timing cover
procarmanuals.com
Page 69 of 255
Other items
34Disconnect the throttle cable from the
operating lever and bracket.
35Disconnect the right-hand exhaust
downpipe from the manifold then remove the
starter motor, the oil filter, and disconnect the
left-hand exhaust downpipe, in that order.
Refer to Part A, Section 8, paragraphs 1 to 8
of this Chapter.
Cylinder head bolts on the V6 engine may
be conventional (hexagon-headed) or Torx
type. The appropriate Torx key will be needed
to deal with the latter.
Before dismantling the engine into its main
components, the following ancillaries can be
removed. The actual items removed, and the
sequence of removal, will depend on the work
to be done.
Distributor and bracket
Spark plugs
Inlet manifold and associated items
Exhaust manifolds
Clutch
Alternator and bracket
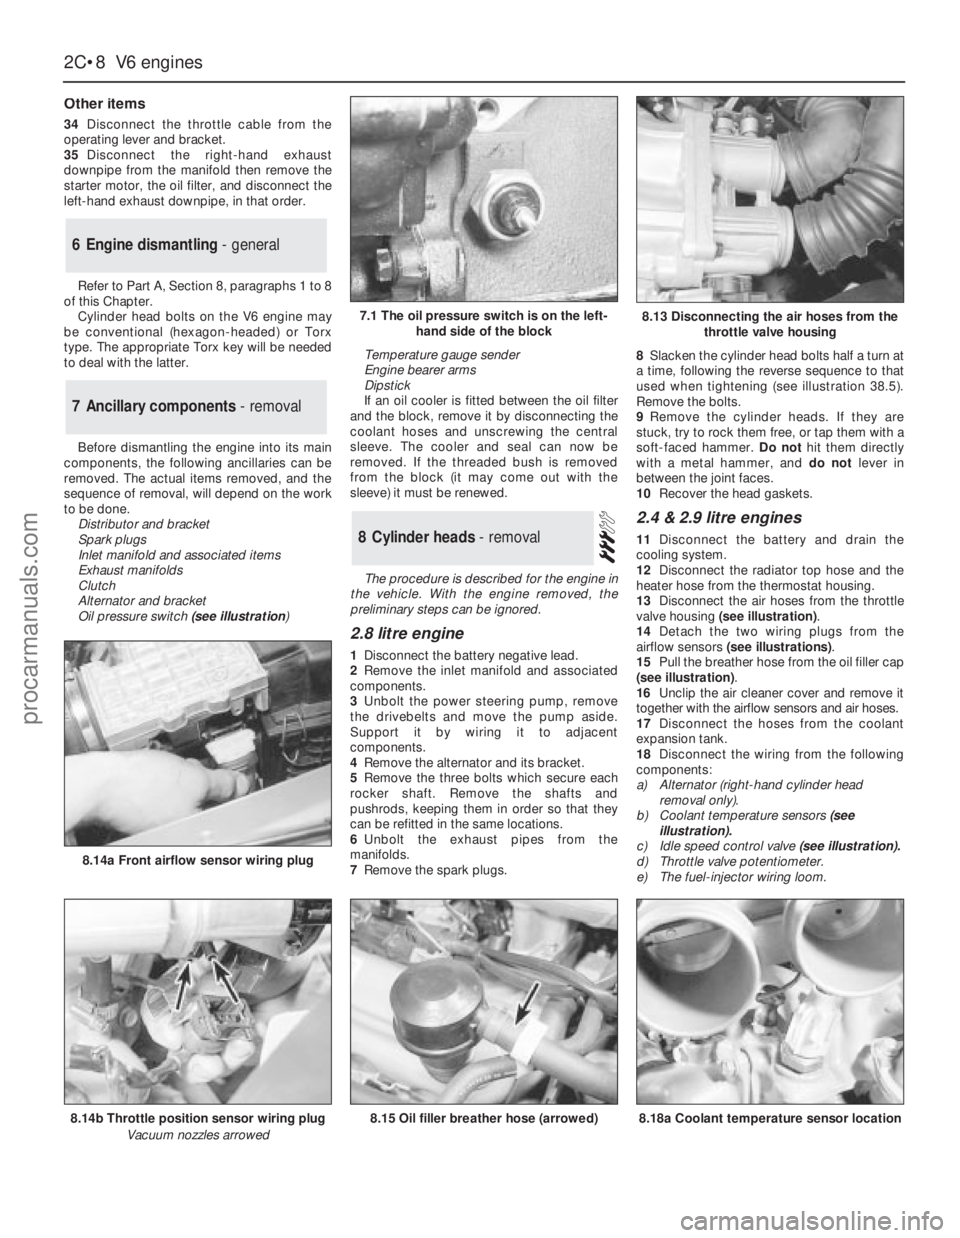
Oil pressure switch(see illustration) Temperature gauge sender
Engine bearer arms
Dipstick
If an oil cooler is fitted between the oil filter
and the block, remove it by disconnecting the
coolant hoses and unscrewing the central
sleeve. The cooler and seal can now be
removed. If the threaded bush is removed
from the block (it may come out with the
sleeve) it must be renewed.
The procedure is described for the engine in
the vehicle. With the engine removed, the
preliminary steps can be ignored.
2.8 litre engine
1Disconnect the battery negative lead.
2Remove the inlet manifold and associated
components.
3Unbolt the power steering pump, remove
the drivebelts and move the pump aside.
Support it by wiring it to adjacent
components.
4Remove the alternator and its bracket.
5Remove the three bolts which secure each
rocker shaft. Remove the shafts and
pushrods, keeping them in order so that they
can be refitted in the same locations.
6Unbolt the exhaust pipes from the
manifolds.
7Remove the spark plugs.8Slacken the cylinder head bolts half a turn at
a time, following the reverse sequence to that
used when tightening (see illustration 38.5).
Remove the bolts.
9Remove the cylinder heads. If they are
stuck, try to rock them free, or tap them with a
soft-faced hammer. Do nothit them directly
with a metal hammer, and do notlever in
between the joint faces.
10Recover the head gaskets.
2.4 & 2.9 litre engines
11Disconnect the battery and drain the
cooling system.
12Disconnect the radiator top hose and the
heater hose from the thermostat housing.
13Disconnect the air hoses from the throttle
valve housing (see illustration).
14Detach the two wiring plugs from the
airflow sensors (see illustrations).
15Pull the breather hose from the oil filler cap
(see illustration).
16Unclip the air cleaner cover and remove it
together with the airflow sensors and air hoses.
17Disconnect the hoses from the coolant
expansion tank.
18Disconnect the wiring from the following
components:
a)Alternator (right-hand cylinder head
removal only).
b)Coolant temperature sensors(see
illustration).
c)Idle speed control valve (see illustration).
d)Throttle valve potentiometer.
e)The fuel-injector wiring loom.8Cylinder heads - removal
7Ancillary components - removal
6Engine dismantling - general
2C•8V6 engines
7.1 The oil pressure switch is on the left-
hand side of the block
8.14b Throttle position sensor wiring plug
Vacuum nozzles arrowed
8.14a Front airflow sensor wiring plug
8.15 Oil filler breather hose (arrowed)8.18a Coolant temperature sensor location
8.13 Disconnecting the air hoses from the
throttle valve housing
procarmanuals.com
Page 94 of 255
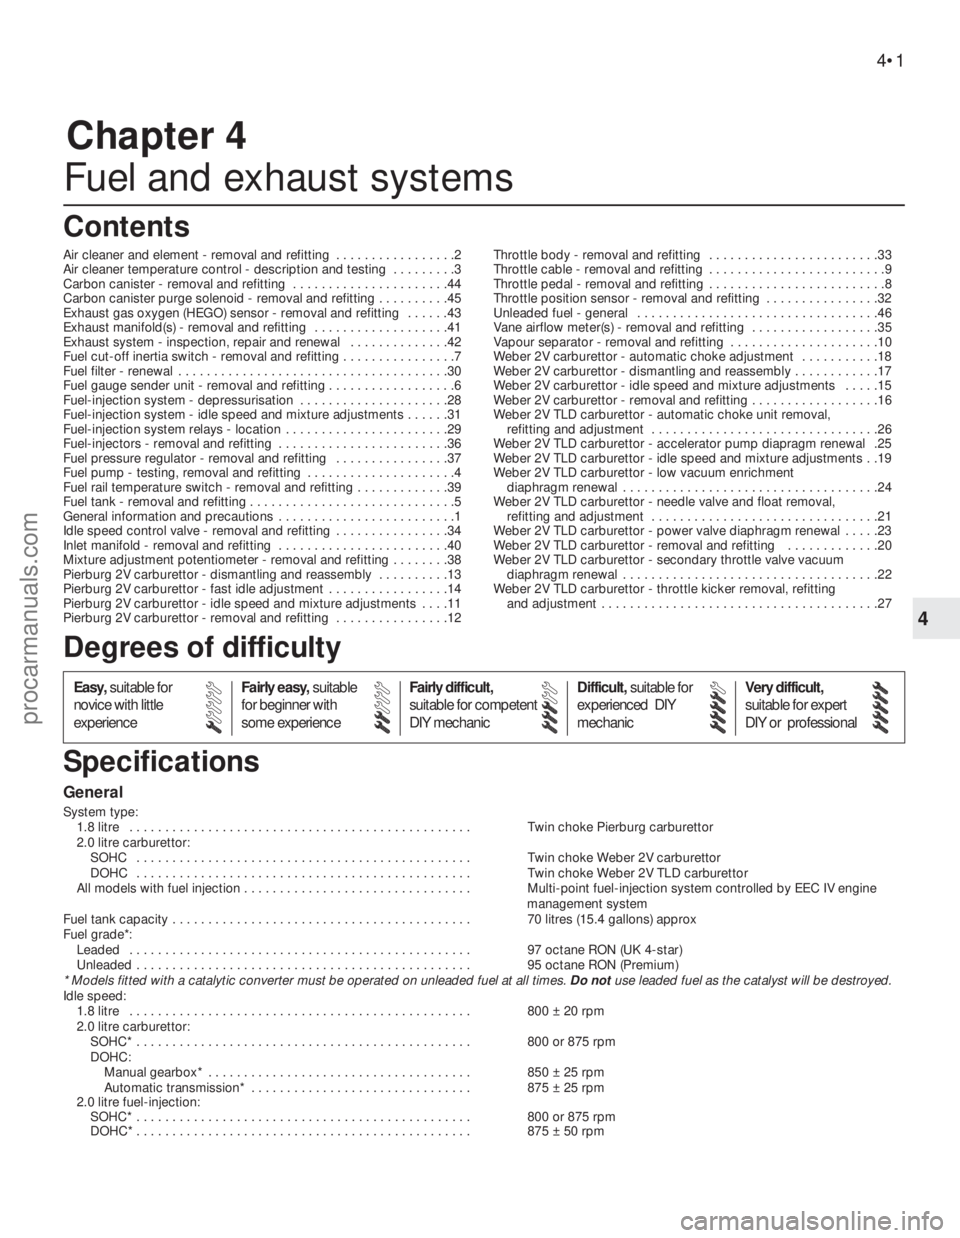
Chapter 4
Fuel and exhaust systems
Air cleaner and element - removal and refitting . . . . . . . . . . . . . . . . .2
Air cleaner temperature control - description and testing . . . . . . . . .3
Carbon canister - removal and refitting . . . . . . . . . . . . . . . . . . . . . .44
Carbon canister purge solenoid - removal and refitting . . . . . . . . . .45
Exhaust gas oxygen (HEGO) sensor - removal and refitting . . . . . .43
Exhaust manifold(s) - removal and refitting . . . . . . . . . . . . . . . . . . .41
Exhaust system - inspection, repair and renewal . . . . . . . . . . . . . .42
Fuel cut-off inertia switch - removal and refitting . . . . . . . . . . . . . . . .7
Fuel filter - renewal . . . . . . . . . . . . . . . . . . . . . . . . . . . . . . . . . . . . . .30
Fuel gauge sender unit - removal and refitting . . . . . . . . . . . . . . . . . .6
Fuel-injection system - depressurisation . . . . . . . . . . . . . . . . . . . . .28
Fuel-injection system - idle speed and mixture adjustments . . . . . .31
Fuel-injection system relays - location . . . . . . . . . . . . . . . . . . . . . . .29
Fuel-injectors - removal and refitting . . . . . . . . . . . . . . . . . . . . . . . .36
Fuel pressure regulator - removal and refitting . . . . . . . . . . . . . . . .37
Fuel pump - testing, removal and refitting . . . . . . . . . . . . . . . . . . . . .4
Fuel rail temperature switch - removal and refitting . . . . . . . . . . . . .39
Fuel tank - removal and refitting . . . . . . . . . . . . . . . . . . . . . . . . . . . . .5
General information and precautions . . . . . . . . . . . . . . . . . . . . . . . . .1
Idle speed control valve - removal and refitting . . . . . . . . . . . . . . . .34
Inlet manifold - removal and refitting . . . . . . . . . . . . . . . . . . . . . . . .40
Mixture adjustment potentiometer - removal and refitting . . . . . . . .38
Pierburg 2V carburettor - dismantling and reassembly . . . . . . . . . .13
Pierburg 2V carburettor - fast idle adjustment . . . . . . . . . . . . . . . . .14
Pierburg 2V carburettor - idle speed and mixture adjustments . . . .11
Pierburg 2V carburettor - removal and refitting . . . . . . . . . . . . . . . .12Throttle body - removal and refitting . . . . . . . . . . . . . . . . . . . . . . . .33
Throttle cable - removal and refitting . . . . . . . . . . . . . . . . . . . . . . . . .9
Throttle pedal - removal and refitting . . . . . . . . . . . . . . . . . . . . . . . . .8
Throttle position sensor - removal and refitting . . . . . . . . . . . . . . . .32
Unleaded fuel - general . . . . . . . . . . . . . . . . . . . . . . . . . . . . . . . . . .46
Vane airflow meter(s) - removal and refitting . . . . . . . . . . . . . . . . . .35
Vapour separator - removal and refitting . . . . . . . . . . . . . . . . . . . . .10
Weber 2V carburettor - automatic choke adjustment . . . . . . . . . . .18
Weber 2V carburettor - dismantling and reassembly . . . . . . . . . . . .17
Weber 2V carburettor - idle speed and mixture adjustments . . . . .15
Weber 2V carburettor - removal and refitting . . . . . . . . . . . . . . . . . .16
Weber 2V TLD carburettor - automatic choke unit removal,
refitting and adjustment . . . . . . . . . . . . . . . . . . . . . . . . . . . . . . . .26
Weber 2V TLD carburettor - accelerator pump diapragm renewal .25
Weber 2V TLD carburettor - idle speed and mixture adjustments . .19
Weber 2V TLD carburettor - low vacuum enrichment
diaphragm renewal . . . . . . . . . . . . . . . . . . . . . . . . . . . . . . . . . . . .24
Weber 2V TLD carburettor - needle valve and float removal,
refitting and adjustment . . . . . . . . . . . . . . . . . . . . . . . . . . . . . . . .21
Weber 2V TLD carburettor - power valve diaphragm renewal . . . . .23
Weber 2V TLD carburettor - removal and refitting . . . . . . . . . . . . .20
Weber 2V TLD carburettor - secondary throttle valve vacuum
diaphragm renewal . . . . . . . . . . . . . . . . . . . . . . . . . . . . . . . . . . . .22
Weber 2V TLD carburettor - throttle kicker removal, refitting
and adjustment . . . . . . . . . . . . . . . . . . . . . . . . . . . . . . . . . . . . . . .27
General
System type:
1.8 litre . . . . . . . . . . . . . . . . . . . . . . . . . . . . . . . . . . . . . . . . . . . . . . . . Twin choke Pierburg carburettor
2.0 litre carburettor:
SOHC . . . . . . . . . . . . . . . . . . . . . . . . . . . . . . . . . . . . . . . . . . . . . . . Twin choke Weber 2V carburettor
DOHC . . . . . . . . . . . . . . . . . . . . . . . . . . . . . . . . . . . . . . . . . . . . . . . Twin choke Weber 2V TLD carburettor
All models with fuel injection . . . . . . . . . . . . . . . . . . . . . . . . . . . . . . . . Multi-point fuel-injection system controlled by EEC IV engine
management system
Fuel tank capacity . . . . . . . . . . . . . . . . . . . . . . . . . . . . . . . . . . . . . . . . . . 70 litres (15.4 gallons) approx
Fuel grade*:
Leaded . . . . . . . . . . . . . . . . . . . . . . . . . . . . . . . . . . . . . . . . . . . . . . . . 97 octane RON (UK 4-star)
Unleaded . . . . . . . . . . . . . . . . . . . . . . . . . . . . . . . . . . . . . . . . . . . . . . . 95 octane RON (Premium)
* Models fitted with a catalytic converter must be operated on unleaded fuel at all times. Do notuse leaded fuel as the catalyst will be destroyed.
Idle speed:
1.8 litre . . . . . . . . . . . . . . . . . . . . . . . . . . . . . . . . . . . . . . . . . . . . . . . . 800 ± 20 rpm
2.0 litre carburettor:
SOHC* . . . . . . . . . . . . . . . . . . . . . . . . . . . . . . . . . . . . . . . . . . . . . . . 800 or 875 rpm
DOHC:
Manual gearbox* . . . . . . . . . . . . . . . . . . . . . . . . . . . . . . . . . . . . . 850 ± 25 rpm
Automatic transmission* . . . . . . . . . . . . . . . . . . . . . . . . . . . . . . . 875 ± 25 rpm
2.0 litre fuel-injection:
SOHC* . . . . . . . . . . . . . . . . . . . . . . . . . . . . . . . . . . . . . . . . . . . . . . . 800 or 875 rpm
DOHC* . . . . . . . . . . . . . . . . . . . . . . . . . . . . . . . . . . . . . . . . . . . . . . . 875 ± 50 rpm
4•1
Easy,suitable for
novice with little
experienceFairly easy,suitable
for beginner with
some experienceFairly difficult,
suitable for competent
DIY mechanicDifficult,suitable for
experienced DIY
mechanicVery difficult,
suitable for expert
DIY or professional
Degrees of difficulty
Specifications Contents
4
procarmanuals.com
Page 101 of 255
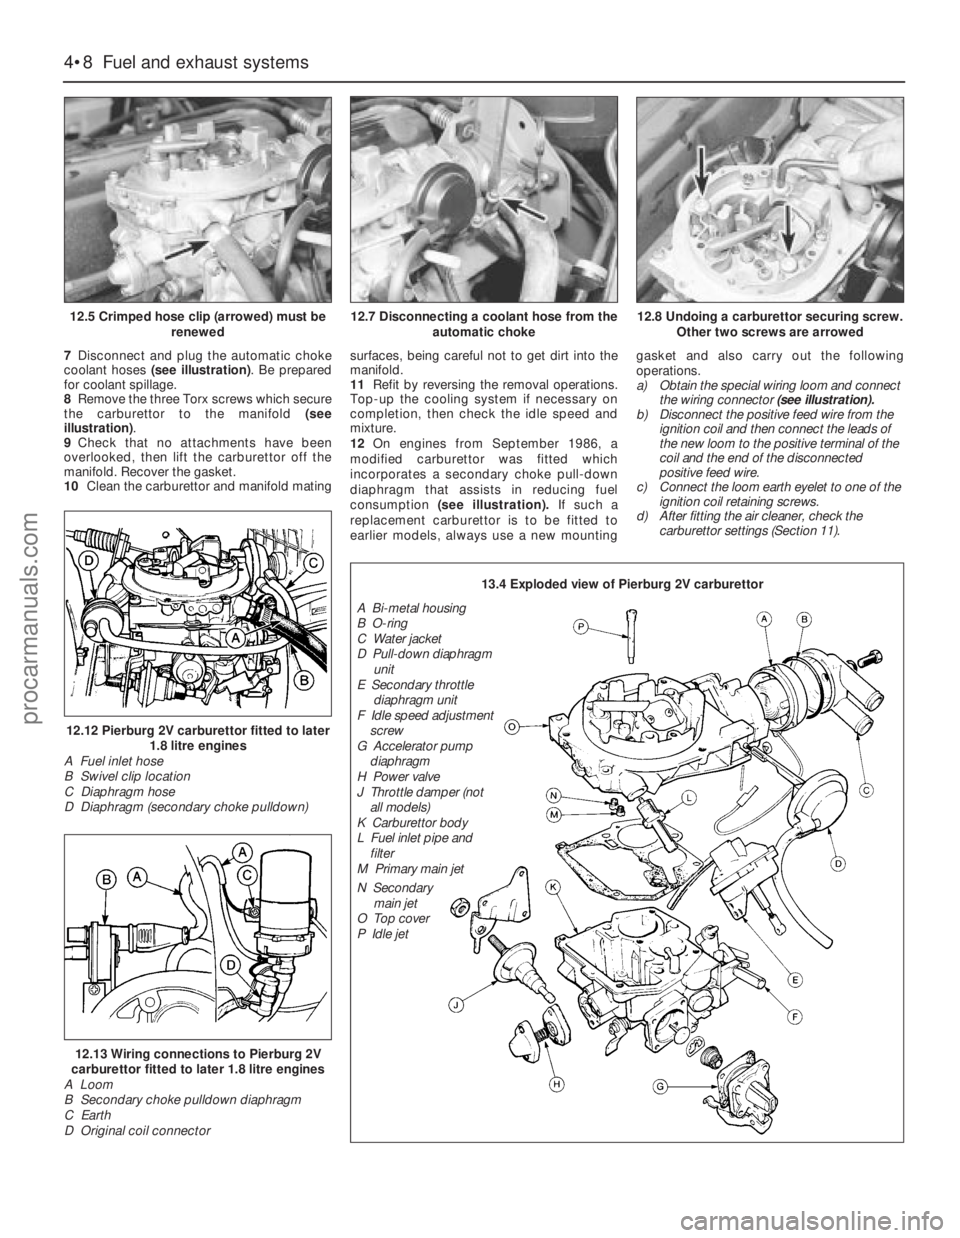
7Disconnect and plug the automatic choke
coolant hoses (see illustration). Be prepared
for coolant spillage.
8Remove the three Torx screws which secure
the carburettor to the manifold (see
illustration).
9Check that no attachments have been
overlooked, then lift the carburettor off the
manifold. Recover the gasket.
10Clean the carburettor and manifold matingsurfaces, being careful not to get dirt into the
manifold.
11Refit by reversing the removal operations.
Top-up the cooling system if necessary on
completion, then check the idle speed and
mixture.
12On engines from September 1986, a
modified carburettor was fitted which
incorporates a secondary choke pull-down
diaphragm that assists in reducing fuel
consumption (see illustration).If such a
replacement carburettor is to be fitted to
earlier models, always use a new mountinggasket and also carry out the following
operations.
a)Obtain the special wiring loom and connect
the wiring connector(see illustration).
b)Disconnect the positive feed wire from the
ignition coil and then connect the leads of
the new loom to the positive terminal of the
coil and the end of the disconnected
positive feed wire.
c)Connect the loom earth eyelet to one of the
ignition coil retaining screws.
d)After fitting the air cleaner, check the
carburettor settings (Section 11).
4•8Fuel and exhaust systems
12.5 Crimped hose clip (arrowed) must be
renewed
12.12 Pierburg 2V carburettor fitted to later
1.8 litre engines
A Fuel inlet hose
B Swivel clip location
C Diaphragm hose
D Diaphragm (secondary choke pulldown)
12.13 Wiring connections to Pierburg 2V
carburettor fitted to later 1.8 litre engines
A Loom
B Secondary choke pulldown diaphragm
C Earth
D Original coil connector
12.7 Disconnecting a coolant hose from the
automatic choke12.8 Undoing a carburettor securing screw.
Other two screws are arrowed
13.4 Exploded view of Pierburg 2V carburettor
A Bi-metal housing
B O-ring
C Water jacket
D Pull-down diaphragm
unit
E Secondary throttle
diaphragm unit
F Idle speed adjustment
screw
G Accelerator pump
diaphragm
H Power valve
J Throttle damper (not
all models)
K Carburettor body
L Fuel inlet pipe and
filter
M Primary main jet
N Secondary
main jet
O Top cover
P Idle jet
procarmanuals.com
Page 107 of 255
16Start the engine and note the engine
speed (rpm). The engine speed should
increase above the normal idle speed, and
should be as given in the Specifications.
17If the engine speed is not as specified,
remove the tamperproof plug from the top of
the throttle kicker housing, and turn the
adjustment screw to give the specified speed.
18On completion of adjustment, fit a new
tamperproof cap.
19Disconnect the tubing from the inlet
manifold, and reconnect the throttle kicker
vacuum hose.
20Refit the plastic shield and the air cleaner.
On 2.4 & 2.9 litre V6 models especially,
residual pressure will remain in the fuel lines
long after the vehicle was last used therefore
the fuel system must be depressurised before
any hose is disconnected; the system is
depressurised via the vent valve on the fuel
rail, noting that it may be necessary to depress
the valve several times before the pressure is
fully released. As an added precaution place a
rag over the valve as it is depressed to catch
any fuel which is forcibly expelled. Before
carrying out any operation on the fuel system
refer to the precautions given in Safety first! at
the beginning of this Manual and follow them
implicitly. Petrol is a highly dangerous and
volatile liquid and the precautions necessary
when handling it cannot be overstressed.
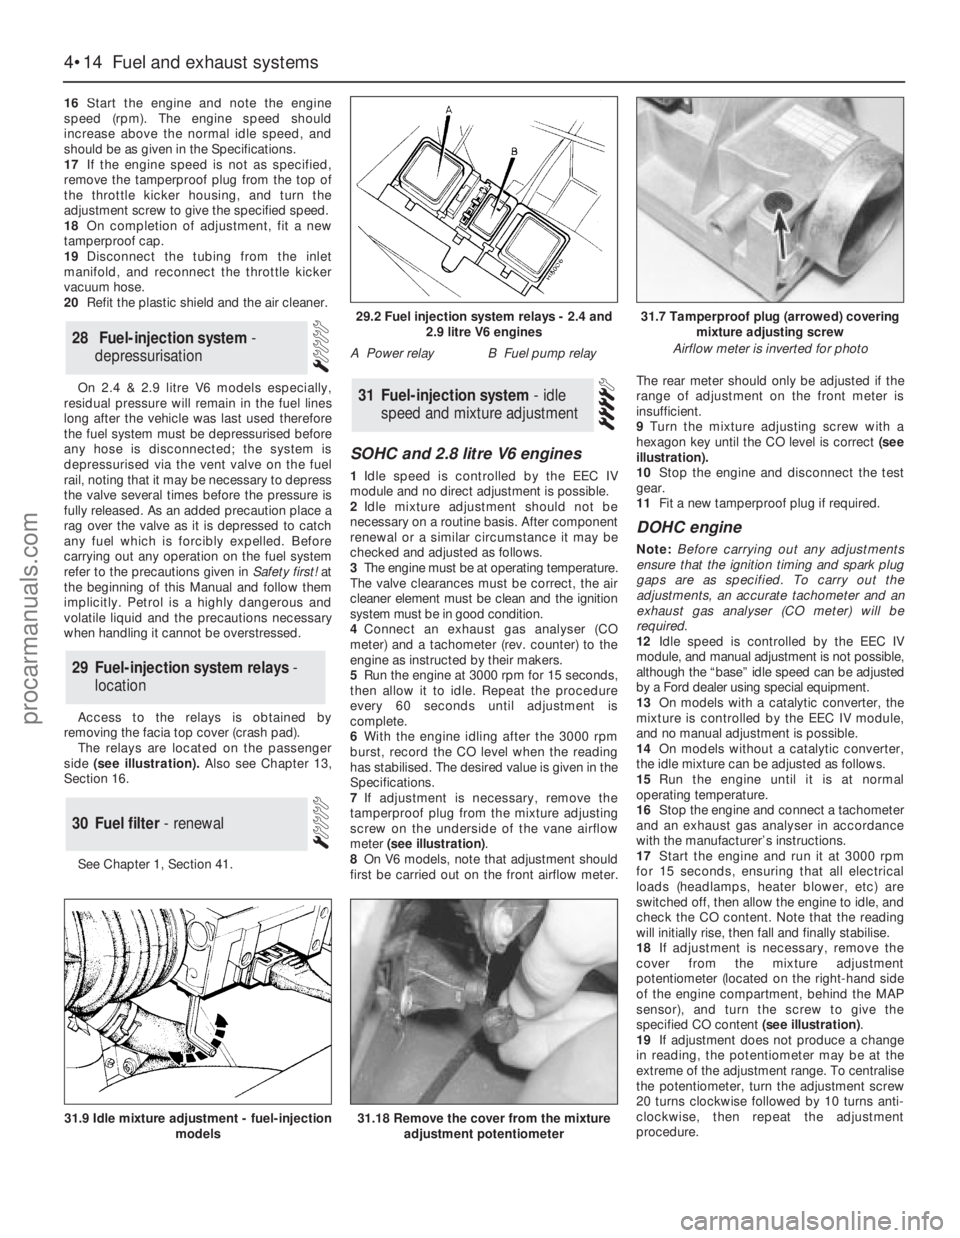
Access to the relays is obtained by
removing the facia top cover (crash pad).
The relays are located on the passenger
side(see illustration). Also see Chapter 13,
Section 16.
See Chapter 1, Section 41.
SOHC and 2.8 litre V6 engines
1Idle speed is controlled by the EEC IV
module and no direct adjustment is possible.
2Idle mixture adjustment should not be
necessary on a routine basis. After component
renewal or a similar circumstance it may be
checked and adjusted as follows.
3The engine must be at operating temperature.
The valve clearances must be correct, the air
cleaner element must be clean and the ignition
system must be in good condition.
4Connect an exhaust gas analyser (CO
meter) and a tachometer (rev. counter) to the
engine as instructed by their makers.
5Run the engine at 3000 rpm for 15 seconds,
then allow it to idle. Repeat the procedure
every 60 seconds until adjustment is
complete.
6With the engine idling after the 3000 rpm
burst, record the CO level when the reading
has stabilised. The desired value is given in the
Specifications.
7If adjustment is necessary, remove the
tamperproof plug from the mixture adjusting
screw on the underside of the vane airflow
meter (see illustration).
8On V6 models, note that adjustment should
first be carried out on the front airflow meter.The rear meter should only be adjusted if the
range of adjustment on the front meter is
insufficient.
9Turn the mixture adjusting screw with a
hexagon key until the CO level is correct (see
illustration).
10Stop the engine and disconnect the test
gear.
11Fit a new tamperproof plug if required.
DOHC engine
Note: Before carrying out any adjustments
ensure that the ignition timing and spark plug
gaps are as specified. To carry out the
adjustments, an accurate tachometer and an
exhaust gas analyser (CO meter) will be
required.
12Idle speed is controlled by the EEC IV
module, and manual adjustment is not possible,
although the “base” idle speed can be adjusted
by a Ford dealer using special equipment.
13On models with a catalytic converter, the
mixture is controlled by the EEC IV module,
and no manual adjustment is possible.
14On models without a catalytic converter,
the idle mixture can be adjusted as follows.
15Run the engine until it is at normal
operating temperature.
16Stop the engine and connect a tachometer
and an exhaust gas analyser in accordance
with the manufacturer’s instructions.
17Start the engine and run it at 3000 rpm
for 15 seconds, ensuring that all electrical
loads (headlamps, heater blower, etc) are
switched off, then allow the engine to idle, and
check the CO content. Note that the reading
will initially rise, then fall and finally stabilise.
18If adjustment is necessary, remove the
cover from the mixture adjustment
potentiometer (located on the right-hand side
of the engine compartment, behind the MAP
sensor), and turn the screw to give the
specified CO content (see illustration).
19If adjustment does not produce a change
in reading, the potentiometer may be at the
extreme of the adjustment range. To centralise
the potentiometer, turn the adjustment screw
20 turns clockwise followed by 10 turns anti-
clockwise, then repeat the adjustment
procedure.
31Fuel-injection system - idle
speed and mixture adjustment
30Fuel filter - renewal
29Fuel-injection system relays -
location
28Fuel-injection system -
depressurisation
4•14Fuel and exhaust systems
31.18 Remove the cover from the mixture
adjustment potentiometer31.9 Idle mixture adjustment - fuel-injection
models
29.2 Fuel injection system relays - 2.4 and
2.9 litre V6 engines
A Power relayB Fuel pump relay
31.7 Tamperproof plug (arrowed) covering
mixture adjusting screw
Airflow meter is inverted for photo
procarmanuals.com
Page 128 of 255
2Disconnect the battery negative lead.
3Drain the cooling system (Chapter 3). Save
the coolant if it is fit for re-use.
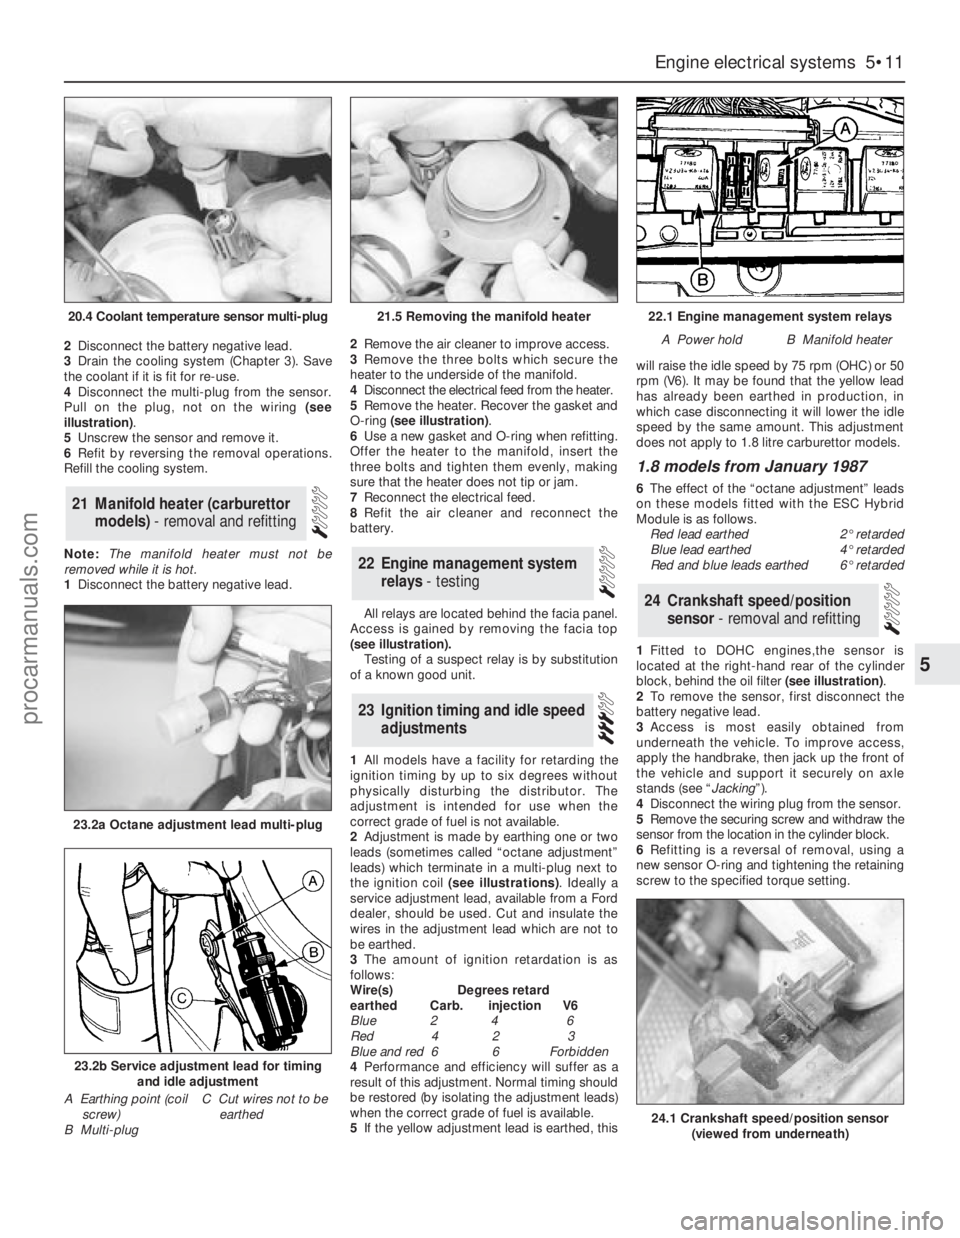
4Disconnect the multi-plug from the sensor.
Pull on the plug, not on the wiring (see
illustration).
5Unscrew the sensor and remove it.
6Refit by reversing the removal operations.
Refill the cooling system.
Note: The manifold heater must not be
removed while it is hot.
1Disconnect the battery negative lead. 2Remove the air cleaner to improve access.
3Remove the three bolts which secure the
heater to the underside of the manifold.
4Disconnect the electrical feed from the heater.
5Remove the heater. Recover the gasket and
O-ring (see illustration).
6Use a new gasket and O-ring when refitting.
Offer the heater to the manifold, insert the
three bolts and tighten them evenly, making
sure that the heater does not tip or jam.
7Reconnect the electrical feed.
8Refit the air cleaner and reconnect the
battery.
All relays are located behind the facia panel.
Access is gained by removing the facia top
(see illustration).
Testing of a suspect relay is by substitution
of a known good unit.
1All models have a facility for retarding the
ignition timing by up to six degrees without
physically disturbing the distributor. The
adjustment is intended for use when the
correct grade of fuel is not available.
2Adjustment is made by earthing one or two
leads (sometimes called “octane adjustment”
leads) which terminate in a multi-plug next to
the ignition coil (see illustrations). Ideally a
service adjustment lead, available from a Ford
dealer, should be used. Cut and insulate the
wires in the adjustment lead which are not to
be earthed.
3The amount of ignition retardation is as
follows:
Wire(s) Degrees retard
earthed Carb. injection V6
Blue 2 4 6
Red 4 2 3
Blue and red 6 6 Forbidden
4Performance and efficiency will suffer as a
result of this adjustment. Normal timing should
be restored (by isolating the adjustment leads)
when the correct grade of fuel is available.
5If the yellow adjustment lead is earthed, thiswill raise the idle speed by 75 rpm (OHC) or 50
rpm (V6). It may be found that the yellow lead
has already been earthed in production, in
which case disconnecting it will lower the idle
speed by the same amount. This adjustment
does not apply to 1.8 litre carburettor models.
1.8 models from January 1987
6The effect of the “octane adjustment” leads
on these models fitted with the ESC Hybrid
Module is as follows.
Red lead earthed2°retarded
Blue lead earthed4°retarded
Red and blue leads earthed6°retarded
1Fitted to DOHC engines,the sensor is
located at the right-hand rear of the cylinder
block, behind the oil filter (see illustration).
2To remove the sensor, first disconnect the
battery negative lead.
3Access is most easily obtained from
underneath the vehicle. To improve access,
apply the handbrake, then jack up the front of
the vehicle and support it securely on axle
stands (see “Jacking”).
4Disconnect the wiring plug from the sensor.
5Remove the securing screw and withdraw the
sensor from the location in the cylinder block.
6Refitting is a reversal of removal, using a
new sensor O-ring and tightening the retaining
screw to the specified torque setting.
24Crankshaft speed/position
sensor - removal and refitting
23Ignition timing and idle speed
adjustments
22Engine management system
relays - testing
21Manifold heater (carburettor
models) - removal and refitting
Engine electrical systems 5•11
5
20.4 Coolant temperature sensor multi-plug21.5 Removing the manifold heater22.1 Engine management system relays
A Power holdB Manifold heater
23.2a Octane adjustment lead multi-plug
23.2b Service adjustment lead for timing
and idle adjustment
A Earthing point (coil
screw)
B Multi-plugC Cut wires not to be
earthed
24.1 Crankshaft speed/position sensor
(viewed from underneath)
procarmanuals.com