1985 FORD GRANADA fog light bulb
[x] Cancel search: fog light bulbPage 178 of 255

Chapter 13
Body electrical system
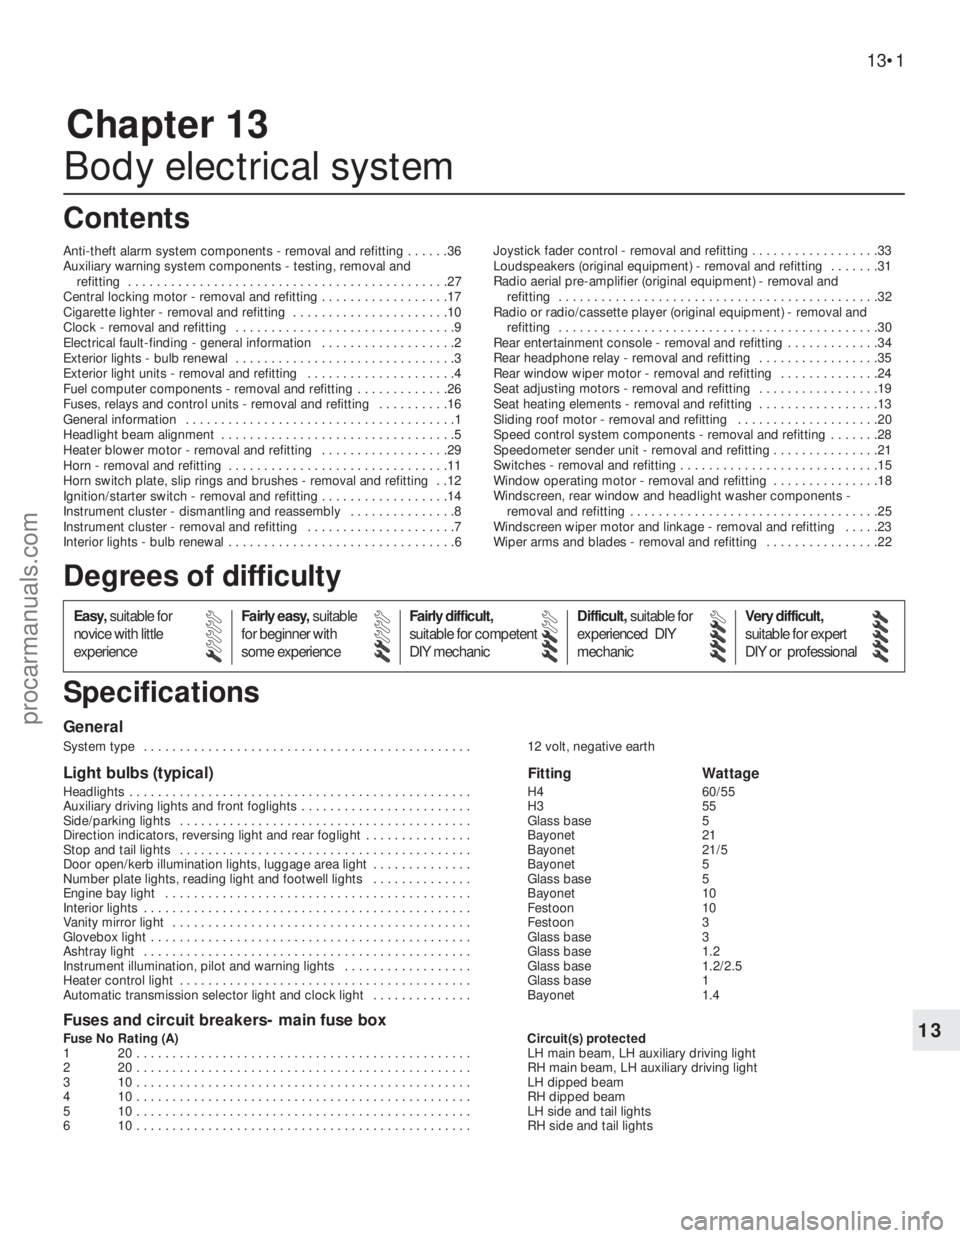
Anti-theft alarm system components - removal and refitting . . . . . .36
Auxiliary warning system components - testing, removal and
refitting . . . . . . . . . . . . . . . . . . . . . . . . . . . . . . . . . . . . . . . . . . . . .27
Central locking motor - removal and refitting . . . . . . . . . . . . . . . . . .17
Cigarette lighter - removal and refitting . . . . . . . . . . . . . . . . . . . . . .10
Clock - removal and refitting . . . . . . . . . . . . . . . . . . . . . . . . . . . . . . .9
Electrical fault-finding - general information . . . . . . . . . . . . . . . . . . .2
Exterior lights - bulb renewal . . . . . . . . . . . . . . . . . . . . . . . . . . . . . . .3
Exterior light units - removal and refitting . . . . . . . . . . . . . . . . . . . . .4
Fuel computer components - removal and refitting . . . . . . . . . . . . .26
Fuses, relays and control units - removal and refitting . . . . . . . . . .16
General information . . . . . . . . . . . . . . . . . . . . . . . . . . . . . . . . . . . . . .1
Headlight beam alignment . . . . . . . . . . . . . . . . . . . . . . . . . . . . . . . . .5
Heater blower motor - removal and refitting . . . . . . . . . . . . . . . . . .29
Horn - removal and refitting . . . . . . . . . . . . . . . . . . . . . . . . . . . . . . .11
Horn switch plate, slip rings and brushes - removal and refitting . .12
Ignition/starter switch - removal and refitting . . . . . . . . . . . . . . . . . .14
Instrument cluster - dismantling and reassembly . . . . . . . . . . . . . . .8
Instrument cluster - removal and refitting . . . . . . . . . . . . . . . . . . . . .7
Interior lights - bulb renewal . . . . . . . . . . . . . . . . . . . . . . . . . . . . . . . .6Joystick fader control - removal and refitting . . . . . . . . . . . . . . . . . .33
Loudspeakers (original equipment) - removal and refitting . . . . . . .31
Radio aerial pre-amplifier (original equipment) - removal and
refitting . . . . . . . . . . . . . . . . . . . . . . . . . . . . . . . . . . . . . . . . . . . . .32
Radio or radio/cassette player (original equipment) - removal and
refitting . . . . . . . . . . . . . . . . . . . . . . . . . . . . . . . . . . . . . . . . . . . . .30
Rear entertainment console - removal and refitting . . . . . . . . . . . . .34
Rear headphone relay - removal and refitting . . . . . . . . . . . . . . . . .35
Rear window wiper motor - removal and refitting . . . . . . . . . . . . . .24
Seat adjusting motors - removal and refitting . . . . . . . . . . . . . . . . .19
Seat heating elements - removal and refitting . . . . . . . . . . . . . . . . .13
Sliding roof motor - removal and refitting . . . . . . . . . . . . . . . . . . . .20
Speed control system components - removal and refitting . . . . . . .28
Speedometer sender unit - removal and refitting . . . . . . . . . . . . . . .21
Switches - removal and refitting . . . . . . . . . . . . . . . . . . . . . . . . . . . .15
Window operating motor - removal and refitting . . . . . . . . . . . . . . .18
Windscreen, rear window and headlight washer components -
removal and refitting . . . . . . . . . . . . . . . . . . . . . . . . . . . . . . . . . . .25
Windscreen wiper motor and linkage - removal and refitting . . . . .23
Wiper arms and blades - removal and refitting . . . . . . . . . . . . . . . .22
General
System type . . . . . . . . . . . . . . . . . . . . . . . . . . . . . . . . . . . . . . . . . . . . . . 12 volt, negative earth
Light bulbs (typical)Fitting Wattage
Headlights . . . . . . . . . . . . . . . . . . . . . . . . . . . . . . . . . . . . . . . . . . . . . . . . H4 60/55
Auxiliary driving lights and front foglights . . . . . . . . . . . . . . . . . . . . . . . . H3 55
Side/parking lights . . . . . . . . . . . . . . . . . . . . . . . . . . . . . . . . . . . . . . . . . Glass base 5
Direction indicators, reversing light and rear foglight . . . . . . . . . . . . . . . Bayonet 21
Stop and tail lights . . . . . . . . . . . . . . . . . . . . . . . . . . . . . . . . . . . . . . . . . Bayonet 21/5
Door open/kerb illumination lights, luggage area light . . . . . . . . . . . . . . Bayonet 5
Number plate lights, reading light and footwell lights . . . . . . . . . . . . . . Glass base 5
Engine bay light . . . . . . . . . . . . . . . . . . . . . . . . . . . . . . . . . . . . . . . . . . . Bayonet 10
Interior lights . . . . . . . . . . . . . . . . . . . . . . . . . . . . . . . . . . . . . . . . . . . . . . Festoon 10
Vanity mirror light . . . . . . . . . . . . . . . . . . . . . . . . . . . . . . . . . . . . . . . . . . Festoon 3
Glovebox light . . . . . . . . . . . . . . . . . . . . . . . . . . . . . . . . . . . . . . . . . . . . . Glass base 3
Ashtray light . . . . . . . . . . . . . . . . . . . . . . . . . . . . . . . . . . . . . . . . . . . . . . Glass base 1.2
Instrument illumination, pilot and warning lights . . . . . . . . . . . . . . . . . . Glass base 1.2/2.5
Heater control light . . . . . . . . . . . . . . . . . . . . . . . . . . . . . . . . . . . . . . . . . Glass base 1
Automatic transmission selector light and clock light . . . . . . . . . . . . . . Bayonet 1.4
Fuses and circuit breakers- main fuse box
Fuse No Rating (A) Circuit(s) protected
1 20 . . . . . . . . . . . . . . . . . . . . . . . . . . . . . . . . . . . . . . . . . . . . . . . LH main beam, LH auxiliary driving light
2 20 . . . . . . . . . . . . . . . . . . . . . . . . . . . . . . . . . . . . . . . . . . . . . . . RH main beam, LH auxiliary driving light
3 10 . . . . . . . . . . . . . . . . . . . . . . . . . . . . . . . . . . . . . . . . . . . . . . . LH dipped beam
4 10 . . . . . . . . . . . . . . . . . . . . . . . . . . . . . . . . . . . . . . . . . . . . . . . RH dipped beam
5 10 . . . . . . . . . . . . . . . . . . . . . . . . . . . . . . . . . . . . . . . . . . . . . . . LH side and tail lights
6 10 . . . . . . . . . . . . . . . . . . . . . . . . . . . . . . . . . . . . . . . . . . . . . . . RH side and tail lights
13•1
Easy,suitable for
novice with little
experienceFairly easy,suitable
for beginner with
some experienceFairly difficult,
suitable for competent
DIY mechanicDifficult,suitable for
experienced DIY
mechanicVery difficult,
suitable for expert
DIY or professional
Degrees of difficulty
Specifications Contents
13
procarmanuals.com
Page 182 of 255

12Connect the new bulb, fit it and secure it
with the spring clip.
13Check the light for correct operation, then
refit and secure the cover.
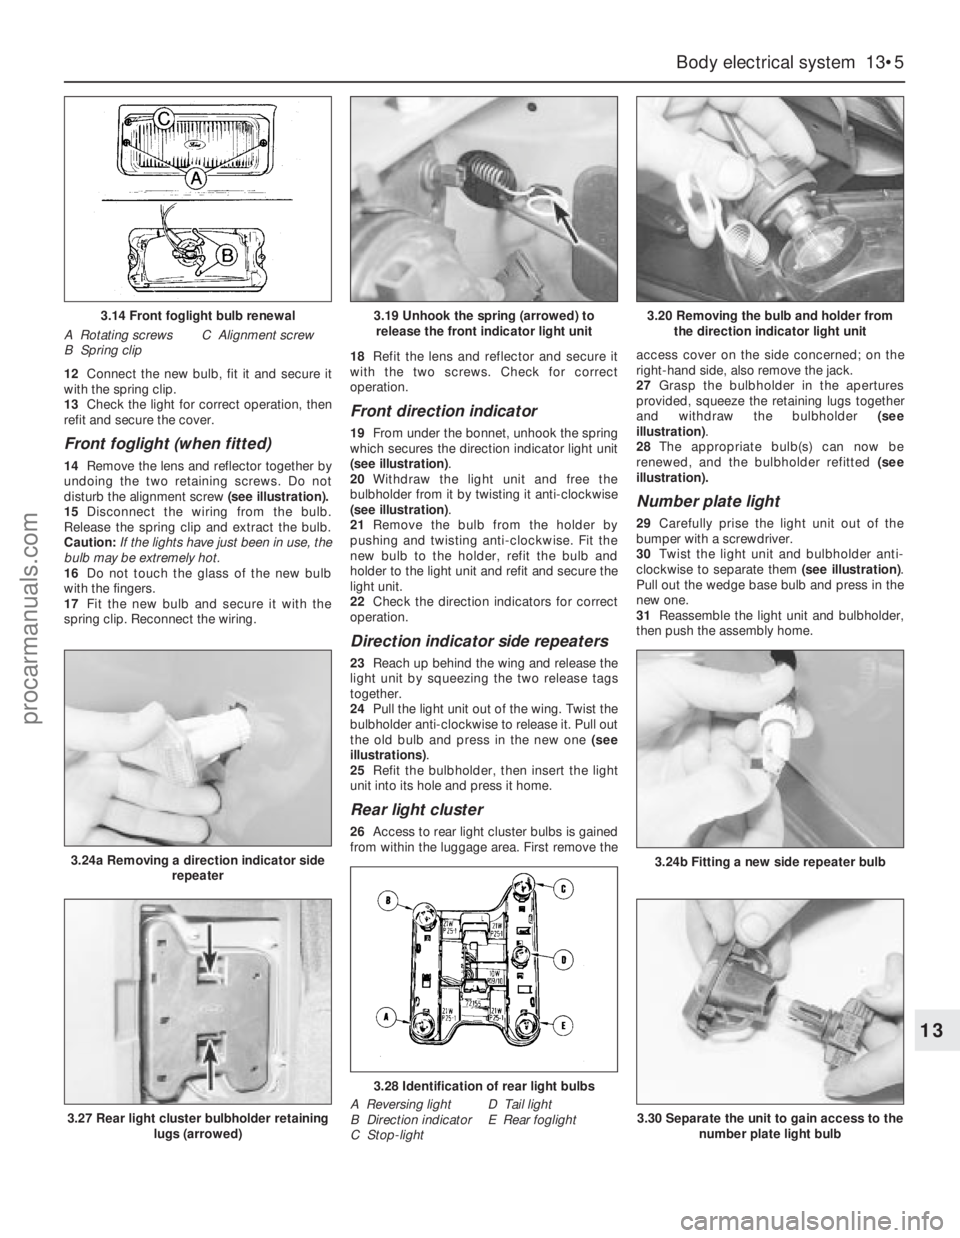
Front foglight (when fitted)
14Remove the lens and reflector together by
undoing the two retaining screws. Do not
disturb the alignment screw (see illustration).
15Disconnect the wiring from the bulb.
Release the spring clip and extract the bulb.
Caution: If the lights have just been in use, the
bulb may be extremely hot.
16Do not touch the glass of the new bulb
with the fingers.
17Fit the new bulb and secure it with the
spring clip. Reconnect the wiring.18Refit the lens and reflector and secure it
with the two screws. Check for correct
operation.
Front direction indicator
19From under the bonnet, unhook the spring
which secures the direction indicator light unit
(see illustration).
20Withdraw the light unit and free the
bulbholder from it by twisting it anti-clockwise
(see illustration).
21Remove the bulb from the holder by
pushing and twisting anti-clockwise. Fit the
new bulb to the holder, refit the bulb and
holder to the light unit and refit and secure the
light unit.
22Check the direction indicators for correct
operation.
Direction indicator side repeaters
23Reach up behind the wing and release the
light unit by squeezing the two release tags
together.
24Pull the light unit out of the wing. Twist the
bulbholder anti-clockwise to release it. Pull out
the old bulb and press in the new one (see
illustrations).
25Refit the bulbholder, then insert the light
unit into its hole and press it home.
Rear light cluster
26Access to rear light cluster bulbs is gained
from within the luggage area. First remove theaccess cover on the side concerned; on the
right-hand side, also remove the jack.
27Grasp the bulbholder in the apertures
provided, squeeze the retaining lugs together
and withdraw the bulbholder (see
illustration).
28The appropriate bulb(s) can now be
renewed, and the bulbholder refitted (see
illustration).
Number plate light
29Carefully prise the light unit out of the
bumper with a screwdriver.
30Twist the light unit and bulbholder anti-
clockwise to separate them (see illustration).
Pull out the wedge base bulb and press in the
newone.
31Reassemble the light unit and bulbholder,
then push the assembly home.
Body electrical system 13•5
13
3.14 Front foglight bulb renewal
A Rotating screws
B Spring clipC Alignment screw
3.24a Removing a direction indicator side
repeater
3.19 Unhook the spring (arrowed) to
release the front indicator light unit3.20 Removing the bulb and holder from
the direction indicator light unit
3.24b Fitting a new side repeater bulb
3.27 Rear light cluster bulbholder retaining
lugs (arrowed)
3.28 Identification of rear light bulbs
A Reversing light
B Direction indicator
C Stop-lightD Tail light
E Rear foglight3.30 Separate the unit to gain access to the
number plate light bulb
procarmanuals.com
Page 183 of 255

1For removal and refitting of the front
foglights, front direction indicators, direction
indicator repeaters and the number plate
lights, refer to the previous Section.
Headlight
2Unhook the direction indicator light unit
retaining spring. Withdraw the direction
indicator unit and allow it to hang.
3Pull out the rubber moulding from between
the base of the headlight and the bumper.
(This moulding may in fact be stuck to the
headlight surround.)
4Release the headlight surround retaininglugs, prising them carefully with a screwdriver.
Work from the outside towards the centre of
the vehicle. Remove the surround by pulling it
forwards and then sideways.
5Remove the radiator grille, secured by two
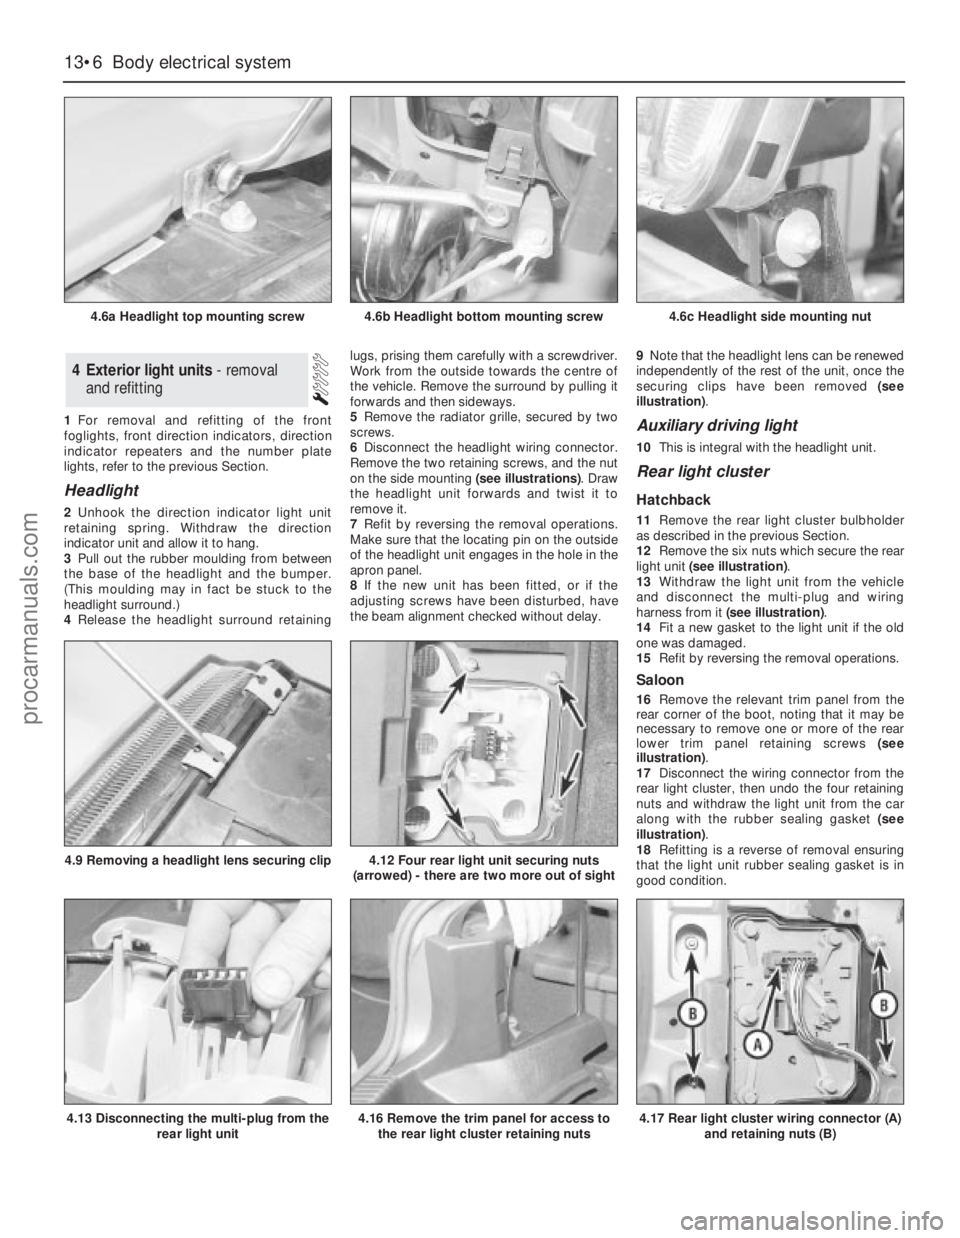
screws.
6Disconnect the headlight wiring connector.
Remove the two retaining screws, and the nut
on the side mounting (see illustrations). Draw
the headlight unit forwards and twist it to
remove it.
7Refit by reversing the removal operations.
Make sure that the locating pin on the outside
of the headlight unit engages in the hole in the
apron panel.
8If the new unit has been fitted, or if the
adjusting screws have been disturbed, have
the beam alignment checked without delay.9Note that the headlight lens can be renewed
independently of the rest of the unit, once the
securing clips have been removed (see
illustration).
Auxiliary driving light
10This is integral with the headlight unit.
Rear light cluster
Hatchback
11Remove the rear light cluster bulbholder
as described in the previous Section.
12Remove the six nuts which secure the rear
light unit (see illustration).
13Withdraw the light unit from the vehicle
and disconnect the multi-plug and wiring
harness from it (see illustration).
14Fit a new gasket to the light unit if the old
one was damaged.
15Refit by reversing the removal operations.
Saloon
16Remove the relevant trim panel from the
rear corner of the boot, noting that it may be
necessary to remove one or more of the rear
lower trim panel retaining screws (see
illustration).
17Disconnect the wiring connector from the
rear light cluster, then undo the four retaining
nuts and withdraw the light unit from the car
along with the rubber sealing gasket (see
illustration).
18Refitting is a reverse of removal ensuring
that the light unit rubber sealing gasket is in
good condition.
4Exterior light units - removal
and refitting
13•6Body electrical system
4.6a Headlight top mounting screw
4.13 Disconnecting the multi-plug from the
rear light unit
4.9 Removing a headlight lens securing clip4.12 Four rear light unit securing nuts
(arrowed) - there are two more out of sight
4.16 Remove the trim panel for access to
the rear light cluster retaining nuts4.17 Rear light cluster wiring connector (A)
and retaining nuts (B)
4.6b Headlight bottom mounting screw4.6c Headlight side mounting nut
procarmanuals.com