1985 FORD GRANADA fuel cap release
[x] Cancel search: fuel cap releasePage 11 of 255
1Firmly apply the handbrake, then jack up the
front and rear of the car and support it
securely on axle stands (see “Jacking”).
2For a quick check, the front brake disc pads
can be inspected without removing the front
wheels, using a mirror and a torch through the
aperture in the rear face of the caliper. If any
one pad is worn down to the minimum
specified, all four pads (on both front wheels)
must be renewed.
3It is necessary to remove the rear wheels in
order to inspect the rear pads. The pads can
be viewed through the top of the caliper after
removing the spring clip. If any one pad is
worn down to the minimum specified, all four
pads (on both rear wheels) must be renewed.
4For a comprehensive check, the brake pads
should be removed and cleaned. The
operation of the caliper can then also be
checked, and the condition of the brake discs
can be fully examined on both sides. Refer to
Chapter 10 for further information.
5At the same interval, check the function of
the brake fluid level warning light. Chock the
wheels, release the handbrake and switch on
the ignition. Unscrew and raise the brake fluid
reservoir cap whilst an assistant observes the
warning light: it should come on as the level
sensor is withdrawn from the fluid. Refit the
cap.
6On completion, refit the wheels and lower
the car to the ground.
1Visually inspect the engine joint faces,
gaskets and seals for any signs of water or oil
leaks. Pay particular attention to the areas
around the rocker cover, cylinder head, oil
filter and sump joint faces. Bear in mind that
over a period of time some very slight seepage
from these areas is to be expected but what
you are really looking for is any indication of a
serious leak. Should a leak be found, renew
the offending gasket or oil seal by referring to
the appropriate Chapter(s) in this manual.
2Similarly, check the transmission for oil
leaks, and investigate and rectify and
problems found.
3Check the security and condition of all the
engine related pipes and hoses. Ensure that all
cable-ties or securing clips are in place and in
good condition. Clips which are broken or
missing can lead to chafing of the hoses,
pipes or wiring which could cause more
serious problems in the future.
4Carefully check the condition of all coolant,
fuel and brake hoses. Renew any hose which
is cracked, swollen or deteriorated. Cracks will
show up better if the hose is squeezed. Pay
close attention to the hose clips that secure
the hoses to the system components. Hoseclips can pinch and puncture hoses, resulting
in leaks. If wire type hose clips are used, it
may be a good idea to replace them with
screw-type clips.
5With the vehicle raised, inspect the fuel tank
and filler neck for punctures, cracks and other
damage. The connection between the filler neck
and tank is especially critical. Sometimes a
rubber filler neck or connecting hose will leak due
to loose retaining clamps or deteriorated rubber.
6Similarly, inspect all brake hoses and metal
pipes. If any damage or deterioration is
discovered, do not drive the vehicle until the
necessary repair work has been carried out.
Renew any damaged sections of hose or pipe.
7Carefully check all rubber hoses and metal
fuel lines leading away from the petrol tank.
Check for loose connections, deteriorated
hoses, crimped lines and other damage. Pay
particular attention to the vent pipes and
hoses which often loop up around the filler
neck and can become blocked or crimped.
Follow the lines to the front of the vehicle
carefully inspecting them all the way. Renew
damaged sections as necessary.
8From within the engine compartment, check
the security of all fuel hose attachments and
pipe unions, and inspect the fuel hoses and
vacuum hoses for kinks, chafing and
deterioration.
9Where applicable, check the condition of
the oil cooler hoses and pipes.
10Check the condition of all exposed wiring
harnesses.
11Also check the engine and transmission
components for signs of fluid leaks.
Periodically check the belts for fraying or
other damage. If evident, renew the belt.
If the belts become dirty, wipe them with a
damp cloth using a little detergent only.
Check the tightness of the anchor bolts and
if they are ever disconnected, make quite sure
that the original sequence of fitting of washers,
bushes and anchor plates is retained.With the vehicle raised on a hoist or
supported on axle stands (see “Jacking”),
check the exhaust system for signs of leaks,
corrosion or damage and check the rubber
mountings for condition and security. Where
damage or corrosion are evident, renew the
system complete or in sections, as applicable,
using the information given in Chapter 4.
With the wheels on the ground, slacken
each wheel nut by a quarter turn, then
retighten it immediately to the specified
torque.
Remove and clean the oil filler cap of any
sludge build-up using paraffin.
Inspect the vent hose for blockage or
damage. A blocked hose can cause a build-up
of crankcase pressure, which in turn can
cause oil leaks.
An accurate tachometer (rev. counter) will
be needed to adjust the idle speed. The
engine must be at operating temperature, the
air cleaner element must be clean and the
vacuum hoses fitted, and the engine valve
clearances must be correct. The ignition
system must also be in good condition.
Connect the tachometer to the engine as
instructed by the manufacturers. Start the
engine and allow it to idle. Read the speed
from the tachometer and compare it with the
value in the Specifications of Chapter 4
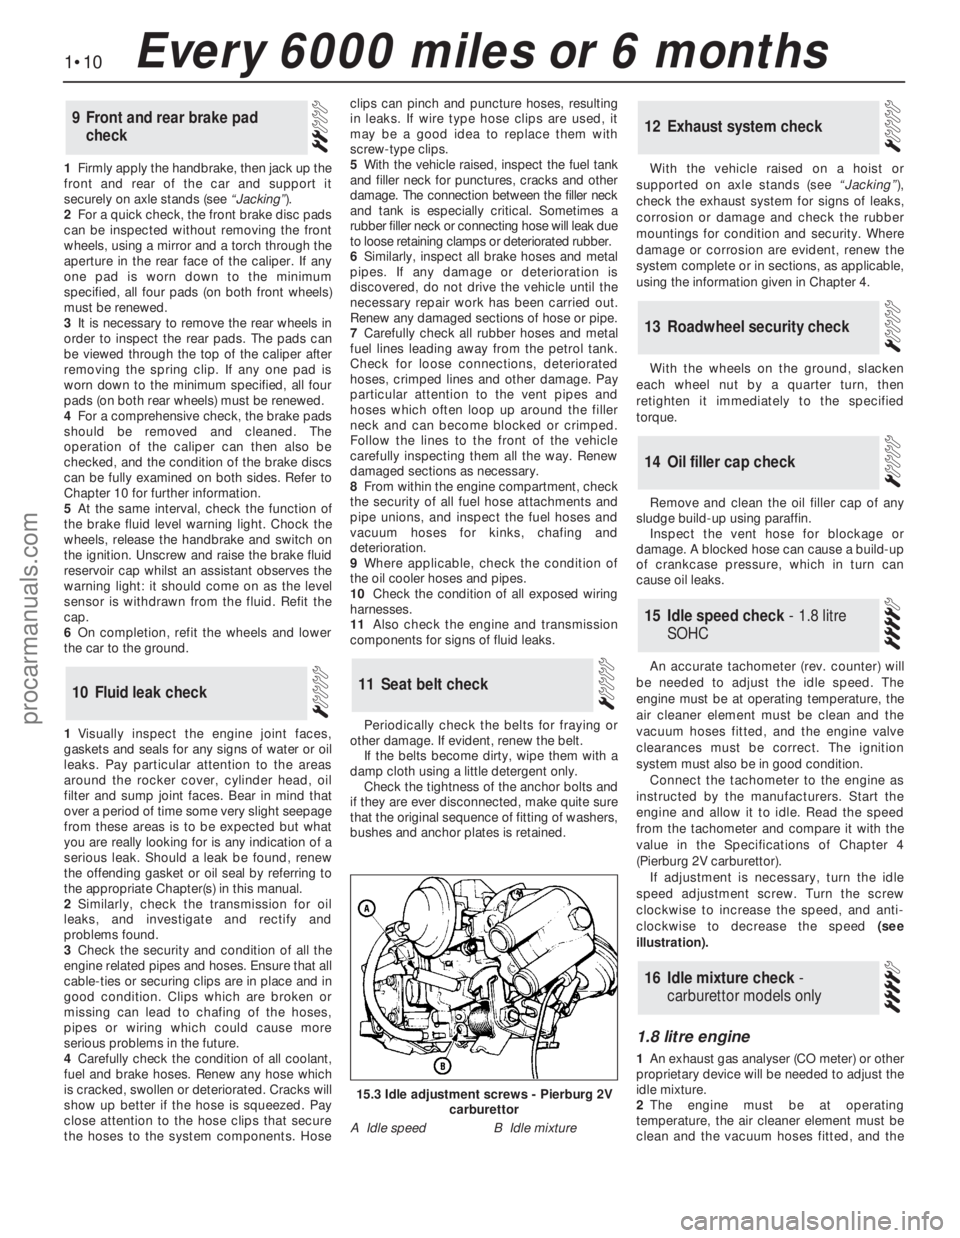
(Pierburg 2V carburettor).
If adjustment is necessary, turn the idle
speed adjustment screw. Turn the screw
clockwise to increase the speed, and anti-
clockwise to decrease the speed (see
illustration).
1.8 litre engine
1An exhaust gas analyser (CO meter) or other
proprietary device will be needed to adjust the
idle mixture.
2The engine must be at operating
temperature, the air cleaner element must be
clean and the vacuum hoses fitted, and the
16Idle mixture check -
carburettor models only
15Idle speed check - 1.8 litre
SOHC
14Oil filler cap check
13Roadwheel security check
12Exhaust system check
11Seat belt check10Fluid leak check
9Front and rear brake pad
check
1•10Every 6000 miles or 6 months
15.3 Idle adjustment screws - Pierburg 2V
carburettor
A Idle speedB Idle mixture
procarmanuals.com
Page 17 of 255
Instruments and electrical
equipment
1Check the operation of all instruments and
electrical equipment.
2Make sure that all instruments read
correctly, and switch on all electrical
equipment in turn to check that it functions
properly.
Steering and suspension
3Check for any abnormalities in the steering,
suspension, handling or road “feel”.
4Drive the vehicle, and check that there are
no unusual vibrations or noises.
5Check that the steering feels positive, with
no excessive “sloppiness”, or roughness, and
check for any suspension noises when
cornering, or when driving over bumps.
Drivetrain
6Check the performance of the engine,
clutch, transmission and driveshafts.
7Listen for any unusual noises from the
engine, clutch and transmission.
8Make sure that the engine runs smoothly
when idling, and that there is no hesitation
when accelerating.
9Where applicable, check that the clutch
action is smooth and progressive, that the
drive is taken up smoothly, and that the pedal
travel is not excessive. Also listen for any
noises when the clutch pedal is depressed.
10Check that all gears can be engaged
smoothly, without noise, and that the gear
lever action is not abnormally vague or
“notchy”.
Check the operation and
performance of the braking system
11Make sure that the vehicle does not pull to
one side when braking, and that the wheels do
not lock prematurely when braking hard.
12Check that there is no vibration through
the steering when braking.
13Check that the handbrake operates
correctly, without excessive movement of the
lever, and that it holds the vehicle stationary
on a slope.
14Test the operation of the brake servo unit
as follows. With the engine off, depress the
footbrake four or five times to exhaust the
vacuum. Start the engine, holding the brake
pedal depressed. As the engine starts, there
should be a noticeable “give” in the brake
pedal as vacuum builds up. Allow the engine
to run for at least two minutes, and then
switch it off. If the brake pedal is depressed
now, it should be possible to detect a hiss
from the servo as the pedal is depressed. After
about four or five applications, no further
hissing should be heard, and the pedal should
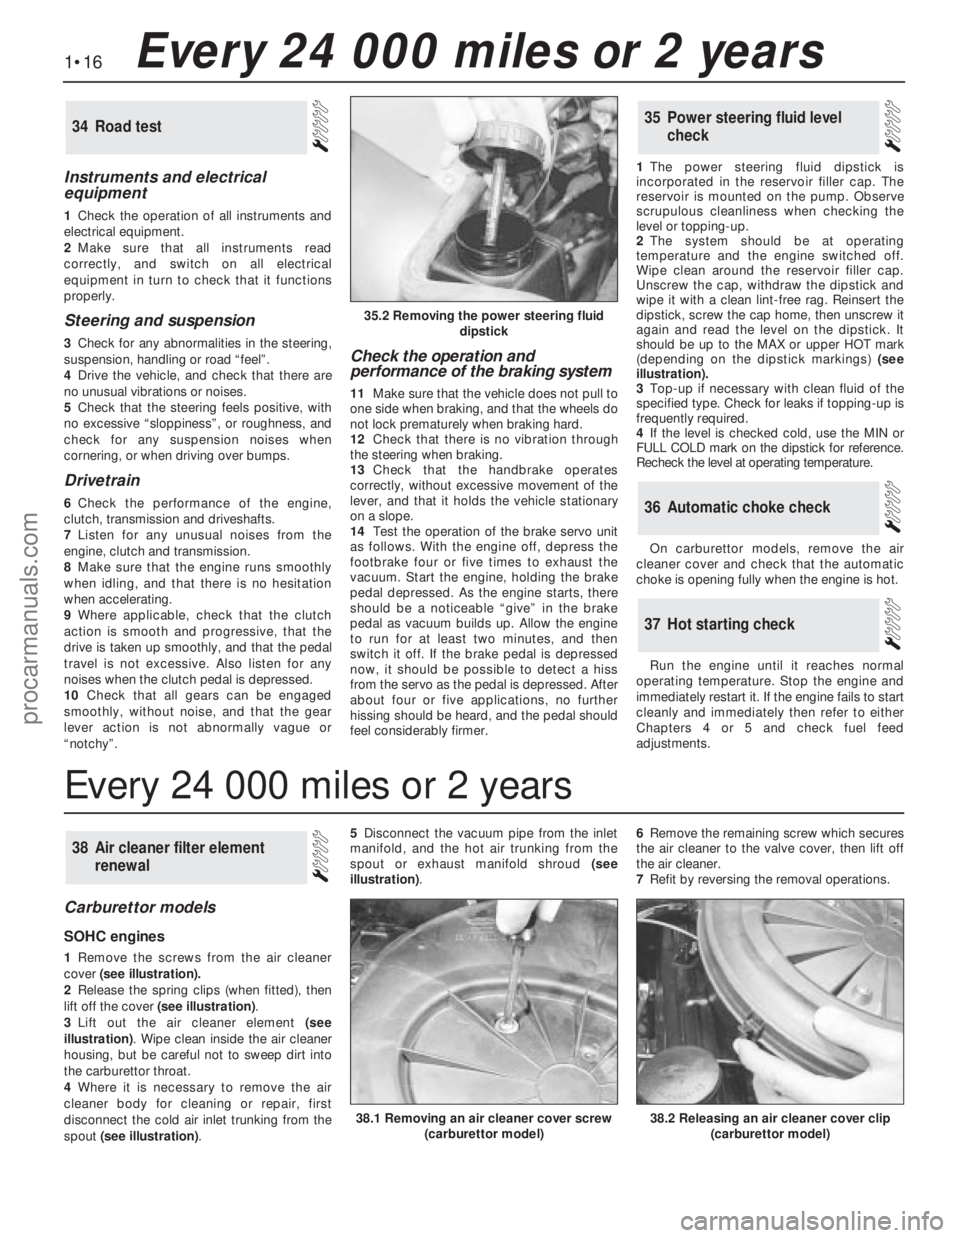
feel considerably firmer.1The power steering fluid dipstick is
incorporated in the reservoir filler cap. The
reservoir is mounted on the pump. Observe
scrupulous cleanliness when checking the
level or topping-up.
2The system should be at operating
temperature and the engine switched off.
Wipe clean around the reservoir filler cap.
Unscrew the cap, withdraw the dipstick and
wipe it with a clean lint-free rag. Reinsert the
dipstick, screw the cap home, then unscrew it
again and read the level on the dipstick. It
should be up to the MAX or upper HOT mark
(depending on the dipstick markings) (see
illustration).
3Top-up if necessary with clean fluid of the
specified type. Check for leaks if topping-up is
frequently required.
4If the level is checked cold, use the MIN or
FULL COLD mark on the dipstick for reference.
Recheck the level at operating temperature.
On carburettor models, remove the air
cleaner cover and check that the automatic
choke is opening fully when the engine is hot.
Run the engine until it reaches normal
operating temperature. Stop the engine and
immediately restart it. If the engine fails to start
cleanly and immediately then refer to either
Chapters 4 or 5 and check fuel feed
adjustments.
37Hot starting check
36Automatic choke check
35Power steering fluid level
check34Road test
Carburettor models
SOHC engines
1Remove the screws from the air cleaner
cover(see illustration).
2Release the spring clips (when fitted), then
lift off the cover (see illustration).
3Lift out the air cleaner element(see
illustration). Wipe clean inside the air cleaner
housing, but be careful not to sweep dirt into
the carburettor throat.
4Where it is necessary to remove the air
cleaner body for cleaning or repair, first
disconnect the cold air inlet trunking from the
spout (see illustration). 5Disconnect the vacuum pipe from the inlet
manifold, and the hot air trunking from the
spout or exhaust manifold shroud(see
illustration). 6Remove the remaining screw which secures
the air cleaner to the valve cover, then lift off
the air cleaner.
7Refit by reversing the removal operations.
38Air cleaner filter element
renewal
1•16Every 24 000 miles or 2 years
35.2 Removing the power steering fluid
dipstick
38.2 Releasing an air cleaner cover clip
(carburettor model)38.1 Removing an air cleaner cover screw
(carburettor model)
Every 24 000 miles or 2 years
procarmanuals.com
Page 18 of 255
DOHC engine
8Proceed as described above whilst noting
that the camshaft cover breather hose must
be disconnected before the air cleaner can be
removed.
Fuel-injection models
SOHC and V6 engines
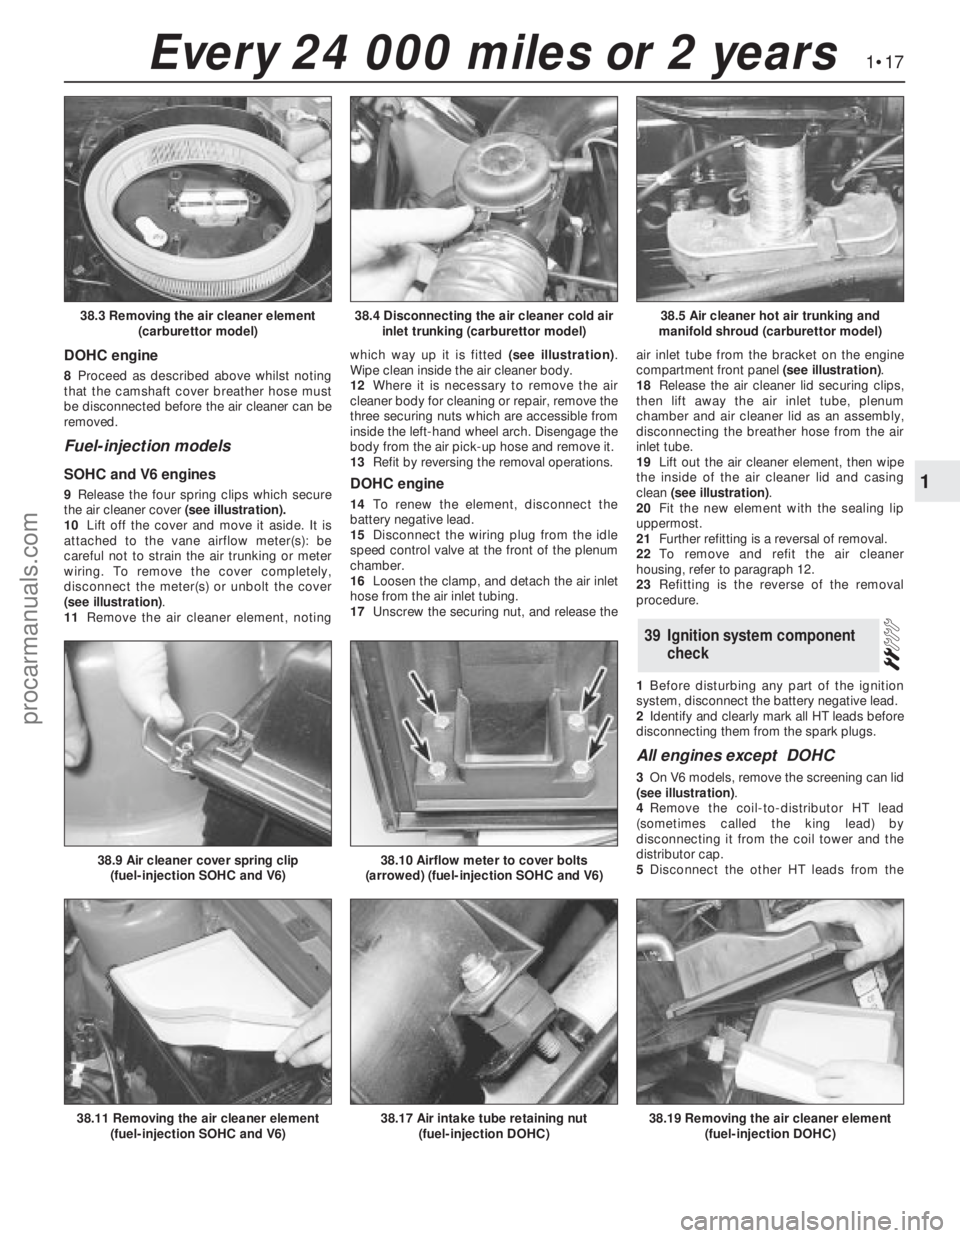
9Release the four spring clips which secure
the air cleaner cover(see illustration).
10Lift off the cover and move it aside. It is
attached to the vane airflow meter(s): be
careful not to strain the air trunking or meter
wiring. To remove the cover completely,
disconnect the meter(s) or unbolt the cover
(see illustration).
11Remove the air cleaner element, notingwhich way up it is fitted (see illustration).
Wipe clean inside the air cleaner body.
12Where it is necessary to remove the air
cleaner body for cleaning or repair, remove the
three securing nuts which are accessible from
inside the left-hand wheel arch. Disengage the
body from the air pick-up hose and remove it.
13Refit by reversing the removal operations.DOHC engine
14To renewthe element, disconnect the
battery negative lead.
15Disconnect the wiring plug from the idle
speed control valve at the front of the plenum
chamber.
16Loosen the clamp, and detach the air inlet
hose from the air inlet tubing.
17Unscrew the securing nut, and release theair inlet tube from the bracket on the engine
compartment front panel (see illustration).
18Release the air cleaner lid securing clips,
then lift away the air inlet tube, plenum
chamber and air cleaner lid as an assembly,
disconnecting the breather hose from the air
inlet tube.
19Lift out the air cleaner element, then wipe
the inside of the air cleaner lid and casing
clean (see illustration).
20Fit the new element with the sealing lip
uppermost.
21Further refitting is a reversal of removal.
22To remove and refit the air cleaner
housing, refer to paragraph 12.
23Refitting is the reverse of the removal
procedure.
1Before disturbing any part of the ignition
system, disconnect the battery negative lead.
2Identify and clearly mark all HT leads before
disconnecting them from the spark plugs.
All engines except DOHC
3On V6 models, remove the screening can lid
(see illustration).
4Remove the coil-to-distributor HT lead
(sometimes called the king lead) by
disconnecting it from the coil tower and the
distributor cap.
5Disconnect the other HT leads from the
39Ignition system component
check
1•17
1
Every 24 000 miles or 2 years
38.4 Disconnecting the air cleaner cold air
inlet trunking (carburettor model)38.5 Air cleaner hot air trunking and
manifold shroud (carburettor model)38.3 Removing the air cleaner element
(carburettor model)
38.17 Air intake tube retaining nut
(fuel-injection DOHC)38.19 Removing the air cleaner element
(fuel-injection DOHC)38.11 Removing the air cleaner element
(fuel-injection SOHC and V6)
38.9 Air cleaner cover spring clip
(fuel-injection SOHC and V6)38.10 Airflow meter to cover bolts
(arrowed) (fuel-injection SOHC and V6)
procarmanuals.com
Page 20 of 255
the previous sub Section.
27Refitting is a reversal of removal, ensuring
that the rotor arm is pushed fully home on the
rotor shaft. Make sure that the HT leads are
fitted to their correct cylinders. Note that the
rotor arm will only fit in one position.
Note: A brake band torque wrench - Ford tool
No 17-005, or equivalent - will be required for
this job.
1Raise and support the front of the vehicle.
2Disconnect the downshift (kickdown) cable
from the transmission when so equipped.
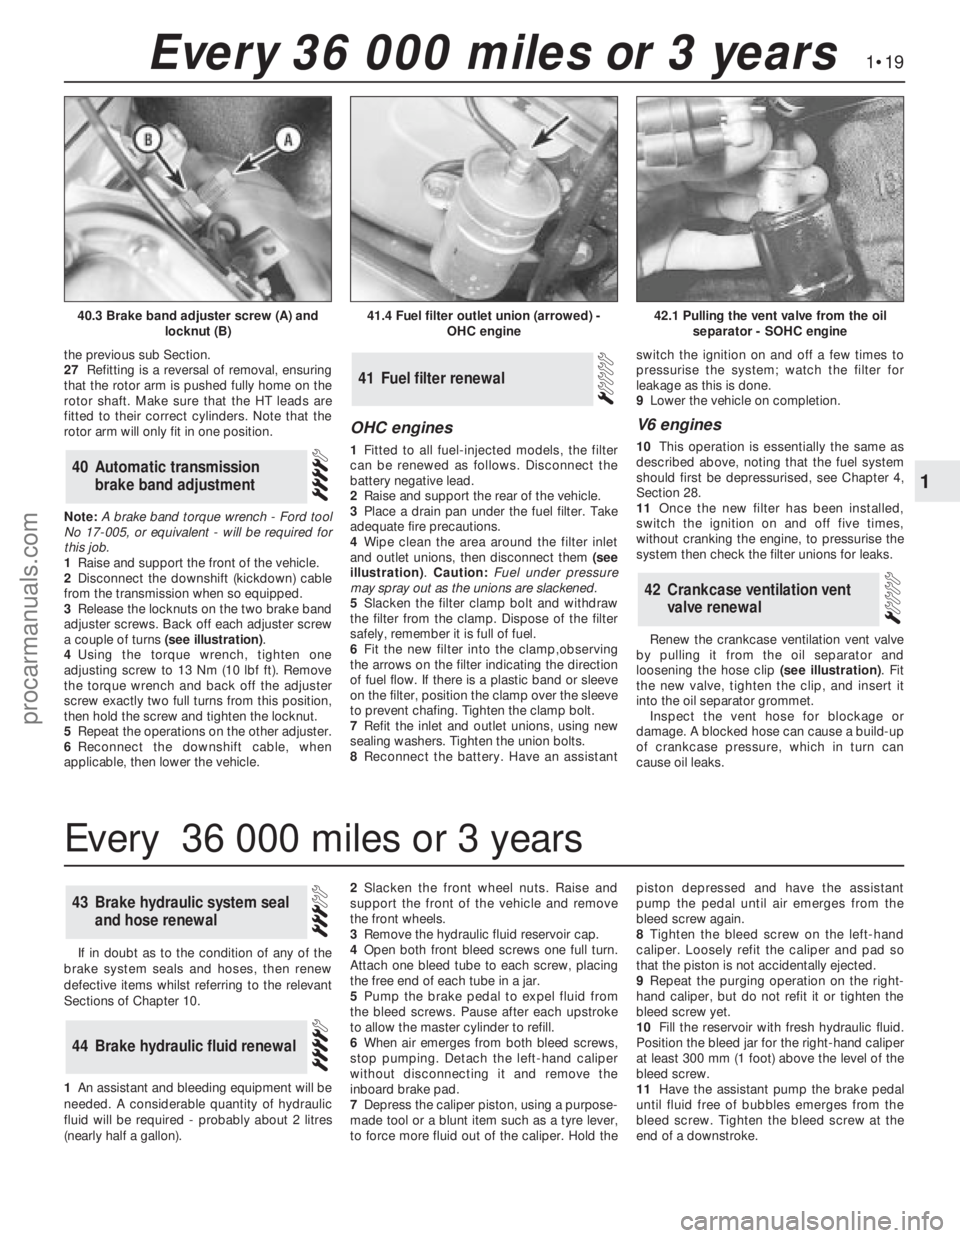
3Release the locknuts on the two brake band
adjuster screws. Back off each adjuster screw
a couple of turns (see illustration).
4Using the torque wrench, tighten one
adjusting screw to 13 Nm (10 lbf ft). Remove
the torque wrench and back off the adjuster
screw exactly two full turns from this position,
then hold the screw and tighten the locknut.
5Repeat the operations on the other adjuster.
6Reconnect the downshift cable, when
applicable, then lower the vehicle.
OHC engines
1Fitted to all fuel-injected models, the filter
can be renewed as follows. Disconnect the
battery negative lead.
2Raise and support the rear of the vehicle.
3Place a drain pan under the fuel filter. Take
adequate fire precautions.
4Wipe clean the area around the filter inlet
and outlet unions, then disconnect them (see
illustration). Caution: Fuel under pressure
may spray out as the unions are slackened.
5Slacken the filter clamp bolt and withdraw
the filter from the clamp. Dispose of the filter
safely, remember it is full of fuel.
6Fit the new filter into the clamp,observing
the arrows on the filter indicating the direction
of fuel flow. If there is a plastic band or sleeve
on the filter, position the clamp over the sleeve
to prevent chafing. Tighten the clamp bolt.
7Refit the inlet and outlet unions, using new
sealing washers. Tighten the union bolts.
8Reconnect the battery. Have an assistantswitch the ignition on and off a few times to
pressurise the system; watch the filter for
leakage as this is done.
9Lower the vehicle on completion.
V6 engines
10This operation is essentially the same as
described above, noting that the fuel system
should first be depressurised, see Chapter 4,
Section 28.
11Once the new filter has been installed,
switch the ignition on and off five times,
without cranking the engine, to pressurise the
system then check the filter unions for leaks.
Renew the crankcase ventilation vent valve
by pulling it from the oil separator and
loosening the hose clip (see illustration). Fit
the new valve, tighten the clip, and insert it
into the oil separator grommet.
Inspect the vent hose for blockage or
damage. A blocked hose can cause a build-up
of crankcase pressure, which in turn can
cause oil leaks.
42Crankcase ventilation vent
valve renewal
41Fuel filter renewal
40Automatic transmission
brake band adjustment
1•19
1
Every 36 000 miles or 3 years
41.4 Fuel filter outlet union (arrowed) -
OHC engine42.1 Pulling the vent valve from the oil
separator - SOHC engine40.3 Brake band adjuster screw (A) and
locknut (B)
If in doubt as to the condition of any of the
brake system seals and hoses, then renew
defective items whilst referring to the relevant
Sections of Chapter 10.
1An assistant andbleeding equipment will be
needed. A considerable quantity of hydraulic
fluid will be required - probably about 2 litres
(nearly half a gallon).2Slacken the front wheel nuts. Raise and
support the front of the vehicle andremove
the front wheels.
3Remove the hydraulic fluid reservoir cap.
4Open both front bleed screws one full turn.
Attach one bleed tube to each screw, placing
the free end of each tube in a jar.
5Pump the brake pedal to expel fluid from
the bleed screws. Pause after each upstroke
to allow the master cylinder to refill.
6When air emerges from both bleed screws,
stop pumping. Detach the left-hand caliper
without disconnecting it and remove the
inboard brake pad.
7Depress the caliper piston, using a purpose-
made tool or a blunt item such as a tyre lever,
to force more fluid out of the caliper. Hold thepiston depressed and have the assistant
pump the pedal until air emerges from the
bleed screw again.
8Tighten the bleed screw on the left-hand
caliper. Loosely refit the caliper and pad so
that the piston is not accidentally ejected.
9Repeat the purging operation on the right-
hand caliper, but do not refit it or tighten the
bleed screw yet.
10Fill the reservoir with fresh hydraulic fluid.
Position the bleed jar for the right-hand caliper
at least 300 mm (1 foot) above the level of the
bleed screw.
11Have the assistant pump the brake pedal
until fluid free of bubbles emerges from the
bleed screw. Tighten the bleed screw at the
end of a downstroke.
44Brake hydraulic fluid renewal
43Brake hydraulic system seal
and hose renewal
Every 36 000 miles or 3 years
procarmanuals.com
Page 31 of 255
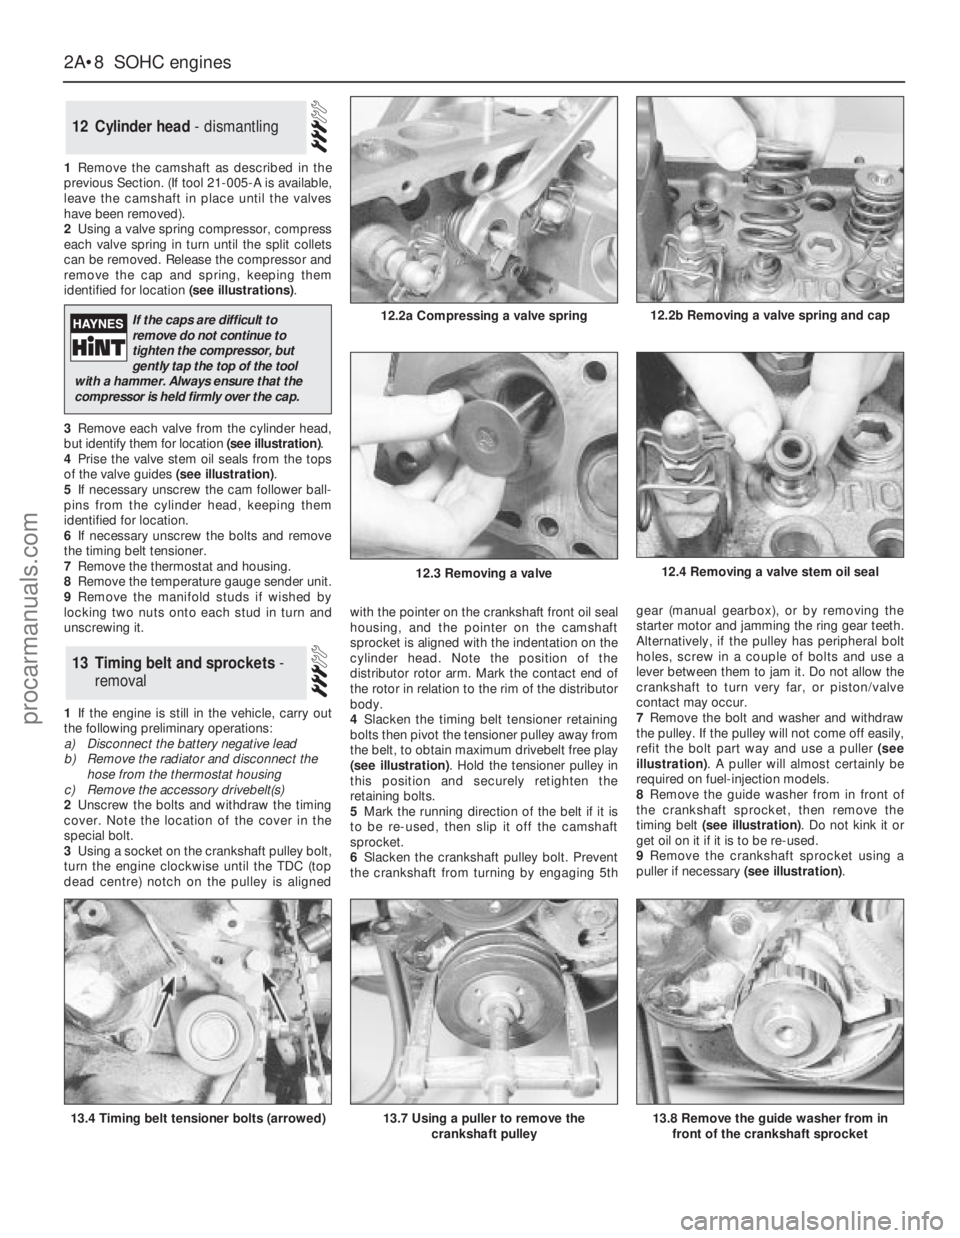
1Remove the camshaft as described in the
previous Section. (If tool 21-005-A is available,
leave the camshaft in place until the valves
have been removed).
2Using a valve spring compressor, compress
each valve spring in turn until the split collets
can be removed. Release the compressor and
remove the cap and spring, keeping them
identified for location (see illustrations).
3Remove each valve from the cylinder head,
but identify them for location (see illustration).
4Prise the valve stem oil seals from the tops
of the valve guides (see illustration).
5If necessary unscrew the cam follower ball-
pins from the cylinder head, keeping them
identified for location.
6If necessary unscrew the bolts and remove
the timing belt tensioner.
7Remove the thermostat and housing.
8Remove the temperature gauge sender unit.
9Remove the manifold studs if wished by
locking two nuts onto each stud in turn and
unscrewing it.
1If the engine is still in the vehicle, carry out
the following preliminary operations:
a)Disconnect the battery negative lead
b)Remove the radiator and disconnect the
hose from the thermostat housing
c)Remove the accessory drivebelt(s)
2Unscrew the bolts and withdraw the timing
cover. Note the location of the cover in the
special bolt.
3Using a socket on the crankshaft pulley bolt,
turn the engine clockwise until the TDC (top
dead centre) notch on the pulley is alignedwith the pointer on the crankshaft front oil seal
housing, and the pointer on the camshaft
sprocket is aligned with the indentation on the
cylinder head. Note the position of the
distributor rotor arm. Mark the contact end of
the rotor in relation to the rim of the distributor
body.
4Slacken the timing belt tensioner retaining
bolts then pivot the tensioner pulley away from
the belt, to obtain maximum drivebelt free play
(see illustration). Hold the tensioner pulley in
this position and securely retighten the
retaining bolts.
5Mark the running direction of the belt if it is
to be re-used, then slip it off the camshaft
sprocket.
6Slacken the crankshaft pulley bolt. Prevent
the crankshaft from turning by engaging 5thgear (manual gearbox), or by removing the
starter motor and jamming the ring gear teeth.
Alternatively, if the pulley has peripheral bolt
holes, screw in a couple of bolts and use a
lever between them to jam it. Do not allow the
crankshaft to turn very far, or piston/valve
contact may occur.
7Remove the bolt and washer and withdraw
the pulley. If the pulley will not come off easily,
refit the bolt part way and use a puller (see
illustration). A puller will almost certainly be
required on fuel-injection models.
8Remove the guide washer from in front of
the crankshaft sprocket, then remove the
timing belt (see illustration). Do not kink it or
get oil on it if it is to be re-used.
9Remove the crankshaft sprocket using a
puller if necessary (see illustration).
13Timing belt and sprockets -
removal
12Cylinder head - dismantling
2A•8SOHCengines
12.2a Compressing a valve spring
13.4 Timing belt tensioner bolts (arrowed)13.7 Using a puller to remove the
crankshaft pulley
12.4 Removing a valve stem oil seal
13.8 Remove the guide washer from in
front of the crankshaft sprocket
12.2b Removing a valve spring and cap
12.3 Removing a valve
If the caps are difficult to
remove do not continue to
tighten the compressor, but
gently tap the top of the tool
with a hammer. Always ensure that the
compressor is held firmly over the cap.
procarmanuals.com
Page 68 of 255
meters and air inlet trunking. Also remove the
oil filler cap, which is connected to the
trunking by a crankcase ventilation hose.
5Release the securing clips and bolts and
remove the upper half of the fan shroud.
6Drain the cooling system and remove the
radiator.
7Disconnect the heater hoses from the
heater matrix and from the coolant outlet.
Unclip the hoses.
8Remove the fan and viscous clutch (where
fitted).
9Disconnect the following wiring:
a)Alternator
b)Temperature gauge sender
c)Engine management temperature sensor
d)Oil pressure switch
e)Idle speed control valve
f)Throttle position sensor
g)Injector nut-harness
h)Distributor multi-plug
i)Distributor-to-coil HT lead
10Disconnect the throttle cable. When
applicable, also disconnect the downshaft
cable or switch.
11Depressurise the fuel system and
disconnect the fuel supply and return lines
(see Chapter 4).
12Remove the steering pump and air
conditioning compressor drivebelts (as
applicable). Unbolt the steering pump and
compressor, move them aside within the limitsof their flexible hoses and support them by
wiring them to adjacent components.
13Remove the distributor cap and rotor.
14Remove the starter motor.
15Drain the engine oil. Unscrew the oil filter
with a strap or chain wrench and remove it; be
prepared for oil spillage.
16On manual gearbox models, disconnect
the clutch cable from the release lever.
17Unbolt the exhaust pipes from the
manifolds.
18On automatic transmission models, unbolt
the torque converter from the driveplate.
19Attach lifting tackle to the engine. If no
lifting eyes are fitted, pass ropes or chains
round the exhaust manifolds.
20Take the weight of the engine, then
remove the single nut on each side which
holds engine bearer to its mountings.
21From under the vehicle unbolt the engine
adapter plate from the bellhousing.
22Remove the engine-to-bellhousing bolts.
Also disconnect or unclip the battery negative
lead, the starter motor lead and the heat
shield.
23Support the transmission, preferably with
a trolley jack.
24Check that nothing has been overlooked,
then raise the engine and draw it forwards
clear of the transmission input shaft. Do not
allow the weight of the engine to hang on the
shaft, and do not lift the transmission by it.25With automatic transmission, make sure
that the torque converter stays engaged with
the oil pump in the transmission as the engine
is withdrawn.
26Lift the engine out of the engine bay and
take it to the bench.
2.4 & 2.9 litre engines
27The removal operations for these engines
are essentially as described for the 2.8 litre
version. Note the following points.
Coolant hoses
28Remove the hoses which run between the
thermostat housing and the water pump, and
the cooling system expansion tank.
29Remove the heater hoses which run
between the thermostat housing or coolant
distribution pipe and oil cooler (where fitted).
Vacuum hoses
30Disconnect the hose from the fuel
pressure regulator.
31Disconnect the hose from the plenum
chamber.
32Disconnect the hose from the throttle valve.
33Disconnect the hose from the T-piece
connector.
V6 engines 2C•7
2C
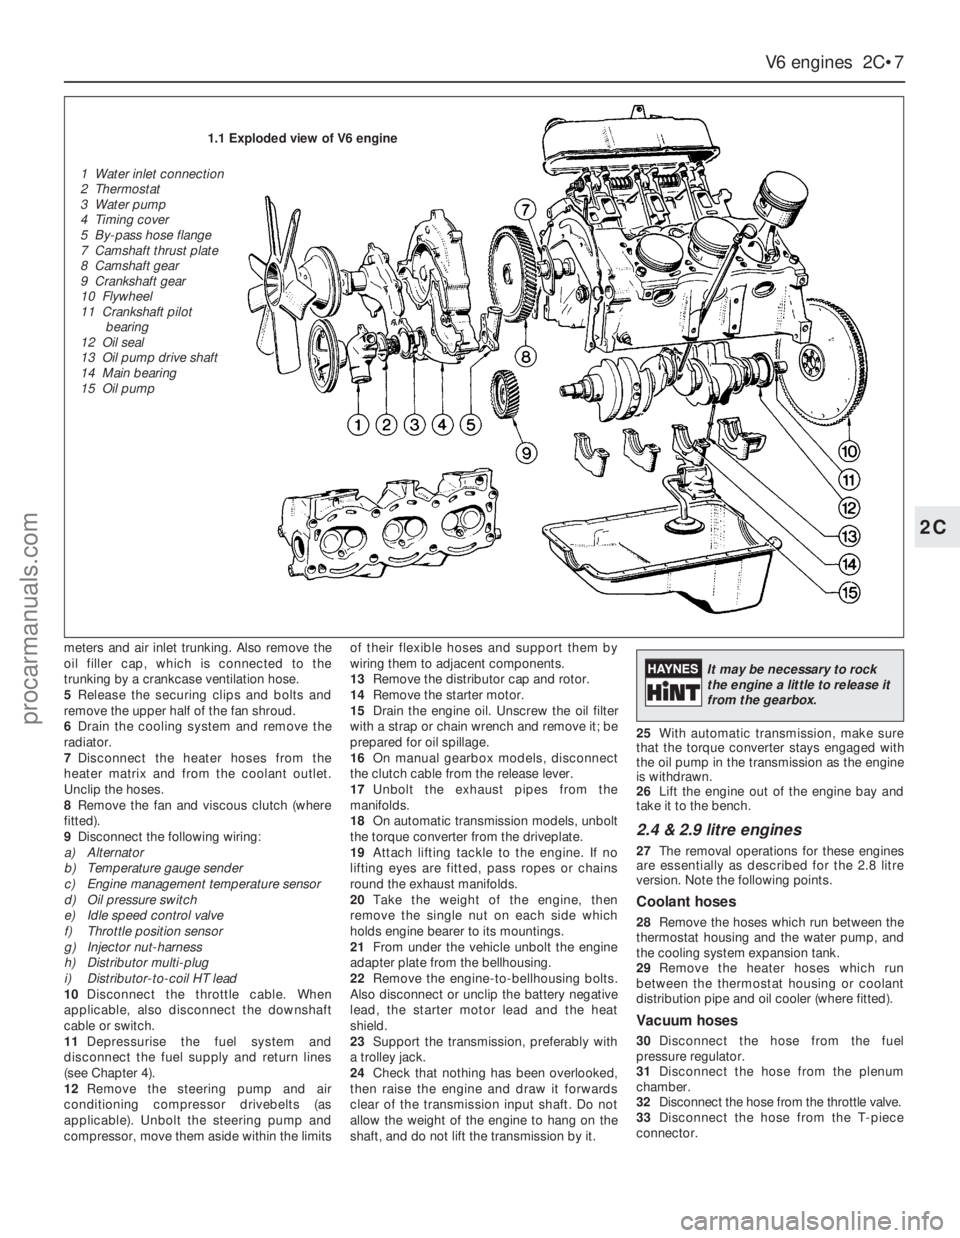
1.1 Exploded view of V6 engine
1 Water inlet connection
2 Thermostat
3 Water pump
4 Timing cover
5 By-pass hose flange
7 Camshaft thrust plate
8 Camshaft gear
9 Crankshaft gear
10 Flywheel
11 Crankshaft pilot
bearing
12 Oil seal
13 Oil pump drive shaft
14 Main bearing
15 Oil pump
It may be necessary to rock
the engine a little to release it
from the gearbox.
procarmanuals.com
Page 70 of 255
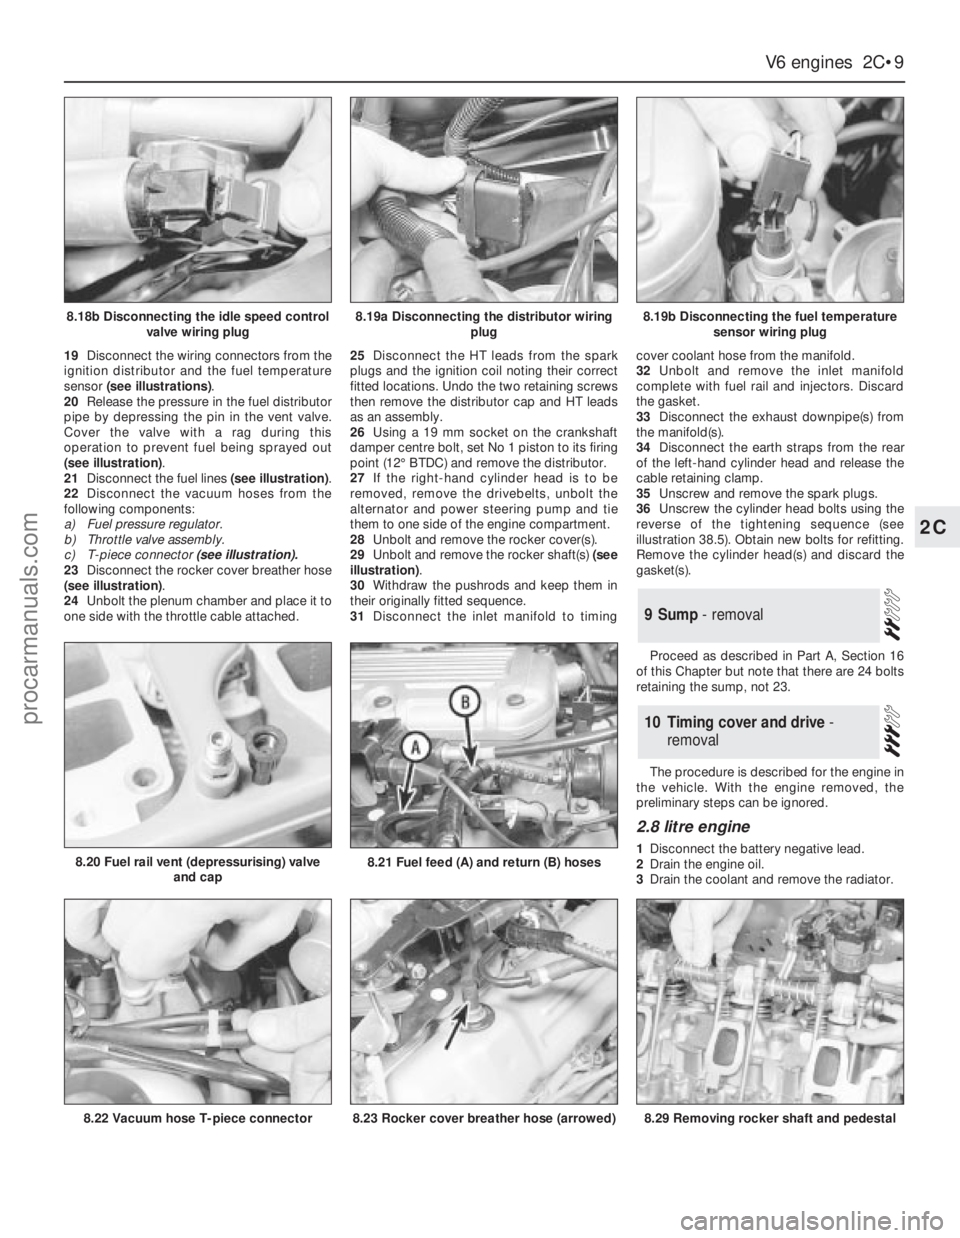
19Disconnect the wiring connectors from the
ignition distributor and the fuel temperature
sensor (see illustrations).
20Release the pressure in the fuel distributor
pipe by depressing the pin in the vent valve.
Cover the valve with a rag during this
operation to prevent fuel being sprayed out
(see illustration).
21Disconnect the fuel lines (see illustration).
22Disconnect the vacuum hoses from the
following components:
a)Fuel pressure regulator.
b)Throttle valve assembly.
c)T-piece connector (see illustration).
23Disconnect the rocker cover breather hose
(see illustration).
24Unbolt the plenum chamber and place it to
one side with the throttle cable attached.25Disconnect the HT leads from the spark
plugs and the ignition coil noting their correct
fitted locations. Undo the two retaining screws
then remove the distributor cap and HT leads
as an assembly.
26Using a 19 mm socket on the crankshaft
damper centre bolt, set No 1 piston to its firing
point (12°BTDC) and remove the distributor.
27If the right-hand cylinder head is to be
removed, remove the drivebelts, unbolt the
alternator and power steering pump and tie
them to one side of the engine compartment.
28Unbolt and remove the rocker cover(s).
29Unbolt and remove the rocker shaft(s) (see
illustration).
30Withdraw the pushrods and keep them in
their originally fitted sequence.
31Disconnect the inlet manifold to timingcover coolant hose from the manifold.
32Unbolt and remove the inlet manifold
complete with fuel rail and injectors. Discard
the gasket.
33Disconnect the exhaust downpipe(s) from
the manifold(s).
34Disconnect the earth straps from the rear
of the left-hand cylinder head and release the
cable retaining clamp.
35Unscrew and remove the spark plugs.
36Unscrew the cylinder head bolts using the
reverse of the tightening sequence (see
illustration 38.5). Obtain new bolts for refitting.
Remove the cylinder head(s) and discard the
gasket(s).
Proceed as described in Part A, Section 16
of this Chapter but note that there are 24 bolts
retaining the sump, not 23.
The procedure is described for the engine in
the vehicle. With the engine removed, the
preliminary steps can be ignored.
2.8 litre engine
1Disconnect the battery negative lead.
2Drain the engine oil.
3Drain the coolant and remove the radiator.
10Timing cover and drive -
removal
9Sump - removal
V6 engines 2C•9
2C
8.18b Disconnecting the idle speed control
valve wiring plug8.19a Disconnecting the distributor wiring
plug8.19b Disconnecting the fuel temperature
sensor wiring plug
8.22 Vacuum hose T-piece connector
8.20 Fuel rail vent (depressurising) valve
and cap8.21 Fuel feed (A) and return (B) hoses
8.23 Rocker cover breather hose (arrowed)8.29 Removing rocker shaft and pedestal
procarmanuals.com
Page 85 of 255
Cooling system
The cooling system is of pressurised type
and includes a front mounted crossflow
radiator, belt-driven water pump, temperature-
sensitive thermo-viscous fan (on DOHC
models, an electrically-operated cooling fan is
fitted, operated by a switch in the thermostat
housing), wax type thermostat, and an
expansion and degas tank.
The radiator matrix is of copper and brass
construction and the end tanks are of plastic.
On automatic transmission models the right-
hand side end tank incorporates the
transmission oil cooler.
The thermostat is located behind the water
outlet elbow at the front of the cylinder head
on OHCmodels, and on the front of the water
pump on V6 models. Its purpose is to ensure
rapid engine warm-up by restricting the flow of
coolant in the engine when cold, and also to
assist in regulating the normal operating
temperature of the engine.
The expansion tank incorporates a pressure
cap which effectively pressurises the cooling
system as the coolant temperature rises,
thereby increasing the boiling point of the
coolant. The tank also has a further degas
function. Any accumulation of air bubbles in
the coolant, in particular in the thermostat
housing and the radiator, is returned to the
tank and released in the air space thus
maintaining the efficiency of the coolant.
On models fitted with the auxiliary warning
system, the expansion tank contains a level
sensor which operates a warning light if the
coolant level falls significantly.
When the engine is started from cold, the
water pump circulates coolant around the
cylinder block, cylinder head(s) and inlet
manifold. The warm coolant passes through
the automatic choke housing (when
applicable) and through the heater matrix
before returning to the engine. As the coolant
expands, the level in the expansion tank rises.
Circulation of coolant through the radiator is
prevented while the thermostat is shut. When
the coolant reaches the predeterminedtemperature the thermostat opens and hot
water passes through the top hose to the top
of the radiator. As the water circulates down
through the radiator, it is cooled by the
passage of air past the radiator when the car is
in forward motion, supplemented by the action
of the thermo-viscous fan when necessary.
Having reached the bottom of the radiator, the
water is now cool and the cycle is repeated.
Circulation of water continues through the
expansion tank, inlet manifold and heater at all
times; the heater temperature control being by
an air flap.
The thermo-viscous fan is controlled by the
temperature of air behind the radiator. When
the air temperature reaches a predetermined
level, a bi-metallic coil commences to open a
valve within the unit and silicon fluid is fed
through a system of vanes. Half of the vanes
are driven directly by the water pump and the
remaining half are connected to the fan blades.
The vanes are arranged so that drive is
transmitted to the fan blades in relation to the
drag or viscosity of the fluid, and this in turn
depends on ambient temperature and engine
speed. The fan is therefore only operated when
required, and compared with direct drive type
fan represents a considerable improvement in
fuel economy, drivebelt wear and fan noise.
Air conditioning
Air conditioning is fitted as standard on
Scorpio models and is optionally available on
some other models. In conjunction with the
heater, the system enables any reasonable air
temperature to be achieved inside the car, it
also reduces the humidity of the incoming air,
aiding demisting even when cooling is not
required.
The refrigeration side of the air conditioning
system functions in a similar way to a
domestic refrigerator. A compressor, belt-
driven from the crankshaft pulley, draws
refrigerant in its gaseous phase from an
evaporator. The compressed refrigerant
passes through a condenser where it loses
heat and enters its liquid phase. After
dehydration the refrigerant returns to the
evaporator where it absorbs heat from air
passing over the evaporator fins. The
refrigerant becomes a gas again and the cycle
is repeated.Various subsidiary controls and sensors
protect the system against excessive
temperature and pressures. Additionally,
engine idle speed is increased when the
system is in use to compensate for the
additional load imposed by the compressor.
Precautions
Antifreeze mixture
Antifreeze mixture is poisonous. Keep it out
of reach of children and pets. Wash splashes
off skin and clothing with plenty of water.
Wash splashes off vehicle paintwork to avoid
discolouration.
Antifreeze/water mixture must be renewed
every two years to preserve its anti-corrosive
properties. In climates where antifreeze
protection is unnecessary, a corrosion
inhibitor may be used instead - consult a Ford
dealer. Never run the engine for long periods
with plain water as coolant. Only use the
specified antifreeze, as inferior brands may not
contain the necessary corrosion inhibitors, or
may break down at high temperatures.
Antifreeze containing methanol is particularly
to be avoided, as the methanol evaporates.
The specified mixture is 45 to 50%
antifreeze and 50 to 55% clean soft water (by
volume). Mix the required quantity in a clean
container.
Air conditioning refrigerant
Although the refrigerant is not itself toxic, in
the presence of a naked flame (or a lighted
cigarette) it forms a highly toxic gas. Liquid
refrigerant spilled on the skin will cause
frostbite. If refrigerant enters the eyes, rinse
them with a dilute solution of boric acid and
seek medical advice immediately.
In view of the above points, and of the need
for specialised equipment for evacuating and
recharging the system, any work which
requires the disconnection of a refrigerant line
must be left to a specialist.
Do not allow refrigerant lines to be exposed
to temperatures above 110°C (230°F) - eg
during welding or paint drying operations and
do not operate the air conditioning system if it
is known to be short of refrigerant, or further
damage may result.
1General information and
precautions
3•2Cooling, heating and ventilation systems
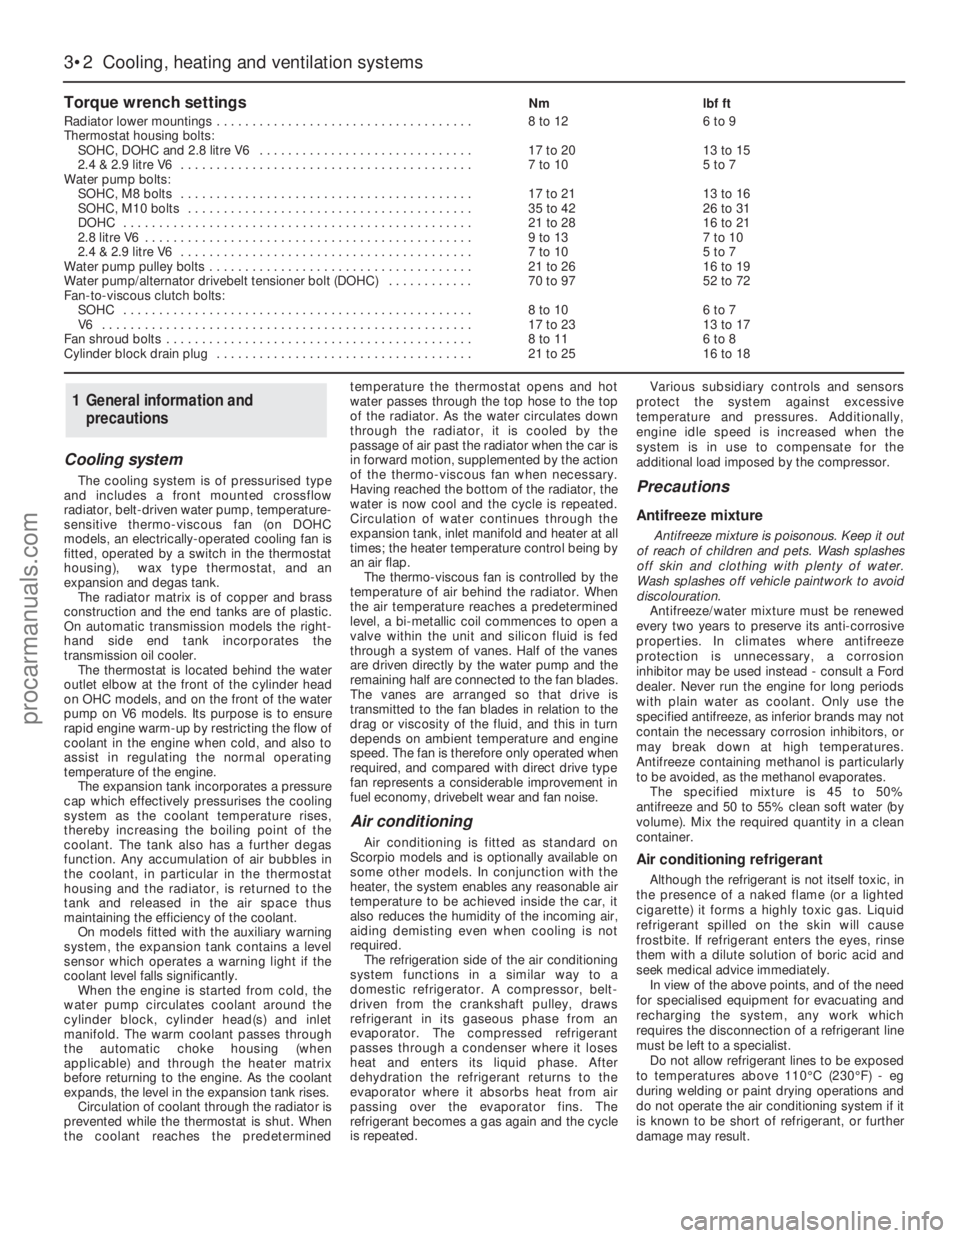
Torque wrench settingsNmlbf ft
Radiator lower mountings . . . . . . . . . . . . . . . . . . . . . . . . . . . . . . . . . . . .8 to 126 to 9
Thermostat housing bolts:
SOHC, DOHC and 2.8 litre V6 . . . . . . . . . . . . . . . . . . . . . . . . . . . . . .17 to 2013 to 15
2.4 & 2.9 litre V6 . . . . . . . . . . . . . . . . . . . . . . . . . . . . . . . . . . . . . . . . .7 to 105 to 7
Water pump bolts:
SOHC, M8 bolts . . . . . . . . . . . . . . . . . . . . . . . . . . . . . . . . . . . . . . . . .17 to 2113 to 16
SOHC, M10 bolts . . . . . . . . . . . . . . . . . . . . . . . . . . . . . . . . . . . . . . . .35 to 4226 to 31
DOHC . . . . . . . . . . . . . . . . . . . . . . . . . . . . . . . . . . . . . . . . . . . . . . . . .21 to 2816 to 21
2.8 litre V6 . . . . . . . . . . . . . . . . . . . . . . . . . . . . . . . . . . . . . . . . . . . . . .9 to 137 to 10
2.4 & 2.9 litre V6 . . . . . . . . . . . . . . . . . . . . . . . . . . . . . . . . . . . . . . . . .7 to 105 to 7
Water pump pulley bolts . . . . . . . . . . . . . . . . . . . . . . . . . . . . . . . . . . . . .21 to 2616 to 19
Water pump/alternator drivebelt tensioner bolt (DOHC) . . . . . . . . . . . .70 to 9752 to 72
Fan-to-viscous clutch bolts:
SOHC . . . . . . . . . . . . . . . . . . . . . . . . . . . . . . . . . . . . . . . . . . . . . . . . .8 to 106 to 7
V6 . . . . . . . . . . . . . . . . . . . . . . . . . . . . . . . . . . . . . . . . . . . . . . . . . . . .17 to 2313 to 17
Fan shroud bolts . . . . . . . . . . . . . . . . . . . . . . . . . . . . . . . . . . . . . . . . . . .8 to 116 to 8
Cylinder block drain plug . . . . . . . . . . . . . . . . . . . . . . . . . . . . . . . . . . . .21 to 2516 to 18
procarmanuals.com