1985 FORD GRANADA wheel
[x] Cancel search: wheelPage 80 of 255
29Fit the sump and the retaining nuts and
bolts. Tighten them progressively in two stages.
30Oil the lip of the timing cover oil seal and
the contact surface of the crankshaft damper.
31Fit the damper to the crankshaft, being
careful not to dislodge the Woodruff key. Draw
the damper into position using the retaining
bolt and washer.
32Remove the bolt and apply sealant to the
faces of the washer. Refit the bolt and washer
then jam the starter gear ring teeth and tighten
the bolt to the specified torque.
33Refit the crankshaft pulley and tighten the
retaining bolts to the specified torque.
34Refit the crossmember side brackets and
brake pipes.
35Reconnect the engine mountings and
remove the engine hoist or axle stands (see
“Jacking”).36Connect the steering shaft coupling with
the steering wheel and front roadwheels in the
straight-ahead position. Fit the pinch-bolt and
tighten it to the specified torque.
37Fit the starter motor and connect the leads.
38Bolt the coolant distributor pipe to the
timing cover.
39Refit the alternator and power steering
pump drivebelts and tension them (see
illustrations).
40Fit the fan and radiator, connect all coolant
hoses, and fit the radiator upper shroud.
41Fit the air cleaner cover with attachments.
42Fill the engine with oil and coolant and
connect the battery.
2.8 litre engine
1Clean the mating faces of the crankcase
and sump. Ensure that the grooves in the seal
carriers are clean.
2Fit the rubber seals in the grooves.
3Apply sealing compound on the crankcase
and slide the tabs of the gasket under the cut-
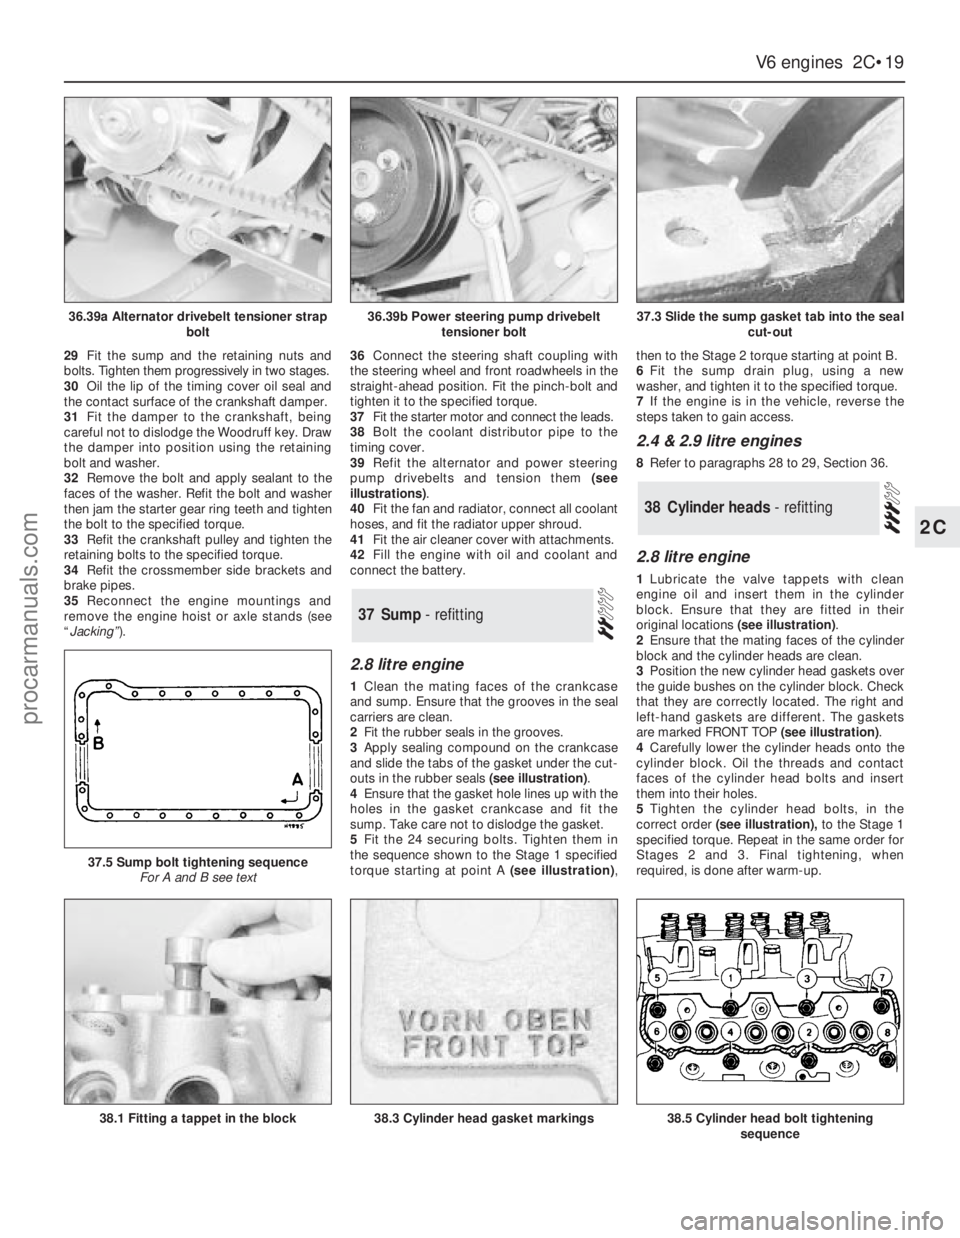
outs in the rubber seals (see illustration).
4Ensure that the gasket hole lines up with the
holes in the gasket crankcase and fit the
sump. Take care not to dislodge the gasket.
5Fit the 24 securing bolts. Tighten them in
the sequence shown to the Stage 1 specified
torque starting at point A (see illustration),then to the Stage 2 torque starting at point B.
6Fit the sump drain plug, using a new
washer, and tighten it to the specified torque.
7If the engine is in the vehicle, reverse the
steps taken to gain access.
2.4 & 2.9 litre engines
8Refer to paragraphs 28 to 29, Section 36.
2.8 litre engine
1Lubricate the valve tappets with clean
engine oil and insert them in the cylinder
block. Ensure that they are fitted in their
original locations (see illustration).
2Ensure that the mating faces of the cylinder
block and the cylinder heads are clean.
3Position the new cylinder head gaskets over
the guide bushes on the cylinder block. Check
that they are correctly located. The right and
left-hand gaskets are different. The gaskets
are marked FRONT TOP (see illustration).
4Carefully lower the cylinder heads onto the
cylinder block. Oil the threads and contact
faces of the cylinder head bolts and insert
them into their holes.
5Tighten the cylinder head bolts, in the
correct order(see illustration),to the Stage 1
specified torque. Repeat in the same order for
Stages 2 and 3. Final tightening, when
required, is done after warm-up.
38Cylinder heads - refitting
37Sump - refitting
V6 engines 2C•19
2C
36.39a Alternator drivebelt tensioner strap
bolt36.39b Power steering pump drivebelt
tensioner bolt37.3 Slide the sump gasket tab into the seal
cut-out
38.1 Fitting a tappet in the block
37.5 Sump bolt tightening sequence
For A and B see text
38.3 Cylinder head gasket markings38.5 Cylinder head bolt tightening
sequence
procarmanuals.com
Page 99 of 255
25To remove the pump, first remove the fuel
tank.
26Unscrew the fuel pump/fuel level sender
unit by engaging two crossed screwdrivers in
the slots on either side of the unit mounting
flange. Recover the seal.
27Refitting is a reversal of removal. It is
necessary to fit a new seal.
1Run the fuel level as low as possible before
removing the tank.
2Disconnect the battery negative lead.
3Remove the fuel filler cap. Siphon or pump
the remaining fuel out of the tank. Store the
fuel in a suitable sealed container.
4Remove the two screws on either side of the
filler neck.
5Raise and support the rear of the vehicle.
6Remove the shield from the right-hand rear
inner wheel arch. Also remove the rear bumper
undershield. which is secured by six screws.
7Disconnect the fuel supply and return lines
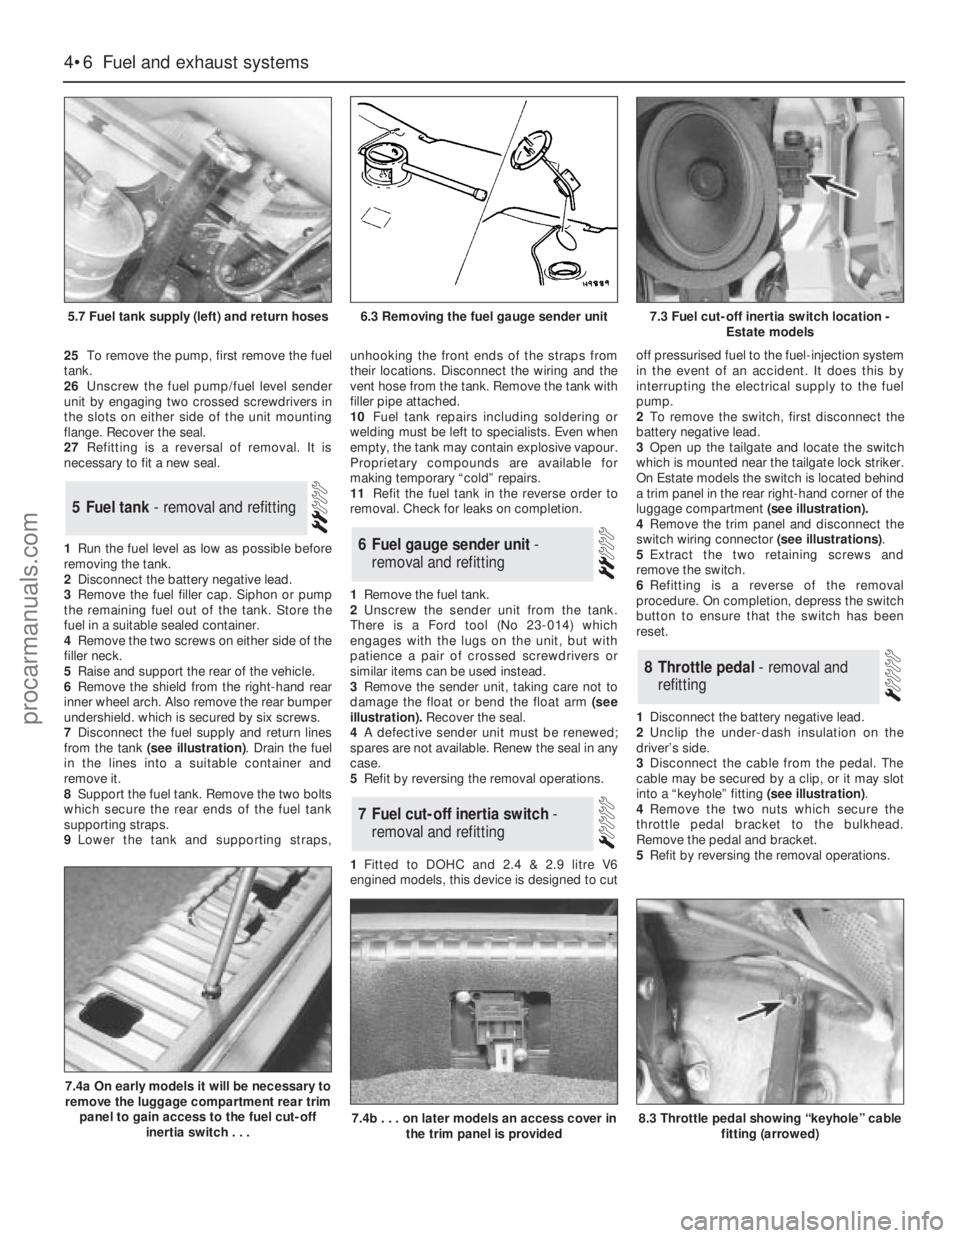
from the tank (see illustration). Drain the fuel
in the lines into a suitable container and
remove it.
8Support the fuel tank. Remove the two bolts
which secure the rear ends of the fuel tank
supporting straps.
9Lower the tank and supporting straps,unhooking the front ends of the straps from
their locations. Disconnect the wiring and the
vent hose from the tank. Remove the tank with
filler pipe attached.
10Fuel tank repairs including soldering or
welding must be left to specialists. Even when
empty, the tank may contain explosive vapour.
Proprietary compounds are available for
making temporary “cold” repairs.
11Refit the fuel tank in the reverse order to
removal. Check for leaks on completion.
1Remove the fuel tank.
2Unscrew the sender unit from the tank.
There is a Ford tool (No 23-014) which
engages with the lugs on the unit, but with
patience a pair of crossed screwdrivers or
similar items can be used instead.
3Remove the sender unit, taking care not to
damage the float or bend the float arm(see
illustration).Recover the seal.
4A defective sender unit must be renewed;
spares are not available. Renew the seal in any
case.
5Refit by reversing the removal operations.
1Fitted to DOHC and 2.4 & 2.9 litre V6
engined models, this device is designed to cutoff pressurised fuel to the fuel-injection system
in the event of an accident. It does this by
interrupting the electrical supply to the fuel
pump.
2To remove the switch, first disconnect the
battery negative lead.
3Open up the tailgate and locate the switch
which is mounted near the tailgate lock striker.
On Estate models the switch is located behind
a trim panel in the rear right-hand corner of the
luggage compartment (see illustration).
4Remove the trim panel and disconnect the
switch wiring connector (see illustrations).
5Extract the two retaining screws and
remove the switch.
6Refitting is a reverse of the removal
procedure. On completion, depress the switch
button to ensure that the switch has been
reset.
1Disconnect the battery negative lead.
2Unclip the under-dash insulation on the
driver’s side.
3Disconnect the cable from the pedal. The
cable may be secured by a clip, or it may slot
into a “keyhole” fitting (see illustration).
4Remove the two nuts which secure the
throttle pedal bracket to the bulkhead.
Remove the pedal and bracket.
5Refit by reversing the removal operations.
8Throttle pedal - removal and
refitting
7Fuel cut-off inertia switch -
removal and refitting
6Fuel gauge sender unit -
removal and refitting
5Fuel tank - removal and refitting
4•6Fuel and exhaust systems
5.7 Fuel tank supply (left) and return hoses
7.4a On early models it will be necessary to
remove the luggage compartment rear trim
panel to gain access to the fuel cut-off
inertia switch . . .
7.4b . . . on later models an access cover in
the trim panel is provided8.3 Throttle pedal showing “keyhole” cable
fitting (arrowed)
6.3 Removing the fuel gauge sender unit7.3 Fuel cut-off inertia switch location -
Estate models
procarmanuals.com
Page 116 of 255
Models up to July 1990
1The carbon canister is situated in the engine
compartment where it is mounted onto the
right-hand valance next to the suspension
strut mounting.
2To remove the canister first disconnect the
battery negative terminal. If necessary, undo
the two coolant expansion tank retaining
screws and position the tank clear of the
canister to improve access.
3Disconnect the vacuum hose from the top
of the canister.
4Slacken and remove the mounting bolt and
withdraw the canister from the engine
compartment.
5Refitting is a reverse of the removal
procedure.
Models from July 1990
6The carbon canister is situated behind the
right-hand rear wheel where it is mounted onto
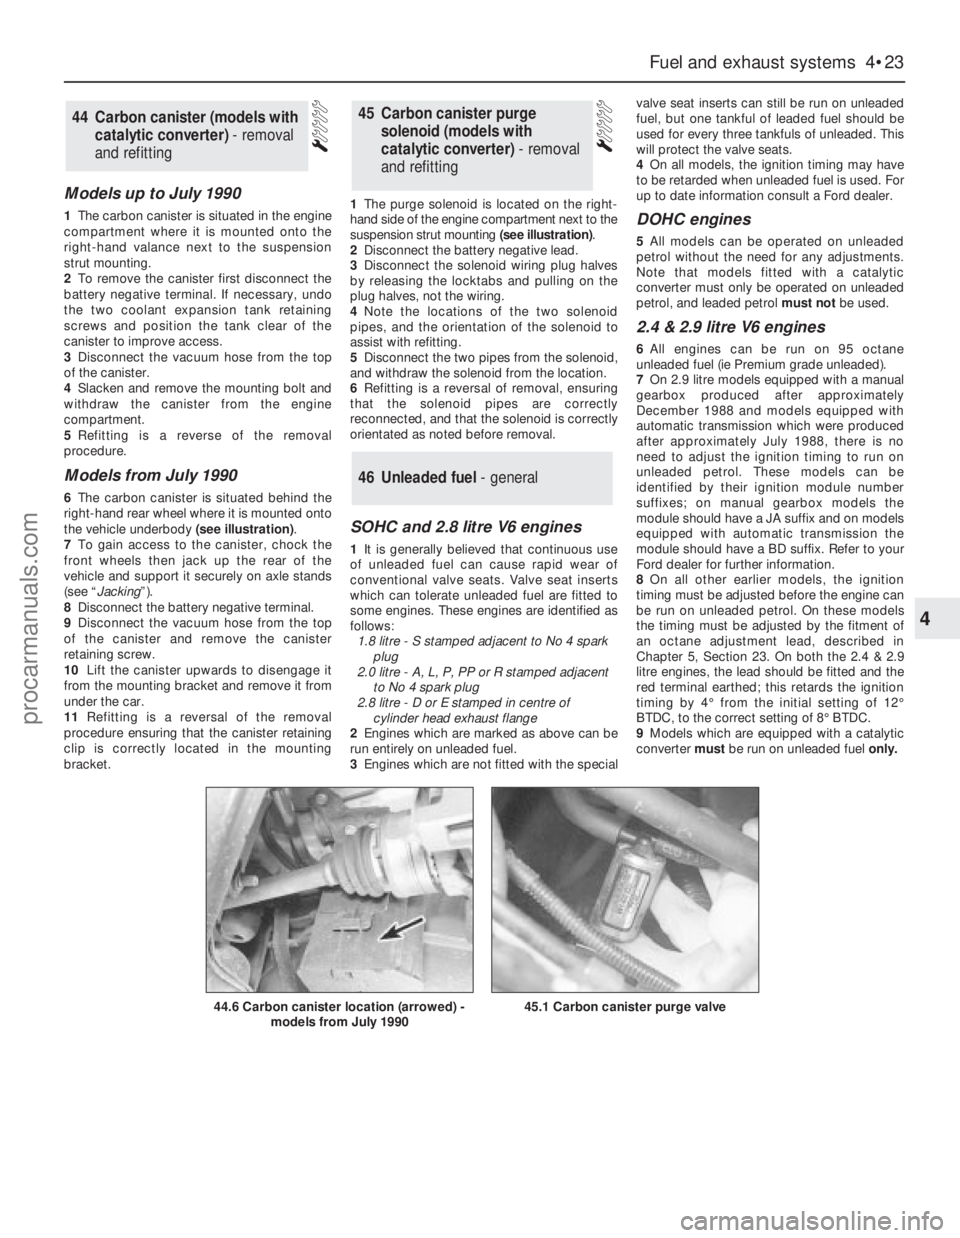
the vehicle underbody (see illustration).
7To gain access to the canister, chock the
front wheels then jack up the rear of the
vehicle and support it securely on axle stands
(see “Jacking”).
8Disconnect the battery negative terminal.
9Disconnect the vacuum hose from the top
of the canister and remove the canister
retaining screw.
10Lift the canister upwards to disengage it
from the mounting bracket and remove it from
under the car.
11Refitting is a reversal of the removal
procedure ensuring that the canister retaining
clip is correctly located in the mounting
bracket.1The purge solenoid is located on the right-
hand side of the engine compartment next to the
suspension strut mounting (see illustration).
2Disconnect the battery negative lead.
3Disconnect the solenoid wiring plug halves
by releasing the locktabs and pulling on the
plug halves, not the wiring.
4Note the locations of the two solenoid
pipes, and the orientation of the solenoid to
assist with refitting.
5Disconnect the two pipes from the solenoid,
and withdraw the solenoid from the location.
6Refitting is a reversal of removal, ensuring
that the solenoid pipes are correctly
reconnected, and that the solenoid is correctly
orientated as noted before removal.
SOHC and 2.8 litre V6 engines
1It is generally believed that continuous use
of unleaded fuel can cause rapid wear of
conventional valve seats. Valve seat inserts
which can tolerate unleaded fuel are fitted to
some engines. These engines are identified as
follows:
1.8 litre - S stamped adjacent to No 4 spark
plug
2.0 litre - A, L, P, PP or R stamped adjacent
to No 4 spark plug
2.8 litre - D or E stamped in centre of
cylinder head exhaust flange
2Engines which are marked as above can be
run entirely on unleaded fuel.
3Engines which are not fitted with the specialvalve seat inserts can still be run on unleaded
fuel, but one tankful of leaded fuel should be
used for every three tankfuls of unleaded. This
will protect the valve seats.
4On all models, the ignition timing may have
to be retarded when unleaded fuel is used. For
up to date information consult a Ford dealer.
DOHC engines
5All models can be operated on unleaded
petrol without the need for any adjustments.
Note that models fitted with a catalytic
converter must only be operated on unleaded
petrol, and leaded petrol must notbe used.
2.4 & 2.9 litre V6 engines
6All engines can be run on 95 octane
unleaded fuel (ie Premium grade unleaded).
7On 2.9 litre models equipped with a manual
gearbox produced after approximately
December 1988 and models equipped with
automatic transmission which were produced
after approximately July 1988, there is no
need to adjust the ignition timing to run on
unleaded petrol. These models can be
identified by their ignition module number
suffixes; on manual gearbox models the
module should have a JA suffix and on models
equipped with automatic transmission the
module should have a BD suffix. Refer to your
Ford dealer for further information.
8On all other earlier models, the ignition
timing must be adjusted before the engine can
be run on unleaded petrol. On these models
the timing must be adjusted by the fitment of
an octane adjustment lead, described in
Chapter 5, Section 23. On both the 2.4 & 2.9
litre engines, the lead should be fitted and the
red terminal earthed; this retards the ignition
timing by 4°from the initial setting of 12°
BTDC, to the correct setting of 8°BTDC.
9Models which are equipped with a catalytic
converter must be run on unleaded fuel only.
46Unleaded fuel - general
45Carbon canister purge
solenoid (models with
catalytic converter) - removal
and refitting44Carbon canister (models with
catalytic converter) - removal
and refitting
Fuel and exhaust systems 4•23
4
44.6 Carbon canister location (arrowed) -
models from July 199045.1 Carbon canister purge valve
procarmanuals.com
Page 130 of 255
Chapter 10
Braking system
ABS module - removal and refitting . . . . . . . . . . . . . . . . . . . . . . . . .25
Brake discs - inspection . . . . . . . . . . . . . . . . . . . . . . . . . . . . . . . . . . .4
Brake hydraulic system - bleeding . . . . . . . . . . . . . . . . . . . . . . . . . . .2
Brake hydraulic system - fluid renewal . . . . . . . . . . . . . . . . . . . . . . .3
Brake pedal - removal and refitting . . . . . . . . . . . . . . . . . . . . . . . . .14
Brake pipes and hoses - inspection, removal and refitting . . . . . . .21
Control module (April 1992 on) - removal and refitting . . . . . . . . . .31
Front brake disc - removal and refitting . . . . . . . . . . . . . . . . . . . . . . .5
Front brake pads - inspection and renewal . . . . . . . . . . . . . . . . . . . .7
Front caliper - overhaul . . . . . . . . . . . . . . . . . . . . . . . . . . . . . . . . . .10
Front caliper - removal and refitting . . . . . . . . . . . . . . . . . . . . . . . . . .9
G (gravity) switch (April 1992 on) - removal and refitting . . . . . . . . .33
General information . . . . . . . . . . . . . . . . . . . . . . . . . . . . . . . . . . . . . .1
Handbrake cable - adjustment . . . . . . . . . . . . . . . . . . . . . . . . . . . . .22
Handbrake cable - removal and refitting . . . . . . . . . . . . . . . . . . . . .23
Handbrake control lever - removal and refitting . . . . . . . . . . . . . . . .24
Hydraulic unit - removal and refitting . . . . . . . . . . . . . . . . . . . . . . . .15
Hydraulic unit accumulator - removal and refitting . . . . . . . . . . . . .17Hydraulic unit fluid reservoir - removal and refitting . . . . . . . . . . . .16
Hydraulic unit hoses - removal and refitting . . . . . . . . . . . . . . . . . . .20
Hydraulic unit pressure switch - removal and refitting . . . . . . . . . . .19
Hydraulic unit pump and motor - removal and refitting . . . . . . . . . .18
Master cylinder (April 1992 on) - removal and refitting . . . . . . . . . .27
Pedal Travel Sensor (PTS) (April 1992 on) - removal and refitting . .32
Rear brake disc - removal and refitting . . . . . . . . . . . . . . . . . . . . . . .6
Rear brake pads - inspection and renewal . . . . . . . . . . . . . . . . . . . .8
Rear caliper - overhaul . . . . . . . . . . . . . . . . . . . . . . . . . . . . . . . . . . .12
Rear caliper - removal and refitting . . . . . . . . . . . . . . . . . . . . . . . . .11
Rear disc splash shield - removal and refitting . . . . . . . . . . . . . . . .13
Vacuum servo unit (April 1992 on) - testing, removal and refitting .28
Vacuum servo unit check valve (April 1992 on) - removal, testing and
refitting . . . . . . . . . . . . . . . . . . . . . . . . . . . . . . . . . . . . . . . . . . . . .29
Valve block and pump assembly (April 1992 on) - removal and
refitting . . . . . . . . . . . . . . . . . . . . . . . . . . . . . . . . . . . . . . . . . . . . .30
Wheel sensors - removal and refitting . . . . . . . . . . . . . . . . . . . . . . .26
General
System type: . . . . . . . . . . . . . . . . . . . . . . . . . . . . . . . . . . . . . . . . . . . . . . Discs all round, hydraulic operation, anti-lock braking system
(ABS). Handbrake by mechanical operation of rear calipers
System make:
Models up to April 1992 . . . . . . . . . . . . . . . . . . . . . . . . . . . . . . . . . . . Teves MK II ABS
Models from April 1992 . . . . . . . . . . . . . . . . . . . . . . . . . . . . . . . . . . . . Teves MK IV ABS
Hydraulic system
Fluid type . . . . . . . . . . . . . . . . . . . . . . . . . . . . . . . . . . . . . . . . . . . . . . . . Hydraulic fluid to Ford spec SAM-6C9103-A
Operating pressure . . . . . . . . . . . . . . . . . . . . . . . . . . . . . . . . . . . . . . . . . 130 to 190 bar (1885 to 2755 lbf/in2)
Pressure warning switch operates at . . . . . . . . . . . . . . . . . . . . . . . . . . . 100 to 110 bar (1450 to 1595 lbf/in2)
Brake pads
Lining minimum thickness . . . . . . . . . . . . . . . . . . . . . . . . . . . . . . . . . . . 1.5 mm (0.06 in)
Brake discs
Run-out . . . . . . . . . . . . . . . . . . . . . . . . . . . . . . . . . . . . . . . . . . . . . . . . . . 0.15 mm (0.006 in) maximum
Thickness variation . . . . . . . . . . . . . . . . . . . . . . . . . . . . . . . . . . . . . . . . . 0.015 mm (0.0006 in) maximum
Minimum thickness:
Front . . . . . . . . . . . . . . . . . . . . . . . . . . . . . . . . . . . . . . . . . . . . . . . . . . 22 mm (0.87 in)
Rear . . . . . . . . . . . . . . . . . . . . . . . . . . . . . . . . . . . . . . . . . . . . . . . . . . . Cast into outer rim (typically 8.9 mm/0.35 in)
Rear - Estate models . . . . . . . . . . . . . . . . . . . . . . . . . . . . . . . . . . . . . 18 mm (0.71 in)
10•1
Easy,suitable for
novice with little
experienceFairly easy,suitable
for beginner with
some experienceFairly difficult,
suitable for competent
DIY mechanicDifficult,suitable for
experienced DIY
mechanicVery difficult,
suitable for expert
DIY or professional
Degrees of difficulty
Specifications Contents
10
procarmanuals.com
Page 131 of 255
Models covered in this Manual have disc
brakes fitted all round. The footbrake operates
hydraulically on all four wheels, and the
handbrake operates mechanically on the rear
wheels. Both footbrake and handbrake are
self-adjusting in use.
Ford’s anti-lock braking system (ABS) is
fitted to all models. The system monitors the
rotational speed of each roadwheel. When a
wheel begins to lock under heavy braking, the
ABS reduces the hydraulic pressure to that
wheel, so preventing it from locking. When this
happens a pulsating effect will be noticed at
the brake pedal. On some road surfaces the
tyres may squeal when braking hard even
though the wheels are not locked.
The main components of the system are the
hydraulic unit, the calipers, pads and discs,
the wheel sensors and the “brain” or control
module. The hydraulic unit contains the
elements of a traditional master cylinder, plus
an electric motor and pump, a pressure
accumulator and control valves. The pump is
the source of pressure for the system and
does away with the need for a vacuum servo.
The hydraulic circuit is split front and rear,
as is normal practice with rear-wheel drive
vehicles. In the event that the hydraulic pump
fails, unassisted braking effort is still available
on the front calipers only.
Warning lights inform the driver of low brake
fluid level, ABS failure and (on some models)
brake pad wear. The low fluid level light
doubles as a “handbrake on” light; if it
illuminates at the same time as the ABS
warning light, it warns of low hydraulic
pressure.
ABS cannot overturn the laws of physics:
stopping distances will inevitably be greater on
loose or slippery surfaces. However, the system
should allow even inexperienced drivers to
retain directional control under panic braking.
From August 1986 the following
modifications were made to the braking
system.
a)The relays differ from earlier versions.b)The hydraulic pump is constructed of iron
rather than alloy.
c)A new pressure warning switch is used.
d)The earlier high pressure rubber hose is
replaced by a steel pipe.
To overcome the problem of excessive rear
brake pad wear, Ford introduced a differential
valve which is screwed into the ABS valve
block.The valve limits the pressure applied to
the rear brake calipers and so reduces brake
pad wear. From 1988 onwards, the valve has
been fitted during production. The differential
valve can also be fitted to earlier models. Refer
to your Ford dealer for further information.
From April 1992 onwards, the models
covered in this Manual were equipped with a
new Teves MK IV anti-lock braking system
instead of the Teves MK II system fitted to the
earlier models.
The Teves MK IV system differs from the
earlier MK II system in the following ways.
a)The source of hydraulic pressure for the
system is a conventional master cylinder
and vacuum servo assembly.
b)A valve block and pump assembly is used
instead of the hydraulic control unit. The
block contains the inlet and outlet
solenoid valves that control the hydraulic
system. There are three pairs of valves,
one for each brake circuit (paragraph c).
c)The hydraulic braking system consists of
three separate circuits; one for each front
brake (which are totally independent of
each other), and a joint circuit which
operates both rear brakes.
d)A G (gravity) switch is incorporated in the
system. This is an inertia type switch and
informs the control module when the
vehicle is decelerating rapidly.
e)A Pedal Travel Sensor (PTS) is fitted to the
vacuum servo unit. The PTS informs the
control module of the position of the brake
pedal when the anti-lock sequence starts
and ensures that a constant pedal height
is maintained during the sequence.
The MK IV system operates as follows.
During normal operation the system
functions in the same way as a non-ABS
system would. During this time the three inlet
valves in the valve block are open and theoutlet valves are closed, allowing full hydraulic
pressure present in the master cylinder to act
on the main braking circuit. If the control
module receives a signal from one of the
wheel sensors and senses that a wheel is
about to lock, it closes the relevant inlet valve
in the valve block which then isolates the
brake caliper on the wheel which is about to
lock from the master cylinder, effectively
sealing in the hydraulic pressure. If the speed
of rotation of the wheel continues to decrease
at an abnormal rate, the control module will
then open the relevant outlet valve in the valve
block; this allows the fluid from the relevant
hydraulic circuit to return to the master
cylinder reservoir, releasing pressure on the
brake caliper so that the brake is released. The
pump in the valve block also operates to assist
in the quick release of pressure. Once the
speed of rotation of the wheel returns to an
acceptable rate the pump stops, the outlet
valve closes and the inlet valve is opened,
allowing the hydraulic master cylinder
pressure to return to the caliper which then
reapplies the brake. This cycle can be carried
many times a second. The solenoid valves
connected to the front calipers operate
independently, but the valve connected to the
rear calipers operates both calipers
simultaneously.
The operation of the ABS system is entirely
dependent on electrical signals. To prevent
the system responding to any inaccurate
signals, a built-in safety circuit monitors all
signals received by the control module. If an
inaccurate signal or low battery voltage is
detected, the ABS system is automatically
shut down and the warning lamp on the
instrument cluster is illuminated to inform the
driver that the ABS system is not operational.
Whilst in this state the system functions in the
same way as a non-ABS system would. If a
fault does develop in the ABS system, the car
must be taken to a Ford dealer for fault
diagnosis and repair. The system is equipped
with a diagnostic plug into which a special
diagnostic (STAR) tester can be plugged. This
allows faults to be easily traced.
1General information
10•2Braking system
Torque wrench settingsNmlbf ft
Front caliper:
To stub axle carrier . . . . . . . . . . . . . . . . . . . . . . . . . . . . . . . . . . . . . . .51 to 6138 to 45
Slide bolts . . . . . . . . . . . . . . . . . . . . . . . . . . . . . . . . . . . . . . . . . . . . . .20 to 2515 to 18
Rear caliper:
Bracket to carrier plate . . . . . . . . . . . . . . . . . . . . . . . . . . . . . . . . . . . .51 to 6138 to 45
Slide bolts . . . . . . . . . . . . . . . . . . . . . . . . . . . . . . . . . . . . . . . . . . . . . .31 to 3523 to 26
Hydraulic unit to bulkhead . . . . . . . . . . . . . . . . . . . . . . . . . . . . . . . . . . .41 to 5130 to 38
Accumulator to pump body . . . . . . . . . . . . . . . . . . . . . . . . . . . . . . . . . .35 to 4526 to 33
Pump mounting bolts . . . . . . . . . . . . . . . . . . . . . . . . . . . . . . . . . . . . . . .7 to 95 to 7
High pressure hose banjo bolts . . . . . . . . . . . . . . . . . . . . . . . . . . . . . . .16 to 2412 to 18
Reservoir mounting bolts . . . . . . . . . . . . . . . . . . . . . . . . . . . . . . . . . . . .4 to 63 to 4
Wheel sensor fixing bolts . . . . . . . . . . . . . . . . . . . . . . . . . . . . . . . . . . . .8 to 116 to 8
Vacuum servo unit retaining nuts (Teves MK IV) . . . . . . . . . . . . . . . . . .35 to 4526 to 33
Master cylinder retaining nuts (Teves MK IV) . . . . . . . . . . . . . . . . . . . . .20 to 2515 to 18
Valve block and pump assembly mounting nuts (Teves MK IV) . . . . . . .21 to 2815 to 21
procarmanuals.com
Page 132 of 255
Note: Hydraulic fluid is poisonous; wash off
immediately and thoroughly in the case of skin
contact and seek immediate medical advice if
any fluid is swallowed or gets into the eyes.
Certain types of hydraulic fluid are inflammable
and may ignite when allowed into contact with
hot components; when servicing any hydraulic
system it is safest to assume that the fluid is
inflammable and to take precautions against
the risk of fire as though it is petrol that is
being handled. Finally, it is hygroscopic (it
absorbs moisture from the air) old fluid may be
contaminated and unfit for further use. When
topping-up or renewing the fluid, always use
the recommended type and ensure that it
comes from a freshly-opened sealed container
1Bleeding is necessary whenever air has
entered the hydraulic system - for instance
after component renewal. Because the
hydraulic circuits are split, if only the front or
rear circuit has been disturbed it will normally
only be necessary to bleed the front or rear
calipers. If the hydraulic unit has been
disturbed or the fluid level has been allowed to
fall so low that air has entered the system,
both front and rear circuits must be bled,
starting with the front
2The services of an assistant will be required.
As far as is known, pressure bleeding or other
“one-man” equipment cannot be used. In
addition a supply of fresh brake fluid of the
correct type will be needed, together with a
length of flexible tube to fit the bleed screws
and a clean glass or plastic container.
3Do not allow the hydraulic unit pump motor
to run for more than two minutes at a time. The
motor must be allowed to cool (with the
ignition off) for at least ten minutes after each
two minute spell of running.
4Remember that brake fluid is poisonous and
that the rear brake hydraulic system may be
under considerable pressure. Take care not to
allow hydraulic fluid to spray into the face or
eyes.
5Keep the reservoir topped up to the MAX
mark during bleeding.
6Discard the fluid bled out of the system as it
is unfit for re-use.
Models before April 1992
Front brakes
7Remove the dust cap (if fitted) from the left-
hand caliper bleed screw. Slacken the bleed
screw, then nip it up again. Make sure that the
ignition is off.8Fit the bleed tube over the bleed screw.
Place the other end of the tube in the bleed jar
(glass or plastic container). Pour sufficient
brake fluid into the jar to cover the end of the
tube.
9Open the bleed screw one full turn. Have
the assistant depress the brake pedal as far as
it will go, and hold it depressed. Tighten the
bleed screw, then tell the assistant to release
the pedal.
10Repeat paragraph 9 until clean fluid, free
of air bubbles, flows from the bleed screw
during the downstrokes. Remember to keep
the fluid reservoir topped up.
11Repeat the operations on the right-hand
caliper. Refit the bleed screw dust caps (if
applicable) on completion.
Rear brakes
12Remove the dust cap (if fitted) from the
rear left-hand caliper bleed screw. Open the
bleed screw one full turn.
13Fit the bleed tube over the bleed screw.
Place the other end of the tube in the bleed jar
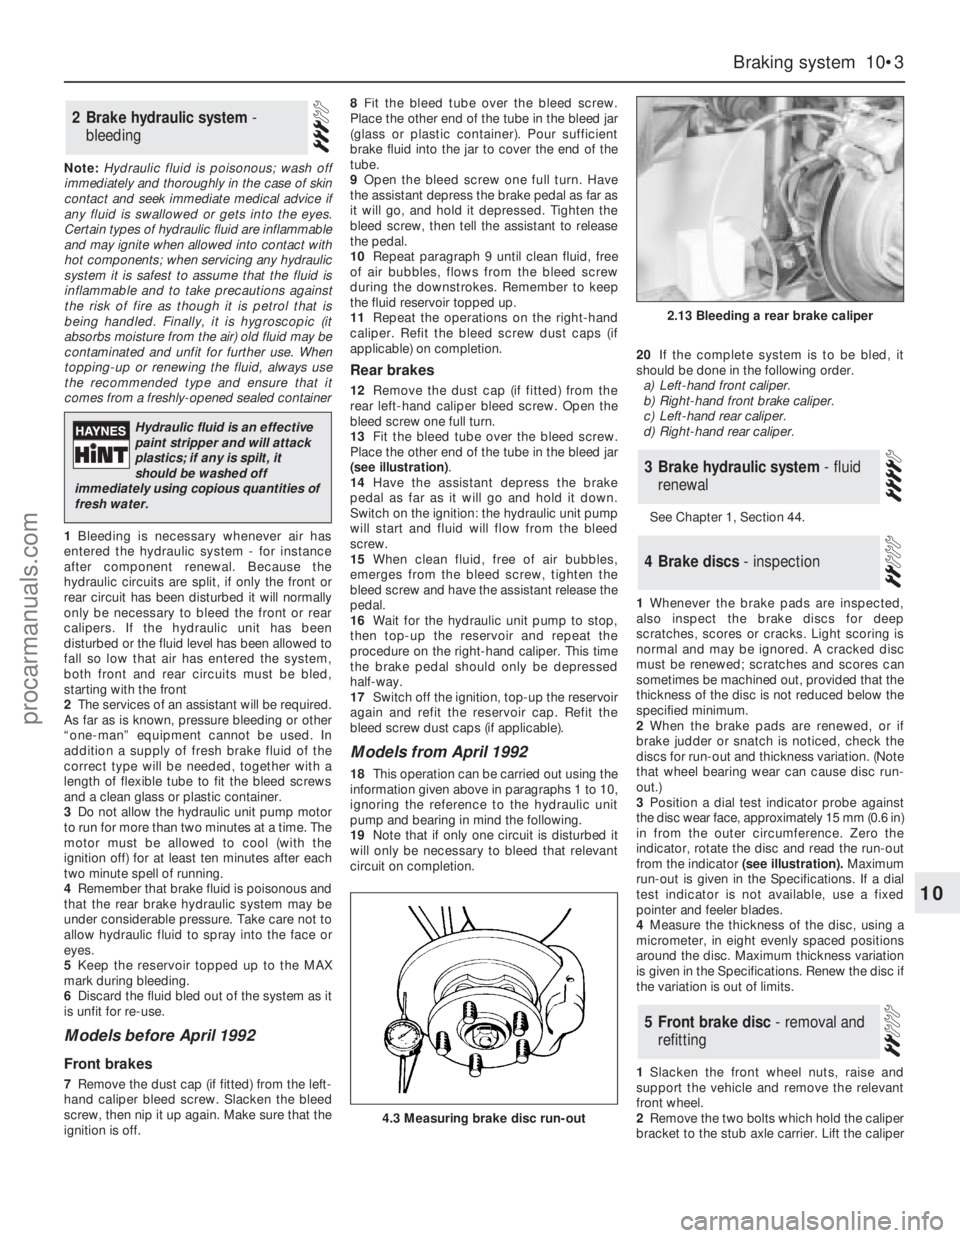
(see illustration).
14Have the assistant depress the brake
pedal as far as it will go and hold it down.
Switch on the ignition: the hydraulic unit pump
will start and fluid will flow from the bleed
screw.
15When clean fluid, free of air bubbles,
emerges from the bleed screw, tighten the
bleed screw and have the assistant release the
pedal.
16Wait for the hydraulic unit pump to stop,
then top-up the reservoir and repeat the
procedure on the right-hand caliper. This time
the brake pedal should only be depressed
half-way.
17Switch off the ignition, top-up the reservoir
again and refit the reservoir cap. Refit the
bleed screw dust caps (if applicable).
Models from April 1992
18This operation can be carried out using the
information given above inparagraphs 1 to 10,
ignoring the reference to the hydraulic unit
pump and bearing in mind the following.
19Note that if only one circuit is disturbed it
will only be necessary to bleed that relevant
circuit on completion.20If the complete system is to be bled, it
should be done in the following order.
a)Left-hand front caliper.
b)Right-hand front brake caliper.
c)Left-hand rear caliper.
d)Right-hand rear caliper.
See Chapter 1, Section 44.
1Whenever the brake pads are inspected,
also inspect the brake discs for deep
scratches, scores or cracks. Light scoring is
normal and may be ignored. A cracked disc
must be renewed; scratches and scores can
sometimes be machined out, provided that the
thickness of the disc is not reduced below the
specified minimum.
2When the brake pads are renewed, or if
brake judder or snatch is noticed, check the
discs for run-out and thickness variation. (Note
that wheel bearing wear can cause disc run-
out.)
3Position a dial test indicator probe against
the disc wear face, approximately 15 mm (0.6 in)
in from the outer circumference. Zero the
indicator, rotate the disc and read the run-out
from the indicator(see illustration).Maximum
run-out is given in the Specifications. If a dial
test indicator is not available, use a fixed
pointer and feeler blades.
4Measure the thickness of the disc, using a
micrometer, in eight evenly spaced positions
around the disc. Maximum thickness variation
is given in the Specifications. Renew the disc if
the variation is out of limits.
1Slacken the front wheel nuts, raise and
support the vehicle and remove the relevant
front wheel.
2Remove the two bolts which hold the caliper
bracket to the stub axle carrier. Lift the caliper
5Front brake disc - removal and
refitting
4Brake discs - inspection
3Brake hydraulic system - fluid
renewal
2Brake hydraulic system -
bleeding
Braking system 10•3
10
2.13 Bleeding a rear brake caliper
4.3 Measuring brake disc run-out
Hydraulic fluid is an effective
paint stripper and will attack
plastics; if any is spilt, it
should be washed off
immediately using copious quantities of
fresh water.
procarmanuals.com
Page 133 of 255
and bracket off the disc and tie them up out of
the way. Do not allow the caliper to hang on
the flexible hose.
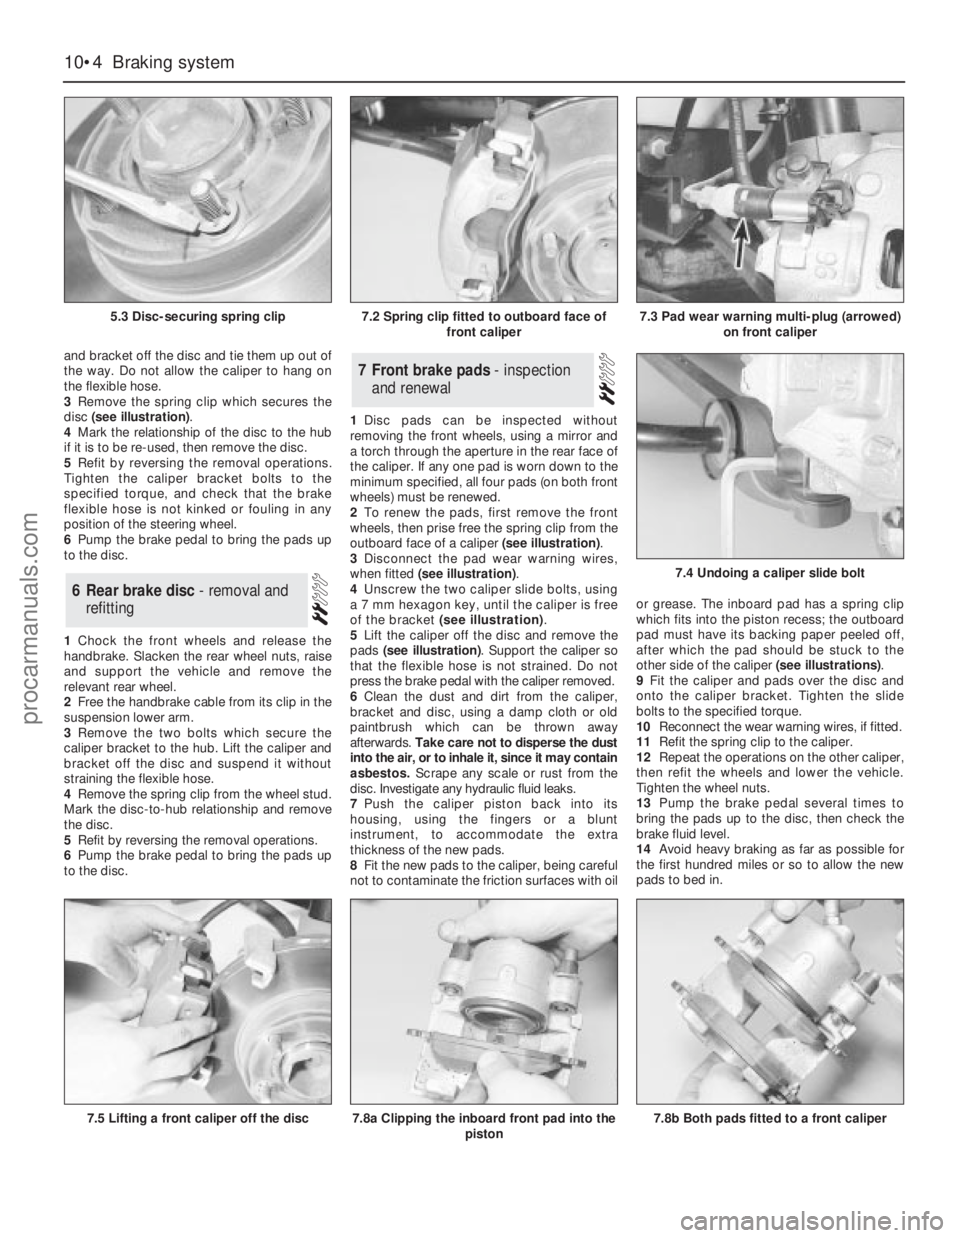
3Remove the spring clip which secures the
disc (see illustration).
4Mark the relationship of the disc to the hub
if it is to be re-used, then remove the disc.
5Refit by reversing the removal operations.
Tighten the caliper bracket bolts to the
specified torque, and check that the brake
flexible hose is not kinked or fouling in any
position of the steering wheel.
6Pump the brake pedal to bring the pads up
to the disc.
1Chock the front wheels and release the
handbrake. Slacken the rear wheel nuts, raise
and support the vehicle and remove the
relevant rear wheel.
2Free the handbrake cable from its clip in the
suspension lower arm.
3Remove the two bolts which secure the
caliper bracket to the hub. Lift the caliper and
bracket off the disc and suspend it without
straining the flexible hose.
4Remove the spring clip from the wheel stud.
Mark the disc-to-hub relationship and remove
the disc.
5Refit by reversing the removal operations.
6Pump the brake pedal to bring the pads up
to the disc.1Disc pads can be inspected without
removing the front wheels, using a mirror and
a torch through the aperture in the rear face of
the caliper. If any one pad is worn down to the
minimum specified, all four pads (on both front
wheels) must be renewed.
2To renew the pads, first remove the front
wheels, then prise free the spring clip from the
outboard face of a caliper (see illustration).
3Disconnect the pad wear warning wires,
when fitted (see illustration).
4Unscrew the two caliper slide bolts, using
a 7 mm hexagon key, until the caliper is free
of the bracket (see illustration).
5Lift the caliper off the disc and remove the
pads (see illustration). Support the caliper so
that the flexible hose is not strained. Do not
press the brake pedal with the caliper removed.
6Clean the dust and dirt from the caliper,
bracket and disc, using a damp cloth or old
paintbrush which can be thrown away
afterwards. Take care not to disperse the dust
into the air, or to inhale it, since it may contain
asbestos. Scrape any scale or rust from the
disc. Investigate any hydraulic fluid leaks.
7Push the caliper piston back into its
housing, using the fingers or a blunt
instrument, to accommodate the extra
thickness of the new pads.
8Fit the new pads to the caliper, being careful
not to contaminate the friction surfaces with oilor grease. The inboard pad has a spring clip
which fits into the piston recess; the outboard
pad must have its backing paper peeled off,
after which the pad should be stuck to the
other side of the caliper (see illustrations).
9Fit the caliper and pads over the disc and
onto the caliper bracket. Tighten the slide
bolts to the specified torque.
10Reconnect the wear warning wires, if fitted.
11Refit the spring clip to the caliper.
12Repeat the operations on the other caliper,
then refit the wheels and lower the vehicle.
Tighten the wheel nuts.
13Pump the brake pedal several times to
bring the pads up to the disc, then check the
brake fluid level.
14Avoid heavy braking as far as possible for
the first hundred miles or so to allow the new
pads to bed in.7Front brake pads - inspection
and renewal
6Rear brake disc - removal and
refitting
10•4Braking system
5.3 Disc-securing spring clip
7.5 Lifting a front caliper off the disc7.8a Clipping the inboard front pad into the
piston
7.4 Undoing a caliper slide bolt
7.8b Both pads fitted to a front caliper
7.2 Spring clip fitted to outboard face of
front caliper7.3 Pad wear warning multi-plug (arrowed)
on front caliper
procarmanuals.com
Page 134 of 255
1It is necessary to remove the rear wheels in
order to inspect the rear pads. The pads can
be viewed through the top of the caliper after
removing the spring clip. If any one pad is
worn down to the minimum specified, all four
pads (on both rear wheels) must be renewed.
2Free the handbrake cable from its clip on
the suspension lower arm. Release the
handbrake.
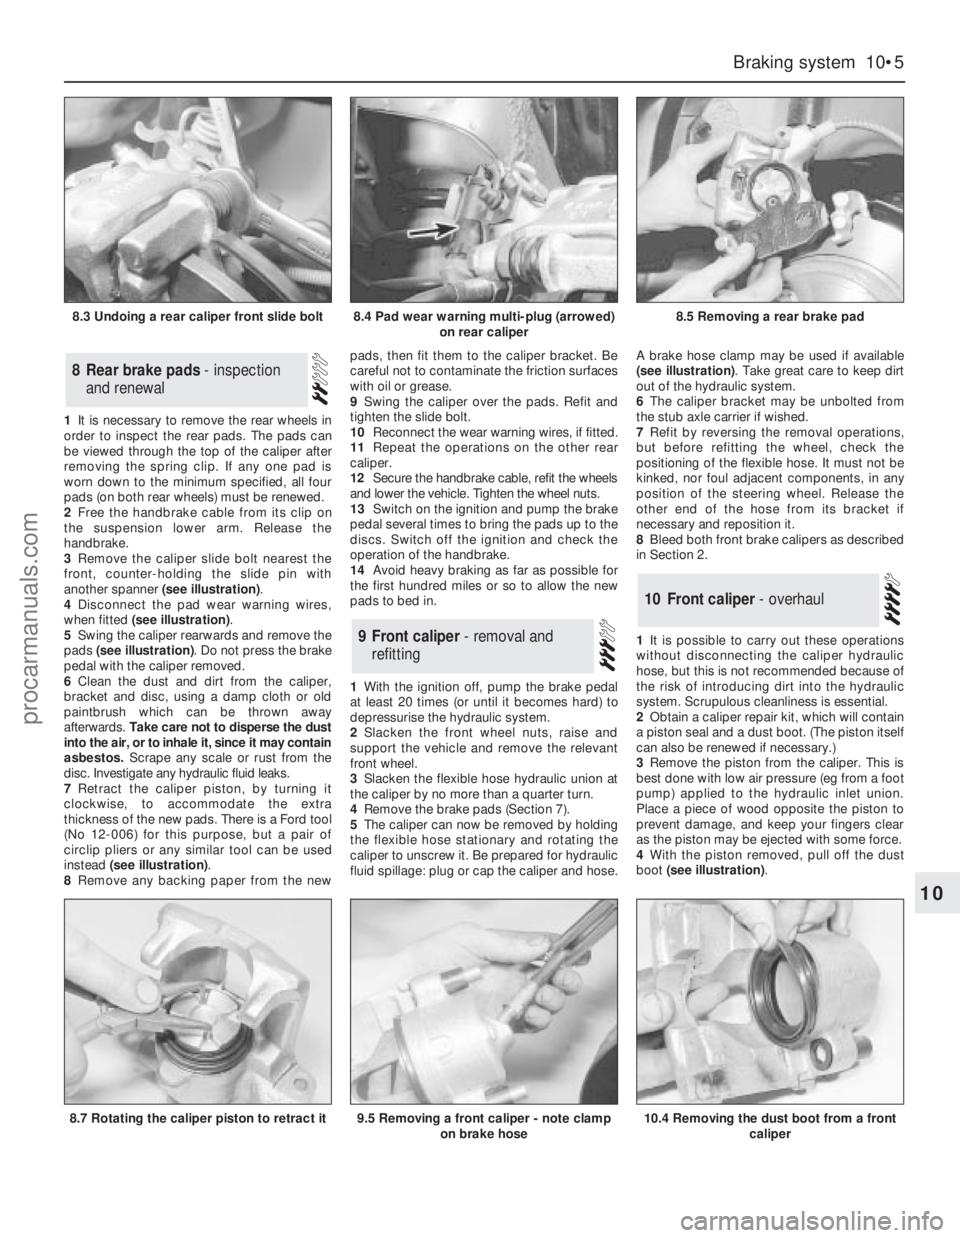
3Remove the caliper slide bolt nearest the
front, counter-holding the slide pin with
another spanner (see illustration).
4Disconnect the pad wear warning wires,
when fitted (see illustration).
5Swing the caliper rearwards and remove the
pads (see illustration). Do not press the brake
pedal with the caliper removed.
6Clean the dust and dirt from the caliper,
bracket and disc, using a damp cloth or old
paintbrush which can be thrown away
afterwards. Take care not to disperse the dust
into the air, or to inhale it, since it may contain
asbestos. Scrape any scale or rust from the
disc. Investigate any hydraulic fluid leaks.
7Retract the caliper piston, by turning it
clockwise, to accommodate the extra
thickness of the new pads. There is a Ford tool
(No 12-006) for this purpose, but a pair of
circlip pliers or any similar tool can be used
instead (see illustration).
8Remove any backing paper from the newpads, then fit them to the caliper bracket. Be
careful not to contaminate the friction surfaces
with oil or grease.
9Swing the caliper over the pads. Refit and
tighten the slide bolt.
10Reconnect the wear warning wires, if fitted.
11Repeat the operations on the other rear
caliper.
12Secure the handbrake cable, refit the wheels
and lower the vehicle. Tighten the wheel nuts.
13Switch on the ignition and pump the brake
pedal several times to bring the pads up to the
discs. Switch off the ignition and check the
operation of the handbrake.
14Avoid heavy braking as far as possible for
the first hundred miles or so to allow the new
pads to bed in.
1With the ignition off, pump the brake pedal
at least 20 times (or until it becomes hard) to
depressurise the hydraulic system.
2Slacken the front wheel nuts, raise and
support the vehicle and remove the relevant
front wheel.
3Slacken the flexible hose hydraulic union at
the caliper by no more than a quarter turn.
4Remove the brake pads (Section 7).
5The caliper can now be removed by holding
the flexible hose stationary and rotating the
caliper to unscrew it. Be prepared for hydraulic
fluid spillage: plug or cap the caliper and hose.A brake hose clamp may be used if available
(see illustration). Take great care to keep dirt
out of the hydraulic system.
6The caliper bracket may be unbolted from
the stub axle carrier if wished.
7Refit by reversing the removal operations,
but before refitting the wheel, check the
positioning of the flexible hose. It must not be
kinked, nor foul adjacent components, in any
position of the steering wheel. Release the
other end of the hose from its bracket if
necessary and reposition it.
8Bleed both front brake calipers as described
in Section 2.
1It is possible to carry out these operations
without disconnecting the caliper hydraulic
hose, but this is not recommended because of
the risk of introducing dirt into the hydraulic
system. Scrupulous cleanliness is essential.
2Obtain a caliper repair kit, which will contain
a piston seal and a dust boot. (The piston itself
can also be renewed if necessary.)
3Remove the piston from the caliper. This is
best done with low air pressure (eg from a foot
pump) applied to the hydraulic inlet union.
Place a piece of wood opposite the piston to
prevent damage, and keep your fingers clear
as the piston may be ejected with some force.
4With the piston removed, pull off the dust
boot (see illustration).
10Front caliper - overhaul
9Front caliper - removal and
refitting
8Rear brake pads - inspection
and renewal
Braking system 10•5
10
8.3 Undoing a rear caliper front slide bolt8.4 Pad wear warning multi-plug (arrowed)
on rear caliper8.5 Removing a rear brake pad
8.7 Rotating the caliper piston to retract it9.5 Removing a front caliper - note clamp
on brake hose10.4 Removing the dust boot from a front
caliper
procarmanuals.com