1985 FORD GRANADA catalytic converter
[x] Cancel search: catalytic converterPage 108 of 255
20Checking and adjustment should be
completed within 30 seconds of the meter
readings stabilising. If this has not been
possible, run the engine at 3000 rpm for 15
seconds, then allow the engine to idle. Re-
check the CO content and carry out further
adjustments if necessary.
21On completion of adjustment, stop the
engine and disconnect the tachometer and the
exhaust gas analyser. Refit the cover to the
adjustment screw.
2.4 & 2.9 litre V6 engines
22As with the 2.8 V6, idle speed is
electronically controlled. Basic idle speed
adjustment can only be carried out by a Ford
dealer using special equipment.
23On models not equipped with a catalytic
converter, mixture adjustment can be carried
out as described above.
24On models equipped with a catalytic
converter, the mixture is controlled by the EEC IV
module and no manual adjustment is possible.
SOHC and V6 engines
1Disconnect the battery negative lead.
2Free the throttle position sensor multi-plug
from its clip. On the OHCmodels this is below
the idle speed control valve, on the underside
of the inlet manifold; on V6 engines it is
located below the throttle valve housing.
3Relieve the locktabs and unbolt the throttle
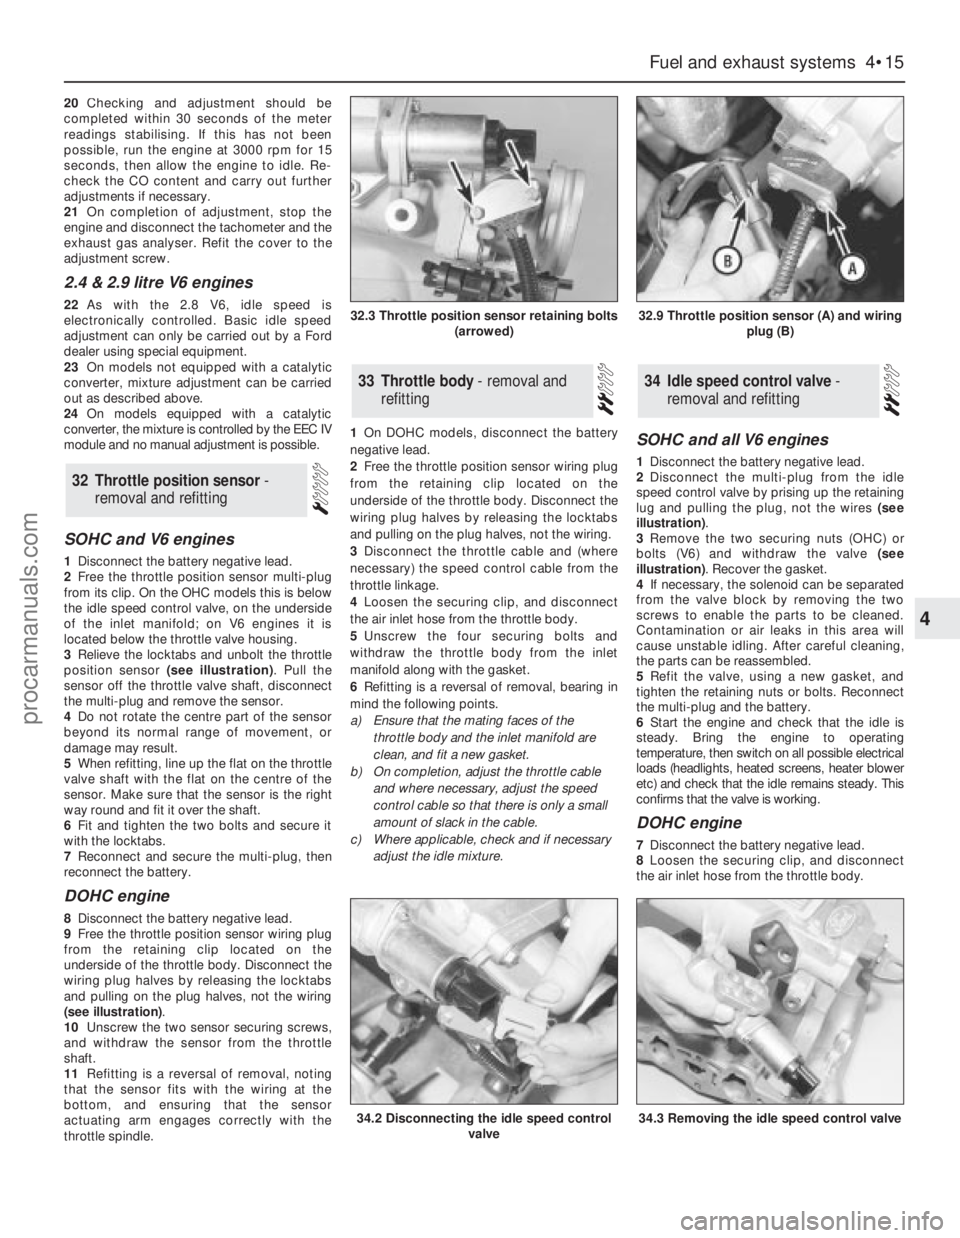
position sensor (see illustration). Pull the
sensor off the throttle valve shaft, disconnect
the multi-plug and remove the sensor.
4Do not rotate the centre part of the sensor
beyond its normal range of movement, or
damage may result.
5When refitting, line up the flat on the throttle
valve shaft with the flat on the centre of the
sensor. Make sure that the sensor is the right
way round and fit it over the shaft.
6Fit and tighten the two bolts and secure it
with the locktabs.
7Reconnect and secure the multi-plug, then
reconnect the battery.
DOHC engine
8Disconnect the battery negative lead.
9Free the throttle position sensor wiring plug
from the retaining clip located on the
underside of the throttle body. Disconnect the
wiring plug halves by releasing the locktabs
and pulling on the plug halves, not the wiring
(see illustration).
10Unscrew the two sensor securing screws,
and withdraw the sensor from the throttle
shaft.
11Refitting is a reversal of removal, noting
that the sensor fits with the wiring at the
bottom, and ensuring that the sensor
actuating arm engages correctly with the
throttle spindle.1On DOHC models, disconnect the battery
negative lead.
2Free the throttle position sensor wiring plug
from the retaining clip located on the
underside of the throttle body. Disconnect the
wiring plug halves by releasing the locktabs
and pulling on the plug halves, not the wiring.
3Disconnect the throttle cable and (where
necessary) the speed control cable from the
throttle linkage.
4Loosen the securing clip, and disconnect
the air inlet hose from the throttle body.
5Unscrew the four securing bolts and
withdraw the throttle body from the inlet
manifold along with the gasket.
6Refitting is a reversal of removal, bearing in
mind the following points.
a)Ensure that the mating faces of the
throttle body and the inlet manifold are
clean, and fit a new gasket.
b)On completion, adjust the throttle cable
and where necessary, adjust the speed
control cable so that there is only a small
amount of slack in the cable.
c)Where applicable, check and if necessary
adjust the idle mixture.
SOHC and all V6 engines
1Disconnect the battery negative lead.
2Disconnect the multi-plug from the idle
speed control valve by prising up the retaining
lug and pulling the plug, not the wires (see
illustration).
3Remove the two securing nuts (OHC) or
bolts (V6) and withdraw the valve (see
illustration). Recover the gasket.
4If necessary, the solenoid can be separated
from the valve block by removing the two
screws to enable the parts to be cleaned.
Contamination or air leaks in this area will
cause unstable idling. After careful cleaning,
the parts can be reassembled.
5Refit the valve, using a new gasket, and
tighten the retaining nuts or bolts. Reconnect
the multi-plug and the battery.
6Start the engine and check that the idle is
steady. Bring the engine to operating
temperature, then switch on all possible electrical
loads (headlights, heated screens, heater blower
etc) and check that the idle remains steady. This
confirms that the valve is working.
DOHC engine
7Disconnect the battery negative lead.
8Loosen the securing clip, and disconnect
the air inlet hose from the throttle body.
34Idle speed control valve -
removal and refitting33Throttle body - removal and
refitting
32Throttle position sensor -
removal and refitting
Fuel and exhaust systems 4•15
4
32.3 Throttle position sensor retaining bolts
(arrowed)32.9 Throttle position sensor (A) and wiring
plug (B)
34.2 Disconnecting the idle speed control
valve34.3 Removing the idle speed control valve
procarmanuals.com
Page 115 of 255
DOHC carburettor engine
8This procedure is essentially as described
above, noting the following points:
a)Note the plastic bush which is fitted to the
rear manifold stud. This must be removed
before the gasket can be withdrawn.
b)On refitting ensure that the mating
surfaces are clean and dry and fit new
gaskets.
c)Apply a thin coat of anti-seize compound
to the manifold studs to aid future
removal.
d)Tighten the manifold nuts to the specified
torque settings.
DOHC fuel-injection engine
9Disconnect the battery negative lead.
10Disconnect the wiring plug from the idle
speed control valve at the front of the plenum
chamber.
11Loosen the clamp, and detach the air inlet
hose from the air inlet tubing.
12Unscrew the securing nut, and release the
air inlet tube from the bracket on the engine
compartment front panel.
13Release the air cleaner lid securing clips,
then lift away the air inlet tube, plenum
chamber and air cleaner lid as an assembly,
disconnecting the breather hose from the air
inlet tube.
14On models fitted with a catalytic
converter, disconnect the exhaust gas oxygen
sensor wiring plug.
15Unscrew the securing nuts and disconnect
the exhaust downpipe from the manifold.
Recover the gasket. Support the exhaust
downpipe from underneath the vehicle (eg
with an axle stand) to avoid placing
unnecessary strain on the exhaust system.
16Unscrew the six securing nuts, and lift the
manifold from the cylinder head. Recover the
gasket.
17Refitting is a reversal of removal, bearing
in mind the following points.
a)Ensure that all mating faces are clean, and
use a new gasket.
b)Tighten the manifold securing nuts and
the downpipe securing nuts progressively
to the specified torque (where given).
SOHC and 2.8 litre V6 engines
1Periodically inspect the exhaust system for
freedom from corrosion and security of
mountings. Large holes will be obvious; small
holes may be found more easily by letting the
engine idle and partly obstructing the tailpipe
with a wad of cloth.
2Check the condition of the rubber
mountings by applying downward pressure on
the exhaust system and observing the
mountings for splits or cracks. Renew
deteriorated mountings.
3The exhaust systems fitted in production
have fewer sections than those available for
repair. Repair sections may be fitted to
production systems by cutting at the
appropriate point.
4The production exhaust systems are made
of aluminised and stainless steel. Repair
systems are available to the same standard, or
in standard quality (SQ) painted mild steel.
5It is recommended that the whole exhaust
system be removed even if only part requires
renewal, since separation of old joints, cutting
pipes etc is much easier away from the
vehicle. Proceed as follows.
6Disconnect the battery negative lead. Raise
and support the vehicle.
7Unbolt the manifold-to-downpipe flanged
joint(s).
8On V6 models, unbolt the left-hand front
silencer mounting.
9Release any earth straps.
10With the help of an assistant, unhook the
system from its mountings and remove it.
11Renew sections as necessary. Apply
exhaust jointing compound to sliding and
flanged joints, but do not tighten their clamps
yet. Use new sealing rings where necessary
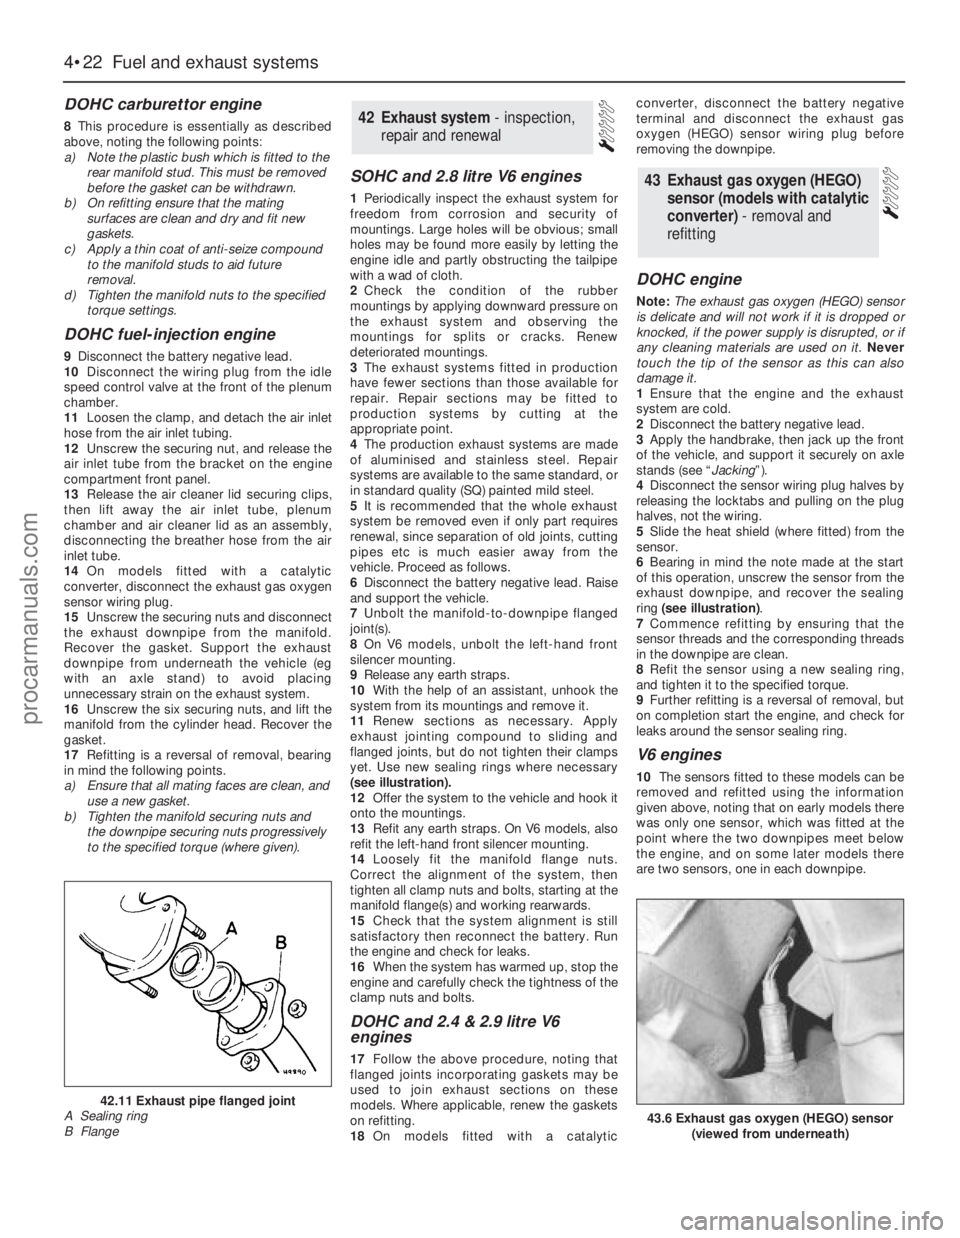
(see illustration).
12Offer the system to the vehicle and hook it
onto the mountings.
13Refit any earth straps. On V6 models, also
refit the left-hand front silencer mounting.
14Loosely fit the manifold flange nuts.
Correct the alignment of the system, then
tighten all clamp nuts and bolts, starting at the
manifold flange(s) and working rearwards.
15Check that the system alignment is still
satisfactory then reconnect the battery. Run
the engine and check for leaks.
16When the system has warmed up, stop the
engine and carefully check the tightness of the
clamp nuts and bolts.
DOHC and 2.4 & 2.9 litre V6
engines
17Follow the above procedure, noting that
flanged joints incorporating gaskets may be
used to join exhaust sections on these
models. Where applicable, renew the gaskets
on refitting.
18On models fitted with a catalyticconverter, disconnect the battery negative
terminal and disconnect the exhaust gas
oxygen (HEGO) sensor wiring plug before
removing the downpipe.
DOHC engine
Note: The exhaust gas oxygen (HEGO) sensor
is delicate and will not work if it is dropped or
knocked, if the power supply is disrupted, or if
any cleaning materials are used on it. Never
touch the tip of the sensor as this can also
damage it.
1Ensure that the engine and the exhaust
system are cold.
2Disconnect the battery negative lead.
3Apply the handbrake, then jack up the front
of the vehicle, and support it securely on axle
stands (see “Jacking”).
4Disconnect the sensor wiring plug halves by
releasing the locktabs and pulling on the plug
halves, not the wiring.
5Slide the heat shield (where fitted) from the
sensor.
6Bearing in mind the note made at the start
of this operation, unscrew the sensor from the
exhaust downpipe, and recover the sealing
ring (see illustration).
7Commence refitting by ensuring that the
sensor threads and the corresponding threads
in the downpipe are clean.
8Refit the sensor using a new sealing ring,
and tighten it to the specified torque.
9Further refitting is a reversal of removal, but
on completion start the engine, and check for
leaks around the sensor sealing ring.
V6 engines
10The sensors fitted to these models can be
removed and refitted using the information
given above, noting that on early models there
was only one sensor, which was fitted at the
point where the two downpipes meet below
the engine, and on some later models there
are two sensors, one in each downpipe.
43Exhaust gas oxygen (HEGO)
sensor (models with catalytic
converter) - removal and
refitting
42Exhaust system - inspection,
repair and renewal
4•22Fuel and exhaust systems
43.6 Exhaust gas oxygen (HEGO) sensor
(viewed from underneath)
42.11 Exhaust pipe flanged joint
A Sealing ring
B Flange
procarmanuals.com
Page 116 of 255
Models up to July 1990
1The carbon canister is situated in the engine
compartment where it is mounted onto the
right-hand valance next to the suspension
strut mounting.
2To remove the canister first disconnect the
battery negative terminal. If necessary, undo
the two coolant expansion tank retaining
screws and position the tank clear of the
canister to improve access.
3Disconnect the vacuum hose from the top
of the canister.
4Slacken and remove the mounting bolt and
withdraw the canister from the engine
compartment.
5Refitting is a reverse of the removal
procedure.
Models from July 1990
6The carbon canister is situated behind the
right-hand rear wheel where it is mounted onto
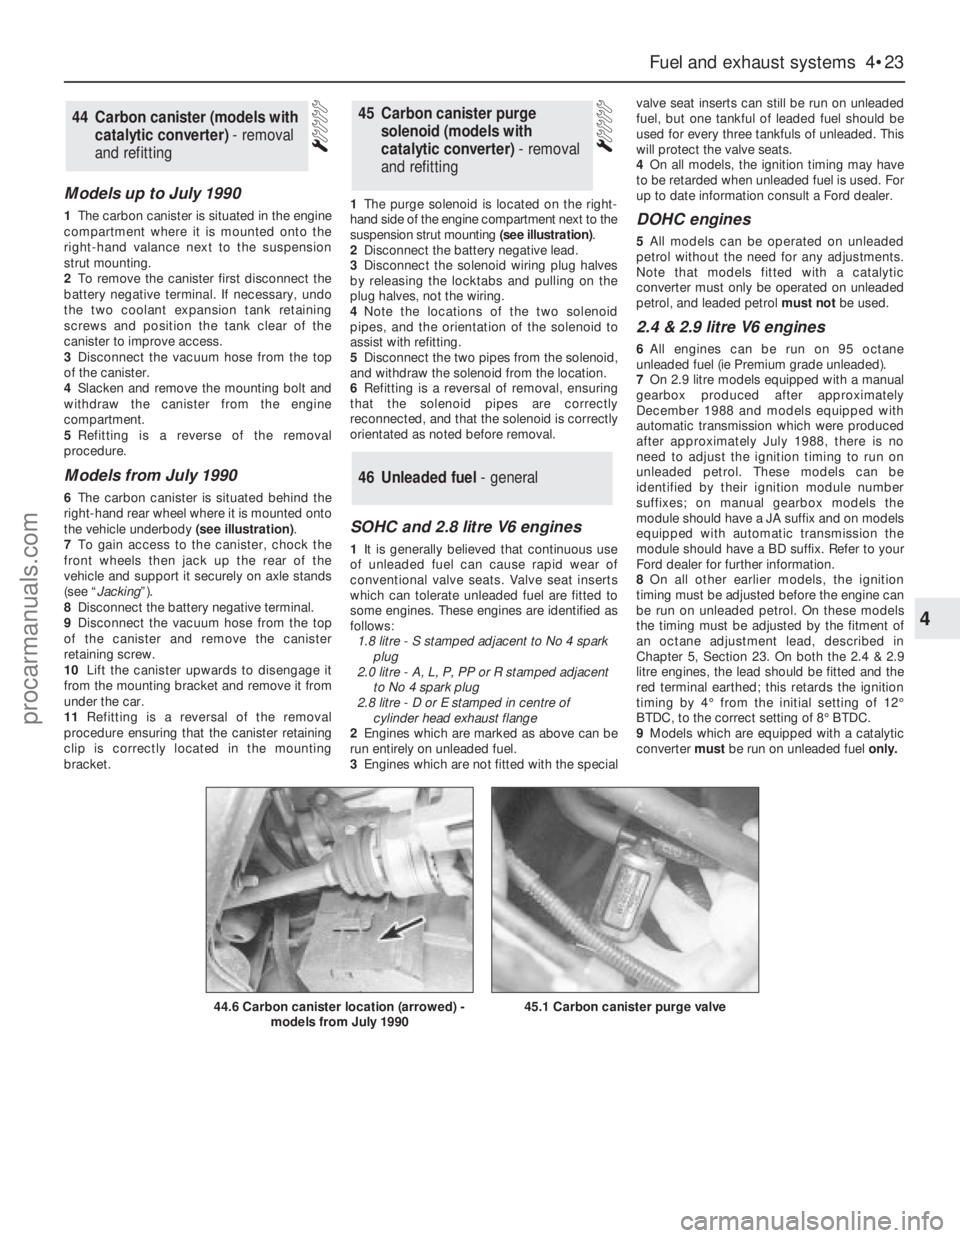
the vehicle underbody (see illustration).
7To gain access to the canister, chock the
front wheels then jack up the rear of the
vehicle and support it securely on axle stands
(see “Jacking”).
8Disconnect the battery negative terminal.
9Disconnect the vacuum hose from the top
of the canister and remove the canister
retaining screw.
10Lift the canister upwards to disengage it
from the mounting bracket and remove it from
under the car.
11Refitting is a reversal of the removal
procedure ensuring that the canister retaining
clip is correctly located in the mounting
bracket.1The purge solenoid is located on the right-
hand side of the engine compartment next to the
suspension strut mounting (see illustration).
2Disconnect the battery negative lead.
3Disconnect the solenoid wiring plug halves
by releasing the locktabs and pulling on the
plug halves, not the wiring.
4Note the locations of the two solenoid
pipes, and the orientation of the solenoid to
assist with refitting.
5Disconnect the two pipes from the solenoid,
and withdraw the solenoid from the location.
6Refitting is a reversal of removal, ensuring
that the solenoid pipes are correctly
reconnected, and that the solenoid is correctly
orientated as noted before removal.
SOHC and 2.8 litre V6 engines
1It is generally believed that continuous use
of unleaded fuel can cause rapid wear of
conventional valve seats. Valve seat inserts
which can tolerate unleaded fuel are fitted to
some engines. These engines are identified as
follows:
1.8 litre - S stamped adjacent to No 4 spark
plug
2.0 litre - A, L, P, PP or R stamped adjacent
to No 4 spark plug
2.8 litre - D or E stamped in centre of
cylinder head exhaust flange
2Engines which are marked as above can be
run entirely on unleaded fuel.
3Engines which are not fitted with the specialvalve seat inserts can still be run on unleaded
fuel, but one tankful of leaded fuel should be
used for every three tankfuls of unleaded. This
will protect the valve seats.
4On all models, the ignition timing may have
to be retarded when unleaded fuel is used. For
up to date information consult a Ford dealer.
DOHC engines
5All models can be operated on unleaded
petrol without the need for any adjustments.
Note that models fitted with a catalytic
converter must only be operated on unleaded
petrol, and leaded petrol must notbe used.
2.4 & 2.9 litre V6 engines
6All engines can be run on 95 octane
unleaded fuel (ie Premium grade unleaded).
7On 2.9 litre models equipped with a manual
gearbox produced after approximately
December 1988 and models equipped with
automatic transmission which were produced
after approximately July 1988, there is no
need to adjust the ignition timing to run on
unleaded petrol. These models can be
identified by their ignition module number
suffixes; on manual gearbox models the
module should have a JA suffix and on models
equipped with automatic transmission the
module should have a BD suffix. Refer to your
Ford dealer for further information.
8On all other earlier models, the ignition
timing must be adjusted before the engine can
be run on unleaded petrol. On these models
the timing must be adjusted by the fitment of
an octane adjustment lead, described in
Chapter 5, Section 23. On both the 2.4 & 2.9
litre engines, the lead should be fitted and the
red terminal earthed; this retards the ignition
timing by 4°from the initial setting of 12°
BTDC, to the correct setting of 8°BTDC.
9Models which are equipped with a catalytic
converter must be run on unleaded fuel only.
46Unleaded fuel - general
45Carbon canister purge
solenoid (models with
catalytic converter) - removal
and refitting44Carbon canister (models with
catalytic converter) - removal
and refitting
Fuel and exhaust systems 4•23
4
44.6 Carbon canister location (arrowed) -
models from July 199045.1 Carbon canister purge valve
procarmanuals.com
Page 119 of 255
The ignition system is responsible for
igniting the fuel/air charge in each cylinder at
the correct moment. The components of the
system are the spark plugs, ignition coil,
distributor and connecting leads. Overall
control of the system is one of the functions of
the engine management module. Fuel-
injection models have a subsidiary ignition
module mounted on the distributor.
There are no contact breaker points in the
distributor. A square wave signal is generated
by the distributor electro-magnetically; this
signal is used by the engine management
module as a basis for switching the coil LT
current. Speed-related (centrifugal) advance is
also handled by the module. On carburettor
models, ignition timing is also advanced under
conditions of high inlet manifold vacuum.The engine management models are “black
boxes” which regulate both the fuel and the
ignition systems to obtain the best power,
economy and emission levels. The module
fitted to carburettor models is known as the
ESC II (Electronic Spark Control Mk II) module.
On fuel-injection models the more powerful
EEC IV (Electronic Engine Control Mk IV)
module is used.
Both types of module receive inputs from
sensors monitoring coolant temperature,
distributor rotor position and (on some
models) manifold vacuum. Outputs from the
module control ignition timing, inlet manifold
heating and (except on 1.8 litre models) idle
speed. The EEC IV module also has overall
control of the fuel-injection system, from
which it receives information.
Provision is made for the ignition timing to
be retarded to allow the use of low octane fuel
if necessary. On all except 1.8 litre models
there is also a facility for raising the idle speed.The EEC IV module contains self-test
circuitry which enables a technician with the
appropriate test equipment to diagnose faults
in a very short time. A Limited Operation
Strategy (LOS) means that the car is still
driveable, albeit at reduced power and
efficiency, in the event of a failure in the
module or its sensors.
Due to the complexity and expense of the
test equipment dedicated to the engine
management system, suspected faults should
be investigated by a Ford dealer, or other
competent specialist. This Chapter deals with
component removal and refitting, and with
some simple checks and adjustments.
On DOHC carburettor engines, the basic
operating principles of the ignition system are
as described above. A development of the
ESC II (Electronic Spark Control ll) system is
used to control the operation of the engine.
The ESC II module receives information from a
crankshaft speed/position sensor and an
1General information and
precautions
5•2Engine electrical systems
Ignition coil
Make . . . . . . . . . . . . . . . . . . . . . . . . . . . . . . . . . . . . . . . . . . . . . . . . . . . .Bosch, Femsa or Polmot
Primary resistance . . . . . . . . . . . . . . . . . . . . . . . . . . . . . . . . . . . . . . . . .0.72 to 0.86 ohm
Secondary resistance:
All except DOHC fuel-injection . . . . . . . . . . . . . . . . . . . . . . . . . . . . . .4.5 to 7.0 k ohms
DOHC fuel-injection . . . . . . . . . . . . . . . . . . . . . . . . . . . . . . . . . . . . . .4.5 to 8.6 k ohms
Output voltage (open-circuit):
All except DOHC fuel-injection . . . . . . . . . . . . . . . . . . . . . . . . . . . . . .25 kV minimum
DOHC fuel-injection . . . . . . . . . . . . . . . . . . . . . . . . . . . . . . . . . . . . . .30 kV minimum
HT leads
Maximum resistance per lead . . . . . . . . . . . . . . . . . . . . . . . . . . . . . . . . .30 k ohms
Distributor
Make . . . . . . . . . . . . . . . . . . . . . . . . . . . . . . . . . . . . . . . . . . . . . . . . . . . .Bosch or Motorcraft
Rotation . . . . . . . . . . . . . . . . . . . . . . . . . . . . . . . . . . . . . . . . . . . . . . . . .Clockwise (viewed from above)
Automatic advance . . . . . . . . . . . . . . . . . . . . . . . . . . . . . . . . . . . . . . . . .Controlled by module
Dwell angle . . . . . . . . . . . . . . . . . . . . . . . . . . . . . . . . . . . . . . . . . . . . . . .Controlled by module
Ignition timing (see text)
SOHC and 2.8 litre V6 engines:
Leaded fuel (97 octane):
Carburettor models . . . . . . . . . . . . . . . . . . . . . . . . . . . . . . . . . . . . .10°BTDC
Fuel-injection models . . . . . . . . . . . . . . . . . . . . . . . . . . . . . . . . . . .12°BTDC
Unleaded fuel (95 octane):
Carburettor models . . . . . . . . . . . . . . . . . . . . . . . . . . . . . . . . . . . . .6°BTDC
Fuel-injection models:
2.0 litre . . . . . . . . . . . . . . . . . . . . . . . . . . . . . . . . . . . . . . . . . . . . .8°BTDC
2.8 litre . . . . . . . . . . . . . . . . . . . . . . . . . . . . . . . . . . . . . . . . . . . . .12°BTDC (no change)
2.4 & 2.9 litre V6 engines:
Models with catalytic converter . . . . . . . . . . . . . . . . . . . . . . . . . . . . .15°BTDC
Models without catalytic converter . . . . . . . . . . . . . . . . . . . . . . . . . . .12°BTDC*
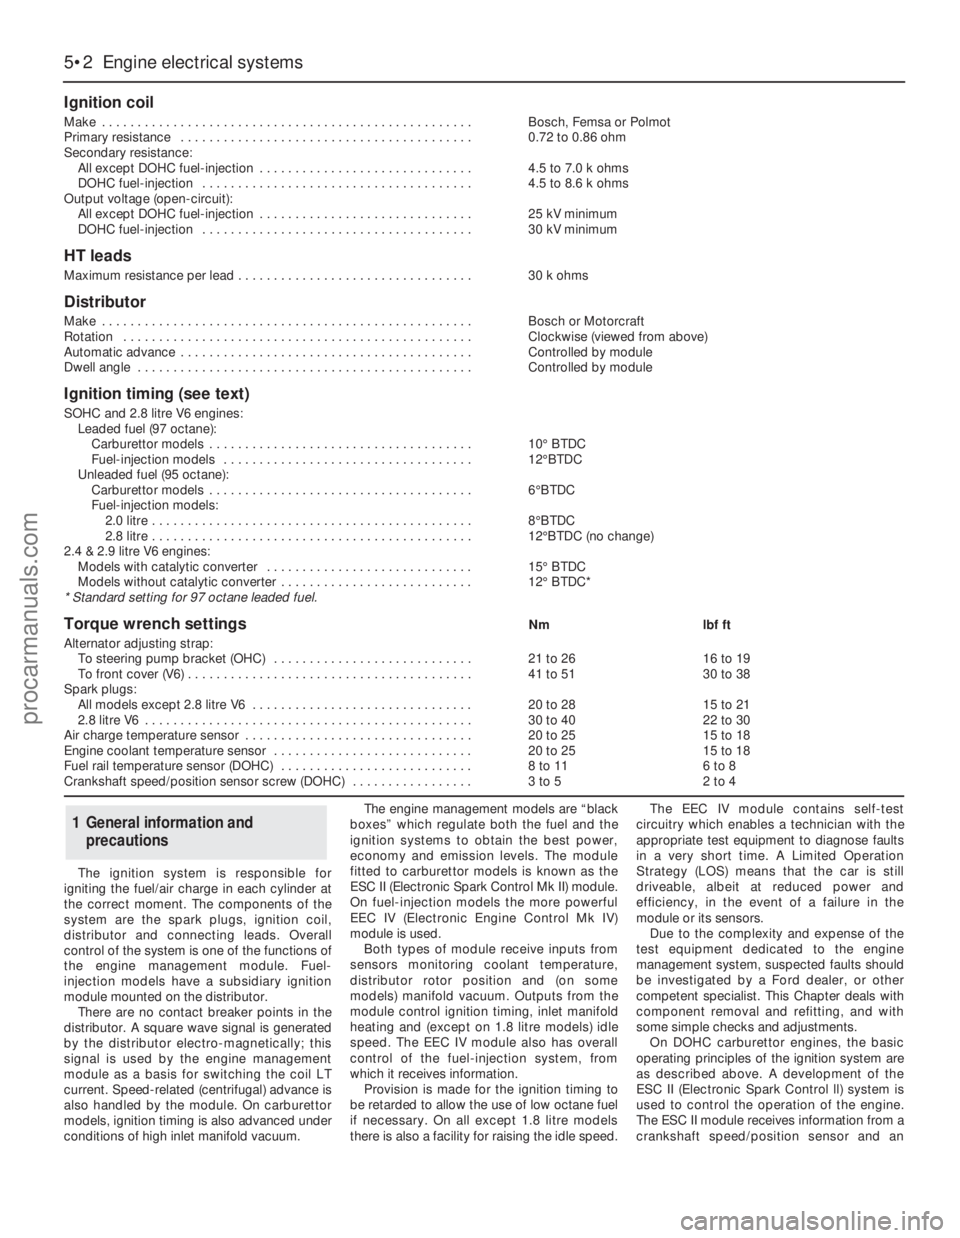
* Standard setting for 97 octane leaded fuel.
Torque wrench settingsNmlbf ft
Alternator adjusting strap:
To steering pump bracket (OHC) . . . . . . . . . . . . . . . . . . . . . . . . . . . .21 to 2616 to 19
To front cover (V6) . . . . . . . . . . . . . . . . . . . . . . . . . . . . . . . . . . . . . . . .41 to 5130 to 38
Spark plugs:
All models except 2.8 litre V6 . . . . . . . . . . . . . . . . . . . . . . . . . . . . . . .20 to 2815 to 21
2.8 litre V6 . . . . . . . . . . . . . . . . . . . . . . . . . . . . . . . . . . . . . . . . . . . . . .30 to 4022 to 30
Air charge temperature sensor . . . . . . . . . . . . . . . . . . . . . . . . . . . . . . . .20 to 2515 to 18
Engine coolant temperature sensor . . . . . . . . . . . . . . . . . . . . . . . . . . . .20 to 2515 to 18
Fuel rail temperature sensor (DOHC) . . . . . . . . . . . . . . . . . . . . . . . . . . .8 to 116 to 8
Crankshaft speed/position sensor screw (DOHC) . . . . . . . . . . . . . . . . .3 to 52 to 4
procarmanuals.com
Page 120 of 255
engine coolant temperature sensor. The
crankshaft speed/position sensor is activated
by a toothed disc on the rear of the crankshaft,
inside the cylinder block. The disc has 35
equally spaced teeth (one every 10°), with a
gap in the 36th position. The gap is used by
the sensor to determine the crankshaft
position relative to Top Dead Centre (TDC) of
No 1 piston.
The ignition advance is a function of the
ESC II module, and is controlled by vacuum.
The module is connected to the carburettor by
a vacuum pipe, and a transducer in the
module translates the vacuum signal into an
electrical voltage. From the vacuum signal, the
module determines engine load; engine speed
and temperature are determined from the
crankshaft speed/position sensor and the
engine coolant temperature sensor. The
module has a range of spark advance settings
stored in the memory, and a suitable setting is
selected for the relevant engine speed, load
and temperature. The degree of advance can
thus be constantly varied to suit the prevailing
engine speed and load conditions.
On DOHC fuel-injected engines, a
development of the EEC IV (Electronic Engine
Control IV) engine management system is
used to control both the ignition and fuel-
injection systems. The EEC IV module receives
information from a crankshaft speed/position
sensor (the same as that fitted to the
carburettor models), a throttle position sensor,
an engine coolant temperature sensor, a fuel
temperature sensor, an air charge temperature
sensor, a Manifold Absolute Pressure (MAP)
sensor, and a vehicle speed sensor (mounted
on the gearbox). Additionally, on models with
a catalytic converter, an additional input is
supplied to the EEC IV module from an
exhaust gas oxygen (HEGO) sensor. On
models with automatic transmission,
additional sensors are fitted to the
transmission to inform the EEC IV module
when the transmission is in neutral, and when
the downshift is being operated.
The module provides outputs to control the
fuel pump, fuel-injectors, idle speed, ignition
system and automatic transmission .
Additionally, on models with air conditioning,
the EEC IV module disengages the air
conditioning compressor clutch when starting
the engine or when the engine is suddenly
accelerated. On models fitted with a catalytic
converter, the EEC IV module also controls the
carbon canister purge solenoid valve.
Using the inputs from the various sensors,
the EEC IV module computes the optimum
ignition advance, and fuel-injector pulse
duration to suit the prevailing engine
conditions.
On 2.4 & 2.9 litre V6 engines, the system
operates in much the same way as that fitted
to the DOHC fuel-injected engine, noting the
following points.
a)There is no crankshaft speed/position
sensor.
b)The vehicle speed sensor is only fitted to
models equipped with a catalytic
converter.Precautions
ESC II module
Although it will tolerate all normal under-
bonnet conditions, the ESC II module may be
adversely affected by water entry during
steam cleaning or pressure washing of the
engine bay.
If cleaning the engine bay, therefore, take
care not to direct jets of water or steam at the
ESC II module. If this cannot be avoided,
remove the module completely, and protect its
multi-plug with a plastic bag.
Ignition system HT voltage
Take care to avoid receiving electric shocks
from the HT side of the ignition system. Do not
handle HT leads, or touch the distributor or
coil, when the engine is running. When tracing
faults in the HT system, use well insulated
tools to manipulate live leads. Electronic
ignition HT voltage could prove fatal.
Electronic ignition systems
General
Further details of the various systems are
given in the relevant Sections of this Chapter.
While some repair procedures are given, the
usual course of action is to renew the
component concerned. The owner whose
interest extends beyond mere component
renewal should obtain a copy of the
Automobile Electrical & Electronic Systems
Manual, available from the publishers of this
manual.
It is necessary to take extra care when
working on the electrical system, to avoid
damage to semi-conductor devices (diodes
and transistors), and to avoid the risk of
personal injury. In addition to the precautions
given in Safety first!at the beginning of this
manual, observe the following when working
on the system:
Always remove rings, watches, etc before
working on the electrical system.Even with the
battery disconnected, capacitive discharge
could occur if a component’s live terminal is
earthed through a metal object. This could
cause a shock or nasty burn.
Do not reverse the battery connections.
Components such as the alternator, electronic
control units, or any other components having
semi-conductor circuitry, could be irreparably
damaged.
If the engine is being started using jump
leads and a slave battery, connect thebatteries positive-to-positiveand negative-to-
negative(see “Jump starting”). This also
applies when connecting a battery charger.
Never disconnect the battery terminals, the
alternator, any electrical wiring, or any test
instruments, when the engine is running.
Do not allow the engine to turn the alternator
when the alternator is not connected.
Never test for alternator output by “flashing”
the output lead to earth.
Never use an ohmmeter of the type
incorporating a hand-cranked generator for
circuit or continuity testing.
Always ensure that the battery negative lead
is disconnected when working on the
electrical system.
Before using electric-arc welding equipment
on the car, disconnect the battery, alternator,
and components such as the fuel-
injection/ignition electronic control unit, to
protect them from the risk of damage.
Refer to Chapter 13
1In normal use the battery should not require
charging from an external source, unless the
vehicle is laid up for long periods, when it
should be recharged every six weeks or so. If
vehicle use consists entirely of short runs in
darkness it is also possible for the battery to
become discharged. Otherwise, a regular
need for recharging points to a fault in the
battery or elsewhere in the charging system.
2There is no need to disconnect the battery
from the vehicle wiring when using a battery
charger, but switch off the ignition and leave
the bonnet open.
3Domestic battery chargers (up to about 6
amps output) may safely be used overnight
without special precautions. Make sure that
the charger is set to deliver 12 volts before
connecting it. Connect the leads (red or
positive to the positive terminal, black or
negative to the negative terminal) before
switching the charger on at the mains.
4When charging is complete, switch off at
the mains beforedisconnecting the charger
from the battery. Remember that the battery
will be giving off hydrogen gas, which is
potentially explosive.
5Charging at a higher rate should only be
carried out under carefully controlled
conditions. Very rapid or “boost” charging
should be avoided if possible, as it is liable to
cause permanent damage to the battery
through overheating.
6During any sort of charging, battery
electrolyte temperature should never exceed
38°C (100°F). If the battery becomes hot, or
the electrolyte is effervescing vigorously,
charging should be stopped.
3Battery - charging
2Electrical fault-finding - general
information
Engine electrical systems 5•3
5
Warning. The voltages produced
by the electronic ignition system
are considerably higher than those
produced by conventional
systems. Extreme care must be taken when
working on the system with the ignition
switched on. Persons with surgically-
implanted cardiac pacemaker devices
should keep well clear of the ignition
circuits, components and test equipment.
procarmanuals.com
Page 129 of 255
1The sensor is located in the upper section of
the inlet manifold (DOHC fuel-injection
engines) or the side of the plenum chamber
(V6 engines).
2To remove the sensor, first disconnect the
battery negative lead.
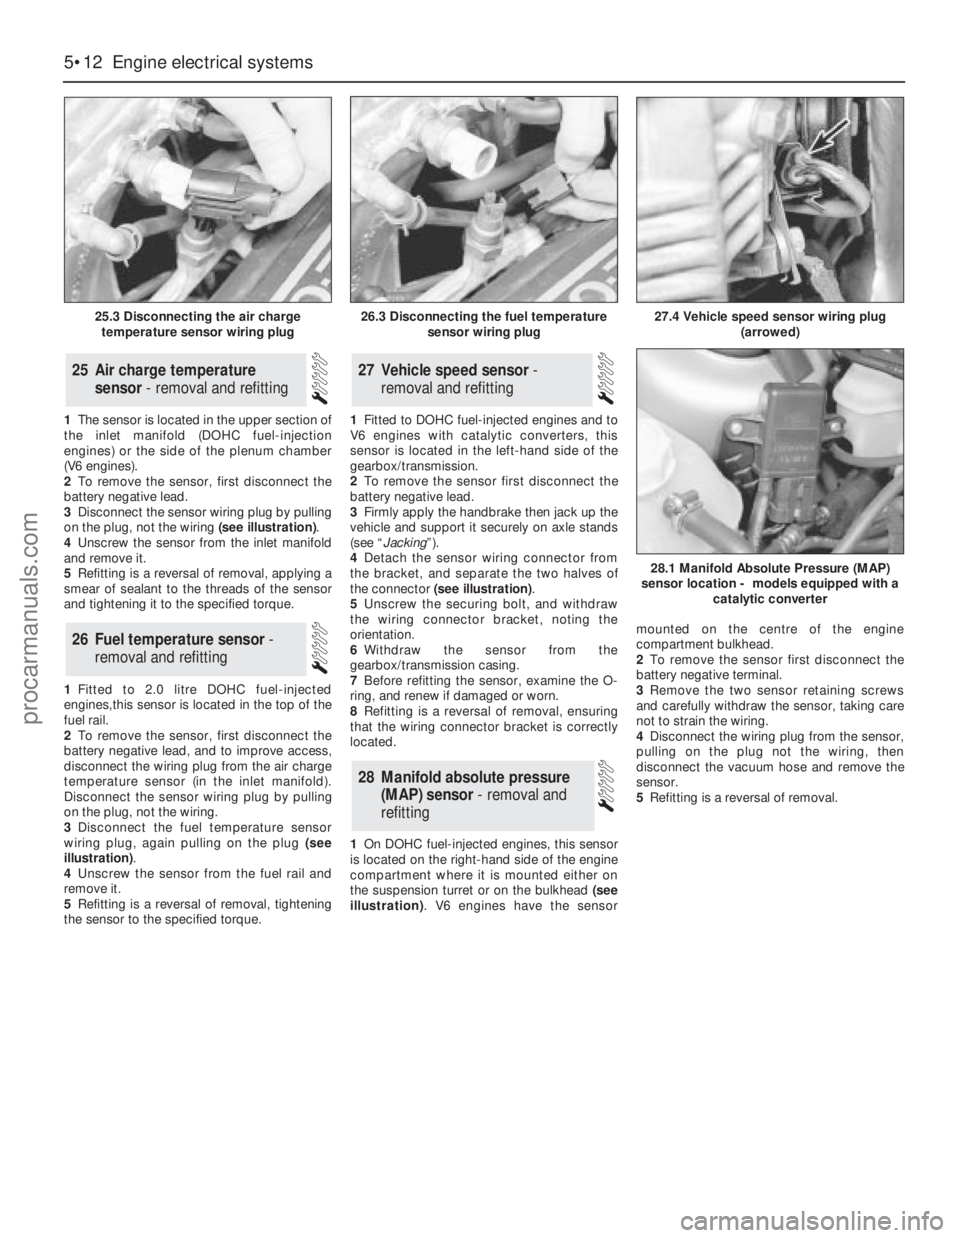
3Disconnect the sensor wiring plug by pulling
on the plug, not the wiring (see illustration).
4Unscrew the sensor from the inlet manifold
and remove it.
5Refitting is a reversal of removal, applying a
smear of sealant to the threads of the sensor
and tightening it to the specified torque.
1Fitted to 2.0 litre DOHC fuel-injected
engines,this sensor is located in the top of the
fuel rail.
2To remove the sensor, first disconnect the
battery negative lead, and to improve access,
disconnect the wiring plug from the air charge
temperature sensor (in the inlet manifold).
Disconnect the sensor wiring plug by pulling
on the plug, not the wiring.
3Disconnect the fuel temperature sensor
wiring plug, again pulling on the plug (see
illustration).
4Unscrew the sensor from the fuel rail and
remove it.
5Refitting is a reversal of removal, tightening
the sensor to the specified torque.1Fitted to DOHC fuel-injected engines and to
V6 engines with catalytic converters, this
sensor is located in the left-hand side of the
gearbox/transmission.
2To remove the sensor first disconnect the
battery negative lead.
3Firmly apply the handbrake then jack up the
vehicle and support it securely on axle stands
(see “Jacking”).
4Detach the sensor wiring connector from
the bracket, and separate the two halves of
the connector (see illustration).
5Unscrew the securing bolt, and withdraw
the wiring connector bracket, noting the
orientation.
6Withdraw the sensor from the
gearbox/transmission casing.
7Before refitting the sensor, examine the O-
ring, and renew if damaged or worn.
8Refitting is a reversal of removal, ensuring
that the wiring connector bracket is correctly
located.
1On DOHC fuel-injected engines, this sensor
is located on the right-hand side of the engine
compartment where it is mounted either on
the suspension turret or on the bulkhead (see
illustration). V6 engines have the sensormounted on the centre of the engine
compartment bulkhead.
2To remove the sensor first disconnect the
battery negative terminal.
3Remove the two sensor retaining screws
and carefully withdraw the sensor, taking care
not to strain the wiring.
4Disconnect the wiring plug from the sensor,
pulling on the plug not the wiring, then
disconnect the vacuum hose and remove the
sensor.
5Refitting is a reversal of removal.
28Manifold absolute pressure
(MAP) sensor - removal and
refitting
27Vehicle speed sensor -
removal and refitting
26Fuel temperature sensor -
removal and refitting
25Air charge temperature
sensor - removal and refitting
5•12Engine electrical systems
25.3 Disconnecting the air charge
temperature sensor wiring plug
28.1 Manifold Absolute Pressure (MAP)
sensor location - models equipped with a
catalytic converter
26.3 Disconnecting the fuel temperature
sensor wiring plug27.4 Vehicle speed sensor wiring plug
(arrowed)
procarmanuals.com
Page 248 of 255
REF•13Glossary of Technical Terms
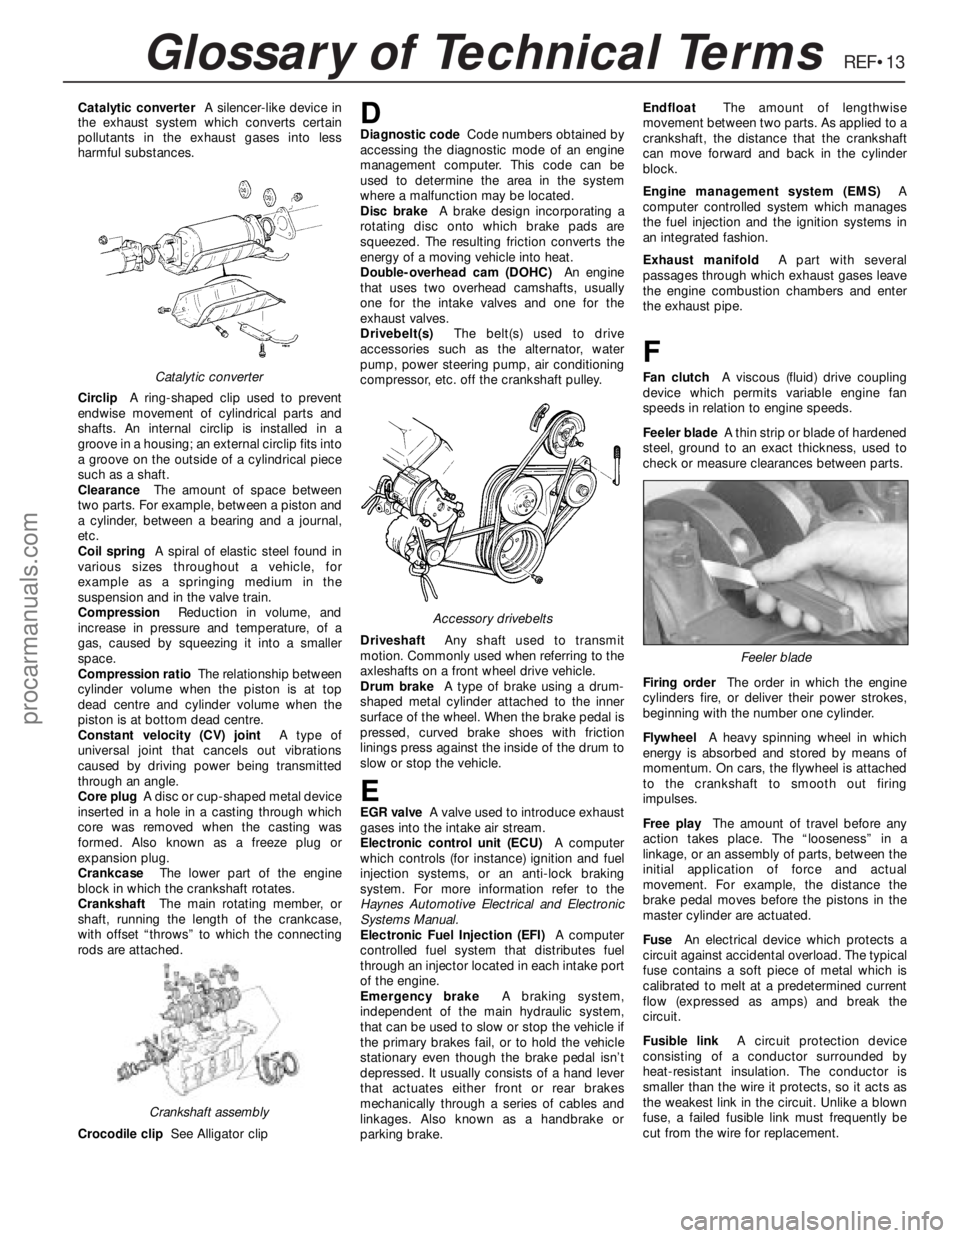
Catalytic converterA silencer-like device in
the exhaust system which converts certain
pollutants in the exhaust gases into less
harmful substances.
CirclipA ring-shaped clip used to prevent
endwise movement of cylindrical parts and
shafts. An internal circlip is installed in a
groove in a housing; an external circlip fits into
a groove on the outside of a cylindrical piece
such as a shaft.
ClearanceThe amount of space between
two parts. For example, between a piston and
a cylinder, between a bearing and a journal,
etc.
Coil springA spiral of elastic steel found in
various sizes throughout a vehicle, for
example as a springing medium in the
suspension and in the valve train.
CompressionReduction in volume, and
increase in pressure and temperature, of a
gas, caused by squeezing it into a smaller
space.
Compression ratioThe relationship between
cylinder volume when the piston is at top
dead centre and cylinder volume when the
piston is at bottom dead centre.
Constant velocity (CV) jointA type of
universal joint that cancels out vibrations
caused by driving power being transmitted
through an angle.
Core plugA disc or cup-shaped metal device
inserted in a hole in a casting through which
core was removed when the casting was
formed. Also known as a freeze plug or
expansion plug.
CrankcaseThe lower part of the engine
block in which the crankshaft rotates.
CrankshaftThe main rotating member, or
shaft, running the length of the crankcase,
with offset “throws” to which the connecting
rods are attached.
Crocodile clipSee Alligator clipDDiagnostic codeCode numbers obtained by
accessing the diagnostic mode of an engine
management computer. This code can be
used to determine the area in the system
where a malfunction may be located.
Disc brakeA brake design incorporating a
rotating disc onto which brake pads are
squeezed. The resulting friction converts the
energy of a moving vehicle into heat.
Double-overhead cam (DOHC)An engine
that uses two overhead camshafts, usually
one for the intake valves and one for the
exhaust valves.
Drivebelt(s)The belt(s) used to drive
accessories such as the alternator, water
pump, power steering pump, air conditioning
compressor, etc. off the crankshaft pulley.
DriveshaftAny shaft used to transmit
motion. Commonly used when referring to the
axleshafts on a front wheel drive vehicle.
Drum brakeA type of brake using a drum-
shaped metal cylinder attached to the inner
surface of the wheel. When the brake pedal is
pressed, curved brake shoes with friction
linings press against the inside of the drum to
slow or stop the vehicle.
EEGR valveA valve used to introduce exhaust
gases into the intake air stream.
Electronic control unit (ECU)A computer
which controls (for instance) ignition and fuel
injection systems, or an anti-lock braking
system. For more information refer to the
Haynes Automotive Electrical and Electronic
Systems Manual.
Electronic Fuel Injection (EFI)A computer
controlled fuel system that distributes fuel
through an injector located in each intake port
of the engine.
Emergency brakeA braking system,
independent of the main hydraulic system,
that can be used to slow or stop the vehicle if
the primary brakes fail, or to hold the vehicle
stationary even though the brake pedal isn’t
depressed. It usually consists of a hand lever
that actuates either front or rear brakes
mechanically through a series of cables and
linkages. Also known as a handbrake or
parking brake.EndfloatThe amount of lengthwise
movement between two parts. As applied to a
crankshaft, the distance that the crankshaft
can move forward and back in the cylinder
block.
Engine management system (EMS)A
computer controlled system which manages
the fuel injection and the ignition systems in
an integrated fashion.
Exhaust manifoldA part with several
passages through which exhaust gases leave
the engine combustion chambers and enter
the exhaust pipe.
F
Fan clutchA viscous (fluid) drive coupling
device which permits variable engine fan
speeds in relation to engine speeds.
Feeler bladeA thin strip or blade of hardened
steel, ground to an exact thickness, used to
check or measure clearances between parts.
Firing orderThe order in which the engine
cylinders fire, or deliver their power strokes,
beginning with the number one cylinder.
Flywheel A heavy spinning wheel in which
energy is absorbed and stored by means of
momentum. On cars, the flywheel is attached
to the crankshaft to smooth out firing
impulses.
Free playThe amount of travel before any
action takes place. The “looseness” in a
linkage, or an assembly of parts, between the
initial application of force and actual
movement. For example, the distance the
brake pedal moves before the pistons in the
master cylinder are actuated.
FuseAn electrical device which protects a
circuit against accidental overload. The typical
fuse contains a soft piece of metal which is
calibrated to melt at a predetermined current
flow (expressed as amps) and break the
circuit.
Fusible linkA circuit protection device
consisting of a conductor surrounded by
heat-resistant insulation. The conductor is
smaller than the wire it protects, so it acts as
the weakest link in the circuit. Unlike a blown
fuse, a failed fusible link must frequently be
cut from the wire for replacement.Catalytic converter
Crankshaft assembly
Accessory drivebelts
Feeler blade
procarmanuals.com
Page 252 of 255
A
ABS module - 10•11
Accelerator pump diaphragm renewal - 4•12
Accessory shops - 0•8
Acknowledgements - 0•4
Aerial pre-amplifier - 13•22
Air bags - 0•5
Air charge temperature sensor - 5•12
Air cleaner - 1•16, 4•4
Air conditioner - 1•14, 1•15, 3•2, 3•9
Air temperature sensor - 13•18
Alarm signal buzzer - 13•23
Alarm system horn - 13•23
Alternator - 3•7, 5•4
Anti-roll bar - 11•9, 11•12
Anti-theft alarm - 13•22, 13•23
Antifreeze mixture - 3•2
Asbestos - 0•5
Ashtray light - 13•8
Automatic choke - 1•16, 4•10, 4•12
Automatic transmission- 1•11, 1•15, 2B•6,
2B•7, 7B•1et seq, REF•8
Automatic transmission brake band
adjustment - 1•19
Automatic transmission selector light - 13•9
Auxiliary drivebelt - 1•12
Auxiliary driving light - 13•4, 13•6
Auxiliary shaft - 2A•9, 2A•14, 2A•16
Auxiliary warning system components - 13•18
B
Backrests - 12•19, 12•18
Battery - 0•5, 1•8, 1•13, 5•3, 5•4
Battery will not hold a charge for more than
a few days - REF•11
Bleeding the brakes - 10•3
Bleeding the power steering - 11•3
Body corrosion - 0•14
Body damage - 12•2, 12•4
Body electrical system- 13•1et seq
Bodywork and fittings- 12•1et seq
Bodywork repairs - 12•3
Bonnet - 12•4, 12•9
Bonnet release cable - 12•6
Booster battery (jump) starting - 0•10
Boot lid - 12•5
Boot lid lock barrel - 12•7
Brake band adjustment - 1•19, 7B•3
Brake fluid - 1•7, 1•19
Brake hydraulic system - 10•3
Brake pedal effort high to stop vehicle - REF•9
Brake pedal feels spongy when depressed
- REF•9
Brake pedal pulsates when braking hard -
REF•10
Brake pedal travel excessive - REF•9
Brake pipe and hoses - 1•15, 10•10
Brakes binding - REF•10
Braking system- 0•13, 10•1et seq, REF•9
Bulb failure module - 13•19
Bulbs - 13•4, 13•7
Bumper - 12•10, 12•11
Burning - 0•5
C
Cables - 3•8, 4•7, 6•3, 7B•3, 10•11
Caliper - 10•5, 10•6
Camshaft - 2A•7, 2A•14, 2A•17, 2B•14,
2C•12, 2C•13, 2C•15
Camshaft drivebelt - 1•20
Capacities - 1•3
Carbon canister - 4•23
Carburettor stepper motor - 5•10
Catalytic converter - 4•4
Central locking motor - 13•13
Central locking system inoperative, or
unsatisfactory in operation - REF•11
Centre console - 12•15
Cigarette lighter - 13•10
Clock - 13•9, 13•10
Clutch- 6•1et seq, REF•8
Clutch fails to disengage (unable to select
gears) - REF•8
Clutch pedal travels to floor - REF•8
Clutch release bearing and arm - 6•4
Clutch slips (engine speed increases, with
no increase in vehicle speed) - REF•8
CO emissions (mixture) - 0•14
Compliance bushes - 11•9
Compression test - 2A•20, 2B•18, 2C•21
Compressor drivebelt - 3•9
Computer module and bulb - 13•18
Condenser fan and motor - 3•10
Connecting rods - 2A•11, 2A•13, 2A•15,
2B•17, 2C•12, 2C•14, 2C•16
Console light - 13•9
Contents - 0•2
Control assembly - 13•19
Control module - 10•13
Control switches - 13•19
Control units - 13•13
Conversion factors - REF•16
Coolant - 1•6, 1•20
Coolant hoses - 2C•7
Coolant leakage - REF•7
Coolant level switch - 13•18
Coolant temperature sensor - 5•10
Cooling, heating and ventilation systems-
3•1 et seq, REF•7
Corrosion - REF•7
Courtesy light - 13•7
Crankcase ventilation system - 1•19,
2A•12, 2B•3, 2C•15
Crankshaft and bearings - 2A•11, 2A•12,
2A•15, 2B•17, 2B•18, 2C•12, 2C•14,
2C•15
Crankshaft oil seals - 2A•10, 2B•15, 2C•12
Crankshaft speed/position sensor - 5•11
Crossmember insulator - 11•12
Crushing - 0•5
Cushion - 12•18
Cylinder block and bores - 2A•13
Cylinder bores - 2C•14
Cylinder head - 2A•6, 2A•8, 2A•14, 2A•17,
2B•10, 2B•11, 2B•14, 2C•8, 2C•13,
2C•19
D
De-ice thermostat - 3•10
Decarbonising - 2A•14
Dents in bodywork - 12•2
Direction indicator - 13•5, 13•11
Discs - 10•3, 10•4, 10•8
Distributor - 5•5
Door exterior handle - 12•6
Door interior trim panel - 12•7
Door latch assembly - 12•6
Door lights - 13•7
Door lock barrel - 12•6
Door pillar switch - 13•12
Door speakers - 13•21
Door striker plate - 12•6
Door switch - 13•18
Door weatherstrip - 12•7
Door window - 12•8, 12•9
Doors - 0•12, 12•4, 12•7, 12•8, 12•9, 12•10
Downshift mechanism - 7B•3
Drivebelts - 1•12, 1•20, 3•7, 3•9, 11•6
Driveshaft - 1•15, 9•3
Drivetrain - 1•16
E
Earth fault - 13•4
EEC IV module - 5•9
Electric shock - 0•5
Electric windows inoperative, or
unsatisfactory in operation - REF•11
Electrical system - 0•12, 1•8, REF•10
Electronic ignition systems - 5•3
Engine- 2A•1 et seq, 2B•1 et seq, 2C•1 et
seq, REF•6
Engine backfires - REF•7
Engine bay light - 13•8
Engine difficult to start - REF•6
Engine dismantling - 2B•8
Engine electrical systems- 5•1et seq
Engine fails to rotate when attempting to
start - REF•6
Engine hesitates on acceleration - REF•7
Engine idles erratically - REF•6
Engine lacks power - REF•7
Engine management control module - 5•9
Engine management system relays - 5•11
Engine misfires - REF•6, REF•7
Engine mountings - 2A•11, 2B•8, 2C•12
Engine oil and filter - 1•6, 1•9
Engine rotates, but will not start - REF•6
Engine runs-on after switching off - REF•7
Engine stalls - REF•7
Engine starts, but stops immediately -
REF•6
Engine will not start in any gear, or starts in
gears other than Park or Neutral -
REF•9
Entertainment console - 13•22
Environmental considerations - REF•4
ESC II module - 5•3, 5•9
Exhaust emission checks - 0•14
Exhaust gas oxygen (HEGO) sensor - 4•22
Exhaust manifold(s) - 4•21
Exhaust system - 0•13, 1•10, 4•22
Expansion tank - 3•7
IND•1Index
Note: References throughout this index are in the form - “Chapter number” • “page number”
procarmanuals.com