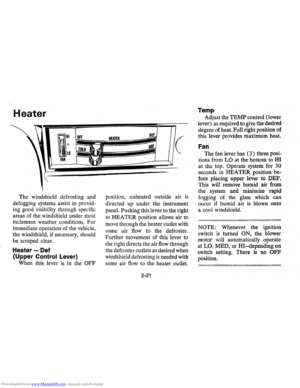
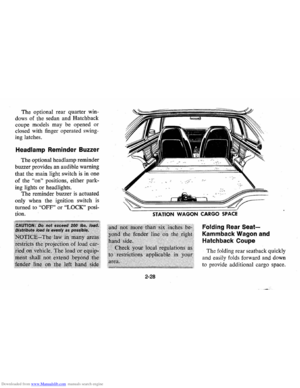
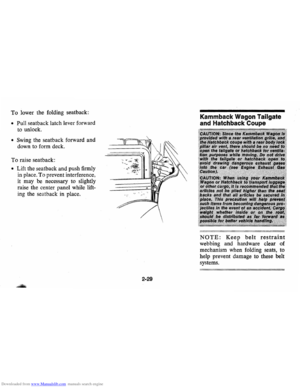
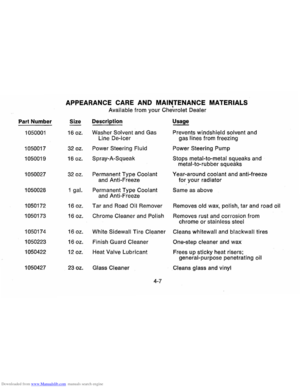
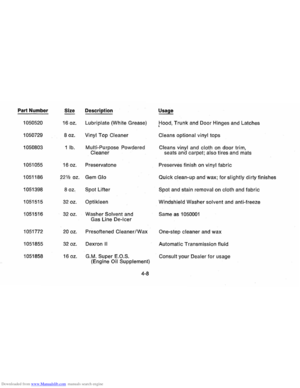
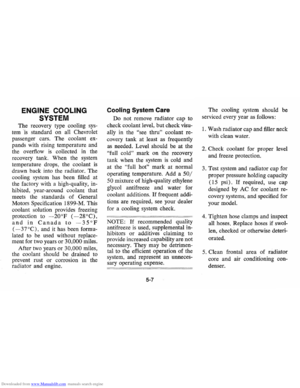
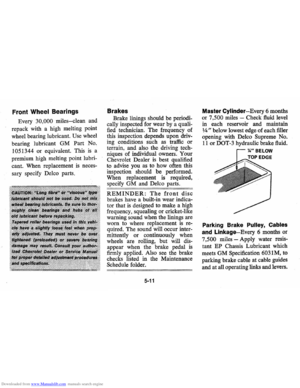
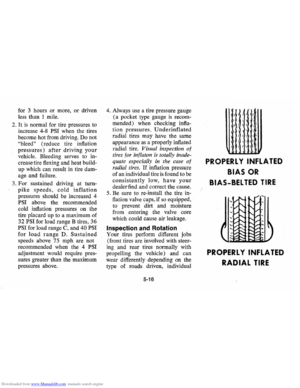
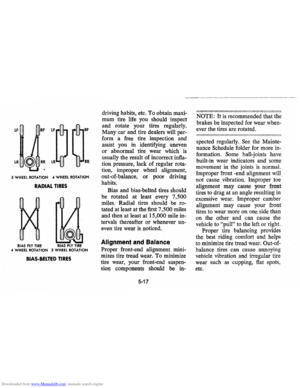
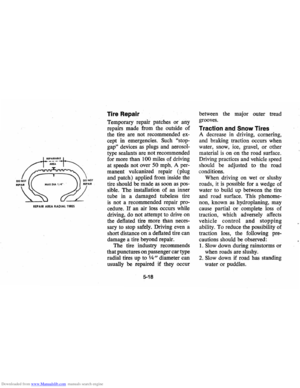
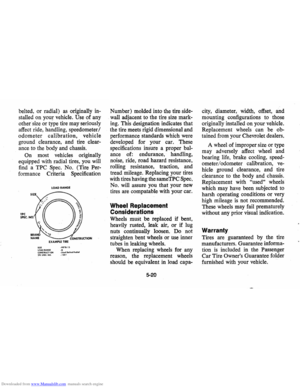
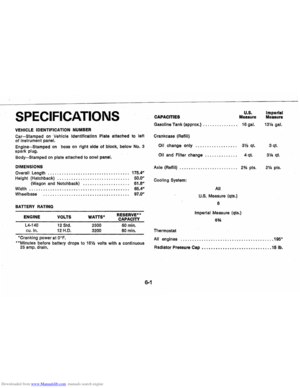
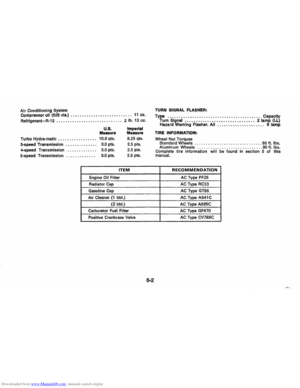
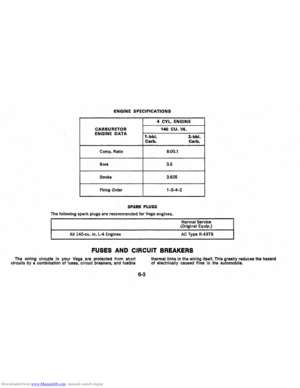
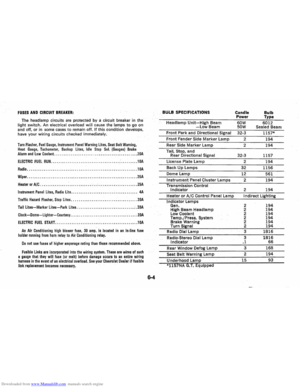
Page 17 of 87

AvoId Inhaling exhaust gases because
they contaIn carbon monoxide,")
Downloaded from www.Manualslib.com manuals search engine STARTING AND OPERATING
Engine Exhaust Gas Caution (Carbon Monoxide)
AvoId Inhaling exhaust gases because
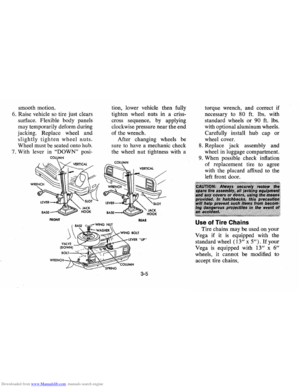
they contaIn carbon monoxide, which by
Itselt is colorless and odorless. Carbon
monoxide Is a dangerous gas that can
cause unconsciousness and is potentially
lethal.
If at any time you suspect that exhaust
fumes are entering the passenger compartment, have the cause determined and
corrected as soon as possible. If you must
drIve under these conditions, drive only
with
all windows fully open.
The best protection agaInst carbon
monoxide entry Into the car body Is a
properly maIntaIned engine exhaust system, car body and body ventilatIon system, It Is recommended that the exhaust system
and body be Inspected by a competent
mechanIc.
• Each time the vehIcle Is raised for an 011 change.
• Whenever 8 change Is noticed In the
sound Of the exhaust system.
• Whenever the exhaust system, underbody or rear of the vehicle Is damaged.
See your MaIntenance Schedule folder
for inspection procedure.
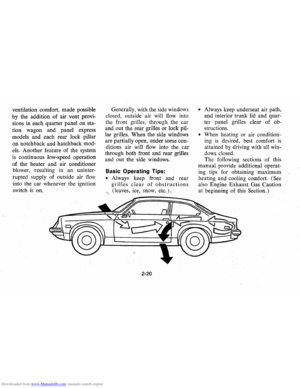
To allow proper operation of the car's
ventilation system, keep aIr Inlet grille
forward of windshield and rear ventilation
grille on station wagon quarter. panels
clear ot snow or other
obstruction at all times, and prevent cargo from blocking
the inside vent holes on the underside of the quarter panels.
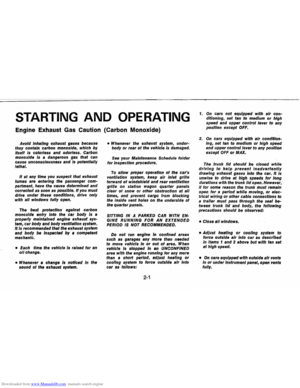
SITTING IN A PARKED CAR WITH ENGINE RUNNING FOR AN EXTENDED PERIOD IS NOT RECOMMENDED.
Do not run engine In confined areas
such as garages any more than needed
to move vehIcle In
or out of area. When vehIcle Is stopped In an UNCONFINED area with the engine runnIng for any more
than a short perIod, adjust heating or cooling system to force outsIde aIr into
car as follows:
2-1
1. On cars not equipped with air conditioning, set fan to medium or high
speed and upper control lever to any
position except OFF.
2. On cars equipped with air conditIoning, set fan to medium or high speed
and upper control lever to any position
except
OFF or MAX.
The trunk lid should be closed while drIving to help prevent inadvertently drawing exhaust gases into the car. It is
unwise to drIve at high speeds for long
durations with the trunk lid open. However, it tor some reason the trunk must remain
open for a period while moving, or electrical wiring or other cable connections to
a trailer must pass through the seal be
tween trunk
lid and body, the following
precautions should be observed:
• Close all windows.
• Adjust heating or cooling system to
force outsIde air into car as described In Items 1 and 2 above but with fan set
at hIgh speed.
• On cars equIpped with outside aIr vents In or under Instrument panel, open vents
fully.
Page 18 of 87

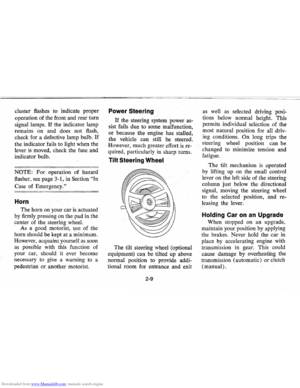
Downloaded from www.Manualslib.com manuals search engine STEERING COLUMN CONTROLS
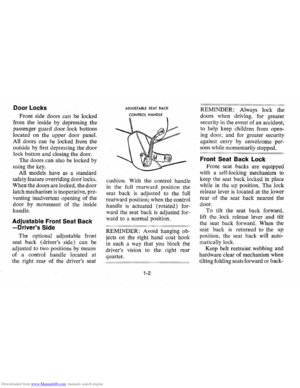
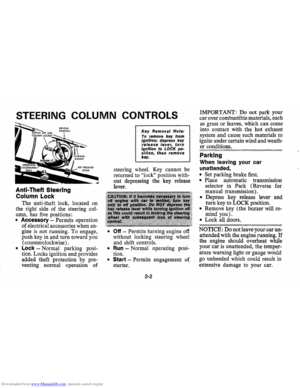
Anti-Theft Steering
Column Lock
The anti-theft lock, located on
the right side of the steering col
umn, has five positions:
• Accessory -Permits operation
of electrical accessories when
en
gine is not running. To engage,
push
key in and turn toward you
( counterclockwise) .
• Lock -Normal parking posi
tion. Locks ignition and provides
added theft protection
by pre
venting normal operation of
Key Removal Note:
To remove key from ignitionjdepress key release lever, . turn Ignition to LOCK position, then remove key.
steering wheel. Key cannot be
returned to
"lock" position with
out depressing the key release
lever.
• Off -Permits turning engine off
without locking steering wheel
and shift controls.
• Run -Normal operating posi
tion.
• Start -Permits engagement of. :
starter.
2-2
IMPORTANT: Donot park your
car over combustible materials, such
as grass or leaves, which can come
into contact with the hot exhaust
system and cause such materials to
ignite under certain wind and
weath
er conditions.
. Parking
When leaving your car
unattended,
• Set parking brake first.
• Place automatic transmission
selector in
Park (Reverse for
manual transmission).
• Depress key release lever and
turn key to
LOCK position.
• Remove key (the buzzer will re
mind you).
• Lock all doors.
NOTICE: Do not leave your car un
attended with the engine running. If
the engine should overheat while
your
caris unattended, the temper
ature warning light or gauge would
go unheeded which could result in
extensive damage to your car.
Page 19 of 87
.")
Downloaded from www.Manualslib.com manuals search engine Starting Engine
Automatic Transmission
Models
1. Apply the parking brake.
2. Place transmission selector
in uP" or "N" ("P" preferred).
A starter safety switch prevents
starter operation while the trans
mission selector
is in any drive
position.
(If it is necessary to·
re-start the engine with the car
moving, place the selector lever
in
"N".)
3. Depress accelerator pedal and
activate starter
as outlined be
low for different conditions.
IMPORTANT: Do not keep the starter
engaged for more than 15 seconds
at a time. Wait 1 0 or 15 seconds
before trying agair.
• Cold Engine -Fully depress
accelerator pedal and slowly
release.
Wilh fOOl 00 the pedal,
crank
the engine by
turning the ignition key to the
Start position -release when
engine starts.
If engine starts, but fails to
run, repeat this procedure.
When engine is running
smoothly (approximately
30
seconds), the idle speed may
be reduced by slightly de
pressing the accelerator pedal
and then slowly releasing.
• Warm Engine -Depress ac
celerator
pedal about halfway
and hold while cranking the
engine.
• Extremely Cold Weather
(Below 00 F. -180 C.) Or
After Car Has Been Standing
Idle Several Days-
2-3
Fully depress and release ac
celerator pedal two
or three
times before cranking the
engine.
With foot 00 the ac
celerator pedal,
crank the en
gine by turning the key to the
Start position and release
when engine starts.
Manual Transmission Models
1. Apply parking brake, fully de
press
clutch pedal, and shift
transmission to neutral.
2. Hold clutch pedal to the floor
throughout
the starting proce
dure, A starter safety switch pre
vents starter operation when the
clutch
is not fully depressed.
(Select the proper gear posi
tion before releasing the clutch
pedal).
3. Operate accelerator pedal and
starter
as outlined in step 3
(under Automatic Transmission
Models).
Page 20 of 87

Downloaded from www.Manualslib.com manuals search engine Engine Flooded
Depress accelerator pedal and
hold to floor while starting until en
gine
is cleared of excess fuel and is
running smoothly. Never "pump"
the accelerator pedal.
Warm-Up
Always let the engine idle for 20
to 30 seconds after starting and
drive at moderate speeds for sev
eral miles, especially during cold
weather.
Driving with the Chevrolet Automatic Transmissions
The Turbo Hydra-Matic is a
completely automatic transmission
that replaces the standard clutch
and transmission.
After starting the engine with the
floor selector lever in N (Neutral)
or
P (Park) position select the
range desired (see table) and de
press the accelerator.
A gradual start with a steady in
crease in accelerator pressure will
result in best possible fuel economy.
Rapid acceleration for fast starts
will result in greater fuel consump
tion.
Automatic transmission shift
quadrants of all GM cars continue
the uniform sequence of selector
positions. This particularly benefits
multicar families and those who oc
casionally drive other cars.
Shift in
dicators are arranged with
"Park"
position at one end, followed in se
quence by
"Reverse", "Neutral"
and the forward driving ranges.
All automatic transmissions are
equipped with a starter safety switch
designed to permit starting the en
gine only when the transmission
is
in the "Park" or "Neutral" position.
For additional engine braking ef-
2-4
fect, as sometimes needed in moun
tainous driving, place the transmis
. sion in low range.
Page 21 of 87

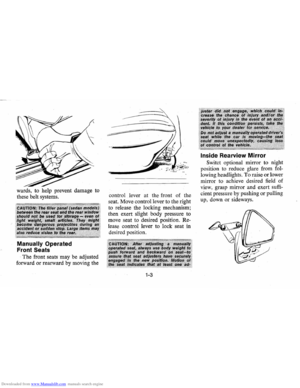
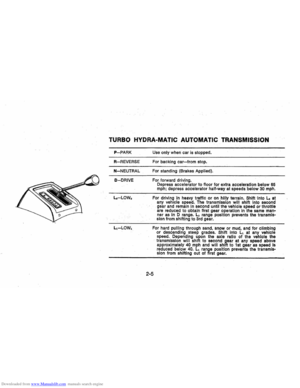
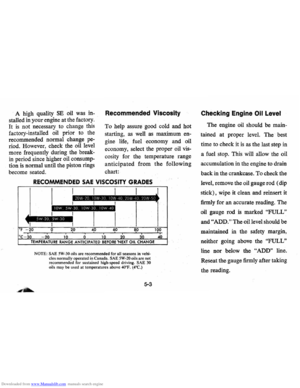
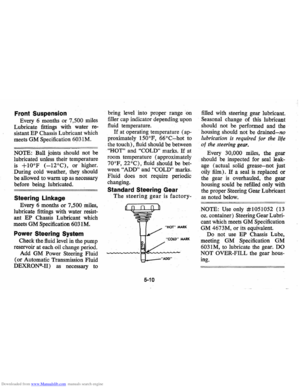
Downloaded from www.Manualslib.com manuals search engine TURBO HYDRA~MATIC AUTOMATIC TRANSMISSION
P-PARK
R-REVERSE
N-NEUTRAL
O-DRIVE
L.-LOW.
Use only when car is stopped.
For backing
car-from stop.
For standing (Brakes
Applied).
For forward driving.
Depress accelerator to floor for extra acceleration below 65 mph; depress accelerator half-way at speeds below 30 mph.
For driving in heavy traffic or on hilly terrain. Shift Into L. at any vehicle speed. The transmission will shift into second
gear and remain In second until the vehicle speed or throttle
are reduced to obtain first gear operation In the same manner as in D range. L2 range position prevents the transmission from shifting to 3rd gear.
For hard pulling through sand, snow or mud, and for climbing or descending steep grades. Shift into Ll at any vehicle
speed. Depending upon the axle ratio of the vehicle the
transmission will shift to second gear at
any speed above
approximately 40 mph and will shift to 1st gear as speed Is reduced below 40. Ll range position prevents the transmission from shifting out of first gear.
2-5
Page 22 of 87
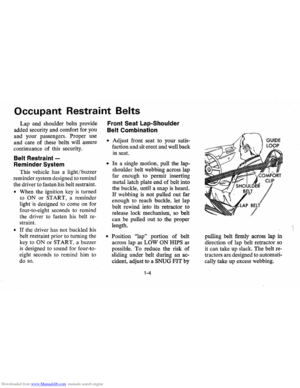
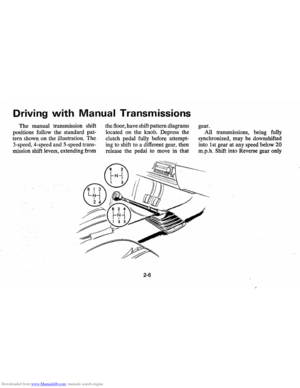
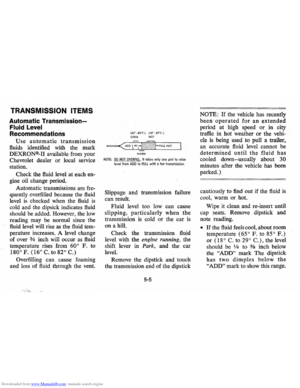
Downloaded from www.Manualslib.com manuals search engine Driving with Manual Transmissions
The manual transmission shift
positions follow the standard pat
tern
shown on the illustration. Th~
3-speed, 4-speed and 5-speed trans~
mission shift levers, extending from the
floor, have shift pattern diagrams
located on the
knob. Depress the
clutch pedal fully before attempt
ing to shift to a different gear, then
release the pedal
to move in that
2-6
gear.
All
tranSIll1SSlons, being fully
synchronized, may be downshifted
into 1 st gear at any speed below
20
m.p.h. Shift into Reverse gear only
Page 23 of 87

Downloaded from www.Manualslib.com manuals search engine after the car has stopped. Always
depress and release the clutch pedal
fully when shifting.
On the 4-speed transmission lift
up on the release handle (below
the shift knob) momentarily when
shifting into reverse.
Good Driving Practice
The lower gears of the transmis
sion are used to normally accelerate
the vehicle to the desired cruising
(Cruising speed
is defined as a rela- tively
constant speed operation that
includes steady speed operation
as
well as moderate variations in speed
consistant with road and traffic con
ditions.) speed and the highest gear
of the transmission is used to
maintain the desired speed. The 5th
gear (overdrive) of a 5-speed man
ual transmission
is recommended
for use in maintaining extended
highway cruising speeds. Use of 5th
gear in city traffic
is not recom
mended.
If the vehicle speed is re-duced
below
20 MPH, or if the en
gine
is obviously lugging, the trans
mission should be downshifted from
high gear to the next lowest gear.
Downshifting two or more gear
positions may be necessary to pre
vent lugging the engine or to pro
vide a satisfactory performance
leveL As the first (1 st) gear of the
transmission
is fully synchronized,
the transmission should be down
shifted to first gear whenever the
vehicle stops or the vehicle speed
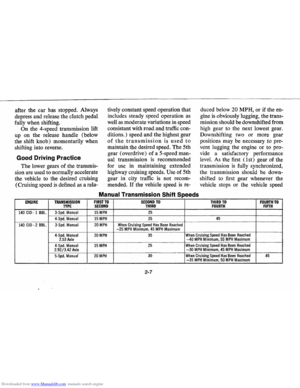
Manual Transmission Shift Speeds
ENGINE TRANSMISSION FIRST TO SECOND TO THIRD TO FOURTH TO TYPE SECOND THIRD FOURTH FIFTH
140 CID . 1 BBL. 3·Spd. Manual 15 MPH 25
4·Spd. Manua! 15 MPH 25 45
140 CID • 2 BBL. 3·Spd. Manual 20 MPH When Cruising Speed Has Been Reached -25 MPH Minimum, 45 MPH Maximum
4·Spd. Manual 20 MPH 35 When Cruising Speed Has Been Reached 2.53 Axle -40 MPH Minimum, 55 MPH Maximum
4·Spd. Manual 15 MPH 25 When Cruising Speed Has Been Reached 2.92/3.42 Axle -30 MPH Minimum, 45 MPH Maximum
5·Spd. Manual 20 MPH 30 When Cruising Speed Has Been Reached 45 -35 MPH Minimum, 50 MPH Maximum
2-7
Page 24 of 87

Downloaded from www.Manualslib.com manuals search engine is reduced below 5 MPH.
The shift speeds chart indicates
the speeds at which each upshift of
the transmission should be
per
formed to produce the best com
promise between vehicle perform
anceand fuel economy.
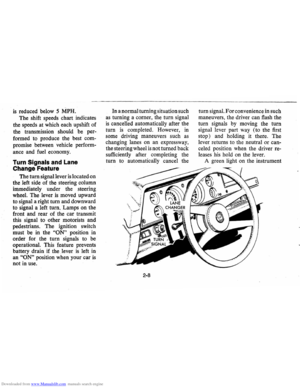
Turn Signals and Lane
Change Feature
The tum signal lever is located on
the left side of the steering column
iIllmediately under the steering
wheel. The lever
is moved upward
to signal a right turn and downward
to signal a left tum. Lamps on the
front and rear of the car transmit
this signal to other motorists and
pedestrians. The ignition switch
must be in the
"ON" position in
order for the tum signals to be
operational. This feature prevents
battery drain if the lever
is left in
an
"ON" position when your car is
not in use. In
a normal turning situation such
as turning a comer, the tum signal
is cancelled automatically after the
tum
is completed. However, in
some driving maneuvers such
as
changing lanes on an expressway,
the steering wheel
is not turned back
sufficiently after completing the
tum to automatically cancel the
2-8
tum signal. For convenience in such
maneuvers, the driver can flash the
tum signals
by moving the tum
signal lever part way (to the first
stop) and holding it there . The
lever returns
tq the neutral or can
celed position when the driver re
leases his hold on the lever.
A green light on the instrument