Page 25 of 87

Downloaded from www.Manualslib.com manuals search engine cluster flashes to indicate proper
operation of the front and rear turn
signal lamps.
If the indicator lamp
remains on and does not flash,
check for a defective lamp bulb.
If
the indicator fails to light when the
lever
is moved, check the fuse and
indicator bulb.
NOTE: For operation of hazard
flasher, see page 3-1, in
Section "In
Case of Emergency."
Horn
The horn on your car is actuated
by firmly pressing on the pad in the
center of the steering wheel.
As a good motorist,
~se of the
horn should be kept at a minimum.
However, acquaint yourself
as soon
as possible with this function of
your car, should it ever become
necessary to give a warning to a
pedestrian
or another motorist.
Power Steering
If the steering system power as
sist fails due to some malfunction,
or because the engine has stalled,
the vehicle can still be steered.
However, much greater effort
is re
quired, particularly in sharp turns.
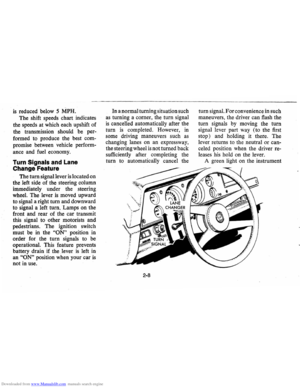
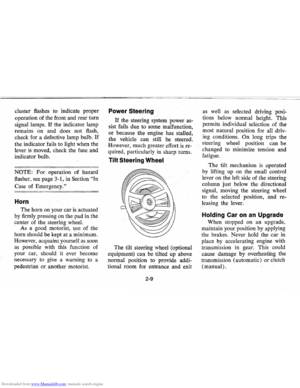
Tilt Steering Wheel
The tilt steering wheel (optional
equipment) can be tilted up above
normal position to provide addi
tional room for entrance and exit
2-9
as well as selected driving· posi
tions below normal height. This
permits individual selection of the
most natural position for
all driv
ing conditions.
On long trips the
steering wheel position can be
changed to minimize tension and
fatigue.
The tilt mechanism
is operated
by lifting up on the small control
lever on the left side of the steering
column just below the directional
signal, moving the steering wheel
to the selected position, and re
leasing the lever.
Holding Car on an Upgrade
When stopped on an upgrade,
maintain your position by applying
the brakes. Never hold the car
in
place by accelerating engine with
transmission in gear. This could
cause damage by overheating
the
. transmission (automatic) or clutch
(manual) .
Page 26 of 87

Downloaded from www.Manualslib.com manuals search engine Parking Your Car
Always engage the parking brake
and place the automatic transmis
sion selector lever in
"Park" posi- tion
when leaving your
car un
attended. Also with automatic
transmissions, never park for pro
longed periods with engine idling
and transmission in gear, especially
FLOOR CONTROLS
Braking System
The service brake system is de
signed for braking performance
under a wide range of driving con
ditions even when the vehicle
is
loaded to its full rated vehicle load.
NOTE: Operation of the brake
system warning light
is covered on
page 2-15 in the section on
"In
strument Panel."
Power Brakes
• On cars with power brakes, if
power assist to the brakes
is in
terrupted due to a stalled engine
or some malfunction, two or
more brake applications nor
mally can be made using reserve
power.
• If the brake pedal is held down,
2-10
if your car is equipped with air
conditioning. This practice
is detri
mental to the transmission, due
to
overheating.
the system
is designed to bring
the car to a full stop on reserve
power. However, the reserve
power
is partially depleted each
time the brake pedal
is applied
and released. Do not pump
brakes when brake power assist
has been interrupted, except
when necessary in order to main
tain steering control on slippery
surfaces.
• When reserve power is exhausted,
the vehicle can still be stopped
by applying greater force to the
pedal.
Page 27 of 87

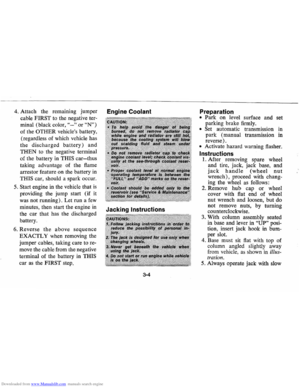
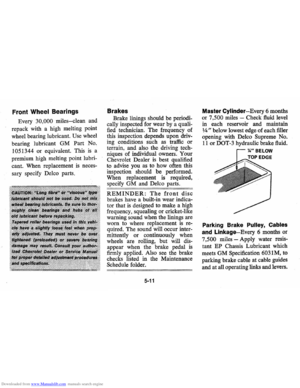
Downloaded from www.Manualslib.com manuals search engine Parking Brake
• To set parking brake, pull up
the handle located between the
seats.
• For maximum holding power,
depress regular brake pedal at
the same time.
• To release parking brake, de
press the button in the handle
tip and push the handle down.
• As a reminder, the brake system warning
light
is designed to come
on whenever the parking brake
control
is not fully released, and
the ignition ·
is on.
• Never drive car with parking
brake set
as this may overheat
or otherwise damage rear brakes.
NOTE: "Riding the brake" by
resting your foot on the brake pedal
when not intending to brake can
cause abnormally high brake tem
peratures, excessive lining wear and
possible damage to the brakes.
REMINDER:
Front disc brakes
have a built-in wear indicator that
is designed to make a high fre
quency, squealing,
or cricket-like
warning sound when the linings are
2-11
worn where replacement is required.
The sound will occur intermittently
or continuously when wheels are
rolling, but will disappear when the
brake pedal
is applied firmly. See
also the various brake checks listed
in the Chevrolet maintenance sched
ule folder.
Clutch Adjustment
Clutch adjustment should be
checked and adjusted periodically
as necessary to compensate for
clutch facing wear.
To check,
depress pedal by hand until resist
ance
is felt. Free travel of pedal
should be approximately one inch;
if very little
or no free travel is
evident , clutch adjustment is re
quired.
Page 28 of 87
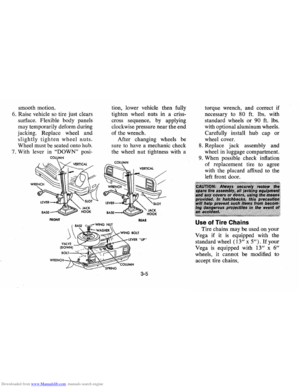
Downloaded from www.Manualslib.com manuals search engine Self-Adjusting Brakes
• Brakes on this car (except for the
parking brake) are self-adjusting,
designed · to eliminate periodic
brake adjustments.
• Drum brake adjustment is made
automatically
as the brakes are
applied while car
is moving back
wards.
• Disc brake adjustment is made
automatically with each brake
application.
• If excess brake pedal travel devel
ops, drive alternately backward
and
forwb-d several times and apply
brakes firmly in eadh
direc
tion.
• See your dealer if normal pedal
travel
is not restored, or if there
is a rapid increase in pedal travel,
which could be a sign of other
brake trouble.
See your dealer
also if adjustment if the parking
brake
is required.
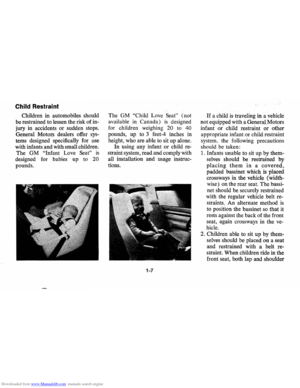
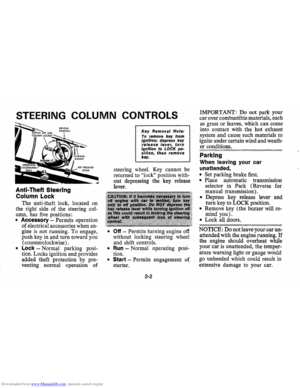
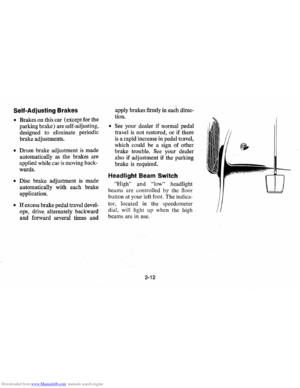
Headlight Beam Switch
"High" and "low" headlight
beams are controlled
by the floor
button at your left foot. The
indica
tor, located in the speedometer
dial , will light up when the high
beams are
in use.
2-12
Page 29 of 87
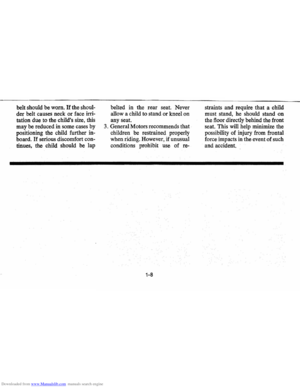
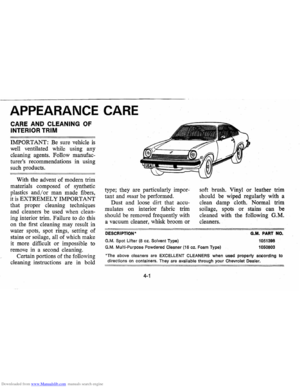
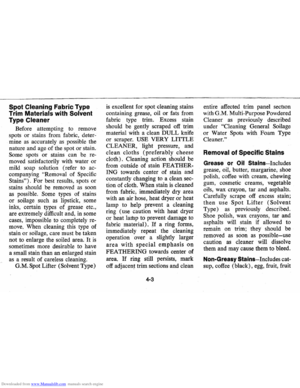
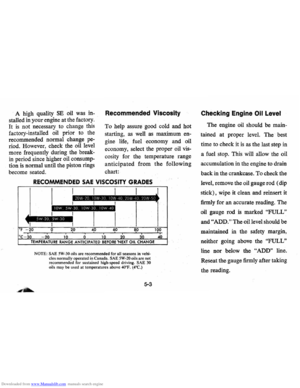
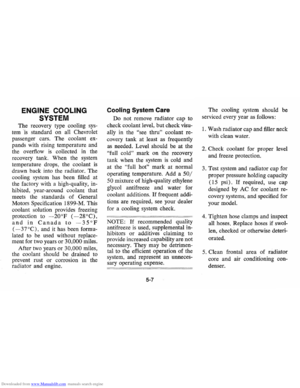
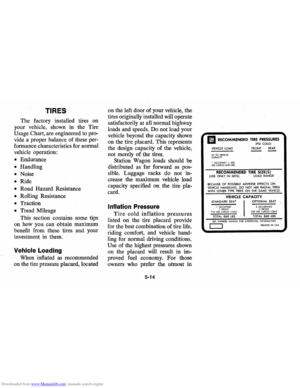
Downloaded from www.Manualslib.com manuals search engine INSTRUMENTS AND CONTROLS
1. Fuel Gauge 2. Warning Lights 3. Speedometer . 4. Hi Beam Indicator 5. Odometer 6. Clock
o STANDARD
o OPTIONAL
7. Glove Box 8. Windshield Wiper-Washer Control 9. Light Switch . 10. Optional Electro Clear Rear
Window Defogger Switch
11. Hazard Warning Control Button
2-13
12. Ignition Switch 13. Heater or Optional Air Conditioner Control 14. Ash Tray 15. Cigarette Lighter-16. Radio and Controls
Page 30 of 87

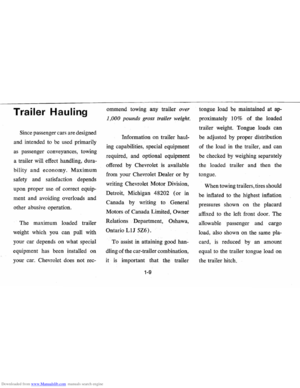
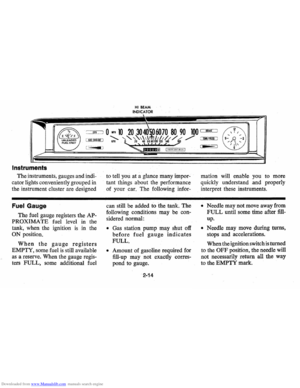
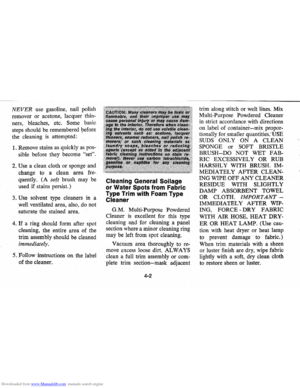
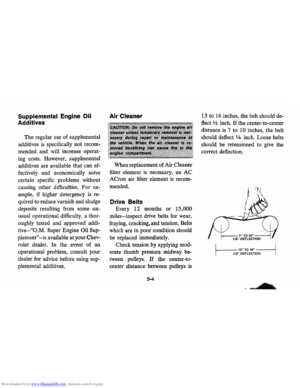
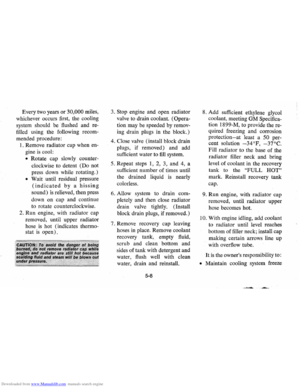
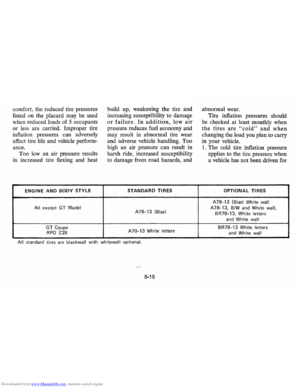
Downloaded from www.Manualslib.com manuals search engine HI BEAM INDICATOR
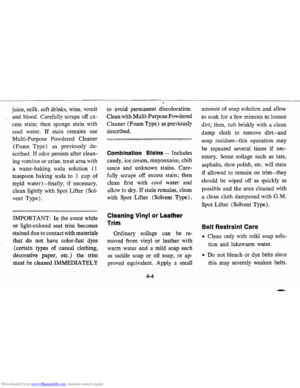
=.Q(LJ 0 .PH 10 20 30 40 iO 60 70 80 90 100 c:=M!LJ
'ADD coiillT' ..............,," ,,'\. 11// / / ./ ././'" .ruf/~ L! !.!LL"'!l!!LJ lP1I 0 20 40 6080100 120 140 160
Instruments
The instruments, gauges and indi
cator lights conveniently grouped
in
the instrument cluster are designed
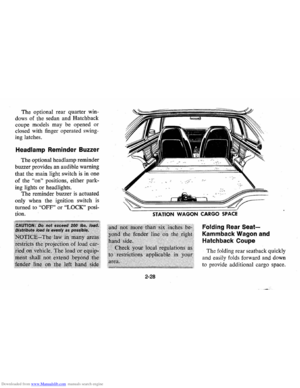
Fuel Gauge
The fuel gauge registers the AP
PROXIMATE fuel level
in the
tank, when the ignition
is ill the
ON position.
When the gauge registers
EMPTY, some fuel is still available
as a reserve. When the gauge regis
ters FULL, some additional fuel
I •••••••• nol I fASTE~ Sf A! BEtTS ·1
to tell you at a glance many impor
tant things about the performance
of your
car. The following infor-
can still
be added to the tank. The
following conditions may
be con
sidered normal:
• Gas station pump may shut off
before fuel gauge indicates
FULL.
• Amount of gasoline required for
fill-up may not exactly
corres
pond to gauge.
2-14
mation will enable you to more
quickly understand and properly
interpret these instruments.
• Needle may not move away from
FULL until some time after fill
up.
• Needle may move during turns,
stops and accelerations.
When the ignition switch
is turned
to the
OFF position, the needle will
not necessarily return all the way
to the EMPTY mark.
Page 31 of 87

Downloaded from www.Manualslib.com manuals search engine Generator Indicator Light
The red light will go on when
the ignition key
is in the "on" posi
tion, but before the engine
is started.
After the engine starts, the light
should go out and remain out.
If
the light remains on when engine
is running, have your Authorized
Chevrolet Dealer locate and correct
the trouble
as soon as possible.
Temp. Pressure Indicator
Light
This indicator light is provided
in the instrument cluster to quickly
warn of an overheated engine
and/or extreme low oil pressure
or oil supply. This light will be on
when the ignition switch is turned
"ON" and should go out after the
engine
is started. Occasionally the
light may be seen to flicker momen
tarily, but this will do no harm. Ex
treme low oil pressure or oil supply
will prevent the electric fuel pump from
operating and under this con
dition the engine will not run.
If the light comes on during ex
treme driving conditions, such
as an
extended idle, turn off the air con
ditioner (if used) and run the en
gine slightly faster than idle speed
with the transmission in
neutral
gear. If the light does not go off
within a short period of time (1-2
minutes), then turn the engine off
until the cause of
the overheating is
corrected. Glance at the instrument
cluster frequently
as you drive to
see if this light is on.
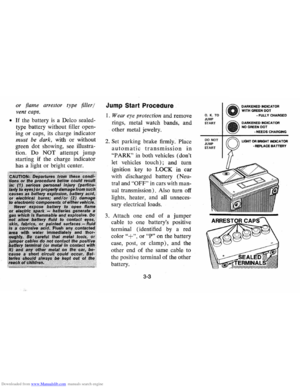
Add Coolant Indicator Light
This indicator light is provided to
warn of a low coolant condition in
the radiator.
If coolant level is low
the yellow
"Add Coolant" warning
light will glow. Coolant level in the
coolant recovery tank, and radiator,
should be checked at the first oppor
tunity.
If necessary add sufficient
2-15
coolant to both the radiator and
coolant recovery tank.
(See Service
and Maintenance, Section 5, for
proper procedure) .
If frequent
additions are required, see your
dealer for a complete cooling sys
tem check.
Brake System Warning
Light
The service brake system is a dual
system designed so that one part will
provide some braking action in the
event of loss of hydraulic pressure
in the other part of the system.
If the
warning light labeled
"Brake" lo
cated in the speedometer face comes
on and stays
on when the ignition is
on and after the brakes have been
firmly applied
it may indicate that
there
is a malfunction in one part of
the brake system.
• As a reminder, the light is de
signed to come
on with the park
ing brake applied and the igni
tion on.
Page 32 of 87

Downloaded from www.Manualslib.com manuals search engine • The light is also designed to come
on during engine starting to
verify that the bulb
is operating
properly.
• Have system repaired if light does
not come
on during check.
• This warning light is not a substi
tute for the visual check of brake
fluid level required
as part of
normal maintenance.
If the light comes on:
• The parking brake control is not
fully released, or,
• The service brake system is par
tially inoperative.
What to do:
1. Check that parking brake is re
leased.
If it is . . .
2.
Pull off the road and stop, care
fully-remembering that:
• Stopping distances may be
greater.
• Greater pedal effort may be re
quired.
• Pedal travel may be greater. 3.
Try out brake operation by start
ing and s,topping on road shoul
der-then:
• If you judge such operation to
be safe, proceed cautiously at
a safe speed to nearest dealer
for repair.
• Or have car towed to dealer for
repair.
Continued operation of the car in this
condition
is dangerous.
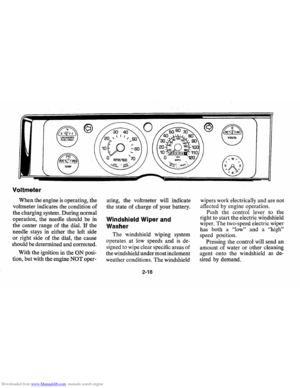
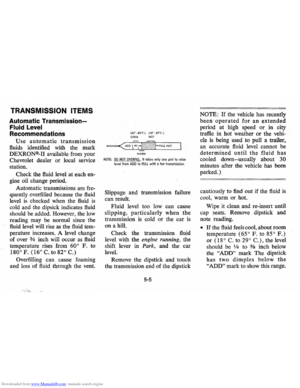
Headlight Beam Indicator
Light
The headlights of your car have
high and
low beams to provide you
with proper night-time visibility
for most driving conditions. The
"low" beams are used during most
city driving. The
"high" beams are
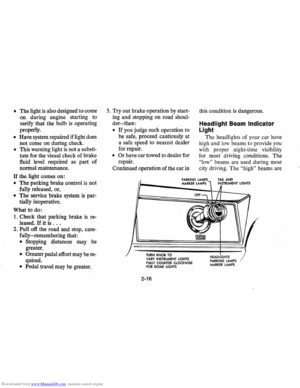
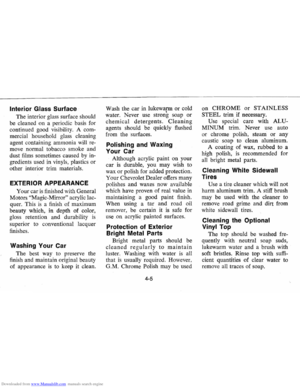
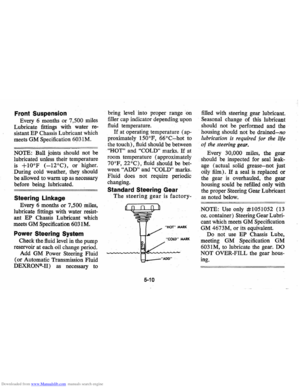
PARKING LAMPS MARKER LAMPS TAIL AND INSTRUMENT LIGHTS
TURN KNOB TO VARY INSTRUMENT LIGHTS FULLY COUNTER CLOCKWISE FOR DOME LIGHTS
2-16
HEADLIGHTS PARKING LAMPS MARKER LAMPS


 are self-adjusting,
designed · to eliminate periodic
brak")
