Page 49 of 376
'Jeep'
UNIVERSAL SERIES
SERVICE
MANUAL
D
FIG.
D-ll—CHECKING PISTON
AND
CONNECTING
ROD
ALIGNMENT 1—
Feeler
Gauge
2—
Fixture
the
opposite
side from the oil spray
hole
in the
bearing
end of the connecting rod. See Fig. D-10.
Install
the piston pin lock screw and torque 35 to
41 lb-ft. [4,8 a 5,7 kg-m.].
d.
Place piston and rod assembly in a connecting
rod
aligning fixture and check alignment of the
assembly as shown in
Fig. D-ll.
Follow instructions
furnished
with the fixture.
e. Using a feeler
gauge
and new piston rings, check the width of the two compression ring
grooves
and
the oil ring groove. Replace the piston if the widths of the
grooves
are not with the limits given in
the specifications.
Insert
feeler
gauge
between
ring and piston to back
of groove. Replace piston if ring
grooves
are not
within
allowable tolerances. If a feeler
gauge
larger
FIG.
D-l 2—CHECKING PISTON RING
SIDE
CLEARANCE
1—
Feeler
Gauge
2—
Piston
Ring
FIG.
D-13—PISTON
RING
GAP
than
.006" [0,152 mm.] can be inserted
J^6"
[1,6
mm.]
between
piston and upper compression
ring,
groove
is worn excessively bell-mouthed and
piston should be replaced.
f.
Check
piston ring end gap by placing compres sion ring in cylinder bore below ring travel using head of an inverted piston as a plunger to push
ring
in squarely. End gap must be as shown in
Par.
D-37 for all rings. If less, file ends to obtain
minimum
gap.
With
cylinders bored to an exact
ring
oversize of
+.020", +.030",
or
+.040"
[0,508-
0,762-1,016
mm.] the proper end clearance as given in Par. D-37
will
result. If end
gaps
are
not within the limits given in Par.
D-3
7, rings are
of the wrong size or were incorrectly filed for fitting.
g.
Install
a new ring set using either production replacement rings or service type oil control rings.
Production
type replacement piston rings are the
same as the original factory-installed rings while
service oil control ring
sets
have different com
ponents, notably the oil ring expander. Follow
instructions of
manufacturer
for proper installation.
Use
a piston ring expander to install rings on pistons. Do not expand rings more than necessary
to install, also be careful not to
burr
the piston
with
ends of rings.
Install
bottom
(oil) ring first, center ring second, and top ring last.
The
width of the compression rings is [2,38
mm.] and that of the oil control ring is f^" [4,78
mm.].
While the compression rings are of the same
size, they are different in construction and must
not be interchanged.
Install
these
rings as shown
in
Fig. D-14. The upper compression ring has an
inside beveled
edge
which must be installed toward
the piston top. The face of the lower compression
ring
is tapered approximately .001" [0,025 mm.].
The
letters T or TOP on the upper
edge
indicate
how the ring is to be installed. 49
Page 50 of 376

D
HURRICANE
F4
ENGINE
10444
FIG.
D-14—PISTON
RING INSTALLATION D-37.
Piston Ring Application Chart
Cylinder
Bora
Ovtrsiie
Correct
Ring
Size
Ring
Gap
Fitting
End
Gap
Std.
te .009'
[•0,228
mm.]
Std.
None
.007' to
.045'
[0,1778 a
1.1430
mm.]
.010*
to .019'
[0,254
a
0,4826
mm.)
-.020'
File
fit .007'
to
.017'
[0,1778 a 0,4318 mm.]
.020'
to
.024'
[0,508 a
0,6096
mm.] -.020'
None
.007' to .029*
[0,1778 a
0,7366
mm.]
.025'
to
.029'
[0,635 a
0,7366
mm.] -.030'
File
fit
.007'
to .017*
.030' to .034*
[0,762 a
0,8636
mm.] -.030'
None
.007'to
.029'
.038'to
.039'
[0,8890
a
0,9908
mm.] -.040*
File
fit
.007'
to .017'
.040' [1,016 mm.]
-.040*
None
.007'
to .017'
D-38.
Crankshaft
The
crankshaft is machined from a heat-treated
carbon
steel forging and is carefully balanced both
dynamically
and statically. The crankshaft is
supported by three replaceable main bearings. The
front main bearing is flanged to take the end
thrust
of the crankshaft. A flanged section on the
rear
of the crankshaft acts as an oil slinger. While the crankshaft is out of the engine, handle it care
fully
to prevent damage to the connecting rod
crankpins
and the main bearing journals. Refer
to
Fig.
D-l5.
D-39.
Crankshaft Inspection
and
Repair
Clean
out the drilled oil passages in the crankshaft
journals
with a small rifle brush making sure to get rid of all sludge or gum deposits. Blow out the passages with compressed air after cleaning.
Clean
the crankshaft thoroughly with a suitable
cleaning solvent. Inspect the crankshaft for
cracks,
alignment, and condition of the crankpins and the
main
bearing journals. Use magnafuix equipment,
if
available, to check for cracks or structural flaws.
Cracks,
misalignment, and scored or worn journals
and
crankpins necessitate crankshaft repair or replacement.
Check
crankshaft counterweights to be sure they
are
not
loose.
D-40.
Checking Crankshaft Alignment
To
check alignment, mount the crankshaft in the
cylinder
block with the front and
rear
bearings in
place but with the intermediate bearing removed.
With
a dial indicator mounted on the crankcase
and
the indicator button resting on the intermediate bearing
journal,
slowly rotate the
crank
shaft and
note
the reading on the indicator
dial.
Install
the intermediate bearing and remove first
the front and then the
rear
bearings to repeat the operation with the dial indicator, checking the
front and
rear
bearing journals. The maximum allowable run-out is .002"
[0,0508
mm.].
D-41.
Checking Main Bearing Journals
An
ordinary 3" [7,62 cm.] micrometer may be used.
The
standard
journal
diameter is
2.334"
to 2.333" 50
Page 51 of 376
![JEEP DJ 1953 Service Manual
-Jeep*
UNIVERSAL
SERIES SERVICE
MANUAL
E>
[5,928 a
5,926
cm.] for all main bearings. Allowable
taper or out-of-round of the journals is .001"
[0,0254
mm.].
D-42.
Checking Connecting Ro JEEP DJ 1953 Service Manual
-Jeep*
UNIVERSAL
SERIES SERVICE
MANUAL
E>
[5,928 a
5,926
cm.] for all main bearings. Allowable
taper or out-of-round of the journals is .001"
[0,0254
mm.].
D-42.
Checking Connecting Ro](/manual-img/16/57041/w960_57041-50.png)
-Jeep*
UNIVERSAL
SERIES SERVICE
MANUAL
E>
[5,928 a
5,926
cm.] for all main bearings. Allowable
taper or out-of-round of the journals is .001"
[0,0254
mm.].
D-42.
Checking Connecting Rod
Crankpins
Check
the crankpin diameters with a micrometer
to ensure that they are not out-of-round or tapered more than .001"
[0,0254
mm.] The standard
crank-
pin
diameter is
1.9383*
to
1.9375"
[4,9233
a
4,9213
cm.].
D-43.
Crankshaft
Main
Bearings
The
crankshaft rotates on three main bearings
with
a running clearance of .0003" to .0029"
[0,0076
a
0,0736
mm.].
These
bearings are positioned and prevented from
rotating in their supports in the cylinder block by
dowel pins. Dowel pins are used in both the center
and
the
rear
bearing caps. No dowel pins are used
in
the front bearing cap because the bearing has
a
flange. The front main bearing takes the end
thrust
of the crankshaft. The main bearings are of premium type which provides long bearing life.
They
are replaceable and when correctly installed, provide proper clearance without filing, boring,
scraping,
or shimming. Crankshaft bearings can
be removed from this
engine
only with the
engine
out of the vehicle. Crankshaft bearings must be replaced as a complete set of three bearings, each
bearing consisting of two halves.
Main
bearings
are
available in the standard size and the following
undersizes:
.001" [0,025mm.] .012" [0,305 mm.] .002" [0,051mm.] .020" [0,508 mm.] .010" [0,254mm.] .030" [0,762 mm.]
The
.001" and .002" undersize main bearings are
for use with standard size crankshafts having
slightly worn
journals.
The .010", .020", and .030" undersize bearings are for use with undersize
crankshafts
in
those
sizes. The .012" undersize
bearings are for use with .010" undersize
crank
shafts having slightly worn journals. Bearing sizes
are
rubber stamped on the reverse side of each
bearing half.
D-44. Crankshaft
Main
Bearing Inspection
The
crankshaft
journals
must be carefully inspected
as detailed previously in Par. D-41. Worn journals
will
require undersize bearings. Scored, flaked, or
worn
bearings must be replaced. Measure the main
bearing bores in the cylinder block using a
telescope
gauge
and micrometer. Measure the bores at right
angles to the split line and at 45° to the split line.
The
bores should not be over .001"
[0,0254
mm.]
out-of-round or .001" in taper from end to end.
Also,
the bores should not be more then .001"
oversize, considering the average diameter of the
bore.
D-45.
Fitting Crankshaft
Main
Bearings
Using
Plastigage
After
wiping and carefully inspecting the bearing bore, install the proper bearing. See that the oil
hole
in the bearing upper half registers properly
with
the oil
hole
in the block, and that the bearing
lock fits properly in the notch in the block.
Install
the crankshaft if replacing bearings with the
engine
out of the vehicle. The desired running fit (dif
ference
between
the diameter of the crankshaft
journal
and the inside diameter of the fitted bear ing) for a main bearing is .0003" to .0029"
[0,0076
a
0,0736
mm.]. With a dimension in
excess
of this
standard
running fit, a satisfactory bearing replacement cannot be made and it
will
be necessary to
regrind
the crankshaft.
Install
the bearing lower
half
and the bearing cap and draw the nuts down
equally and only slightly tight. Rotate the
crank
shaft by hand to be sure it turns freely without
drag.
Pull
the nuts tighter, first one then the other,
a
little at a time, intermittently rotating the
crank
shaft by hand until the recommended torque of
35 to 45 lb-ft. [4,8 a 6,2 kg-m.] is reached. If the
bearings are of the correct size, and lubricated with
light oil before installation, the crankshaft should
turn
freely in the bearings. If the crankshaft cannot
be turned, a larger bearing is
required.
If there is no binding or tightness, it is still necessary to check
clearance to guard against too
loose
a fit. Never file
either the bearing cap or the bearing to compensate
for too much clearance. Do not use shims under a
bearing cap or behind a bearing shell. Do not run a
new bearing half with a worn bearing half. The use
of "Plastigage" of the proper size to measure .001" [0,025 mm.] clearance is recommended for check
ing crankshaft main bearing clearance. The method
of checking clearance is as follows:
a.
Remove the bearing cap and carefully wipe
all
oil from the bearing and the
journal.
b.
Lay a piece of "Plastigage" y%" [3 mm.]
shorter than the width of the bearing across the
journal
(lengthwise of the crankshaft).
c.
Install
the bearing and cap and tighten first
one nut, then the other, a little at a time to the specified torque. As the bearing
tightens
down
around
the
journal,
the "Plastigage" flattens to a
width that indicates the bearing clearance.
d.
Remove the cap and measure the width of
the flattened "Plastigage," using the scale printed
on the
edge
of the envelope. The proper size "Plasti
gage"
will
accurately measure clearance down to .001".
e. If the flattened "Plastigage" tapers toward the middle, or toward the end, or both ends, there
is a difference in clearance, indicating a taper, a
low
spot,
or other irregularity of the bearing or
journal.
D-46.
Fitting Crankshaft
Main
Bearings
Using
Shim Stock
Thin
feeler or shim stock may be used instead of "Plastigage" to check bearing clearances. The
method is simple, but care must be taken to protect
the bearing metal surface from
injury
by too much pressure against the feeler stock,
a.
Cut a piece of .001" [0,025 mm.] thick, by Yl [12,7 mm.] wide, feeler stock }4" [3 mm.]
shorter than the width of the bearing. Coat this 51
Page 52 of 376

D
HURRICANE
F4
ENGINE
10442
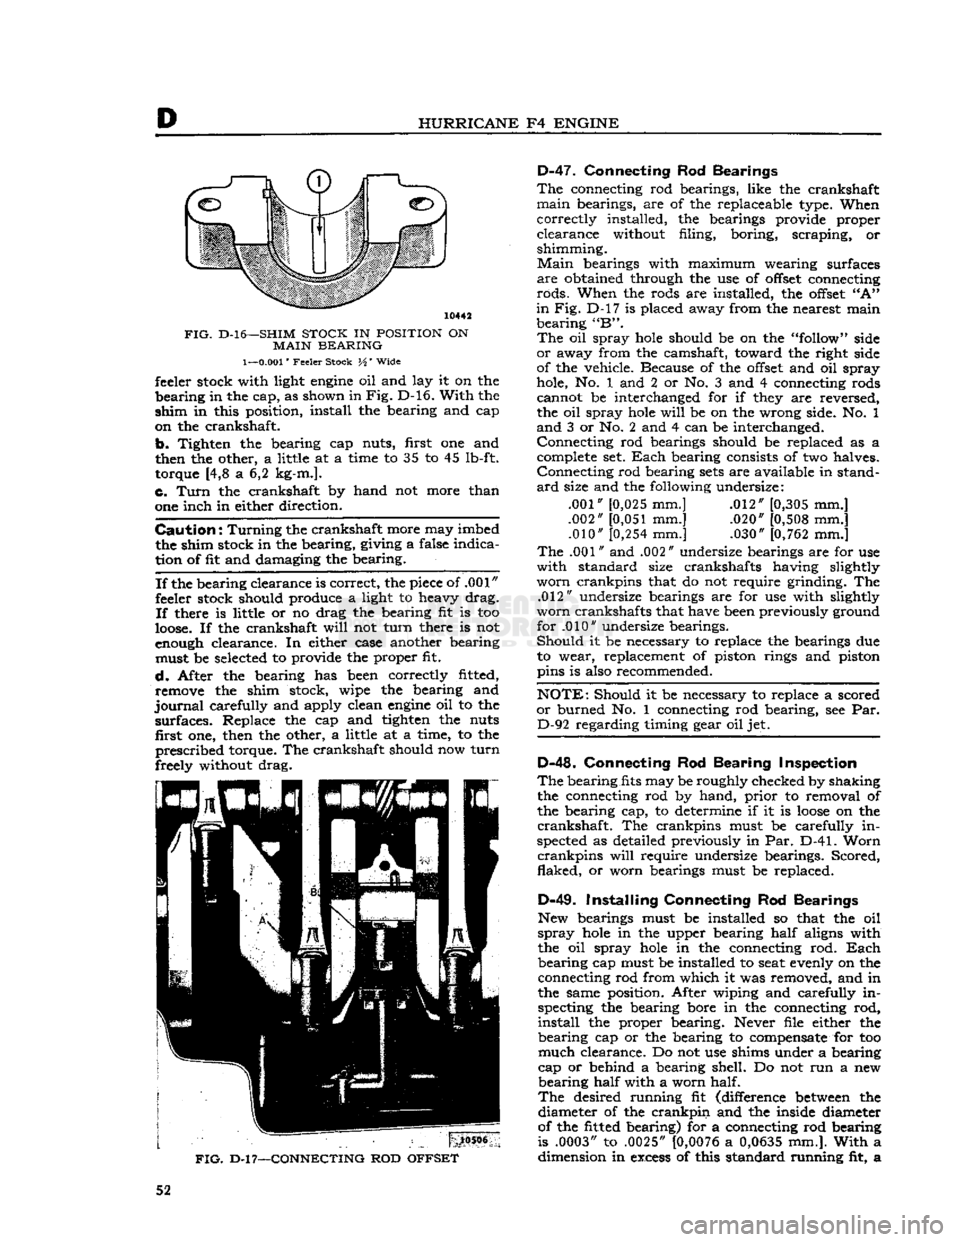
FIG.
D-l6—SHIM
STOCK
IN
POSITION
ON
MAIN
BEARING
1—0.001"
Feeler Stock H' Wide feeler stock with light
engine
oil and lay it on the
bearing
in the cap, as shown in
Fig.
D-16.
With
the
shim
in this position, install the bearing and cap
on the crankshaft.
b.
Tighten the bearing cap nuts, first one and
then the other, a little at a time to 35 to 45 lb-ft. torque [4,8 a 6,2 kg-m.].
c.
Turn
the crankshaft by hand not more than
one inch in either direction.
Caution:
Turning
the crankshaft more may imbed the shim stock in the bearing, giving a false indica
tion of fit and damaging the bearing.
If
the bearing clearance is correct, the piece of .001"
feeler stock should produce a light to heavy drag.
If
there is little or no drag the bearing fit is too
loose.
If the crankshaft
will
not
turn
there is not
enough clearance. In either case another bearing must be selected to provide the proper fit.
d.
After the bearing has been correctly fitted, remove the shim stock, wipe the bearing and
journal
carefully and apply clean
engine
oil to the
surfaces.
Replace the cap and tighten the nuts first one, then the other, a little at a time, to the
prescribed
torque. The crankshaft should now
turn
freely without drag.
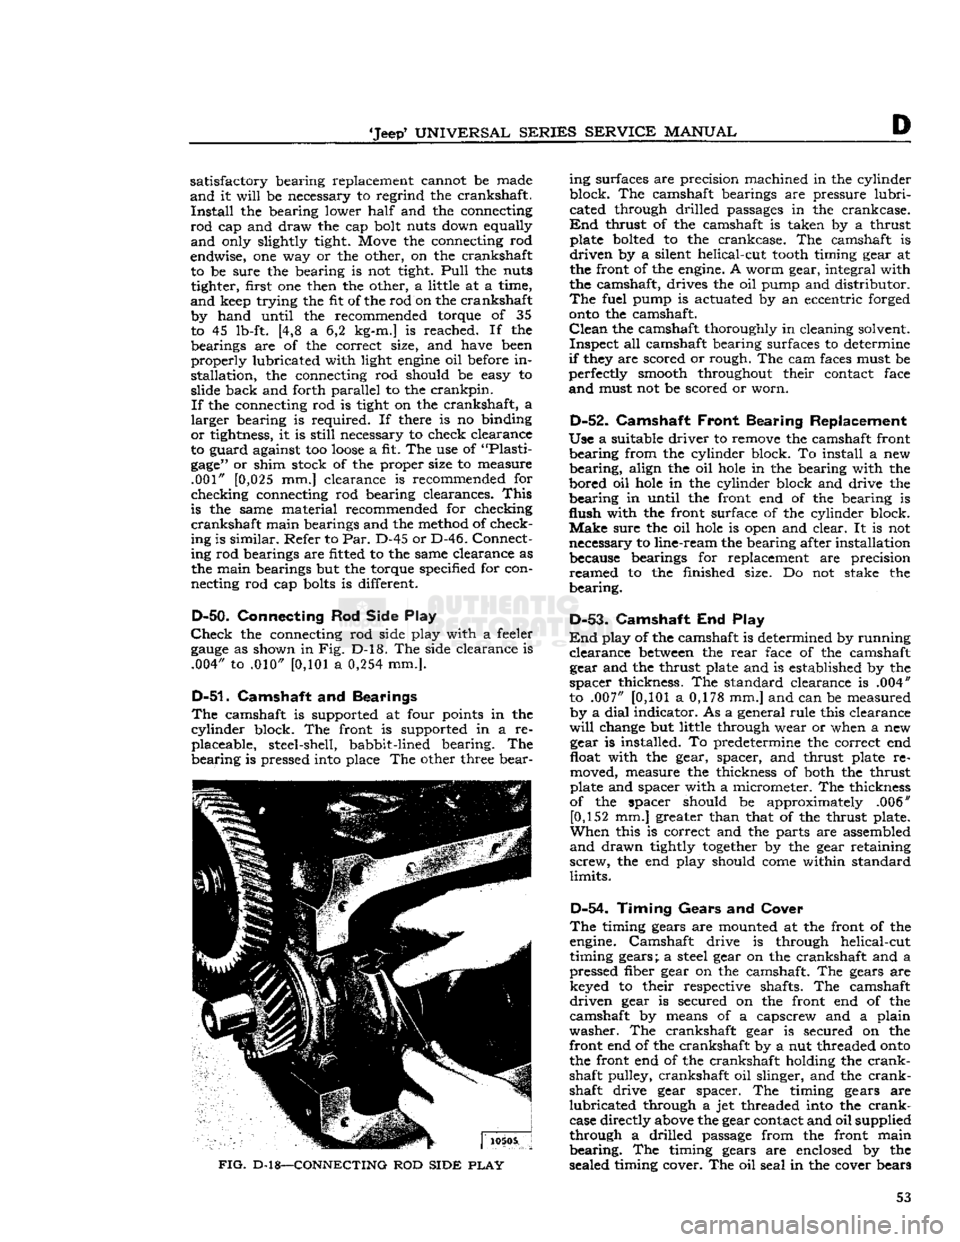
FIG.
D-l
7—CONNECTING
ROD
OFFSET
D-47.
Connecting Rod Bearings
The
connecting rod bearings, like the crankshaft
main
bearings, are of the replaceable type. When
correctly
installed, the bearings provide proper
clearance
without filing, boring, scraping, or
shimming.
Main
bearings with maximum wearing surfaces
are
obtained through the use of
offset
connecting
rods.
When the rods are installed, the
offset
"A"
in
Fig. D-l7 is placed away from the nearest main
bearing
"B".
The
oil spray
hole
should be on the "follow" side
or
away from the camshaft, toward the right side
of the vehicle. Because of the
offset
and oil spray
hole, No. 1 and 2 or No. 3 and 4 connecting rods cannot be interchanged for if they are reversed,
the oil spray
hole
will
be on the wrong side. No. 1
and
3 or No. 2 and 4 can be interchanged.
Connecting
rod bearings should be replaced as a complete set.
Each
bearing consists of two halves.
Connecting
rod bearing
sets
are available in stand
ard
size and the following undersize:
.001" [0,025 mm.] .012" [0,305 mm.]
.002"
[0,051
mm.] .020" [0,508 mm.] .010"
[0,254
mm.] .030" [0,762 mm.]
The
.001" and .002" undersize bearings are for use
with
standard size crankshafts having slightly
worn
crankpins that do not require grinding. The .012" undersize bearings are for use with slightly
worn
crankshafts that have been previously ground for .010" undersize bearings.
Should
it be necessary to replace the bearings due to wear, replacement of piston rings and piston
pins is also recommended.
NOTE:
Should it be necessary to replace a scored
or
burned No. 1 connecting rod bearing, see Par. D-92 regarding timing gear oil jet.
D-48.
Connecting Rod Bearing Inspection
The
bearing fits may be roughly checked by shaking the connecting rod by hand,
prior
to removal of
the bearing cap, to determine if it is
loose
on the
crankshaft.
The crankpins must be carefully in
spected as detailed previously in Par. D-41.
Worn
crankpins
will
require undersize bearings. Scored,
flaked,
or
worn bearings must be replaced.
D-49.
Installing Connecting Rod Bearings
New bearings must be installed so that the oil
spray
hole
in the upper bearing
half
aligns with
the oil spray
hole
in the connecting rod.
Each
bearing
cap must be installed to seat evenly on the connecting rod from which it was removed, and in
the same position. After wiping and carefully in specting the bearing bore in the connecting rod,
install
the proper bearing. Never file either the
bearing
cap or the bearing to compensate for too
much
clearance. Do not use shims under a bearing
cap or behind a bearing shell. Do not run a new
bearing
half
with a worn half.
The
desired running fit (difference
between
the diameter of the
crankpin
and the inside diameter
of the fitted bearing) for a connecting rod bearing
is .0003" to .0025"
[0,0076
a
0,0635
mm.].
With
a dimension in
excess
of this standard running fit, a 52
Page 53 of 376

'Jeep'
UNIVERSAL
SERIES
SERVICE
MANUAL
D
satisfactory bearing replacement cannot be made
and
it
will
be necessary to regrind the crankshaft.
Install
the bearing lower
half
and the connecting
rod
cap and draw the cap bolt nuts down equally
and
only slightly tight. Move the connecting rod
endwise, one way or the other, on the crankshaft to be sure the bearing is not tight.
Pull
the nuts tighter, first one then the other, a little at a time,
and
keep trying the fit of the rod on the crankshaft by hand until the recommended torque of 35 to 45 lb-ft. [4,8 a 6,2 kg-m.] is reached. If the
bearings are of the correct size, and have been
properly
lubricated with light
engine
oil before in
stallation,
the connecting rod should be easy to
slide back and forth parallel to the
crankpin.
If
the connecting rod is tight on the crankshaft, a
larger
bearing is required. If there is no binding
or
tightness, it is
still
necessary to check clearance
to guard against too
loose
a fit. The use of "Plasti
gage"
or shim stock of the proper size to measure .001" [0,025 mm.] clearance is recommended for
checking
connecting rod bearing clearances.
This
is the same material recommended for checking
crankshaft
main bearings and the method of check
ing is
similar.
Refer to
Par.
D-45 or D-46. Connect
ing rod bearings are fitted to the same clearance as the main bearings but the torque specified for con
necting rod cap
bolts
is different.
D-50.
Connecting
Rod
Side Play
Check
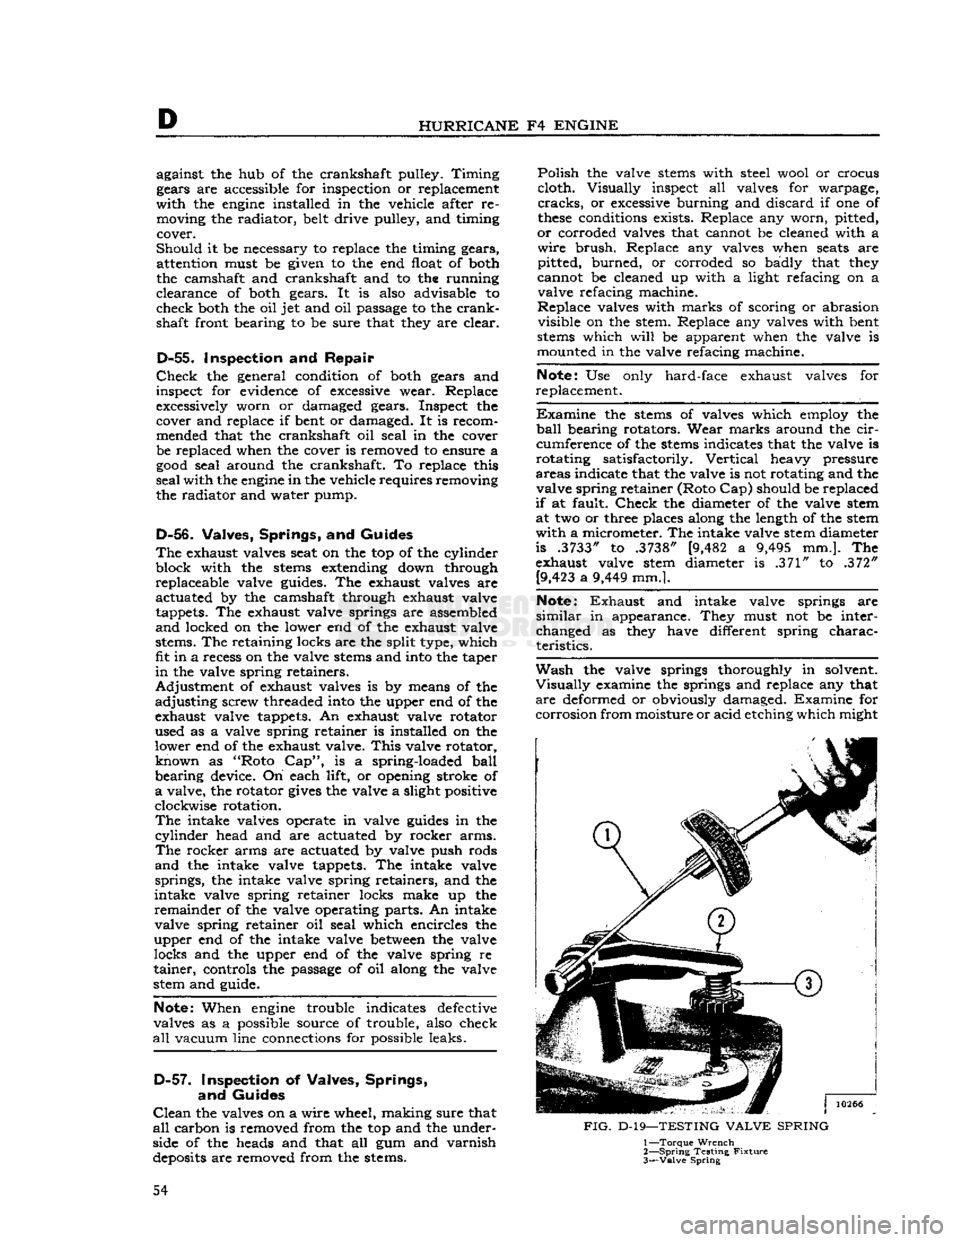
the connecting rod side play with a feeler
gauge
as shown in Fig. D-l8. The side clearance is .004" to .010"
[0,101
a
0,254
mm.].
D-51.
Camshaft and Bearings
The
camshaft is supported at four points in the
cylinder
block. The front is supported in a re placeable, steel-shell, babbit-lined bearing. The
bearing
is pressed into place The other three bear-
FIG.
D-18—CONNECTING
ROD
SIDE
PLAY
ing surfaces are precision machined in the cylinder
block. The camshaft bearings are pressure
lubri
cated through drilled passages in the crankcase.
End
thrust of the camshaft is taken by a thrust plate bolted to the crankcase. The camshaft is
driven
by a silent helical-cut
tooth
timing gear at
the front of the engine. A worm gear, integral with
the camshaft, drives the oil pump and distributor.
The
fuel pump is actuated by an eccentric forged
onto
the camshaft.
Clean
the camshaft thoroughly in cleaning solvent.
Inspect
all camshaft bearing surfaces to determine
if
they are scored or rough. The cam faces must be
perfectly smooth throughout their contact face
and
must not be scored or worn.
D-52.
Camshaft
Front Bearing Replacement
Use
a suitable driver to remove the camshaft front
bearing
from the cylinder block. To install a new
bearing,
align the oil
hole
in the bearing with the
bored oil
hole
in the cylinder block and drive the
bearing
in until the front end of the bearing is
flush
with the front surface of the cylinder block.
Make
sure the oil
hole
is open and clear. It is not
necessary to line-ream the bearing after installation because bearings for replacement are precision
reamed
to the finished size. Do not stake the
bearing.
D-53-
Camshaft End Play
End
play of the camshaft is determined by running
clearance
between
the
rear
face of the camshaft gear and the thrust plate and is established by the
spacer
thickness. The standard clearance is .004"
to .007"
[0,101
a 0,178 mm.] and can be measured by a
dial
indicator. As a general rule this clearance
will
change but little through wear or when a new gear is installed. To predetermine the correct end
float with the gear, spacer, and thrust plate re
moved, measure the thickness of both the thrust
plate and spacer with a micrometer. The thickness
of the spacer should be approximately .006" [0,152 mm.] greater than that of the thrust plate.
When
this is correct and the parts are assembled
and
drawn tightly
together
by the gear retaining
screw,
the end play should
come
within standard
limits.
D-54.
Timing Gears
and
Cover
The
timing gears are mounted at the front of the
engine. Camshaft drive is through helical-cut
timing gears; a steel gear on the crankshaft and a
pressed fiber gear on the camshaft. The gears are keyed to their respective shafts. The camshaft
driven
gear is secured on the front end of the
camshaft by means of a capscrew and a plain
washer.
The crankshaft gear is secured on the
front end of the crankshaft by a nut threaded
onto
the front end of the crankshaft holding the
crank
shaft pulley, crankshaft oil slinger, and the
crank
shaft drive gear spacer. The timing gears are
lubricated
through a jet threaded into the
crank
case directly above the gear contact and oil supplied
through a drilled passage from the front main
bearing.
The timing gears are enclosed by the
sealed timing cover. The oil seal in the cover bears 53
Page 54 of 376

D
HURRICANE
F4
ENGINE
against the hub of the crankshaft pulley.
Timing
gears are accessible for inspection or replacement
with
the
engine
installed in the vehicle after re moving the radiator, belt drive pulley, and timing
cover.
Should
it be necessary to replace the timing gears, attention must be given to the end float of both
the camshaft and crankshaft and to the running
clearance
of both gears. It is also advisable to
check
both the oil jet and oil passage to the
crank
shaft front bearing to be sure that they are clear.
D-55.
Inspection and
Repair
Check
the general condition of both gears and
inspect for evidence of excessive wear. Replace
excessively worn or damaged gears. Inspect the
cover and replace if bent or damaged. It is recom mended that the crankshaft oil seal in the cover
be replaced when the cover is removed to ensure a
good
seal around the crankshaft. To replace this
seal
with the
engine
in the vehicle
requires
removing
the radiator and water pump.
D-56.
Valves, Springs, and Guides
The
exhaust valves seat on the top of the cylinder
block
with the
stems
extending down through
replaceable valve guides. The exhaust valves are actuated by the camshaft through exhaust valve
tappets. The exhaust valve springs are assembled
and
locked on the lower end of the exhaust valve
stems. The retaining locks are the split type, which
fit in a recess on the valve
stems
and into the taper
in
the valve spring retainers.
Adjustment
of exhaust valves is by means of the
adjusting
screw threaded into the upper end of the
exhaust valve tappets. An exhaust valve rotator used as a valve spring retainer is installed on the
lower end of the exhaust valve.
This
valve rotator,
known
as "Roto Cap", is a spring-loaded
ball
bearing
device. On each lift, or opening stroke of
a
valve, the rotator
gives
the valve a slight positive
clockwise rotation.
The
intake valves operate in valve
guides
in the
cylinder
head and are actuated by rocker arms.
The
rocker arms are actuated by valve push rods
and
the intake valve tappets. The intake valve
springs,
the intake valve spring retainers, and the
intake
valve spring retainer locks make up the
remainder
of the valve operating parts. An intake
valve spring retainer oil seal which encircles the
upper
end of the intake valve
between
the valve
locks and the upper end of the valve spring re
tainer,
controls the passage of oil along the valve
stem and guide.
Note:
When
engine
trouble indicates defective
valves as a possible source of trouble, also check
all
vacuum line connections for possible leaks.
D-57.
Inspection of Valves, Springs,
and
Guides
Clean
the valves on a wire wheel, making sure that
all
carbon is removed from the top and the under
side of the heads and that all gum and varnish
deposits
are removed from the stems.
Polish
the valve
stems
with steel wool or crocus
cloth.
Visually
inspect all valves for warpage,
cracks,
or excessive burning and discard if one of
these
conditions exists. Replace any worn, pitted,
or
corroded valves that cannot be cleaned with a
wire
brush.
Replace any valves when
seats
are pitted, burned, or corroded so badly that they
cannot be cleaned up with a light refacing on a valve refacing machine.
Replace
valves with marks of scoring or abrasion visible on the stem. Replace any valves with bent
stems
which
will
be apparent when the valve is
mounted in the valve refacing machine.
Note:
Use only hard-face exhaust valves for
replacement.
Examine
the
stems
of valves which employ the
ball
bearing rotators.
Wear
marks around the
cir
cumference of the
stems
indicates that the valve is
rotating satisfactorily.
Vertical
heavy pressure
areas
indicate that the valve is not rotating and the valve spring retainer (Roto
Cap)
should be replaced
if
at fault.
Check
the diameter of the valve stem at two or three places along the length of the stem
with
a micrometer. The intake valve stem diameter is .3733" to .3738" [9,482 a
9,495
mm.]. The
exhaust valve stem diameter is .371" to .372"
[9,423
a
9,449
mm.].
Note:
Exhaust
and intake valve springs are
similar
in appearance. They must not be inter
changed as they have different spring
charac
teristics.
Wash
the valve springs thoroughly in solvent.
Visually
examine the springs and replace any that
are
deformed or obviously damaged. Examine for
corrosion
from moisture or acid etching which might
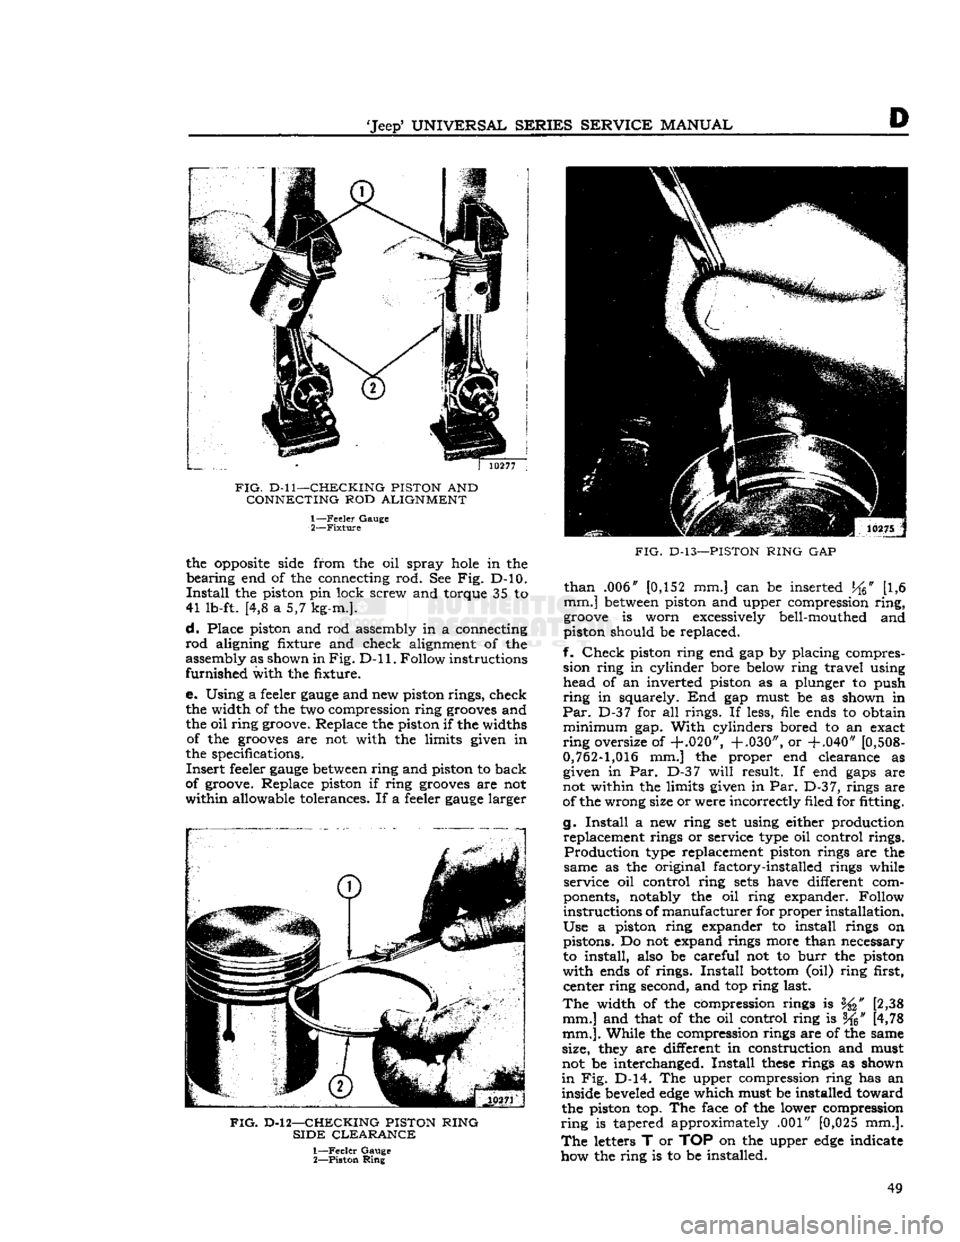
FIG.
D-19—TESTING
VALVE
SPRING
1—
Torque
Wrench
2—
Spring
Testing
Fixture
3—
Valve
Spring
54
Page 55 of 376

'Jeep'
UNIVERSAL
SERIES SERVICE
MANUAL
develop
into surface cracks and cause failure.
Measure
the over all free length of the springs and
replace any that do not measure to standard: 1%" [35,7 mm.] for intake valve springs and 2j^"
[63,5 mm.] for exhaust valve springs. If possible,
check each valve spring in a valve spring testing
fixture C-647 or equivalent as shown in Fig. D-l9.
Test
each spring when compressed to the two
different spring lengths given (representing valve closed and valve open spring length). If any spring
fails to register spring tension equal to or greater
than
the minimum load limit in pounds specified for that spring length, replace the spring.
Length
Minimun
Load
Intake
valve spring. . .
1.660"
[4,216 cm.] 66 lb. [29,9 kg.]
1.400"
[3,556 cm.] 140 lb. [63,5 kg.]
Exhaust
valve spring. 2.109" [5,356 cm.] 47 lb. [21,3 kg.]
1.750"
[4,445 cm.] 110 lb. [49,9 kg.]
Note:
When using a spring checking fixture C-647
or
equivalent as shown in Fig. D-l9, it is necessary
to convert the torque wrench reading which is in pounds-feet to the static pound pressure specified above according to the instructions furnished with
the wrench. For example, should the torque wrench reading be 50 lb-ft. and the wrench is two
feet
long
the static pressure of the spring
will
be 50 x 2 or 100 lbs.
Clean
the valve
guides
with a standard valve guide
cleaner or a wire
brush.
Check
the valve
guides
in the cylinder block. Replace valve
guides
which are
broken
or worn enough to cause excessive valve
stem-to-guide
clearance. See Par. D-61.
Standard
intake valve clearance is .0007" to .0022"
[0,0178
a
0,0559
mm.] and the exhaust valve
clearance is .0025" to .0045" [0,0635 a
0,1143
mm.].
Excessive
clearance
between
the valve
stems
and
guides
will
cause improper seating and burned
valves. When there is a tendency to draw oil vapor
through the guide causing excessive oil consump tion, fouled
spark
plugs, and poor low-speed per
formance. To check the clearance of the valve stem
to the valve guide, take a new valve and place in
each valve guide.
Check
the clearance with a
suitably mounted
dial
indicator or feel the clearance by moving the valve stem back and forth. If this
check shows excessive clearance it
will
be necessary to replace the valve guide.
D-58.
Refacing Valves
Re
face the valves with a valve refacer. The valve
refacer
manufacturer's instructions should be fol
lowed carefully to ensure a valve face concentric
with
the valve stem. Reface both intake and ex
haust valves to an angle of 46°.
Take
off only the
minimum
of metal required to clean up the valve faces.
If
the thickness of the
edge
of the valve head is
reduced to
less
than
J^>"
[0>8 mm.] replace the valve.
Note:
Cocked or deformed valve springs or im
properly
installed or missing locks can be responsible
for valve problems.
D-59.
Valve Seat Inspection
and
Refacing
Inspect the valve
seats
for
cracks,
burns, pitting,
ridges, or improper angle.
During
any general
engine
overhaul it is advisable to reface the valve
seats
in both the cylinder block and head regardless
of their condition. If the valve
guides
are to be re placed, this must be
done
before refacing the valve
seats.
Note
that later
engines
have hardened
exhaust valve seat inserts.
Valve
seat inserts must be concentric with finish
ream
of valve stem
guides
(exhaust) within .002"
[0,051
mm.] total indicator reading.
When
necessary to reface the valve seats, use a
valve seat grinder in accordance with the grinder
manufacturer's
instructions. Any grinding of valve
seats
should be preceded by touching up the
grinding
stone
so that their angles are accurate and
the
stone
is not
clogged.
Grind
each valve seat to
a
true 45° angle. Never grind any more than is necessary to clean up pits, grooves, or to correct
the valve seat runout.
Check
the valve
seats
with
10465
FIG.
D-20—VALVE
WITH
ROTO
CAP
FIG.
D-21—GAUGING
VALVE
SEATS
55
Page 56 of 376

D
HURRICANE
F4
ENGINE
FIG.
D-2
2—REFACING
VALVES
1—
Valve
Refacer
2—
Valve
a
dial
indicator as shown in
Fig.
D-21 after refacing.
The
valve seat should not be out of round more
than
.002"
[0,051
mm.]. A simple check can be
made in the absence of a
dial
indicator by spreading
a
thin coat of pencil lead or bearing-fitting blue on
the valve face and then inserting the valve into the valve seat.
With
hand pressure, rotate the valve
a
quarter
turn
and then remove the valve and ob
serve the transfer of blue (or pencil lead) to the valve seat. An uneven transfer
will
indicate an
inaccurate
valve and valve seat refacing operation.
After
the seat is ground, check its width with a
seat width scale or a steel scale placed across the
face of the seat. The valve seat width after refacing
should measure [2,3 mm.] and not wider than
y%"
[3,2 mm.]. Valve seat width is
vital.
Too wide
a
seat can cause seat burning as it
tends
to trap
and
hold carbon particles. Seats that are too
narrow
will
not transfer heat to the coolant rapidly enough to keep the valves in proper operating condition.
When
a valve seat has been refaced several times
or
where it must be cut deeply for adequate recon
ditioning, the seat may
become
too wide for efficient
operation. Narrow the seat without changing its
position in relation to the valve face by using a
valve seat relief counterbore above the seat and a valve seat narrowing cutter below the seat. These
operations are performed only after the valve
seats
have been refaced and then only when necessary.
The
finished valve seat should contact the approximate center of the valve face.
Check
by applying
an
extremely thin coat of pencil lead or bearing-
fitting blue to the seat.
Then
install and rotate the
valve with light pressure. Blue (or pencil
marks)
will
transfer to the face of the valve. If the blue
is near the top
edge
of the valve face, lower the valve seat by using the valve seat relief counter-
bore. If the blue is transferred to the
bottom
edge
of the valve face, raise the seat by using the valve
seat narrowing cutter.
When
the valve seat can no longer be corrected, it
is advisable to investigate installing seat inserts.
D-60.
Exhaust
Valve Seat Insert Replacement
Hardened
valve seat inserts for exhaust valves
will
seldom require replacement. To avoid damaging the blcck, remove an insert with a tool designed for
this purpose.
When
installing a new insert, make certain the
counterbore is clean and smooth. Use a driver that
will
keep the insert in true alignment with the bore.
Cool
the insert and the installing tool with dry ice
for 30 minutes.
Note:
The insert should be sufficiently cooled
to permit installation with light taps; excessive
driving
of the insert may cock it in the counterbore
or
crack the insert.
Make
certain the valve seat is facing out.
Drive
in
the insert with the tool until it
bottoms
in the counterbore. After installation, grind the valve
seat at an angle of 45° and then check with a
dial
indicator
as shown in Fig. D-21.
D-61.
Valve Guide Replacement
Damaged,
loose,
or worn valve
guides
must be re
placed.
Use valve guide driver W-238 or equivalent
to drive out the old guides. When replacing valve
guides, maximum
engine
performance can be se
cured
only when the guide is positioned correctly
FIG.
D-23—VALVE
GUIDE
DRIVER
FIG.
D-24—VALVE
GUIDE
POSITIONS
1—Flush
at
this
point
2—One
Inch
[25
mm.
I
56
 1
1 2
2 3
3 4
4 5
5 6
6 7
7 8
8 9
9 10
10 11
11 12
12 13
13 14
14 15
15 16
16 17
17 18
18 19
19 20
20 21
21 22
22 23
23 24
24 25
25 26
26 27
27 28
28 29
29 30
30 31
31 32
32 33
33 34
34 35
35 36
36 37
37 38
38 39
39 40
40 41
41 42
42 43
43 44
44 45
45 46
46 47
47 48
48 49
49 50
50 51
51 52
52 53
53 54
54 55
55 56
56 57
57 58
58 59
59 60
60 61
61 62
62 63
63 64
64 65
65 66
66 67
67 68
68 69
69 70
70 71
71 72
72 73
73 74
74 75
75 76
76 77
77 78
78 79
79 80
80 81
81 82
82 83
83 84
84 85
85 86
86 87
87 88
88 89
89 90
90 91
91 92
92 93
93 94
94 95
95 96
96 97
97 98
98 99
99 100
100 101
101 102
102 103
103 104
104 105
105 106
106 107
107 108
108 109
109 110
110 111
111 112
112 113
113 114
114 115
115 116
116 117
117 118
118 119
119 120
120 121
121 122
122 123
123 124
124 125
125 126
126 127
127 128
128 129
129 130
130 131
131 132
132 133
133 134
134 135
135 136
136 137
137 138
138 139
139 140
140 141
141 142
142 143
143 144
144 145
145 146
146 147
147 148
148 149
149 150
150 151
151 152
152 153
153 154
154 155
155 156
156 157
157 158
158 159
159 160
160 161
161 162
162 163
163 164
164 165
165 166
166 167
167 168
168 169
169 170
170 171
171 172
172 173
173 174
174 175
175 176
176 177
177 178
178 179
179 180
180 181
181 182
182 183
183 184
184 185
185 186
186 187
187 188
188 189
189 190
190 191
191 192
192 193
193 194
194 195
195 196
196 197
197 198
198 199
199 200
200 201
201 202
202 203
203 204
204 205
205 206
206 207
207 208
208 209
209 210
210 211
211 212
212 213
213 214
214 215
215 216
216 217
217 218
218 219
219 220
220 221
221 222
222 223
223 224
224 225
225 226
226 227
227 228
228 229
229 230
230 231
231 232
232 233
233 234
234 235
235 236
236 237
237 238
238 239
239 240
240 241
241 242
242 243
243 244
244 245
245 246
246 247
247 248
248 249
249 250
250 251
251 252
252 253
253 254
254 255
255 256
256 257
257 258
258 259
259 260
260 261
261 262
262 263
263 264
264 265
265 266
266 267
267 268
268 269
269 270
270 271
271 272
272 273
273 274
274 275
275 276
276 277
277 278
278 279
279 280
280 281
281 282
282 283
283 284
284 285
285 286
286 287
287 288
288 289
289 290
290 291
291 292
292 293
293 294
294 295
295 296
296 297
297 298
298 299
299 300
300 301
301 302
302 303
303 304
304 305
305 306
306 307
307 308
308 309
309 310
310 311
311 312
312 313
313 314
314 315
315 316
316 317
317 318
318 319
319 320
320 321
321 322
322 323
323 324
324 325
325 326
326 327
327 328
328 329
329 330
330 331
331 332
332 333
333 334
334 335
335 336
336 337
337 338
338 339
339 340
340 341
341 342
342 343
343 344
344 345
345 346
346 347
347 348
348 349
349 350
350 351
351 352
352 353
353 354
354 355
355 356
356 357
357 358
358 359
359 360
360 361
361 362
362 363
363 364
364 365
365 366
366 367
367 368
368 369
369 370
370 371
371 372
372 373
373 374
374 375
375

![JEEP DJ 1953 Service Manual
-Jeep*
UNIVERSAL
SERIES SERVICE
MANUAL
E>
[5,928 a
5,926
cm.] for all main bearings. Allowable
taper or out-of-round of the journals is .001"
[0,0254
mm.].
D-42.
Checking Connecting Ro JEEP DJ 1953 Service Manual
-Jeep*
UNIVERSAL
SERIES SERVICE
MANUAL
E>
[5,928 a
5,926
cm.] for all main bearings. Allowable
taper or out-of-round of the journals is .001"
[0,0254
mm.].
D-42.
Checking Connecting Ro](/manual-img/16/57041/w960_57041-50.png)
