2024 CHEVROLET SILVERADO EV change time
[x] Cancel search: change timePage 166 of 429
Chevrolet Silverado EV Owner Manual (GMNA-Localizing-U.S./Canada-
16702912) - 2024 - CRC - 1/13/23
Infotainment System 165
Ending a Call
.Presscon the steering wheel controls.
.Touch#on the infotainment display,
next to a call, to end only that call.
Dual Tone Multi-Frequency (DTMF) Tones
The in-vehicle Bluetooth system can send
numbers during a call. This is used when
calling a menu-driven phone system. Use the
Keypad to enter the number.
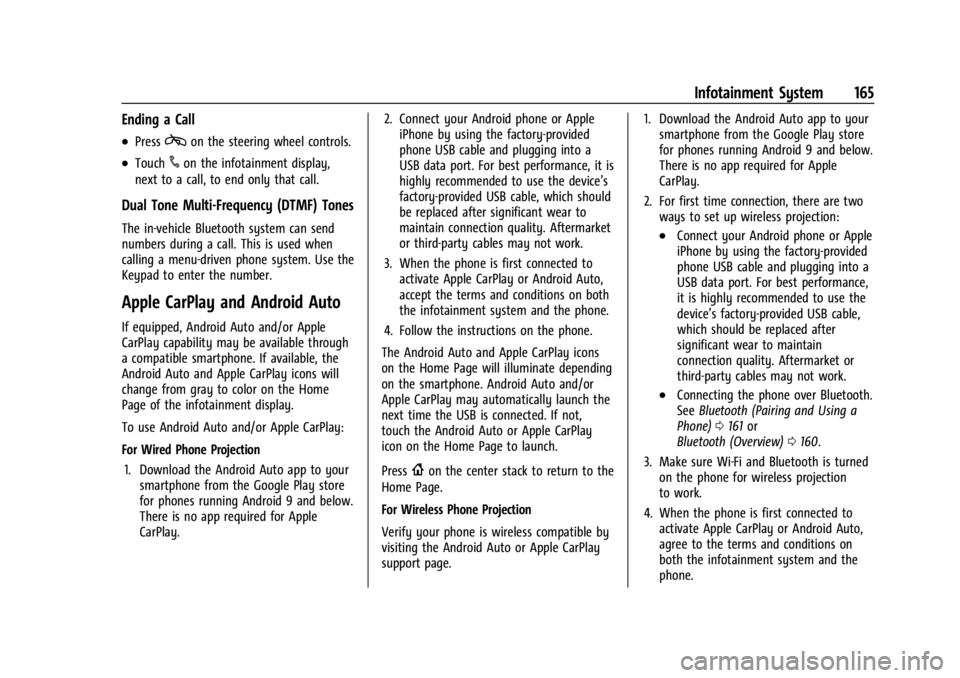
Apple CarPlay and Android Auto
If equipped, Android Auto and/or Apple
CarPlay capability may be available through
a compatible smartphone. If available, the
Android Auto and Apple CarPlay icons will
change from gray to color on the Home
Page of the infotainment display.
To use Android Auto and/or Apple CarPlay:
For Wired Phone Projection
1. Download the Android Auto app to your smartphone from the Google Play store
for phones running Android 9 and below.
There is no app required for Apple
CarPlay. 2. Connect your Android phone or Apple
iPhone by using the factory-provided
phone USB cable and plugging into a
USB data port. For best performance, it is
highly recommended to use the device’s
factory-provided USB cable, which should
be replaced after significant wear to
maintain connection quality. Aftermarket
or third-party cables may not work.
3. When the phone is first connected to activate Apple CarPlay or Android Auto,
accept the terms and conditions on both
the infotainment system and the phone.
4. Follow the instructions on the phone.
The Android Auto and Apple CarPlay icons
on the Home Page will illuminate depending
on the smartphone. Android Auto and/or
Apple CarPlay may automatically launch the
next time the USB is connected. If not,
touch the Android Auto or Apple CarPlay
icon on the Home Page to launch.
Press
{on the center stack to return to the
Home Page.
For Wireless Phone Projection
Verify your phone is wireless compatible by
visiting the Android Auto or Apple CarPlay
support page. 1. Download the Android Auto app to your
smartphone from the Google Play store
for phones running Android 9 and below.
There is no app required for Apple
CarPlay.
2. For first time connection, there are two ways to set up wireless projection:
.Connect your Android phone or Apple
iPhone by using the factory-provided
phone USB cable and plugging into a
USB data port. For best performance,
it is highly recommended to use the
device’s factory-provided USB cable,
which should be replaced after
significant wear to maintain
connection quality. Aftermarket or
third-party cables may not work.
.Connecting the phone over Bluetooth.
See Bluetooth (Pairing and Using a
Phone) 0161 or
Bluetooth (Overview) 0160.
3. Make sure Wi-Fi and Bluetooth is turned on the phone for wireless projection
to work.
4. When the phone is first connected to activate Apple CarPlay or Android Auto,
agree to the terms and conditions on
both the infotainment system and the
phone.
Page 167 of 429
Chevrolet Silverado EV Owner Manual (GMNA-Localizing-U.S./Canada-
16702912) - 2024 - CRC - 1/13/23
166 Infotainment System
5. Follow the instructions on the phone.
The Android Auto and Apple CarPlay icons
on the Home Page will illuminate depending
on the smartphone. Android Auto and/or
Apple CarPlay may automatically launch
upon wireless connection. If not, touch the
Android Auto or Apple CarPlay icon on the
Home Page to launch.
Wireless CarPlay and/or Wireless Android
Auto may experience occasional service
disruption due to outside Wi-Fi interference.
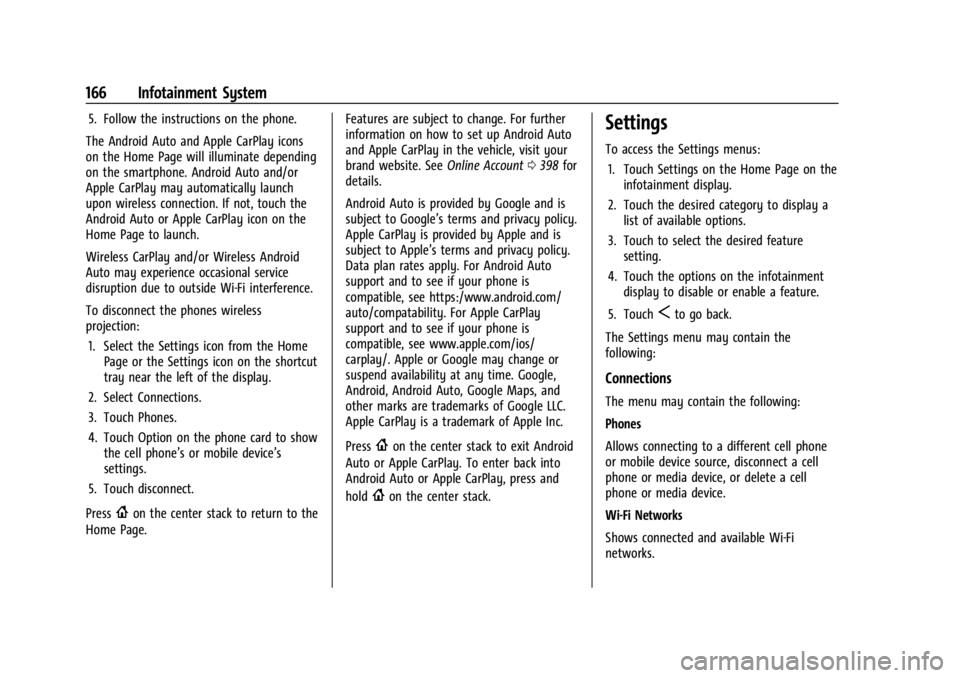
To disconnect the phones wireless
projection: 1. Select the Settings icon from the Home Page or the Settings icon on the shortcut
tray near the left of the display.
2. Select Connections.
3. Touch Phones.
4. Touch Option on the phone card to show the cell phone’s or mobile device’s
settings.
5. Touch disconnect.
Press
{on the center stack to return to the
Home Page. Features are subject to change. For further
information on how to set up Android Auto
and Apple CarPlay in the vehicle, visit your
brand website. See
Online Account0398 for
details.
Android Auto is provided by Google and is
subject to Google’s terms and privacy policy.
Apple CarPlay is provided by Apple and is
subject to Apple’s terms and privacy policy.
Data plan rates apply. For Android Auto
support and to see if your phone is
compatible, see https:/www.android.com/
auto/compatability. For Apple CarPlay
support and to see if your phone is
compatible, see www.apple.com/ios/
carplay/. Apple or Google may change or
suspend availability at any time. Google,
Android, Android Auto, Google Maps, and
other marks are trademarks of Google LLC.
Apple CarPlay is a trademark of Apple Inc.
Press
{on the center stack to exit Android
Auto or Apple CarPlay. To enter back into
Android Auto or Apple CarPlay, press and
hold
{on the center stack.
Settings
To access the Settings menus:
1. Touch Settings on the Home Page on the infotainment display.
2. Touch the desired category to display a list of available options.
3. Touch to select the desired feature setting.
4. Touch the options on the infotainment display to disable or enable a feature.
5. Touch
Sto go back.
The Settings menu may contain the
following:
Connections
The menu may contain the following:
Phones
Allows connecting to a different cell phone
or mobile device source, disconnect a cell
phone or media device, or delete a cell
phone or media device.
Wi-Fi Networks
Shows connected and available Wi-Fi
networks.
Page 170 of 429
Chevrolet Silverado EV Owner Manual (GMNA-Localizing-U.S./Canada-
16702912) - 2024 - CRC - 1/13/23
Infotainment System 169
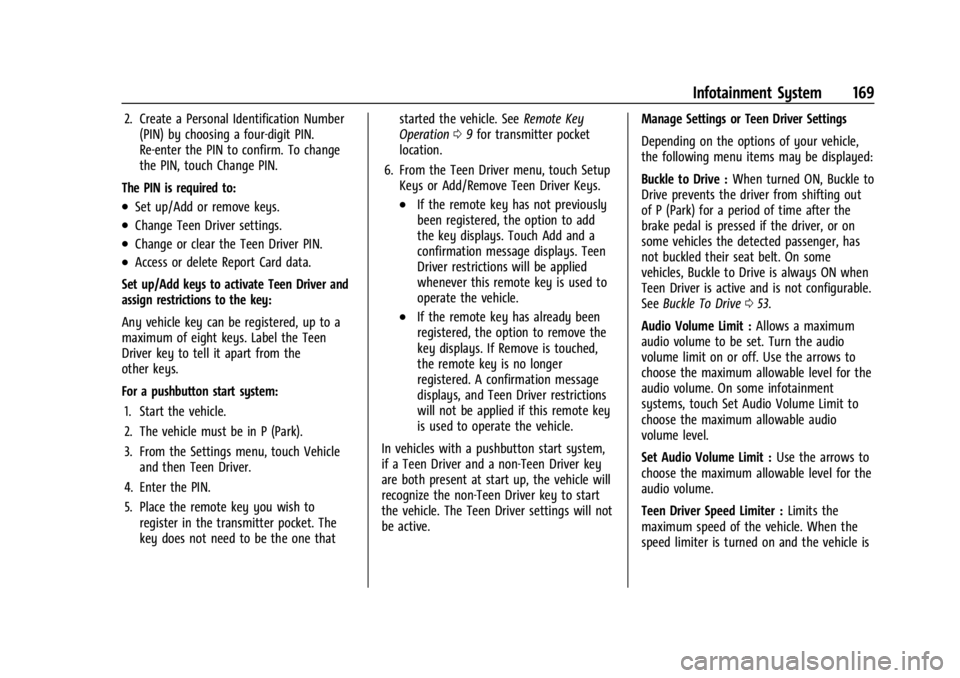
2. Create a Personal Identification Number(PIN) by choosing a four-digit PIN.
Re-enter the PIN to confirm. To change
the PIN, touch Change PIN.
The PIN is required to:
.Set up/Add or remove keys.
.Change Teen Driver settings.
.Change or clear the Teen Driver PIN.
.Access or delete Report Card data.
Set up/Add keys to activate Teen Driver and
assign restrictions to the key:
Any vehicle key can be registered, up to a
maximum of eight keys. Label the Teen
Driver key to tell it apart from the
other keys.
For a pushbutton start system: 1. Start the vehicle.
2. The vehicle must be in P (Park).
3. From the Settings menu, touch Vehicle and then Teen Driver.
4. Enter the PIN.
5. Place the remote key you wish to register in the transmitter pocket. The
key does not need to be the one that started the vehicle. See
Remote Key
Operation 09for transmitter pocket
location.
6. From the Teen Driver menu, touch Setup Keys or Add/Remove Teen Driver Keys.
.If the remote key has not previously
been registered, the option to add
the key displays. Touch Add and a
confirmation message displays. Teen
Driver restrictions will be applied
whenever this remote key is used to
operate the vehicle.
.If the remote key has already been
registered, the option to remove the
key displays. If Remove is touched,
the remote key is no longer
registered. A confirmation message
displays, and Teen Driver restrictions
will not be applied if this remote key
is used to operate the vehicle.
In vehicles with a pushbutton start system,
if a Teen Driver and a non-Teen Driver key
are both present at start up, the vehicle will
recognize the non-Teen Driver key to start
the vehicle. The Teen Driver settings will not
be active. Manage Settings or Teen Driver Settings
Depending on the options of your vehicle,
the following menu items may be displayed:
Buckle to Drive :
When turned ON, Buckle to
Drive prevents the driver from shifting out
of P (Park) for a period of time after the
brake pedal is pressed if the driver, or on
some vehicles the detected passenger, has
not buckled their seat belt. On some
vehicles, Buckle to Drive is always ON when
Teen Driver is active and is not configurable.
See Buckle To Drive 053.
Audio Volume Limit : Allows a maximum
audio volume to be set. Turn the audio
volume limit on or off. Use the arrows to
choose the maximum allowable level for the
audio volume. On some infotainment
systems, touch Set Audio Volume Limit to
choose the maximum allowable audio
volume level.
Set Audio Volume Limit : Use the arrows to
choose the maximum allowable level for the
audio volume.
Teen Driver Speed Limiter : Limits the
maximum speed of the vehicle. When the
speed limiter is turned on and the vehicle is
Page 171 of 429
Chevrolet Silverado EV Owner Manual (GMNA-Localizing-U.S./Canada-
16702912) - 2024 - CRC - 1/13/23
170 Infotainment System
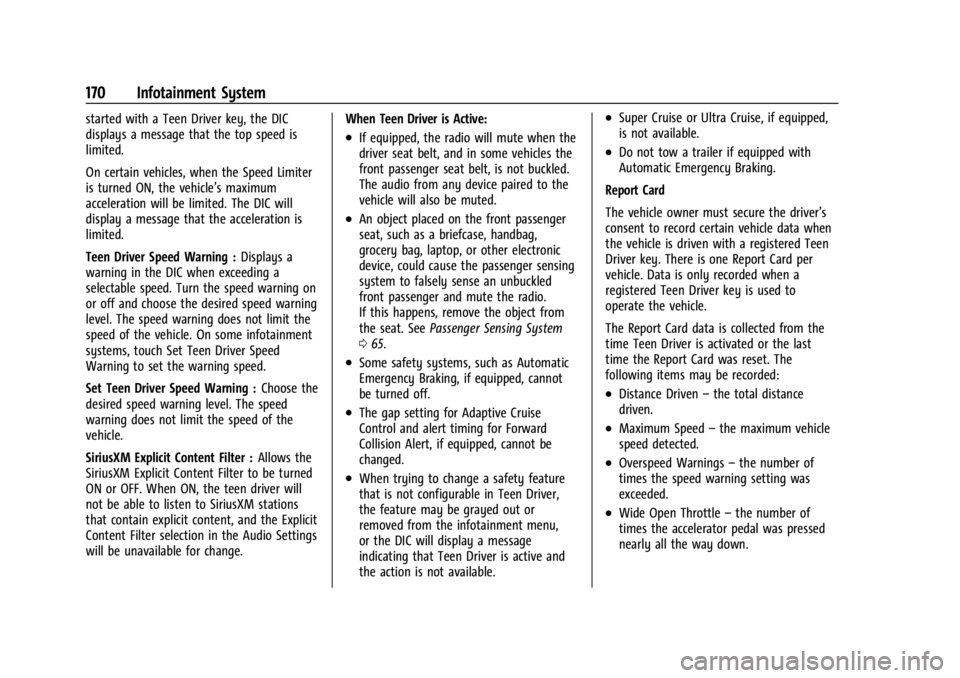
started with a Teen Driver key, the DIC
displays a message that the top speed is
limited.
On certain vehicles, when the Speed Limiter
is turned ON, the vehicle’s maximum
acceleration will be limited. The DIC will
display a message that the acceleration is
limited.
Teen Driver Speed Warning :Displays a
warning in the DIC when exceeding a
selectable speed. Turn the speed warning on
or off and choose the desired speed warning
level. The speed warning does not limit the
speed of the vehicle. On some infotainment
systems, touch Set Teen Driver Speed
Warning to set the warning speed.
Set Teen Driver Speed Warning : Choose the
desired speed warning level. The speed
warning does not limit the speed of the
vehicle.
SiriusXM Explicit Content Filter : Allows the
SiriusXM Explicit Content Filter to be turned
ON or OFF. When ON, the teen driver will
not be able to listen to SiriusXM stations
that contain explicit content, and the Explicit
Content Filter selection in the Audio Settings
will be unavailable for change. When Teen Driver is Active:
.If equipped, the radio will mute when the
driver seat belt, and in some vehicles the
front passenger seat belt, is not buckled.
The audio from any device paired to the
vehicle will also be muted.
.An object placed on the front passenger
seat, such as a briefcase, handbag,
grocery bag, laptop, or other electronic
device, could cause the passenger sensing
system to falsely sense an unbuckled
front passenger and mute the radio.
If this happens, remove the object from
the seat. See
Passenger Sensing System
0 65.
.Some safety systems, such as Automatic
Emergency Braking, if equipped, cannot
be turned off.
.The gap setting for Adaptive Cruise
Control and alert timing for Forward
Collision Alert, if equipped, cannot be
changed.
.When trying to change a safety feature
that is not configurable in Teen Driver,
the feature may be grayed out or
removed from the infotainment menu,
or the DIC will display a message
indicating that Teen Driver is active and
the action is not available.
.Super Cruise or Ultra Cruise, if equipped,
is not available.
.Do not tow a trailer if equipped with
Automatic Emergency Braking.
Report Card
The vehicle owner must secure the driver’s
consent to record certain vehicle data when
the vehicle is driven with a registered Teen
Driver key. There is one Report Card per
vehicle. Data is only recorded when a
registered Teen Driver key is used to
operate the vehicle.
The Report Card data is collected from the
time Teen Driver is activated or the last
time the Report Card was reset. The
following items may be recorded:
.Distance Driven –the total distance
driven.
.Maximum Speed –the maximum vehicle
speed detected.
.Overspeed Warnings –the number of
times the speed warning setting was
exceeded.
.Wide Open Throttle –the number of
times the accelerator pedal was pressed
nearly all the way down.
Page 177 of 429
Chevrolet Silverado EV Owner Manual (GMNA-Localizing-U.S./Canada-
16702912) - 2024 - CRC - 1/13/23
176 Climate Controls
When AUTO is selected, all four functions
operate automatically. Each function can
also be manually set and the selected
setting is displayed. Functions not manually
set will continue to be automatically
controlled, even if the AUTO indicator is not
lit. When enabled, the climate controls will
remain in auto mode through power cycles.
For automatic operation:1. Touch AUTO.
2. Set the temperature. Allow the system time to stabilize. Adjust the temperature
as needed for best comfort.
To improve efficiency and to cool the vehicle
faster, recirculation may be automatically
selected in warm weather.
Manual Operation
9: Press up or down to increase or
decrease fan speed. Toggle all the way
down to turn the fan off. When off is
selected, a small amount of air may still
come out of the outlets depending on the
vehicle’s speed. If any buttons are pressed,
the climate control system will turn on and
operate at the current setting.
Touch AUTO to return to automatic
operation. Driver and Passenger Temperature Control :
The temperature can be adjusted separately
for the driver and passenger.
SYNC :
Touch to link the passenger
temperature setting to the driver setting.
Air Delivery Mode Control : Touch to change
the direction of the airflow. Any
combination of
z,Y, or[can be
selected.
Changing the mode cancels the automatic
operation and the system goes into manual
mode. Touch AUTO to return to automatic
operation.
z: Air is directed to the windshield,
outboard A/C outlets, and side window
outlets.
Y: Air is directed to the A/C outlets.
[:Air is directed to the floor outlets,
with some air directed to the windshield,
outboard A/C outlets, and side window
outlets.
0 5MAX : Air is directed to the
windshield and the fan runs at a higher
speed if not already above a medium fan
speed. This mode overrides the previous
mode selected and clears fog or frost from the windshield quickly. When the control is
pressed again, the system returns to the
previous mode setting and fan speed.
For best results, clear all snow and ice from
the windshield before defrosting.
@:
Touch to turn on recirculation. An
indicator light comes on. Air is recirculated
to quickly cool the interior of the vehicle.
It can also be used to help reduce outside
air and odors that enter the vehicle.
Avoid using recirculation for long periods of
time in cold or damp conditions. Using
recirculation in cold or damp conditions can
result in window fogging.
A/C : Press to turn the air conditioning on
or off. An indicator light comes on to show
that the air conditioning is enabled. If the
fan is turned off, the air conditioner will
not run.
Heat : Press to turn the heater on or off.
The air conditioning compressor is used to
provide heat to the cabin and may run
when heat is enabled.
Page 178 of 429
Chevrolet Silverado EV Owner Manual (GMNA-Localizing-U.S./Canada-
16702912) - 2024 - CRC - 1/13/23
Climate Controls 177
Rear Window Defogger
1REAR :If equipped, press to turn the
rear window defogger on or off. An indicator
light on the button comes on to show that
the rear window defogger is on.
The rear window defogger only works when
the vehicle is on. The defogger turns off if
the vehicle is turned off.
If the vehicle is equipped with heated
outside mirrors, they turn on when the rear
window defogger button is on and help to
clear fog or frost from the surface of the
mirror. See Heated Mirrors 036.
Caution
Using a razor blade or sharp object to
clear the inside rear window can damage
the rear window defogger. Repairs would
not be covered by the vehicle warranty.
Do not clear the inside rear window with
sharp objects.
Remote Start Climate Control Operation :
If equipped with remote start, the climate
control system may run when the vehicle is
started remotely. If equipped with heated or ventilated seats or a heated steering wheel,
these features may come on during a
remote start. See
Remote Vehicle Start 014,
Heated and Ventilated Front Seats 047, and
Heated Steering Wheel 097.
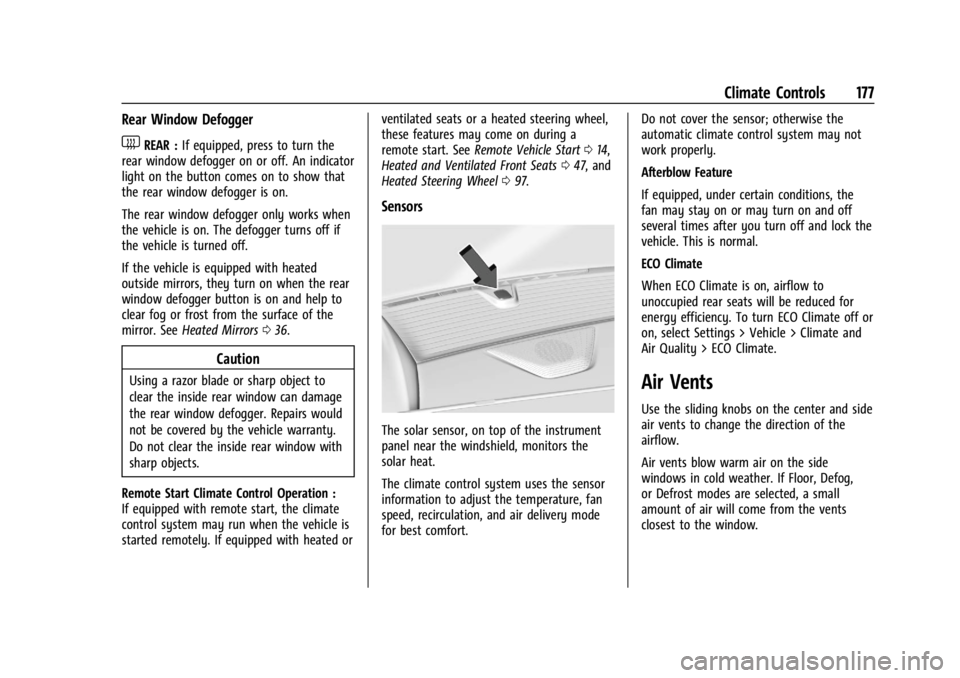
Sensors
The solar sensor, on top of the instrument
panel near the windshield, monitors the
solar heat.
The climate control system uses the sensor
information to adjust the temperature, fan
speed, recirculation, and air delivery mode
for best comfort. Do not cover the sensor; otherwise the
automatic climate control system may not
work properly.
Afterblow Feature
If equipped, under certain conditions, the
fan may stay on or may turn on and off
several times after you turn off and lock the
vehicle. This is normal.
ECO Climate
When ECO Climate is on, airflow to
unoccupied rear seats will be reduced for
energy efficiency. To turn ECO Climate off or
on, select Settings > Vehicle > Climate and
Air Quality > ECO Climate.
Air Vents
Use the sliding knobs on the center and side
air vents to change the direction of the
airflow.
Air vents blow warm air on the side
windows in cold weather. If Floor, Defog,
or Defrost modes are selected, a small
amount of air will come from the vents
closest to the window.
Page 205 of 429
Chevrolet Silverado EV Owner Manual (GMNA-Localizing-U.S./Canada-
16702912) - 2024 - CRC - 1/17/23
204 Driving and Operating
used to hold the vehicle after coming to a
stop, and a noise may be noticed when the
brakes apply.
When driving on slippery roads, it is
recommended to turn off One-Pedal Driving
for maximum vehicle stability. SeeWinter
Driving 0191.
One-Pedal Driving is a useful feature when
towing a trailer, however, using the brake
pedal may be required to slow down and
hold the vehicle with large loads or steep
hills. Trailer brakes are only activated with
the brake pedal but trailer brake lights will
be functional during substantial deceleration
or when the vehicle is stopped. See Trailer
Towing 0297.
While using One-Pedal Driving, the Electric
Parking Brake (EPB) may apply in some
circumstances. This can occur when:
.The driver exits the vehicle.
.The vehicle has remained stationary for
five minutes.
To resume driving, press the accelerator
pedal, and the EPB will automatically
disengage.
Drive Systems
Four-Wheel Drive
This vehicle is equipped with advanced
electric four-wheel drive (e4WD). The e4WD
system delivers power to all four wheels,
and the system adjusts automatically to the
driving conditions. The e4WD system
continuously varies the drive power to the
front and rear wheels to maximize driving
efficiency and improve driving dynamics.
Your vehicle has exceptional driving
capability, but care must always be taken to
adjust driving style to the traffic and road
conditions.
Torque Vectoring
If equipped, the torque vectoring feature of
e4WD enhances vehicle performance by
focusing the vehicle torque to the optimal
wheel(s).
The vehicle e4WD settings may be
customized for the driver mode selected. See
Driver Mode Control 0209 for more
information.
Brakes
Antilock Brake System (ABS)
The Antilock Brake System (ABS) helps
prevent a braking skid and maintain steering
while braking hard.
If there is a problem with ABS, this warning
light stays on. See Antilock Brake System
(ABS) Warning Light 0116.
ABS does not change the time needed to
get a foot on the brake pedal and does not
always decrease stopping distance. If you
get too close to the vehicle ahead, there will
not be enough time to apply the brakes if
that vehicle suddenly slows or stops. Always
leave enough room ahead to stop, even
with ABS.
Using ABS
Do not pump the brakes. Just hold the brake
pedal down firmly. Hearing and feeling ABS
operate is normal.
Page 211 of 429
Chevrolet Silverado EV Owner Manual (GMNA-Localizing-U.S./Canada-
16702912) - 2024 - CRC - 1/17/23
210 Driving and Operating
For more information on Tow/Haul mode,
seeTowing Equipment 0301.
Wide Open Watts : Use this mode for short
durations. It not intended for daily use.
Wide Open Watts provides maximum
propulsion. Engaging Wide Open Watts will
not change the currently active drive mode
but will provide additional propulsion torque
for maximum acceleration.
Wide Open Watts will not function when
the vehicle battery is low. Remaining in this
mode will reduce the range of the vehicle.
Wide Open Watts adjusts the acceleration
pedal map.
qMy Mode : Use this mode to
personalize everyday driving. This mode
allows the driver to configure the vehicle
subsystem settings to their driving
preferences. My mode remains active across
on/off cycles.
Through the infotainment display, the
following vehicle subsystems may be
available for customization in this mode:
Acceleration Pedal : Relaxed, Normal, Sport
Steering Effort : Low, Normal, High
Suspension : Soft, Normal, Firm Motor Sound :
Off, Refined, Engaging
For a more detailed description of each
selectable option, refer to “Drive Mode
Customization.”
Drive Mode Customization
The vehicle is equipped to modify the
following settings based on vehicle content.
Through the infotainment home screen,
select Settings > Vehicle > Drive Mode
Customization to personalize My mode.
These settings will be retained over each
on/off cycle, and do not have to be reset
each time the vehicle is started.
Acceleration Pedal : Choose how responsive
you want acceleration to feel. You can
adjust the accelerator pedal to provide
increased power.
Steering Effort : Choose how responsive you
want the steering to feel. You can set the
steering wheel to provide more feedback,
which requires more steering effort.
Suspension : Choose how responsive you
want the suspension to feel. You can make
the suspension stiffer or more comfortable. Motor Sound :
Customize how your vehicle
sounds when you are accelerating. Your
electric motor remains quiet outside but the
sound you hear inside changes as you drive
faster or slower.Four-Wheel Steering
This vehicle is equipped with four-wheel
steering. This feature steers the vehicle with
all four wheels, which reduces the vehicle
turn diameter and improves maneuverability
of the vehicle.
At slower speeds the front and rear wheels
will turn in opposite directions. This helps
the vehicle make tighter turns, such as
during parking, cornering and turning into
tight spaces. At higher speeds the front and
rear wheels will turn in the same direction.
This improves stability of the vehicle during
lane changes and wide turns
When the vehicle is shut-off, the rear
steering angle will automatically return to
the forward position.
Four-wheel steering is not operational when
Super Cruise is active. See Super Cruise
0 227.