2024 CHEVROLET SILVERADO EV light
[x] Cancel search: lightPage 369 of 429
Chevrolet Silverado EV Owner Manual (GMNA-Localizing-U.S./Canada-
16702912) - 2024 - CRC - 1/13/23
368 Vehicle Care
If the vehicle only has a cigarette lighter,
use the cigarette lighter.
Do not pinch the power plug cord in the
door or window.
7. Start the vehicle. The vehicle must be running while using the air compressor.
8. Press the on/off button (4) to turn the tire sealant and compressor kit on.
The compressor will inflate the tire with
air only.
9. Inflate the tire to the recommended inflation pressure using the pressure
gauge (6). The recommended inflation
pressure can be found on the Tire and
Loading Information label. See Tire
Pressure 0349.
The pressure gauge (6) may read higher
than the actual tire pressure while the
compressor is on. Turn the compressor
off to get an accurate pressure reading.
The compressor may be turned on/off
until the correct pressure is reached.
Caution
If the recommended pressure cannot be
reached after approximately 25 minutes,
the vehicle should not be driven farther.
(Continued)
Caution (Continued)
The tire is too severely damaged and the
tire sealant and compressor kit cannot
inflate the tire. Remove the power plug
from the accessory power outlet and
unscrew the inflating hose from the tire
valve. See Roadside Assistance Program
0 399.
10. Press the on/off button (4) to turn the tire sealant and compressor kit off.
Be careful while handling the compressor
as it could be warm after usage.
11. Unplug the power plug (7) from the accessory power outlet in the vehicle.
12. Turn the air only hose (8) counterclockwise to remove it from the
tire valve stem.
13. Replace the tire valve stem cap.
14. Return the air only hose (8) and power plug (7) back to their original storage
location.
15. Return the equipment to its original storage location in the vehicle.
Accessory adapters that can be used to
inflate an air mattress or a ball, etc., are
located on the bottom of the compressor kit
Storing the Tire Sealant and
Compressor Kit
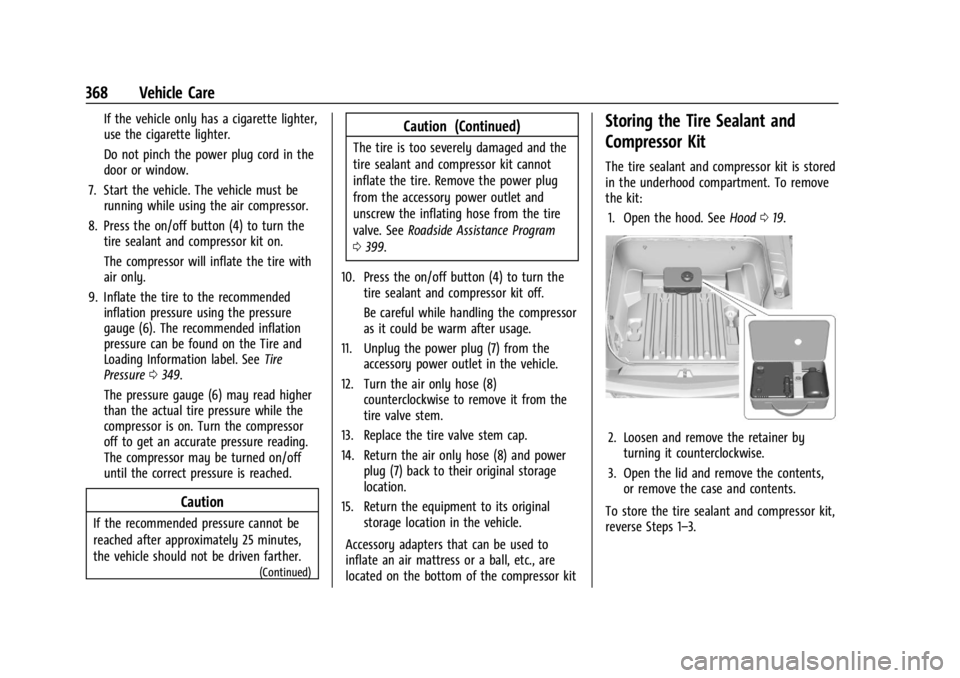
The tire sealant and compressor kit is stored
in the underhood compartment. To remove
the kit: 1. Open the hood. See Hood019.
2. Loosen and remove the retainer by
turning it counterclockwise.
3. Open the lid and remove the contents, or remove the case and contents.
To store the tire sealant and compressor kit,
reverse Steps 1–3.
Page 371 of 429
Chevrolet Silverado EV Owner Manual (GMNA-Localizing-U.S./Canada-
16702912) - 2024 - CRC - 1/13/23
370 Vehicle Care
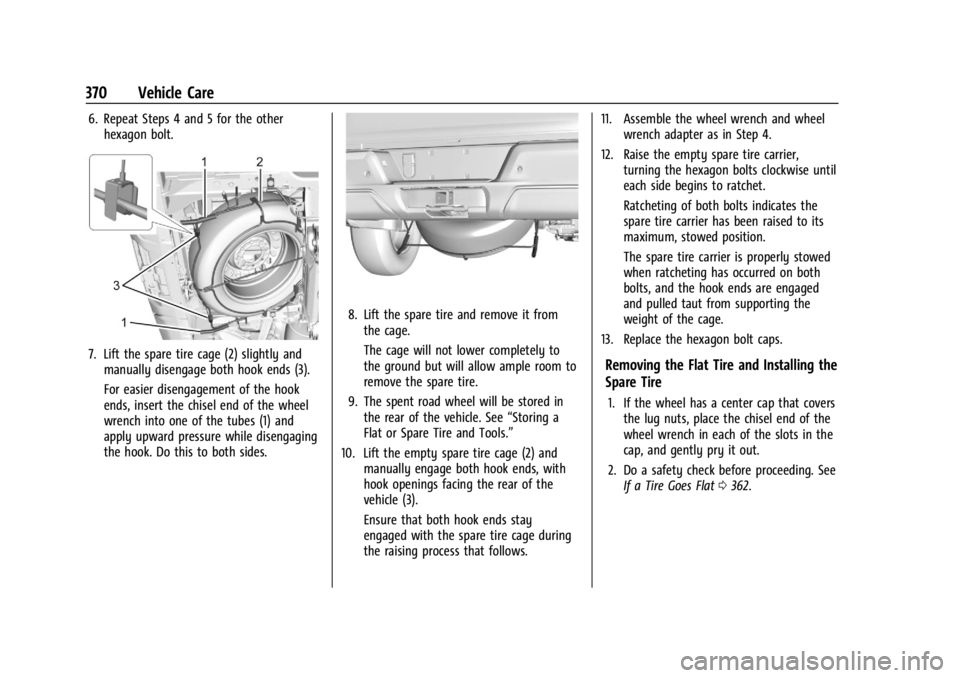
6. Repeat Steps 4 and 5 for the otherhexagon bolt.
7. Lift the spare tire cage (2) slightly andmanually disengage both hook ends (3).
For easier disengagement of the hook
ends, insert the chisel end of the wheel
wrench into one of the tubes (1) and
apply upward pressure while disengaging
the hook. Do this to both sides.
8. Lift the spare tire and remove it fromthe cage.
The cage will not lower completely to
the ground but will allow ample room to
remove the spare tire.
9. The spent road wheel will be stored in the rear of the vehicle. See “Storing a
Flat or Spare Tire and Tools.”
10. Lift the empty spare tire cage (2) and manually engage both hook ends, with
hook openings facing the rear of the
vehicle (3).
Ensure that both hook ends stay
engaged with the spare tire cage during
the raising process that follows. 11. Assemble the wheel wrench and wheel
wrench adapter as in Step 4.
12. Raise the empty spare tire carrier, turning the hexagon bolts clockwise until
each side begins to ratchet.
Ratcheting of both bolts indicates the
spare tire carrier has been raised to its
maximum, stowed position.
The spare tire carrier is properly stowed
when ratcheting has occurred on both
bolts, and the hook ends are engaged
and pulled taut from supporting the
weight of the cage.
13. Replace the hexagon bolt caps.
Removing the Flat Tire and Installing the
Spare Tire
1. If the wheel has a center cap that covers the lug nuts, place the chisel end of the
wheel wrench in each of the slots in the
cap, and gently pry it out.
2. Do a safety check before proceeding. See If a Tire Goes Flat 0362.
Page 377 of 429
Chevrolet Silverado EV Owner Manual (GMNA-Localizing-U.S./Canada-
16702912) - 2024 - CRC - 1/13/23
376 Vehicle Care
Before you connect the cables, here are
some basic things you should know.
Positive (+) will go to the positive (+)
terminal. Negative (−) will go to the
negative (−) terminal on the battery
providing the jump start to the negative
grounding point for the discharged battery.
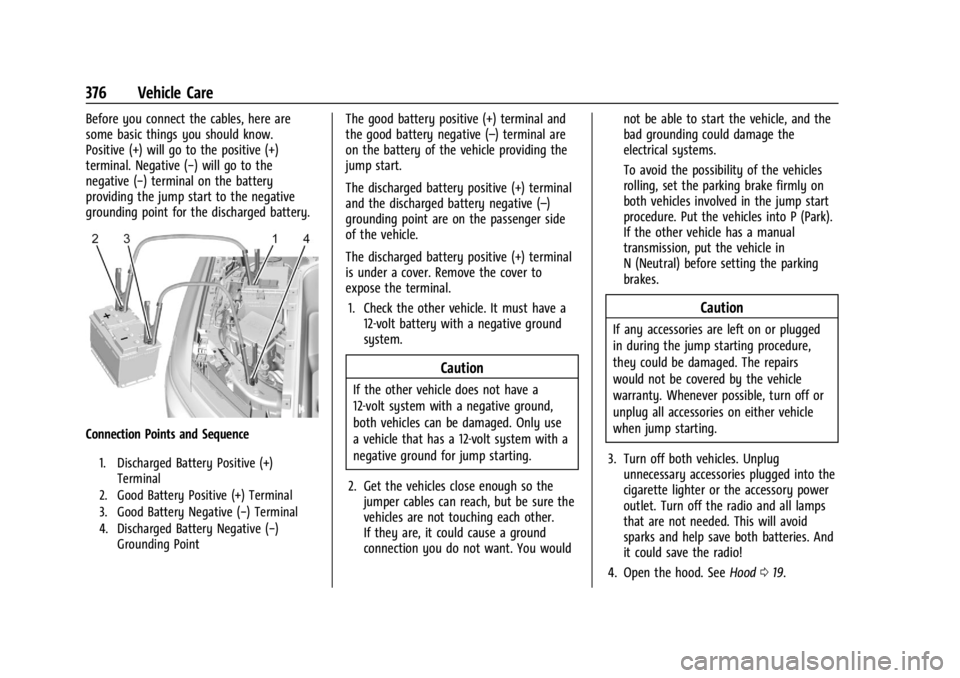
Connection Points and Sequence
1. Discharged Battery Positive (+)Terminal
2. Good Battery Positive (+) Terminal
3. Good Battery Negative (−) Terminal
4. Discharged Battery Negative (−) Grounding Point
The good battery positive (+) terminal and
the good battery negative (–) terminal are
on the battery of the vehicle providing the
jump start.
The discharged battery positive (+) terminal
and the discharged battery negative (–)
grounding point are on the passenger side
of the vehicle.
The discharged battery positive (+) terminal
is under a cover. Remove the cover to
expose the terminal.
1. Check the other vehicle. It must have a 12-volt battery with a negative ground
system.
Caution
If the other vehicle does not have a
12-volt system with a negative ground,
both vehicles can be damaged. Only use
a vehicle that has a 12-volt system with a
negative ground for jump starting.
2. Get the vehicles close enough so the jumper cables can reach, but be sure the
vehicles are not touching each other.
If they are, it could cause a ground
connection you do not want. You would not be able to start the vehicle, and the
bad grounding could damage the
electrical systems.
To avoid the possibility of the vehicles
rolling, set the parking brake firmly on
both vehicles involved in the jump start
procedure. Put the vehicles into P (Park).
If the other vehicle has a manual
transmission, put the vehicle in
N (Neutral) before setting the parking
brakes.
Caution
If any accessories are left on or plugged
in during the jump starting procedure,
they could be damaged. The repairs
would not be covered by the vehicle
warranty. Whenever possible, turn off or
unplug all accessories on either vehicle
when jump starting.
3. Turn off both vehicles. Unplug unnecessary accessories plugged into the
cigarette lighter or the accessory power
outlet. Turn off the radio and all lamps
that are not needed. This will avoid
sparks and help save both batteries. And
it could save the radio!
4. Open the hood. See Hood019.
Page 380 of 429
Chevrolet Silverado EV Owner Manual (GMNA-Localizing-U.S./Canada-
16702912) - 2024 - CRC - 1/13/23
Vehicle Care 379
The vehicle is equipped with a tow eye.
Only use the tow eye to pull the vehicle
onto a flatbed car carrier from a flat road
surface. Do not use the tow eye to pull the
vehicle from snow, mud, sand, or ditch.
Carefully open the cover in the fascia by
using the small notch that conceals the tow
eye socket.
Install the tow eye into the socket and turn
it until it is fully tightened. When the tow
eye is removed, reinstall the cover with the
notch in the original position.
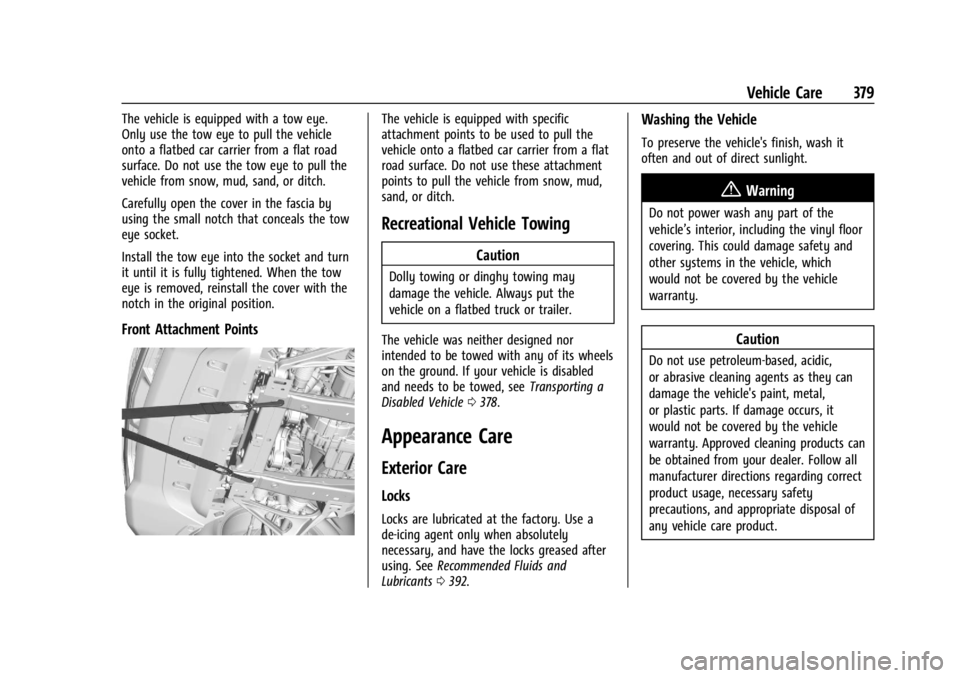
Front Attachment Points
The vehicle is equipped with specific
attachment points to be used to pull the
vehicle onto a flatbed car carrier from a flat
road surface. Do not use these attachment
points to pull the vehicle from snow, mud,
sand, or ditch.
Recreational Vehicle Towing
Caution
Dolly towing or dinghy towing may
damage the vehicle. Always put the
vehicle on a flatbed truck or trailer.
The vehicle was neither designed nor
intended to be towed with any of its wheels
on the ground. If your vehicle is disabled
and needs to be towed, see Transporting a
Disabled Vehicle 0378.
Appearance Care
Exterior Care
Locks
Locks are lubricated at the factory. Use a
de-icing agent only when absolutely
necessary, and have the locks greased after
using. See Recommended Fluids and
Lubricants 0392.
Washing the Vehicle
To preserve the vehicle's finish, wash it
often and out of direct sunlight.
{Warning
Do not power wash any part of the
vehicle’s interior, including the vinyl floor
covering. This could damage safety and
other systems in the vehicle, which
would not be covered by the vehicle
warranty.
Caution
Do not use petroleum-based, acidic,
or abrasive cleaning agents as they can
damage the vehicle's paint, metal,
or plastic parts. If damage occurs, it
would not be covered by the vehicle
warranty. Approved cleaning products can
be obtained from your dealer. Follow all
manufacturer directions regarding correct
product usage, necessary safety
precautions, and appropriate disposal of
any vehicle care product.
Page 383 of 429
Chevrolet Silverado EV Owner Manual (GMNA-Localizing-U.S./Canada-
16702912) - 2024 - CRC - 1/13/23
382 Vehicle Care
.Solvents, alcohols, fuels, or other harsh
cleaners.
.Ice scrapers or other hard items.
.Aftermarket appearance caps or covers
while the lamps are illuminated, due to
excessive heat generated.
Caution
Failure to clean lamps properly can cause
damage to the lamp cover that would
not be covered by the vehicle warranty.
Caution
Using wax on low gloss black finish
stripes can increase the gloss level and
create a non-uniform finish. Clean low
gloss stripes with soap and water only.
Air Intakes
Clear debris from the air intakes, between
the hood and windshield, when washing the
vehicle.
Shutter System
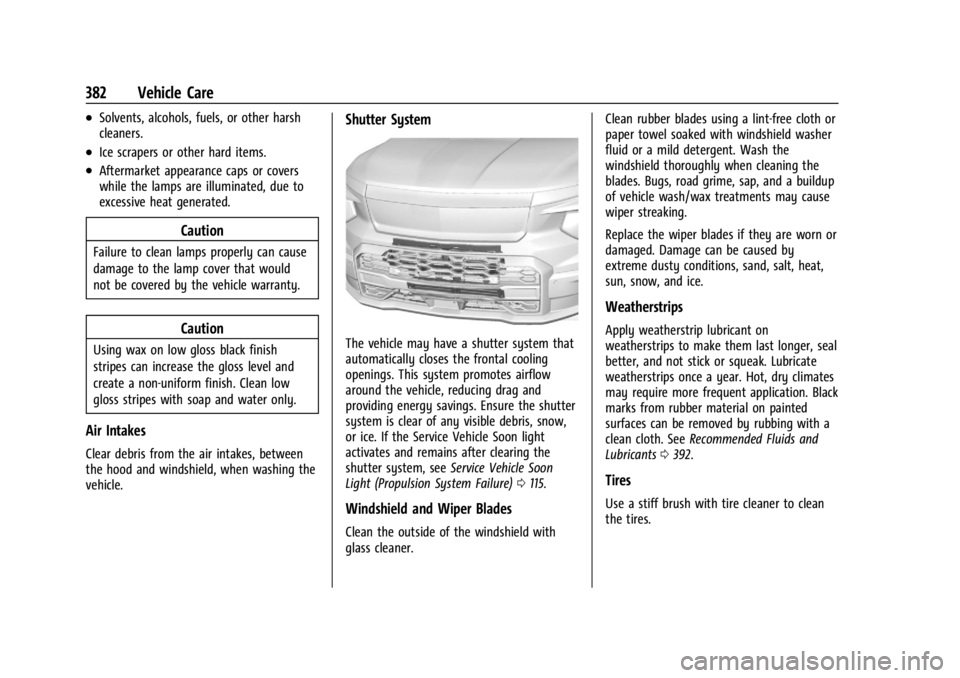
The vehicle may have a shutter system that
automatically closes the frontal cooling
openings. This system promotes airflow
around the vehicle, reducing drag and
providing energy savings. Ensure the shutter
system is clear of any visible debris, snow,
or ice. If the Service Vehicle Soon light
activates and remains after clearing the
shutter system, seeService Vehicle Soon
Light (Propulsion System Failure) 0115.
Windshield and Wiper Blades
Clean the outside of the windshield with
glass cleaner. Clean rubber blades using a lint-free cloth or
paper towel soaked with windshield washer
fluid or a mild detergent. Wash the
windshield thoroughly when cleaning the
blades. Bugs, road grime, sap, and a buildup
of vehicle wash/wax treatments may cause
wiper streaking.
Replace the wiper blades if they are worn or
damaged. Damage can be caused by
extreme dusty conditions, sand, salt, heat,
sun, snow, and ice.
Weatherstrips
Apply weatherstrip lubricant on
weatherstrips to make them last longer, seal
better, and not stick or squeak. Lubricate
weatherstrips once a year. Hot, dry climates
may require more frequent application. Black
marks from rubber material on painted
surfaces can be removed by rubbing with a
clean cloth. See
Recommended Fluids and
Lubricants 0392.
Tires
Use a stiff brush with tire cleaner to clean
the tires.
Page 386 of 429
Chevrolet Silverado EV Owner Manual (GMNA-Localizing-U.S./Canada-
16702912) - 2024 - CRC - 1/13/23
Vehicle Care 385
Caution (Continued)
transfer to the wipe or change the
appearance of the interior surface
when used.
.Do not use scented or gel-type hand
sanitizers. If hand sanitizer comes in
contact with interior surfaces of the
vehicle, blot immediately and clean
with a soft cloth dampened with a
mild soap and water solution.
Interior Glass
To clean, use a microfiber cloth fabric
dampened with water. Wipe droplets left
behind with a clean dry cloth. If necessary,
use a commercial glass cleaner after
cleaning with plain water.
Caution
To prevent scratching, never use abrasive
cleaners on automotive glass. Abrasive
cleaners or aggressive cleaning may
damage the rear window defogger.
Cleaning the windshield with water during
the first three to six months of ownership
will reduce tendency to fog.
Speaker Covers
Vacuum around a speaker cover gently, so
that the speaker will not be damaged. Clean
spots with water and mild soap.
Coated Moldings
Coated moldings should be cleaned.
.When lightly soiled, wipe with a sponge
or soft, lint-free cloth dampened with
water.
.When heavily soiled, use warm soapy
water.
Vinyl/Rubber
If equipped with vinyl floor and rubber floor
mats, use a soft cloth and/or brush
dampened with water to remove dust and
loose dirt. For more thorough cleaning, use
a mild soap and water solution.
{Warning
Do not use cleaners that contain silicone,
wax-based products, or cleaners that
increase gloss on vinyl/rubber floor and
mats. These cleaners can permanently
change the appearance and feel of the
vinyl/rubber and can make the floor (Continued)
Warning (Continued)
slippery. Your foot could slip while
operating the vehicle, and you could lose
control, resulting in a crash. You or
others could be injured.
Fabric/Carpet/Suede
Start by vacuuming the surface using a soft
brush attachment. If a rotating vacuum
brush attachment is being used, only use it
on the floor carpet. Before cleaning, gently
remove as much of the soil as possible:
.Gently blot liquids with a paper towel.
Continue blotting until no more soil can
be removed.
.For solid soils, remove as much as
possible prior to vacuuming.
To clean: 1. Saturate a clean, lint-free colorfast cloth with water. Microfiber cloth is
recommended to prevent lint transfer to
the fabric or carpet.
2. Remove excess moisture by gently wringing until water does not drip from
the cleaning cloth.
Page 391 of 429
Chevrolet Silverado EV Owner Manual (GMNA-Localizing-U.S./Canada-
16702912) - 2024 - CRC - 1/13/23
390 Service and Maintenance
Owner Checks and Services
Every Five Years
.Replace brake fluid every five years. See
Brake Fluid0329.
Every Seven Years
.Replace Air Conditioning Desiccant every
seven years. The air conditioning system
requires maintenance every seven years.
This service requires replacement of the
desiccant to help the longevity and
efficient operation of the air conditioning
system. This service can be complex. See
your dealer.
Multi-Point Vehicle
Inspection (MPVI)
A Multi Point Vehicle Inspection (MPVI)
completed by a GM dealer technician is a
maintenance assessment of your vehicle.
The benefit of the MPVI is to identify and
inform the customer of service items that
require immediate attention and those that
may require attention in the future. The technician will perform the following
checks on your vehicle. For a complete list
of checks, inspections, and services, see your
dealer.
Some items may not apply to your vehicle
and/or region.
Diagnostics
.OnStar active, if equipped
.Service history/recall check
Exterior Lights
.Visual inspection
Windshield and Wipers
.Visual inspection
Battery
.Battery visual inspection
.Battery test results
.Battery cables and connections
Systems, Fluids, and Visible Leak
Inspection
.Electric Drive Unit
.Drive axle
.Transfer case
.Power electronics cooling system
.Windshield washer fluid
Tire Inspection
.Tire pressure, tread depth, and wear
.Rotation, if applicable
.Alignment check, optional
.Reset tire pressure monitor
.Check tire sealant expiration date,
if equipped
.Check spare tire, if equipped
Brakes
.Check brake system
Page 409 of 429
Chevrolet Silverado EV Owner Manual (GMNA-Localizing-U.S./Canada-
16702912) - 2024 - CRC - 1/13/23
408 OnStar
OnStar
OnStar Overview
OnStar Overview . . . . . . . . . . . . . . . . . . . . . . 408
OnStar Services
Emergency . . . . . . . . . . . . . . . . . . . . . . . . . . . . 409
Security . . . . . . . . . . . . . . . . . . . . . . . . . . . . . . . 409
OnStar Additional Information
OnStar Additional Information . . . . . . . . . 410
OnStar Overview
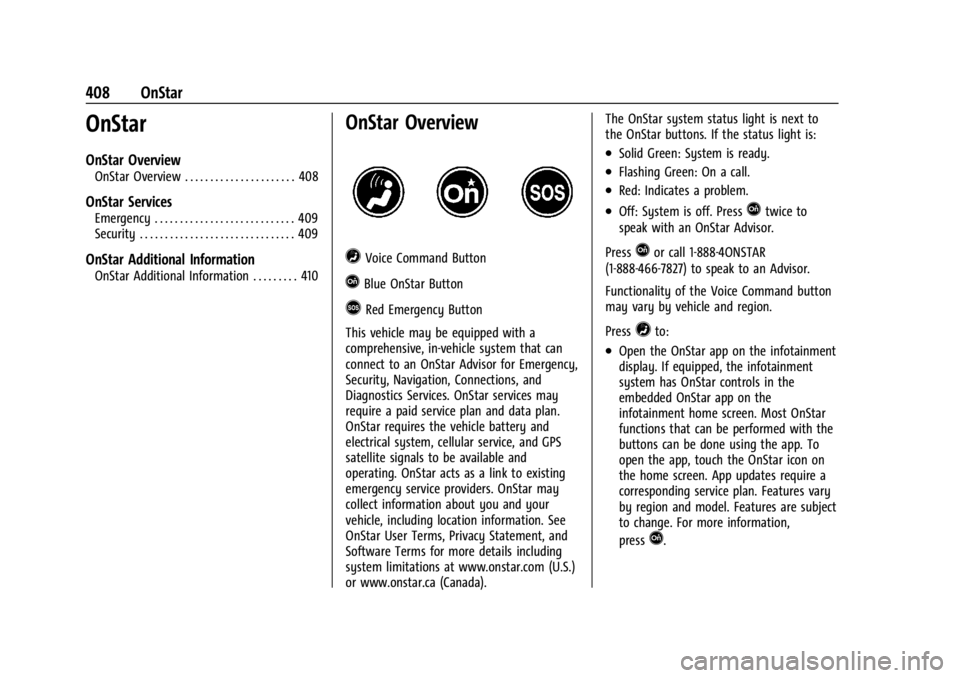
=Voice Command Button
QBlue OnStar Button
>Red Emergency Button
This vehicle may be equipped with a
comprehensive, in-vehicle system that can
connect to an OnStar Advisor for Emergency,
Security, Navigation, Connections, and
Diagnostics Services. OnStar services may
require a paid service plan and data plan.
OnStar requires the vehicle battery and
electrical system, cellular service, and GPS
satellite signals to be available and
operating. OnStar acts as a link to existing
emergency service providers. OnStar may
collect information about you and your
vehicle, including location information. See
OnStar User Terms, Privacy Statement, and
Software Terms for more details including
system limitations at www.onstar.com (U.S.)
or www.onstar.ca (Canada). The OnStar system status light is next to
the OnStar buttons. If the status light is:
.Solid Green: System is ready.
.Flashing Green: On a call.
.Red: Indicates a problem.
.Off: System is off. PressQtwice to
speak with an OnStar Advisor.
Press
Qor call 1-888-4ONSTAR
(1-888-466-7827) to speak to an Advisor.
Functionality of the Voice Command button
may vary by vehicle and region.
Press
=to:
.Open the OnStar app on the infotainment
display. If equipped, the infotainment
system has OnStar controls in the
embedded OnStar app on the
infotainment home screen. Most OnStar
functions that can be performed with the
buttons can be done using the app. To
open the app, touch the OnStar icon on
the home screen. App updates require a
corresponding service plan. Features vary
by region and model. Features are subject
to change. For more information,
press
Q.