2024 CHEVROLET SILVERADO EV remove seats
[x] Cancel search: remove seatsPage 10 of 429
Chevrolet Silverado EV Owner Manual (GMNA-Localizing-U.S./Canada-
16702912) - 2024 - CRC - 1/23/23
Keys, Doors, and Windows 9
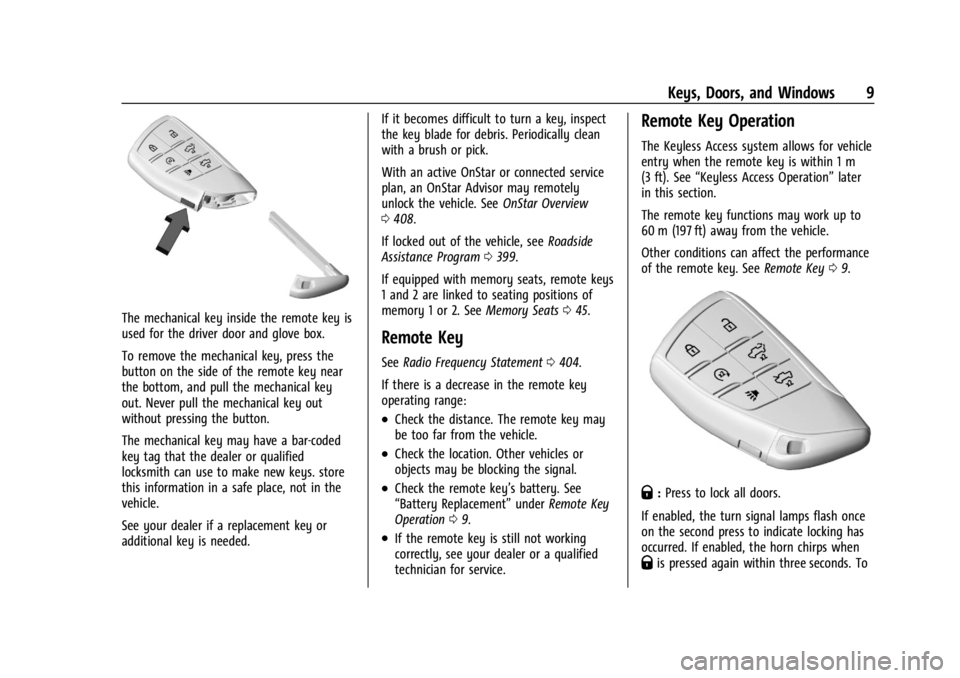
The mechanical key inside the remote key is
used for the driver door and glove box.
To remove the mechanical key, press the
button on the side of the remote key near
the bottom, and pull the mechanical key
out. Never pull the mechanical key out
without pressing the button.
The mechanical key may have a bar-coded
key tag that the dealer or qualified
locksmith can use to make new keys. store
this information in a safe place, not in the
vehicle.
See your dealer if a replacement key or
additional key is needed.If it becomes difficult to turn a key, inspect
the key blade for debris. Periodically clean
with a brush or pick.
With an active OnStar or connected service
plan, an OnStar Advisor may remotely
unlock the vehicle. See
OnStar Overview
0 408.
If locked out of the vehicle, see Roadside
Assistance Program 0399.
If equipped with memory seats, remote keys
1 and 2 are linked to seating positions of
memory 1 or 2. See Memory Seats045.
Remote Key
See Radio Frequency Statement 0404.
If there is a decrease in the remote key
operating range:
.Check the distance. The remote key may
be too far from the vehicle.
.Check the location. Other vehicles or
objects may be blocking the signal.
.Check the remote key’s battery. See
“Battery Replacement” underRemote Key
Operation 09.
.If the remote key is still not working
correctly, see your dealer or a qualified
technician for service.
Remote Key Operation
The Keyless Access system allows for vehicle
entry when the remote key is within 1 m
(3 ft). See “Keyless Access Operation” later
in this section.
The remote key functions may work up to
60 m (197 ft) away from the vehicle.
Other conditions can affect the performance
of the remote key. See Remote Key09.
Q:Press to lock all doors.
If enabled, the turn signal lamps flash once
on the second press to indicate locking has
occurred. If enabled, the horn chirps when
Qis pressed again within three seconds. To
Page 25 of 429
Chevrolet Silverado EV Owner Manual (GMNA-Localizing-U.S./Canada-
16702912) - 2024 - CRC - 1/23/23
24 Keys, Doors, and Windows
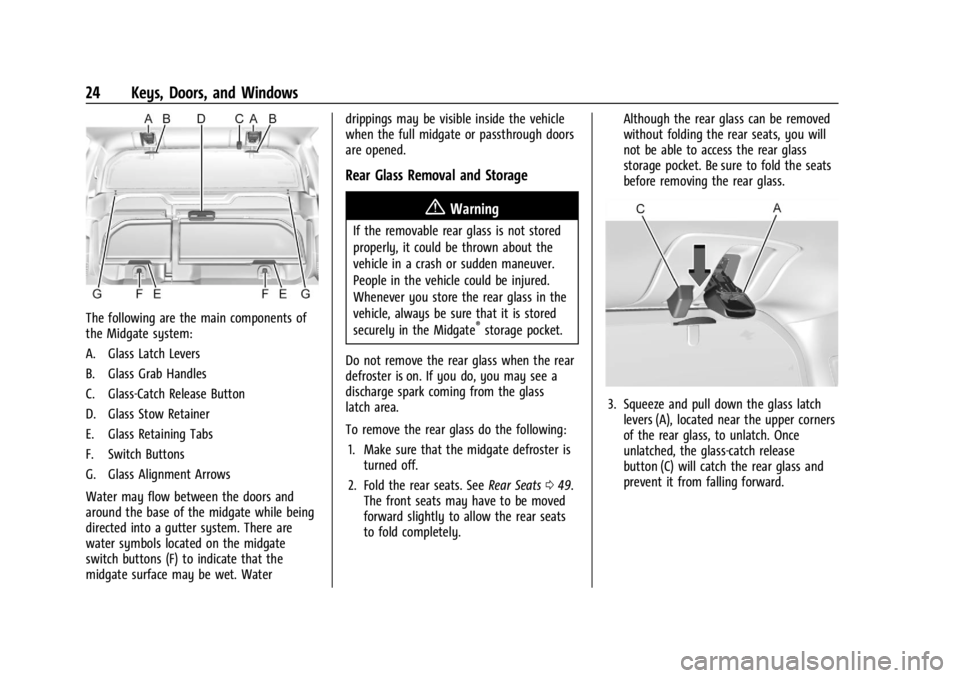
The following are the main components of
the Midgate system:
A. Glass Latch Levers
B. Glass Grab Handles
C. Glass-Catch Release Button
D. Glass Stow Retainer
E. Glass Retaining Tabs
F. Switch Buttons
G. Glass Alignment Arrows
Water may flow between the doors and
around the base of the midgate while being
directed into a gutter system. There are
water symbols located on the midgate
switch buttons (F) to indicate that the
midgate surface may be wet. Waterdrippings may be visible inside the vehicle
when the full midgate or passthrough doors
are opened.
Rear Glass Removal and Storage
{Warning
If the removable rear glass is not stored
properly, it could be thrown about the
vehicle in a crash or sudden maneuver.
People in the vehicle could be injured.
Whenever you store the rear glass in the
vehicle, always be sure that it is stored
securely in the Midgate
®storage pocket.
Do not remove the rear glass when the rear
defroster is on. If you do, you may see a
discharge spark coming from the glass
latch area.
To remove the rear glass do the following: 1. Make sure that the midgate defroster is turned off.
2. Fold the rear seats. See Rear Seats049.
The front seats may have to be moved
forward slightly to allow the rear seats
to fold completely. Although the rear glass can be removed
without folding the rear seats, you will
not be able to access the rear glass
storage pocket. Be sure to fold the seats
before removing the rear glass.
3. Squeeze and pull down the glass latch
levers (A), located near the upper corners
of the rear glass, to unlatch. Once
unlatched, the glass-catch release
button (C) will catch the rear glass and
prevent it from falling forward.
Page 28 of 429
Chevrolet Silverado EV Owner Manual (GMNA-Localizing-U.S./Canada-
16702912) - 2024 - CRC - 1/23/23
Keys, Doors, and Windows 27
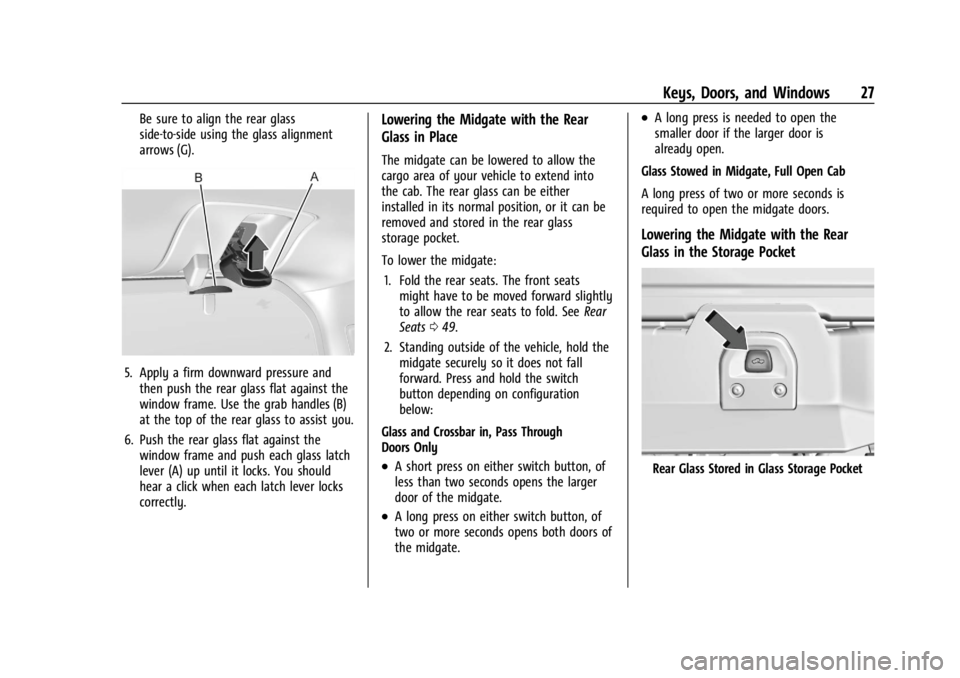
Be sure to align the rear glass
side-to-side using the glass alignment
arrows (G).
5. Apply a firm downward pressure andthen push the rear glass flat against the
window frame. Use the grab handles (B)
at the top of the rear glass to assist you.
6. Push the rear glass flat against the window frame and push each glass latch
lever (A) up until it locks. You should
hear a click when each latch lever locks
correctly.
Lowering the Midgate with the Rear
Glass in Place
The midgate can be lowered to allow the
cargo area of your vehicle to extend into
the cab. The rear glass can be either
installed in its normal position, or it can be
removed and stored in the rear glass
storage pocket.
To lower the midgate:
1. Fold the rear seats. The front seats might have to be moved forward slightly
to allow the rear seats to fold. See Rear
Seats 049.
2. Standing outside of the vehicle, hold the midgate securely so it does not fall
forward. Press and hold the switch
button depending on configuration
below:
Glass and Crossbar in, Pass Through
Doors Only
.A short press on either switch button, of
less than two seconds opens the larger
door of the midgate.
.A long press on either switch button, of
two or more seconds opens both doors of
the midgate.
.A long press is needed to open the
smaller door if the larger door is
already open.
Glass Stowed in Midgate, Full Open Cab
A long press of two or more seconds is
required to open the midgate doors.
Lowering the Midgate with the Rear
Glass in the Storage Pocket
Rear Glass Stored in Glass Storage Pocket
Page 46 of 429
Chevrolet Silverado EV Owner Manual (GMNA-Localizing-U.S./Canada-
16702912) - 2024 - CRC - 1/13/23
Seats and Restraints 45
.Tilt the top of the control forward to
raise.
Lumbar Adjustment
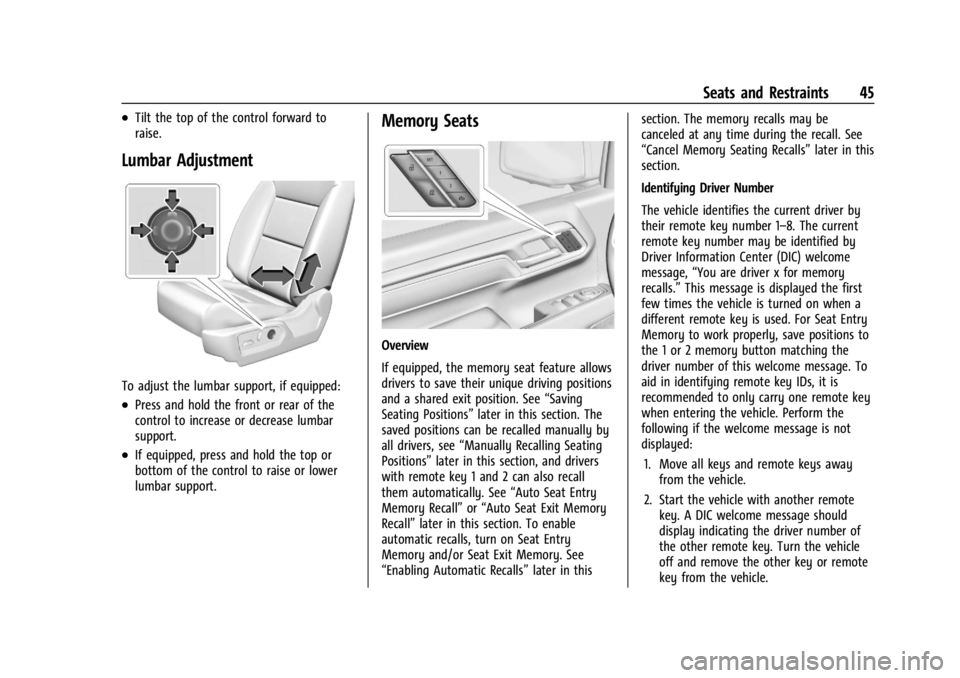
To adjust the lumbar support, if equipped:
.Press and hold the front or rear of the
control to increase or decrease lumbar
support.
.If equipped, press and hold the top or
bottom of the control to raise or lower
lumbar support.
Memory Seats
Overview
If equipped, the memory seat feature allows
drivers to save their unique driving positions
and a shared exit position. See“Saving
Seating Positions” later in this section. The
saved positions can be recalled manually by
all drivers, see “Manually Recalling Seating
Positions” later in this section, and drivers
with remote key 1 and 2 can also recall
them automatically. See “Auto Seat Entry
Memory Recall” or“Auto Seat Exit Memory
Recall” later in this section. To enable
automatic recalls, turn on Seat Entry
Memory and/or Seat Exit Memory. See
“Enabling Automatic Recalls” later in thissection. The memory recalls may be
canceled at any time during the recall. See
“Cancel Memory Seating Recalls”
later in this
section.
Identifying Driver Number
The vehicle identifies the current driver by
their remote key number 1–8. The current
remote key number may be identified by
Driver Information Center (DIC) welcome
message, “You are driver x for memory
recalls.” This message is displayed the first
few times the vehicle is turned on when a
different remote key is used. For Seat Entry
Memory to work properly, save positions to
the 1 or 2 memory button matching the
driver number of this welcome message. To
aid in identifying remote key IDs, it is
recommended to only carry one remote key
when entering the vehicle. Perform the
following if the welcome message is not
displayed:
1. Move all keys and remote keys away from the vehicle.
2. Start the vehicle with another remote key. A DIC welcome message should
display indicating the driver number of
the other remote key. Turn the vehicle
off and remove the other key or remote
key from the vehicle.
Page 48 of 429
Chevrolet Silverado EV Owner Manual (GMNA-Localizing-U.S./Canada-
16702912) - 2024 - CRC - 1/13/23
Seats and Restraints 47
If the memory seat recalls to the wrong
position, remote key number 1 or 2 may not
match the memory button number positions
they were saved to. Try the other remote
key or try saving the positions to the other
1 or 2 memory button. See“Saving Seating
Positions” previously in this section.
Automatic Seat Entry Memory recalls are
only available for remote key numbers 1 and
2. Remote keys 3–8 will not provide Seat
Entry Memory recalls.
Auto Seat Exit Memory Recall
Seat Exit Memory will begin movement to
the seating position of the
B
button when:
.The vehicle is turned off and the driver
door is open or opened within a
short time.
.A seating position has been previously
been saved to the
Bmemory button.
See “Saving Seating Positions” previously
in this section.
.Seat Exit Memory is enabled. See
“Enabling Automatic Recalls” previously in
this section.
.The vehicle is in P (Park). Seat Exit Memory recall will continue if the
vehicle is shifted out of P (Park) prior to
reaching the saved memory position.
Seat Exit Memory is not linked to a remote
key. The seating position saved to
Bis
used for all drivers.
Cancel Memory Seating Recalls
.During any memory recall:
Press a power seat control
Press SET memory button
.During Manual memory recall:
Release 1, 2, or
Bmemory button
.During Auto Seat Entry Memory Recall:
Turn vehicle off
Press SET, 1, 2, or
Bmemory buttons
.During Auto Seat Exit Memory Recall:
Press SET, 1, 2, or
Bmemory buttons
Obstructions
If something has blocked the seat while
recalling a memory position, the recall may
stop. Remove the obstruction and try the
recall again. If the memory position still
does not recall, see your dealer.
Heated and Ventilated Front
Seats
{Warning
If temperature change or pain to the skin
cannot be felt, the seat heater may cause
burns. To reduce the risk of burns, use
care when using the seat heater,
especially for long periods of time. Do
not place anything on the seat that
insulates against heat, such as a blanket,
cushion, cover, or similar item. This may
cause the seat heater to overheat. An
overheated seat heater may cause a burn
or may damage the seat.
Page 54 of 429

Chevrolet Silverado EV Owner Manual (GMNA-Localizing-U.S./Canada-
16702912) - 2024 - CRC - 1/13/23
Seats and Restraints 53
Why Seat Belts Work
When riding in a vehicle, you travel as fast
as the vehicle does. If the vehicle stops
suddenly, you keep going until something
stops you. It could be the windshield, the
instrument panel, or the seat belts!
When you wear a seat belt, you and the
vehicle slow down together. There is more
time to stop because you stop over a longer
distance and, when worn properly, your
strongest bones take the forces from the
seat belts. That is why wearing seat belts
makes such good sense.
Questions and Answers About Seat Belts
Q: Will I be trapped in the vehicle after acrash if I am wearing a seat belt?
A: You could be— whether you are
wearing a seat belt or not. Your chance
of being conscious during and after a
crash, so you canunbuckle and get out,
is much greater if you are belted.
Q: If my vehicle has airbags, why should I have to wear seat belts?
A: Airbags are supplemental systems only.
They work withseat belts —not instead
of them. Whether or not an airbag is
provided, all occupants still have to
buckle up to get the most protection.
Also, in nearly all states and in all
Canadian provinces, the law requires
wearing seat belts.
Buckle To Drive
If equipped, this feature delays the vehicle
from shifting out of P (Park) when the driver
seat belt is not buckled. The Buckle to Drive
feature must be turned ON in the
infotainment system to work. To turn the
Buckle to Drive feature on or off, select
Settings > Vehicle > Buckle to Drive. See
Teen Driver 0168, if equipped. If the vehicle is on and the brake pedal is
pressed with the vehicle in P (Park) but the
driver seat belt is not buckled, a message
displays in the Driver Information
Center (DIC) and the vehicle will be delayed
from shifting out of P (Park). Buckle the
driver seat belt to clear the message and
shift out of P (Park). Shifting from P (Park)
will be delayed once for each time the
vehicle is started.
On some models, Buckle to Drive may also
delay shifting out of P (Park) if a front
passenger seat belt is unbuckled. A message
displays in the DIC. Buckle the front
passenger seat belt to clear the message
and shift out of P (Park). This feature may
delay the vehicle from shifting out of
P (Park) if an object, such as a briefcase,
handbag, grocery bag, laptop, or other
electronic device, is on the front passenger
seat. If this happens, remove the object
from the seat or buckle the seat belt to shift
out of P (Park).
If the driver, or on some vehicles, the
present front passenger remains unbuckled,
the DIC message will turn off after several
seconds and the vehicle can be shifted out
of P (Park). See
“Seat Belts”and“Child
Page 67 of 429
Chevrolet Silverado EV Owner Manual (GMNA-Localizing-U.S./Canada-
16702912) - 2024 - CRC - 1/13/23
66 Seats and Restraints
Warning (Continued)
Never put a rear-facing child restraint in
the front seat, even if the airbag is off.
If securing a forward-facing child restraint
in the front outboard passenger seat,
always move the seat as far back as it
will go. It is better to secure child
restraints in the rear seat. Consider using
another vehicle to transport the child
when a rear seat is not available.
The passenger sensing system is designed to
turn off the front outboard passenger
frontal airbag if:
.The front outboard passenger seat is
unoccupied.
.The system determines an infant is
present in a child restraint.
.A front outboard passenger takes his/her
weight off of the seat for a period
of time.
When the passenger sensing system has
turned off the front outboard passenger
frontal airbag, the OFF indicator will light
and stay lit as a reminder that the airbag is
off. See Passenger Airbag Status Indicator
0 114. The passenger sensing system is designed to
turn on the front outboard passenger frontal
airbag anytime the system senses that a
person of adult size is sitting properly in the
front outboard passenger seat.
When the passenger sensing system has
allowed the airbag to be enabled, the ON
indicator will light and stay lit as a reminder
that the airbag is active.
For some children, including children in child
restraints, and for very small adults, the
passenger sensing system may or may not
turn off the front outboard passenger
frontal airbag, depending upon the person's
seating posture and body build. Everyone in
the vehicle who has outgrown child
restraints should wear a seat belt
properly
—whether or not there is an
airbag for that person.{Warning
If the airbag readiness light ever comes
on and stays on, it means that
something may be wrong with the airbag
system. To help avoid injury to yourself
or others, have the vehicle serviced right
(Continued)
Warning (Continued)
away. SeeAirbag Readiness Light 0113
for more information, including important
safety information.
If the On Indicator Is Lit for a Child
Restraint
The passenger sensing system is designed to
turn off the front outboard passenger
frontal airbag if the system determines that
an infant is present in a child restraint. If a
child restraint has been installed and the ON
indicator is lit:
1. Turn the vehicle off.
2. Remove the child restraint from the vehicle.
3. Remove any additional items from the seat such as blankets, cushions, seat
covers, seat heaters, or seat massagers.
4. Reinstall the child restraint following the directions provided by the child restraint
manufacturer and refer to Securing Child
Restraints (With the Seat Belt in the Rear
Seat) 086 or
Securing Child Restraints (With the Seat
Belt in the Front Passenger Seat) 088.
Page 68 of 429
Chevrolet Silverado EV Owner Manual (GMNA-Localizing-U.S./Canada-
16702912) - 2024 - CRC - 1/13/23
Seats and Restraints 67
Make sure the seat belt retractor is
locked by pulling the shoulder belt all
the way out of the retractor when
installing the child restraint, even if the
child restraint is equipped with a seat
belt lock off. When the retractor lock is
set, the belt can be tightened but not
pulled out of the retractor.
5. If, after reinstalling the child restraint and restarting the vehicle, the ON
indicator is still lit, turn the vehicle off.
Then slightly recline the vehicle seatback
and adjust the seat cushion,
if adjustable, to make sure that the
vehicle seatback is not pushing the child
restraint into the seat cushion.
Also make sure the child restraint is not
trapped under the vehicle head restraint.
If this happens, adjust the head restraint.
See Head Restraints 041.
6. Restart the vehicle.
The passenger sensing system may or may
not turn off the airbag for a child in a child
restraint depending upon the child’s size.
It is better to secure the child restraint in a
rear seat. Never put a rear-facing child
restraint in the front seat, even if the ON
indicator is not lit.If the Off Indicator Is Lit for an
Adult-Sized Occupant
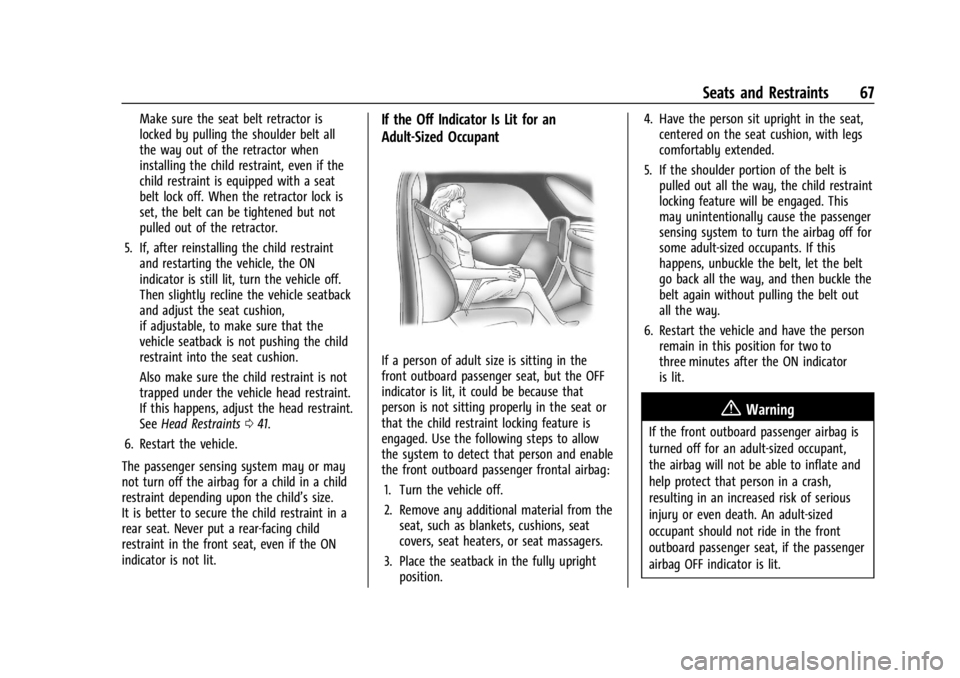
If a person of adult size is sitting in the
front outboard passenger seat, but the OFF
indicator is lit, it could be because that
person is not sitting properly in the seat or
that the child restraint locking feature is
engaged. Use the following steps to allow
the system to detect that person and enable
the front outboard passenger frontal airbag: 1. Turn the vehicle off.
2. Remove any additional material from the seat, such as blankets, cushions, seat
covers, seat heaters, or seat massagers.
3. Place the seatback in the fully upright position. 4. Have the person sit upright in the seat,
centered on the seat cushion, with legs
comfortably extended.
5. If the shoulder portion of the belt is pulled out all the way, the child restraint
locking feature will be engaged. This
may unintentionally cause the passenger
sensing system to turn the airbag off for
some adult-sized occupants. If this
happens, unbuckle the belt, let the belt
go back all the way, and then buckle the
belt again without pulling the belt out
all the way.
6. Restart the vehicle and have the person remain in this position for two to
three minutes after the ON indicator
is lit.
{Warning
If the front outboard passenger airbag is
turned off for an adult-sized occupant,
the airbag will not be able to inflate and
help protect that person in a crash,
resulting in an increased risk of serious
injury or even death. An adult-sized
occupant should not ride in the front
outboard passenger seat, if the passenger
airbag OFF indicator is lit.