2024 CHEVROLET SILVERADO EV start stop button
[x] Cancel search: start stop buttonPage 50 of 429

Chevrolet Silverado EV Owner Manual (GMNA-Localizing-U.S./Canada-
16702912) - 2024 - CRC - 1/13/23
Seats and Restraints 49
seats feature will not activate that seat. To
enable or disable auto heated or ventilated
seats, select Settings > Vehicle > Climate
and Air Quality > Auto Cooled or Auto
Heated Seats > ON or OFF.
Remote Start Heated and Ventilated Seats
During a remote start, the heated or
ventilated seats, if equipped, can be turned
on automatically. When it is cold outside,
the heated seats turn on, and when it is hot
outside the ventilated seats turn on. If the
auto heated or ventilated seats feature is
not on when then vehicle is turned on, the
heated or ventilated seats may be canceled.
If necessary, press the heated or ventilated
seat button to use the heated or ventilated
seats after the vehicle is started.
The heated or ventilated seat indicator lights
may turn on during a remote start.
The temperature performance of an
unoccupied seat may be reduced. This is
normal.
To enable or disable remote start heated or
ventilated seats, select Settings > Vehicle >
Remote Lock, Unlock, and Start > Remote
Start Auto Heat Seats or Remote Start Auto
Cool Seats > ON or OFF. SeeRemote Vehicle
Start 014.Rear Seats
Rear Seat Reminder
If equipped, the message REAR SEAT
REMINDER LOOK IN REAR SEAT displays
under certain conditions indicating there
may be an item or passenger in the rear
seat. Check before exiting the vehicle.
This feature will activate when a second row
door is opened while the vehicle is on or up
to 10 minutes before the vehicle is turned
on. There will be an alert when the vehicle
is turned off. The alert does not directly
detect objects in the rear seat; instead,
under certain conditions, it detects when a
rear door is opened and closed, indicating
that there may be something in the
rear seat.
The feature is active only once each time
the vehicle is turned on and off, and will
require reactivation by opening and closing
the second row doors. There may be an
alert even when there is nothing in the rear
seat; for example, if a child entered the
vehicle through the rear door and left the
vehicle without the vehicle being shut off. The feature can be turned on or off. Select
Settings > Vehicle > Rear Seat Reminder >
ON or OFF.Folding the Rear Seat Cushion (Uplevel
Models)
Either side of the rear seat cushion can be
folded down for added cargo space.
{Warning
Folding a rear seat with the seat belts
still fastened may cause damage to the
seat or the seat belts. Always unbuckle
the seat belts and return them to their
normal stowed position before folding a
rear seat.
{Warning
Do not operate the vehicle with the rear
seat cushion(s) folded down and the rear
seatbacks in the upright position. The
folded seat cushion is not locked. It can
move when the vehicle is in motion.
People in the vehicle could be injured in a
sudden stop or crash. Be sure to return
the seat cushion to the seating position
(Continued)
Page 102 of 429
Chevrolet Silverado EV Owner Manual (GMNA-Localizing-U.S./Canada-
16702912) - 2024 - CRC - 1/13/23
Instruments and Controls 101
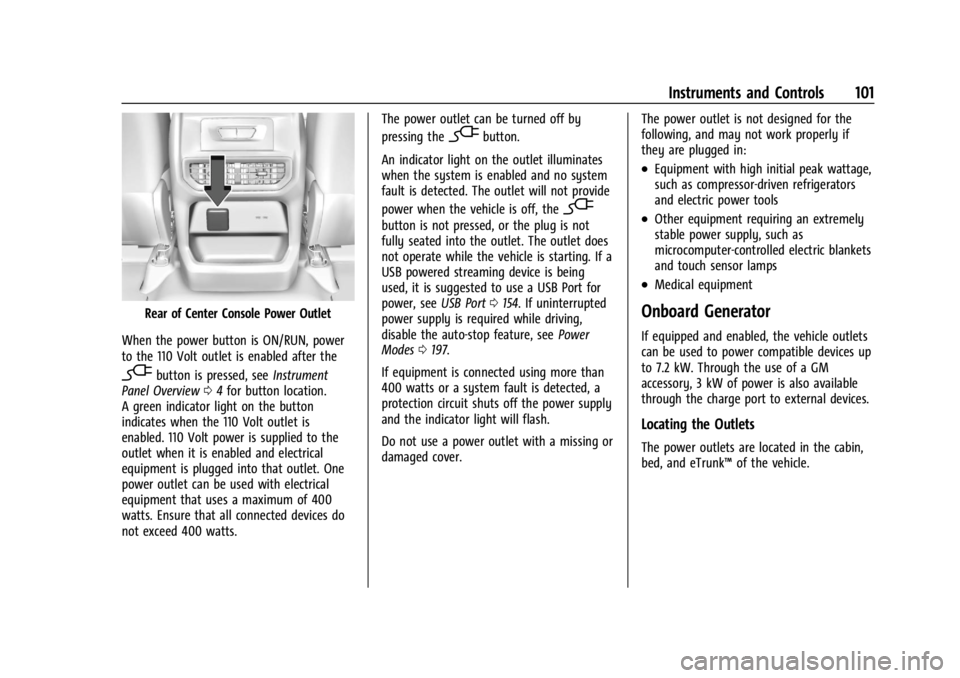
Rear of Center Console Power Outlet
When the power button is ON/RUN, power
to the 110 Volt outlet is enabled after the
-button is pressed, see Instrument
Panel Overview 04for button location.
A green indicator light on the button
indicates when the 110 Volt outlet is
enabled. 110 Volt power is supplied to the
outlet when it is enabled and electrical
equipment is plugged into that outlet. One
power outlet can be used with electrical
equipment that uses a maximum of 400
watts. Ensure that all connected devices do
not exceed 400 watts. The power outlet can be turned off by
pressing the
-button.
An indicator light on the outlet illuminates
when the system is enabled and no system
fault is detected. The outlet will not provide
power when the vehicle is off, the
-
button is not pressed, or the plug is not
fully seated into the outlet. The outlet does
not operate while the vehicle is starting. If a
USB powered streaming device is being
used, it is suggested to use a USB Port for
power, see USB Port0154. If uninterrupted
power supply is required while driving,
disable the auto-stop feature, see Power
Modes 0197.
If equipment is connected using more than
400 watts or a system fault is detected, a
protection circuit shuts off the power supply
and the indicator light will flash.
Do not use a power outlet with a missing or
damaged cover. The power outlet is not designed for the
following, and may not work properly if
they are plugged in:
.Equipment with high initial peak wattage,
such as compressor-driven refrigerators
and electric power tools
.Other equipment requiring an extremely
stable power supply, such as
microcomputer-controlled electric blankets
and touch sensor lamps
.Medical equipment
Onboard Generator
If equipped and enabled, the vehicle outlets
can be used to power compatible devices up
to 7.2 kW. Through the use of a GM
accessory, 3 kW of power is also available
through the charge port to external devices.
Locating the Outlets
The power outlets are located in the cabin,
bed, and eTrunk™
of the vehicle.
Page 199 of 429
Chevrolet Silverado EV Owner Manual (GMNA-Localizing-U.S./Canada-
16702912) - 2024 - CRC - 1/17/23
198 Driving and Operating
If the vehicle must be shut off in an
emergency:1. Brake using firm and steady pressure. Do not pump the brakes repeatedly. This
may deplete power assist, requiring
increased brake pedal force.
2. Shift the vehicle to N (Neutral). This can be done while the vehicle is moving.
After shifting to N (Neutral), firmly apply
the brakes and steer the vehicle to a
safe location.
3. Come to a complete stop, shift to P (Park), and turn the vehicle off.
4. Set the parking brake. See Electric
Parking Brake 0205.
{Warning
Turning off the vehicle while moving may
disable the airbags. While driving, only
shut the propulsion system off in an
emergency.
If a drive mode is entered where
fis
present while moving, the vehicle can be
shut off while driving. Press
fand follow
the instructions displayed in the Driver
Information Center (DIC) to confirm that
vehicle off mode is desired. Climate control functions, such as defrost,
heating, and air conditioning are only
available while the vehicle is powered on.
Turning the vehicle off will turn off all
climate controls.
If a collision is detected an additional
emergency vehicle off display will be shown
and can be pressed to turn the vehicle off.
Keeping Vehicle On After Driver Exit
{Warning
It is dangerous to get out of the vehicle
if the P (Park) button is not pressed with
the parking brake set. The vehicle
can roll.
Do not leave the vehicle when the
propulsion system is running. If you have
left the propulsion system running, the
vehicle can move suddenly. You or others
could be injured. To be sure the vehicle
will not move, even when you are on
fairly level ground, always set the
parking brake and press the P (Park)
button.
Press
gon the infotainment display to
keep the vehicle on after a driver exit is
detected.
gneeds to be selected each
time the vehicle is shifted to P (Park) to be
active. The vehicle will remain on for a set
time displayed in a notification upon
activation.
gcan be reselected to restart
the time interval.
Before exiting the vehicle, press the P (Park)
button and the Electric Parking Brake (EPB)
switch, then activate
g. See Shifting Into
Park 0199.
Using
gwill reduce the charge level of
the high voltage battery. Ensure your
battery has sufficient charge before
activating
g. See Battery Gauge (High
Voltage) 0110.
gshould only be used when the vehicle
is attended. A horn chirp will sound if the
vehicle turns off during the set time
interval.
Page 202 of 429
Chevrolet Silverado EV Owner Manual (GMNA-Localizing-U.S./Canada-
16702912) - 2024 - CRC - 1/17/23
Driving and Operating 201
Warning (Continued)
will not move, even when you are on
fairly level ground, always set the
parking brake and press the P (Park)
button.
The vehicle will not shift into P (Park) if it is
moving too fast. Stop the vehicle and shift
into P (Park).
To shift in and out of P (Park), see Shifting
Into Park 0199 and
Shifting out of Park 0199.
R : Use this gear to back up.
If the vehicle is shifted from either
R (Reverse) to D (Drive) or L (Low),
or D (Drive) or L (Low) to R (Reverse) while
the speed is too high, the vehicle may shift
to N (Neutral). Reduce the vehicle speed and
try the shift again.
To shift into R (Reverse): 1. Bring the vehicle to a complete stop.
2. From the center position, move the shift lever rearward toward you, and then up.
R is illuminated in red.
3. After releasing the shift lever, it will return to the center position. To shift out of R (Reverse):
1. Bring the vehicle to a complete stop.
2. Shift to the desired gear.
3. After releasing the shift lever, it will return to the center position.
At low vehicle speeds, R (Reverse) can be
used to rock the vehicle back and forth to
get out of snow, ice, or sand without
damaging the electric drive unit. See If the
Vehicle Is Stuck 0192.
N : In this position, the propulsion system is
inactive. If the vehicle is moving and turned
off, restart the propulsion system in
N (Neutral) only.
Caution
The vehicle is not designed to stay in
N (Neutral) for extended periods of time.
It will automatically shift into P (Park).
To shift into N (Neutral): 1. Move the shift lever rearward toward the driver.
.If the vehicle is in P (Park), apply the
brake pedal while moving the shift
lever rearward.
.The N indicator will illuminate red. 2. After releasing the shift lever, it will
return to the center position.
To shift out of N (Neutral): 1. Bring the vehicle to a complete stop.
2. Hold the brake pedal down
3. Shift into the desired gear.
If the brake pedal is not applied, the vehicle
may remain in N (Neutral).
Car Wash Mode
This vehicle includes a Car Wash Mode that
allows the vehicle to remain in N (Neutral)
for use in automatic car washes.
Car Wash Mode is not to be used for vehicle
towing. If the vehicle needs to be towed,
see Transporting a Disabled Vehicle 0378.
Caution
The vehicle is not designed to stay in
N (Neutral) for extended periods of time.
It will automatically shift into P (Park).
Car Wash Mode (Vehicle Off) –Driver In
Vehicle
To place the vehicle in N (Neutral) with the
vehicle off and occupied:
1. Drive to the entrance of the car wash.
Page 259 of 429
Chevrolet Silverado EV Owner Manual (GMNA-Localizing-U.S./Canada-
16702912) - 2024 - CRC - 1/17/23
258 Driving and Operating
Follow the instructions in the vehicle’s
infotainment display. Select the option to
supervise the maneuver remotely. When
prompted, check all your belongings and
exit the vehicle. Press and hold the
authorization button on the myChevrolet
app to allow the maneuver to complete. As
the vehicle automatically steers, brakes,
accelerates, and shifts gears into the parking
spot, stay in close proximity of the vehicle,
and check surroundings. Be prepared to
release the authorization button, or cancel
the maneuver, to avoid vehicles, pedestrians,
or objects.
Once automatic parking is finished and the
vehicle has come to a full stop, a message
will be displayed indicating parking is
complete.
How to Activate Remote Unparking
To activate the unparking maneuver
remotely, launch Remote Auto Parking from
the myChevrolet app. A screen will be
displayed for unparking options. Similar to
automatic parking, follow the displayed
instructions, press and hold the
authorization button, check surroundings as
the vehicle unparks.Once automatic unparking is finished and
the vehicle has come to a full stop, a
message will be displayed indicating
unparking is complete. The vehicle is now
positioned such that the path to exit the
parking spot is free of obstructions. Enter
the vehicle to start driving away.
How to Cancel Remote Automatic Parking or
Automatic Unparking
To cancel automatic parking or automatic
unparking at any time, press the cancel
button on the myChevrolet app. Remote
Auto Parking applies the parking brake and
shifts into P (Park) to hold the vehicle.
Reverse Automatic Braking (RAB)
Backing Warning and Reverse Automatic
Braking (RAB)
Vehicles with Adaptive Cruise Control (ACC)
have the Backing Warning System and
Reverse Automatic Braking (RAB) system.
When in R (Reverse), Backing Warning alerts
of rear objects at vehicle speeds greater
than 8 km/h (5 mph), and RAB may
automatically brake hard at speeds between
1-32 km/h (0.5-20 mph).
The Backing Warning System will beep once
from the rear when an object is first
detected, or pulse twice on both sides of the
Safety Alert Seat. When the system detects
a potential crash, beeps will be heard from
the rear, or five pulses will be felt on both
sides of the Safety Alert Seat. There may
also be a brief, sharp application of the
brakes.
{Warning
The Backing Warning System only
operates at speeds greater than 8 km/h
(5 mph). It does not detect children,
pedestrians, bicyclists, animals, or objects
below the bumper or that are too close
or too far from the vehicle. In some
situations, such as at higher backing
speeds, there may not be enough time
for the short, sharp application of the
vehicle brake system to occur. To prevent
injury, death, or vehicle damage, even
with the Backing Warning System, always
check the area around the vehicle and
check all mirrors before backing.
Page 278 of 429
Chevrolet Silverado EV Owner Manual (GMNA-Localizing-U.S./Canada-
16702912) - 2024 - CRC - 1/17/23
Driving and Operating 277
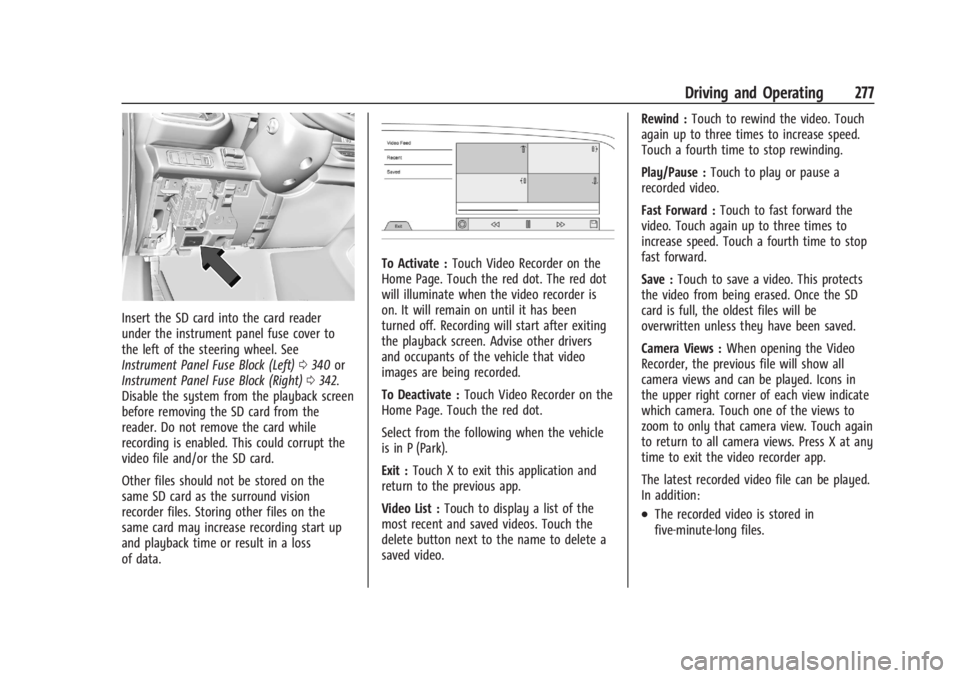
Insert the SD card into the card reader
under the instrument panel fuse cover to
the left of the steering wheel. See
Instrument Panel Fuse Block (Left)0340 or
Instrument Panel Fuse Block (Right) 0342.
Disable the system from the playback screen
before removing the SD card from the
reader. Do not remove the card while
recording is enabled. This could corrupt the
video file and/or the SD card.
Other files should not be stored on the
same SD card as the surround vision
recorder files. Storing other files on the
same card may increase recording start up
and playback time or result in a loss
of data.
To Activate : Touch Video Recorder on the
Home Page. Touch the red dot. The red dot
will illuminate when the video recorder is
on. It will remain on until it has been
turned off. Recording will start after exiting
the playback screen. Advise other drivers
and occupants of the vehicle that video
images are being recorded.
To Deactivate : Touch Video Recorder on the
Home Page. Touch the red dot.
Select from the following when the vehicle
is in P (Park).
Exit : Touch X to exit this application and
return to the previous app.
Video List : Touch to display a list of the
most recent and saved videos. Touch the
delete button next to the name to delete a
saved video. Rewind :
Touch to rewind the video. Touch
again up to three times to increase speed.
Touch a fourth time to stop rewinding.
Play/Pause : Touch to play or pause a
recorded video.
Fast Forward : Touch to fast forward the
video. Touch again up to three times to
increase speed. Touch a fourth time to stop
fast forward.
Save : Touch to save a video. This protects
the video from being erased. Once the SD
card is full, the oldest files will be
overwritten unless they have been saved.
Camera Views : When opening the Video
Recorder, the previous file will show all
camera views and can be played. Icons in
the upper right corner of each view indicate
which camera. Touch one of the views to
zoom to only that camera view. Touch again
to return to all camera views. Press X at any
time to exit the video recorder app.
The latest recorded video file can be played.
In addition:
.The recorded video is stored in
five-minute-long files.
Page 282 of 429
Chevrolet Silverado EV Owner Manual (GMNA-Localizing-U.S./Canada-
16702912) - 2024 - CRC - 1/17/23
Driving and Operating 281
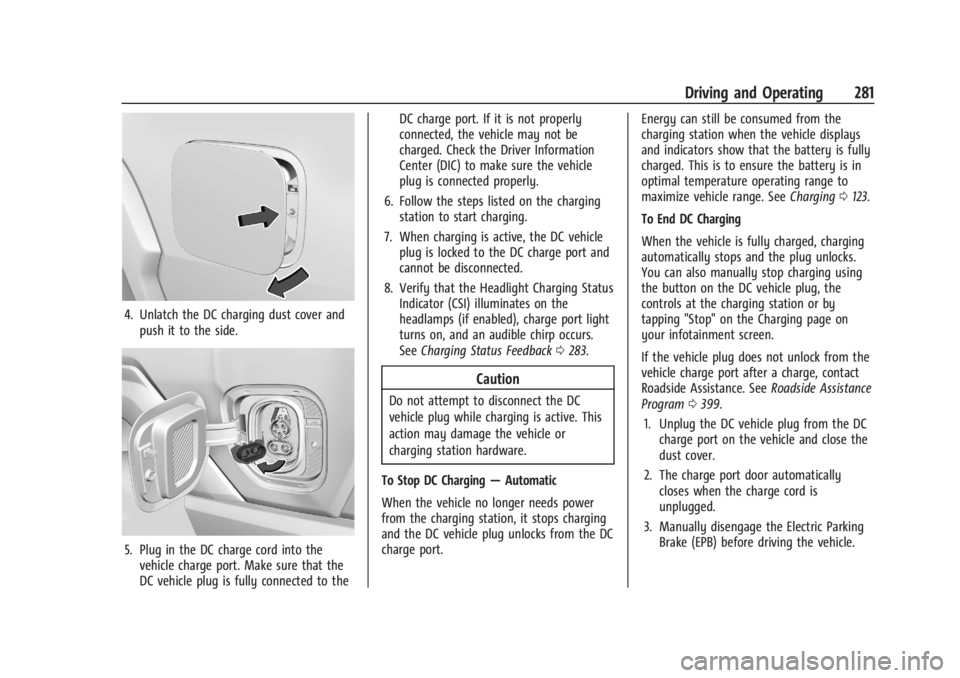
4. Unlatch the DC charging dust cover andpush it to the side.
5. Plug in the DC charge cord into thevehicle charge port. Make sure that the
DC vehicle plug is fully connected to the DC charge port. If it is not properly
connected, the vehicle may not be
charged. Check the Driver Information
Center (DIC) to make sure the vehicle
plug is connected properly.
6. Follow the steps listed on the charging station to start charging.
7. When charging is active, the DC vehicle plug is locked to the DC charge port and
cannot be disconnected.
8. Verify that the Headlight Charging Status Indicator (CSI) illuminates on the
headlamps (if enabled), charge port light
turns on, and an audible chirp occurs.
See Charging Status Feedback 0283.
Caution
Do not attempt to disconnect the DC
vehicle plug while charging is active. This
action may damage the vehicle or
charging station hardware.
To Stop DC Charging —Automatic
When the vehicle no longer needs power
from the charging station, it stops charging
and the DC vehicle plug unlocks from the DC
charge port. Energy can still be consumed from the
charging station when the vehicle displays
and indicators show that the battery is fully
charged. This is to ensure the battery is in
optimal temperature operating range to
maximize vehicle range. See
Charging0123.
To End DC Charging
When the vehicle is fully charged, charging
automatically stops and the plug unlocks.
You can also manually stop charging using
the button on the DC vehicle plug, the
controls at the charging station or by
tapping "Stop" on the Charging page on
your infotainment screen.
If the vehicle plug does not unlock from the
vehicle charge port after a charge, contact
Roadside Assistance. See Roadside Assistance
Program 0399.
1. Unplug the DC vehicle plug from the DC charge port on the vehicle and close the
dust cover.
2. The charge port door automatically closes when the charge cord is
unplugged.
3. Manually disengage the Electric Parking Brake (EPB) before driving the vehicle.