2024 CHEVROLET SILVERADO EV seat memory
[x] Cancel search: seat memoryPage 10 of 429
Chevrolet Silverado EV Owner Manual (GMNA-Localizing-U.S./Canada-
16702912) - 2024 - CRC - 1/23/23
Keys, Doors, and Windows 9
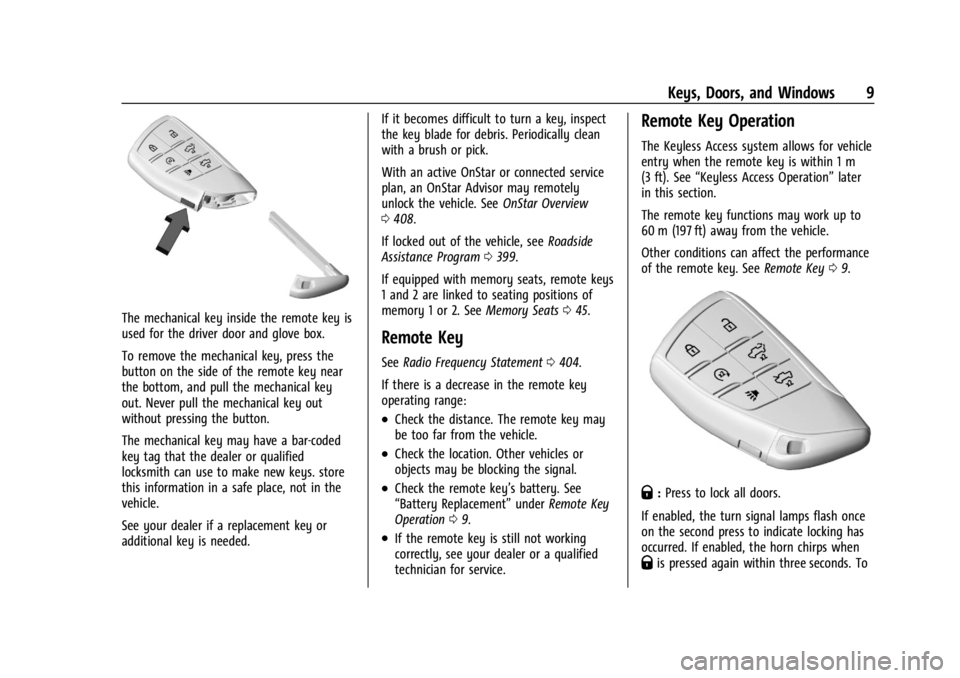
The mechanical key inside the remote key is
used for the driver door and glove box.
To remove the mechanical key, press the
button on the side of the remote key near
the bottom, and pull the mechanical key
out. Never pull the mechanical key out
without pressing the button.
The mechanical key may have a bar-coded
key tag that the dealer or qualified
locksmith can use to make new keys. store
this information in a safe place, not in the
vehicle.
See your dealer if a replacement key or
additional key is needed.If it becomes difficult to turn a key, inspect
the key blade for debris. Periodically clean
with a brush or pick.
With an active OnStar or connected service
plan, an OnStar Advisor may remotely
unlock the vehicle. See
OnStar Overview
0 408.
If locked out of the vehicle, see Roadside
Assistance Program 0399.
If equipped with memory seats, remote keys
1 and 2 are linked to seating positions of
memory 1 or 2. See Memory Seats045.
Remote Key
See Radio Frequency Statement 0404.
If there is a decrease in the remote key
operating range:
.Check the distance. The remote key may
be too far from the vehicle.
.Check the location. Other vehicles or
objects may be blocking the signal.
.Check the remote key’s battery. See
“Battery Replacement” underRemote Key
Operation 09.
.If the remote key is still not working
correctly, see your dealer or a qualified
technician for service.
Remote Key Operation
The Keyless Access system allows for vehicle
entry when the remote key is within 1 m
(3 ft). See “Keyless Access Operation” later
in this section.
The remote key functions may work up to
60 m (197 ft) away from the vehicle.
Other conditions can affect the performance
of the remote key. See Remote Key09.
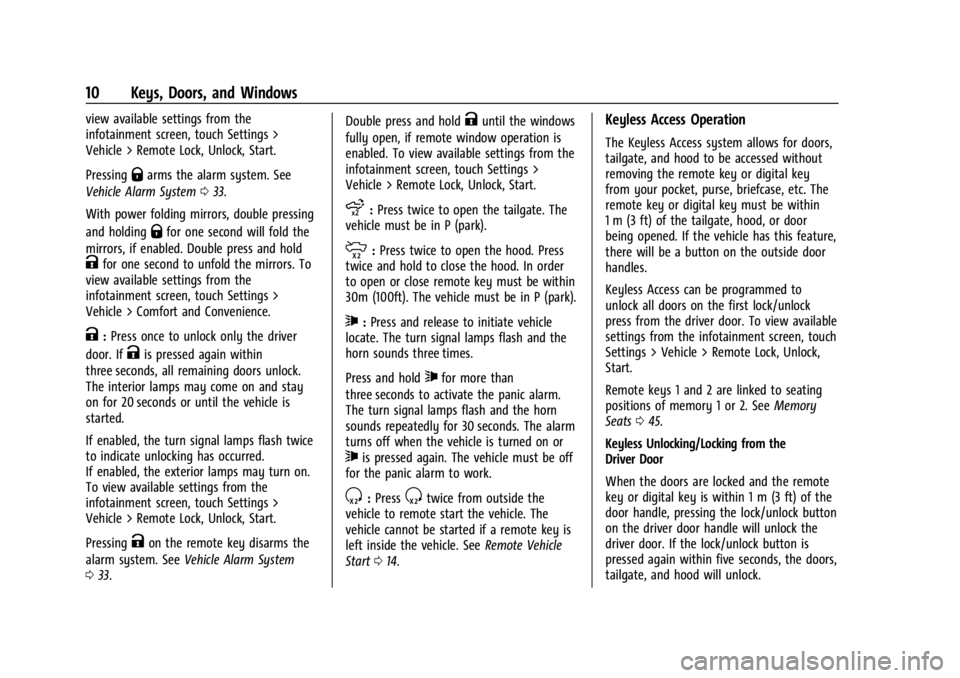
Q:Press to lock all doors.
If enabled, the turn signal lamps flash once
on the second press to indicate locking has
occurred. If enabled, the horn chirps when
Qis pressed again within three seconds. To
Page 11 of 429
Chevrolet Silverado EV Owner Manual (GMNA-Localizing-U.S./Canada-
16702912) - 2024 - CRC - 1/23/23
10 Keys, Doors, and Windows
view available settings from the
infotainment screen, touch Settings >
Vehicle > Remote Lock, Unlock, Start.
Pressing
Qarms the alarm system. See
Vehicle Alarm System 033.
With power folding mirrors, double pressing
and holding
Qfor one second will fold the
mirrors, if enabled. Double press and hold
Kfor one second to unfold the mirrors. To
view available settings from the
infotainment screen, touch Settings >
Vehicle > Comfort and Convenience.
K: Press once to unlock only the driver
door. If
Kis pressed again within
three seconds, all remaining doors unlock.
The interior lamps may come on and stay
on for 20 seconds or until the vehicle is
started.
If enabled, the turn signal lamps flash twice
to indicate unlocking has occurred.
If enabled, the exterior lamps may turn on.
To view available settings from the
infotainment screen, touch Settings >
Vehicle > Remote Lock, Unlock, Start.
Pressing
Kon the remote key disarms the
alarm system. See Vehicle Alarm System
0 33. Double press and hold
Kuntil the windows
fully open, if remote window operation is
enabled. To view available settings from the
infotainment screen, touch Settings >
Vehicle > Remote Lock, Unlock, Start.
x: Press twice to open the tailgate. The
vehicle must be in P (park).
m: Press twice to open the hood. Press
twice and hold to close the hood. In order
to open or close remote key must be within
30m (100ft). The vehicle must be in P (park).
7: Press and release to initiate vehicle
locate. The turn signal lamps flash and the
horn sounds three times.
Press and hold
7for more than
three seconds to activate the panic alarm.
The turn signal lamps flash and the horn
sounds repeatedly for 30 seconds. The alarm
turns off when the vehicle is turned on or
7is pressed again. The vehicle must be off
for the panic alarm to work.
S: PressStwice from outside the
vehicle to remote start the vehicle. The
vehicle cannot be started if a remote key is
left inside the vehicle. See Remote Vehicle
Start 014.
Keyless Access Operation
The Keyless Access system allows for doors,
tailgate, and hood to be accessed without
removing the remote key or digital key
from your pocket, purse, briefcase, etc. The
remote key or digital key must be within
1 m (3 ft) of the tailgate, hood, or door
being opened. If the vehicle has this feature,
there will be a button on the outside door
handles.
Keyless Access can be programmed to
unlock all doors on the first lock/unlock
press from the driver door. To view available
settings from the infotainment screen, touch
Settings > Vehicle > Remote Lock, Unlock,
Start.
Remote keys 1 and 2 are linked to seating
positions of memory 1 or 2. See Memory
Seats 045.
Keyless Unlocking/Locking from the
Driver Door
When the doors are locked and the remote
key or digital key is within 1 m (3 ft) of the
door handle, pressing the lock/unlock button
on the driver door handle will unlock the
driver door. If the lock/unlock button is
pressed again within five seconds, the doors,
tailgate, and hood will unlock.
Page 36 of 429
Chevrolet Silverado EV Owner Manual (GMNA-Localizing-U.S./Canada-
16702912) - 2024 - CRC - 1/23/23
Keys, Doors, and Windows 35
Puddle Lamps
Puddle lamps project light to the area of
ground below the front and rear doors, on
both the driver and passenger side. See
Entry Lighting0144 and
Exit Lighting 0145.
Memory Mirrors
The vehicle may have memory mirrors. See
Memory Seats 045.
Lane Change Alert (LCA)
The vehicle may have LCA. See Lane Change
Alert (LCA) 0269.
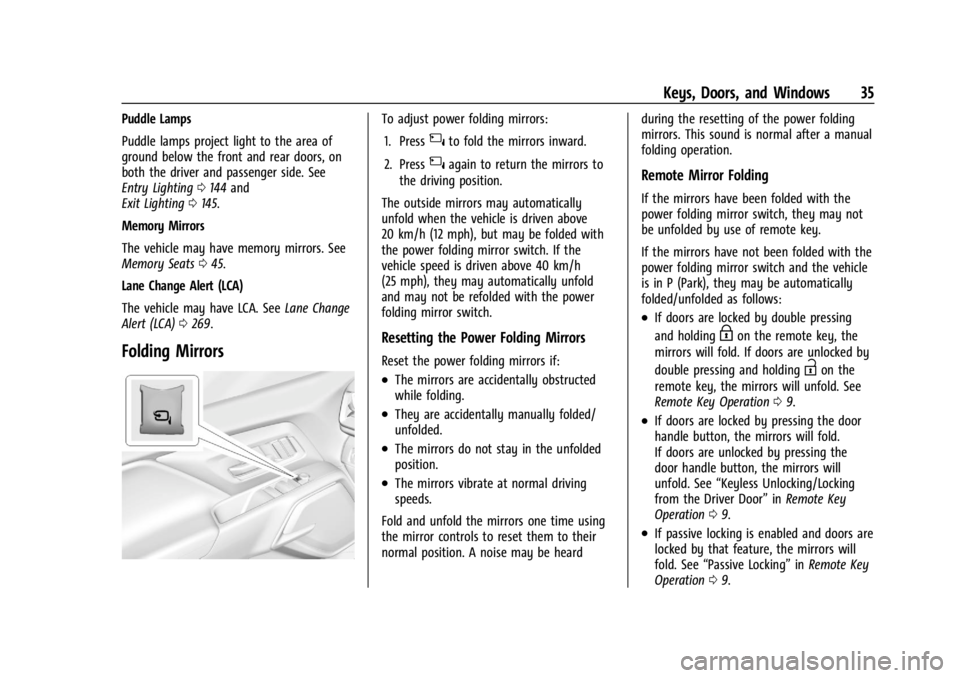
Folding Mirrors
To adjust power folding mirrors:
1. Press
{to fold the mirrors inward.
2. Press
{again to return the mirrors to
the driving position.
The outside mirrors may automatically
unfold when the vehicle is driven above
20 km/h (12 mph), but may be folded with
the power folding mirror switch. If the
vehicle speed is driven above 40 km/h
(25 mph), they may automatically unfold
and may not be refolded with the power
folding mirror switch.
Resetting the Power Folding Mirrors
Reset the power folding mirrors if:
.The mirrors are accidentally obstructed
while folding.
.They are accidentally manually folded/
unfolded.
.The mirrors do not stay in the unfolded
position.
.The mirrors vibrate at normal driving
speeds.
Fold and unfold the mirrors one time using
the mirror controls to reset them to their
normal position. A noise may be heard during the resetting of the power folding
mirrors. This sound is normal after a manual
folding operation.
Remote Mirror Folding
If the mirrors have been folded with the
power folding mirror switch, they may not
be unfolded by use of remote key.
If the mirrors have not been folded with the
power folding mirror switch and the vehicle
is in P (Park), they may be automatically
folded/unfolded as follows:
.If doors are locked by double pressing
and holding
Hon the remote key, the
mirrors will fold. If doors are unlocked by
double pressing and holding
Ion the
remote key, the mirrors will unfold. See
Remote Key Operation 09.
.If doors are locked by pressing the door
handle button, the mirrors will fold.
If doors are unlocked by pressing the
door handle button, the mirrors will
unfold. See “Keyless Unlocking/Locking
from the Driver Door” inRemote Key
Operation 09.
.If passive locking is enabled and doors are
locked by that feature, the mirrors will
fold. See “Passive Locking” inRemote Key
Operation 09.
Page 37 of 429
Chevrolet Silverado EV Owner Manual (GMNA-Localizing-U.S./Canada-
16702912) - 2024 - CRC - 1/23/23
36 Keys, Doors, and Windows
Heated Mirrors
To heat the mirrors, pressKon the
infotainment display.
See “Rear Window Defogger” underDual
Automatic Climate Control System 0174.
Automatic Dimming Mirror
The driver outside mirror automatically
adjusts for the glare of the headlamps from
behind. This feature comes on when the
vehicle is started.
Reverse Tilt Mirrors
If equipped with reverse tilt mirrors and
memory seats, the passenger and/or driver
mirror tilts to a preselected position when
the vehicle is in R (Reverse). This allows the
curb to be seen when parallel parking.
The mirror(s) may move from their tilted
position when:
.The vehicle is shifted out of R (Reverse) or
remains in R (Reverse) for about
30 seconds.
.The vehicle is turned off.
.The vehicle is driven in R (Reverse) above
a set speed. To view available settings from the
infotainment screen, touch Settings >
Vehicle > Comfort and Convenience.
Interior Mirrors
Interior Rearview Mirrors
Adjust the rearview mirror for a clear view
of the area behind the vehicle.
Do not spray glass cleaner directly on the
mirror. Use a soft towel dampened with
water.
Manual Rearview Mirror
If equipped, push the tab forward for
daytime use and pull it rearward for
nighttime use to avoid glare of the
headlamps from behind.
Automatic Dimming Rearview
Mirror
If equipped, automatic dimming reduces the
glare of headlamps from behind. The
dimming feature comes on when the vehicle
is started.
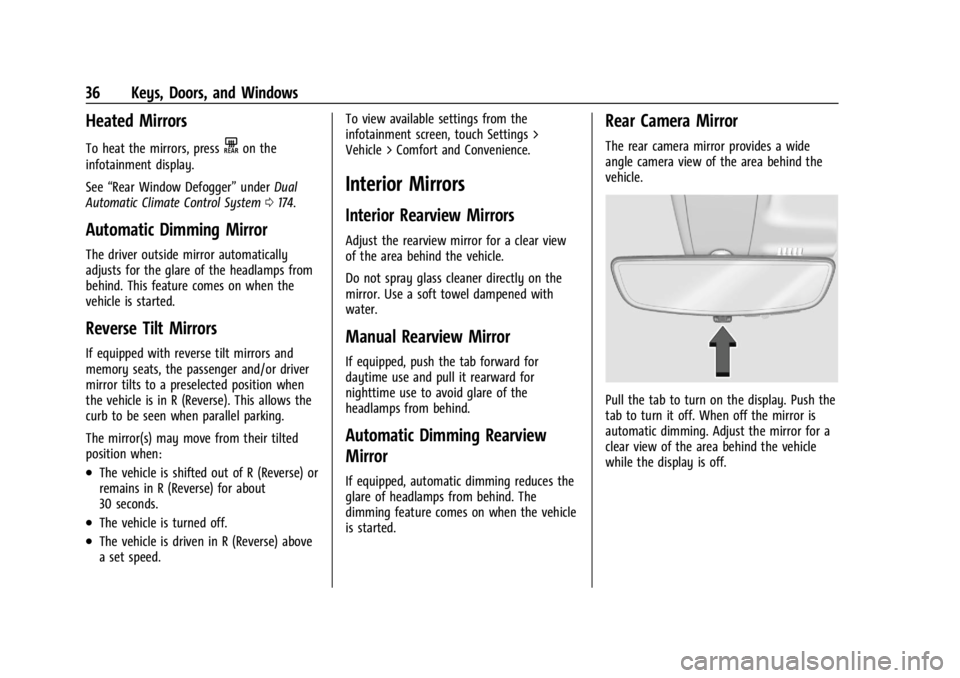
Rear Camera Mirror
The rear camera mirror provides a wide
angle camera view of the area behind the
vehicle.
Pull the tab to turn on the display. Push the
tab to turn it off. When off the mirror is
automatic dimming. Adjust the mirror for a
clear view of the area behind the vehicle
while the display is off.
Page 42 of 429
Chevrolet Silverado EV Owner Manual (GMNA-Localizing-U.S./Canada-
16702912) - 2024 - CRC - 1/13/23
Seats and Restraints 41
Seats and Restraints
Head Restraints
Head Restraints . . . . . . . . . . . . . . . . . . . . . . . . . 41
Front Seats
Seat Adjustment . . . . . . . . . . . . . . . . . . . . . . . . 43
Power Seat Adjustment . . . . . . . . . . . . . . . . 43
Reclining Seatbacks . . . . . . . . . . . . . . . . . . . . . 43
Lumbar Adjustment . . . . . . . . . . . . . . . . . . . . 45
Memory Seats . . . . . . . . . . . . . . . . . . . . . . . . . . 45
Heated and Ventilated Front Seats . . . . . 47
Rear Seats
Rear Seats . . . . . . . . . . . . . . . . . . . . . . . . . . . . . . 49
Heated Rear Seats . . . . . . . . . . . . . . . . . . . . . . 51
Seat Belts
Seat Belts . . . . . . . . . . . . . . . . . . . . . . . . . . . . . . 52
Buckle To Drive . . . . . . . . . . . . . . . . . . . . . . . . . 53
How to Wear Seat Belts Properly . . . . . . 54
Lap-Shoulder Belt . . . . . . . . . . . . . . . . . . . . . . . 56
Seat Belt Use During Pregnancy . . . . . . . . 58
Seat Belt Extender . . . . . . . . . . . . . . . . . . . . . . 59
Safety System Check . . . . . . . . . . . . . . . . . . . 59
Seat Belt Care . . . . . . . . . . . . . . . . . . . . . . . . . . 59
Replacing Seat Belt System Parts after aCrash . . . . . . . . . . . . . . . . . . . . . . . . . . . . . . . . . 59
Airbag System
Airbag System . . . . . . . . . . . . . . . . . . . . . . . . . 60
Where Are the Airbags? . . . . . . . . . . . . . . . . 61
When Should an Airbag Inflate? . . . . . . . . 62
What Makes an Airbag Inflate? . . . . . . . . . 63
How Does an Airbag Restrain? . . . . . . . . . 63
What Will You See after an AirbagInflates? . . . . . . . . . . . . . . . . . . . . . . . . . . . . . . 64
Passenger Sensing System . . . . . . . . . . . . . 65
Servicing the Airbag-Equipped Vehicle . . . . . . . . . . . . . . . . . . . . . . . . . . . . . . . 68
Adding Equipment to the Airbag-Equipped Vehicle . . . . . . . . . . . . . . 68
Airbag System Check . . . . . . . . . . . . . . . . . . . 69
Replacing Airbag System Parts after a Crash . . . . . . . . . . . . . . . . . . . . . . . . . . . . . . . . . 69
Child Restraints
Older Children . . . . . . . . . . . . . . . . . . . . . . . . . . 70
Infants and Young Children . . . . . . . . . . . . . 71
Child Restraint Systems . . . . . . . . . . . . . . . . . 73
Where to Put the Restraint . . . . . . . . . . . . . 75
Lower Anchors and Tethers for Children(LATCH System) . . . . . . . . . . . . . . . . . . . . . . . 76
Replacing LATCH System Parts After a Crash . . . . . . . . . . . . . . . . . . . . . . . . . . . . . . . . . 85
Securing Child Restraints (With the Seat Belt in the Rear Seat) . . . . . . . . . . . . . . . . 86
Securing Child Restraints (With the Seat Belt in the Front Passenger Seat) . . . . . 88
Head Restraints
{
Warning
With head restraints that are not
installed and adjusted properly, there is a
greater chance that occupants will suffer
a neck/spinal injury in a crash. Do not
drive until the head restraints for all
occupants are installed and adjusted
properly.
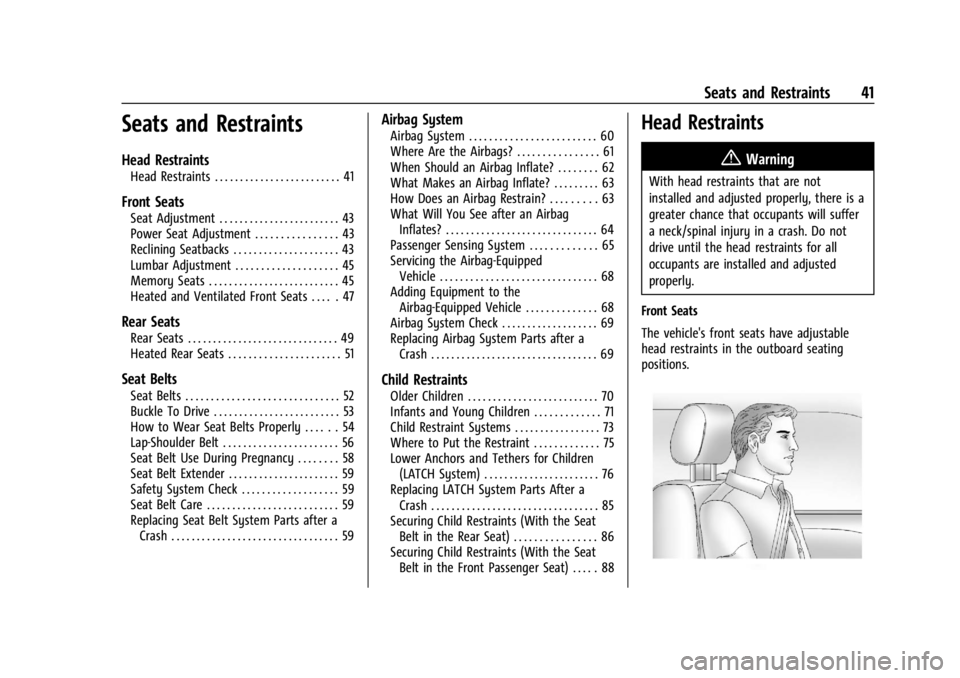
Front Seats
The vehicle's front seats have adjustable
head restraints in the outboard seating
positions.
Page 46 of 429
Chevrolet Silverado EV Owner Manual (GMNA-Localizing-U.S./Canada-
16702912) - 2024 - CRC - 1/13/23
Seats and Restraints 45
.Tilt the top of the control forward to
raise.
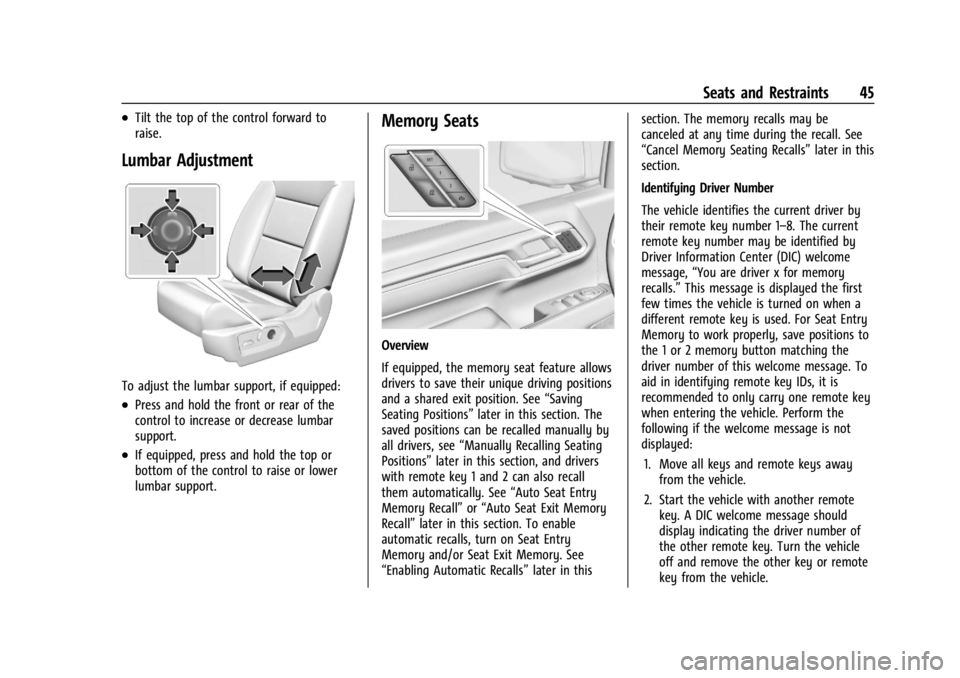
Lumbar Adjustment
To adjust the lumbar support, if equipped:
.Press and hold the front or rear of the
control to increase or decrease lumbar
support.
.If equipped, press and hold the top or
bottom of the control to raise or lower
lumbar support.
Memory Seats
Overview
If equipped, the memory seat feature allows
drivers to save their unique driving positions
and a shared exit position. See“Saving
Seating Positions” later in this section. The
saved positions can be recalled manually by
all drivers, see “Manually Recalling Seating
Positions” later in this section, and drivers
with remote key 1 and 2 can also recall
them automatically. See “Auto Seat Entry
Memory Recall” or“Auto Seat Exit Memory
Recall” later in this section. To enable
automatic recalls, turn on Seat Entry
Memory and/or Seat Exit Memory. See
“Enabling Automatic Recalls” later in thissection. The memory recalls may be
canceled at any time during the recall. See
“Cancel Memory Seating Recalls”
later in this
section.
Identifying Driver Number
The vehicle identifies the current driver by
their remote key number 1–8. The current
remote key number may be identified by
Driver Information Center (DIC) welcome
message, “You are driver x for memory
recalls.” This message is displayed the first
few times the vehicle is turned on when a
different remote key is used. For Seat Entry
Memory to work properly, save positions to
the 1 or 2 memory button matching the
driver number of this welcome message. To
aid in identifying remote key IDs, it is
recommended to only carry one remote key
when entering the vehicle. Perform the
following if the welcome message is not
displayed:
1. Move all keys and remote keys away from the vehicle.
2. Start the vehicle with another remote key. A DIC welcome message should
display indicating the driver number of
the other remote key. Turn the vehicle
off and remove the other key or remote
key from the vehicle.
Page 47 of 429
Chevrolet Silverado EV Owner Manual (GMNA-Localizing-U.S./Canada-
16702912) - 2024 - CRC - 1/13/23
46 Seats and Restraints
3. Start the vehicle with the initial key orremote key. The DIC welcome message
should display the driver number of the
initial remote key.
Saving Seating Positions
Read these instructions completely before
saving memory positions.
To save preferred driving positions to
1 and 2: 1. Turn the vehicle on. A DIC welcome message may indicate the driver number
of the current remote key. See
“Identifying Driver Number” previously in
this section.
2. Adjust all available memory features to the desired driving position.
3. Press and release SET; a beep will sound.
4. Immediately upon releasing SET, press and hold memory button 1 or 2 matching
the current remote key number until two
beeps sound. If too much time passes
between releasing SET and pressing 1 or
2, the two beeps will not sound
indicating memory position were not
saved. Repeat Steps 3 and 4 to try again.
5. Repeat Steps 1–4 for the other remote key 1 or 2 using the other 1 or 2 memory
button. It is recommended to save the preferred
driving positions to both 1 and 2 if you are
the only driver.
To save the common exit seating position to
Bthat is used by all drivers for Manually
Recalling Seating Positions and Auto Seat
Exit Memory Recall features, repeat
Steps 1–4 using
B, the exit button.
Manually Recalling Seating Positions
Press and hold 1, 2, or
Bbutton until the
recall is complete, to recall the positions
previously saved to that button.
Manual Memory recall movement for 1, 2 or
Bbuttons may be initiated and will
complete to the saved memory position if
the vehicle is in or out of P (Park).
Enabling Automatic Recalls
.Seat Entry Memory moves the driver seat
to the selected 1 or 2 position when the
vehicle is started. Select Settings >
Vehicle > Seating Position > Seat Entry
Memory > ON or OFF. See “Auto Seat
Entry Memory Recall” later in this section.
.Seat Exit Memory moves the driver seat
to the preferred exit position of the
B
button when the vehicle is turned off and the door is opened. Select Settings >
Vehicle > Seating Position > Seat Exit
Memory > Select ON or OFF. See
“Auto
Seat Exit Memory Recall” later in this
section.
Auto Seat Entry Memory Recall
Seat Entry Memory will automatically begin
movement to the seating positions of the 1
or 2 button corresponding to remote key
number 1 or 2 detected by the vehicle when:
.The vehicle is turned ON.
.Seating positions have been previously
saved to the same 1 or 2 button. See
“Saving Seating Positions” previously in
this section.
.Seat Entry Memory is enabled. See
“Enabling Automatic Recalls” previously in
this section.
.The vehicle is in P (Park).
Seat Entry Memory Recall will continue if
the vehicle is shifted out of P (Park) prior to
reaching the saved memory position.
If the saved memory seat position does not
automatically recall, verify the recall is
enabled. See “Enabling Automatic Recalls”
previously in this section.
Page 48 of 429
Chevrolet Silverado EV Owner Manual (GMNA-Localizing-U.S./Canada-
16702912) - 2024 - CRC - 1/13/23
Seats and Restraints 47
If the memory seat recalls to the wrong
position, remote key number 1 or 2 may not
match the memory button number positions
they were saved to. Try the other remote
key or try saving the positions to the other
1 or 2 memory button. See“Saving Seating
Positions” previously in this section.
Automatic Seat Entry Memory recalls are
only available for remote key numbers 1 and
2. Remote keys 3–8 will not provide Seat
Entry Memory recalls.
Auto Seat Exit Memory Recall
Seat Exit Memory will begin movement to
the seating position of the
B
button when:
.The vehicle is turned off and the driver
door is open or opened within a
short time.
.A seating position has been previously
been saved to the
Bmemory button.
See “Saving Seating Positions” previously
in this section.
.Seat Exit Memory is enabled. See
“Enabling Automatic Recalls” previously in
this section.
.The vehicle is in P (Park). Seat Exit Memory recall will continue if the
vehicle is shifted out of P (Park) prior to
reaching the saved memory position.
Seat Exit Memory is not linked to a remote
key. The seating position saved to
Bis
used for all drivers.
Cancel Memory Seating Recalls
.During any memory recall:
Press a power seat control
Press SET memory button
.During Manual memory recall:
Release 1, 2, or
Bmemory button
.During Auto Seat Entry Memory Recall:
Turn vehicle off
Press SET, 1, 2, or
Bmemory buttons
.During Auto Seat Exit Memory Recall:
Press SET, 1, 2, or
Bmemory buttons
Obstructions
If something has blocked the seat while
recalling a memory position, the recall may
stop. Remove the obstruction and try the
recall again. If the memory position still
does not recall, see your dealer.
Heated and Ventilated Front
Seats
{Warning
If temperature change or pain to the skin
cannot be felt, the seat heater may cause
burns. To reduce the risk of burns, use
care when using the seat heater,
especially for long periods of time. Do
not place anything on the seat that
insulates against heat, such as a blanket,
cushion, cover, or similar item. This may
cause the seat heater to overheat. An
overheated seat heater may cause a burn
or may damage the seat.