2024 CHEVROLET SILVERADO EV battery location
[x] Cancel search: battery locationPage 10 of 429
Chevrolet Silverado EV Owner Manual (GMNA-Localizing-U.S./Canada-
16702912) - 2024 - CRC - 1/23/23
Keys, Doors, and Windows 9
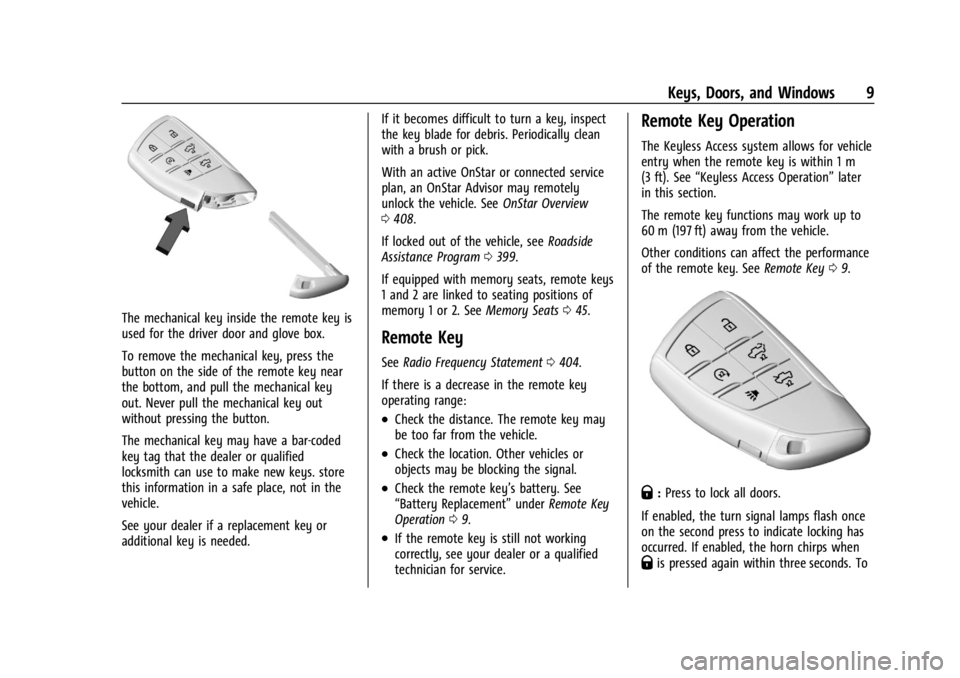
The mechanical key inside the remote key is
used for the driver door and glove box.
To remove the mechanical key, press the
button on the side of the remote key near
the bottom, and pull the mechanical key
out. Never pull the mechanical key out
without pressing the button.
The mechanical key may have a bar-coded
key tag that the dealer or qualified
locksmith can use to make new keys. store
this information in a safe place, not in the
vehicle.
See your dealer if a replacement key or
additional key is needed.If it becomes difficult to turn a key, inspect
the key blade for debris. Periodically clean
with a brush or pick.
With an active OnStar or connected service
plan, an OnStar Advisor may remotely
unlock the vehicle. See
OnStar Overview
0 408.
If locked out of the vehicle, see Roadside
Assistance Program 0399.
If equipped with memory seats, remote keys
1 and 2 are linked to seating positions of
memory 1 or 2. See Memory Seats045.
Remote Key
See Radio Frequency Statement 0404.
If there is a decrease in the remote key
operating range:
.Check the distance. The remote key may
be too far from the vehicle.
.Check the location. Other vehicles or
objects may be blocking the signal.
.Check the remote key’s battery. See
“Battery Replacement” underRemote Key
Operation 09.
.If the remote key is still not working
correctly, see your dealer or a qualified
technician for service.
Remote Key Operation
The Keyless Access system allows for vehicle
entry when the remote key is within 1 m
(3 ft). See “Keyless Access Operation” later
in this section.
The remote key functions may work up to
60 m (197 ft) away from the vehicle.
Other conditions can affect the performance
of the remote key. See Remote Key09.
Q:Press to lock all doors.
If enabled, the turn signal lamps flash once
on the second press to indicate locking has
occurred. If enabled, the horn chirps when
Qis pressed again within three seconds. To
Page 19 of 429
Chevrolet Silverado EV Owner Manual (GMNA-Localizing-U.S./Canada-
16702912) - 2024 - CRC - 1/23/23
18 Keys, Doors, and Windows
When the safety lock is enabled, adults and
older children will not be able to open the
rear door from the inside. Cancel the safety
locks to enable the doors to open from the
inside.
To cancel the safety lock:1. Unlock the door and open it from the outside.
2. Move the lever up to unlock. Do the same for the other door.
Digital Key
If equipped and enabled, the Digital Key
feature allows you to access and operate
the vehicle using a smartphone. Many of
the functions performed by a remote key
can also be done using a Digital Key. See
Remote Key Operation 09.
Only certain smartphones support Digital
Key. Please see the myChevrolet app to see
if your device is compatible.
If the smartphone battery is weak or if
there is interference with the signal, the
Driver Information Center (DIC) may display
NO KEY FOUND or NO REMOTE KEY WAS
DETECTED, PLACE KEY IN KEY POCKET THEN START YOUR VEHICLE when starting the
vehicle. Charge the smartphone battery as
soon as possible.
You can use the myChevrolet mobile app to
pair, manage, or delete your Digital Key.
If the Digital Key is not working:
.Check the distance. The smartphone may
be too far from the vehicle.
.Check the location. Other vehicles or
objects may be blocking the signal. Your
body could also impact the signal. Hold
the smartphone in your hand, away from
your body, and toward the vehicle for
best results.
.Check that the smartphone is turned on
and has sufficient battery power.
.Check the connection. Your smartphone’s
bluetooth connection must be enabled.
.Check the myChevrolet app. Ensure that it
is open. Try relaunching the app if it is
open but is still not working.
Setting up Digital Key
Digital Key is only available with an OnStar
account associated with the vehicle. 1. Log in to your OnStar account in the MyChevrolet mobile app. 2. Select the Digital Key menu option, and
follow the steps on your screen to pair
your phone.
Using Your Digital Key
Digital Key allows you to:
.Use keyless access features to lock and
unlock the vehicle’s doors, and access the
rear compartments without a remote key.
See “Keyless Access Operation” under
Remote Key Operation 09.
.Start the vehicle with just your phone
present.
.Use remote commands in the
myChevrolet app to lock, unlock, and
remote start the vehicle.
Digital Key Personal Identification
Number (PIN)
As an added security measure, you will have
the option to set up a PIN to be used with
the Digital Key. When a PIN is enabled, you
will be prompted to enter the PIN on your
infotainment screen before starting your
vehicle. After entering your PIN successfully,
the vehicle can be started for a short period
of time. If you do not start your vehicle
within that time, you will be prompted for
your PIN again.
Page 20 of 429
Chevrolet Silverado EV Owner Manual (GMNA-Localizing-U.S./Canada-
16702912) - 2024 - CRC - 1/23/23
Keys, Doors, and Windows 19
Even if PIN to Start is enabled, you can still
start your vehicle without entering a PIN if
a remote key is in the vehicle, or by using
your key card. See“Key Card”later in this
section.
PIN Settings
If you forget your PIN, would like to change
your PIN, or would like to enable/disable
your PIN, you can do so via the Digital Key
menu in your myChevrolet app.
PIN Lockout
If the PIN is entered incorrectly too many
times, you will need to wait several minutes
before attempting to enter your PIN again.
You can still start your vehicle by using a
remote key or key card. You may also reset
your PIN or disable the PIN setting via the
Digital Key menu in your myChevrolet app.
Key Card
Your vehicle may be equipped with a key
card that unlocks, locks, and starts the
vehicle. The key card works by tapping it on
the location of the vehicle shown on the
back of the key card. It is highly recommended to carry a key
card as a back up to the Digital Key in case
the Digital Key battery is weak or there is
interference to the signal.
Only key cards programmed to the vehicle
will work. If a key card is lost or stolen, a
replacement can be purchased and
programmed through your dealer. To
prevent lost or stolen key cards from being
able to operate the vehicle, see your dealer.
Each vehicle can have up to eight key cards
programmed to it.
Unlocking with the Key Card
Tap your key card on the rectangular
symbol on the driver door near the edge of
the window to unlock the driver door. Only
the driver door may be unlocked this way.
See
Door Locks 015 for how to unlock the
other doors and rear compartment.
Locking with the Key Card
With all doors closed, the vehicle off, and
any door unlocked, tap your key card on the
rectangular symbol on the driver door near
the edge of the window to lock all doors. Starting with the Key Card
You can start your vehicle for a short period
after unlocking it with your key card. If the
period has ended, you will need to unlock
the vehicle with the key card again to start
your vehicle.
Doors
Hood
Manual Hood Release
{Warning
Do not drive the vehicle if the hood is
not latched completely. The hood could
open fully, block your vision, and cause a
crash. You or others could be injured.
Always close the hood completely before
driving. When the hood is not closed, the
vehicle will not exceed 42 km/h
(26 mph). Close the hood to drive faster
than 42 km/h (26 mph).
The hood compartment can be accessed in
several ways.
Ensure the hood is clear of any objects
before opening.
Page 65 of 429
Chevrolet Silverado EV Owner Manual (GMNA-Localizing-U.S./Canada-
16702912) - 2024 - CRC - 1/13/23
64 Seats and Restraints
Airbags should never be regarded as
anything more than a supplement to seat
belts.
What Will You See after an
Airbag Inflates?
After frontal and seat-mounted side impact
airbags inflate, they quickly deflate, so
quickly that some people may not even
realize the airbags inflated. Roof-rail airbags
may still be at least partially inflated for
some time after they inflate. Some
components of the airbag module may be
hot for several minutes. For location of the
airbags, seeWhere Are the Airbags? 061.
The parts of the airbag that come into
contact with you may be warm, but not too
hot to touch. There may be some smoke
and dust coming from the vents in the
deflated airbags. Airbag inflation does not
prevent people from leaving the vehicle.
{Warning
When an airbag inflates, there may be
dust in the air. This dust could cause
breathing problems for people with a
history of asthma or other breathing (Continued)
Warning (Continued)
trouble. To avoid this, everyone in the
vehicle should get out as soon as it is
safe to do so. If you have breathing
problems but cannot get out of the
vehicle after an airbag inflates, then get
fresh air by opening a window or a door.
If you experience breathing problems
following an airbag deployment, you
should seek medical attention.
The vehicle has a feature that may
automatically unlock the doors, turn on the
interior lamps and hazard warning flashers
after the airbags inflate. The feature may
also activate, without airbag inflation, after
an event that exceeds a predetermined
threshold. After turning the vehicle off and
then on again, the doors can be locked, the
interior lamps can be turned off, and the
hazard warning flashers can be turned off
using the controls for those features. If any
of these systems are damaged in the crash
they may not operate as normal.
{Warning
A crash severe enough to inflate the
airbags may have also damaged
important functions in the vehicle, such
as the brake and steering systems, etc.
Even if the vehicle appears to be drivable
after a moderate crash, there may be
concealed damage that could make it
difficult to safely operate the vehicle.
Use caution if attempting to restart the
vehicle after a crash has occurred.
Plug-in vehicles have a high voltage battery
and a standard 12-volt battery.
If an airbag inflates or the vehicle has been
in a crash, the sensing system may shut
down the high voltage system. When this
occurs, the high voltage battery is
disconnected and the vehicle will not start.
Before the vehicle can be operated again, it
must be serviced at your dealer.
In many crashes severe enough to inflate
the airbag, windshields are broken by
vehicle deformation. Additional windshield
breakage may also occur from the front
outboard passenger airbag.
Page 125 of 429
Chevrolet Silverado EV Owner Manual (GMNA-Localizing-U.S./Canada-
16702912) - 2024 - CRC - 1/13/23
124 Instruments and Controls
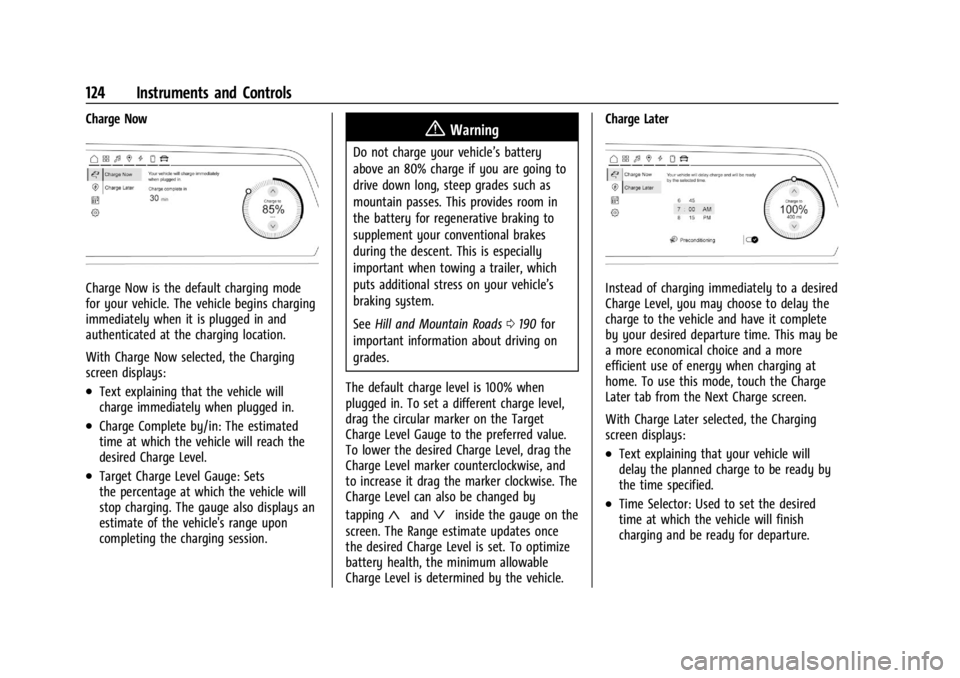
Charge Now
Charge Now is the default charging mode
for your vehicle. The vehicle begins charging
immediately when it is plugged in and
authenticated at the charging location.
With Charge Now selected, the Charging
screen displays:
.Text explaining that the vehicle will
charge immediately when plugged in.
.Charge Complete by/in: The estimated
time at which the vehicle will reach the
desired Charge Level.
.Target Charge Level Gauge: Sets
the percentage at which the vehicle will
stop charging. The gauge also displays an
estimate of the vehicle's range upon
completing the charging session.
{Warning
Do not charge your vehicle’s battery
above an 80% charge if you are going to
drive down long, steep grades such as
mountain passes. This provides room in
the battery for regenerative braking to
supplement your conventional brakes
during the descent. This is especially
important when towing a trailer, which
puts additional stress on your vehicle’s
braking system.
SeeHill and Mountain Roads 0190 for
important information about driving on
grades.
The default charge level is 100% when
plugged in. To set a different charge level,
drag the circular marker on the Target
Charge Level Gauge to the preferred value.
To lower the desired Charge Level, drag the
Charge Level marker counterclockwise, and
to increase it drag the marker clockwise. The
Charge Level can also be changed by
tapping
«andªinside the gauge on the
screen. The Range estimate updates once
the desired Charge Level is set. To optimize
battery health, the minimum allowable
Charge Level is determined by the vehicle. Charge Later
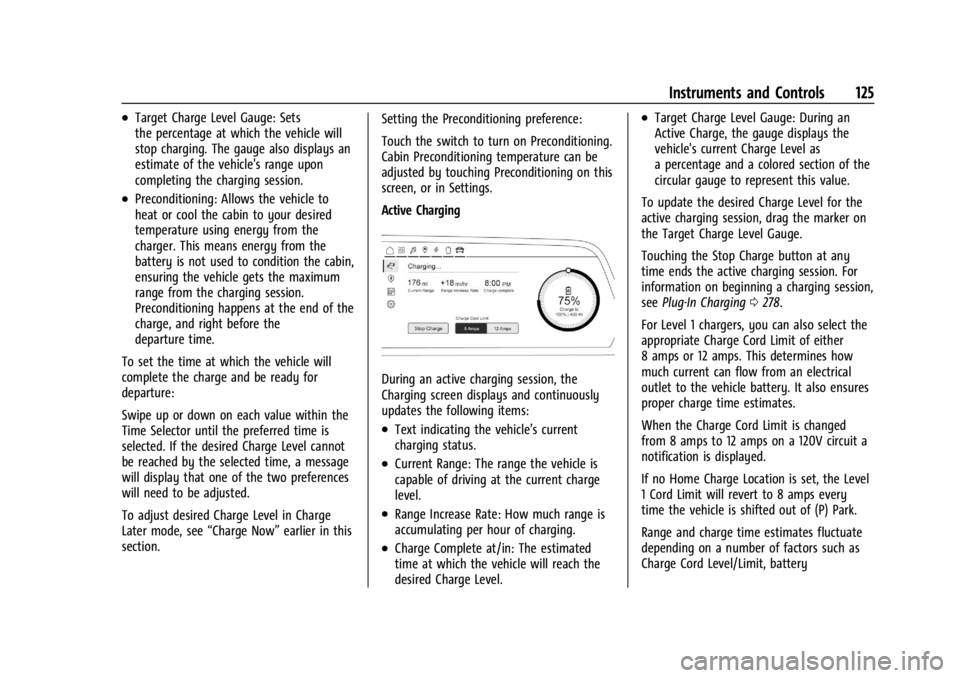
Instead of charging immediately to a desired
Charge Level, you may choose to delay the
charge to the vehicle and have it complete
by your desired departure time. This may be
a more economical choice and a more
efficient use of energy when charging at
home. To use this mode, touch the Charge
Later tab from the Next Charge screen.
With Charge Later selected, the Charging
screen displays:
.Text explaining that your vehicle will
delay the planned charge to be ready by
the time specified.
.Time Selector: Used to set the desired
time at which the vehicle will finish
charging and be ready for departure.
Page 126 of 429
Chevrolet Silverado EV Owner Manual (GMNA-Localizing-U.S./Canada-
16702912) - 2024 - CRC - 1/13/23
Instruments and Controls 125
.Target Charge Level Gauge: Sets
the percentage at which the vehicle will
stop charging. The gauge also displays an
estimate of the vehicle's range upon
completing the charging session.
.Preconditioning: Allows the vehicle to
heat or cool the cabin to your desired
temperature using energy from the
charger. This means energy from the
battery is not used to condition the cabin,
ensuring the vehicle gets the maximum
range from the charging session.
Preconditioning happens at the end of the
charge, and right before the
departure time.
To set the time at which the vehicle will
complete the charge and be ready for
departure:
Swipe up or down on each value within the
Time Selector until the preferred time is
selected. If the desired Charge Level cannot
be reached by the selected time, a message
will display that one of the two preferences
will need to be adjusted.
To adjust desired Charge Level in Charge
Later mode, see “Charge Now”earlier in this
section. Setting the Preconditioning preference:
Touch the switch to turn on Preconditioning.
Cabin Preconditioning temperature can be
adjusted by touching Preconditioning on this
screen, or in Settings.
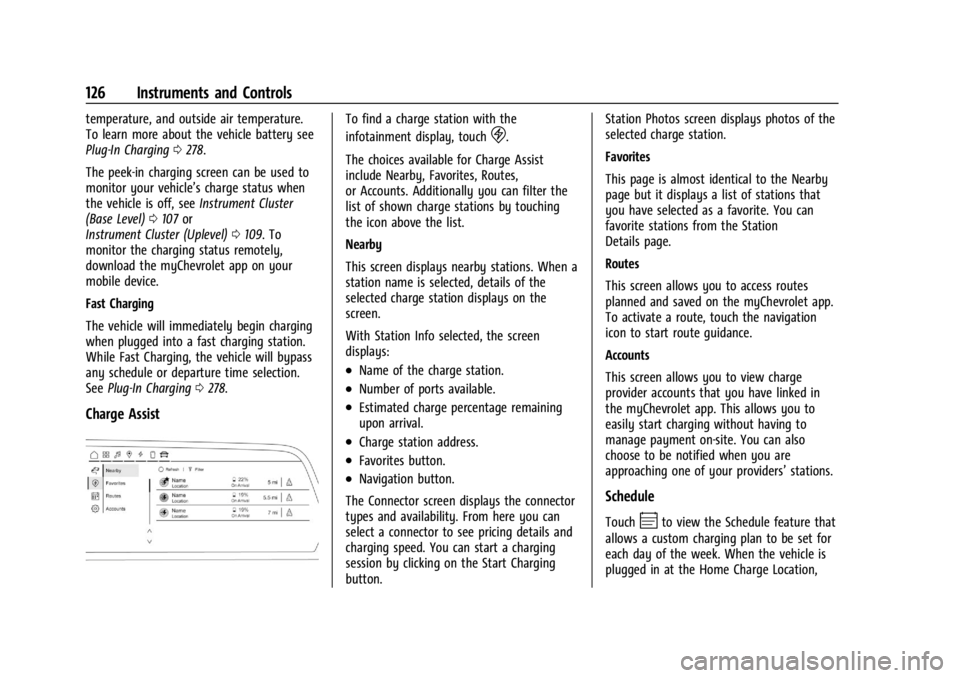
Active Charging
During an active charging session, the
Charging screen displays and continuously
updates the following items:
.Text indicating the vehicle’s current
charging status.
.Current Range: The range the vehicle is
capable of driving at the current charge
level.
.Range Increase Rate: How much range is
accumulating per hour of charging.
.Charge Complete at/in: The estimated
time at which the vehicle will reach the
desired Charge Level.
.Target Charge Level Gauge: During an
Active Charge, the gauge displays the
vehicle's current Charge Level as
a percentage and a colored section of the
circular gauge to represent this value.
To update the desired Charge Level for the
active charging session, drag the marker on
the Target Charge Level Gauge.
Touching the Stop Charge button at any
time ends the active charging session. For
information on beginning a charging session,
see Plug-In Charging 0278.
For Level 1 chargers, you can also select the
appropriate Charge Cord Limit of either
8 amps or 12 amps. This determines how
much current can flow from an electrical
outlet to the vehicle battery. It also ensures
proper charge time estimates.
When the Charge Cord Limit is changed
from 8 amps to 12 amps on a 120V circuit a
notification is displayed.
If no Home Charge Location is set, the Level
1 Cord Limit will revert to 8 amps every
time the vehicle is shifted out of (P) Park.
Range and charge time estimates fluctuate
depending on a number of factors such as
Charge Cord Level/Limit, battery
Page 127 of 429
Chevrolet Silverado EV Owner Manual (GMNA-Localizing-U.S./Canada-
16702912) - 2024 - CRC - 1/13/23
126 Instruments and Controls
temperature, and outside air temperature.
To learn more about the vehicle battery see
Plug-In Charging0278.
The peek-in charging screen can be used to
monitor your vehicle’s charge status when
the vehicle is off, see Instrument Cluster
(Base Level) 0107 or
Instrument Cluster (Uplevel) 0109. To
monitor the charging status remotely,
download the myChevrolet app on your
mobile device.
Fast Charging
The vehicle will immediately begin charging
when plugged into a fast charging station.
While Fast Charging, the vehicle will bypass
any schedule or departure time selection.
See Plug-In Charging 0278.
Charge Assist
To find a charge station with the
infotainment display, touch
D.
The choices available for Charge Assist
include Nearby, Favorites, Routes,
or Accounts. Additionally you can filter the
list of shown charge stations by touching
the icon above the list.
Nearby
This screen displays nearby stations. When a
station name is selected, details of the
selected charge station displays on the
screen.
With Station Info selected, the screen
displays:
.Name of the charge station.
.Number of ports available.
.Estimated charge percentage remaining
upon arrival.
.Charge station address.
.Favorites button.
.Navigation button.
The Connector screen displays the connector
types and availability. From here you can
select a connector to see pricing details and
charging speed. You can start a charging
session by clicking on the Start Charging
button. Station Photos screen displays photos of the
selected charge station.
Favorites
This page is almost identical to the Nearby
page but it displays a list of stations that
you have selected as a favorite. You can
favorite stations from the Station
Details page.
Routes
This screen allows you to access routes
planned and saved on the myChevrolet app.
To activate a route, touch the navigation
icon to start route guidance.
Accounts
This screen allows you to view charge
provider accounts that you have linked in
the myChevrolet app. This allows you to
easily start charging without having to
manage payment on-site. You can also
choose to be notified when you are
approaching one of your providers’
stations.
Schedule
TouchEto view the Schedule feature that
allows a custom charging plan to be set for
each day of the week. When the vehicle is
plugged in at the Home Charge Location,
Page 129 of 429
Chevrolet Silverado EV Owner Manual (GMNA-Localizing-U.S./Canada-
16702912) - 2024 - CRC - 1/13/23
128 Instruments and Controls
delete the schedule, simply touch the Delete
Schedule button, at which point you will be
prompted to confirm your decision.
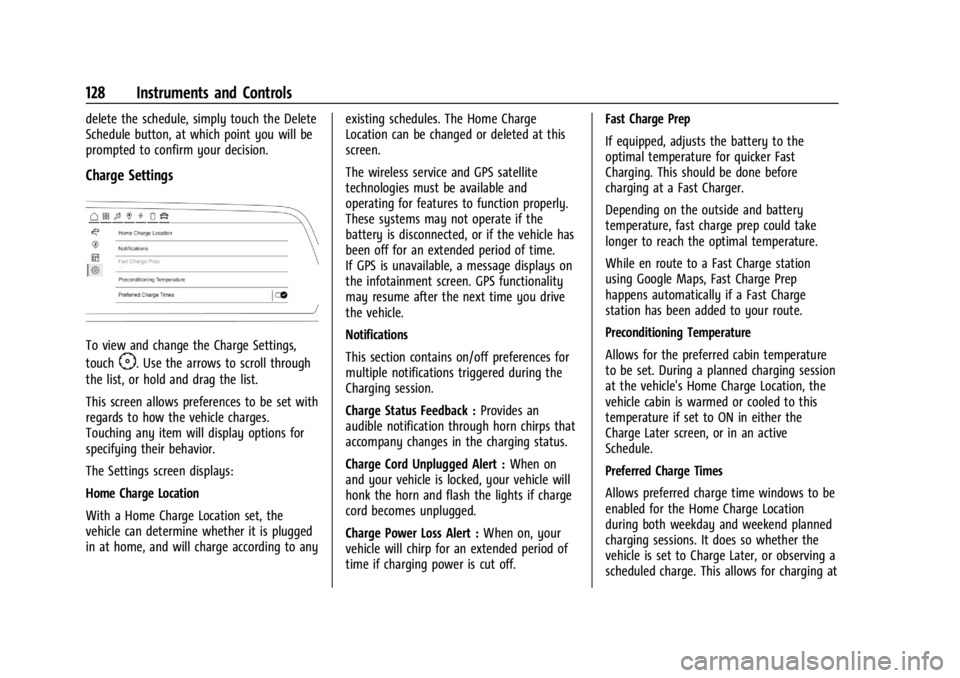
Charge Settings
To view and change the Charge Settings,
touch
F. Use the arrows to scroll through
the list, or hold and drag the list.
This screen allows preferences to be set with
regards to how the vehicle charges.
Touching any item will display options for
specifying their behavior.
The Settings screen displays:
Home Charge Location
With a Home Charge Location set, the
vehicle can determine whether it is plugged
in at home, and will charge according to any existing schedules. The Home Charge
Location can be changed or deleted at this
screen.
The wireless service and GPS satellite
technologies must be available and
operating for features to function properly.
These systems may not operate if the
battery is disconnected, or if the vehicle has
been off for an extended period of time.
If GPS is unavailable, a message displays on
the infotainment screen. GPS functionality
may resume after the next time you drive
the vehicle.
Notifications
This section contains on/off preferences for
multiple notifications triggered during the
Charging session.
Charge Status Feedback :
Provides an
audible notification through horn chirps that
accompany changes in the charging status.
Charge Cord Unplugged Alert : When on
and your vehicle is locked, your vehicle will
honk the horn and flash the lights if charge
cord becomes unplugged.
Charge Power Loss Alert : When on, your
vehicle will chirp for an extended period of
time if charging power is cut off. Fast Charge Prep
If equipped, adjusts the battery to the
optimal temperature for quicker Fast
Charging. This should be done before
charging at a Fast Charger.
Depending on the outside and battery
temperature, fast charge prep could take
longer to reach the optimal temperature.
While en route to a Fast Charge station
using Google Maps, Fast Charge Prep
happens automatically if a Fast Charge
station has been added to your route.
Preconditioning Temperature
Allows for the preferred cabin temperature
to be set. During a planned charging session
at the vehicle's Home Charge Location, the
vehicle cabin is warmed or cooled to this
temperature if set to ON in either the
Charge Later screen, or in an active
Schedule.
Preferred Charge Times
Allows preferred charge time windows to be
enabled for the Home Charge Location
during both weekday and weekend planned
charging sessions. It does so whether the
vehicle is set to Charge Later, or observing a
scheduled charge. This allows for charging at