2024 CHEVROLET SILVERADO EV length
[x] Cancel search: lengthPage 24 of 429
Chevrolet Silverado EV Owner Manual (GMNA-Localizing-U.S./Canada-
16702912) - 2024 - CRC - 1/23/23
Keys, Doors, and Windows 23
3. Check to make sure the hood is latchedcompletely. Push down on the hood to
latch if it does not latch completely.
Repeat this step with additional force if
necessary.
When the hood is not latched, a message
will display on the Driver Information Center
(DIC) and the vehicle will not be able to
shift out of P (Park). To override this
function, press and hold the shift button
and brake pedal until the DIC message
shifter unlock complete is displayed. The
vehicle’s speed will be limited to 42 km/h
(26 mph) when the hood is not completely
closed.
If the vehicle has lost power, and the hood
is open when the power is restored, the
power hood and power closing latch will not
operate. To allow powered hood operation
again, the hood must be manually closed
and fully latched.
{Warning
Do not drive the vehicle if the hood is
not latched completely. The hood could
open fully, block your vision, and cause a (Continued)
Warning (Continued)
crash. You or others could be injured.
Always close the hood completely before
driving.
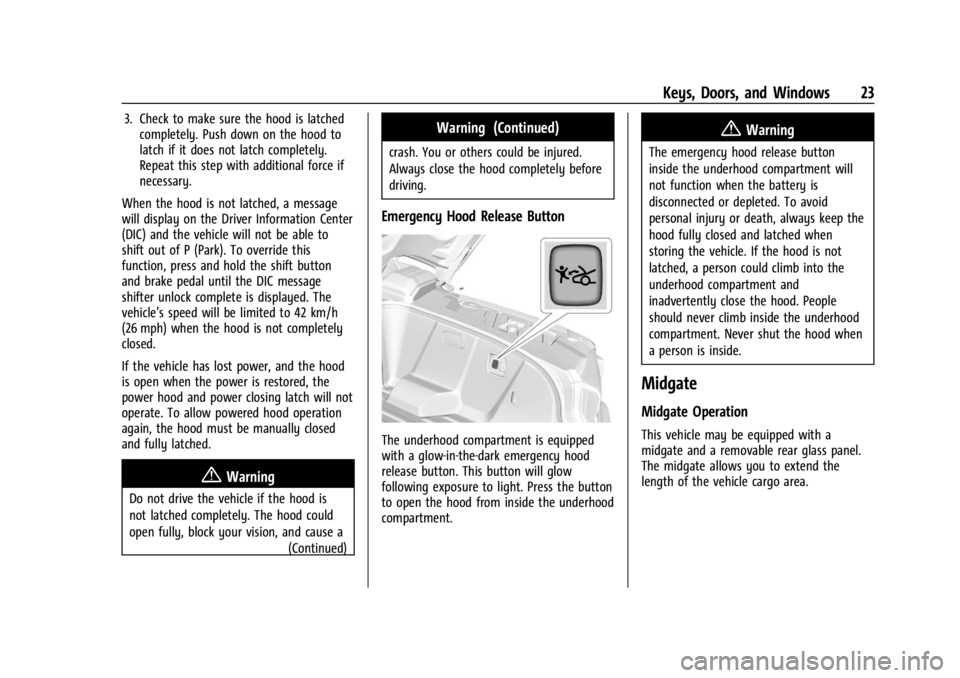
Emergency Hood Release Button
The underhood compartment is equipped
with a glow-in-the-dark emergency hood
release button. This button will glow
following exposure to light. Press the button
to open the hood from inside the underhood
compartment.
{Warning
The emergency hood release button
inside the underhood compartment will
not function when the battery is
disconnected or depleted. To avoid
personal injury or death, always keep the
hood fully closed and latched when
storing the vehicle. If the hood is not
latched, a person could climb into the
underhood compartment and
inadvertently close the hood. People
should never climb inside the underhood
compartment. Never shut the hood when
a person is inside.
Midgate
Midgate Operation
This vehicle may be equipped with a
midgate and a removable rear glass panel.
The midgate allows you to extend the
length of the vehicle cargo area.
Page 71 of 429
Chevrolet Silverado EV Owner Manual (GMNA-Localizing-U.S./Canada-
16702912) - 2024 - CRC - 1/13/23
70 Seats and Restraints
Child Restraints
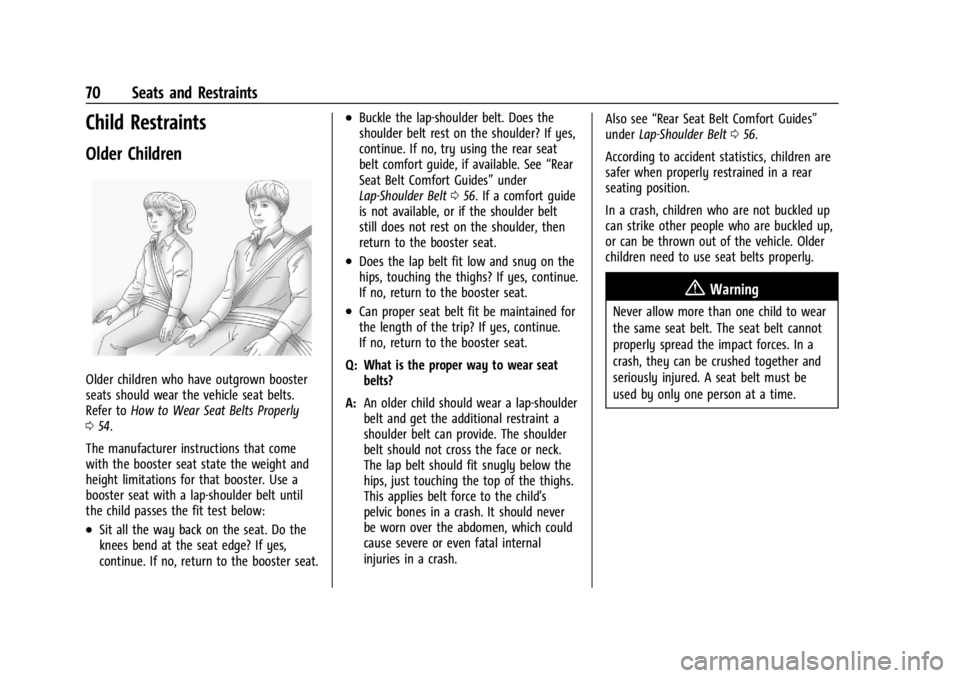
Older Children
Older children who have outgrown booster
seats should wear the vehicle seat belts.
Refer toHow to Wear Seat Belts Properly
0 54.
The manufacturer instructions that come
with the booster seat state the weight and
height limitations for that booster. Use a
booster seat with a lap-shoulder belt until
the child passes the fit test below:
.Sit all the way back on the seat. Do the
knees bend at the seat edge? If yes,
continue. If no, return to the booster seat.
.Buckle the lap-shoulder belt. Does the
shoulder belt rest on the shoulder? If yes,
continue. If no, try using the rear seat
belt comfort guide, if available. See “Rear
Seat Belt Comfort Guides” under
Lap-Shoulder Belt 056. If a comfort guide
is not available, or if the shoulder belt
still does not rest on the shoulder, then
return to the booster seat.
.Does the lap belt fit low and snug on the
hips, touching the thighs? If yes, continue.
If no, return to the booster seat.
.Can proper seat belt fit be maintained for
the length of the trip? If yes, continue.
If no, return to the booster seat.
Q: What is the proper way to wear seat belts?
A: An older child should wear a lap-shoulder
belt and get the additional restraint a
shoulder belt can provide. The shoulder
belt should not cross the face or neck.
The lap belt should fit snugly below the
hips, just touching the top of the thighs.
This applies belt force to the child's
pelvic bones in a crash. It should never
be worn over the abdomen, which could
cause severe or even fatal internal
injuries in a crash. Also see
“Rear Seat Belt Comfort Guides”
under Lap-Shoulder Belt 056.
According to accident statistics, children are
safer when properly restrained in a rear
seating position.
In a crash, children who are not buckled up
can strike other people who are buckled up,
or can be thrown out of the vehicle. Older
children need to use seat belts properly.
{Warning
Never allow more than one child to wear
the same seat belt. The seat belt cannot
properly spread the impact forces. In a
crash, they can be crushed together and
seriously injured. A seat belt must be
used by only one person at a time.
Page 173 of 429
Chevrolet Silverado EV Owner Manual (GMNA-Localizing-U.S./Canada-
16702912) - 2024 - CRC - 1/13/23
172 Infotainment System
Trial length and service availability may vary
by model, model year or trim. Service will
automatically stop at the end of your trial
subscription period unless you decide to
continue service. If you do not wish to enjoy
your trial, you can cancel by calling the
number below. All SiriusXM services require
a subscription, each sold separately by
SiriusXM after the trial period. Service
subject to the applicable SiriusXM Customer
Agreement and Privacy Policy, visit
www.siriusxm.com (USA) or www.siriusxm.ca
(Canada) to see complete terms and how to
cancel which includes calling 1-866-635-2349
(USA) or 1-888-539-7474 (Canada). Some
services and features are subject to device
capabilities and location availability. Content
varies by SiriusXM subscription package. All
fees, content and features are subject to
change.
SiriusXM with 360L: Some features,
including streaming content and listening
recommendations, require an active OnStarConnected Access plan and may vary by
vehicle model. Content varies by SiriusXM
subscription plan. GM connected vehicle
services vary by vehicle model and require
active service plan, working electrical
system, cell reception and GPS signal. See
onstar.com for details and limitations.
SiriusXM, Pandora, Stitcher and all related
logos are trademarks of Sirius XM Radio Inc.
and its respective subsidiaries.
SiriusXM satellite service is only available in
the 48 contiguous United States (and Puerto
Rico with limited availability) and Canada.
In Canada: Some deterioration of service
may occur in extreme northern latitudes.
This is beyond the control of SiriusXM.
Explicit Language Notice: Channels with
frequent explicit language are indicated with
an
“XL” after the channel name.
Family-friendly packages are available by
contacting SiriusXM:
.USA Customers —See www.siriusxm.com
or call 1-888-601-6296.
.Canada Customers —See
www.siriusxm.ca or call 1-877-438-9677.
It is prohibited to copy, decompile,
disassemble, reverse engineer, hack,
manipulate, or otherwise make available any technology or software incorporated in
receivers compatible with the SiriusXM
Satellite Radio System or that support the
SiriusXM website, the Online Service or any
of its content.
General Requirements:
1. A License Agreement from SiriusXM is required for any product that
incorporates SiriusXM Technology and/or
for use of any of the SiriusXM marks to
be manufactured, distributed,
or marketed in the SiriusXM
Service Area.
2. For products to be distributed, marketed, and/or sold in Canada, a separate
agreement is required with Sirius XM
Canada Inc.TouchSense Technology and TouchSense
System 1000 Series Licensed from
Immersion Corporation. TouchSense System
1000 is protected under one or more of the
Page 244 of 429
Chevrolet Silverado EV Owner Manual (GMNA-Localizing-U.S./Canada-
16702912) - 2024 - CRC - 1/17/23
Driving and Operating 243
Super Cruise Message Summary (cont'd)
Unavailable Trailer Too UnstableSuper Cruise has detected that trailer attached is causing unstable
condition. Check trailer and/or load.
Unavailable Trailer Too Large Trailer size (length/width) is larger than supported for Super Cruise
operation.
Unavailable Lane Too Narrow Super Cruise has detected lane width ahead is too narrow for Super
Cruise operation while towing a trailer.
Unavailable Sharp Curve Some curves are too sharp to be navigated by the Super Cruise
system. Super Cruise will be available after the curve is traveled.
Super Cruise Unavailable Super Cruise is unavailable for reasons not described in other
messages.
Super Cruise Locked Out See Owner’s Manual The driver did not take control of the vehicle when prompted by the
Super Cruise system. The Super Cruise system will be disabled until
the vehicle is turned off and back on.
Unavailable Seat Belt Not Fastened The driver seat belt is not fastened.
Unavailable Teen Driver Mode Active Teen Driver mode is active.
Unavailable Snow Mode A snow plow is attached.
Unavailable Unsupported Intersection Super Cruise has detected an unsupported intersection.
Unavailable Approaching Toll Booth Super Cruise has detected that there is a toll booth ahead.
Unavailable Ride Height Out of Range The vehicle ride height is out of Super Cruise operational range.
Drive With Care Super Cruise has detected a construction zone.
Page 252 of 429
Chevrolet Silverado EV Owner Manual (GMNA-Localizing-U.S./Canada-
16702912) - 2024 - CRC - 1/17/23
Driving and Operating 251
settings from the infotainment screen,
touch Settings > Vehicle > Collision/
Detection Systems. The view can be
closed early by selecting X, Home,
or Back.
A Trailer Length Indicator Overlay is
available in the Turn Signal Activated
Views when the trailer is relatively
straight behind the vehicle and a
compatible profile is configured and
selected via the Trailering App. The
overlay will not be visible when the
position of the trailer is too far to the left
or right. The overlay can be enabled or
disabled. To view available settings from
the infotainment screen, touch Settings >
Vehicle > Collision/Detection Systems.
.Jack-Knife Detection and Alert
The vehicle may be equipped with
Jack-Knife Detection. The system will track
the position of the trailer relative to the
vehicle. As the front of the trailer
approaches the rear of the vehicle, a
warning or an alert will be displayed.
A warning indicates to the driver to
proceed with caution and an alert
indicates that a collision is imminent.
Based on vehicle equipment and user
settings, the visual warning or alert may
be accompanied by audible or safety alertseat notifications. To view available
settings from the infotainment screen,
touch Settings > Vehicle > Collision/
Detection Systems.
.Trailer Angle Indicator
The vehicle may be equipped with a
Trailer Angle Indicator. The Trailer Angle
Indicator gives the driver a visual
representation of the trailer’s position
relative to the vehicle. Available only in
R (Reverse), Guidelines On, or Rear
Trailering Views.
.When driving Off-Road the system will
allow camera usage at higher speeds to
improve safety and awareness. To
activate place the vehicle drive mode in
Off-Road. In this mode all Camera Views
in the infotainment display will be
available at higher speeds.
{Warning
Use Hitch Guidance only to help back the
vehicle to a trailer hitch or, when
traveling above 12 km/h (8 mph), to
briefly check the status of your trailer. Do
not use for any other purpose, such as
making lane change decisions. Before
making a lane change, always check the
(Continued)
Warning (Continued)
mirrors and glance over your shoulder.
Improper use could result in serious
injury to you or others.
HD Surround Vision with Trailer Camera
Provisions
The system shows multiple views in the
infotainment display using five cameras
mounted around the vehicle and up to two
additional accessory cameras that can be
mounted on or in a trailer. This feature
provides additional views to aid in
trailering/towing. The front camera is in the
grille under the front emblem, the side
cameras are on the bottom of the outside
mirrors, the rear camera is in the tailgate
handle and the bed camera is mounted on
the rear of the cab.
Additionally, up to two accessory cameras
can be mounted to the rear and/or interior
of the trailer. See your dealer for accessory
trailer cameras. To access, touch CAMERA on
the infotainment display or shift to
R (Reverse). To return to the previous screen
when not in R (Reverse), touch the Home or
Back buttons on the infotainment display.
Page 255 of 429
Chevrolet Silverado EV Owner Manual (GMNA-Localizing-U.S./Canada-
16702912) - 2024 - CRC - 1/17/23
254 Driving and Operating
.Performance for Transparent Trailer and
Jack Knife Detection are optimized when
the entered value for trailer width reflects
the width of the box of the trailer. If total
width is entered:
.The inlayed camera view in
Transparent Trailer View may appear
wider than the trailer face.
.Jack Knife Detection alerts may
activate prematurely.
.Performance for Rear Trailer Guidance
Lines and Trailer Length Indicator Overlays
are optimized when the entered value for
trailer width reflects the total width of
the trailer including outboard wheels.
If the trailer box width is entered:
.The Rear Trailer Guidance Lines will
appear narrower than the actual path
of the trailer.
.The Trailer Length Indicator Overlays
will appear closer and possibly overlap
with the trailer.
Park Assist
With Front and Rear Park Assist, as the
vehicle moves at speeds of less than 8 km/h
(5 mph) the sensors on the bumpers may
detect objects up to 1.2 m (4 ft) in front and
1.8 m (6 ft) behind the vehicle within a zone
25 cm (10 in) high off the ground and below
bumper level. These detection distances may
be shorter during warmer or humid weather.
Blocked sensors will not detect objects and
can also cause false detections. Keep the
sensors clean of mud, dirt, snow, ice, and
slush; and clean sensors after a car wash in
freezing temperatures.
{Warning
The Park Assist system does not detect
children, pedestrians, bicyclists, animals,
or objects located below the bumper or
that are too close or too far from the
vehicle. It is not available at speeds
greater than 8 km/h (5 mph). To prevent
injury, death, or vehicle damage, even
with Park Assist, always check the area
around the vehicle and check all mirrors
before moving forward or backing.
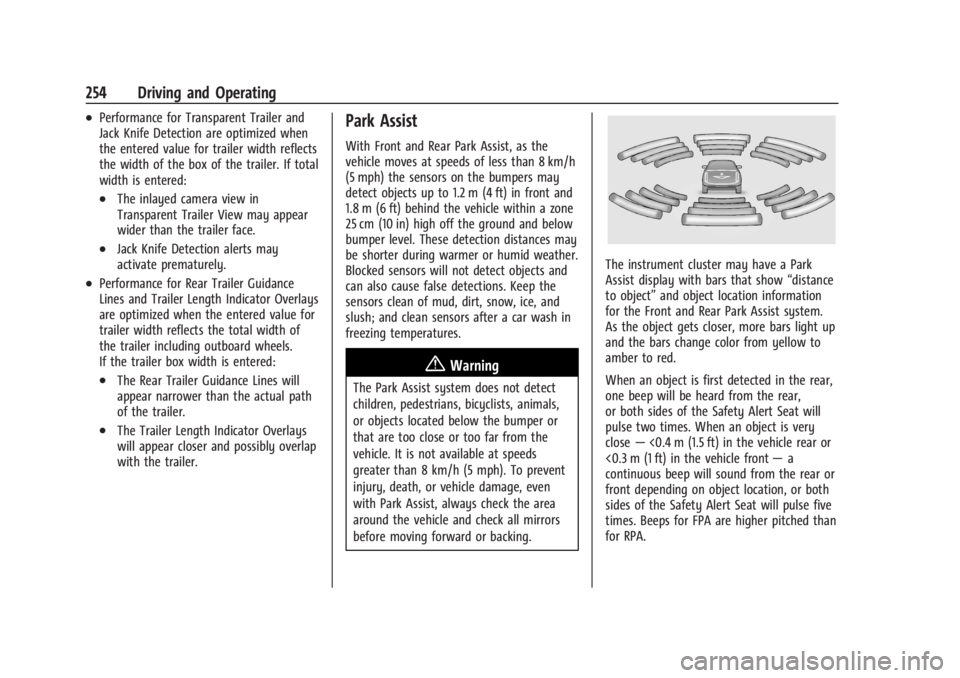
The instrument cluster may have a Park
Assist display with bars that show“distance
to object” and object location information
for the Front and Rear Park Assist system.
As the object gets closer, more bars light up
and the bars change color from yellow to
amber to red.
When an object is first detected in the rear,
one beep will be heard from the rear,
or both sides of the Safety Alert Seat will
pulse two times. When an object is very
close —<0.4 m (1.5 ft) in the vehicle rear or
<0.3 m (1 ft) in the vehicle front —a
continuous beep will sound from the rear or
front depending on object location, or both
sides of the Safety Alert Seat will pulse five
times. Beeps for FPA are higher pitched than
for RPA.
Page 281 of 429
Chevrolet Silverado EV Owner Manual (GMNA-Localizing-U.S./Canada-
16702912) - 2024 - CRC - 1/17/23
280 Driving and Operating
4. Plug in the AC charge cord into thevehicle charge port . Make sure the AC
vehicle plug is fully connected to the AC
charge port. If it is not properly
connected, the vehicle may not be
charged.
5. Verify that the Headlight Charging Status Indicator (CSI) illuminates on the
headlamps (if enabled), charge port light
turns on, and an audible chirp occurs.
See Charging Status Feedback 0283.
To End AC Charging 1. Unlock the charge cord from the vehicle by pressing the button on the top of the
charge cord plug. Unplug the charge cord
from the vehicle.
2. Close the charge port door by pressing firmly in the center until it latches.
3. Unplug the charge cord from the electrical outlet.
4. Place the charge cord into the storage case.
DC Charging
DC Charging Station Hardware
The vehicle can be charged using DC
charging equipment typically found at
service stations and other public locations. Check the charging station DC vehicle plug
for compatibility with the DC charge port on
this vehicle. This vehicle is compatible with a
Combined Charging System 1 (CCS1)
connector.
When recharging at a DC charge station, the
charging cable connected to the vehicle
must be less than 10 m (33 ft) in length to
meet functionality and regulatory
requirements.
{Warning
Do not use the charging station if the
handle has defects such as cracks,
exposed wires, burnt or missing pins,
or any other damage. A damaged handle
may result in personal injury and/or
damage to the vehicle, the charging port
or other property.
For maximum charging performance, and to
prevent charging interruptions or damage to
the high voltage battery and vehicle:
.Remove your hands from the charging
handle once it has been plugged in. If not
done, this can cause a charging
interruption.
.Ensure that the charge cord plug clicks. Follow the steps listed on the charging
station to perform a DC vehicle charge.
If for any reason DC charging does not
begin or is interrupted, check the DC
charging station display for messages.
Unplug the cord to restart the DC charging
process.
To Start DC Charging
1. Put the vehicle in P (Park).
2. Press the Electric Parking brake (EPB) switch. See Electric Parking Brake 0205.
3. Push the rearward edge of the charge port door and release to open the door.
In cold weather conditions, ice may form
around the charge port door. The charge
port door may not open on the first
attempt. Remove ice from the area and
repeat attempting to open the charge
port door.
Page 294 of 429
Chevrolet Silverado EV Owner Manual (GMNA-Localizing-U.S./Canada-
16702912) - 2024 - CRC - 1/17/23
Driving and Operating 293
Utility Interruption of Charging
This vehicle responds to requests through
the utility company to limit or completely
block electrical power grid use. This feature
is inactive during DC charging. A utility
interruption will lengthen the vehicle
charge time.
When electrical grid power is completely
blocked, the vehicle will not charge until the
utility interruption has expired. The vehicle
should be left plugged in so that the vehicle
will automatically resume charging.
Changing the charge mode to Charge Now
or performing a delayed charging override
will not disable a utility interruption.
A message will display on the instrument
cluster indicating that a utility interruption
has occurred.
Charging Station Troubleshooting
If the vehicle does not charge after being
plugged in to a residential 240-volt charging
station:1. Verify that the charge mode is set to Charge Now.
2. Verify that the charging station circuit breaker is not tripped. 3. Plug the portable charge cord into the
wall outlet, verify that the indicator light
on the charge cord is solid green, and
connect it to the vehicle. See “Charge
Cord Status Indicators” inCharge Cord
0 286.
4. If the vehicle charges with the portable charge cord and a different 240-volt
charging station, such as a public station,
there may be a problem with the
charging station. Contact the charging
station manufacturer for service.
Electrical Requirements for
Battery Charging
The vehicle is designed for compatibility
with most standard vehicle charging
equipment in the region of sale. Check for
charger compatibility before purchasing a
charger
The portable charge cord defaults to
120 volts and 8 amps. Have the outlet
inspected before changing to 12 amps on the
Charging Screens. If 12 amps is selected, a
pop-up will show on the infotainment
display to confirm the change to 12 amps.
See the “Active Charging” section under
Charging 0123.
Caution
Do not use portable or stationary backup
generating equipment to charge the
vehicle. This may cause damage to the
vehicle's charging system. Only charge
the vehicle from utility supplied power.
Trailer Towing
General Towing Information
Only use towing equipment that has been
designed for the vehicle. Contact your dealer
or trailering dealer for assistance with
preparing the vehicle to tow a trailer. Read
the entire section before towing a trailer.
To tow a disabled vehicle, see Transporting
a Disabled Vehicle 0378. To tow the vehicle
behind another vehicle such as a motor
home, see Recreational Vehicle Towing
0 379.