2024 CHEVROLET SILVERADO EV clock
[x] Cancel search: clockPage 97 of 429
Chevrolet Silverado EV Owner Manual (GMNA-Localizing-U.S./Canada-
16702912) - 2024 - CRC - 1/13/23
96 Instruments and Controls
Instruments and Controls
Controls
Steering Wheel Adjustment . . . . . . . . . . . . 97
Heated Steering Wheel . . . . . . . . . . . . . . . . . 97
Horn . . . . . . . . . . . . . . . . . . . . . . . . . . . . . . . . . . . 98
Pedestrian Safety Signal . . . . . . . . . . . . . . . . 98
Windshield Wiper/Washer . . . . . . . . . . . . . 98
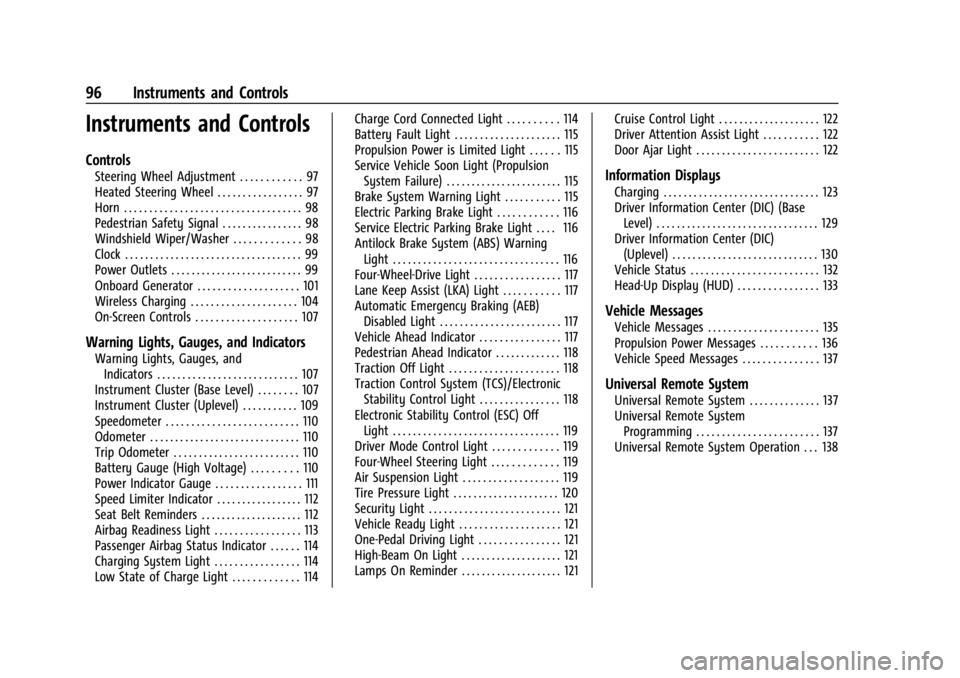
Clock . . . . . . . . . . . . . . . . . . . . . . . . . . . . . . . . . . . 99
Power Outlets . . . . . . . . . . . . . . . . . . . . . . . . . . 99
Onboard Generator . . . . . . . . . . . . . . . . . . . . 101
Wireless Charging . . . . . . . . . . . . . . . . . . . . . 104
On-Screen Controls . . . . . . . . . . . . . . . . . . . . 107
Warning Lights, Gauges, and Indicators
Warning Lights, Gauges, andIndicators . . . . . . . . . . . . . . . . . . . . . . . . . . . . 107
Instrument Cluster (Base Level) . . . . . . . . 107
Instrument Cluster (Uplevel) . . . . . . . . . . . 109
Speedometer . . . . . . . . . . . . . . . . . . . . . . . . . . 110
Odometer . . . . . . . . . . . . . . . . . . . . . . . . . . . . . . 110
Trip Odometer . . . . . . . . . . . . . . . . . . . . . . . . . 110
Battery Gauge (High Voltage) . . . . . . . . . 110
Power Indicator Gauge . . . . . . . . . . . . . . . . . 111
Speed Limiter Indicator . . . . . . . . . . . . . . . . . 112
Seat Belt Reminders . . . . . . . . . . . . . . . . . . . . 112
Airbag Readiness Light . . . . . . . . . . . . . . . . . 113
Passenger Airbag Status Indicator . . . . . . 114
Charging System Light . . . . . . . . . . . . . . . . . 114
Low State of Charge Light . . . . . . . . . . . . . 114 Charge Cord Connected Light . . . . . . . . . . 114
Battery Fault Light . . . . . . . . . . . . . . . . . . . . . 115
Propulsion Power is Limited Light . . . . . . 115
Service Vehicle Soon Light (Propulsion
System Failure) . . . . . . . . . . . . . . . . . . . . . . . 115
Brake System Warning Light . . . . . . . . . . . 115
Electric Parking Brake Light . . . . . . . . . . . . 116
Service Electric Parking Brake Light . . . . 116
Antilock Brake System (ABS) Warning Light . . . . . . . . . . . . . . . . . . . . . . . . . . . . . . . . . 116
Four-Wheel-Drive Light . . . . . . . . . . . . . . . . . 117
Lane Keep Assist (LKA) Light . . . . . . . . . . . 117
Automatic Emergency Braking (AEB) Disabled Light . . . . . . . . . . . . . . . . . . . . . . . . 117
Vehicle Ahead Indicator . . . . . . . . . . . . . . . . 117
Pedestrian Ahead Indicator . . . . . . . . . . . . . 118
Traction Off Light . . . . . . . . . . . . . . . . . . . . . . 118
Traction Control System (TCS)/Electronic Stability Control Light . . . . . . . . . . . . . . . . 118
Electronic Stability Control (ESC) Off Light . . . . . . . . . . . . . . . . . . . . . . . . . . . . . . . . . 119
Driver Mode Control Light . . . . . . . . . . . . . 119
Four-Wheel Steering Light . . . . . . . . . . . . . 119
Air Suspension Light . . . . . . . . . . . . . . . . . . . 119
Tire Pressure Light . . . . . . . . . . . . . . . . . . . . . 120
Security Light . . . . . . . . . . . . . . . . . . . . . . . . . . 121
Vehicle Ready Light . . . . . . . . . . . . . . . . . . . . 121
One-Pedal Driving Light . . . . . . . . . . . . . . . . 121
High-Beam On Light . . . . . . . . . . . . . . . . . . . . 121
Lamps On Reminder . . . . . . . . . . . . . . . . . . . . 121 Cruise Control Light . . . . . . . . . . . . . . . . . . . . 122
Driver Attention Assist Light . . . . . . . . . . . 122
Door Ajar Light . . . . . . . . . . . . . . . . . . . . . . . . 122
Information Displays
Charging . . . . . . . . . . . . . . . . . . . . . . . . . . . . . . . 123
Driver Information Center (DIC) (Base
Level) . . . . . . . . . . . . . . . . . . . . . . . . . . . . . . . . 129
Driver Information Center (DIC) (Uplevel) . . . . . . . . . . . . . . . . . . . . . . . . . . . . . 130
Vehicle Status . . . . . . . . . . . . . . . . . . . . . . . . . 132
Head-Up Display (HUD) . . . . . . . . . . . . . . . . 133
Vehicle Messages
Vehicle Messages . . . . . . . . . . . . . . . . . . . . . . 135
Propulsion Power Messages . . . . . . . . . . . 136
Vehicle Speed Messages . . . . . . . . . . . . . . . 137
Universal Remote System
Universal Remote System . . . . . . . . . . . . . . 137
Universal Remote System Programming . . . . . . . . . . . . . . . . . . . . . . . . 137
Universal Remote System Operation . . . 138
Page 100 of 429

Chevrolet Silverado EV Owner Manual (GMNA-Localizing-U.S./Canada-
16702912) - 2024 - CRC - 1/13/23
Instruments and Controls 99
{Warning
In freezing weather, do not use the
washer until the windshield is warmed.
Otherwise the washer fluid can form ice
on the windshield, blocking your vision.
{Warning
Before driving the vehicle, always clear
snow and ice from the hood, windshield,
washer nozzles, roof, and rear of the
vehicle, including all lamps and windows.
Reduced visibility from snow and ice
buildup could lead to a crash.
Wiper Parking
If the vehicle is turned off while the wipers
are on LO, HI, or INT, they will
immediately stop.
If the windshield wiper lever is then moved
to OFF before the driver door is opened or
within 10 minutes, the wipers will restart
and move to the base of the windshield.
If the vehicle is turned off while the wipers
are performing wipes due to windshield
washing, the wipers continue to run until
they reach the base of the windshield.
Rain Sense
If equipped with Rain Sense and the feature
is turned on, a sensor near the top center of
the windshield detects the amount of water
on the windshield and controls the
frequency of the windshield wiper based on
the current sensitivity setting.
Keep this area of the windshield clear of
debris to allow for best system performance.
To turn the Rain Sense feature on or off, see
“Rain Sense Wipers” under Settings >
Vehicle > Comfort and Convenience > Rain
Sense > Enable/Disable.
If Rain Sense is enabled in Settings, turning
the wiper lever to INT will activate Rain
Sense.
Clock
Set the time and date using the
infotainment system. See "Time/Date" under
Settings 0166.
Power Outlets
Power Outlets 12-Volt Direct Current
The vehicle has two 12-volt outlets that can
be used to plug in electrical equipment, such
as a tablet or MP3 player. Lift the cover to access the outlet and
replace when not in use.
The power outlets are located:
.In the center console storage area under
the armrest
.In the eTrunk™
area
Center Console 12 Volt Power Outlet
Page 125 of 429
Chevrolet Silverado EV Owner Manual (GMNA-Localizing-U.S./Canada-
16702912) - 2024 - CRC - 1/13/23
124 Instruments and Controls
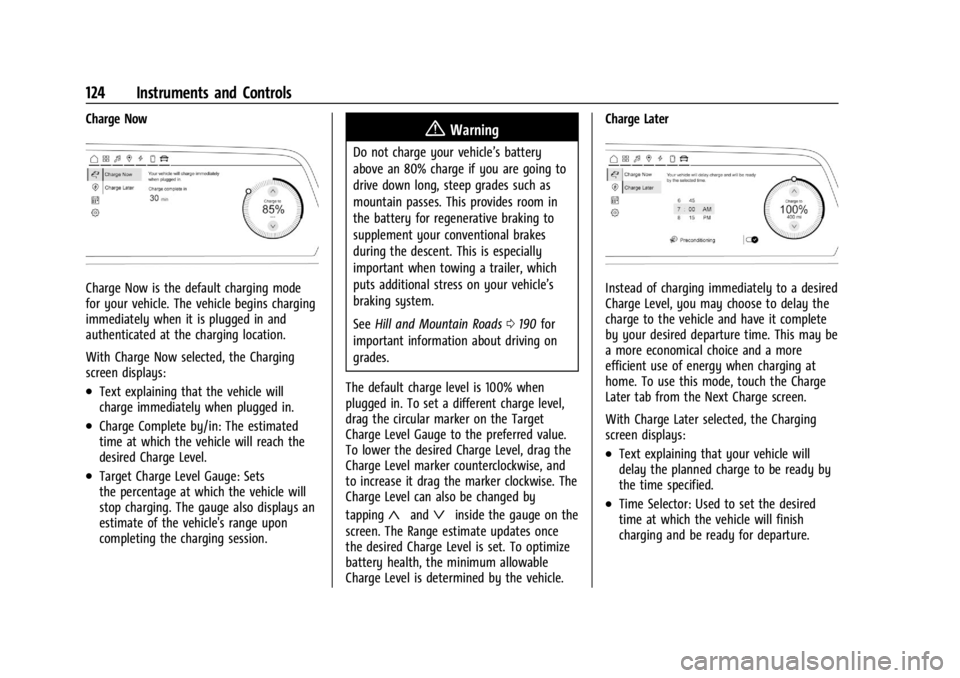
Charge Now
Charge Now is the default charging mode
for your vehicle. The vehicle begins charging
immediately when it is plugged in and
authenticated at the charging location.
With Charge Now selected, the Charging
screen displays:
.Text explaining that the vehicle will
charge immediately when plugged in.
.Charge Complete by/in: The estimated
time at which the vehicle will reach the
desired Charge Level.
.Target Charge Level Gauge: Sets
the percentage at which the vehicle will
stop charging. The gauge also displays an
estimate of the vehicle's range upon
completing the charging session.
{Warning
Do not charge your vehicle’s battery
above an 80% charge if you are going to
drive down long, steep grades such as
mountain passes. This provides room in
the battery for regenerative braking to
supplement your conventional brakes
during the descent. This is especially
important when towing a trailer, which
puts additional stress on your vehicle’s
braking system.
SeeHill and Mountain Roads 0190 for
important information about driving on
grades.
The default charge level is 100% when
plugged in. To set a different charge level,
drag the circular marker on the Target
Charge Level Gauge to the preferred value.
To lower the desired Charge Level, drag the
Charge Level marker counterclockwise, and
to increase it drag the marker clockwise. The
Charge Level can also be changed by
tapping
«andªinside the gauge on the
screen. The Range estimate updates once
the desired Charge Level is set. To optimize
battery health, the minimum allowable
Charge Level is determined by the vehicle. Charge Later
Instead of charging immediately to a desired
Charge Level, you may choose to delay the
charge to the vehicle and have it complete
by your desired departure time. This may be
a more economical choice and a more
efficient use of energy when charging at
home. To use this mode, touch the Charge
Later tab from the Next Charge screen.
With Charge Later selected, the Charging
screen displays:
.Text explaining that your vehicle will
delay the planned charge to be ready by
the time specified.
.Time Selector: Used to set the desired
time at which the vehicle will finish
charging and be ready for departure.
Page 168 of 429
Chevrolet Silverado EV Owner Manual (GMNA-Localizing-U.S./Canada-
16702912) - 2024 - CRC - 1/13/23
Infotainment System 167
Wi-Fi Hotspot
Allows adjustment of different Wi-Fi
features.
Vehicle-to-Phone Sharing
Trusted Device
Allows for setting a phone as your trusted
device to establish a secure communication
channel between your phone and vehicle
that enables convenient features like instant
profile unlocking and account sign in. When
nearby, your trusted device is recognized
automatically via a unique Bluetooth
connection.
Vehicle
The menu may contain the following:
Teen Driver
SeeTeen Driver 0168.
Rear Seat Reminder
Allows for a chime and a message when the
rear door has been opened before or during
operation of the vehicle. Buckle to Drive
This feature can prevent shifting out of Park
when the driver, and if applicable the front
passenger, seat belt is not buckled. See
Buckle To Drive
053.
Climate and Air Quality
Adjusts different climate settings.
Collision/Detection Systems
Adjusts different driver assistance system
settings.
Comfort and Convenience
Adjusts different comfort and convenience
settings.
Lighting
Adjusts different lighting settings.
Power Door Locks
Adjusts different door lock settings.
Remote Lock, Unlock, and Start
Adjusts different remote lock settings.
Ride Height
Adjusts different ride height settings.
Power Assist Steps
Adjusts different running board settings. Seating Position
Adjusts different seating position settings.
Suspension
Adjusts different suspension settings.
Trailering
Adjusts different trailering settings.
Apps and Notifications
Shows a list of installed apps and the
permissions used.
Date / Time
Allows setting of the clock.
Display
Allows adjustment of the infotainment
display.
Sounds
Allows adjustment of the infotainment
system sounds.
Profiles and Accounts
Modifies the infotainment system’s profiles
and provides access to the accounts assigned
to the currently active profile.
Page 344 of 429
Chevrolet Silverado EV Owner Manual (GMNA-Localizing-U.S./Canada-
16702912) - 2024 - CRC - 1/13/23
Vehicle Care 343
See your dealer if additional assistance is
needed.
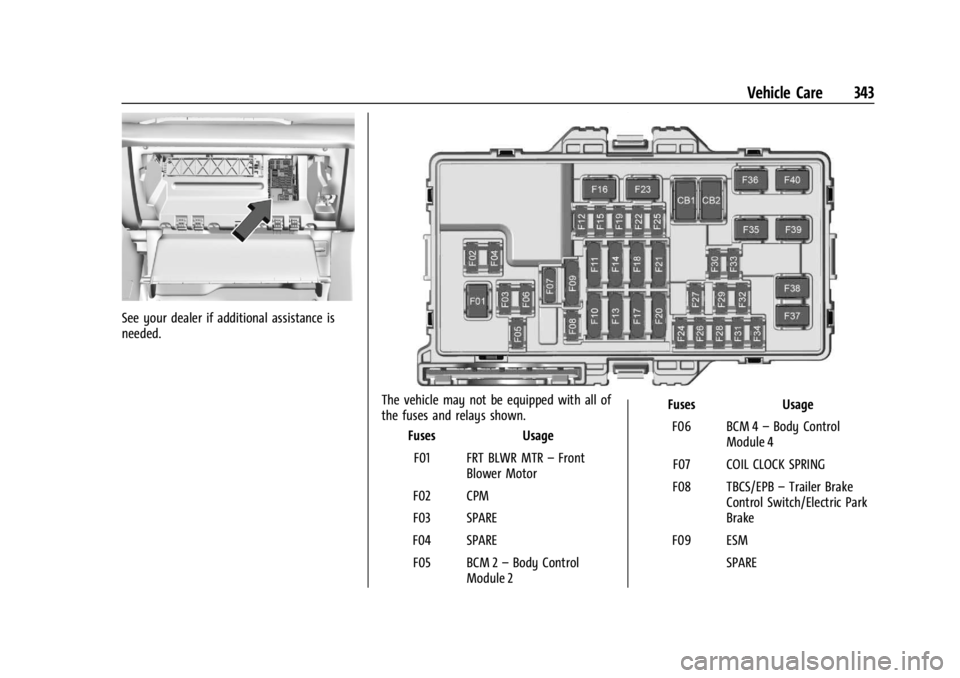
The vehicle may not be equipped with all of
the fuses and relays shown.Fuses Usage
F01 FRT BLWR MTR –Front
Blower Motor
F02 CPM
F03 SPARE
F04 SPARE F05 BCM 2 –Body Control
Module 2 Fuses
Usage
F06 BCM 4 –Body Control
Module 4
F07 COIL CLOCK SPRING
F08 TBCS/EPB –Trailer Brake
Control Switch/Electric Park
Brake
F09 ESM SPARE
Page 366 of 429
Chevrolet Silverado EV Owner Manual (GMNA-Localizing-U.S./Canada-
16702912) - 2024 - CRC - 1/13/23
Vehicle Care 365
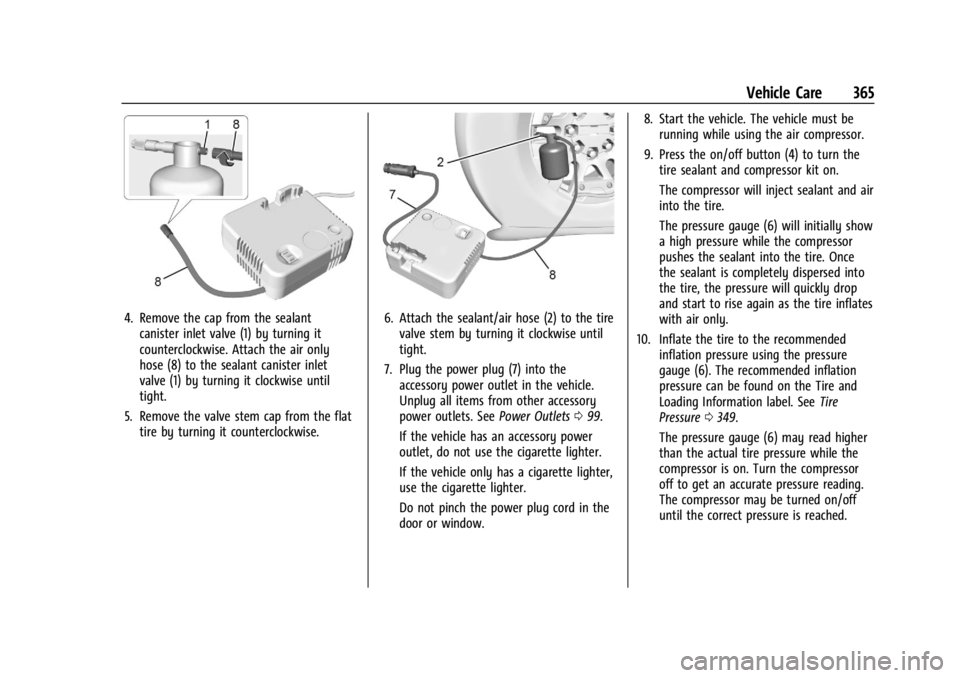
4. Remove the cap from the sealantcanister inlet valve (1) by turning it
counterclockwise. Attach the air only
hose (8) to the sealant canister inlet
valve (1) by turning it clockwise until
tight.
5. Remove the valve stem cap from the flat tire by turning it counterclockwise.6. Attach the sealant/air hose (2) to the tirevalve stem by turning it clockwise until
tight.
7. Plug the power plug (7) into the accessory power outlet in the vehicle.
Unplug all items from other accessory
power outlets. See Power Outlets099.
If the vehicle has an accessory power
outlet, do not use the cigarette lighter.
If the vehicle only has a cigarette lighter,
use the cigarette lighter.
Do not pinch the power plug cord in the
door or window. 8. Start the vehicle. The vehicle must be
running while using the air compressor.
9. Press the on/off button (4) to turn the tire sealant and compressor kit on.
The compressor will inject sealant and air
into the tire.
The pressure gauge (6) will initially show
a high pressure while the compressor
pushes the sealant into the tire. Once
the sealant is completely dispersed into
the tire, the pressure will quickly drop
and start to rise again as the tire inflates
with air only.
10. Inflate the tire to the recommended inflation pressure using the pressure
gauge (6). The recommended inflation
pressure can be found on the Tire and
Loading Information label. See Tire
Pressure 0349.
The pressure gauge (6) may read higher
than the actual tire pressure while the
compressor is on. Turn the compressor
off to get an accurate pressure reading.
The compressor may be turned on/off
until the correct pressure is reached.
Page 367 of 429
Chevrolet Silverado EV Owner Manual (GMNA-Localizing-U.S./Canada-
16702912) - 2024 - CRC - 1/13/23
366 Vehicle Care
Caution
If the recommended pressure cannot be
reached after approximately 25 minutes,
the vehicle should not be driven farther.
The tire is too severely damaged and the
tire sealant and compressor kit cannot
inflate the tire. Remove the power plug
from the accessory power outlet and
unscrew the inflating hose from the tire
valve. SeeRoadside Assistance Program
0 399.
11. Press the on/off button (4) to turn the tire sealant and compressor kit off.
The tire is not sealed and will continue
to leak air until the vehicle is driven and
the sealant is distributed in the tire.
Therefore, Steps 12–20 must be done
immediately after Step 11.
Be careful while handling the tire sealant
and compressor kit as it could be warm
after usage.
12. Unplug the power plug (7) from the accessory power outlet in the vehicle.
13. Turn the sealant/air hose (2) counterclockwise to remove it from the
tire valve stem.
14. Replace the tire valve stem cap. 15. Turn the air only hose (8)
counterclockwise to remove it from the
tire sealant canister inlet valve (1).
16. Replace the tire sealant canister inlet valve (1) cap.
17. Return the air only hose (8) and power plug (7) back to their original storage
location.
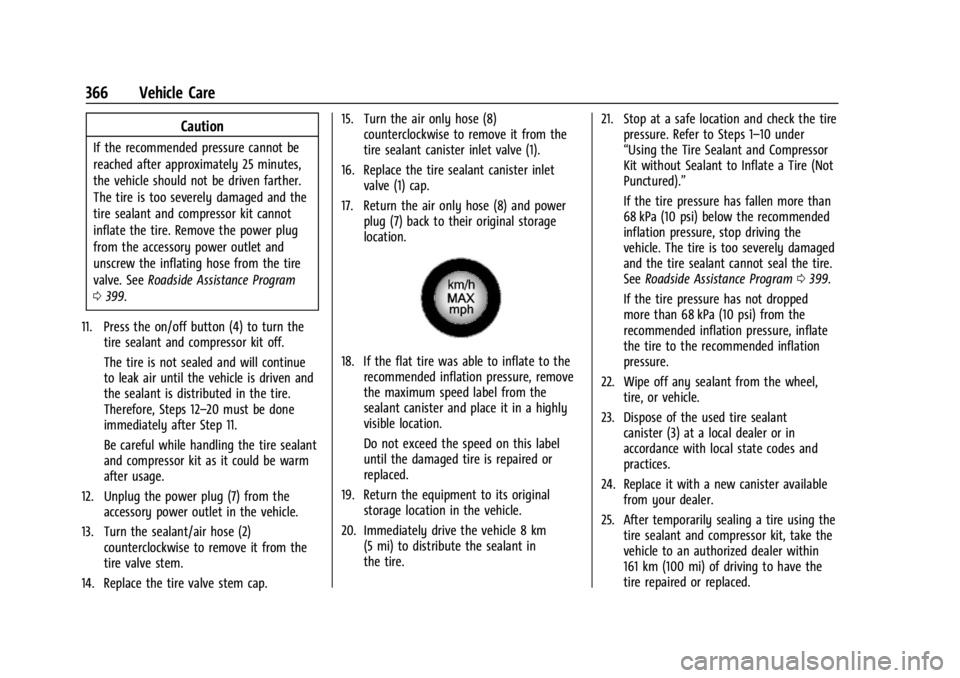
18. If the flat tire was able to inflate to therecommended inflation pressure, remove
the maximum speed label from the
sealant canister and place it in a highly
visible location.
Do not exceed the speed on this label
until the damaged tire is repaired or
replaced.
19. Return the equipment to its original storage location in the vehicle.
20. Immediately drive the vehicle 8 km (5 mi) to distribute the sealant in
the tire. 21. Stop at a safe location and check the tire
pressure. Refer to Steps 1–10 under
“Using the Tire Sealant and Compressor
Kit without Sealant to Inflate a Tire (Not
Punctured).”
If the tire pressure has fallen more than
68 kPa (10 psi) below the recommended
inflation pressure, stop driving the
vehicle. The tire is too severely damaged
and the tire sealant cannot seal the tire.
SeeRoadside Assistance Program 0399.
If the tire pressure has not dropped
more than 68 kPa (10 psi) from the
recommended inflation pressure, inflate
the tire to the recommended inflation
pressure.
22. Wipe off any sealant from the wheel, tire, or vehicle.
23. Dispose of the used tire sealant canister (3) at a local dealer or in
accordance with local state codes and
practices.
24. Replace it with a new canister available from your dealer.
25. After temporarily sealing a tire using the tire sealant and compressor kit, take the
vehicle to an authorized dealer within
161 km (100 mi) of driving to have the
tire repaired or replaced.
Page 368 of 429
Chevrolet Silverado EV Owner Manual (GMNA-Localizing-U.S./Canada-
16702912) - 2024 - CRC - 1/13/23
Vehicle Care 367
Using the Tire Sealant and Compressor
Kit without Sealant to Inflate a Tire (Not
Punctured)
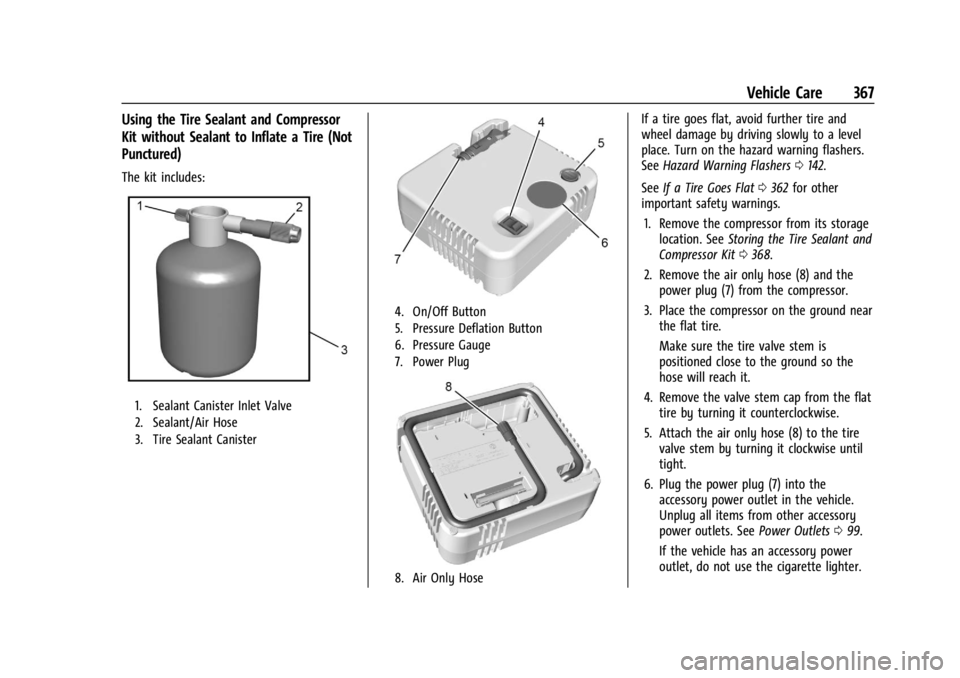
The kit includes:
1. Sealant Canister Inlet Valve
2. Sealant/Air Hose
3. Tire Sealant Canister
4. On/Off Button
5. Pressure Deflation Button
6. Pressure Gauge
7. Power Plug
8. Air Only Hose
If a tire goes flat, avoid further tire and
wheel damage by driving slowly to a level
place. Turn on the hazard warning flashers.
SeeHazard Warning Flashers 0142.
See If a Tire Goes Flat 0362 for other
important safety warnings.
1. Remove the compressor from its storage location. See Storing the Tire Sealant and
Compressor Kit 0368.
2. Remove the air only hose (8) and the power plug (7) from the compressor.
3. Place the compressor on the ground near the flat tire.
Make sure the tire valve stem is
positioned close to the ground so the
hose will reach it.
4. Remove the valve stem cap from the flat tire by turning it counterclockwise.
5. Attach the air only hose (8) to the tire valve stem by turning it clockwise until
tight.
6. Plug the power plug (7) into the accessory power outlet in the vehicle.
Unplug all items from other accessory
power outlets. See Power Outlets099.
If the vehicle has an accessory power
outlet, do not use the cigarette lighter.