2023 TOYOTA YARIS CROSS tire type
[x] Cancel search: tire typePage 404 of 698

402
Owners Manual_Europe_M52N75_en
6-3. Do-it-yourself maintenance
When replacing wheels, care
should be taken to ensure that they
are equivalent to those removed in
load capacity, diameter, rim width
and inset*.
Replacement wheels are available
at any authorized Toyota retailer or
Toyota authorized repairer, or any
reliable repairer.
*: Conventionally referred to as offset.
Toyota does not recommend using
the following:
Wheels of different sizes or types
Used wheels
Bent wheels that have been
straightened
■When replacing wheels
The wheels of your vehicle are equipped with tire pressure warning valves and
transmitters that allow the tire pressure warning system to provide advance warning in the event of a loss in tire
inflation pressure. Whenever wheels are replaced, the tire pressure warning valves and transmitters must be
installed. ( P.394)
■When removing the wheel orna-
ment (vehicles with an emergency tire puncture repair kit)
Remove the wheel ornament using the
wheel cap clip*.*: The wheel cap clip is installed in the
glove box. ( P.353)
Wheels
If a wheel is bent, cracked or
heavily corroded, it should be
replaced. Otherwise, the tire
may separate from the wheel
or cause a loss of handling
control.
Wheel selection
WARNING
■When replacing wheels
●Do not use wheels that are a differ- ent size from those recommended in the Owner’s Manual, as this may
result in a loss of handling control.
●Never use an inner tube in a leak-
ing wheel which is designed for a tubeless tire.Doing so may result in an accident,
causing death or serious injury.
■When installing the wheel nuts
●Be sure to install the wheel nuts with the tapered ends facing inward ( P.464). Installing the nuts with
the tapered ends facing outward can cause the wheel to break and eventually cause the wheel to come
off while driving, which could lead to an accident resulting in death or serious injury.
Page 412 of 698

410
Owners Manual_Europe_M52N75_en
6-3. Do-it-yourself maintenance
repairer, local electrical appliance
shops or camera stores.
●Replace only with the same or equiva-
lent type recommended by the manu- facturer.
●Dispose of used batteries according to local laws.
Vehicles without a smart entry &
start system
1 Remove the key cover.
To prevent damage to the key, cover the tip of the flathead screwdriver with a
rag.
2 Remove the battery cover.
Use a screwdriver of an appropriate size. Forcedly prying may cause the
cover damaged.
If the battery cover is difficult to remove, lift the edge to remove it.
3 Remove the depleted battery
using a small flathead screw-
driver.
When removing the battery, use a screwdriver of an appropriate size.
Insert a new battery with the “+” termi-
nal facing up.
4 Install the battery cover with the
tab facing up.
Push the entire edge of the battery
cover into the key.
5 Install the key cover.
Align the key cover with the key and then press it straight into the key.
Make sure that the key cover is securely installed without any gaps
Replacing the battery
Page 432 of 698

430
Owners Manual_Europe_M52N75_en
7-2. Steps to take in an emergency
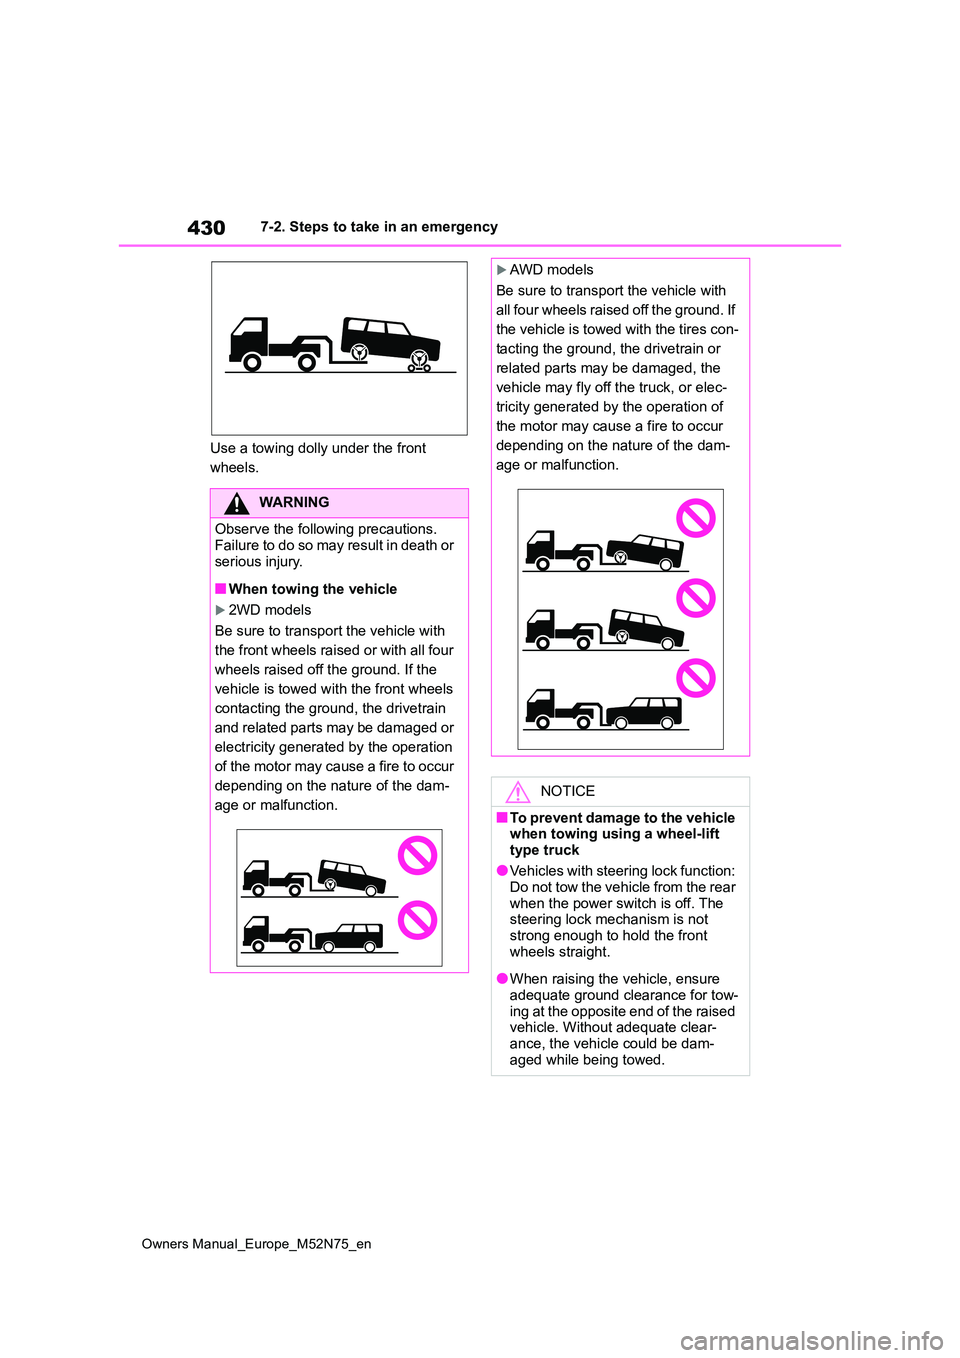
Use a towing dolly under the front
wheels.
WARNING
Observe the following precautions.
Failure to do so may result in death or serious injury.
■When towing the vehicle
2WD models
Be sure to transport the vehicle with
the front wheels raised or with all four
wheels raised off the ground. If the
vehicle is towed with the front wheels
contacting the ground, the drivetrain
and related parts may be damaged or
electricity generated by the operation
of the motor may cause a fire to occur
depending on the nature of the dam-
age or malfunction.
AWD models
Be sure to transport the vehicle with
all four wheels raised off the ground. If
the vehicle is towed with the tires con-
tacting the ground, the drivetrain or
related parts may be damaged, the
vehicle may fly off the truck, or elec-
tricity generated by the operation of
the motor may cause a fire to occur
depending on the nature of the dam-
age or malfunction.
NOTICE
■To prevent damage to the vehicle when towing using a wheel-lift
type truck
●Vehicles with steering lock function: Do not tow the vehicle from the rear
when the power switch is off. The steering lock mechanism is not strong enough to hold the front
wheels straight.
●When raising the vehicle, ensure
adequate ground clearance for tow- ing at the opposite end of the raised vehicle. Without adequate clear-
ance, the vehicle could be dam- aged while being towed.
Page 433 of 698

431
7
Owners Manual_Europe_M52N75_en
7-2. Steps to take in an emergency
When trouble arises
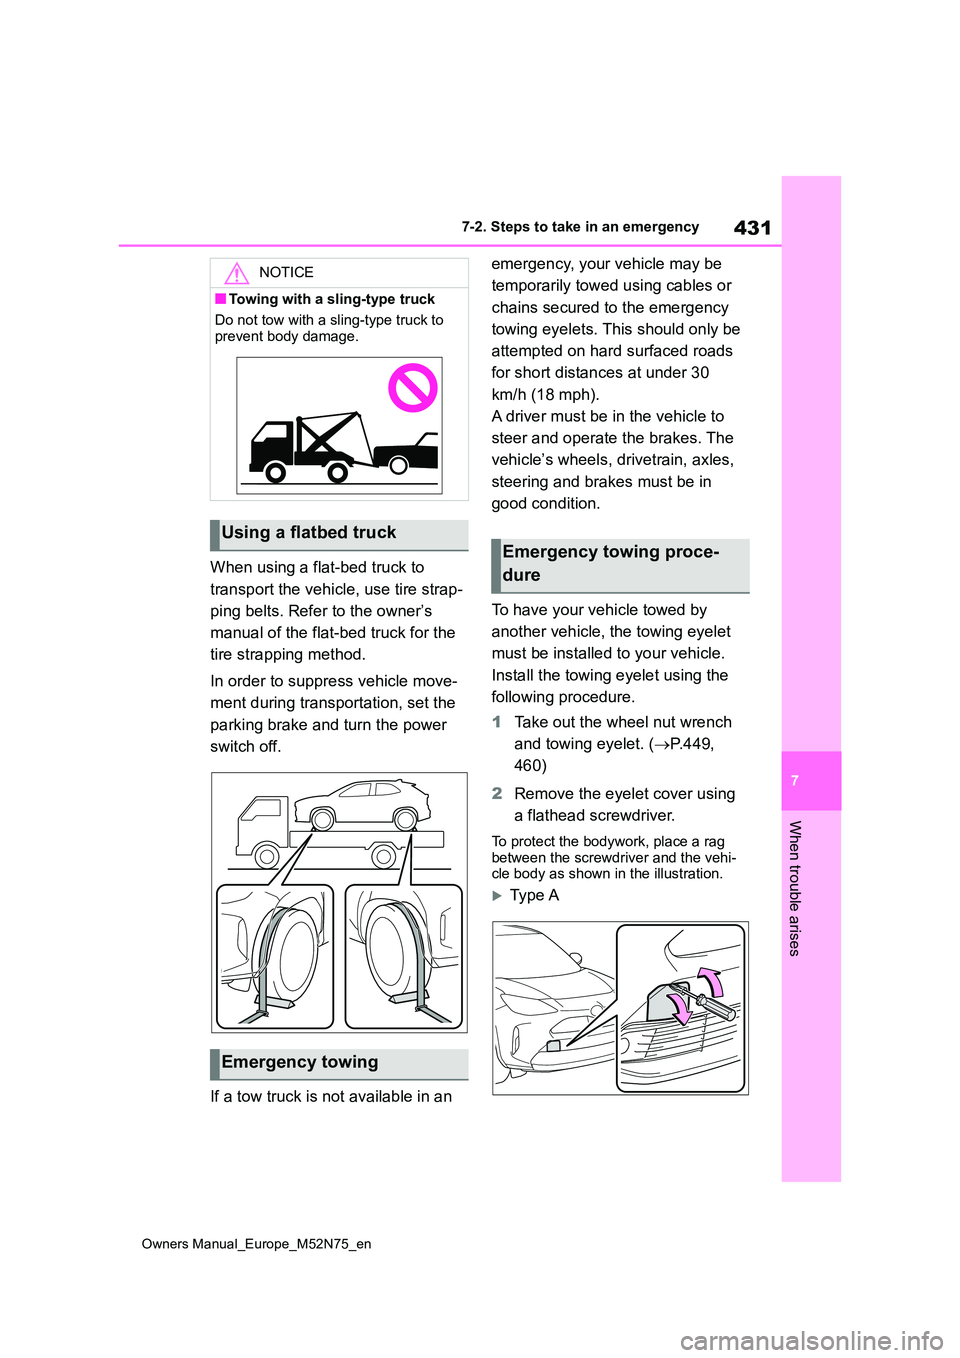
When using a flat-bed truck to
transport the vehicle, use tire strap-
ping belts. Refer to the owner’s
manual of the flat-bed truck for the
tire strapping method.
In order to suppress vehicle move-
ment during transportation, set the
parking brake and turn the power
switch off.
If a tow truck is not available in an
emergency, your vehicle may be
temporarily towed using cables or
chains secured to the emergency
towing eyelets. This should only be
attempted on hard surfaced roads
for short distances at under 30
km/h (18 mph).
A driver must be in the vehicle to
steer and operate the brakes. The
vehicle’s wheels, drivetrain, axles,
steering and brakes must be in
good condition.
To have your vehicle towed by
another vehicle, the towing eyelet
must be installed to your vehicle.
Install the towing eyelet using the
following procedure.
1 Take out the wheel nut wrench
and towing eyelet. ( P. 4 4 9 ,
460)
2 Remove the eyelet cover using
a flathead screwdriver.
To protect the bodywork, place a rag between the screwdriver and the vehi-cle body as shown in the illustration.
Typ e A
NOTICE
■Towing with a sling-type truck
Do not tow with a sling-type truck to
prevent body damage.
Using a flatbed truck
Emergency towing
Emergency towing proce-
dure
Page 453 of 698

451
7
Owners Manual_Europe_M52N75_en
7-2. Steps to take in an emergency
When trouble arises
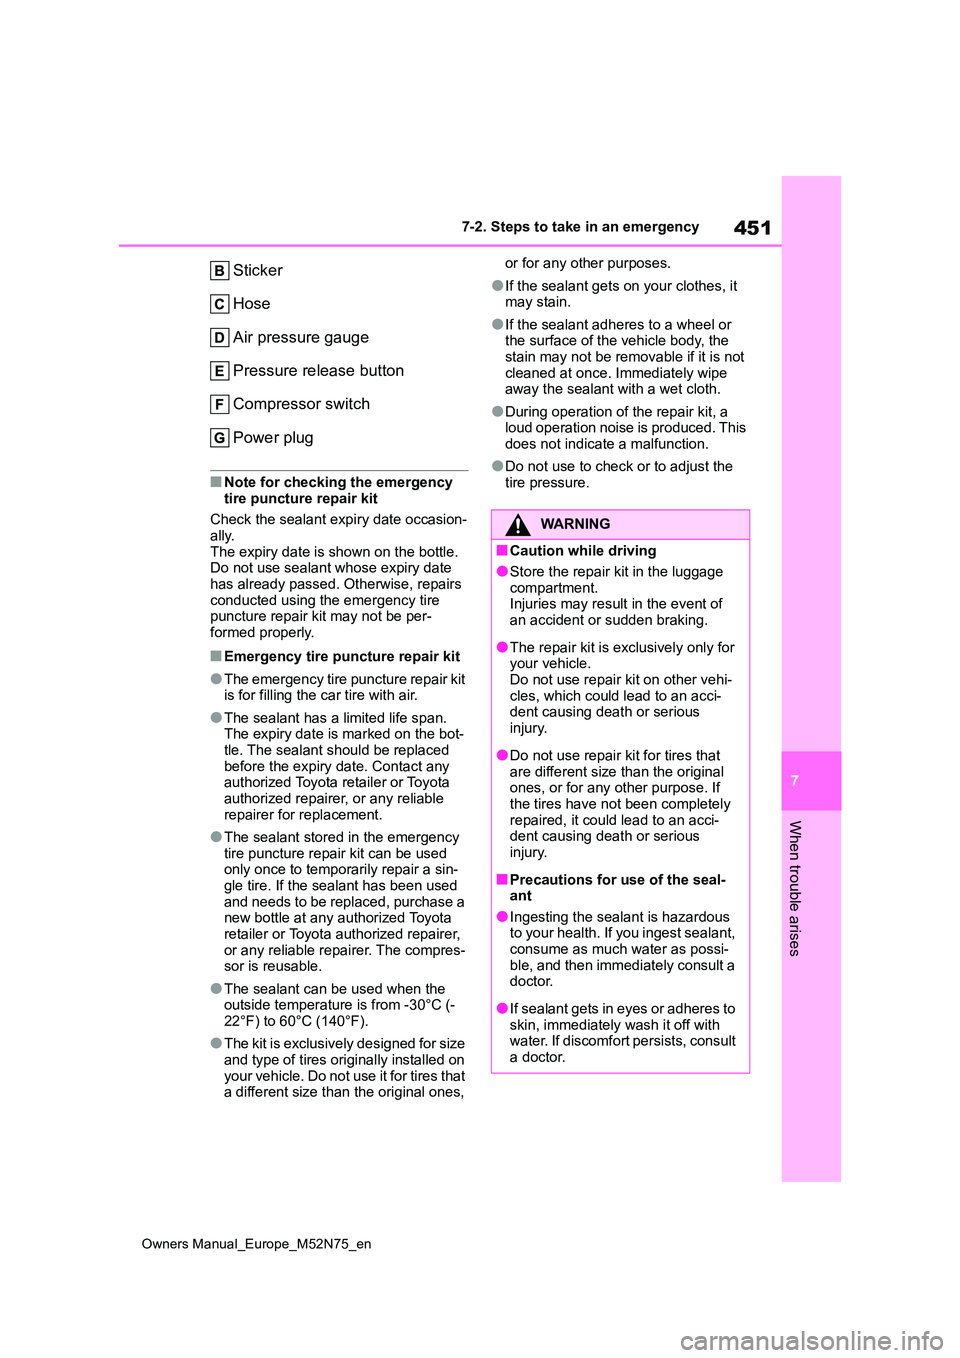
Sticker
Hose
Air pressure gauge
Pressure release button
Compressor switch
Power plug
■Note for checking the emergency
tire puncture repair kit
Check the sealant expiry date occasion- ally.
The expiry date is shown on the bottle. Do not use sealant whose expiry date has already passed. Otherwise, repairs
conducted using the emergency tire puncture repair kit may not be per-formed properly.
■Emergency tire puncture repair kit
●The emergency tire puncture repair kit is for filling the car tire with air.
●The sealant has a limited life span. The expiry date is marked on the bot-
tle. The sealant should be replaced before the expiry date. Contact any authorized Toyota retailer or Toyota
authorized repairer, or any reliable repairer for replacement.
●The sealant stored in the emergency tire puncture repair kit can be used only once to temporarily repair a sin-
gle tire. If the sealant has been used and needs to be replaced, purchase a new bottle at any authorized Toyota
retailer or Toyota authorized repairer, or any reliable repairer. The compres-sor is reusable.
●The sealant can be used when the outside temperature is from -30°C (-
22°F) to 60°C (140°F).
●The kit is exclusively designed for size
and type of tires originally installed on yo u r ve hi cl e . Do n ot u se it f o r ti r e s t ha t a different size than the original ones,
or for any other purposes.
●If the sealant gets on your clothes, it may stain.
●If the sealant adheres to a wheel or the surface of the vehicle body, the
stain may not be removable if it is not cleaned at once. Immediately wipe away the sealant with a wet cloth.
●During operation of the repair kit, a loud operation noise is produced. This
does not indicate a malfunction.
●Do not use to check or to adjust the
tire pressure.
WARNING
■Caution while driving
●Store the repair kit in the luggage
compartment. Injuries may result in the event of an accident or sudden braking.
●The repair kit is exclusively only for your vehicle.
Do not use repair kit on other vehi- cles, which could lead to an acci-dent causing death or serious
injury.
●Do not use repair kit for tires that
are different size than the original ones, or for any other purpose. If the tires have not been completely
repaired, it could lead to an acci- dent causing death or serious injury.
■Precautions for use of the seal-ant
●Ingesting the sealant is hazardous to your health. If you ingest sealant, consume as much water as possi-
ble, and then immediately consult a doctor.
●If sealant gets in eyes or adheres to skin, immediately wash it off with water. If discomfort persists, consult
a doctor.
Page 486 of 698

484
Owners Manual_Europe_M52N75_en
8-1. Specifications
8-1.Spec ific ations
*1: With front bumper type A (P.431)
*2: With front bumper type B (P.431)
*3: 17-inch tires or 18-inch tires
*4: 16-inch tires
*5: 17-inch tires or 18-inch tires and AWD models
*6: 16-inch tires and AWD models
*7: 17-inch tires or 18-inch tires and 2WD models
*8: 16-inch tires and 2WD models
*9: 2WD models
*10: AWD models
Maintenance data (fuel, oil level, etc.)
Dimensions and weights
Overall length4180 mm (164.6 in.)*1
4200 mm (165.4 in.)*2
Overall width1765 mm (69.5 in.)
Overall height (unladen vehicles)1595 mm (62.8 in.)
Wheelbase2560 mm (100.8 in.)
Tread
Front1517 mm (59.7 in.)*3
1527 mm (60.1 in.)*4
Rear
1504 mm (59.2 in.)*5
1514 mm (59.6 in.)*6
1517 mm (59.7 in.)*7
1527 mm (60.1 in.)*8
Gross vehicle mass1690 kg (3726.4 lb.)*9
1775 kg (3913.8 lb.)*10
Maximum permissible axle
capacity
Front965 kg (2127.8 lb.)
Rear925 kg (2039.6 lb.)
Drawbar load (vehicles with towing packages)75 kg (165.3 lb.)
Towing capacity (vehicles with
towing packages)
Without brake550 kg (1212.7 lb.)
With brake750 kg (1653.7 lb.)
Page 492 of 698

490
Owners Manual_Europe_M52N75_en
8-1. Specifications
If replacement is necessary, contact any authorized Toyota reta iler or Toyota
authorized repairer, or any reliable repairer.
*1: Minimum pedal clearance when depressed with a force of 300 N ( 31.0 kgf, 67.4
lbf) while the hybrid system is operating.
*2: Make sure to confirm that the brake warning light (yellow) doe s not illuminate. (If
the brake warning light illuminates, refer to P.91, 435.)
16-inch tires
NOTICE
■Transmission fluid type
Using transmission fluid other than the above type may cause ab normal noise or vibration, or ultimately damage the transmission of your vehicl e.
Brakes
Pedal clearance*188 mm (3.5 in.) Min.
Pedal free play1 6 mm (0.04 0.24 in.)
Parking brake indicator*2
When pulling the parking brake switch for 1 to 2
seconds: comes on
When pushing the parking brake switch for 1 to
2 seconds: turns off
Fluid typeSAE J1704 or FMVSS No.116 DOT 4
Steering
Free playLess than 30 mm (1.2 in.)
Tires and wheels
Tire size205/65R16 95H
Tire inflation pressure
(Recommended cold tire
inflation pressure)
Front tire
230 kPa (2.3 kgf/cm2 or bar, 33 psi)
Rear tire
220 kPa (2.2 kgf/cm2 or bar, 32 psi)
Wheel size16 6 1/2J
Wheel nut torque103 N•m (10.5 kgf•m, 76 ft•lbf)
Page 493 of 698

491
8
Owners Manual_Europe_M52N75_en
8-1. Specifications
Vehicle specifications
17-inch tires
18-inch tires (Type A)
18-inch tires (Type B)
Compact spare tire (if equipped)
Tire size215/55R17 94V
Tire inflation pressure
(Recommended cold tire
inflation pressure)
Front tire
220 kPa (2.2 kgf/cm2 or bar, 32 psi)
Rear tire
200 kPa (2.0 kgf/cm2 or bar, 29 psi)
Wheel size17 7J
Wheel nut torque103 N•m (10.5 kgf•m, 76 ft•lbf)
Tire size215/50R18 92V
Tire inflation pressure
(Recommended cold tire
inflation pressure)
Front tire
220 kPa (2.2 kgf/cm2 or bar, 32 psi)
Rear tire
200 kPa (2.0 kgf/cm2 or bar, 29 psi)
Wheel size18 7J
Wheel nut torque103 N•m (10.5 kgf•m, 76 ft•lbf)
Tire size215/50R18 92V
Tire inflation pressure
(Recommended cold tire
inflation pressure)
Front tire
220 kPa (2.2 kgf/cm2 or bar, 32 psi)
Rear tire
200 kPa (2.0 kgf/cm2 or bar, 29 psi)
Wheel size18 7 1/2J
Wheel nut torque103 N•m (10.5 kgf•m, 76 ft•lbf)
Tire sizeT145/90D16 106M
Tire inflation pressure
(Recommended cold tire
inflation pressure)
420 kPa (4.2 kgf/cm2 or bar, 60 psi)
Wheel size16 4T
Wheel nut torque103 N•m (10.5 kgf•m, 76 ft•lbf)