2023 TOYOTA PRIUS PRIME fuel
[x] Cancel search: fuelPage 252 of 680
2525-2. Driving procedures
●If a message related to start-up is
shown on the multi-information
display, read the message and fol-
low the instructions.
●If the door is unlocked with the
mechanical key, the hybrid system
cannot be started using the smart
key system. Refer to P.588 to start
the hybrid system. However, if the
electronic key is carried inside the
vehicle and the doors are locked
( P.187), the hybrid system can
be started.
■When the ambient temperature
is low, such as during winter
driving conditions
●When starting the hybrid system,
the flashing time of the “READY”
indicator may be long. Leave the
vehicle as it is until the “READY”
indicator is steady on, as steady
means the vehicle is able to move.
●When the hybrid battery (traction
battery) is extremely cold (below
approximately -22°F [-30°C])
under the influence of the outside
temperature, it may not be possi-
ble to start the hybrid system. In
this case, try to start the hybrid
system again after the tempera-
ture of the hybrid battery
increases due to the outside tem-
perature increase etc.
■Sounds and vibrations specific
to a Hybrid Electric Vehicle
P.79
■If the 12-volt battery is dis-
charged
The hybrid system cannot be
started using the smart key system.
Refer to P.589to restart the hybrid
system.
■Electronic key battery depletion
P.180
■Conditions affecting operation
P.205
■Note for the entry function
P.206
■If “Smart Key System malfunc-
tion See owner’s manual” is
displayed on the multi-informa-
tion display
The system may be malfunctioning.
Have the vehicle inspected by your
Toyota dealer immediately.
■If the “READY” indicator does
not come on
In the event that the “READY” indi-
cator does not come on even after
performing the proper procedures
for starting the vehicle, contact your
Toyota dealer immediately.
■When “Check Fuel Cap” is dis-
played on the mu lti-information
display
P.281
■If the hybrid system is malfunc-
tioning
P.87
■Electronic key battery
P.538
■Operation of the power switch
●If the switch is not pressed shortly
and firmly, the power switch mode
may not change or the hybrid sys-
tem may not start.
●If attempting to restart the hybrid
system immediately after turning
the power switch to OFF, the
hybrid system may not start in
some cases. After turning the
power switch to OFF, please wait
a few seconds before restarting
the hybrid system.
■Customization
If the smart key system has been
deactivated in a customized setting,
refer to P.588.
Page 256 of 680

2565-2. Driving procedures
*: To improve fuel efficiency and reduce noise, set the shift posi-
tion in D for normal driving.
■When driving with dynamic
radar cruise control activated
Even when switching the driving
mode to sport mode with the intent
of enabling engine braking, engine
braking will not activate because
dynamic radar cruise control will not
be canceled.
■If a message about a shift oper-
ation is shown
To prevent the shift position from
being selected incorrectly or the
vehicle from moving unexpectedly,
the shift position may be changed
automatically or operating the shift
lever may be required . In this case,
change the shift position following
the messages on the multi-informa-
tion display.
■Restraining sudden start (Drive-
Start Control)
P.245
Transmission
Select the shift position
depending on your purpose
and situation.
Shift position purpose
and functions
Shift posi-
tionObjective or function
P
Parking the vehi-
cle/starting the hybrid system
RReversing
N
Neutral
(Condition in which the power is not transmit- ted)
DNormal driving*
B
Applying engine brak-ing or strong braking
when the accelerator pedal has been
released on steep
downward slopes etc.
WARNING
■When driving on slippery
road surfaces
Do not accelerate or shift the shift
position suddenly.
Sudden changes in engine brak-
ing may cause the vehicle to spin
or skid, resulting in an accident.
NOTICE
■Hybrid battery (traction bat-
tery) charge
If the shift position is in N, the
hybrid battery (traction battery)
will not be charged. To help pre-
vent the battery from discharging,
avoid leaving the N position
selected for an extended period of
time.
■Situations where shift con-
trol system malfunctions are
possible
If any of the following situations
occurs, shift control system mal-
functions are possible.
Immediately stop the vehicle in a
safe place on level ground, apply
the parking brake, and then con-
tact your Toyota dealer.
Page 270 of 680

2705-3. Operating the lights and wipers
Canada
1 The headlights, side
marker, parking, LED acces-
sories lamp (if equipped),
daytime running lights
( P.270) and so on turn on
and off automatically.
2 The side marker, park-
ing, LED accessories lamp (if
equipped), tail, license plate,
instrument panel lights, and
daytime running lights
( P.270) turn on.
3 The headlights and all
lights listed above (except
daytime running lights) turn
on.
■AUTO mode can be used when
The power switch is in ON.
■Daytime running light system
●Vehicles without LED accessories
lamp: The daytime running lights
illuminate using the same lights as
the low beam head lights, and illu-
minate dimmer than the low beam
headlights.
●Vehicles with LED accessories
lamp: The daytime running lights
illuminate using the same lights as
the parking lights, and illuminate
brighter than the parking lights.
●To make your vehicle more visible
to other drivers during daytime
driving, the daytime running lights
turn on automatically when all of
the following conditions are met.
(The daytime running lights are
not designed for use at night.)
• The hybrid system is operating
• The parking brake is released
• The headlight switch is in the ,
or
* position
*: When the surroundings are bright
The daytime running lights remain
on after they illuminate, even if the
parking brake is set again.
●For the U.S.A.: Daytime running
lights can be turned off by operat-
ing the switch.
●Compared to turning on the head-
lights, the daytime running light
system offers gr eater durability
and consumes less electricity, so
it can help improve fuel economy.
■Headlight control sensor (if
equipped)
The sensor may not function prop-
erly if an object is placed on the sen-
sor, or anything that blocks the
sensor is affixed to the windshield.
Doing so interferes with the sensor
detecting the level of ambient light
and may cause the automatic head-
light system to malfunction.
Page 279 of 680

2795-4. Refueling
5
Driving
5-4.Refueling
Close all the doors and win-
dows, and turn the power
switch to OFF.
Confirm the type of fuel.
■Fuel types
P.607
■Fuel tank opening for unleaded
gasoline
To help prevent incorrect fueling,
your vehicle has a fuel tank opening
that only accommodates the spe-
cial nozzle on unleaded fuel pumps.
Opening the fuel tank
cap
The fuel tank of your vehicle
has a special structure,
which requires a reduction
in fuel tank pressure before
refueling. After the opener
switch has been pressed, it
will take several seconds
until the vehicle is ready for
refueling.
Before refueling the vehi-
cle
WARNING
■When refueling the vehicle
Observe the following precautions
while refueling the vehicle. Failure
to do so may result in death or
serious injury.
●After exiting the vehicle and
before opening the fuel door,
touch an unpainted metal sur-
face to discharge any static
electricity. It is important to dis-
charge static electricity before
refueling because sparks result-
ing from static electricity can
cause fuel vapors to ignite while
refueling.
●Always hold the grips on the
fuel tank cap and turn it slowly
to remove it.
A whooshing sound may be
heard when the fuel tank cap is
loosened. Wait until the sound
cannot be heard before fully
removing the cap. In hot
weather, pressurized fuel may
spray out of the filler neck and
cause injury.
●Do not allow anyone that has
not discharged static electricity
from their body to come close to
an open fuel tank.
●Do not inhale vaporized fuel.
Fuel contains substances that
are harmful if inhaled.
●Do not smoke while refueling
the vehicle.
Doing so may cause the fuel to
ignite and cause a fire.
●Do not return to the vehicle or
touch any person or object that
is statically charged. This may
cause static electricity to build
up, resulting in a possible igni-
tion hazard.
■When refueling
Observe the following precautions
to prevent fuel overflowing from
the fuel tank:
●Securely insert the fuel nozzle
into the fuel filler neck.
●Stop filling the tank after the fuel
nozzle automatically clicks off.
Page 280 of 680
2805-4. Refueling
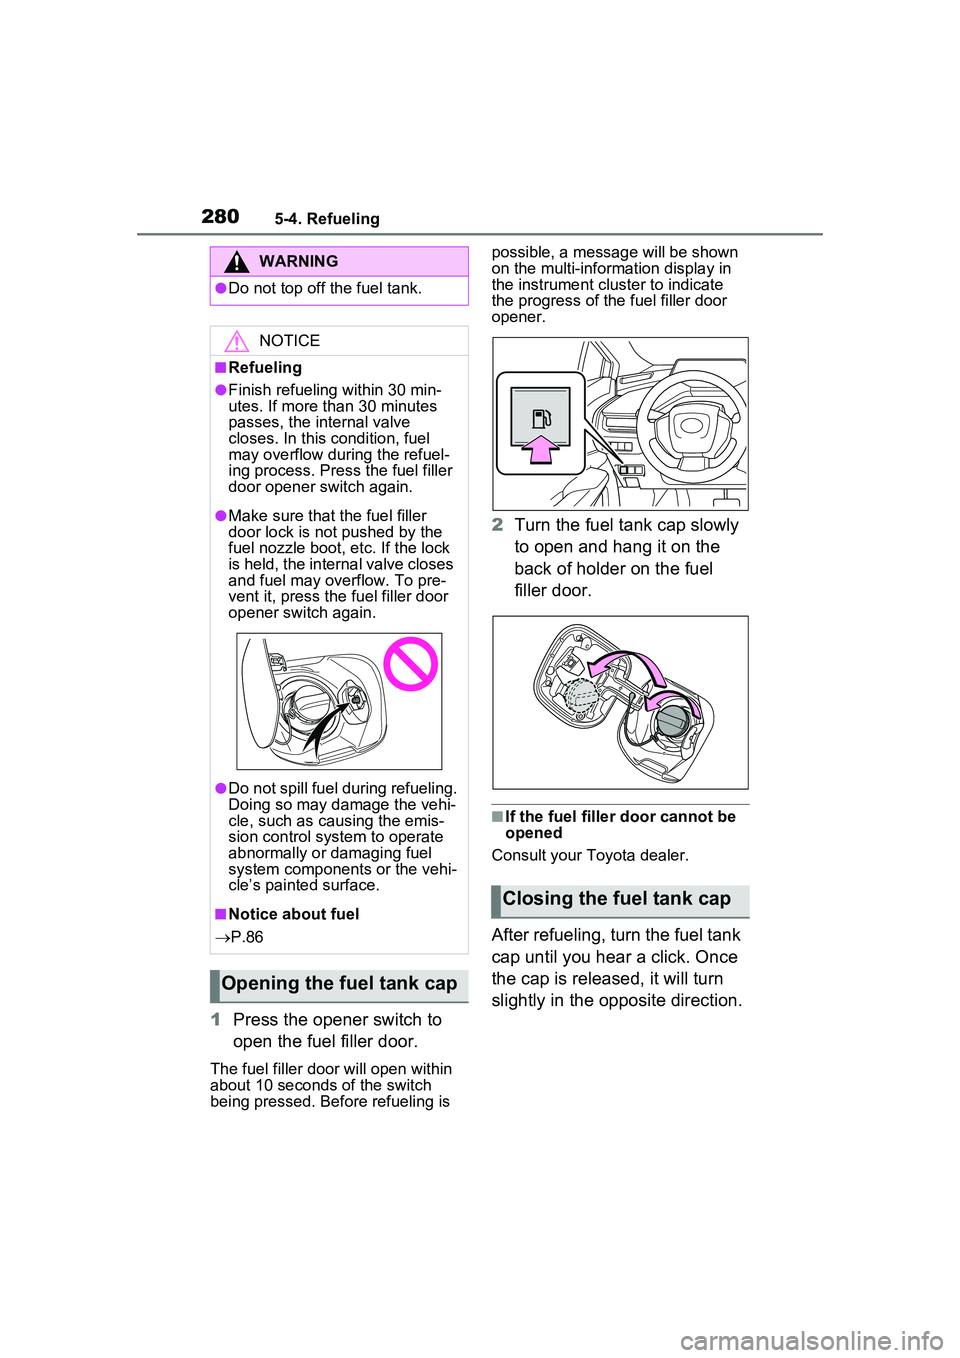
1Press the opener switch to
open the fuel filler door.
The fuel filler door will open within
about 10 seconds of the switch
being pressed. Before refueling is possible, a message will be shown
on the multi-information display in
the instrument clus
ter to indicate
the progress of the fuel filler door
opener.
2 Turn the fuel tank cap slowly
to open and hang it on the
back of holder on the fuel
filler door.
■If the fuel filler door cannot be
opened
Consult your Toyota dealer.
After refueling, turn the fuel tank
cap until you hear a click. Once
the cap is released, it will turn
slightly in the opposite direction.
WARNING
●Do not top off the fuel tank.
NOTICE
■Refueling
●Finish refueling within 30 min-
utes. If more than 30 minutes
passes, the internal valve
closes. In this condition, fuel
may overflow during the refuel-
ing process. Press the fuel filler
door opener switch again.
●Make sure that the fuel filler
door lock is not pushed by the
fuel nozzle boot, etc. If the lock
is held, the internal valve closes
and fuel may overflow. To pre-
vent it, press the fuel filler door
opener switch again.
●Do not spill fuel during refueling.
Doing so may damage the vehi-
cle, such as causing the emis-
sion control system to operate
abnormally or damaging fuel
system components or the vehi-
cle’s painted surface.
■Notice about fuel
P.86
Opening the fuel tank cap
Closing the fuel tank cap
Page 281 of 680

2815-4. Refueling
5
Driving
■When “Check Fuel Cap” is dis-
played on the multi-information
display
The fuel tank cap may be unfas-
tened or loose. Turn the power
switch to OFF, check the cap and
tighten it securely . If the message
remains, wait a few seconds and
then turn the power switch to OFF
once again.
WARNING
■When replacing the fuel tank
cap
Do not use anything but a genu-
ine Toyota fuel tank cap designed
for your vehicle. Doing so may
cause a fire or other incident
which may result in death or seri-
ous injury.
Page 422 of 680

4225-5. Using the driving support systems
around your vehicle and exit from
the parking space manually.
■If “Cannot control speed” is
displayed
The system judged that it cannot
adjust the speed of the vehicle when
using the system in an area with a
slope or step and assistance was
canceled.
Use the system in a level location.
■If “Obstacle detected” is dis-
played
As a moving object or stationary
object that may collide with your
vehicle has been detected, the
hybrid system output control/braking
control operates to suspend
Advanced Park assistance.
Check the condition of the surround-
ing area. To resume assistance,
select the “Start” button on the Multi-
media Display.
■If “No available parking space
to register” is displayed
This message is displayed when
is selected at a parking space that
cannot be detected.
Operate the system at a parking
space where differences in the road
surface can be recognized.
( P.414)
Operate the driving mode select
switch forward or backward to
select the desired driving mode.
Indicator
Driving mode select switch
1 Normal mode
Provides an optimal balance of fuel
economy, quietness, and dynamic
performance. Suitable for normal
driving.
2Eco drive mode
Helps the driver accelerate in an
eco-friendly manner and improve
fuel economy through moderate
throttle characteristics and by con-
trolling the operation of the air con-
ditioning system (heating/cooling).
Driving mode select
switch
The driving modes can be
selected to suit the driving
and usage conditions.
Selecting a driving mode
A
B
Page 423 of 680

4235-5. Using the driving support systems
5
Driving
When Eco drive mode is selected,
Eco drive mode indicator comes
on.
3Sport mode
Controls the hybrid system to pro-
vide quick, powerful acceleration.
This mode also expands the possi-
ble rate of deceleration by operat-
ing the accelerator pedal and
enables acceleration/deceleration
control based on the driver’s inten-
tions. This changes the steering
feel, making it suitable for when
agile driving response is desired,
such as when driving on roads with
many curves.
When Sport mode is selected,
Sport mode indicator comes on.
4Custom mode
Allows you to drive with the power
train, steering wheel and air condi-
tioning system func tions set to your
preferred settings.
Custom mode settings can only be
changed on the drive mode cus-
tomization display of Multimedia
Display. ( P.632)
When the Custom mode is
selected, Custom mode indicator
comes on.
■Operation of the air condition-
ing system in Eco drive mode
When Eco drive mode is selected,
the air conditioning system will auto-
matically be changed to eco air con-
ditioning mode.
Eco air conditioning mode controls
the heating/cooling operations and
fan speed of the air conditioning
system to enhance fuel efficiency.
To improve air conditioning perfor-
mance, perform the following opera-
tions:
●Adjust the fan speed ( P.435)
●Deactivate Eco drive mode
●Turn off eco air conditioning mode
( P.440)
■Automatic deactivation of a
driving mode
●Sport mode and Custom mode
are automatically deactivated and
the driving mode returns to normal
mode when the power switch is
turned to OFF.
●Normal mode and Eco drive mode
are not deactivated until another
driving mode is selected. (Even if
the power switch is turned to OFF,
normal mode and Eco drive mode
will not be automatically deacti-
vated.)
■Customization
The custom mode can be changed.
(Customizable features: P.618)