2023 TOYOTA PRIUS PRIME steering wheel
[x] Cancel search: steering wheelPage 162 of 680

1623-1. Instrument cluster
Driving support system infor-
mation (P.165)
■The multi-information display is
displayed when
The power switch is in ON.
■Liquid crystal display
( P.159)
The multi-information display is
operated using the meter control
switches.
/ : Select menu icons,
scroll the screen and move
the cursor
/ : Change displayed
content, scroll the screen and
move the cursor
Press: Enter/Set
Press and hold: Reset/Dis-
play customizable items
Return to the previous
screen/Move the main meter
Call sending/receiving and
history display
Linked with the hands-free system,
sending or receiving call is dis-
played. For details regarding the hands-free system, refer to “MUL-
TIMEDIA OWNER’S MANUAL”.
Information related to each icon
can be displayed by selecting
the icon with the meter control
switches.
Some of the information may be
displayed automatically depending
on the situation.
Changing the display
D
A
B
C
D
WARNING
■Caution for use while driving
For safety, avoid operating the
meter control switch while driving
as much as possible, and do not
look continuously at the multi-
information displa y while driving.
Stop the vehicle and operate the
meter control switch. Failure to do
so may cause a steering wheel
operation error, resulting in an
unexpected accident.
Menu icons
IconDisplay
Driving information dis-
play ( P.163)
Driving support system
information display
( P.165)
Audio system-linked dis-
play ( P.166)
Vehicle information dis-
play ( P.166)
Settings display
( P.166)
Warning message dis-
play ( P.172)
Page 179 of 680

179
4
4
Before driving
Before driving
4-1. Key informationKeys ............................ 180
Digital Key ................... 183
4-2. Opening, closing and locking the doors
Side doors ................... 185
Back door .................... 191
Smart key system ....... 203
4-3. Adjusting the seats Front seats .................. 209
Rear seats................... 210
Head restraints............ 212
4-4. Adjusting the steering wheel and mirrors
Steering wheel ............ 215
Inside rear view mirror 216
Digital Rear-view Mirror .................................. 217
Outside rear view mirrors .................................. 225
4-5. Opening, closing the win- dows
Power windows ........... 227
4-6. Favorite settings Driving position memory.................................. 230
My Settings ................. 234
Page 215 of 680

2154-4. Adjusting the steering wheel and mirrors
4
Before driving
4-4.Adjusting the steering wheel and mirrors
1Hold the steering wheel and
push the lever down.
2 Adjust to the ideal position by
moving the steering wheel
horizontally and vertically.
After adjustment, pull the lever up
to secure the steering wheel.
To sound the horn, press on or
close to the mark.
Steering wheel
Adjustment procedure
WARNING
■Caution while driving
Do not adjust the steering wheel
while driving.
Doing so may cause the driver to
mishandle the vehicle and cause
an accident, resulting in death or
serious injury.
■After adjusting the steering
wheel
Make sure that the steering wheel
is securely locked.
Otherwise, the steering wheel
may move suddenly, possibly
causing an accident, and resulting
in death or serious injury. Also,
the horn may not sound if the
steering wheel is not securely
locked.
Sounding the horn
Page 216 of 680

2164-4. Adjusting the steering wheel and mirrors
*: If equipped
The height of the rear view mir-
ror can be adjusted to suit your
driving posture.
Adjust the height of the rear
view mirror by moving it up and
down.
Manual anti-glare inside rear
view mirror
Reflected light from the head-
lights of vehicles behind can be reduced by operating the lever.
Normal position
Anti-glare position
Auto anti-glare inside rear
view mirror
Responding to the level of
brightness of the headlights of
vehicles behind, the reflected
light is automatically reduced.
■To prevent sensor error (vehi-
cles with auto anti-glare inside
rear view mirror)
To ensure that the sensors operate
properly, do not touch or cover
them.
Inside rear view mir-
ror*
The rear view mirror’s posi-
tion can be adjusted.
Adjusting the height of
rear view mirror
WARNING
■Caution while driving
Do not adjust the position of the
mirror while driving.
Doing so may lead to mishandling
of the vehicle and cause an acci-
dent, resulting in death or serious
injury.
Anti-glare function
A
B
Page 217 of 680

2174-4. Adjusting the steering wheel and mirrors
4
Before driving
*: If equipped
Camera indicator
Indicates that the camera is operat-
ing normally.
Icon display area
Displays icons, adjusting gauge,
etc. (P.219)
Select/adjust button
Press to change the setting of the
item you want to adjust.
Menu button
Press to display the icon display
area and select the item you want
to adjust.
Lever
Operate to change between digital
mirror mode and optical mirror
mode.
Digital anti-glare mode indi-
cator
In digital mirror mode, this indicates
Digital Rear-view Mir-
ror*
The Digital Rear-view Mirror
is a system that uses the
camera on the rear of the
vehicle and displays its
image on the display of the
Digital Rear-view Mirror.
The Digital Rear-view Mirror
can be changed between
optical mirror mode and dig-
ital mirror mode by operat-
ing the lever.
The Digital Rear-view Mirror
allows the driver to see the
rear view despite obstruc-
tions, such as the head
restraints or luggage,
ensuring rear visibility.
Also, the rear seats are not
displayed and privacy of the
passengers is enhanced.
WARNING
Observe the following precau-
tions.
Failure to do so may result in
death or serious injury.
■Before using the Digital Rear-
view Mirror
●Make sure to adjust the mirror
before driving. ( P.219)
• Change to optical mirror mode and adjust the position of the
Digital Rear-view Mirror so that
the area behind your vehicle
can be viewed properly.
• Change to digital mirror mode and adjust the display settings.
●As the range of the image dis-
played by the Digital Rear-view
Mirror is different from that of
the optical mirror, make sure to
check this difference before
driving.
System components
A
B
C
D
E
F
Page 218 of 680

2184-4. Adjusting the steering wheel and mirrors
that the anti-glare function is on.
( P.219)
Operate the lever to change
between digital mirror mode and
optical mirror mode.
1 Digital mirror mode
Displays an image of the area
behind the vehicle.
will illuminate in this mode.
2Optical mirror mode
Turns off the display of the Digital
Rear-view Mirror allows it to be
used as an optical mirror.
■Digital mirror mode operating
condition
The power switch is turned to ON.
When the power switch is changed
from ON to OFF or ACC, the image
will disappear afte r several seconds.
■When using the Digital Rear-
view Mirror in digital mirror
mode
●If it is difficult to see the Digital
Rear-view Mirror image because
water, snow, mud, etc. is stuck to
the camera lens, operate the cam-
era cleaning washer ( P.275) or
change to optical mirror mode.
●When the back door is open, the
Digital Rear-view Mirror image may not display properly. Before
driving, make sure the back door
is closed.
●If the display is difficult to see due
to reflected light, close the sun-
shade (if equipped).
●Any of the following conditions
may occur when driving in the
dark, such as at night. None of
them indicates that a malfunction
has occurred.
• Colors of objects in the displayed image may differ from their actual
color.
• Depending on the height of the lights of the vehicle behind, the
area around the vehicle may
appear white and blurry.
• Automatic image adjustment for
brighter surrounding image may
cause flickering.
If it is difficult to see the displayed
image or flickering bothers you,
change to optical mirror mode.
●The Digital Rear-view Mirror may
become hot while it is in digital
mirror mode.
This is not a malfunction.
●Depending on your physical con-
dition or age, it may take longer
than usual to focus on the dis-
played image. In this case,
change to optical mirror mode.
●Do not let passengers stare at the
displayed image when the vehicle
is being driven, as doing so may
cause motion sickness.
■When the system malfunctions
If the symbol shown in the illustra-
tion is displayed when using the
Digital Rear-view Mirror in digital
mirror mode, the system may be
malfunctioning. The symbol will dis-
appear in a few seconds. Operate
the lever, change to optical mirror
mode and have the vehicle
inspected by your Toyota dealer.
Changing modes
Page 219 of 680
2194-4. Adjusting the steering wheel and mirrors
4
Before driving
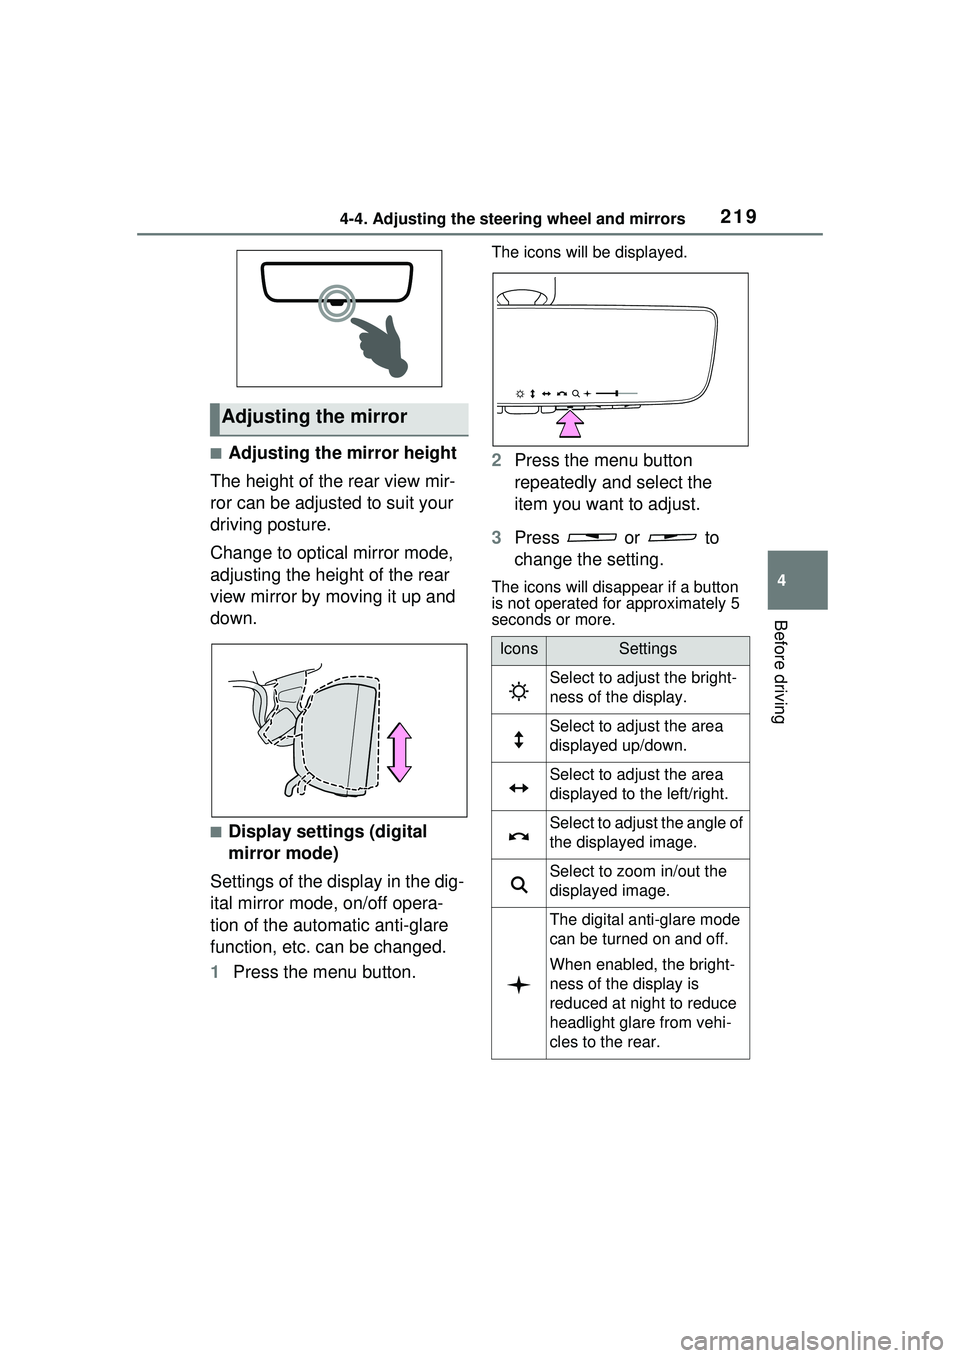
■Adjusting the mirror height
The height of the rear view mir-
ror can be adjusted to suit your
driving posture.
Change to optical mirror mode,
adjusting the height of the rear
view mirror by moving it up and
down.
■Display settings (digital
mirror mode)
Settings of the display in the dig-
ital mirror mode, on/off opera-
tion of the automatic anti-glare
function, etc. can be changed.
1 Press the menu button.
The icons will be displayed.
2Press the menu button
repeatedly and select the
item you want to adjust.
3 Press or to
change the setting.
The icons will disappear if a button
is not operated for approximately 5
seconds or more.
Adjusting the mirror
IconsSettings
Select to adjust the bright-
ness of the display.
Select to adjust the area
displayed up/down.
Select to adjust the area
displayed to the left/right.
Select to adjust the angle of
the displayed image.
Select to zoom in/out the
displayed image.
The digital anti-glare mode
can be turned on and off.
When enabled, the bright-
ness of the display is
reduced at night to reduce
headlight glare from vehi-
cles to the rear.
Page 220 of 680

2204-4. Adjusting the steering wheel and mirrors
■Adjusting the display (digital
mirror mode)
●The icons will disappear if a button
is not operated for approximately
5 seconds or more.
●If the displayed image is adjusted,
it may appear distorted. This is not
a malfunction.
●If the brightness of the Digital
Rear-view Mirror is set too high, it
may cause eye strain. Adjust the
Digital Rear-view Mirror to an
appropriate brightness. If your
eyes become tired, change to
optical mirror mode.
●The brightness of the Digital Rear-
view Mirror will change automati-
cally according to the brightness
of the area in front of your vehicle.
●The digital anti-glare mode oper-
ates only in locations where the
surroundings are dark. Depending
on the surrounding illumination
environment, the image may not
darken and it may not be possible
to reduce headlight glare from
vehicles to the rear.
■To prevent the light sensors
from malfunctioning
To prevent the light sensors from
malfunctioning, do not touch or
cover them.
■Cleaning the mirror surface
If the mirror surface is dirty, the
image on the display may be dif-
ficult to see.
Clean the mirror surface gently
using a soft dry cloth.
■Cleaning the camera
If it is difficult to see the Digital
WARNING
Observe the following precau-
tions.
Failure to do so may result in
death or serious injury.
■While driving
●Do not adjust the position of the
Digital Rear-view Mirror or
adjust the displa y settings while
driving.
Stop the vehicle and operate
the Digital Rear-view Mirror
control switches.
Failure to do so may cause a
steering wheel operation error,
resulting in an unexpected acci-
dent.
●Always pay attention to the
vehicle’s surroundings.
The size of the vehicles and other
objects may look different when in
digital mirror mode and optical
mirror mode.
When backing up, make sure to
directly check the safety of the
area around your vehicle, espe-
cially behind the vehicle.
Additionally, if a vehicle
approaches from the rear in the
dark, such as at night, the sur-
rounding area may appear dim.
■To prevent causes of fire
If the driver continues using the
Digital Rear-view Mirror while
smoke or odor comes from the
mirror, it may result in fire. Stop
using the system immediately and
contact your Toyota dealer.
Cleaning the Digital Rear-
view Mirror