2023 TOYOTA COROLLA CROSS lights
[x] Cancel search: lightsPage 88 of 500

882-1. Instrument cluster
To select a response to a dis-
played suggestion, use the
meter control switches.
■Suggestion to enable the
power back door (if
equipped)
If the power back door system is
disabled (setting on set to
off) and the power back door
switch on the instrument panel
is operated, a suggestion mes-
sage will be displayed asking if
you wish to enable the power
back door system.
To enable the power back door
system, select “Yes”.
After enabling the power back door
system, press the power back door
switch again to open or close the
power back door.
■Suggestion to turn off the
headlights
If the headlights are left on for a
certain amount of time after the
engine switch has been turned
off, if the headlight switch is in
the “AUTO” position, a sugges-
tion message will be displayed
asking if you wish to turn the
headlights off.
To turn the headlights off, select
“Yes”.
If the driver's door is opened after
the engine switch is turned off, this
suggestion message will not be dis-
played.
■Customization
Some functions can be customized.
( P.449)
Page 94 of 500

942-1. Instrument cluster
Displays suggestions to the
driver in the following situations.
To select a response to a dis-
played suggestion, use the
meter control switches.
■Suggestion to enable the
power back door (if
equipped)
If the power back door system is
disabled (setting on set to
off) and the power back door
switch on the instrument panel
is operated, a suggestion mes-
sage will be displayed asking if
you wish to enable the power
back door system.
To enable the power back door system, select “Yes”.
After enabling the power back door
system, press the power back door
switch again to op
en or close the
power back door.
■Suggestion to turn off the
headlights
If the headlights are left on for a
certain amount of time after the
engine switch has been turned
off, if the headlight switch is in
the “AUTO” position, a sugges-
tion message will be displayed
asking if you wish to turn the
headlights off.
To turn the headlights off, select
“Yes”.
If the driver's door is opened after
the engine switch is turned off, this
suggestion message will not be dis-
played.
WARNING
■Cautions during setting up
the display
If the engine is running when
changing the display settings,
ensure that the vehicle is parked
in a place with adequate ventila-
tion. In a closed area such as a
garage, exhaust gases including
harmful carbon monoxide (CO)
may collect and enter the vehicle.
This may lead to death or a seri-
ous health hazard.
NOTICE
■During setting up the display
To prevent battery discharge,
ensure that the engine is running
while setting up the display fea-
tures.
Suggestion function (if
equipped)
Page 100 of 500
1003-1. Key information
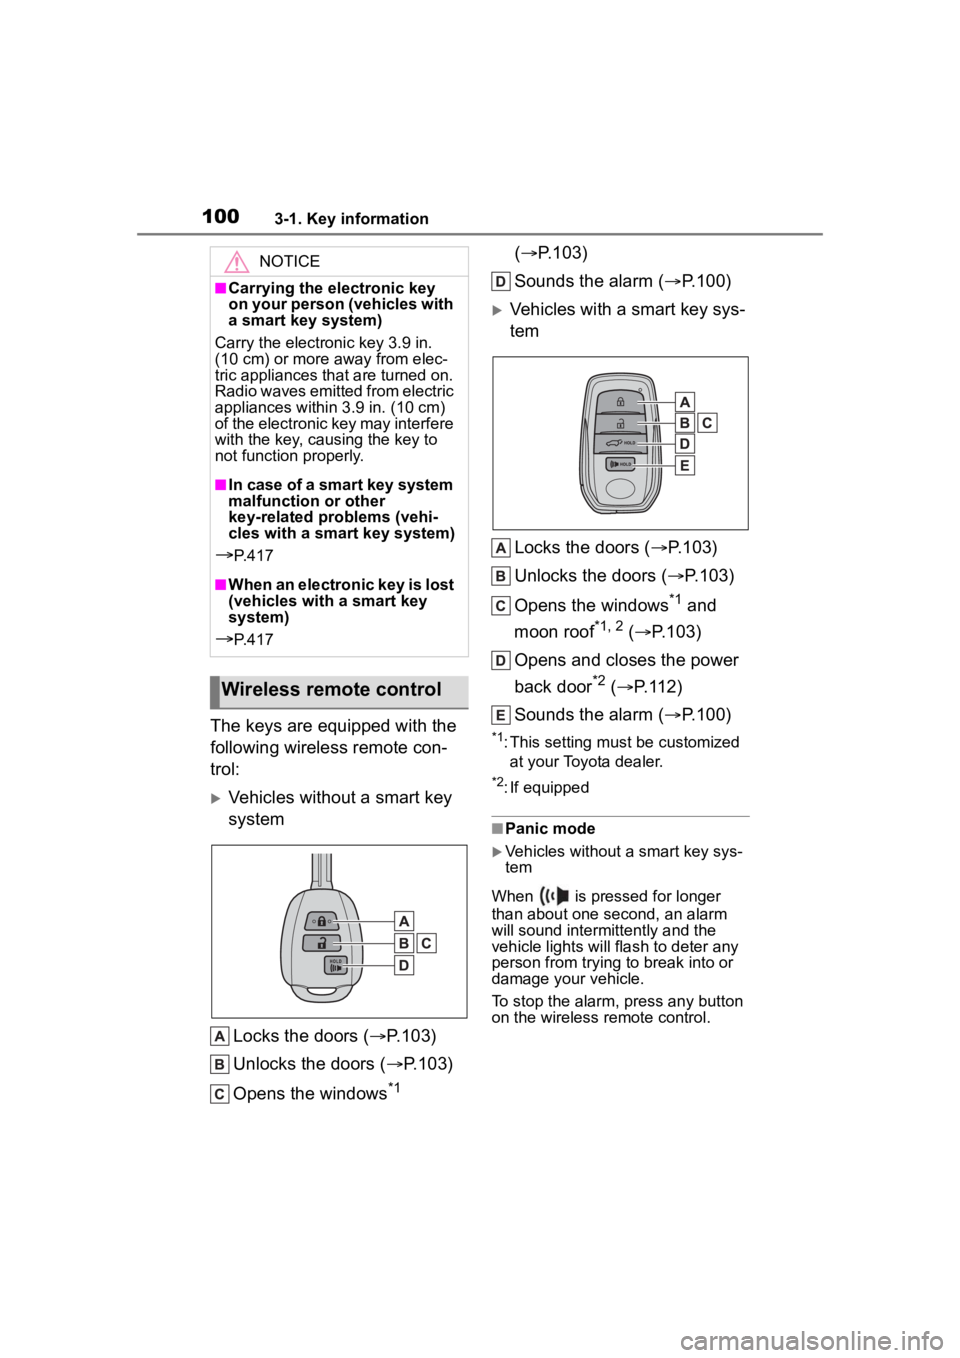
The keys are equipped with the
following wireless remote con-
trol:
Vehicles without a smart key
systemLocks the doors ( P.103)
Unlocks the doors ( P.103)
Opens the windows
*1 (
P.103)
Sounds the alarm ( P.100)
Vehicles with a smart key sys-
tem
Locks the doors ( P.103)
Unlocks the doors ( P.103)
Opens the windows
*1 and
moon roof
*1, 2 ( P.103)
Opens and closes the power
back door
*2 ( P.112)
Sounds the alarm ( P.100)
*1: This setting must be customized
at your Toyota dealer.
*2: If equipped
■Panic mode
Vehicles without a smart key sys-
tem
When is pressed for longer
than about one second, an alarm
will sound intermittently and the
vehicle lights will flash to deter any
person from trying to break into or
damage your vehicle.
To stop the alarm, press any button
on the wireless remote control.
NOTICE
■Carrying the electronic key
on your person (vehicles with
a smart key system)
Carry the electronic key 3.9 in.
(10 cm) or more away from elec-
tric appliances that are turned on.
Radio waves emitted from electric
appliances within 3.9 in. (10 cm)
of the electronic key may interfere
with the key, causing the key to
not function properly.
■In case of a smart key system
malfunction or other
key-related problems (vehi-
cles with a smart key system)
P. 4 1 7
■When an electronic key is lost
(vehicles with a smart key
system)
P. 4 1 7
Wireless remote control
Page 101 of 500
1013-1. Key information
3
Before driving
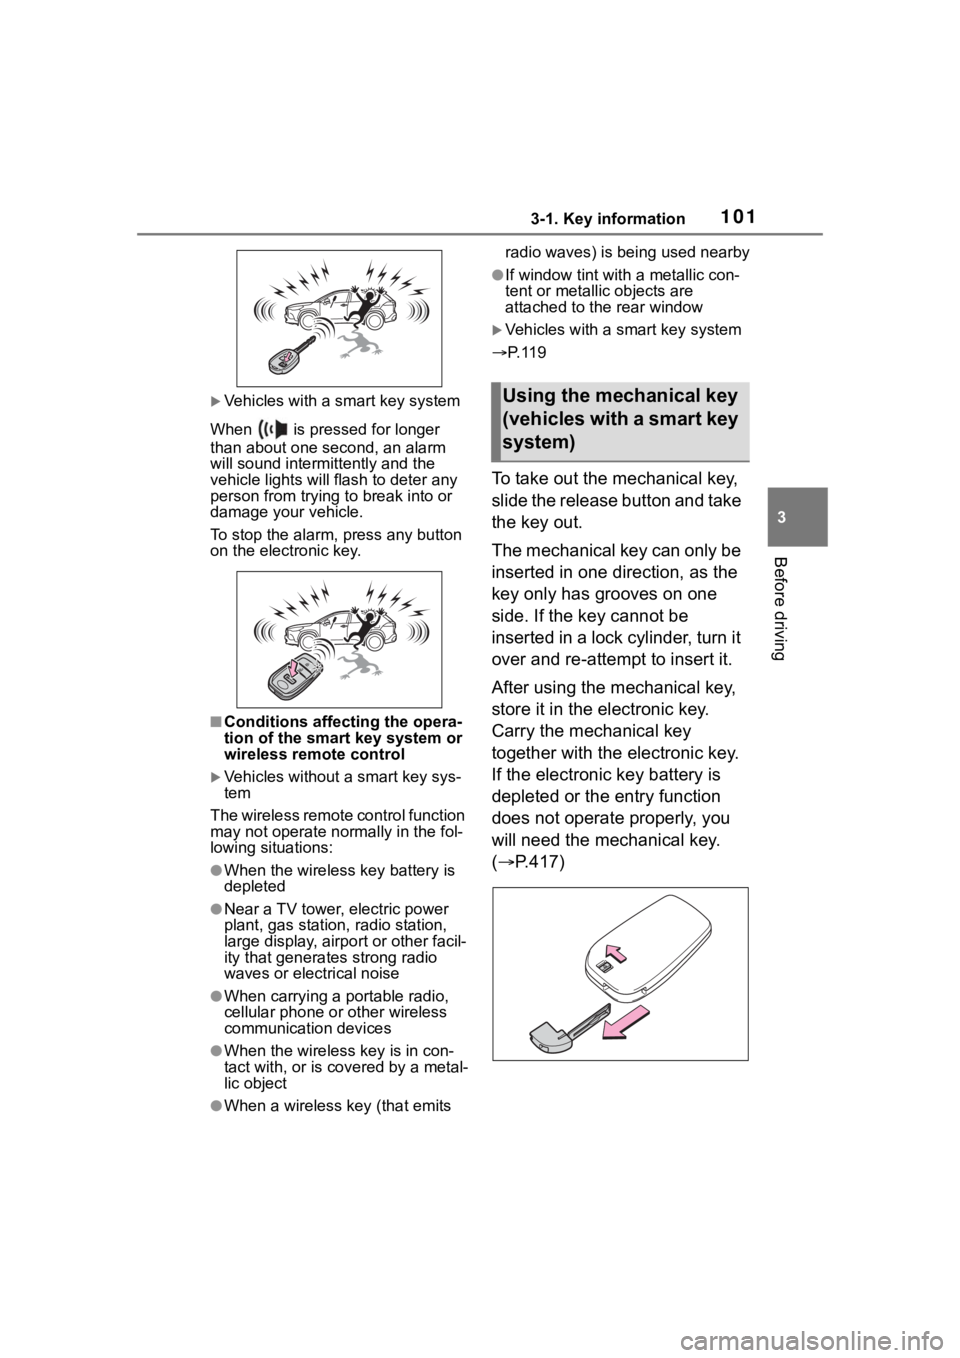
Vehicles with a smart key system
When is pressed for longer
than about one second, an alarm
will sound intermittently and the
vehicle lights will f lash to deter any
person from trying to break into or
damage your vehicle.
To stop the alarm, press any button
on the electronic key.
■Conditions affect ing the opera-
tion of the smart key system or
wireless remo te control
Vehicles without a smart key sys-
tem
The wireless remote control function
may not operate normally in the fol-
lowing situations:
●When the wireless key battery is
depleted
●Near a TV tower, electric power
plant, gas station , radio station,
large display, airpo rt or other facil-
ity that generates strong radio
waves or electrical noise
●When carrying a portable radio,
cellular phone or other wireless
communication devices
●When the wireles s key is in con-
tact with, or is covered by a metal-
lic object
●When a wireless key (that emits radio waves) is being used nearby
●If window tint wit
h a metallic con-
tent or metallic objects are
attached to the rear window
Vehicles with a smart key system
P. 1 1 9
To take out the mechanical key,
slide the release button and take
the key out.
The mechanical key can only be
inserted in one direction, as the
key only has grooves on one
side. If the key cannot be
inserted in a lock cylinder, turn it
over and re-attempt to insert it.
After using the mechanical key,
store it in the electronic key.
Carry the mechanical key
together with the electronic key.
If the electronic key battery is
depleted or the entry function
does not operate properly, you
will need the mechanical key.
( P.417)
Using the mechanical key
(vehicles with a smart key
system)
Page 129 of 500
1293-4. Adjusting the steering wheel and mirrors
3
Before driving
The height of the rear view mir-
ror can be adjusted to suit your
driving posture.
Adjust the height of the rear
view mirror by moving it up and
down.
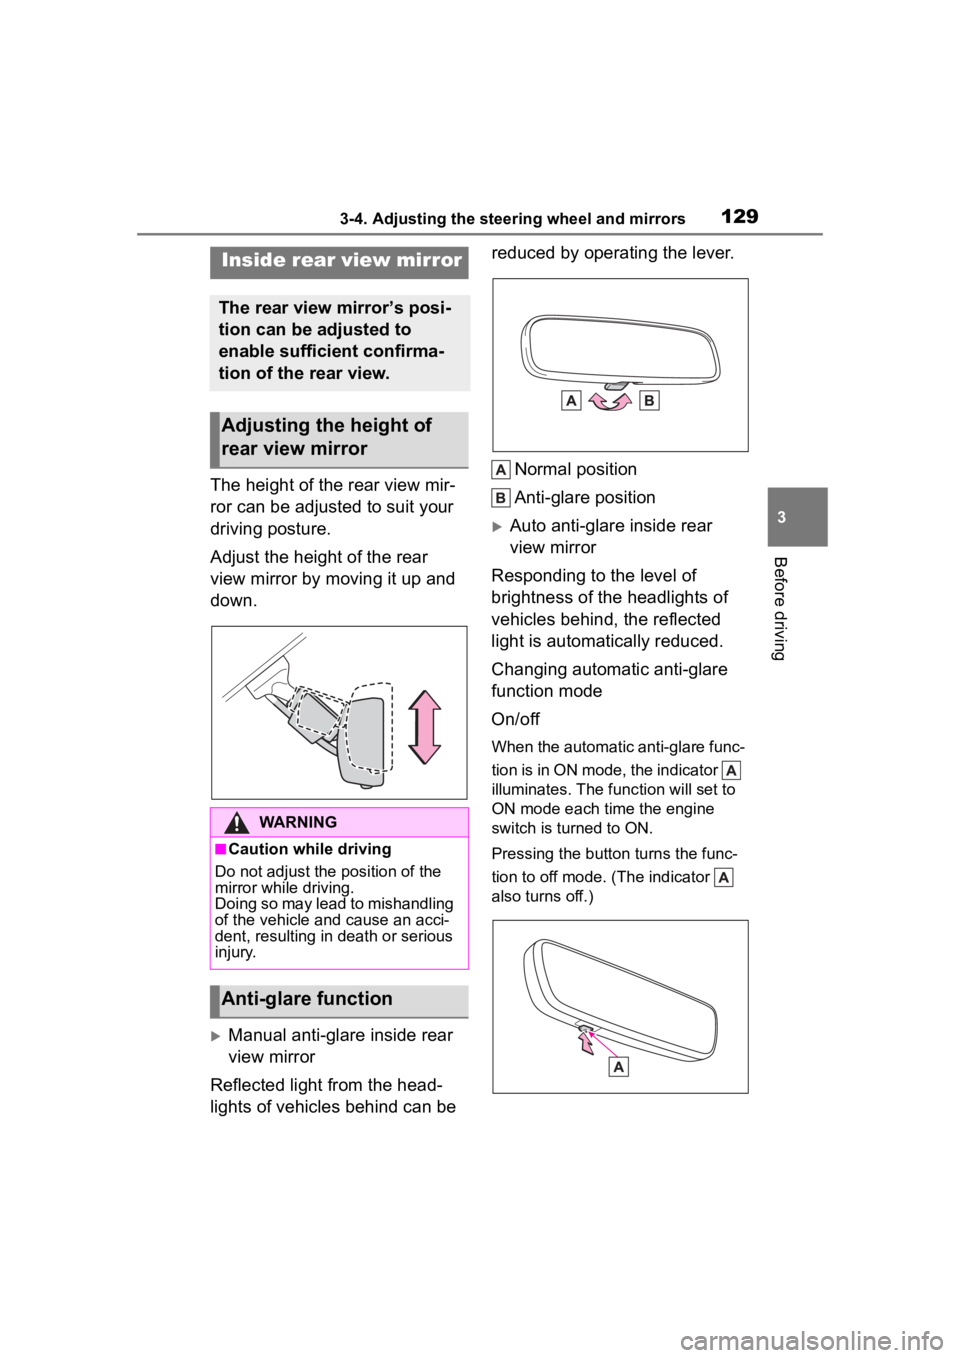
Manual anti-glare inside rear
view mirror
Reflected light from the head-
lights of vehicles behind can be reduced by operating the lever.
Normal position
Anti-glare position
Auto anti-glare inside rear
view mirror
Responding to the level of
brightness of the headlights of
vehicles behind, the reflected
light is automatically reduced.
Changing automatic anti-glare
function mode
On/off
When the automatic anti-glare func-
tion is in ON mode, the indicator
illuminates. The func tion will set to
ON mode each time the engine
switch is turned to ON.
Pressing the button turns the func-
tion to off mode. (The indicator
also turns off.)
Inside rear view mirror
The rear view mirror’s posi-
tion can be adjusted to
enable sufficient confirma-
tion of the rear view.
Adjusting the height of
rear view mirror
WARNING
■Caution while driving
Do not adjust the position of the
mirror while driving.
Doing so may lead to mishandling
of the vehicle and cause an acci-
dent, resulting in death or serious
injury.
Anti-glare function
Page 139 of 500
139
4
4
Driving
Driving
.4-1. Before drivingDriving the vehicle....... 141
Cargo and luggage ..... 147
Vehicle load limits ....... 150
Trailer towing............... 151
Dinghy towing ............. 161
4-2. Driving procedures Engine (ignition) switch (vehicles without a smart
key system) ............... 162
Engine (ignition) switch (vehicles with a smart key
system)...................... 163
Continuously variable trans- mission ...................... 168
Turn signal lever.......... 171
Parking brake .............. 172
Brake Hold .................. 175
4-3. Operating the lights and wipers
Headlight switch .......... 178
AHB (Automatic High Beam)........................ 181
Fog light switch ........... 184
Windshield wipers and washer....................... 184
Rear windshield wiper and washer....................... 186
4-4. Refueling Opening the fuel tank cap.................................. 1884-5. Using the dr
iving support
systems
Toyota Safety Sense 3 soft- ware update............... 190
Toyota Safety Sense 3.0 .................................. 192
PCS (Pre-Collision System) .................................. 198
LTA (Lane Tracing Assist) .................................. 208
LDA (Lane Departure Alert) .................................. 213
RSA (Road Sign Assist) .................................. 218
Dynamic radar cruise con- trol ............................. 220
Cruise control .............. 231
Emergency Driving Stop System ...................... 235
Stop & Start system .... 237
BSM (Blind Spot Monitor) .................................. 243
RCTA (Rear Cross Traffic Alert) .......................... 248
Safe Exit Assist ........... 254
Intuitive parking assist . 259
PKSB (Parking Support Brake) ........................ 265
Driving assist systems .................................. 274
4-6. Driving tips Winter driving tips........ 279
Page 152 of 500

1524-1. Before driving
■Matching trailer ball height to
trailer coupler height
No matter which class of tow hitch
applies, for a more safe trailer
hookup, the trailer ball setup must
be the proper height for the coupler
on the trailer.
Coupler
Trailer ball
■Before towing
Check that the following conditions
are met:
●Ensure that your vehicle’s tires
are properly inflated. ( P.434)
●Trailer tires are inflated according
to the trailer manufacturer’s rec-
ommendation.
●All trailer lights work as required
by law.
●All lights work each time you con-
nect them.
●The trailer ball is set at the proper
height for the coupler on the
trailer.
●The trailer is level when it is
hitched.
Do not drive if th e trailer is not
level, and check for improper
tongue weight, overloading, worn
suspension, or other possible
causes.
●The trailer cargo is securely
loaded.
●The rear view mirr ors conform to
all applicable fede ral, state/provin-
cial or local regulations. If they do
not, install rear view mirrors
appropriate for towing purposes.
■Break-in schedule
If your vehicle is new or equipped
with any new power train compo-
nents (such as an engine, transaxle,
transfer [AWD models], rear differ-
ential [AWD models] or wheel bear-
ing), Toyota recommends that you
do not tow a trailer until the vehicle
has been driven for over 500 miles
(800 km).
After the vehicle has been driven for
over 500 miles (800 km), you can
start towing. However, for the next
500 miles (800 km), drive the vehi-
cle at a speed of less than 50 mph
(80 km/h) when towing a trailer, and
avoid full throttle acceleration.
■Maintenance
●If you tow a trailer, your vehicle
will require more fr equent mainte-
nance due to the additional load.
(See “Scheduled Maintenance
Guide” or “Owner ’s Manual Sup-
plement”.)
●Retighten the fixing bolts of the
towing ball and bracket after
approximately 600 miles (1000
km) of tra iler towing.
Toyota warranties do not
apply to damage or mal-
function caused by towing a
trailer for commercial pur-
poses.
Contact your Toyota dealer
for further information
about additional require-
ments such as a towing kit,
etc.
Page 158 of 500
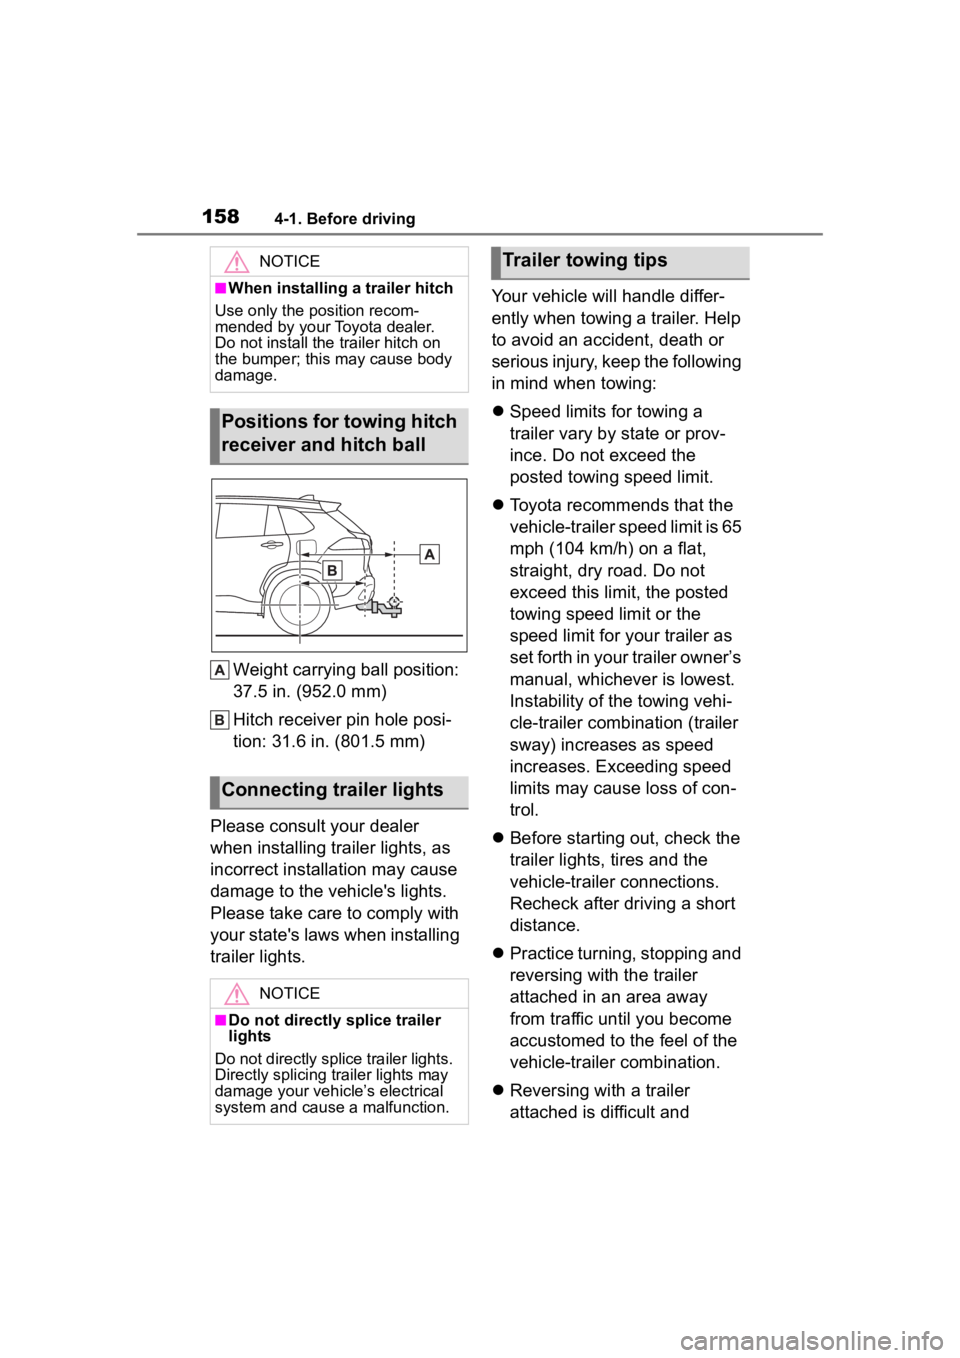
1584-1. Before driving
Weight carrying ball position:
37.5 in. (952.0 mm)
Hitch receiver pin hole posi-
tion: 31.6 in. (801.5 mm)
Please consult your dealer
when installing trailer lights, as
incorrect installation may cause
damage to the vehicle's lights.
Please take care to comply with
your state's laws when installing
trailer lights. Your vehicle will handle differ-
ently when towing a trailer. Help
to avoid an accident, death or
serious injury, keep the following
in mind when towing:
Speed limits for towing a
trailer vary by state or prov-
ince. Do not exceed the
posted towing speed limit.
Toyota recommends that the
vehicle-trailer speed limit is 65
mph (104 km/h) on a flat,
straight, dry road. Do not
exceed this limit, the posted
towing speed limit or the
speed limit for your trailer as
set forth in your trailer owner’s
manual, whichever is lowest.
Instability of the towing vehi-
cle-trailer combination (trailer
sway) increases as speed
increases. Exceeding speed
limits may cause loss of con-
trol.
Before starting out, check the
trailer lights, tires and the
vehicle-trailer connections.
Recheck after driving a short
distance.
Practice turning, stopping and
reversing with the trailer
attached in an area away
from traffic until you become
accustomed to the feel of the
vehicle-trailer combination.
Reversing with a trailer
attached is difficult and
NOTICE
■When installing a trailer hitch
Use only the position recom-
mended by your Toyota dealer.
Do not install the trailer hitch on
the bumper; this may cause body
damage.
Positions for towing hitch
receiver and hitch ball
Connecting trailer lights
NOTICE
■Do not directly splice trailer
lights
Do not directly splice trailer lights.
Directly splicing trailer lights may
damage your vehicle’s electrical
system and cause a malfunction.
Trailer towing tips