2023 TOYOTA 86 key
[x] Cancel search: keyPage 159 of 449

1594-3. Operating the lights and wipers
4
Driving
parking lights and illuminate
brighter than the parking lights.
●To make your vehicle more visible
to other drivers during daytime
driving, the daytime running lights
turn on automatically when all of
the following conditions are met.
(The daytime running lights are
not designed for use at night.)
• The engine is running
• The shift lever is shifted out of P (vehicles with an automatic trans-
mission)
• The parking brake is released
• The headlight s witch is in the
(U.S.A. only), or
* position
*: When the surroundings are bright
The daytime running lights remain
on after they illumi nate, even if the
parking brake is set again.
●When the turn signal indicators
are flashing, the daytime running
light on the side that the turn sig-
nals are flashing will turn off.
●When the emergency flashers are
flashing, both daytime running
lights will turn off.
●Compared to turning on the head-
lights, the daytime running light
system offers gr eater durability
and consumes less electricity, so
it can help improve fuel economy.
■Headlight control sensor
In the following si tuations, the auto-
matic light control system may not
operate correctly.
●When an object is placed on the
sensor or something which blocks
the sensor is affixed to the wind-
shield
●When the surrounding area is lit
by light other than natural light
■Automatic light off system
When the light switch is in : The
headlights and tail lights turn off 30
seconds after a door is opened and
closed if the engine switch is turned
off. (The lights turn off immediately if on the key is pressed twice after
both side doors are closed.)
To turn the lights on again, turn the
engine switch to ON, or turn the light
switch off once and then back to
or (except for Canada).
■Light reminder buzzer
A buzzer sounds when the engine
switch is turned off and the driver’s
door is opened wh ile the lights are
turned on.
■Automatic headlight leveling
system
The level of the headlights is auto-
matically adjusted according to the
number of passengers and the load-
ing condition of the vehicle to
ensure that the headlights do not
interfere with o ther road users.
■Windshield wiper linked head-
light illumination
When driving during daytime with
the headlight switch turned to , if
the windshield wipers are used, the
headlights will turn o n automatically
after several se conds to help
enhance the visibility of your vehi-
cle.
■Battery-saving function
In order to prevent the battery of the
vehicle from discharging, if the
headlights and/or tail lights are on
Page 248 of 449
2484-6. Using other driving systems
Pre-Collision Braking System has
been turned off
The Reverse Automatic Braking
(RAB) system can be temporar-
ily canceled by any of the follow-
ing operation.
While the vehicle is stopped
by the operation of automatic
braking, the brake pedal is
depressed.
While the vehicle is stopped
by the operation of automatic
braking, the accelerator pedal
is depressed.
The accelerator pedal is
depressed continuously (In
this case, limited acceleration
will be canceled and the vehi-
cle will continue reversing.)
The shift lever is shifted to a
position other than R.
The system will be c anceled if the
object is no longer detected.
While the shift lever is shifted to
R, the below functions of the
Reverse Automatic Braking
(RAB) system can be set by
operating the multimedia system
screen.
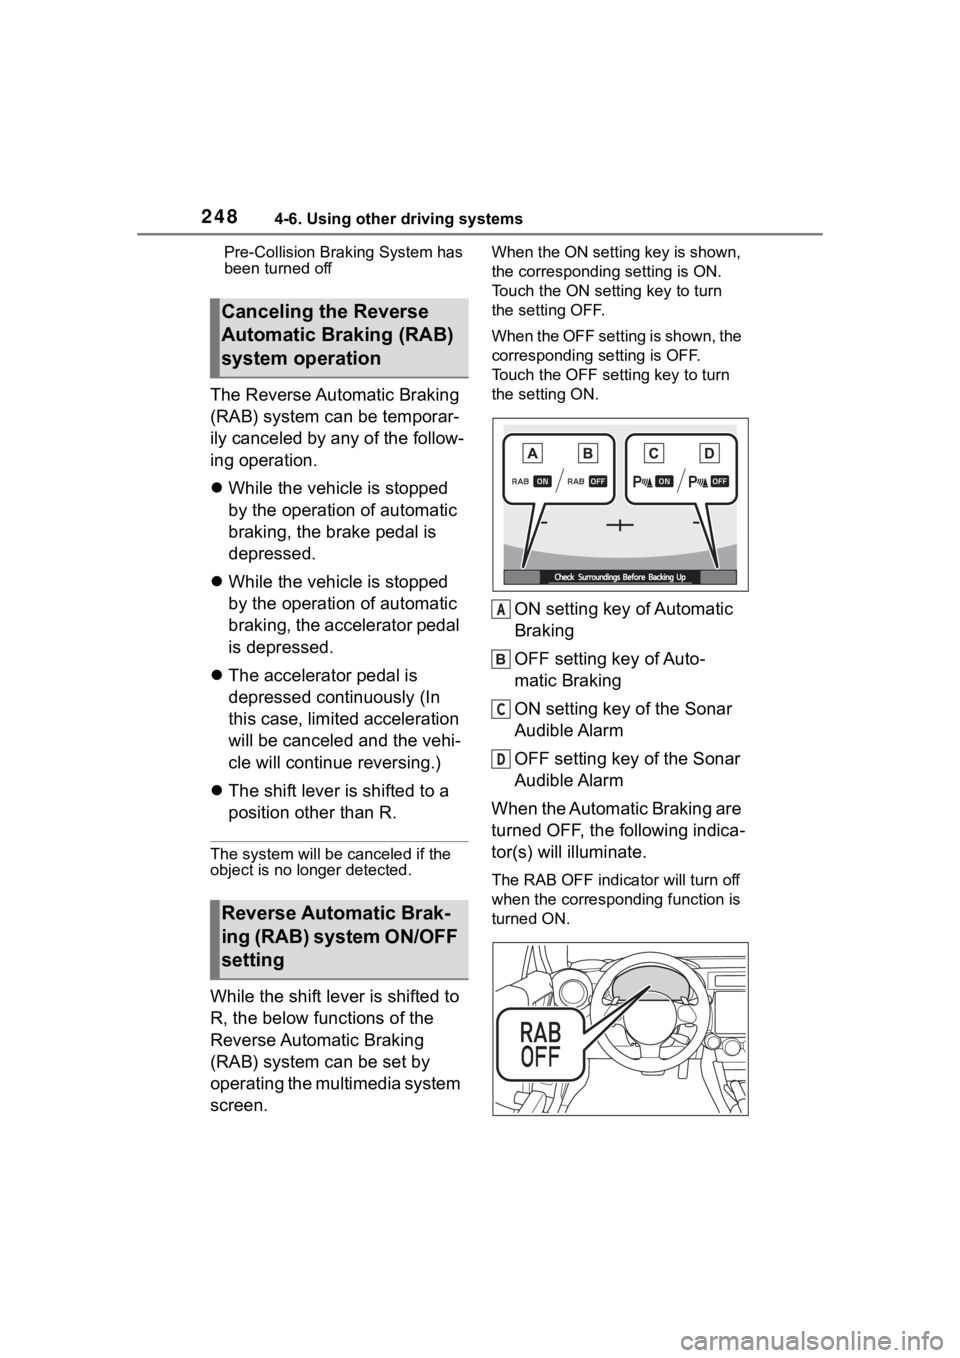
When the ON setting key is shown,
the corresponding setting is ON.
Touch the ON setting key to turn
the setting OFF.
When the OFF setting is shown, the
corresponding setting is OFF.
Touch the OFF setting key to turn
the setting ON.
ON setting key of Automatic
Braking
OFF setting key of Auto-
matic Braking
ON setting key of the Sonar
Audible Alarm
OFF setting key of the Sonar
Audible Alarm
When the Automatic Braking are
turned OFF, the following indica-
tor(s) will illuminate.
The RAB OFF indica tor will turn off
when the corresponding function is
turned ON.
Canceling the Reverse
Automatic Braking (RAB)
system operation
Reverse Automatic Brak-
ing (RAB) system ON/OFF
setting
A
C
D
Page 249 of 449

2494-6. Using other driving systems
4
Driving
When the settings cannot be
changed, the ON/OFF setting key
will be grayed out.
Also, the following settings can be
changed by operating the multime-
dia system screen. (P.400)
●Warning Volume
●Sonar Audible Alarm
●Automatic Braking
If the Reverse Automatic Brak-
ing (RAB) system malfunctions,
the above indicator illuminates
on the meter. Contact the near-
est Toyota dealer for details.
The 4 sonar sensors are located
in the rear bumper. To ensure
the proper operation of the
Reverse Automatic Braking
(RAB) system, observe the fol-
lowing precautions.
Do not affix any stickers or
other items on the sonar sen-
sor or the bumper surface
near the sonar sensors.
Always keep the sonar sensor and the rear bumper surface
near the sonar sensors clean.
Do not modify rear bumper.
Do not paint the bumper near
the sonar sensors.
Do not apply high pressure
water to the sonar sensors
with a high pressure
car-washing machine.
Do not apply strong impacts
to the rear bumper near the
sonar sensors. If a sensor
becomes misaligned, a sys-
tem malfunction may occur,
including inability to detect
objects in the reversing direc-
tion. If any strong impact is
applied to the rear bumper,
contact a Toyota dealer to
have the system inspected.
Do not disassemble the sonar
sensors.
If the sonar sensors require repair or
replacement, or if the area of the
rear bumper near the sonar sensors
requires repair, paintwork or
replacement, contact your Toyota
dealer for assistance.
RAB warning light
Handling of the Sonar
Sensors
Page 278 of 449
2785-2. Using the interior lights
electronic key, locking/unlocking
and opening/closing of the doors,
and the engine switch mode.
■To prevent the battery from
being discharged
When the door position is on, if the
engine switch is turned off with a
door not fully closed and the interior
lights remain illuminated, they will
automatically be turned off after
approximately 20 minutes. How-
ever, if a light lens has been pushed
to illuminate the int erior light, it will
not turn off automatically.
■Customization
Some functions can be customized.
( P.400)
NOTICE
■To prevent battery discharge
Do not leave the lights on longer
than necessary when the engine
is not running.
Page 287 of 449
287
6
6
Maintenance and care
Maintenance and care
.6-1. Maintenance and careCleaning and protecting the vehicle exterior .......... 288
Cleaning and protecting the vehicle interior ........... 291
Cleaning and protecting the Ultrasuede
®area ....... 293
6-2. Maintenance Maintenance requirements.................................. 295
General maintenance.. 296
Emission inspection and maintenance (I/M) pro-
grams ........................ 299
6-3. Do-it-yourself mainte- nance
Do-it-yourself service pre- cautions ..................... 300
Hood ........................... 302
Positioning a floor jack .................................. 303
Engine compartment ... 305
Tires ............................ 312
Replacing the tire ........ 319
Tire inflation pressure.. 323
Wheels ......... ...............325
Air conditioning filter .... 327
Electronic key battery.. 328
Checking and replacing fuses.......................... 330
Headlight aim .............. 332Light bulbs ...................
333
Page 288 of 449
2886-1. Maintenance and care
6-1.Maintenance and care
Working from top to bottom,
liberally apply water to the
vehicle body, wheel wells and
underside of the vehicle to
remove any dirt and dust.
Wash the vehicle body using
a sponge or soft cloth, such
as a chamois.
If very dirty, use a car wash
soap that does not contain
abrasives and then thor-
oughly rinse with water.
Wipe away any water.
Wax the vehicle when the
waterproof coating deterio-
rates.
If water does not bead on a clean
surface, apply wax when the vehi-
cle body is cool.
■Automatic car washes
●Fold the mirrors before washing
the vehicle. Start washing from the
front of the vehicle. Make sure to
extend the mirrors before driving.
●Brushes used in automatic car
washes may scratch the vehicle
surface, parts (wheel, etc.) and
harm your vehicle’s paint.
■High pressure car washes
As water may enter the cabin, do
not bring the nozzle tip near the
gaps around the doors or perimeter
of the windows, or spray these
areas continuously.
■When using a car wash
If the door handle becomes wet
while the electronic key is within the
effective range, the door may lock
and unlock repeatedly. In that case,
follow the following correction pro-
cedures to wash the vehicle:
●Place the key in a position 6 ft. (2
m) or more separate from the
vehicle while the vehicle is being
washed. (Take care to ensure that
the key is not stolen.)
●Set the electronic key to bat-
tery-saving mode to disable the
smart key system. ( P. 1 1 1 )
■Wheels and wheel ornaments
(vehicles without matte painted
wheels)
●Remove any dirt immediately by
using a neutral detergent.
●Wash detergent off with water
immediately after use.
●To protect the paint from damage,
make sure to obs erve the follow-
ing precautions.
• Do not use acidic, alkaline or abrasive detergent
• Do not use hard brushes
• Do not use detergent on the
wheels when they are hot, such
as after driving or parking in hot
weather
■Wheels and wheel ornaments
(vehicles with matte painted
wheels)
As matte painted wheels require dif-
ferent cleaning methods than con-
ventional wheels, be sure to
observe the following. For details,
consult your Toyota dealer.
●Remove dirt using water. If the
wheels are excessively dirty, use
a sponge or soft cloth dampened
Cleaning and protect-
ing the vehicle exte-
rior
Perform cleaning in a man-
ner appropriate to each
component and its material.
Cleaning instructions
Page 310 of 449
3106-3. Do-it-yourself maintenance
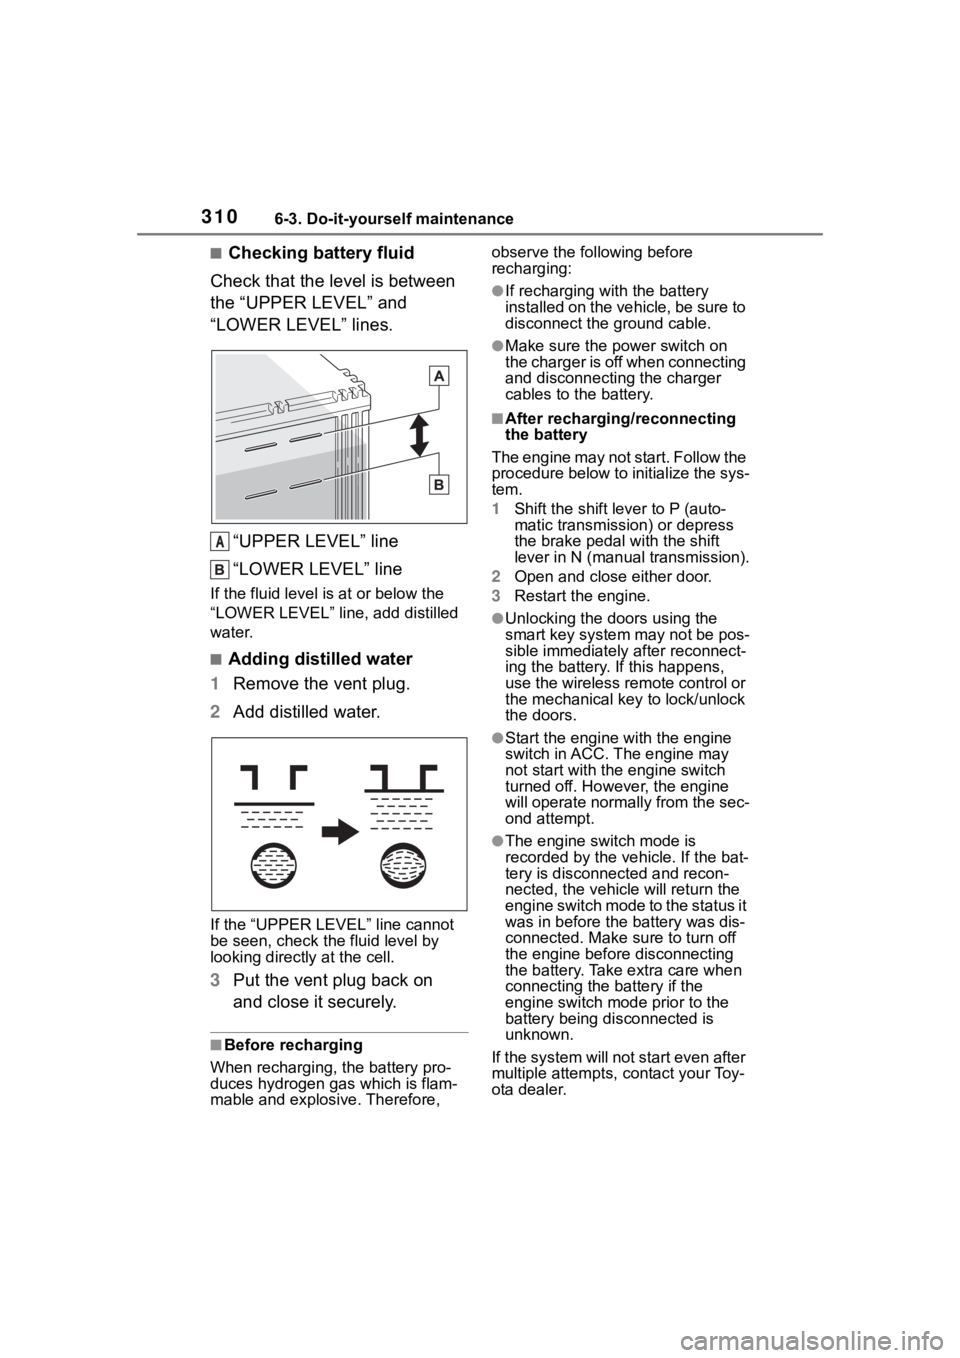
■Checking battery fluid
Check that the level is between
the “UPPER LEVEL” and
“LOWER LEVEL” lines.
“UPPER LEVEL” line
“LOWER LEVEL” line
If the fluid level is at or below the
“LOWER LEVEL” line, add distilled
water.
■Adding distilled water
1 Remove the vent plug.
2 Add distilled water.
If the “UPPER LEVEL ” line cannot
be seen, check the fluid level by
looking directly at the cell.
3 Put the vent plug back on
and close it securely.
■Before recharging
When recharging, t he battery pro-
duces hydrogen ga s which is flam-
mable and explosive. Therefore, observe the following before
recharging:
●If recharging with the battery
installed on the vehicle, be sure to
disconnect the ground cable.
●Make sure the power switch on
the charger is off when connecting
and disconnecting the charger
cables to the battery.
■After recharging/reconnecting
the battery
The engine may not start. Follow the
procedure below to initialize the sys-
tem.
1 Shift the shift lever to P (auto-
matic transmission) or depress
the brake pedal with the shift
lever in N (manual transmission).
2 Open and close either door.
3 Restart the engine.
●Unlocking the doors using the
smart key system may not be pos-
sible immediately after reconnect-
ing the battery. If this happens,
use the wireless remote control or
the mechanical key to lock/unlock
the doors.
●Start the engine with the engine
switch in ACC. T he engine may
not start with th e engine switch
turned off. However, the engine
will operate normally from the sec-
ond attempt.
●The engine switch mode is
recorded by the vehicle. If the bat-
tery is disconnected and recon-
nected, the vehi cle will return the
engine switch mode to the status it
was in before the battery was dis-
connected. Make sure to turn off
the engine before disconnecting
the battery. Take extra care when
connecting the battery if the
engine switch mode prior to the
battery being disconnected is
unknown.
If the system will not start even after
multiple attempts, contact your Toy-
ota dealer.
A
Page 328 of 449
3286-3. Do-it-yourself maintenance
7When installing, reverse the
steps listed.
■Checking interval
Inspect and replace the air condi-
tioning filter according to the mainte-
nance schedule. In dusty areas or
areas with heavy traffic flow, early
replacement may be required. (For
scheduled maintenance information,
please refer to the “Owner’s Manual
Supplement” or “Scheduled Mainte-
nance”.)
■If air flow from the vents
decreases dramatically
The filter may be clogged. Check
the filter and replace if necessary.
■If the electronic key battery is
depleted
The following symptoms may occur:
●The smart key system and wire-
less remote control will not func-
tion properly.
●The operational range will be
reduced.
Flathead screwdriver
Lithium battery CR2032
■Use a CR2032 lithium battery
●Batteries can be purchased at
your Toyota dealer, local electrical
appliance shops or camera stores.
●Replace only with the same or
equivalent type recommended by
the manufacturer.
●Dispose of used batteries accord-
ing to local laws.
NOTICE
■When removing the glove box
Do not forcibly pull the glove box.
Otherwise, the lower claws or the
lower claw engagement points
may be deformed, m aking it diffi-
cult to reinstall or close the glove
box.
■When using the air condition-
ing system
Make sure that a filter is always
installed.
Using the air conditioning system
without a filter may cause damage
to the system.
Electronic key batter y
Replace the battery with a
new one if it is depleted.
As the key may be damaged
if the following procedure is
not performed properly, it is
recommended that key bat-
tery replacement be per-
formed by your Toyota
dealer.
Items to prepare