2023 TOYOTA 86 height
[x] Cancel search: heightPage 36 of 449
361-1. For safe use
WARNING
■General Precautions regard-
ing SRS Airbag System and
Children
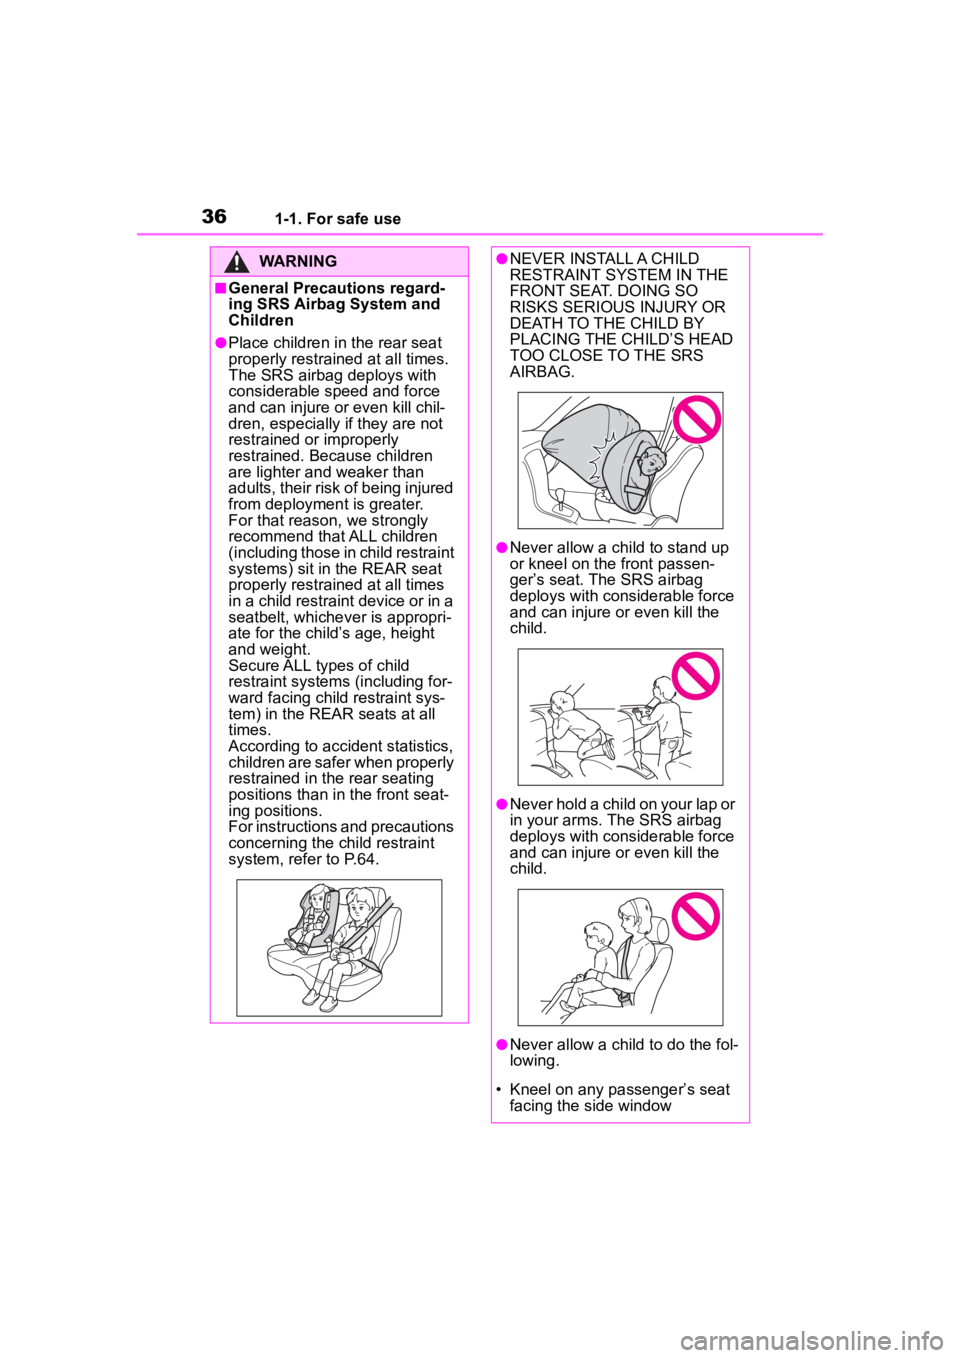
●Place children in the rear seat
properly restrained at all times.
The SRS airbag deploys with
considerable speed and force
and can injure or even kill chil-
dren, especially if they are not
restrained or improperly
restrained. Because children
are lighter and weaker than
adults, their risk of being injured
from deployment is greater.
For that reason, we strongly
recommend that ALL children
(including those in child restraint
systems) sit in the REAR seat
properly restrained at all times
in a child restraint device or in a
seatbelt, whichever is appropri-
ate for the child’s age, height
and weight.
Secure ALL types of child
restraint systems (including for-
ward facing child restraint sys-
tem) in the REAR seats at all
times.
According to accident statistics,
children are safer when properly
restrained in the rear seating
positions than in the front seat-
ing positions.
For instructions and precautions
concerning the child restraint
system, refer to P.64.
●NEVER INSTALL A CHILD
RESTRAINT SYSTEM IN THE
FRONT SEAT. DOING SO
RISKS SERIOUS INJURY OR
DEATH TO THE CHILD BY
PLACING THE CHILD’S HEAD
TOO CLOSE TO THE SRS
AIRBAG.
●Never allow a child to stand up
or kneel on the front passen-
ger’s seat. The SRS airbag
deploys with considerable force
and can injure o r even kill the
child.
●Never hold a child on your lap or
in your arms. The SRS airbag
deploys with considerable force
and can injure o r even kill the
child.
●Never allow a child to do the fol-
lowing.
• Kneel on any passenger’s seat facing the side window
Page 119 of 449
1193-3. Adjusting the seats
3
Before driving
3-3.Adjusting the seats
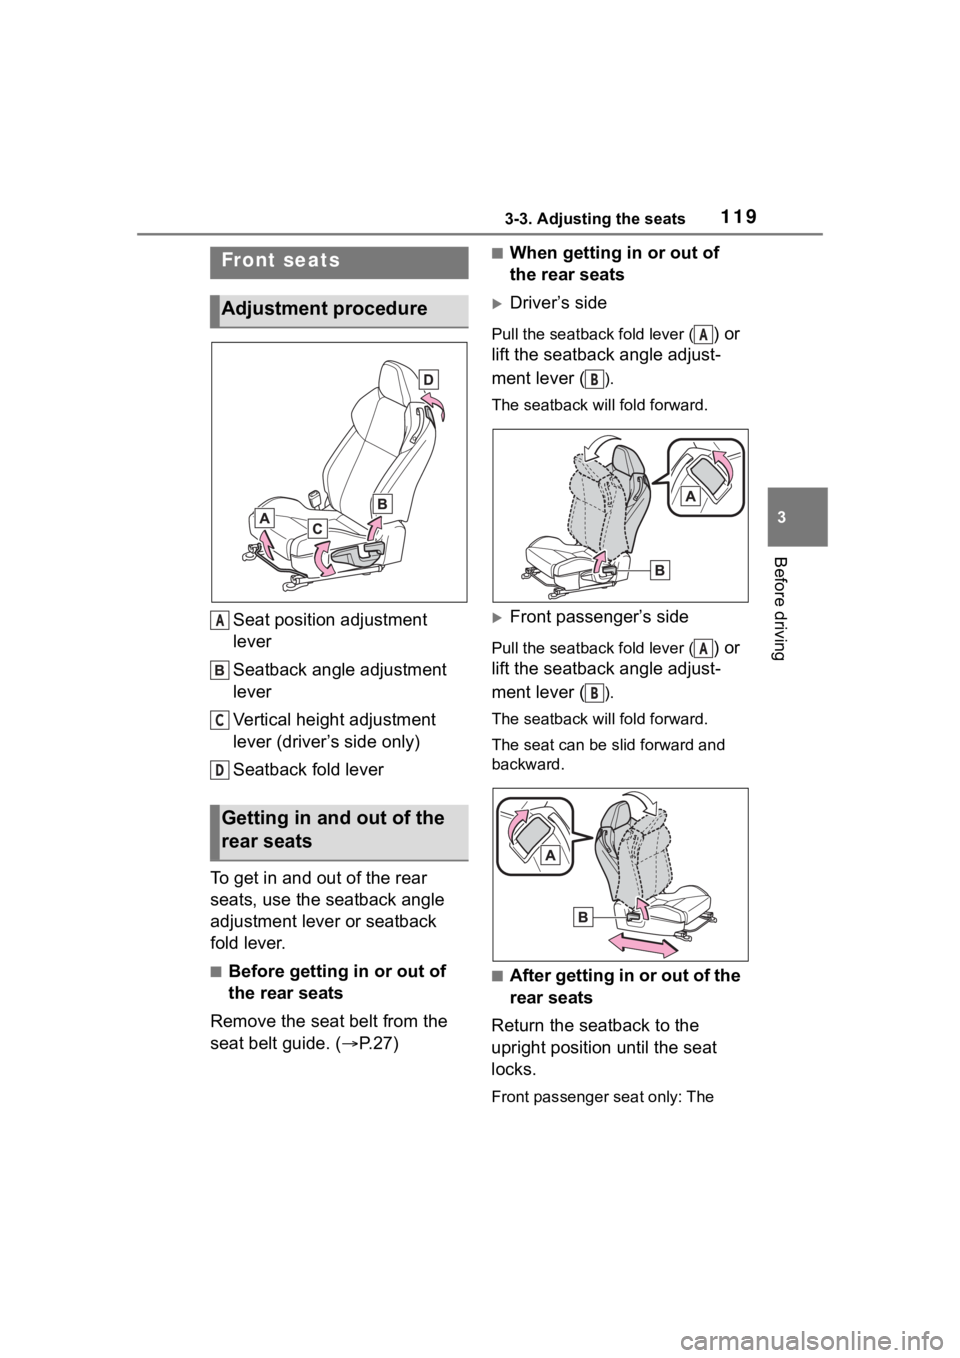
Seat position adjustment
lever
Seatback angle adjustment
lever
Vertical height adjustment
lever (driver’s side only)
Seatback fold lever
To get in and out of the rear
seats, use the seatback angle
adjustment lever or seatback
fold lever.
■Before getting in or out of
the rear seats
Remove the seat belt from the
seat belt guide. ( P.27)
■When getting in or out of
the rear seats
Driver’s side
Pull the seatback fold lever () or
lift the seatback angle adjust-
ment lever (
).
The seatback will fold forward.
Front passenger’s side
Pull the seatback fold lever () or
lift the seatback angle adjust-
ment lever (
).
The seatback will fold forward.
The seat can be slid forward and
backward.
■After getting in or out of the
rear seats
Return the seatback to the
upright position until the seat
locks.
Front passenger seat only: The
Front seats
Adjustment procedure
Getting in and out of the
rear seats
A
C
D
A
B
A
B
Page 123 of 449
1233-3. Adjusting the seats
3
Before driving
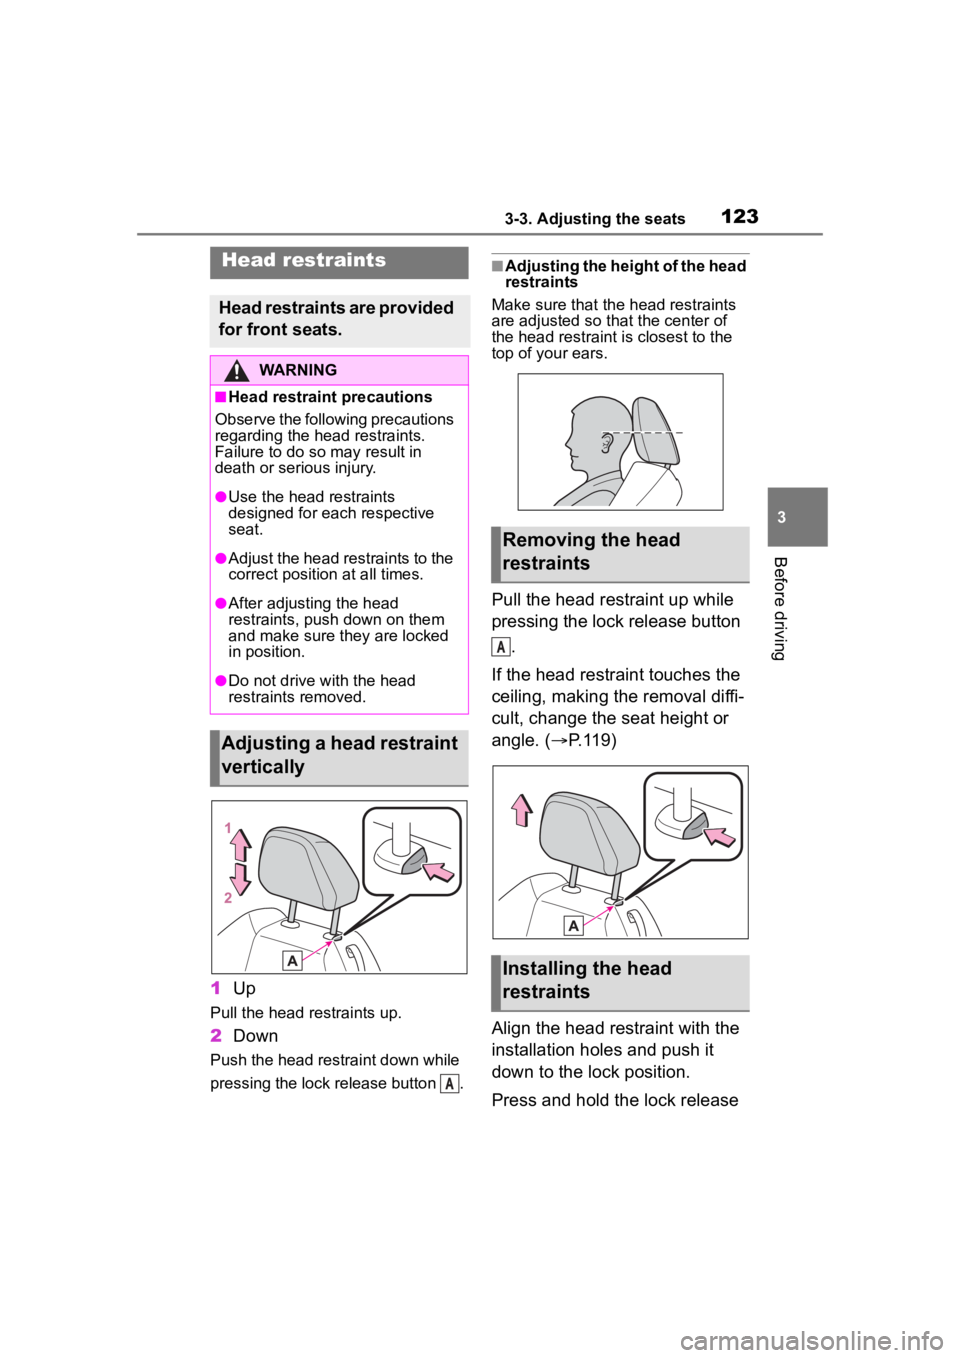
1Up
Pull the head restraints up.
2Down
Push the head restraint down while
pressing the lock release button .
■Adjusting the height of the head
restraints
Make sure that the head restraints
are adjusted so that the center of
the head restraint i s closest to the
top of your ears.
Pull the head restraint up while
pressing the lock release button
.
If the head restraint touches the
ceiling, making the removal diffi-
cult, change the seat height or
angle. ( P.119)
Align the head restraint with the
installation holes and push it
down to the lock position.
Press and hold the lock release
Head restraints
Head restraints are provided
for front seats.
WARNING
■Head restraint precautions
Observe the following precautions
regarding the head restraints.
Failure to do so m ay result in
death or serious injury.
●Use the head restraints
designed for each respective
seat.
●Adjust the head restraints to the
correct position at all times.
●After adjusting the head
restraints, push down on them
and make sure they are locked
in position.
●Do not drive with the head
restraints removed.
Adjusting a head restraint
vertically
A
Removing the head
restraints
Installing the head
restraints
A
Page 126 of 449
1263-4. Adjusting the steering wheel and mirrors
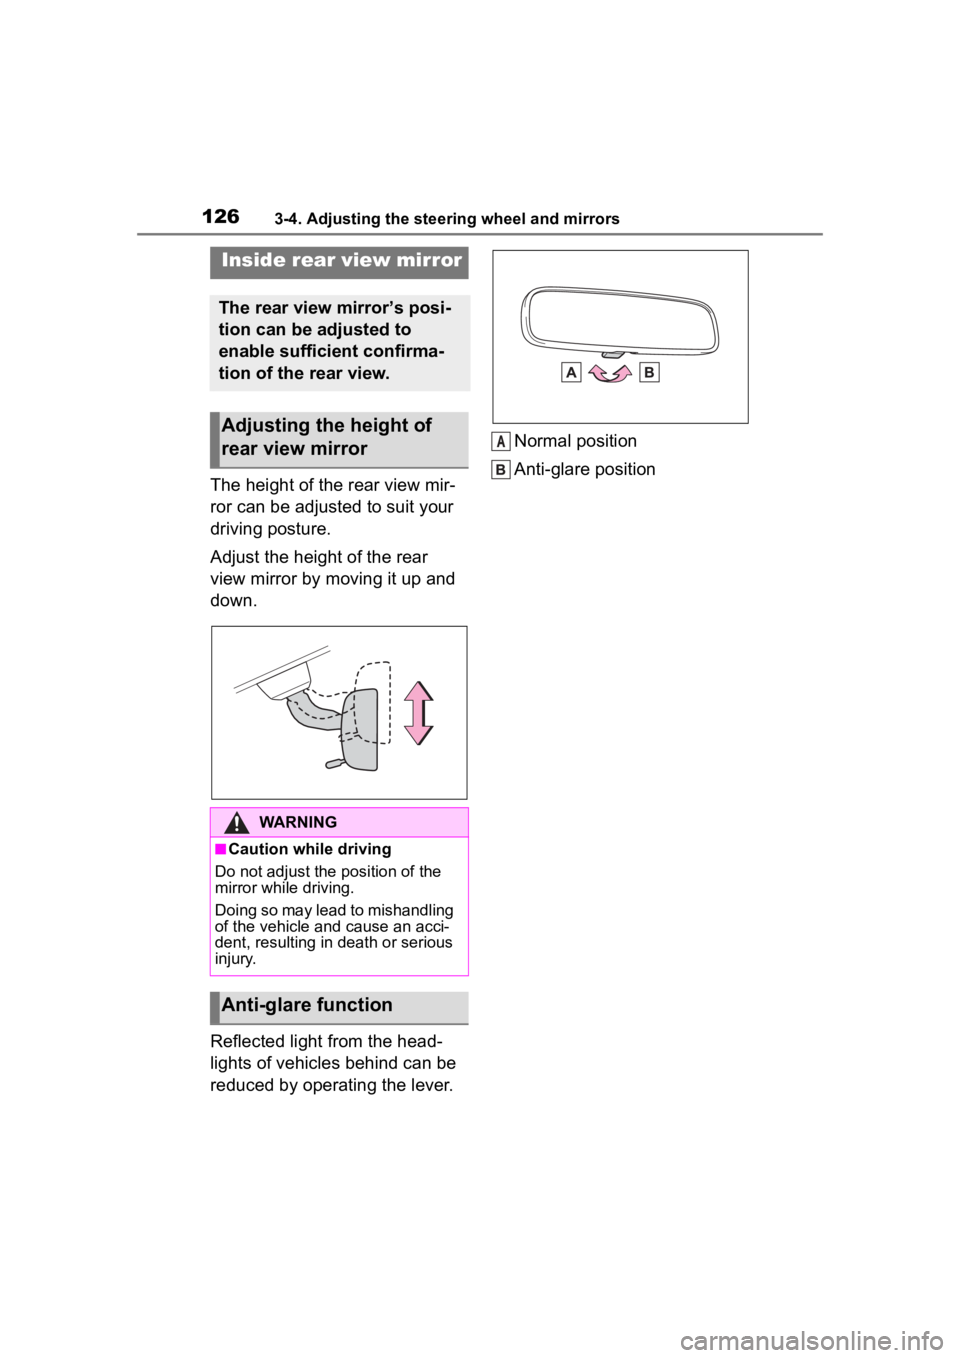
The height of the rear view mir-
ror can be adjusted to suit your
driving posture.
Adjust the height of the rear
view mirror by moving it up and
down.
Reflected light from the head-
lights of vehicles behind can be
reduced by operating the lever.Normal position
Anti-glare position
Inside rear view mirror
The rear view mirror’s posi-
tion can be adjusted to
enable sufficient confirma-
tion of the rear view.
Adjusting the height of
rear view mirror
WARNING
■Caution while driving
Do not adjust the position of the
mirror while driving.
Doing so may lead to mishandling
of the vehicle and cause an acci-
dent, resulting in death or serious
injury.
Anti-glare function
A
Page 182 of 449
1824-5. EyeSight
WARNING
Fluid has not been fully wiped
off the windshield during or after
washer use.
The target cannot be correctly
recognized because the stereo
camera’s view is obstructed by
water droplets from rain or the
window washer, or by the wiper
blades.
The stereo camera’s field of
view is obstructed.
The rear aspect of the vehicle
in front is low, s mall or irregular
(the system may recognize
another part of the vehicle as its
rear and will determine operation
from that).
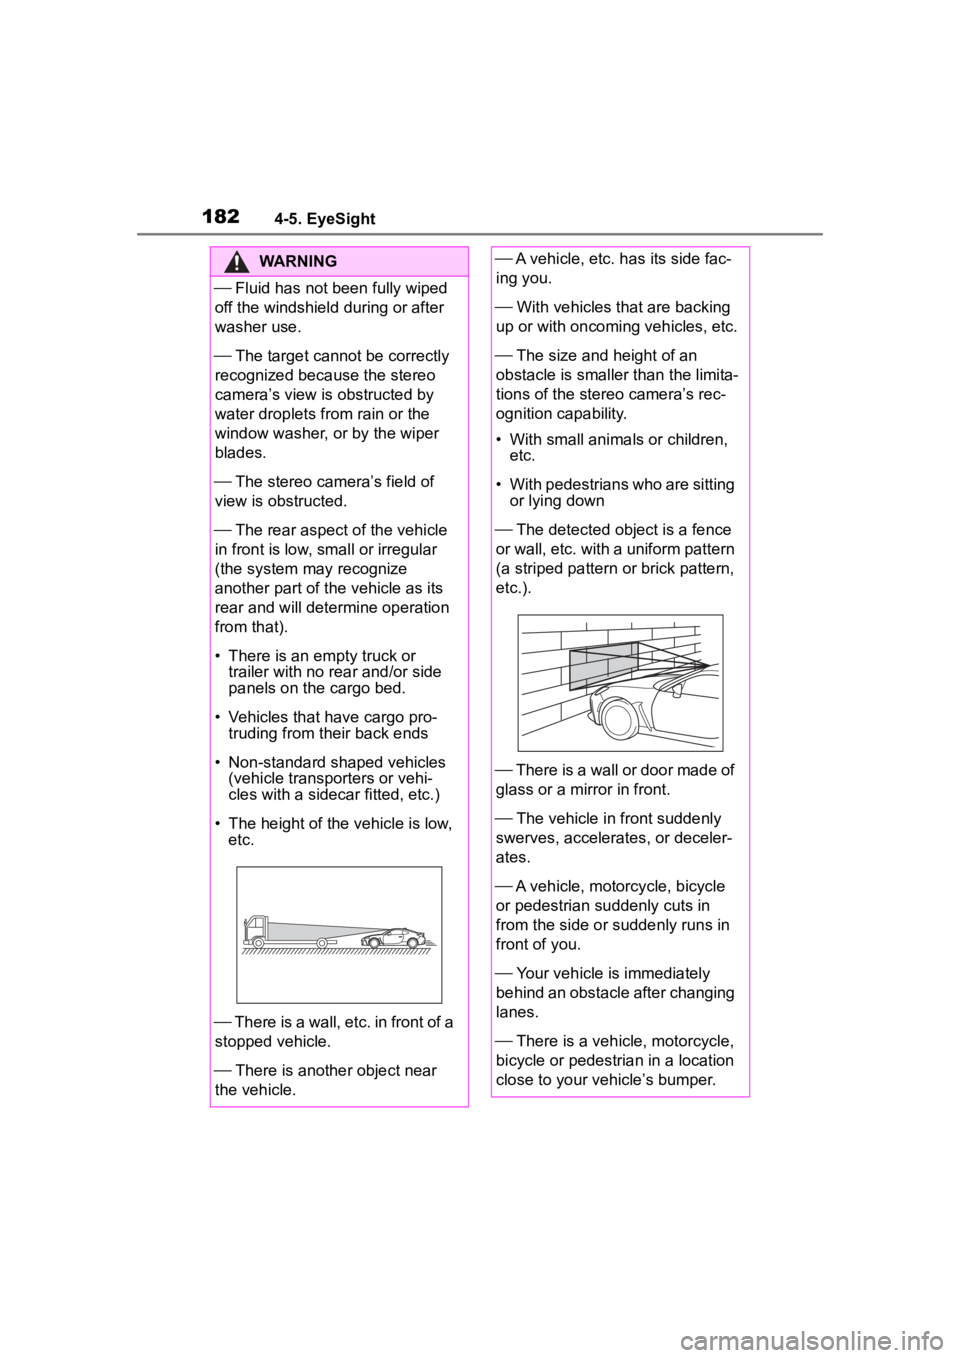
• There is an empty truck or trailer with no r ear and/or side
panels on the cargo bed.
• Vehicles that have cargo pro- truding from their back ends
• Non-standard shaped vehicles (vehicle transporters or vehi-
cles with a sidecar fitted, etc.)
• The height of the vehicle is low, etc.
There is a wall, etc. in front of a
stopped vehicle.
There is another object near
the vehicle.
A vehicle, etc. has its side fac-
ing you.
With vehicles that are backing
up or with oncoming vehicles, etc.
The size and height of an
obstacle is smaller than the limita-
tions of the stereo camera’s rec-
ognition capability.
• With small animals or children, etc.
• With pedestrians who are sitting or lying down
The detected ob ject is a fence
or wall, etc. with a uniform pattern
(a striped pattern or brick pattern,
etc.).
There is a wall or door made of
glass or a mirror in front.
The vehicle in front suddenly
swerves, accelerates, or deceler-
ates.
A vehicle, motorcycle, bicycle
or pedestrian suddenly cuts in
from the side or suddenly runs in
front of you.
Your vehicle is immediately
behind an obstacle after changing
lanes.
There is a vehicle, motorcycle,
bicycle or pedestrian in a location
close to your vehicle’s bumper.
Page 235 of 449

2354-6. Using other driving systems
4
Driving
The vehicle speed is below 6
mph (10 km/h) even when the
BSD/RCTA OFF indicator
does not appear (except
when reversing).
●In the following cases, the
BSD/RCTA will stop operating and
the BSD/RCTA warning light will
appear.
• When a malfunction occurs in the system, including the BSD/RCTA
approach indicator
●If the BSD/RCTA warning light
appears, exercise proper caution.
( P.238)
●In the following cases, the
BSD/RCTA will temporarily stop
operating (or may stop operating)
and the BSD/RCTA OFF indicator
will appear.
• When the radar sensor becomes significantly misaligned (If the ori-
entation of the r adar sensor is
shifted for any reason, readjust-
ment is required. Have the sensor
adjusted at a Toyota dealer.)
• When a large amount of snow or ice sticks to the rear bumper sur-
face around the radar sensors
• When the vehicle is driven on a snow-covered road or in an envi-
ronment in which there are no
objects around (such as in a des-
ert) for a prolonged period of time
• When the temperature around the
radar sensors increases exces-
sively due to long driving on uphill
grades in the summer, etc.
• When the temperature around the radar sensors becomes extremely
low
• When the vehicle battery voltage lowers
• When the vehicle voltage exceeds
the battery voltage rating
●The BSD/RCTA will resume oper-
ation once these conditions are
corrected, and the BSD/RCTA
OFF indicator will disappear. How-
ever, if the BSD/RCTA OFF indi- cator appears for a prolonged
period of time, have the system
inspected at a Toyota dealer as
soon as possible.
●The detectability o
f the radar sen-
sors is restricted. The BSD/RCTA
detection may be impaired and
the system may not operate prop-
erly under the following condi-
tions.
• When the rear bumper around the
radar sensors is distorted
• When ice, snow or mud adheres to the rear bumper surface around
the radar sensors
• When stickers, etc . are affixed on
the areas of the radar sensors on
the rear bumper
• During adverse weather condi- tions such as ra in, snow or fog
• When driving on wet roads such as snow-covered roads and
through puddles
●The radar sensors may not detect
or may have difficulty detecting
the following vehicles and objects.
• Small motorcycles, bicycles, pedestrians, stationary objects on
the road or ro ad side, etc.
• Vehicles with body shapes that the radar may not reflect (vehicles
with lower body height such as a
trailer with no cargo and sports
cars)
• Vehicles that are not approaching
your vehicle even though they are
in the detection area (either on a
neighboring lane to the rear or
beside your vehicle when revers-
ing) (The system determines the
presence of approaching vehicles
based on data detected by the
radar sensors.)
• Vehicles traveling at significantly
different speeds
• Vehicles driving in parallel at almost the same speed as your
vehicle for a prolonged time
• Oncoming vehicles
• Vehicles in a lane beyond the neighboring lane
• Vehicles travelling at a signifi- cantly lower speed that you are
Page 237 of 449
2374-6. Using other driving systems
4
Driving
be changed by operating the
multimedia system screen.
(P.400)
■Safety tips regarding the
BSD/RCTA approach indi-
cator/warning buzzer
In the following cases, opera-
tion of the BSD/RCTA
approach indicator and the
warning buzzer may be
delayed or the system may
fail to issue these warnings.
• When a vehicle moves to the
neighboring lane from a lane next
to the neighboring lane
• When driving on a steep incline or on repeated sharp uphill and
downhill grades
• When going beyond a pass
• When both your vehicle and a vehicle driving on a neighboring
lane are driving o n the far side of
each lane.
• When several narrowly-spaced vehicles are approaching in a row
• In low radius bends (tight bends or when making turns at an inter-
section)
• When there is a difference in height between your lane and the
neighboring lane
• Immediately after the BSD/RCTA is activated by touching
“BSD/RCTA”
• Immediately after the shift lever is shifted to R
• When extremely heavy cargo is loaded in the trunk
During reversing, operation of the BSD/RCTA approach indi-
cator and the warning buzzer
may be delayed or the system
may fail to issue these warn-
ings under the following con-
ditions.
• When backing out of an angled
parking space
• When a large-sized vehicle is parked next to your vehicle (That
vehicle prevents the propagation
of radar waves.)
• When reversing on sloped roads
• When reversing at a high speed
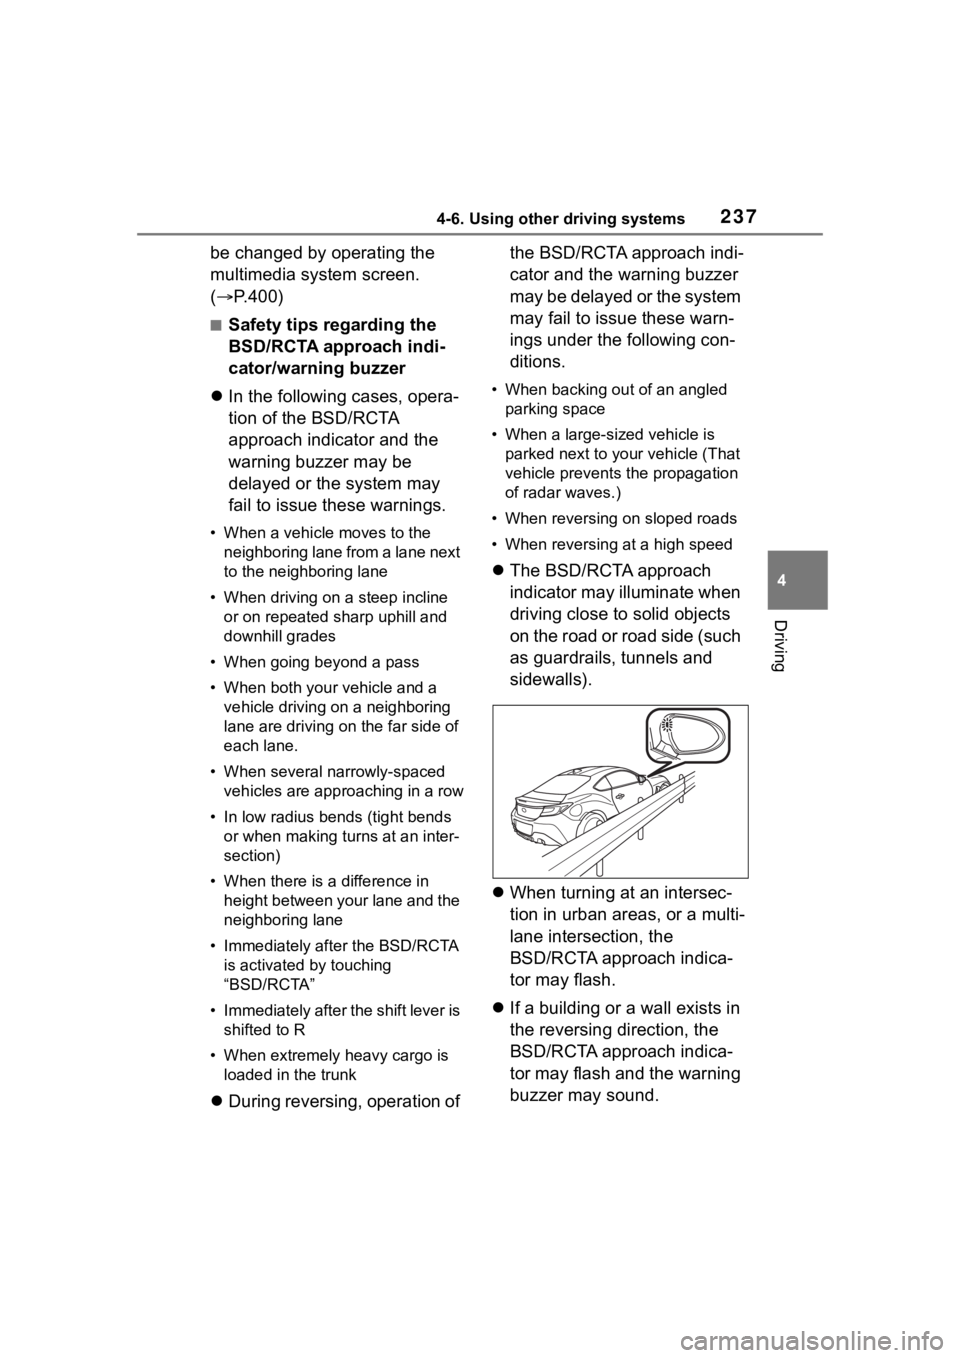
The BSD/RCTA approach
indicator may illuminate when
driving close to solid objects
on the road or road side (such
as guardrails, tunnels and
sidewalls).
When turning at an intersec-
tion in urban areas, or a multi-
lane intersection, the
BSD/RCTA approach indica-
tor may flash.
If a building or a wall exists in
the reversing direction, the
BSD/RCTA approach indica-
tor may flash and the warning
buzzer may sound.
Page 320 of 449
3206-3. Do-it-yourself maintenance
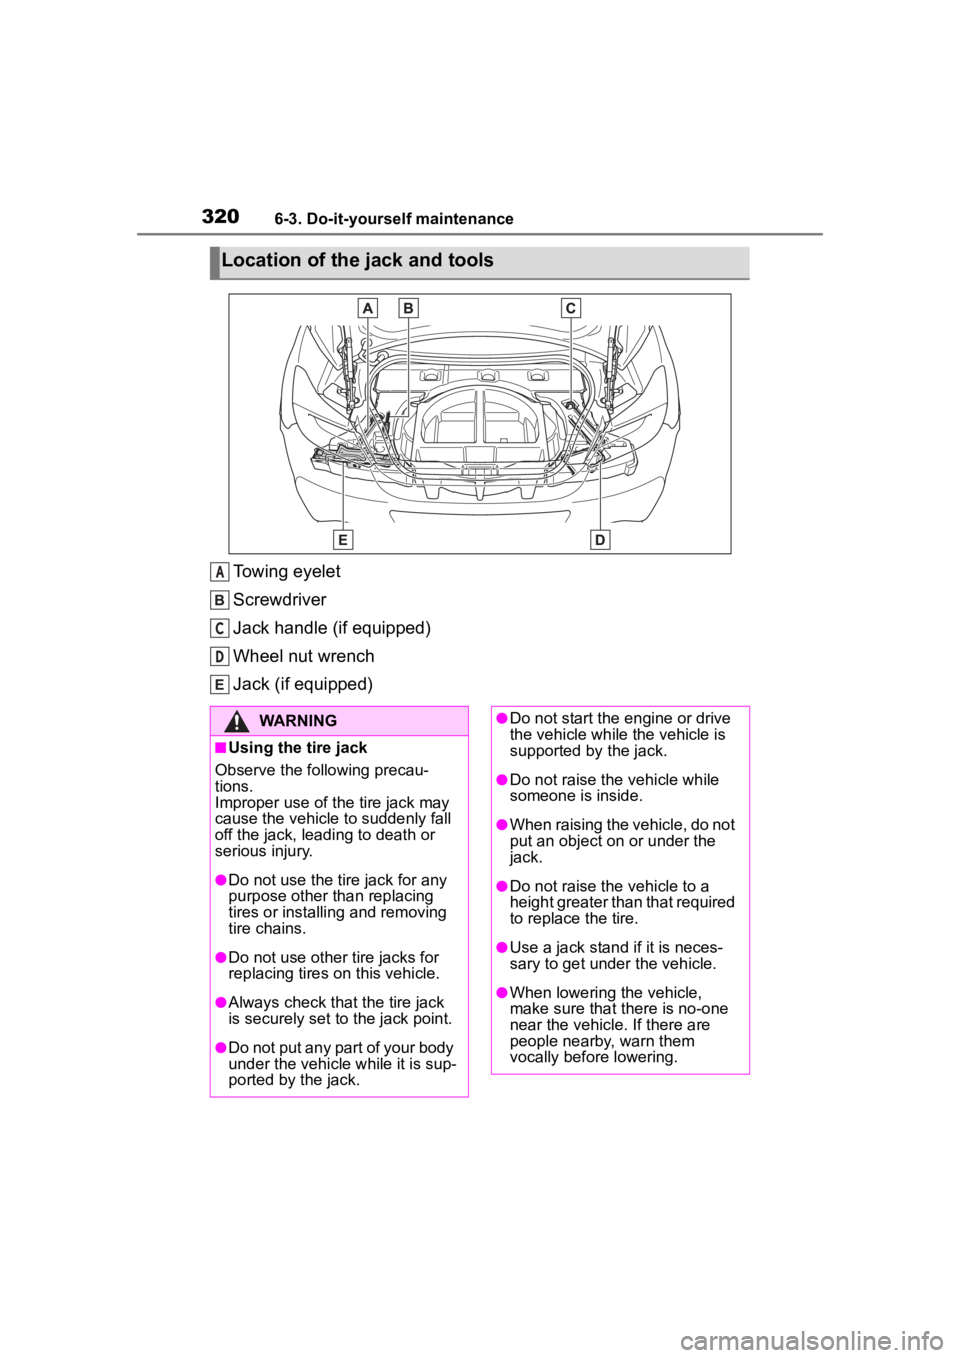
Towing eyelet
Screwdriver
Jack handle (if equipped)
Wheel nut wrench
Jack (if equipped)
Location of the jack and tools
A
C
D
WARNING
■Using the tire jack
Observe the following precau-
tions.
Improper use of the tire jack may
cause the vehicle to suddenly fall
off the jack, leading to death or
serious injury.
●Do not use the tire jack for any
purpose other than replacing
tires or installing and removing
tire chains.
●Do not use other tire jacks for
replacing tires on this vehicle.
●Always check that the tire jack
is securely set to the jack point.
●Do not put any part of your body
under the vehicle while it is sup-
ported by the jack.
●Do not start the engine or drive
the vehicle while the vehicle is
supported by the jack.
●Do not raise the vehicle while
someone is inside.
●When raising the vehicle, do not
put an object on or under the
jack.
●Do not raise the vehicle to a
height greater than that required
to replace the tire.
●Use a jack stand if it is neces-
sary to get under the vehicle.
●When lowering the vehicle,
make sure that there is no-one
near the vehicle. If there are
people nearby, warn them
vocally before lowering.