Page 335 of 449

3356-3. Do-it-yourself maintenance
6
Maintenance and care
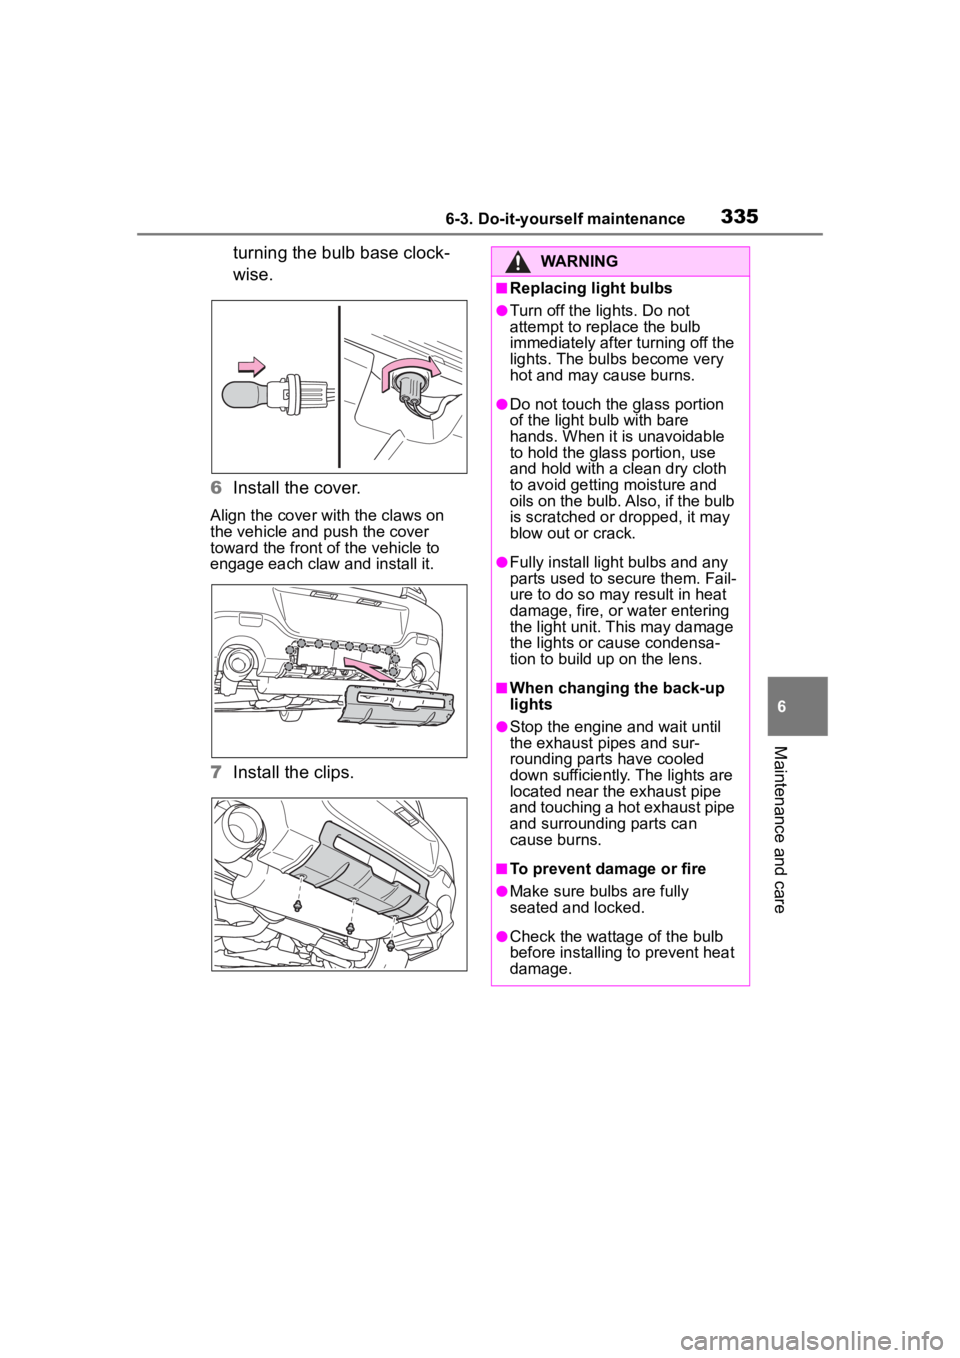
turning the bulb base clock-
wise.
6 Install the cover.
Align the cover with the claws on
the vehicle and push the cover
toward the front of the vehicle to
engage each claw and install it.
7Install the clips.
WARNING
■Replacing light bulbs
●Turn off the lights. Do not
attempt to replace the bulb
immediately after turning off the
lights. The bulbs become very
hot and may cause burns.
●Do not touch the glass portion
of the light bulb with bare
hands. When it is unavoidable
to hold the glass portion, use
and hold with a clean dry cloth
to avoid getting moisture and
oils on the bulb. Also, if the bulb
is scratched or dropped, it may
blow out or crack.
●Fully install light bulbs and any
parts used to secure them. Fail-
ure to do so may result in heat
damage, fire, or water entering
the light unit. This may damage
the lights or cause condensa-
tion to build up on the lens.
■When changing the back-up
lights
●Stop the engine and wait until
the exhaust pi pes and sur-
rounding parts have cooled
down sufficiently. The lights are
located near the exhaust pipe
and touching a hot exhaust pipe
and surrounding parts can
cause burns.
■To prevent damage or fire
●Make sure bulbs are fully
seated and locked.
●Check the wattage of the bulb
before installing to prevent heat
damage.
Page 344 of 449
3447-2. Steps to take in an emergency
illustration.
3Remove the upper cover
from the bumper.
When removing the cover, pull it
toward the center of the vehicle to
remove it.
4Remove the lower cover from
the bumper.
When removing the cover, pull it
upward and then outward to remove it.
5
Insert the towing eyelet into
the hole and tighten partially
by hand.
6 Tighten down the towing eye-
let securely using a wheel nut
wrench or hard metal bar.
7 Securely attach cables or
chains to the towing eyelet.
Take care not to damage the vehi-
cle body.
8Enter the vehicle being towed
and start the engine.
If the engine does not start, turn the
Page 345 of 449

3457-2. Steps to take in an emergency
7
When trouble arises
engine switch to ON.
9Shift the shift lever to N and
release the parking brake.
Vehicles with an automatic trans-
mission: When the shift lever can-
not be shifted: P. 1 5 0
■Towing eyelet purpose
The towing eyelet i s to be used to
tow your vehicle, not to tow other
vehicles.
■While towing
If the engine is not running, the
power assist for the brakes and
steering will not function, making
steering and braking more difficult.
■Wheel nut wrench
Wheel nut wrench is installed in
trunk. ( P.359)
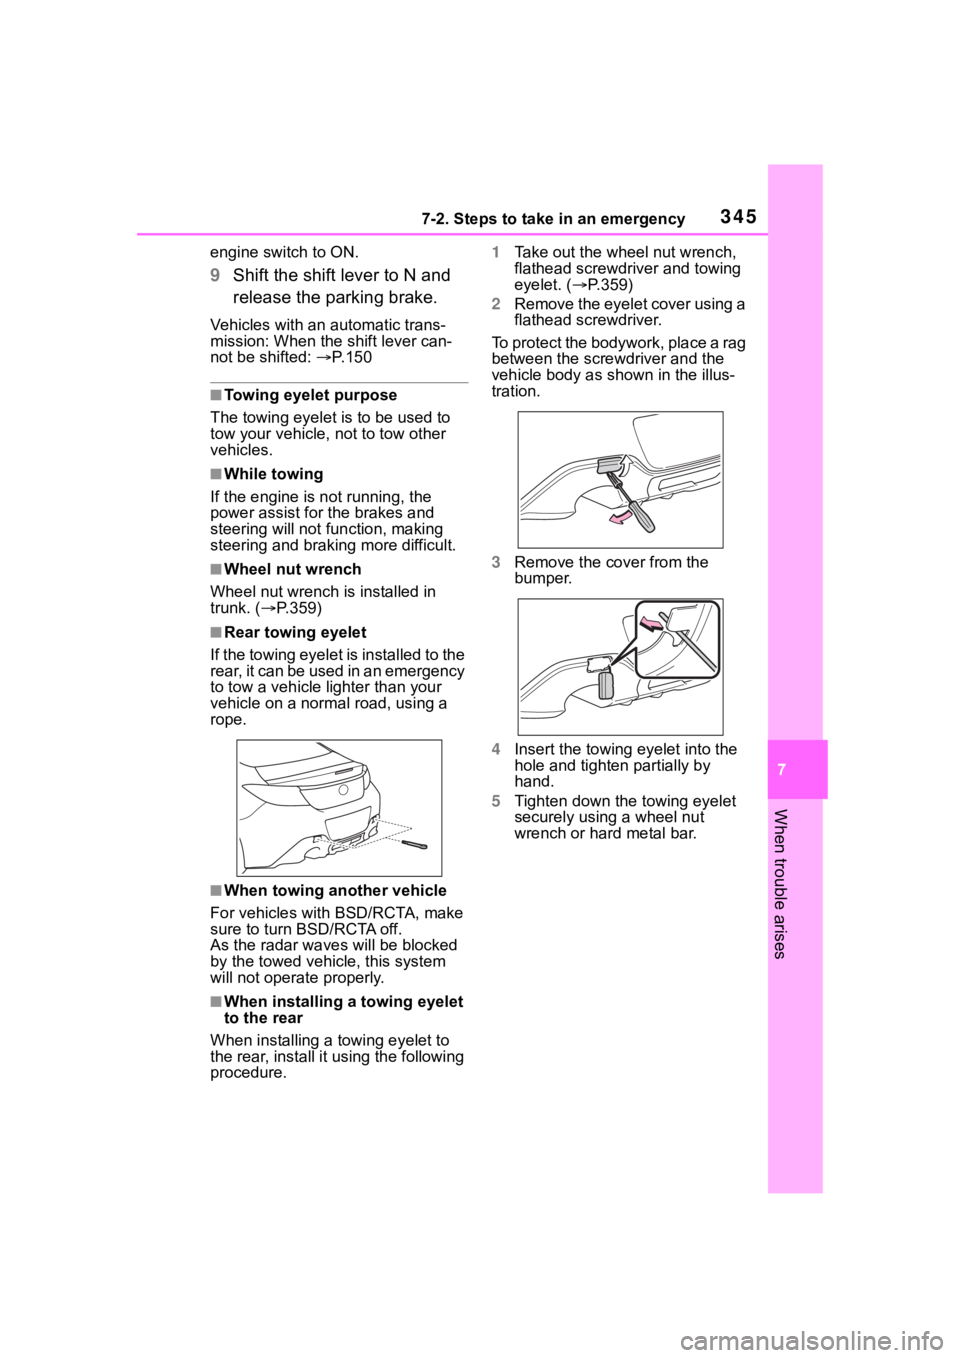
■Rear towing eyelet
If the towing eyelet is installed to the
rear, it can be used in an emergency
to tow a vehicle lig hter than your
vehicle on a norma l road, using a
rope.
■When towing another vehicle
For vehicles with BSD/RCTA, make
sure to turn BSD/RCTA off.
As the radar wave s will be blocked
by the towed vehicle, this system
will not operat e properly.
■When installing a towing eyelet
to the rear
When installing a towing eyelet to
the rear, install it using the following
procedure. 1
Take out the wheel nut wrench,
flathead screwdriver and towing
eyelet. ( P.359)
2 Remove the eyelet cover using a
flathead screwdriver.
To protect the bodywork, place a rag
between the screwdriver and the
vehicle body as shown in the illus-
tration.
3 Remove the cover from the
bumper.
4 Insert the towing eyelet into the
hole and tighten partially by
hand.
5 Tighten down the towing eyelet
securely using a wheel nut
wrench or hard metal bar.